Let us first understand what a Blob is. The word ‘Blob’ expands to Binary Large OBject. Blobs include images, text files, videos and audios. There are three types of blobs in the service offered by Windows Azure namely block, append and page blobs.
- Block blobs are collection of individual blocks with unique block ID. The block blobs allow the users to upload large amount of data.
- Append blobs are optimized blocks that helps in making the operations efficient.
- Page blobs are compilation of pages. They allow random read and write operations. While creating a blob, if the type is not specified they are set to block type by default.
All the blobs must be inside a container in your storage. Here is how to create a container in Azure storage.
Create a Container
Step 1 − Go to Azure portal and then in your storage account.
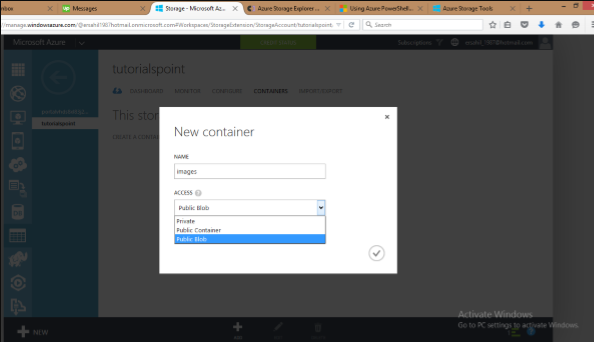
Step 2 − Create a container by clicking ‘Create new container’ as shown in following image.

There are three options in the Access dropdown which sets the permission of who can access the blobs. ‘Private’ option will let only the account owner to access it. ‘Public Container’ will allow anonymous access to all the contents of that container. ‘Public blob’ option will set open access to blob but won’t allow access to the container.
Upload a Blob using PowerShell
Step 1 − Go to ‘Windows PowerShell’ in the taskbar and right-click. Choose ‘Run ISE as Administrator’.
Step 2 − Following command will let you access your account. You have to change the fields highlighted in all the commands.
$context = New-AzureStorageContext -StorageAccountName tutorialspoint StorageAccountKey

iUZNeeJD+ChFHt9XHL6D5rkKFWjzyW4FhV0iLyvweDi+Xtzfy76juPzJ+mWtDmbqCWjsu/nr+1pqBJj rdOO2+A==
Step 3 − Run the following command. This will get you the details of you Azure account. This will make sure that your subscription is all set.
Get-AzureSubscription
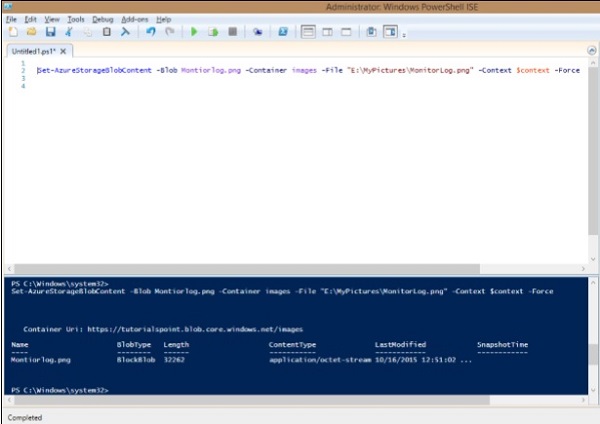
Step 4 − Run the following command to upload your file.
Set-AzureStorageBlobContent -Blob Montiorlog.png -Container images -File
"E:\MyPictures\MonitorLog.png" -Context $context -Force

Step 5 − To check if the file is uploaded, run the following command.
Get-AzureStorageBlob -Container $ContainerName -Context $ctx | Select Name
Download a Blob
Step 1 − Set the directory where you want to download the file.
$localTargetDirectory = "C:\Users\Sahil\Downloads"
Step 2 − Download it.
$BlobName = "Montiorlog.png" Get-AzureStorageBlobContent -Blob $BlobName
Container $ContainerName -Destination $localTargetDirectory -Context $ctx
Remember the following −
- All command names and file names are case sensitive.
- Commands should be in one line or should be continued in the next line by appending ` in the preceding line (`is continuation character in PowerShell)
Manage Blobs using Azure Storage Explorer
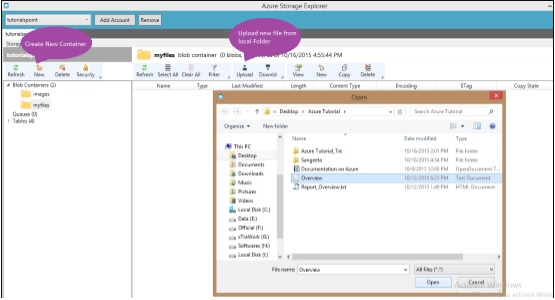
Managing blobs is pretty simple using ‘Azure Storage Explorer’ interface as it is just like Windows files and folder explorer. You can create a new container, upload blobs, see them in a listed format, and download them. Moreover, you can copy them to a secondary location in a very simple manner with this interface. The following image makes the process clear. As can be seen, once an account is added, we can select it from the dropdown and get going. It makes operating Azure storage very easy.


No comments:
Post a Comment