Setting up your own VPC with AWS
The following diagram shows the setup that I want to create in this post:

These are the steps that I will perform to set up the VPC:

These are the steps that I will perform to set up the VPC:
- Create a VPC
- Create subnets
- Create Internet Gateway
- Create a custom Route Table
Create a VPC
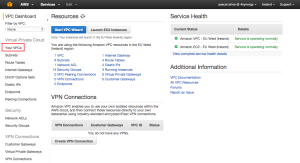
The first step is to create the VPC. I am not using the wizard but rather go via the menu:
And choose to create VPC manually:

Fill in the name of the VPC and the CIDR block to assign to this VPC:

After clicking ‘Yes, Create’ we see the VPC is created. Next is to create the two subnets in our VPC.
The first step is to create the VPC. I am not using the wizard but rather go via the menu:

And choose to create VPC manually:

Fill in the name of the VPC and the CIDR block to assign to this VPC:

After clicking ‘Yes, Create’ we see the VPC is created. Next is to create the two subnets in our VPC.
Create subnets
In the VPC dashboard click on the option to create subnets:

The subnets look like this after creation:

Remember that a subnet is mapped to only one availability zone. It has by default a route table created that will make communication between the two subnets possible. However, to have internet access from/to our public subnet we need a Internet Gateway (this is created automatically using the wizard but we have to do it manually since we do not use the wizard).
Create Internet Gateway
To make public access possible we need to create an Internet Gateway. This is also straightforward in the console. Go to Internet Gateways, click ‘Create Internet Gateway’ and fill the name of the IGW:

To make public access possible we need to create an Internet Gateway. This is also straightforward in the console. Go to Internet Gateways, click ‘Create Internet Gateway’ and fill the name of the IGW:

The created IGW is detached by default and we have to attach it to our VPC (remember you can only have one IGW per VPC). To attach it simply click ‘Attach to VPC’ and select the VPC:

Next step is to create a new Route Table to attach our public subnet to the IGW.

Next step is to create a new Route Table to attach our public subnet to the IGW.
Create a custom Route Table
To attach the IGW to our public subnet we need a Route Table to define the routes. We do this by clicking ‘Create Route Table’ and create it in our VPC:

After creating the table we need to add a route to allow outgoing traffic to our IGW. To do this we add a new route to our custom Route Table:
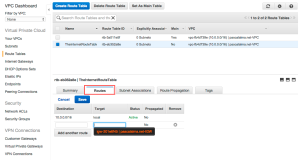
Select our IGW as the target and enter as destination ‘0.0.0.0/0’ to allow all IP addresses in the assigned subnet to access the IGW. After creating the route we need to associate our public subnet to this Route Table as by default no subnet is associated with our custom Route Table:

So assign our public subnet to the Route Table:

Now we have one public subnet acting as our DMZ and one private subnet. Lets now deploy an EC2 instance in both subnets and test it!
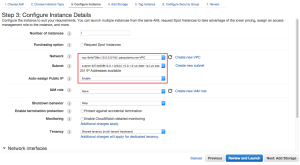
I create a standard EC2 micro.t2 instance running AWS Linux. Important is to create the instance in the VPN we just created, assign our public subnet to it and have a public IP assigned to it automatically:
Next accept the defaults until the security group step. Add ‘HTTP’ as allowed protocol to the default security group:

Hit next and launch the instance. When it is asking for a key-pair create a new key-pair and don’t forget to download it:

When our webserver is launched we create a new instance called ‘MyAppServer’ which will reside in our private subnet:

Use the same security group as the previous instance (note that Security Groups can be used across Availability Zones where subnets can not). Also use the same key-pair as the previous instance (MyNewKeyPair).
We now have two instances running in our VPC each in its own subnet:

We can see in the properties of our WebServer instance that it has received a public IP address, so lets try to access it via SSH. I use Terminal on my Mac for this. Make sure your downloaded pem file is in the correct SSH key location and has the correct access rights. I simply create a new file like this:
With this pem file in place we can now setup a ssh connection to our web server. Copy the public IP address of the instance and execute the following command:
This should lead to a successful connection like this:
I create a standard EC2 micro.t2 instance running AWS Linux. Important is to create the instance in the VPN we just created, assign our public subnet to it and have a public IP assigned to it automatically:

Next accept the defaults until the security group step. Add ‘HTTP’ as allowed protocol to the default security group:

Hit next and launch the instance. When it is asking for a key-pair create a new key-pair and don’t forget to download it:

When our webserver is launched we create a new instance called ‘MyAppServer’ which will reside in our private subnet:

Use the same security group as the previous instance (note that Security Groups can be used across Availability Zones where subnets can not). Also use the same key-pair as the previous instance (MyNewKeyPair).
We now have two instances running in our VPC each in its own subnet:

We can see in the properties of our WebServer instance that it has received a public IP address, so lets try to access it via SSH. I use Terminal on my Mac for this. Make sure your downloaded pem file is in the correct SSH key location and has the correct access rights. I simply create a new file like this:
cd ~
nano MyNewKeyPair.pem
** paste pem content of downloaded key file **
[ctrl]-o
[ctrl]-x
chmod 600 MyNewKeyPair.pem
With this pem file in place we can now setup a ssh connection to our web server. Copy the public IP address of the instance and execute the following command:
ssh ec2-user@52.7.40.73 -i MyNewKeyPair.pem This should lead to a successful connection like this:
The authenticity of host ‘52.7.40.73 (52.7.40.73)’ can’t be established.
RSA key fingerprint is 0c:5e:48:9a:44:79:af:bd:18:85:68:53:aa:52:a4:5f.
Are you sure you want to continue connecting (yes/no)? yes
Warning: Permanently added ‘52.7.40.73’ (RSA) to the list of known hosts.__| __|_ )
_| ( / Amazon Linux AMI
___|\___|___|https://aws.amazon.com/amazon-linux-ami/2015.03-release-notes/
18 package(s) needed for security, out of 46 available
Run “sudo yum update” to apply all updates.
-bash: warning: setlocale: LC_CTYPE: cannot change locale (UTF-8): No such file or directory
[ec2-user@ip-10-0-1-92 ~]$
When we now perform a ‘sudo yum update’ it will update the necessary packages by getting these packages via internet:
Installed:
kernel.x86_64 0:3.14.42-31.38.amzn1Updated:
aws-amitools-ec2.noarch 0:1.5.7-1.0.amzn1 aws-apitools-common.noarch 0:1.1.0-1.9.amzn1
aws-cfn-bootstrap.noarch 0:1.4-9.4.amzn1 aws-cli.noarch 0:1.7.29-1.13.amzn1
0.1.a1.11.amzn1
python27-configobj.noarch 0:4.7.2-7.15.amzn1 python27-devel.x86_64 0:2.7.9-4.115.amzn1
python27-jmespath.noarch 0:0.7.1-1.8.amzn1 python27-libs.x86_64 0:2.7.9-4.115.amzn1
python27-setuptools.noarch 0:12.2-1.30.amzn1 rpm.x86_64 0:4.11.2-2.64.amzn1
rpm-build-libs.x86_64 0:4.11.2-2.64.amzn1 rpm-libs.x86_64 0:4.11.2-1.25.amzn1
rubygem20-bigdecimal.x86_64 0:1.2.0-1.25.amzn1 rubygem20-psych.x86_64 0:2.0.0-1.25.amzn1
rubygems20.noarch 0:2.0.14-1.25.amzn1 time.x86_64 0:1.7-38.9.amzn1
tzdata.noarch 0:2015b-1.33.amzn1 tzdata-java.noarch 0:2015b-1.33.amzn1
unzip.x86_64 0:6.0-2.9.amzn1 yum.noarch 0:3.4.3-137.57.amzn1
yum-metadata-parser.x86_64 0:1.1.4-8.12.amzn1Complete!
[ec2-user@ip-10-0-1-92 ~]$
Lets now have a look at our ApplicationServer instance. As we can see in our console this instance has no public IP address nor an Elastic IP address. The only IP address it has is the private one:

So if we want to SSH into this instance we have to start our SSH connection from our webserver. We can use the same steps we used to log in into our webserver (we need to create a key-pair first and then open the SSH like this):

So if we want to SSH into this instance we have to start our SSH connection from our webserver. We can use the same steps we used to log in into our webserver (we need to create a key-pair first and then open the SSH like this):
[ec2-user@ip-10-0-1-92 ~]$ nano MyNewKeyPair.pem
[ec2-user@ip-10-0-1-92 ~]$ chmod 600 MyNewKeyPair.pem
[ec2-user@ip-10-0-1-92 ~]$ ssh ec2-user@10.0.2.37 -i MyNewKeyPair.pem
Last login: Sun May 31 07:22:39 2015 from 10.0.1.92
__| __|_ )
_| ( / Amazon Linux AMI
___|\___|___|
https://aws.amazon.com/amazon-linux-ami/2015.03-release-notes/
[ec2-user@ip-10-0-2-37 ~]$
Now we are logged in in our Application Server. If we now run the command ‘sudo yum update’ we see the following:

And this makes sense since our private subnet is not attached to our Internet Gateway and therefore doesn’t have access to the internet. To give the subnet access to internet we should add a NAT to our VPC. I will show in another post how to do that.
No comments:
Post a Comment