Friday 19 January 2024

Ansible Installation in Linux


Ansible Installation in Linux

When you have compared and weighed your options and decided to go for Ansible. Then installed it on your system. Let's go step by step of the installation in different Linux distributions, such as:

Prerequisites

  1. PyYAML: a YAML parser and emitter for the python programming language.
  2. Httplib2: a comprehensive HTTP client library.
  3. parmiko: native python SSHv2 protocol library.
  4. Distro: RHEL/ CentOS/ Debian/ Ubuntu Linux.
  5. Jinja2: a modern and designer friendly templating language for python.
  6. sshpass: a non-interactive ssh password authentication.

Install Ansible on RedHat/Centos systems

Step 1: Install the EPEL repo

  1. [root@ansible-server ~]# sudo yum install epel-release  

Step 2: Install the Ansible package.

  1. [root@ansible-server ~]# sudo yum install -y ansible  

Install Ansible on Debian/Ubuntu systems

Step 1: First perform an update to the packages$ sudo apt update  

Step 2: Then install the software properties common package.

  1. $ sudo apt install software-properties-common  

Step 3: And install the Ansible personal package archive.

  1. $ sudo apt-add-repository ppa:ansible/ansible  

Step 4: Install the Ansible.

  1. $ sudo apt update  
  2. $ sudo apt install ansible  

Install Ansible using pip

The pip command is a tool for installing and managing python packages.

Step 1: This given method works on the Linux and UNIX like systems.

  1. $ sudo pip install ansible   

Install the latest version of Ansible

Using Portage (Gentoo)


$ emerge -av app-admin/ansible  

To install the latest version, you need to unmask the Ansible package prior to emerging:

  1. $ echo 'app-admin/ansible' >> /etc/portage/package.accept_keywords  

Using pkg (FreeBSD)

Ansible works with both python 2 and 3 version, FreeBSD has different packages for each python version. To install you can use:

  1. $ sudo pkg install py27-ansible  

Or

  1. $ sudo pkg install py36-ansible  

You can also to install from ports:

  1. $ sudo make -C /usr/ports/sysutils/ansible install  

Using OpenCSW (Solaris)

The Ansible is available for Solaris as SysV package from openCSW:


# pkgadd -d http:
//get.opencsw.org/now  

  1. # /opt/csw/bin/pkgutil -i ansible  

Using Pacman (Arch Linux)

Ansible is available in the community repository:

  1. $ pacman -S ansible  

Using sbopkg (Slackware Linux)


Ansible build script is available in the SlackBuilds.org repository. Also can be built and installed using sbopkg.

Step 1: Create queue with Ansible and all dependencies.

  1. # sqg -p ansible  
    Step 2: Build and install packages from created queue file.
  1. # sbopkg -k -i ansible  

Using swupd (Clear Linux)

Step 1: Ansible and its dependencies are available as part of the sysadmin host management bundle.

  1. $ sudo swupd bundle-add sysadmin-hostmgmt  

Step 2: And update of the software will be managed by the swupd tool.

  1. $ sudo swupd update  

Installing

By using yum

On Fedora:

  1. $ sudo dnf install python-argcomplete  

  1. On RHEL and CentOS:
    $ sudo yum install epel-release  
  2. $ sudo yum install python-argcomplete  

By using apt

  1. $ sudo apt install python-argcomplete  

By using pip

  1. $ pip install argcomplete  

Ansible Architecture


Ansible Architecture

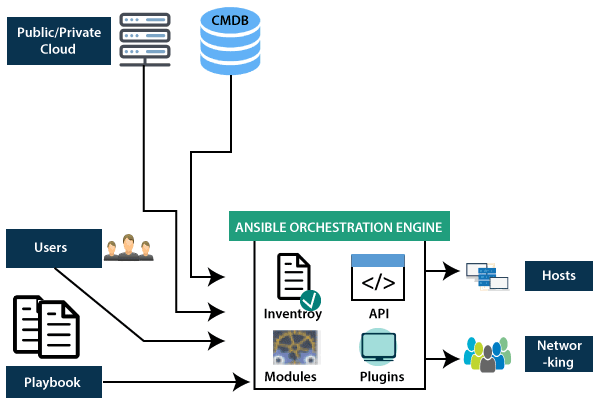
The Ansible orchestration engine interacts with a user who is writing the Ansible playbook to execute the Ansible orchestration and interact along with the services of private or public cloud and configuration management database. You can show in the below diagram, such as:

Ansible Architecture

Inventory

Inventory is lists of nodes or hosts having their IP addresses, databases, servers, etc. which are need to be managed.

API's

The Ansible API's works as the transport for the public or private cloud services.

Modules

Ansible connected the nodes and spread out the Ansible modules programs. Ansible executes the modules and removed after finished. These modules can reside on any machine; no database or servers are required here. You can work with the chose text editor or a terminal or version control system to keep track of the changes in the content.

Plugins

Plugins is a piece of code that expends the core functionality of Ansible. There are many useful plugins, and you also can write your own.

Playbooks

Playbooks consist of your written code, and they are written in YAML format, which describes the tasks and executes through the Ansible. Also, you can launch the tasks synchronously and asynchronously with playbooks.

Hosts

In the Ansible architecture, hosts are the node systems, which are automated by Ansible, and any machine such as RedHat, Linux, Windows, etc.

Networking

Ansible is used to automate different networks, and it uses the simple, secure, and powerful agentless automation framework for IT operations and development. It uses a type of data model which separated from the Ansible automation engine that spans the different hardware quite easily.

Cloud

A cloud is a network of remote servers on which you can store, manage, and process the data. These servers are hosted on the internet and storing the data remotely rather than the local server. It just launches the resources and instances on the cloud, connect them to the servers, and you have good knowledge of operating your tasks remotely.

CMDB

CMDB is a type of repository which acts as a data warehouse for the IT installations.

Ansible Workflow


Ansible Workflow

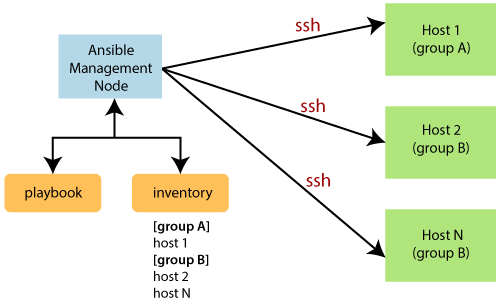
Ansible works by connecting to your nodes and pushing out a small program called Ansible modules to them. Then Ansible executed these modules and removed them after finished. The library of modules can reside on any machine, and there are no daemons, servers, or databases required.

Ansible Workflow

In the above image, the Management Node is the controlling node that controls the entire execution of the playbook. The inventory file provides the list of hosts where the Ansible modules need to be run. The Management Node makes an SSH connection and executes the small modules on the host's machine and install the software.

Ansible removes the modules once those are installed so expertly. It connects to the host machine executes the instructions, and if it is successfully installed, then remove that code in which one was copied on the host machine.

Terms used in Ansible

Here are some important terms which are used in Ansible, such as:


TermsExplanation
Ansible ServerIt is a machine where Ansible is installed and from which all tasks and playbooks will be executed.
ModulesThe module is a command or set of similar commands which is executed on the client-side.
TaskA task is a section which consists of a single procedure to be completed.
RoleIt is a way of organizing tasks and related files to be later called in a playbook.
FactThe information fetched from the client system from the global variables with the gather facts operation.
InventoryA file containing the data regarding the Ansible client-server.
PlayIt is the execution of the playbook.
HandlerThe task is called only if a notifier is present.
NotifierThe section attributed to a task which calls a handler if the output is changed.
TagIt is a name set to a task that can be used later on to issue just that specific task or group of jobs.

Ansible Tutorial


Ansible Tutorial

Ansible Tutorial

Ansible tutorial provides basic and advanced concepts of Ansible. Our Ansible tutorial is designed for beginners and professionals.

Ansible is an open-source IT engine which automates the IT tools such as intra service orchestration, application deployment, cloud provisioning, etc.

What is Ansible?

Ansible is an open-source IT engine that automates application deployment, cloud provisioning, intra service orchestration, and other IT tools.

Ansible is easy to deploy because it does not use any agents or custom security infrastructure on the client-side, and by pushing modules to the clients. These modules are executed locally on the client-side, and the output is pushed back to the Ansible server.

It can easily connect to clients using SSH-Keys, simplifying though the whole process. Client details, such as hostnames or IP addresses and SSH ports, are stored in the files, which are called inventory files. If you created an inventory file and populated it, then Ansible can use it.

Ansible uses the playbook to describe automation jobs, and playbook, which uses simple language, i.e., YAML. YAML is a human-readable data serialization language & commonly used for configuration files, but it can be used in many applications where data is being stored.

A significant advantage is that even the IT infrastructure support guys can read and understand the playbook and debug if needed.

Ansible is designed for multi-tier deployment. Ansible does not manage one system at a time, and it models IT infrastructure by describing all of your systems are interrelated. Ansible is entirely agentless, which means Ansible works by connecting your nodes through SSH (by default). Ansible gives the option to you if you want another method for the connection like Kerberos.

Ansible pushes small programs after connecting to your nodes which are known as "Ansible Modules". Ansible runs that module on your nodes and removes them when finished. Ansible manages the inventory in simple text files (These are the host's files). Ansible uses the host file where one can group the hosts and can control the actions on a specific group in the playbooks.

Why Use Ansible

Here are some important reasons for using Ansible, such as:Ansible is free to use by everyone.

  • Ansible is very consistent and lightweight, and no constraints regarding the operating system or underlying hardware are present.
  • It is very secure due to its agentless capabilities and open SSH security features.
  • Ansible does not need any special system administrator skills to install and use it.
  • Ansible has a smooth learning curve determined by the comprehensive documentation and easy to learn structure and configuration.
  • Its modularity regarding plugins, inventories, modules, and playbooks make Ansible perfect companion orchestrate large environments.

Ansible History

Here are some essential points from the history of Ansible, such as:

  • Michael DeHaan developed Ansible, and the Ansible project began in February 2012.
  • The creator of Cobbler and Func is also the controller of the Fedora Unified network.
  • RedHat acquired the Ansible tool in 2015.
  • Ansible is included as part of the Fedora distribution of the Linux.
  • Ansible is also available for RedHat Enterprise Linux, Debian, CentOS, Oracle Linux, and Scientific Linux via Extra Packages for Enterprise Linux (EPEL) and Ubuntu as well as for other operating systems.

Prerequisite

To learn Ansible, you have hands-on experience with running commands into a Linux shell. This will help you the Ansible tasks in a better way.

Audience

Our Ansible tutorial is designed to help beginners and professionals.


Wednesday 17 January 2024

How to configure Git Server on CentOS 8

 Introduction

Git is a version control system that supports teamwork between programmers thanks to what in computer science is namedversioning. This practice allows you to trace the changes that are performed on a specific file, such as a source code, while defining a new version for each change. If you are new to Git, reading our getting started guide on installation and first steps with Git is recommended.

Tracking the work of programmers and enabling an incremental approach to complex software development, Git has recently come in very useful, especially in software development processes. In this tutorial you will see how to install and configure Git on your Linux server with CentOS 8 to create your own private repository, without hosting restrictions, such as those of GitHub.

Installing and Configuring Server-side Git

INSTALLING GIT-SERVER

Two alternative ways of installing GIT-server are shown below.

Installation via Yum

To install the Git service via Yum, simply use this pair of commands:

$ yum update -y
$ yum install git -y

Installation from source code

Git can also be installed from the official site, where the latest  release is also available.

Although the installation will take longer and will not be automatically updated by the yum package manager, this method has an advantage: greater control over the updates of your installation, as it will be linked to the CentOS repositories.

The first thing to do is to install the dependencies:

$ yum groupinstall “Development Tools”
$ yum install gettext-devel openssl-devel perl-CPAN perl-devel zlib-devel

Once the installation has been completed, open the release page link and copy the download link.By choosing the file called  tar.gz, for example, the link could be simply copied by right clicking on the file and selecting "copy link".

Now it's time to download the selected file to the server, using the command:

$ wget https://github.com/git/git/archive/refs/tags/v2.32.0-rc0.tar.gz -O git.tar.gz

Once the download is complete, extract the .tar file :

$ tar -zxf git.tar.gz

Then, move to the directory of the file:

$ cd git-*

Now, it's time to check the configuration script to create through the make utility.

$ make configure
$./configure –prefix=/usr/local

It is also important to define the "prefix" of the configuration file, as it will be placed in the default folder for Linux programs.

The make utility  allows you to apply configurations by compiling scripts linked to your CentOS installation.

Install make via:

$ make install

To check that everything went well, check the version of Git you just installed using the command:

$ git -version

CONFIGURING GIT REPOSITORY

The steps to configure the server side of Git are as follows:

  • Add a user to manage repositories, using the command:

    $ useradd git
  • Assign a password to the newly created user:

    $ passwd git
  • Log ing in as a git user:

    $ su -git
  • Create a new empty repository:

    $ git init –bare ~/myrepo.git
  • Enable post-update by uploading a sample file:

    $ cd hooks/
    $ cp post-update.sample post-update

Installing and Configuring Client-side Git

GIT-CLIENT INSTALLATION

On the client side, simply install Git via the yum manager :

$ yum install git -y

GIT-CLIENT CONFIGURATION

One of the first features that we suggest configuring, is to add personal information to allow commit messages to have such data attached.

$ git config –global user.name “myusername”
$ git config –global user.email “myemail@samplemail.com”

Now, create a directory to save your projects:

$ mkdir ~/dev
$ cd ~/dev

Now, try to clone the sample repository, created in the server side configuration step:

$ git clone myemail@sampleservermail.com:~/myrepo.git myrepo.git

Navigating to the repository, your first file can be now inserted:

$ cd myrepo.git
$ echo "test">samplefile.txt

Add the file to the repository:

$ git add.

Enter the changes in the commit :

$ git commit -am “My First Commit”

Submit commit changes to the remote repository on the server:

$ git push origin master

After entering the password, an output will be received to inform on the status of the process. When done, check that everything was correctly performed by opening the log file from the server:

$ git log

Conclusion

If you have correctly followed the procedures described so far and the Client-side test worked, your Git server will have been properly installed and configured and your first repository created. To learn more about how Git works, read our guide on How to manage versions with Git.