Tuesday, 26 July 2022

Linux 2NdModule Tests


Unit-3  Extend a Logical Volume

Unit-4  Perform user and group administration

Unit-5  Network Configuration and Troubleshooting

Unit-6  Managing Simple Partitions and Filesystems

Unit-7  Configure Ntp services.

Unit-9  Backup file systems with tar archives

Unit-11 Manage Access to Files

Unit-12  SELinux Overview       

Unit-13 Installing and Managing Software


Unit-6  Managing Simple Partitions and Filesystems


Add a new harddisk for 5GB and mount it to /mails 

Add a new harddisk for 7GB and mount it to /backup


Unit-4  Perform user and group administration


Create a user named natasha with uid 9000 

create a user tommy  with non interactive shell 

create a user  sammy with  home directory /mails/sammy 


Unit-11 Manage Access to Files


Create a folder /mail/database and assign permissions  as follows


Task 1: 

owner read write execute      

group read and execute     

others write only    


  Create a folder /mail/data and assign permissions  as follows


Task 2: 

Owner read & execute   

Group read & write & execute       

Others read only   


 Create a folder /mail/redhat and assign permissions  as follows


Task 3: 

Owner read & write     

group read only     

others execute only     


 Unit-13 Installing and Managing Software


Install php   java mysql python and wireshark on linux servers.


a

Monday, 18 July 2022

AWS Cloud Migration Strategy : Theory

 A cloud migration is when a company moves some or all of its data center capabilities into the cloud, usually to run on the cloud-based infrastructure provided by a cloud service provider such as AWS, Google Cloud, or Azure.

As more and more companies have already transitioned to the cloud, cloud migrations are increasingly taking place within the cloud, as companies migrate between different cloud providers (known as cloud-to-cloud migration). But for those making the initial foray to the cloud, there are a few critical considerations to be aware of, which we’ll take a look at below.


This is part of our series of comprehensive guides about Infrastructure as a Service (IaaS).

In this article, you will learn:

What are the Main Benefits of Migrating to the Cloud?

Here are some of the benefits that compel organizations to migrate resources to the public cloud:

  • Scalability - cloud computing can scale to support larger workloads and more users, much more easily than on-premises infrastructure. In traditional IT environments, companies had to purchase and set up physical servers, software licenses, storage and network equipment to scale up business services.
  • Cost - cloud providers take over maintenance and upgrades, companies migrating to the cloud can spend significantly less on IT operations. They can devote more resources to innovation - developing new products or improving existing products.
  • Performance - migrating to the cloud can improve performance and end-user experience. Applications and websites hosted in the cloud can easily scale to serve more users or higher throughput, and can run in geographical locations near to end-users, to reduce network latency.
  • Digital experience - users can access cloud services and data from anywhere, whether they are employees or customers. This contributes to digital transformation, enables an improved experience for customers, and provides employees with modern, flexible tools.

What are Common Cloud Migration Challenges?

Cloud migrations can be complex and risky. Here are some of the major challenges facing many organizations as they transition resources to the cloud.

Lack of Strategy

Many organizations start migrating to the cloud without devoting sufficient time and attention to their strategy. Successful cloud adoption and implementation requires rigorous end-to-end cloud migration planning. Each application and dataset may have different requirements and considerations, and may require a different approach to cloud migration. The organization must have a clear business case for each workload it migrates to the cloud.

Cost Management

When migrating to the cloud, many organizations have not set clear KPIs to understand what they plan to spend or save after migration. This makes it difficult to understand if migration was successful, from an economic point of view. In addition, cloud environments are dynamic and costs can change rapidly as new services are adopted and application usage grows.

Vendor Lock-In

Vendor lock-in is a common problem for adopters of cloud technology. Cloud providers offer a large variety of services, but many of them cannot be extended to other cloud platforms. Migrating workloads from one cloud to another is a lengthy and costly process. Many organizations start using cloud services, and later find it difficult to switch providers if the current provider doesn't suit their requirements.

Data Security and Compliance

One of the major obstacles to cloud migration is data security and compliance. Cloud services use a shared responsibility model, where they take responsibility for securing the infrastructure, and the customer is responsible for securing data and workloads. 

So while the cloud provider may provide robust security measures, it is your organization’s responsibility to configure them correctly and ensure that all services and applications have the appropriate security controls. 

The migration process itself presents security risks. Transferring large volumes of data, which may be sensitive, and configuring access controls for applications across different environments, creates significant exposure.

Cloud Migration Strategies

Gartner has identified five cloud migration techniques, known as the “5 Rs”. Organizations looking to migrate to the cloud should consider which migration strategy best answers their needs. The following is a brief description of each:

  • Rehost. Rehosting, or ‘lift and shift,’ involves using infrastructure-as-a-service (IaaS). You simply redeploy your existing data and applications on the cloud server. This is easy to do and is thus suited for organizations less familiar with cloud environments. It is also a good option for cases where it is difficult to modify the code, and you want to migrate your applications intact. 
  • Refactor. Refactoring, or ‘lift, tinker, and shift,’ is when you tweak and optimize your applications for the cloud. In this case, a platform-as-a-service (PaaS) model is employed. The core architecture of the applications remain unchanged, but adjustments are made to enable the better use of cloud-based tools.
  • Revise. Revising builds upon the previous strategies, requiring more significant changes to the architecture and code of the systems being moved to the cloud. This is done to enable applications to take full advantage of the services available in the cloud, which may require introducing major code changes. This strategy requires foreplanning and advanced knowledge. 
  • Rebuild. Rebuilding takes the Revise approach even further by discarding the existing code base and replacing it with a new one. This process takes a lot of time and is only considered when companies decide that their existing solutions don’t meet current business needs. 
  • Replace. Replacing is another solution to the challenges that inform the Rebuild approach. The difference here is that the company doesn’t redevelop its own native application from scratch. This involves migrating to a third-party, prebuilt application provided by the vendor. The only thing that you migrate from your existing application is the data, while everything else about the system is new.

A 4-Step Cloud Migration Process

1. Cloud Migration Planning

One of the first steps to consider before migrating data to the cloud is to determine the use case that the public cloud will serve. Will it be used for disaster recoveryDevOps? Hosting enterprise workloads by completely shifting to the cloud? Or will a hybrid approach work best for your deployment.

In this stage it is important to assess your environment and determine the factors that will govern the migration, such as critical application data, legacy data, and application interoperability. It is also necessary to determine your reliance on data: do you have data that needs to be resynced regularly, data compliance requirements to meet, or non-critical data that can possibly be migrated during the first few passes of the migration?

Determining these requirements will help you charter a solid plan for the tools you’ll need during migration, identifying which data needs to be migrated and when, if the data needs any scrubbing, the kind of destination volumes to use, and whether you’ll need encryption of the data both at rest and in transit.

Related content: read our guide to cloud migration tools.

2. Migration Business Case

Once you have determined your business requirements, understand the relevant services offered by cloud providers and other partners and their costs. Determine the expected benefits of cloud migration along three dimensions: operational benefits, cost savings, and architectural improvements.

Build a business case for every application you plan to migrate to the cloud, showing an expected total cost of ownership (TCO) on the cloud, compared to current TCO. Use cloud cost calculators to estimate future cloud costs, using realistic assumptions - including the amount and nature of storage used, computing resources, taking into account instance types, operating systems, and specific performance and networking requirements. 

Work with cloud providers to understand the options for cost savings, given your proposed cloud deployment. Cloud providers offer multiple pricing models, and provide deep discounts in exchange for long-term commitment to cloud resources (reserved instances) or a commitment to a certain level of cloud spend (savings plans). These discounts must be factored into your business plan, to understand the true long-term cost of your cloud migration.

3. Cloud Data Migration Execution

Once your environment has been assessed and a plan has been mapped out, it’s necessary to execute your migration. The main challenge here is carrying out your migration with minimal disruption to normal operation, at the lowest cost, and over the shortest period of time.

If your data becomes inaccessible to users during a migration, you risk impacting your business operations. The same is true as you continue to sync and update your systems after the initial migration takes place. Every workload element individually migrated should be proven to work in the new environment before migrating another element.

You’ll also need to find a way to synchronize changes that are made to the source data while the migration is ongoing. Both AWS and Azure provide built-in tools that aid in AWS cloud migration and in Azure data migration, and later in this article we’ll see how NetApp users benefit from migrating with services and features that come with Cloud Volumes ONTAP.

4. Ongoing Upkeep 

Once that data has been migrated to the cloud, it is important to ensure that it is optimized, secure, and easily retrievable moving forward. It also helps to monitor for real-time changes to critical infrastructure and predict workload contentions.

Apart from real-time monitoring, you should also assess the security of the data at rest to ensure that working in your new environment meets regulatory compliance laws such as HIPAA and GDPR.

Another consideration to keep in mind is meeting ongoing performance and availability benchmarks to ensure your RPO and RTO objectives should they change.

Migrating Data to the Cloud with NetApp Cloud Volumes

Cloud migrations can be complex and contain a lot of moving parts. One of the most complex aspects of a migration, especially in a large enterprise, is moving and synchronizing large volumes of data.

NetApp’s cloud solutions can help simplify the migration process by providing tools that will help you move and sync data easily, quickly and securely. In this section we will discuss some of the benefits of using NetApp’s Cloud Volumes, which comes in two service models: the fully-managed Cloud Volumes Service and the hands-on Cloud Volumes ONTAP.

Faster Transfers, Lower Costs

With Cloud Volumes, NetApp provides several tools that help you automate, sync data faster, and secure your data while transitioning to the cloud. NetApp’s SnapMirror data replication technology gives Cloud Volumes ONTAP a way to seamlessly transition data and workloads into the cloud not just during the initial migration, but onwards with continuous synchronization according to the user’s pre-defined schedules. Cloud Volumes ONTAP storage efficiencies also help reduce network bandwidth costs during migrations by reducing storage footprint, which also accelerates data transfers.

For users of on-premises FAS or AFF ONTAP storage systems, SnapMirror enables you to seamlessly move data to or from the cloud as necessary for ongoing hybrid environment syncs. For migrations that are being carried out from systems that are not both ONTAP, Cloud Volumes Service offers Cloud Sync to carry out the migration between any kind of object-based storage repository.

High Availability with Cloud Volumes

This is one of the most important parameters to measure uptime. Some of the biggest cloud migration challenges that can impact your business continuity arise from failing to plan for issues such as drive failures, network misconfigurations, and Availability Zone failures. The Cloud Volumes HA configuration provides an AWS high availability infrastructure by maintaining two storage environments and synchronously writing to them during storage operations. This ensures that, from an application or end-user perspective, there is no downtime as there is a seamless transition to the secondary storage in case the primary storage fails.

In terms of SLA numbers, Cloud Volumes HA can help you achieve a recovery point objective (RPO) of zero and a recovery time objective (RTO) of less than 60 seconds. The Multiple Availability Zone deployment model helps protect against Availability Zone failures. These features ensure that your cloud environment is resilient, safe from service disruptions, and able to host critical workloads as well as data migration processes without requiring expensive HA setup on the application side.

Data Protection

Cloud Volumes allows creation of application-aware snapshots that have no performance impact and consume minimal storage space. These snapshots are created in a matter of seconds irrespective of the size of the volume that is being copied. Instead of copying all the data in the system, NetApp Snapshots only copy the data that was changed by manipulating block pointers.

For ongoing migrations, these snapshots are low cost and highly efficient way to protect your system. And ONTAP snapshot creation can also be entirely automated in order to create backups, which for many users has benefits over using native AWS or Azure services for disk backup.


Cost Optimization

The major benefits of using Cloud Volumes ONTAP come with its storage efficiency features: thin provisioning, data compression, deduplication, and compaction as well as data tiering, and FlexClone writable clones. The storage efficiency features work in tandem to limit the amount of storage you consume and reduce data in transit costs. All together, these benefits can save a company as much as 50% to 70% in storage and data transfer costs.

AWS DataSync : Theory

AWS DATASYNC :

With AWS DataSync, AWS allows you to migrate your data in a simple and secure way. AWS Data Sync allows you to transfer between on-premises and AWS, between AWS storage services and even between different cloud providers.

The AWS DataSync service is a secure, online data transfer service for moving large amounts of data, efficiently, and automatically, to and from many different locations. You can migrate and replicate any of your sets of data natively within DataSync. 

This can all be done whilst avoiding building custom solutions or wasting time on difficult and repetitive tasks.

AWS DataSync supports a number of different data formats, spanning file systems, object storage both within cloud environments and from an on-premises environment.

DataSync is available through the console or the AWS CLI (Command Line Interface) and can be used to move data between many different sources and destination.

If you want to perform any kind of migration, or any kind of data relocation where the end point is within AWS – AWS DataSync will likely help you achieve your goals. 

Features

AWS DataSync has a number of different features which make it a desirable tool to use for any kind of data migration. 

As with many AWS services, AWS employs their own custom features. In this case their own custom transfer protocol – which decides the specifics of how data is sent over a network and when. This is all designed to speed up data migration compared to traditional tools. 

It is possible to schedule tasks to run periodically, to detect and copy changes from your source storage system to the destination storage system.

In order to move files directly into your Amazon VPC, DataSync supports VPC endpoints (powered by AWS PrivateLink).

You can create tasks based on a schedule with AWS DataSync, to perform migrations on a time-oriented basis as and when you require. 

Files can be copied into EFS using AWS DataSync, and files that have not been accessed for a specified period can be migrated to Infrequent Access (IA) storage.

DataSync is a fully managed service, which means that there is no infrastructure that you must provision.

DataSync integrates seamlessly with Amazon EventBridge. You can set it to trigger an event when a transfer completes, thereby automating your workflows. 

During transit and in rest, DataSync performs integrity checks to ensure your data arrives intact. 

At rest, encryption is either done by SSE-S3 or by the Key Management Service. In transit, it uses TLS 1.2 and in transit it uses TLS 1.2 and SSE-S3. 

When you use DataSync with S3, it supports storing data directly into any S3 storage class. You do not need to use lifecycle policies or manually transfer data from S3. 

Use Cases

Data migration to Amazon S3, Amazon EFS, or Amazon FSx for Windows File Server can all take place.

You can use AWS DataSync to transfer expensive archival storage into S3 Glacier Flexible Retrieval, Glacier Instant Retrieval, as well as the archival classes – Glacier and Glacier Deep archive.

Some organizations have AWS environment that use both an on-premises data center and a cloud-based solution.

Large volumes of data might be generated in the on-premises environment that need to be transferred to AWS for processing.

To ensure your data is protected, you can use AWS DataSync to back up your on-premises solutions to AWS.

DataSync can be used to replicate and store a copy of your data in Amazon Web Services. To ensure that your data is stored securely at rest, you can turn on the encryption settings on all of these services. 

DataSync Agent allows you to run DataSync on-premises as a virtual machine, supporting hybrid cloud deployments. 

The DataSync VM image is provided as an Amazon Machine Image (AMI) to be run on an EC2 instance.

To communicate with AWS, the agent VM needs access to certain endpoints. You must configure your firewall to allow this communication.

Pricing

DataSync charges a flat fee per gigabyte for network acceleration technology, managed cloud infrastructure, data validation, and automation capabilities. 

AWS services, such as Amazon S3, Amazon EFS, Amazon FSx for Windows File Server, and AWS Key Management Service (KMS) charge standard request, storage, and data transfer rates.

You pay AWS Data Transfer at your standard rate when copying data from AWS to an on-premises storage system. In addition, Amazon CloudWatch Logs, Amazon CloudWatch Events, and Amazon CloudWatch Metrics are charged at standard rates.

The AWS PrivateLink service will charge you for interface VPC endpoints that you create to manage and control traffic between your agent(s) and the DataSync service.

Limits


AWS Database Migration Service : Theory


What is AWS Database Migration Service?

AWS Database Migration Service (DMS) is a managed and automated service that provides a quick and secure way to migrate database from on-premise databases, DB instance, or database running on EC2 instance to the cloud. It helps you modernize, migrate, and manage your environments in the AWS cloud. Amazon provides a wide spectrum of databases to work with such as Amazon RDS, Aurora, DynamoDB, ElasticCache, and Redshift.

Check out this blog to know more in detail about AWS Database Service – Amazon RDS, Aurora, DynamoDB, ElastiCache
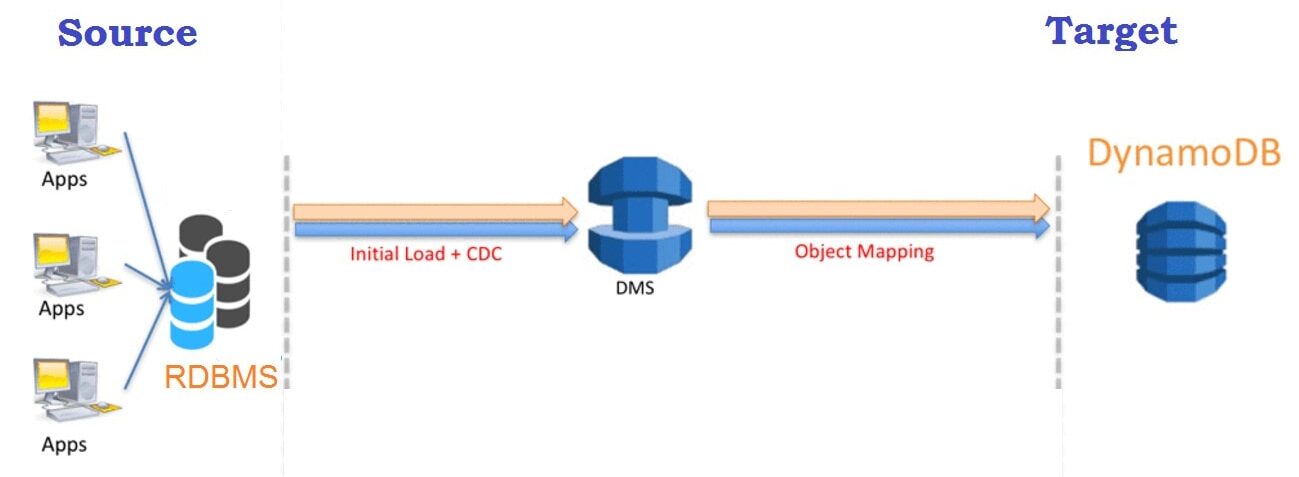
Source-Target-DynamoDB

DMS can be used to migrate relational databases, data warehouses, NoSQL databases, and other types of databases into the cloud. AWS DMS supports homogeneous (i.e. Oracle to Oracle) and heterogeneous (i.e. Oracle to Amazon Aurora) database migration. During migration the source database remains operational, thereby minimizing the downtime. The entire migration process can be controlled from the AWS Management Console.

Learn With Us: Join our  AWS Solution Architect Training and understand AWS basics in an easy way.

AWS DMS Benefits

AWS Database Migration Service has various benefits over traditional migration methods such as:
dms benefits

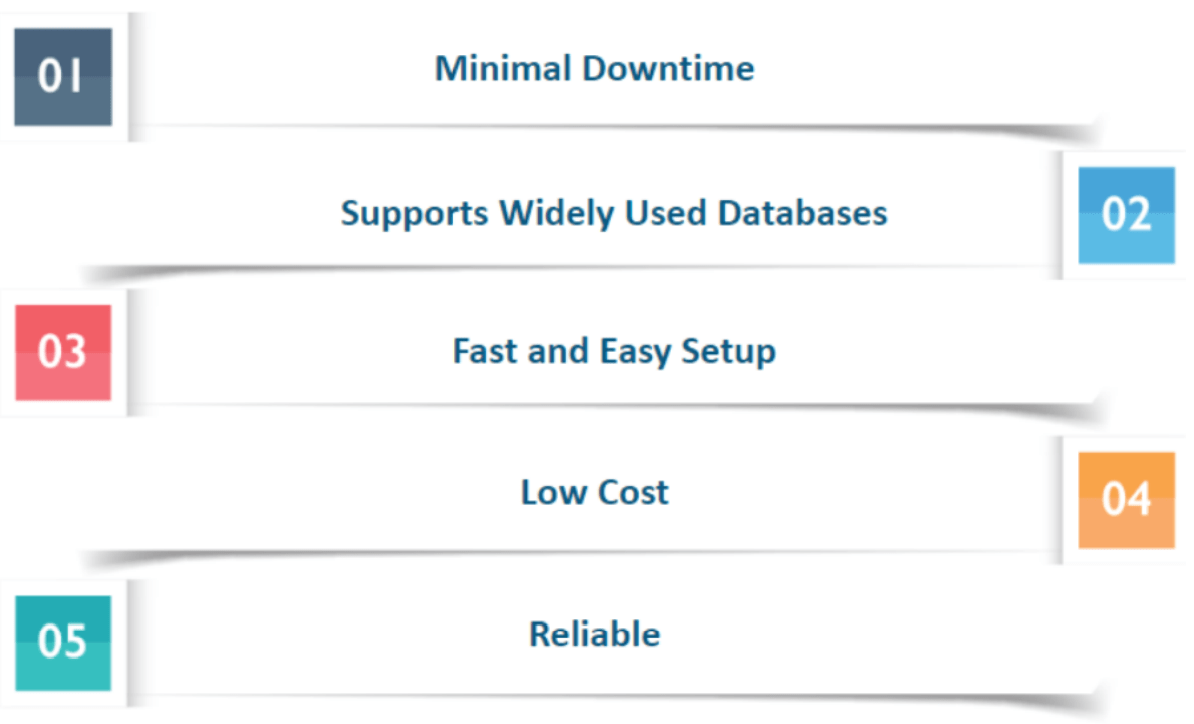
  • Minimal downtime – DMS continuously replicates the changes to your source database during migration while keeping your source database operational. This allows you to switch over at any time without shutting down either database.
  • Supports Widely Used Databases – AWS Database Migration Service can migrate your data to and from most of the widely used commercial and open-source databases.
  • Fast & Easy Setup – A migration task can be set up within a few minutes in the AWS Management Console.
  • Low cost – DMS is a free migration service for migration to Aurora, Redshift, DynamoDB, or DocumentDB. For other databases, you have to pay based on the amount of log storage and computational power needed to transfer.
  • Reliability – DMS is a self-healing service and will automatically restart in case of an interruption occurs. DMS provides an option of setting up a Multi-AZ (availability zone) replication for disaster recovery.

Know More: About AWS Route 53.

How does AWS DMS work?

AWS Database Migration Service (DMS) is a managed and automated migration service that allows you to migrate your data from one database to another. The process starts by first connecting DMS to the endpoints; source, and target endpoints. The only requirement to use AWS DMS is that one of your endpoints must be on an AWS service.

AWS Database migration starts by first connecting to your source database, the service then reads the data, formats the data according to the target database. It then loads the data into the target database. It goes through a full load migration where the source data is moved to the target. During full load, any changes made to the tables being loaded are cached on the replication server; these are the cached changes. Once the full load completes, AWS DMS immediately begins to apply the cached changes to the database to keep both the source and target database in sync with each other.

aws migration components

Components of AWS Database Migration Service

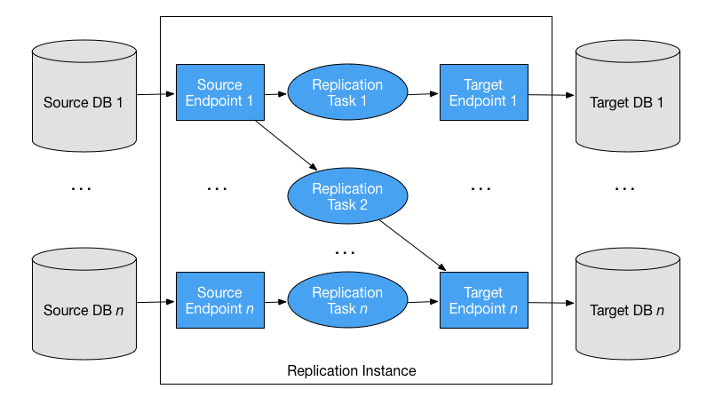
AWS DMS migration consists of three components that you should know about before starting with migration:

  • Replication instance
  • Source & Target Endpoints
  • Replication tasks

database migration components

Replication Instance

A replication instance is simply a managed Amazon Elastic Compute Cloud (EC2) instance that is used to host one or more replication tasks. The above image shows a replication instance running several associated replication tasks.

Endpoints

DMS uses an endpoint to connect to your source and target databases. When you create an endpoint, you require the following information:

  • Endpoint type
  • Engine type
  • Server name
  • Port number
  • Encryption protocols
  • Credentials

You can create an endpoint using AWS DMS console, where you test the endpoint connection that verifies whether the database exists at the given server name and port, and the supplied credentials can be used to connect to the database.

Replication Tasks

A replication task is used to move data from the source endpoint to the target endpoint, this is where you specify what tables and schemas are moved between your source and target databases and when. Creating a replication task is the last step you need before you start a migration.

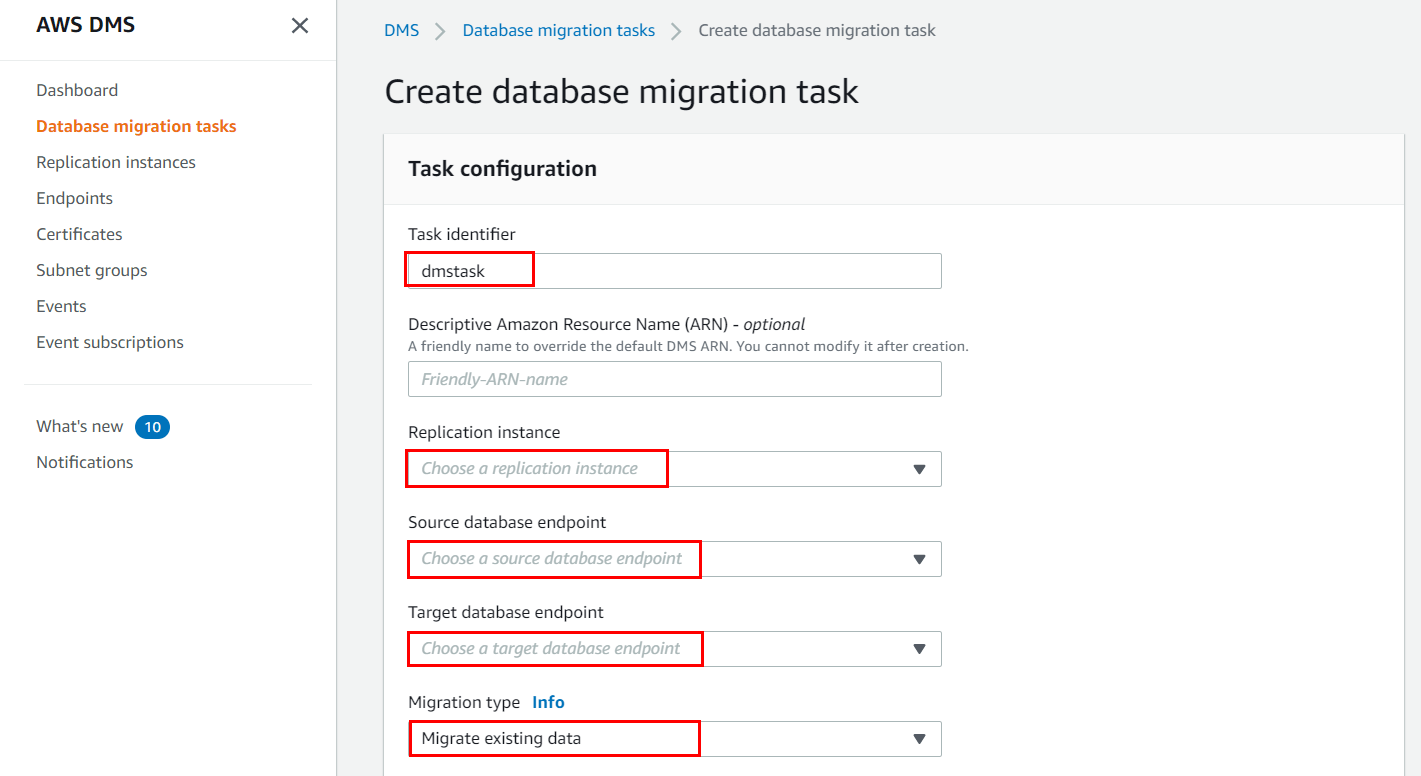
When you create a replication task, you need to specify which replication instance to use, your target and source endpoints, and your migration type option.

AWS Schema Conversion Tool

For a homogenous migration, DMS attempts to create a target schema. However, it is not always possible. In these cases, we use tools such as MySQL Workbench, Oracle SQL Developer, and pgAdmin III.

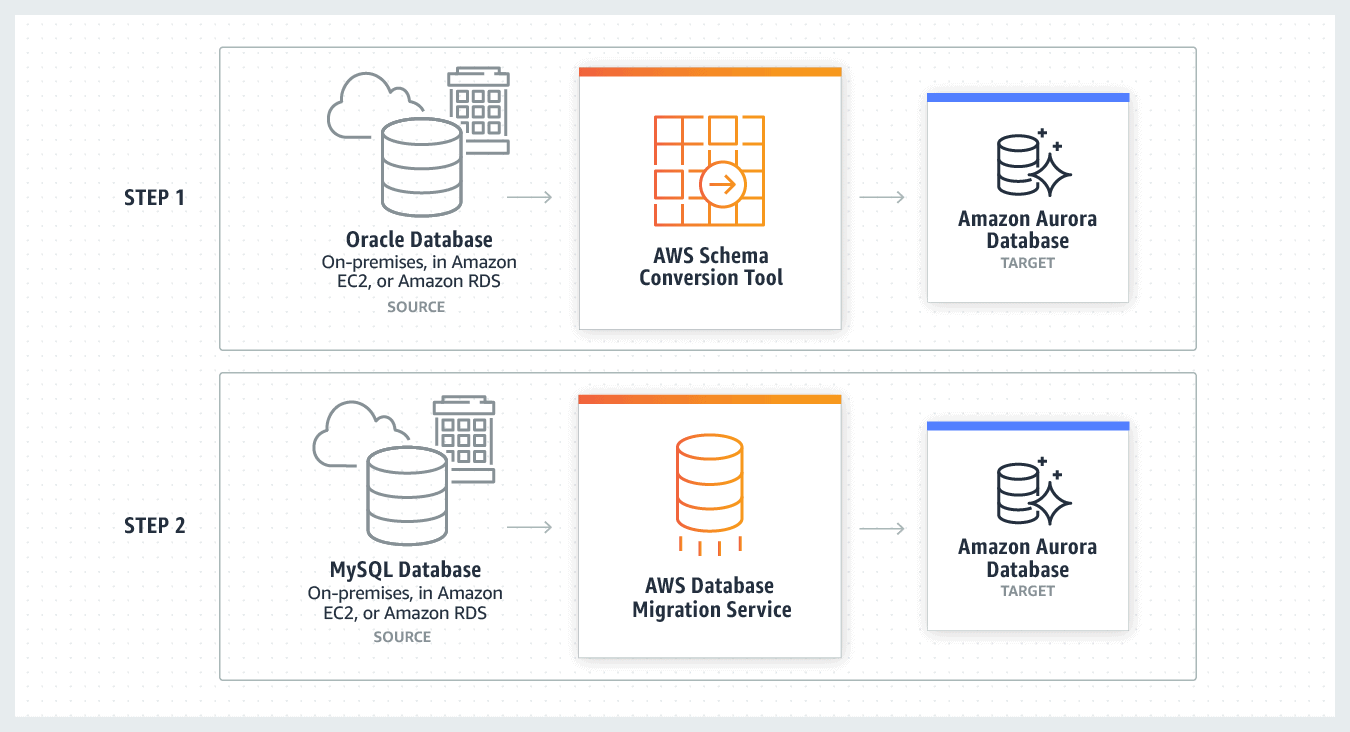
For heterogeneous migrations, AWS Database Migration Service is not able to perform schema conversions. In these cases, you can use AWS Schema Conversion Tool (SCT). SCT automatically converts source schema to a compatible format for your target database.  It can create a target schema and also can generate and create an entire schema, with tables, indexes, views, and so on.

Use Cases

DMS supports migration to Amazon RDS, Aurora, Redshift, DynamoDB, and DocumentDB. There are several use cases of AWS DMS, some of them are listed below:

1. Homogeneous Database Migration

Homogeneous Database Migration is when the source and target databases are the same or compatible with each other such as Oracle to Amazon RDS for Oracle, MySQL to Amazon Aurora, MySQL to Amazon RDS for MySQL, or Microsoft SQL Server to Amazon RDS for SQL Server. Since the schema structure and data types of source and target database are compatible, it is a one-step process as there is no need for schema conversion.
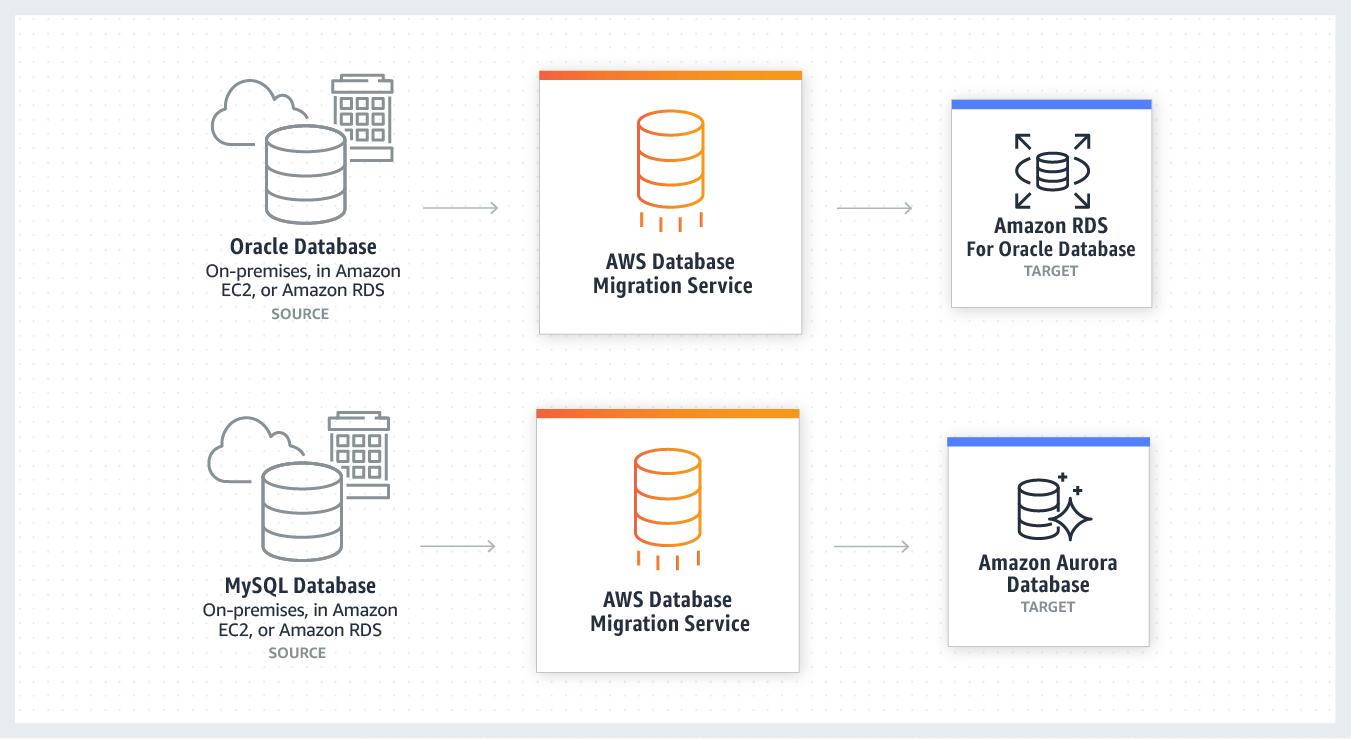
homogeneous database migration

2. Heterogeneous Database Migration

Heterogeneous Database Migration is when the source and target database engines are different from each other such as Oracle to Amazon Aurora, Oracle to PostgreSQL, or Microsoft SQL Server to MySQL migrations. In this case, the schema structure and data types of source and target databases are different from each other, this requires a schema and code transformation before migration, which makes it a two-step process.
heterogeneous-database-migrations

Migrating an On-Premises Oracle Database to Amazon Aurora MySQL

In this section, we will look at the step-by-step process for migrating an on-premises Oracle database (the source endpoint) to an Amazon Aurora with MySQL compatibility (the target endpoint) using AWS Database Migration Service (AWS DMS).

Before starting, you must have an AWS cloud account, if you don’t know how to create one, read our blog on How To Create AWS Free Tier Account.

Step 1: Configure Your Source Oracle Database

1. Run the following command to enable supplemental logging at the database level for AWS DMS

ALTER DATABASE ADD SUPPLEMENTAL LOG DATA;

2. If you are using an account with the minimal privileges required by AWS DMS, then you need to make sure it has the required privileges.

Step 2: Configure Your Target Aurora MySQL Database

If you want to create a temporary dms_user with the minimal privileges required for migration, then follow the steps in official AWS docs.

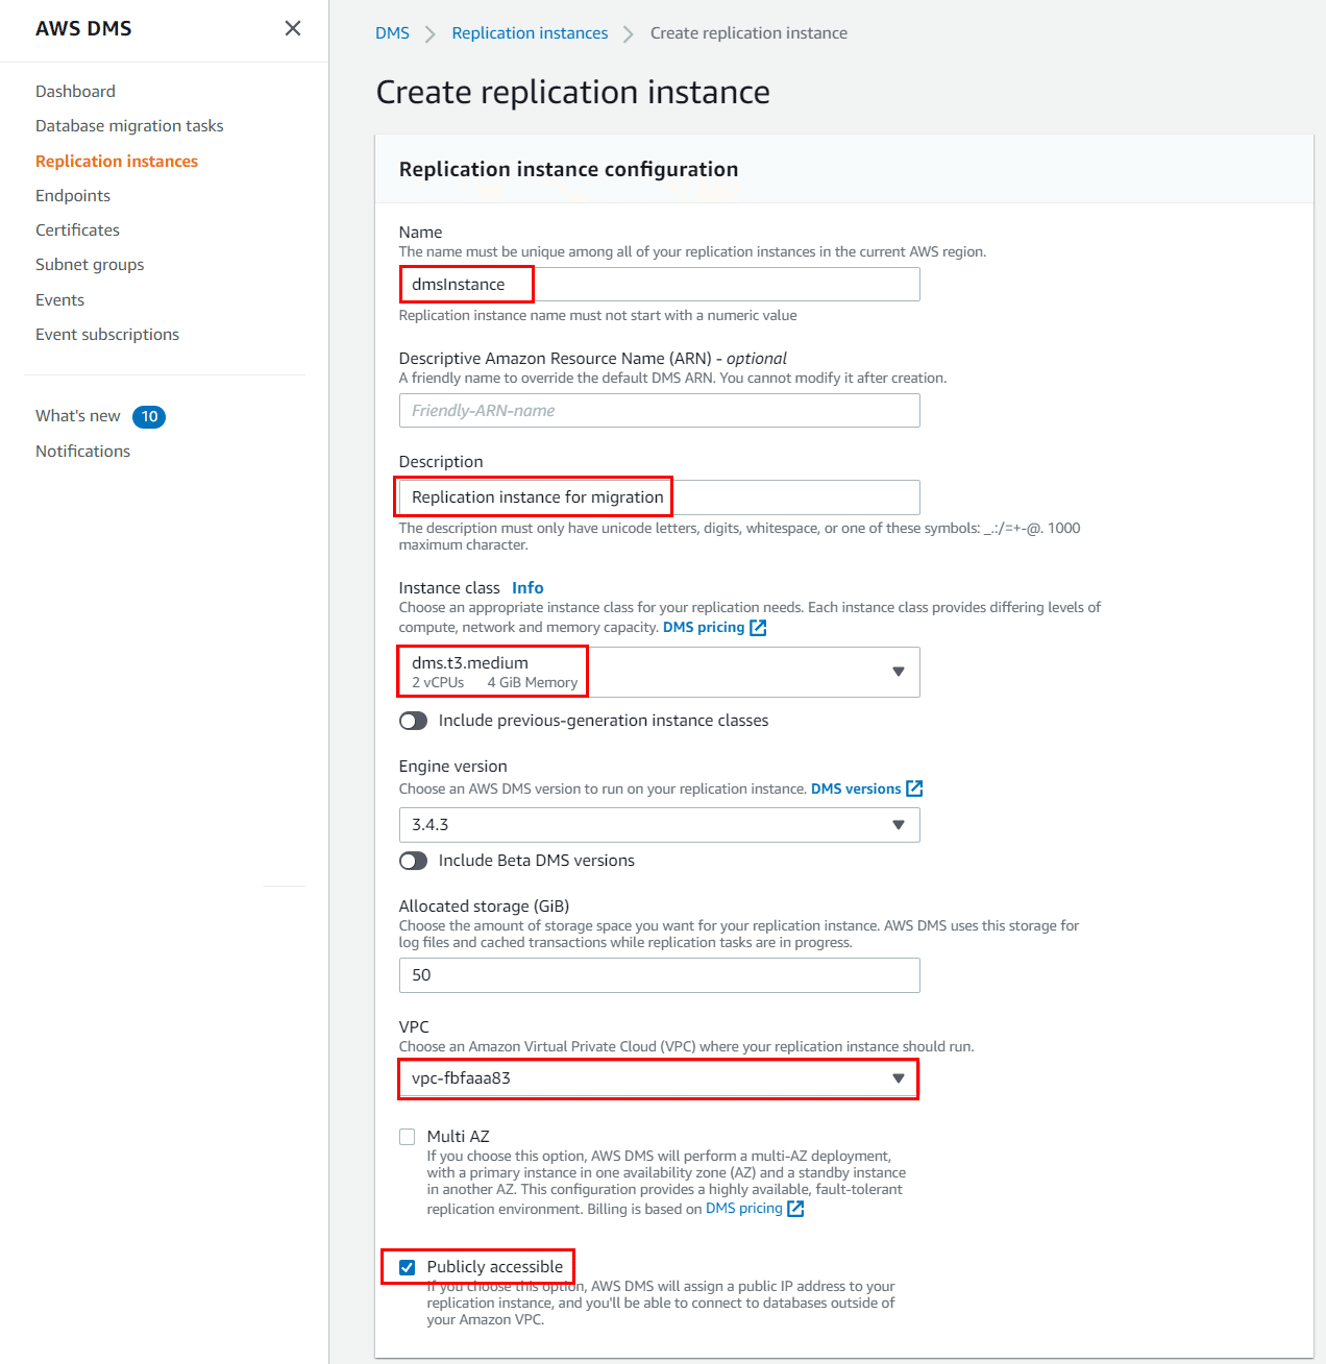
Step 3: Create a Replication Instance

1. Sign in to the AWS Management Console, and open the AWS DMS console and choose Replication instances.

2. Click on Create replication instance.

aws replication instance

3. On the Create replication instance page, enter the required details. Once done, click Create.
create replication instance

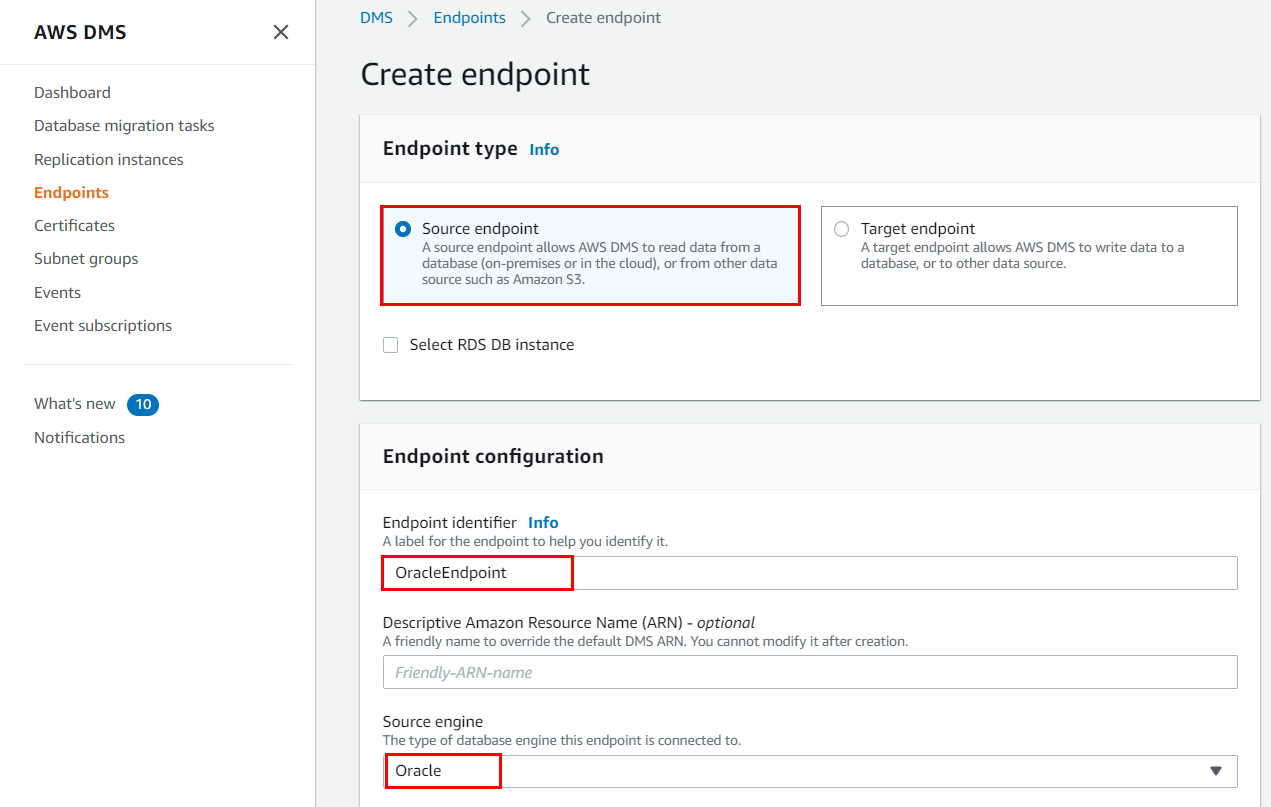
Step 4: Create Oracle Source Endpoint

1. Go to the AWS DMS console, choose Endpoints. Select Create Endpoint.

aws endpoints

2. On the Create database endpoint page, enter the required details and create the source endpoint.
create endpoint

Step 5: Create Aurora MySQL Target Endpoint

Create a target endpoint in a similar way that you created the source endpoint. Select Target endpoint on the create endpoint details page, select Aurora MySQL as your source engine, enter the database details for Aurora database, and create the endpoint.

Step 6: Create a Migration Task

1. Go to the AWS DMS console, choose Database Migration Tasks, click Create Task.

aws migration tasks

2. On the Create Task page, select the replication instance, source, and target endpoints that we created in previous steps and enter the other required details.
create dms task

Conclusion

I hope that by now you have a better understanding of AWS Database Migration Service, its benefits, components, and working. This should help you overcome the complex challenges of database migration to AWS.