Friday, 5 July 2019

Continuous Integration - Jenkins vs Travis-CI

What is CI?

Continuous integration is a software development method where members of the team can integrate their work at least once in a day. In this method, every integration is checked by an automated build to search the error. The CI concept was first introduced over two decades ago to avoid "integration hell," which happens when integration is put off till the end of a project.
In this tutorial, you will learn
  • What is CI?
  • What is Travis CI?
  • What is Jenkins?
  • What does Travis do?
  • What did Jenkin do?
  • Travis CI Features:
  • Jenkin Features:
  • Travis vs. Jenkins
  • Popularity Index
  • Which is better?
How CI works?
  • Developers write code and commit changes to the shared repository
  • After that, the CI server monitors the repository and evaluates all the changes
  • CI builds the system and conduct integration and unit tests
  • The server releases deployable artifacts
  • The Continous integration server assigns a build tag to the version and building code
  • Then the CI server reports the team about the successful build. If the tests fail, the server alerts about the event to the development team. The team will fix the issues as fast as is possible.

What is Travis CI?

Travis CI was the first CI as a Service tool. It introduced a new approach to building code in the cloud. This CI tool allows the user to sign up, link their repository, build, as well as test their apps.
Travis CI tool can easily integrate with the common cloud repositories like GitHub and Bitbucket. It offers many automated CI options which cut out the need for a dedicated server as the Travis CI server is hosted in the cloud. This allows you to test in different environments, on various machines, running on different Operating Systems.
Travis CI is free for open source projects. For commercial projects, you need to purchase an enterprise plan.

What is Jenkins?

Jenkins is an award-winning continuous integration tool that monitors executions of deployment cycles. It started as a side project by Sun's software engineers group. Later it was expanded as one of the popular open source CI tools which help software development teams to automate their deployments.
Jenkins is a Java-based tool, which means you only need Java Runtime Environment to operate it. Hence, Jenkins can be installed on any operating system where Java runs.
In this tool, Developers can also specify conditions for customized builds. Jenkins supports a massive plugin archive. This allows developers to alter how Jenkin looks and operates.
Moreover, the Jenkins Pipeline suite of plugins comes with special tools that allow developers to model easy-to-complex delivery pipelines using DSL ( Digital Subscribe line) method.

What does Travis do?

Travis CI offers following benefits:
  • You can monitor GitHub projects
  • Runs Test and generate results quickly. Parallel test execution is possible.
  • Build artifacts & check code quality
  • Easy Deployment to cloud services
  • It can identify small as well as large code changes.
  • Developers can use Travis CI to watch the tests when they are running.
  • The tool integrates with Slack, HipChat, Email, etc.

What does Jenkin do?

Jenkins allows you to automate your build, test, and deploy tasks. The tool provides support for different OS like Windows, Mac OSX, and Linux systems.
Moreover, Jenkins gives you an ability to quickly build and test your code to get early feedback on whether it's ready for production or not. In most cases, Jenkin will require few modifications according to your team's custom requirements.

Travis CI Features:

  • Automatic integration with GitHub
  • Repository access to build pull requests
  • Support for 21 languages like Android, C, C#, C++, Java, JavaScript (with Node.js), Perl, PHP, Python, R, Ruby, etc
  • Pre-installed build & test tools
  • Available services - databases, message queues, etc.
  • Deployment to multiple cloud services
  • Encrypt secure environment variables or files
  • Virtual machines recreated after every build
  • CLI client and API for scripting
  • Comes with free cloud-based hosting which does not require maintenance or administration.

Jenkin Features:

  • Easy to install, upgrade, and configure
  • Distributed Builds
  • Monitoring external jobs
  • More than 600 plugins to customize your Jenkins environment
  • Over 1000+ public repositories on Github, 500+ contributors, strong commit activity
  • Support for various authentication methods, version control systems, notification, etc.
  • Jenkins provides remote access API and its functionalities.
  • Provide Powerful CI/CD tool for big projects
  • It supports various job models like Freestyle, Pipeline, etc.,
  • Allows developers to add their extensions
  • Compatible with Docker, Libvirt, Kubernetes, and many other programs

Travis vs. Jenkins

ParameterJenkinTravis
CostJenkins is free. But development team need to run and maintain their dedicated server. This could be considered an extra expense.Travis CI enterprise suites start at $129 per month. Cost increase based on the level of support you require.
Set up TimeJenkins needs elaborate setup. So you'll have a very long wait time for the complete installation.It takes very less time to get started. Create a config file and start integrating.
PerformanceIf you're looking for a CI tool with unlimited customization options, then Jenkins is the best choice for you.Travis CI is the best choice If you are working in an open source project.
Tool TypeIt is an open-source free to use the tool.It is a commercial CI Tool
UsageEasy to useFlexible to use
GithubGood for GithubExcellent for Github
SupportExtensive support from the community.Limited support for the community.
Pros
  • Customization is biggest benefit of the Jenkins CI server
  • An extensive plugin archive can be configured to change the look of Jenkins.
  • You can also add new functionality like authentication, alerts, and credentials.
  • Integration with GitHub & cloud
  • Unlimited open source projects with full functionality
  • Extensive project configuration via .travis.ymi file
  • Allows cluster tests and run them in parallel
  • Multiple build environments and target platforms (i.e. Node 0.10,0.8,0.6, Li on).
Cons
  • One major drawback of Jenkins for continuous integration is that it is highly configurable. There is no out-of-the-box setup. That's why it may take two-three hours to days to get everything configured in the system.
  • The biggest cons of installing Travis CI is that it's Commercial plans start at $129/m which is quite expensive.
  • Not suitable for high-security projects
  • Unlike other CI tools, it does not offer Bitbucket Support.
Usage PlansFreeFree for open source projects. However, Paid for Enterprise.
Server MachineServer-basedCloud-based
Customization OptionsMoreLess
ConfigurationFully customizableYAML
Control on systemFullVery less

Popularity Index

The number of questions labeled Jenkins and Travis in Stack Overflow.

Which is better?

Thus, with the above discussion, we can get ay that Travis and Jenkins both offer wonderful features. However, small open source projects are best suited for Travis CI as it is easy to run and quick to set up. On the other hand, large enterprise is best suited to Jenkins as it offers free licensing for a private project and a wide range of customizable feature. So, we can say that both of these continuous integration tools are good in their way.

Jenkins Pipeline Tutorial: JenkinsFile EXAMPLE

What is Jenkins Pipeline?

In Jenkins, a pipeline is a group of events or jobs which are interlinked with one another in a sequence.
In simple words, Jenkins Pipeline is a combination of plugins that support the integration and implementation of continuous delivery pipelines using Jenkins. A pipeline has an extensible automation server for creating simple or complex delivery pipelines "as code," via pipeline DSL (Domain-specific Language).

What is Continuous Delivery Pipelines? How it Works?

In a Jenkins pipeline, every job or event has some sort of dependency on at least one or more events.
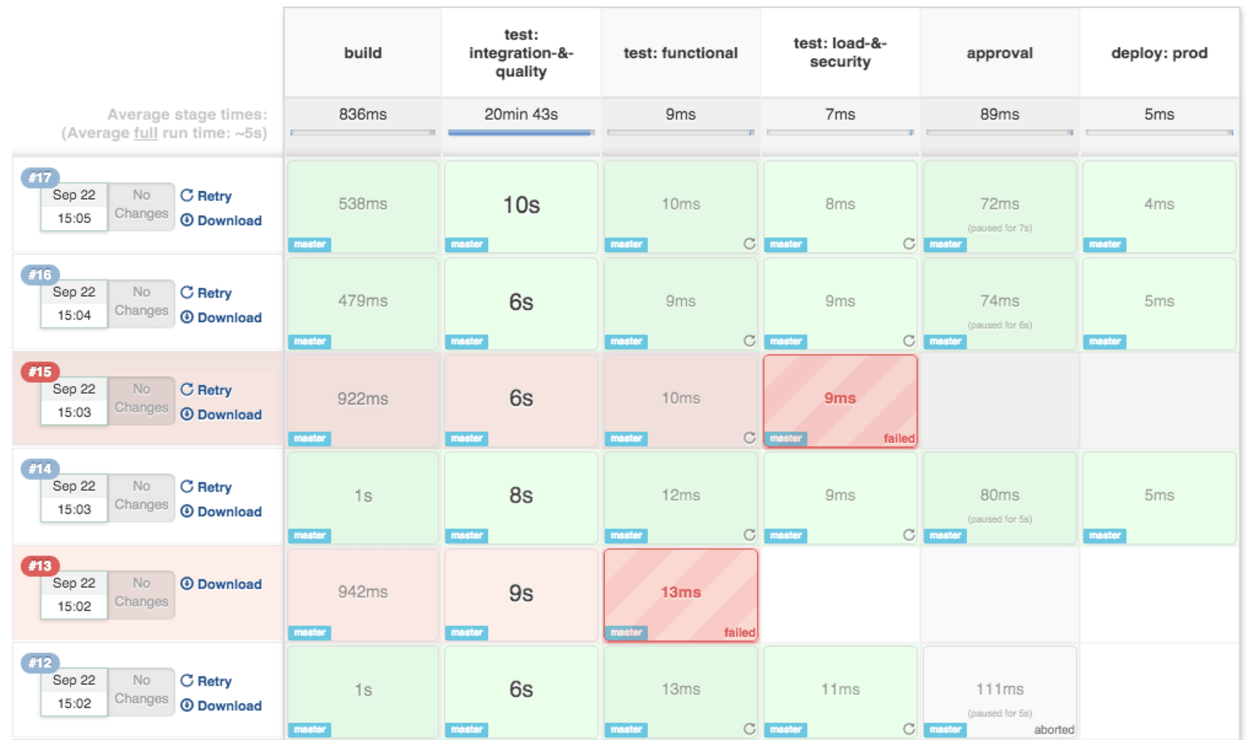
The picture above represents a continuous delivery pipeline in Jenkins. It contains a group of states called build, deploy, test and release. These events are interlinked with each other. Every state has its events, which work in a sequence called a continuous delivery pipeline.
A continuous delivery pipeline is an automated expression to display your process for getting software for version control. Thus, every change made in your software goes through a number of complex processes on its way to being released. It also involves developing the software in a reliable and repeatable manner, and progression of the built software through multiple stages of testing and deployment.
In this tutorial, you will learn

What is a JenkinsFile?

Jenkins pipelines can be defined using a text file called JenkinsFile. You can implement pipeline as code using JenkinsFile, and this can be defined by using a domain specific language (DSL). With JenkinsFile, you can write the steps needed for running a Jenkins pipeline.
The benefits of using JenkinsFile are:
  • You can create pipelines automatically for all branches and execute pull requests with just one JenkinsFile.
  • You can review your code on the pipeline
  • You can audit your Jenkins pipeline
  • This is the singular source for your pipeline and can be modified by multiple users.
JenkinsFile can be defined by either Web UI or with a JenkinsFile.
Declarative versus Scripted pipeline syntax:
There are two types of syntax used for defining your JenkinsFile.
  1. Declarative
  2. Scripted
Declarative:
Declarative pipeline syntax offers an easy way to create pipelines. It contains a predefined hierarchy to create Jenkins pipelines. It gives you the ability to control all aspects of a pipeline execution in a simple, straight-forward manner.
Scripted:
Scripted Jenkins pipeline runs on the Jenkins master with the help of a lightweight executor. It uses very few resources to translate the pipeline into atomic commands. Both declarative and scripted syntax are different from each other and are defined totally differently.

Why Use Jenkin's Pipeline?

Jenkins is an open continuous integration server which has the ability to support the automation of software development processes. You can create multiple automation jobs with the help of use cases, and run them as a Jenkins pipeline.
Here are the reasons why you use should use Jenkins pipeline:
  • Jenkins pipeline is implemented as a code which allows multiple users to edit and execute the pipeline process.
  • Pipelines are robust. So if your server undergoes an unforeseen restart, the pipeline will be automatically resumed.
  • You can pause the pipeline process and make it wait to resume until there is an input from the user.
  • Jenkins Pipelines support big projects. You can run multiple jobs, and even use pipelines in a loop.

Jenkins Pipeline Concepts

TermDescription
PipelineThe pipeline is a set of instructions given in the form of code for continuous delivery and consists of instructions needed for the entire build process. With pipeline, you can build, test, and deliver the application.
NodeThe machine on which Jenkins runs is called a node. A node block is mainly used in scripted pipeline syntax.
StageA stage block contains a series of steps in a pipeline. That is, the build, test, and deploy processes all come together in a stage. Generally, a stage block is used to visualize the Jenkins pipeline process.
StepA step is nothing but a single task that executes a specific process at a defined time. A pipeline involves a series of steps.

Install Build Pipeline Plugin in Jenkins

With the build pipeline plugin, you can create a pipeline view of incoming and outgoing jobs, and create triggers which require manual intervention.
Here is how you can install the build pipeline plugin in your Jenkins:
Step 1) The settings for the plugin can be found under Manage Jenkins > Manage Plugins.
If you have already installed the plugin, it is shown under the installed tab.
Step 2) If you do not have the plugin previously installed, it shows up under the Available tab.
Once you have successfully installed the build pipeline plugin in your Jenkins, follow these steps to create your Jenkins pipeline:

How to Create Jenkins Pipeline

Once you are logged in to your Jenkins dashboard:
Step 1) Click on the "+" button on the left-hand side of your Jenkins dashboard to create a pipeline.
Step 2)
  1. You will be asked to give a name to the pipeline view. We shall call it "Guru99 Pipeline" for the duration of this demo.
  2. Select Build a pipeline view under options
  3. Click ok
Step 4) In the next page, you will be asked for some more details to configure your Jenkins pipeline. Just accept the default settings, and make sure you choose the first job under the settings.
Click on Apply and then OK.
This will show you the sample pipeline view of your item, as given below:

Running a pipeline build

Step 1) For running a pipeline build, you need to chain your jobs first. For this, go to your first job and click on configure.
Step 2) Now, under Build Triggers, check the Build after other projects are built option.
Thus, a chain for all your jobs has been created.
Step 3) Install the Build Pipeline view plugin if you don't have it installed already.
Step 4) Go to your Jenkins dashboard and create a view by clicking on the "+" button. Select the Build Pipeline View option and click OK.
Step 5) Under Pipeline view configuration, locate Pipeline Flow.
Under Pipeline flow, select the initial job to run. Now choose the job which has chains to other jobs, as shown in Step 1 and Step 2.
Here we have selected Guru99 Project 1 as the initial job, chained to other jobs. So, one by one, the jobs will run in the pipeline.
When the Jenkins pipeline is running, you can check its status with the help of Red and Green status symbols. Red means the pipeline has failed, while green indicates success.
In this example, we see that the button is green. Hence, the pipeline is successful.

Running Jenkins pipeline

Click on Run to run the Jenkins pipeline. It will look something like this:
In the example above, we are demonstrating a simple "helloworld.java" program. But in real time projects, you will be responsible for creating and building complex pipelines in Jenkins. See below for a sample pipeline view.
Best Practices using Jenkins Pipeline:
  • Use the genuine Jenkins Pipeline
  • Develop your pipeline as code
  • Any non-setup work in your pipeline should occur within a stage block.
  • Any material work in a pipeline must be performed within a node block.
  • Don't use input within a node block.
  • Never set environment variables with env global variable
  • Wrap your inputs in a timeout

How to Create Builds with the Jenkins Freestyle Project

What is a Jenkins freestyle project?

A Jenkins project is a repeatable build job which contains steps and post-build actions. The types of actions you can perform in a build step or post-build action are quite limited. There are many standard plugins available within a Jenkins freestyle project to help you overcome this problem. They allow you to configure build triggers and offers project-based security for your Jenkins project.

Creating a Freestyle Build Job

The freestyle build job is a highly flexible and easy-to-use option. You can use it for any type of project; it is easy to set up, and many of its options appear in other build jobs.
Step 1) To create a Jenkins freestyle job, log on to your Jenkins dashboard by visiting your Jenkins installation path. Usually, it will be hosted on localhost at http://localhost:8080 If you have installed Jenkins in another path, use the appropriate URL to access your dashboard.
Step 2) Click on "New Item" at the top left-hand side of your dashboard.
Step 3) In the next screen,
  1. Enter the name of the item you want to create. We shall use the "Hello world" for this demo.
  2. Select Freestyle project
  3. Click Okay
Step 4) Enter the details of the project you want to test.
Step 5) Under Source Code Management, Enter your repository URL. We have a test repository located at https://github.com/kriru/firstJava.git
It is also possible for you to use a local repository.
If your GitHub repository is private, Jenkins will first validate your login credentials with GitHub and only then pull the source code from your GitHub repository.
Step 6) Now that you have provided all the details, it's time to build the code. Tweak the settings under the build section to build the code at the time you want. You can even schedule the build to happen periodically, at set times.
Under build,
1. Click on "Add build step"
2. Click on "Execute Windows batch command" and add the commands you want to execute during the build process.
Here, I have added the java commands to compile the java code.
I have added the following windows commands:
javac HelloWorld.java
java HelloWorld
Step 7) When you have entered all the data,
  1. Click Apply
  2. Save the project.
Step 8) Now, in the main screen, Click the Build Now button on the left-hand side to build the source code.
Step 9) After clicking on Build now, you can see the status of the build you run under Build History.
Step 10) Click on the build number and then Click on console output to see the status of the build you run. It should show you a success message, provided you have followed the setup properly.
In sum, we have executed a HelloWorld program hosted on GitHub. Jenkin pulls the code from the remote repository and builds continuously at a frequency you define.