Wednesday, 31 July 2024

New capabilities for Elastic Cloud (Elasticsearch) – An Azure native ISV service

 New capabilities for Elastic Cloud (Elasticsearch) – An Azure native ISV service

Elastic Cloud (Elasticsearch) – An Azure native ISV service is a cloud native deep integration experience for all Azure and Elastic joint customers to power their digital transformation. Using this service, customers can quickly setup their Elastic deployments right from within Azure experiences for their Elasticsearch, observability or security needs. The service can easily be managed using clients such as Azure portal, Command-line interfaces (CLI) and Software Development Kits (SDKs) without requiring any custom code or connectors.


To further enhance the customer experience, we have introduced the following new features:

  1. ‘QuickStart template’ in the Code Samples gallery – to enhance productivity of developers while setting up their Elastic resources.
  2. ‘Connected Elastic resources’ experience in Azure portal – for consolidated billing visibility to manage Elastic deployments from a single view.
  3. ‘Suggest a feature’ in Azure resource overview blade – for users to provide feature/ enhancement suggestions for us to incorporate as part of product roadmap.


‘QuickStart template’ to create a new Elastic resource

Creating an Elastic deployment is now super easy.

Azure QuickStart templates for commonly used workloads is a go-to resource for customers looking to jumpstart resources quickly.


The Elastic QuickStart template can be accessed here. Click on ‘Deploy to Azure’ button:

thumbnail image 1 of blog post titled 


							New capabilities for Elastic Cloud (Elasticsearch) – An Azure native ISV service


After signing into the Azure portal, it lands you in the Basics tab of the template deployment flow.

thumbnail image 2 of blog post titled 


							New capabilities for Elastic Cloud (Elasticsearch) – An Azure native ISV service


In the Basics tab,

  • Choose the Subscription you want to create your Elastic resource in (You must have Owner or contributor role assigned on the subscription you choose)
  • Provide the name of the resource group for the resource. If the name provided doesn’t match that of any existing resource group, a new resource group is created.
  • Resource Name is the name of the Elastic resource that would be created.
  • Location defines the region where the resource will be deployed.
  • Plan and Billing Term fields are currently set to defaults (Elastic’s public Pay as you Go plan with a monthly billing frequency) and can’t be modified.

thumbnail image 3 of blog post titled 


							New capabilities for Elastic Cloud (Elasticsearch) – An Azure native ISV service


Click on “Next” or “Review + create”.


If the validation is successful, verify the details at the bottom. If the validation throws an error or you want to modify any field, go back to the previous step to make the necessary changes.


thumbnail image 4 of blog post titled 


							New capabilities for Elastic Cloud (Elasticsearch) – An Azure native ISV service


Click on Create. The deployment takes ~1-2 minutes to complete. You should see a confirmation screen regarding successful deployment.

thumbnail image 5 of blog post titled 


							New capabilities for Elastic Cloud (Elasticsearch) – An Azure native ISV service


You are all set!

Alternate approach using ‘Deploy a custom template’

Apart from starting from the Code Samples gallery, you can alternately also choose to start by searching for ‘Deploy a custom template’ from the Azure portal.


thumbnail image 6 of blog post titled 


							New capabilities for Elastic Cloud (Elasticsearch) – An Azure native ISV service


If you choose this path, you need to search for ‘quickstarts/microsoft.elastic/elastic-create’ from the QuickStart template dropdown:


thumbnail image 7 of blog post titled 


							New capabilities for Elastic Cloud (Elasticsearch) – An Azure native ISV service

Once you select this template, rest of the steps remain the same as the above process, walked through starting from the Code Samples gallery.


‘Connected Elastic Resources’ experience in Azure portal

Customers today can set up Elastic deployments from the Azure experience across multiple subscriptions, or directly from Elastic portal. Although we ensure a unified bill across all these deployments, customers needed a consolidated perspective in Azure bringing together all the deployments accruing to billing, so that they could be managed easily.


With this in mind, we have introduced a new ‘Connected Elastic Resources’ blade in your Elastic resource experience.


thumbnail image 8 of blog post titled 


							New capabilities for Elastic Cloud (Elasticsearch) – An Azure native ISV service


This experience will now be available on all Elastic resources within the Azure portal. It will cover all Elastic resources created by a user across Azure subscriptions or from Elastic portal.


Customers can easily switch to corresponding Elastic deployment experience in Elastic portal, by clicking on the deep links provided in the ‘Elastic Deployment’ column. Similarly, users can also switch to multiple Elastic resources across Azure subscriptions using the deep links in the ‘Azure Resource’ column, subject to user having the owner or contributor rights to manage the corresponding resource.


Suggest a feature

We are always looking for ways to improve our product experience. We would love to hear your suggestions for new features or enhancements you would like to see. To suggest a new feature, you can click on ‘Suggest a Feature’ link in your Elastic resource’s overview blade. This redirects to the Developer community forum where you can also view other feature suggestions from other customers, and you can also upvote other posts and comment on them.


thumbnail image 9 of blog post titled 


							New capabilities for Elastic Cloud (Elasticsearch) – An Azure native ISV service

How to deploy and manage Elastic on Microsoft Azure


How to deploy and manage Elastic on Microsoft Azure

Getting started with Azure

First, log in to the Azure portal. We’ll walk through the steps required to create an Elasticsearch resource on Azure. Behind the scenes, this process will provision a marketplace subscription with Elastic Cloud.

1. Ensure your Azure account is configured with Owner access on the subscription in which you want to deploy Elasticsearch. You can read more about Azure subscriptions in the Microsoft Azure documentation.

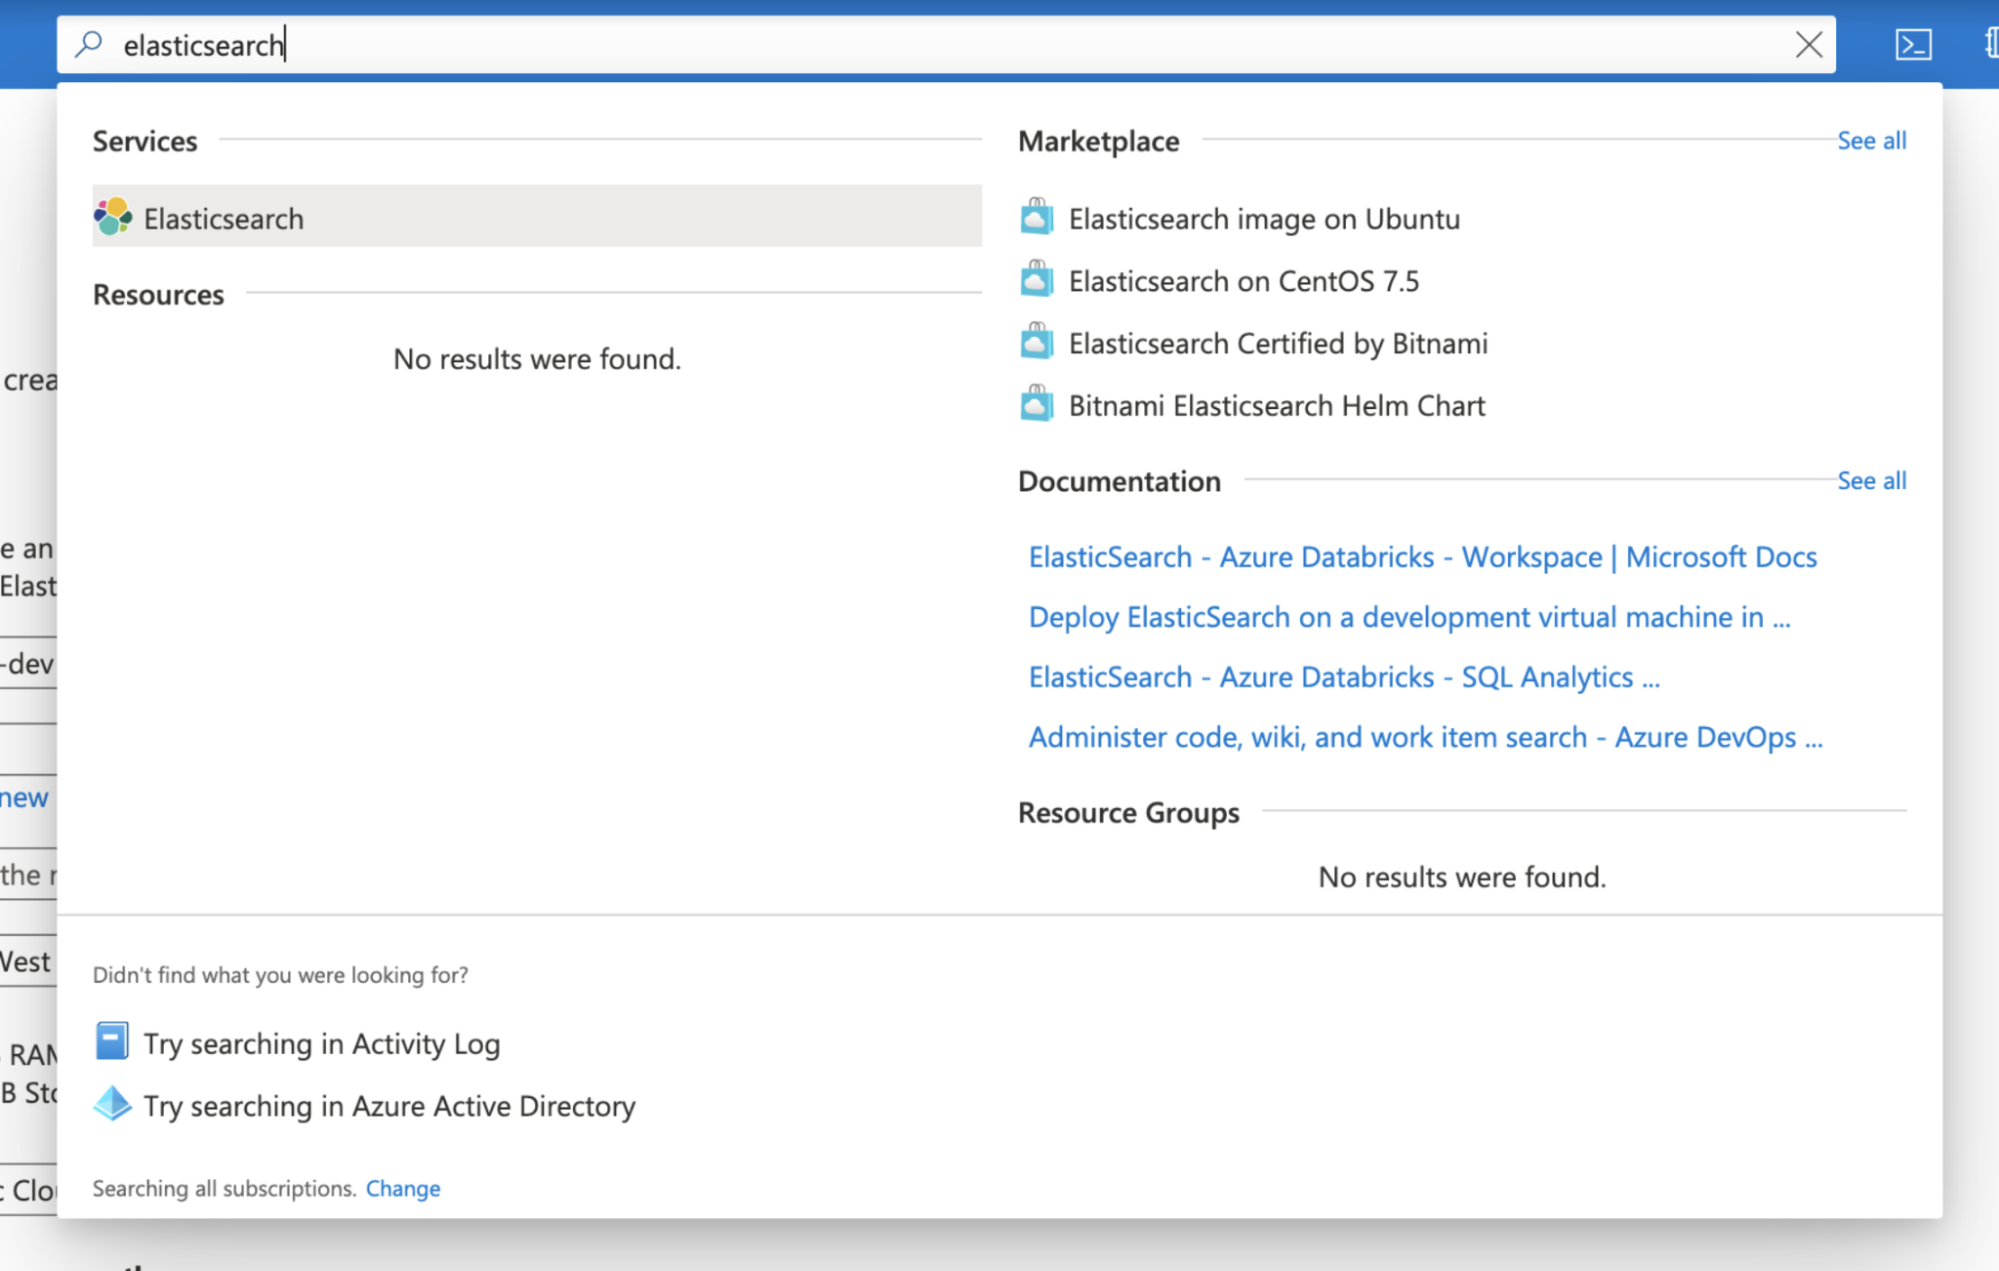
2. Search for Elasticsearchfrom the Azure search bar. Alternatively, you can access the integration from this marketplace listing.

elasticsearch azure marketplace

3. Click on Add to begin creating an Elasticsearch resource.

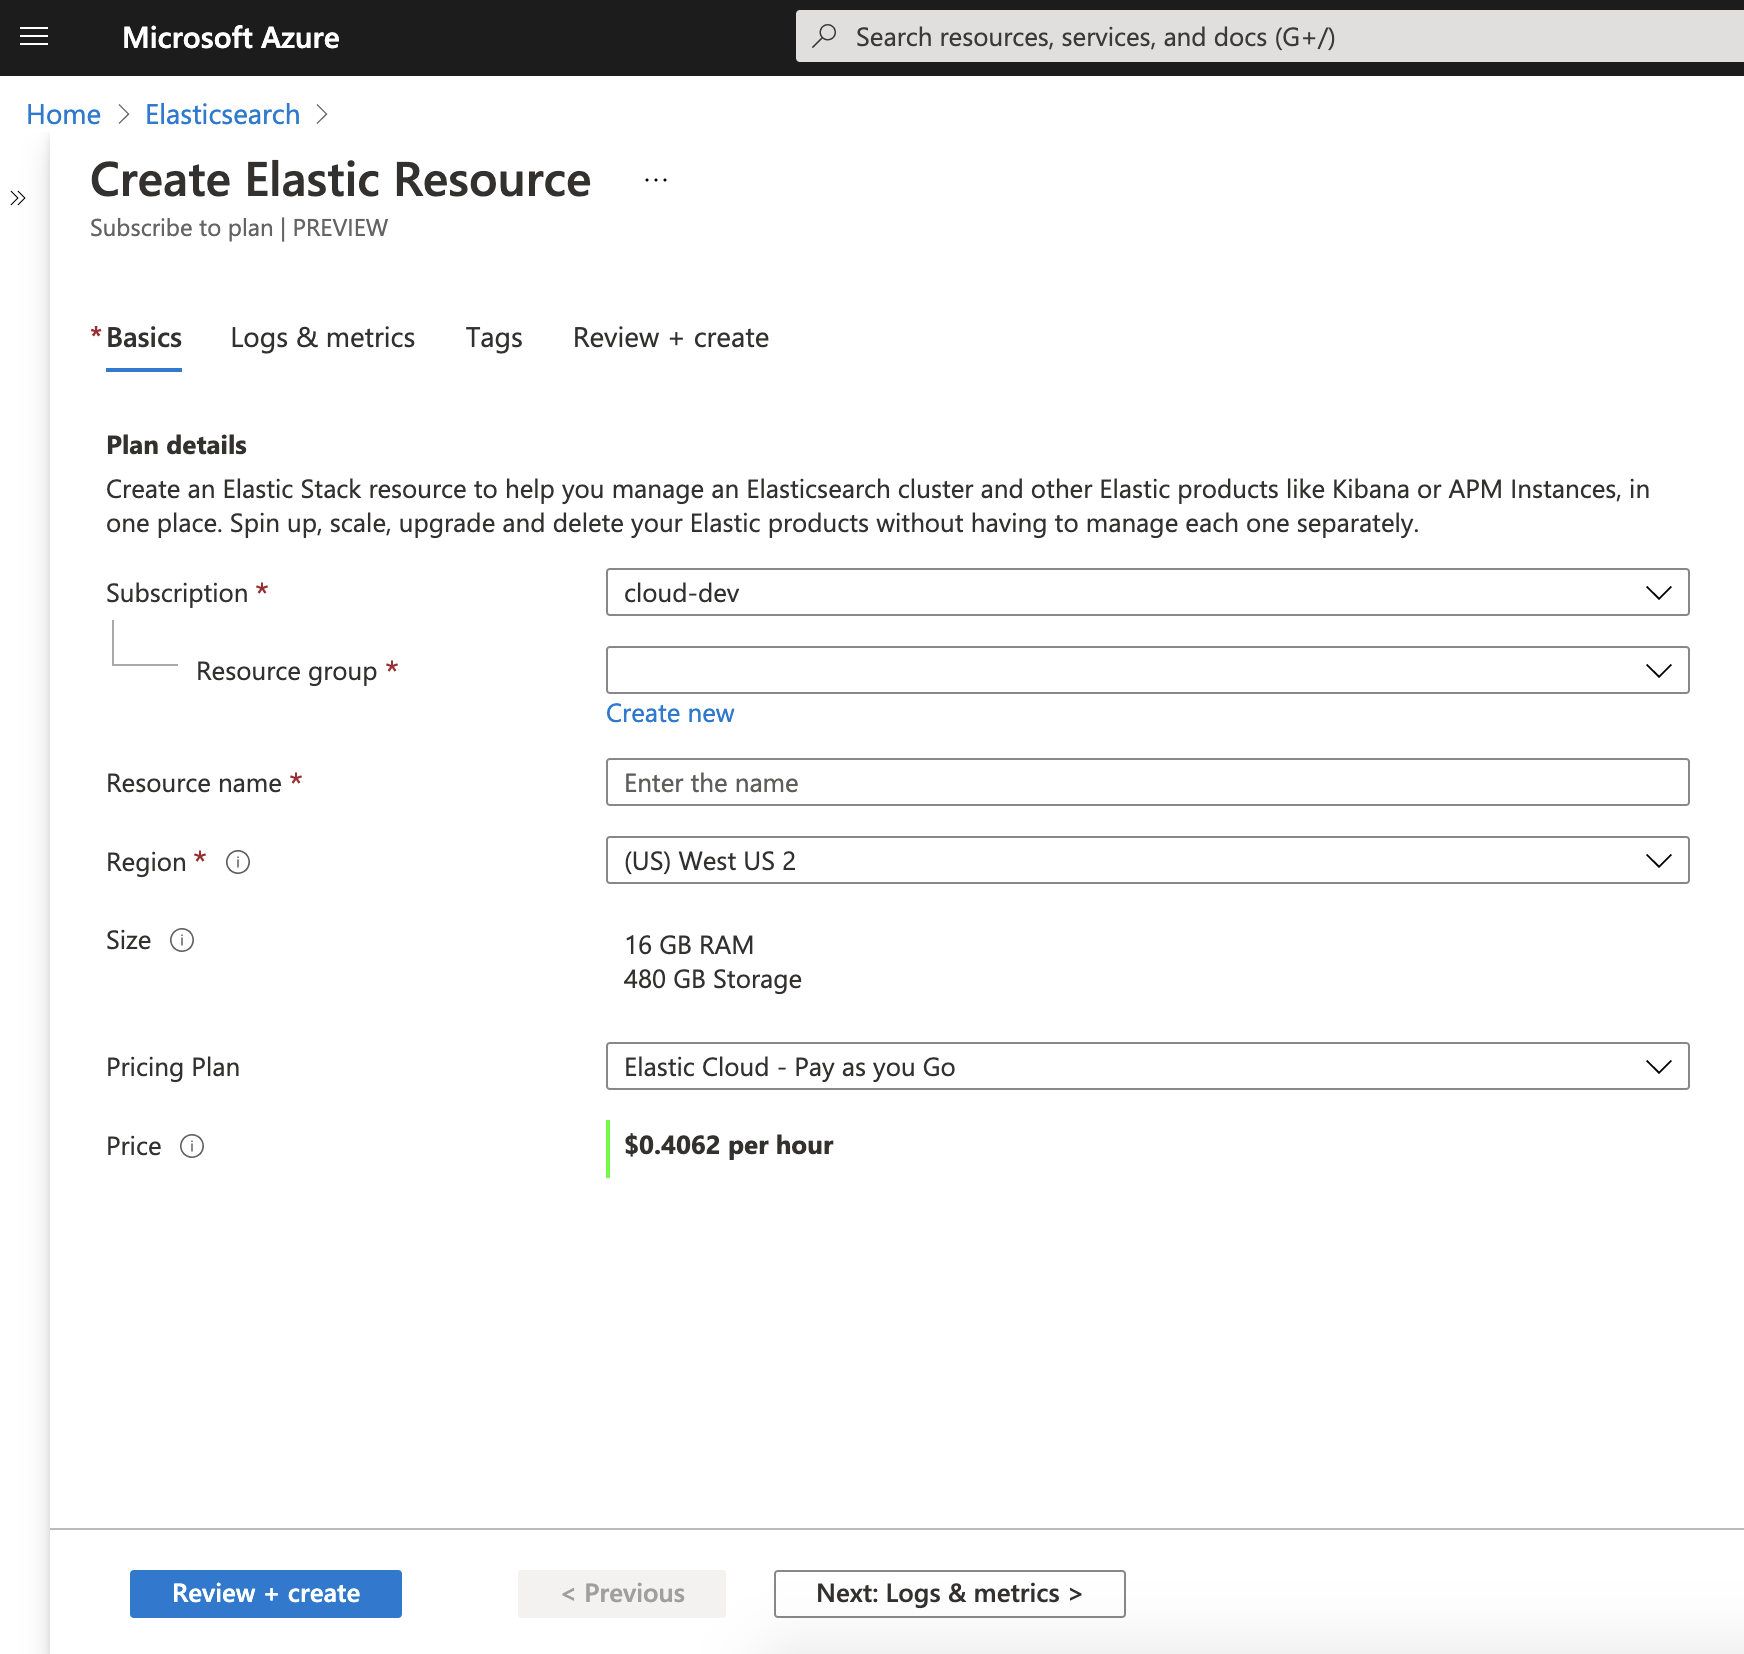
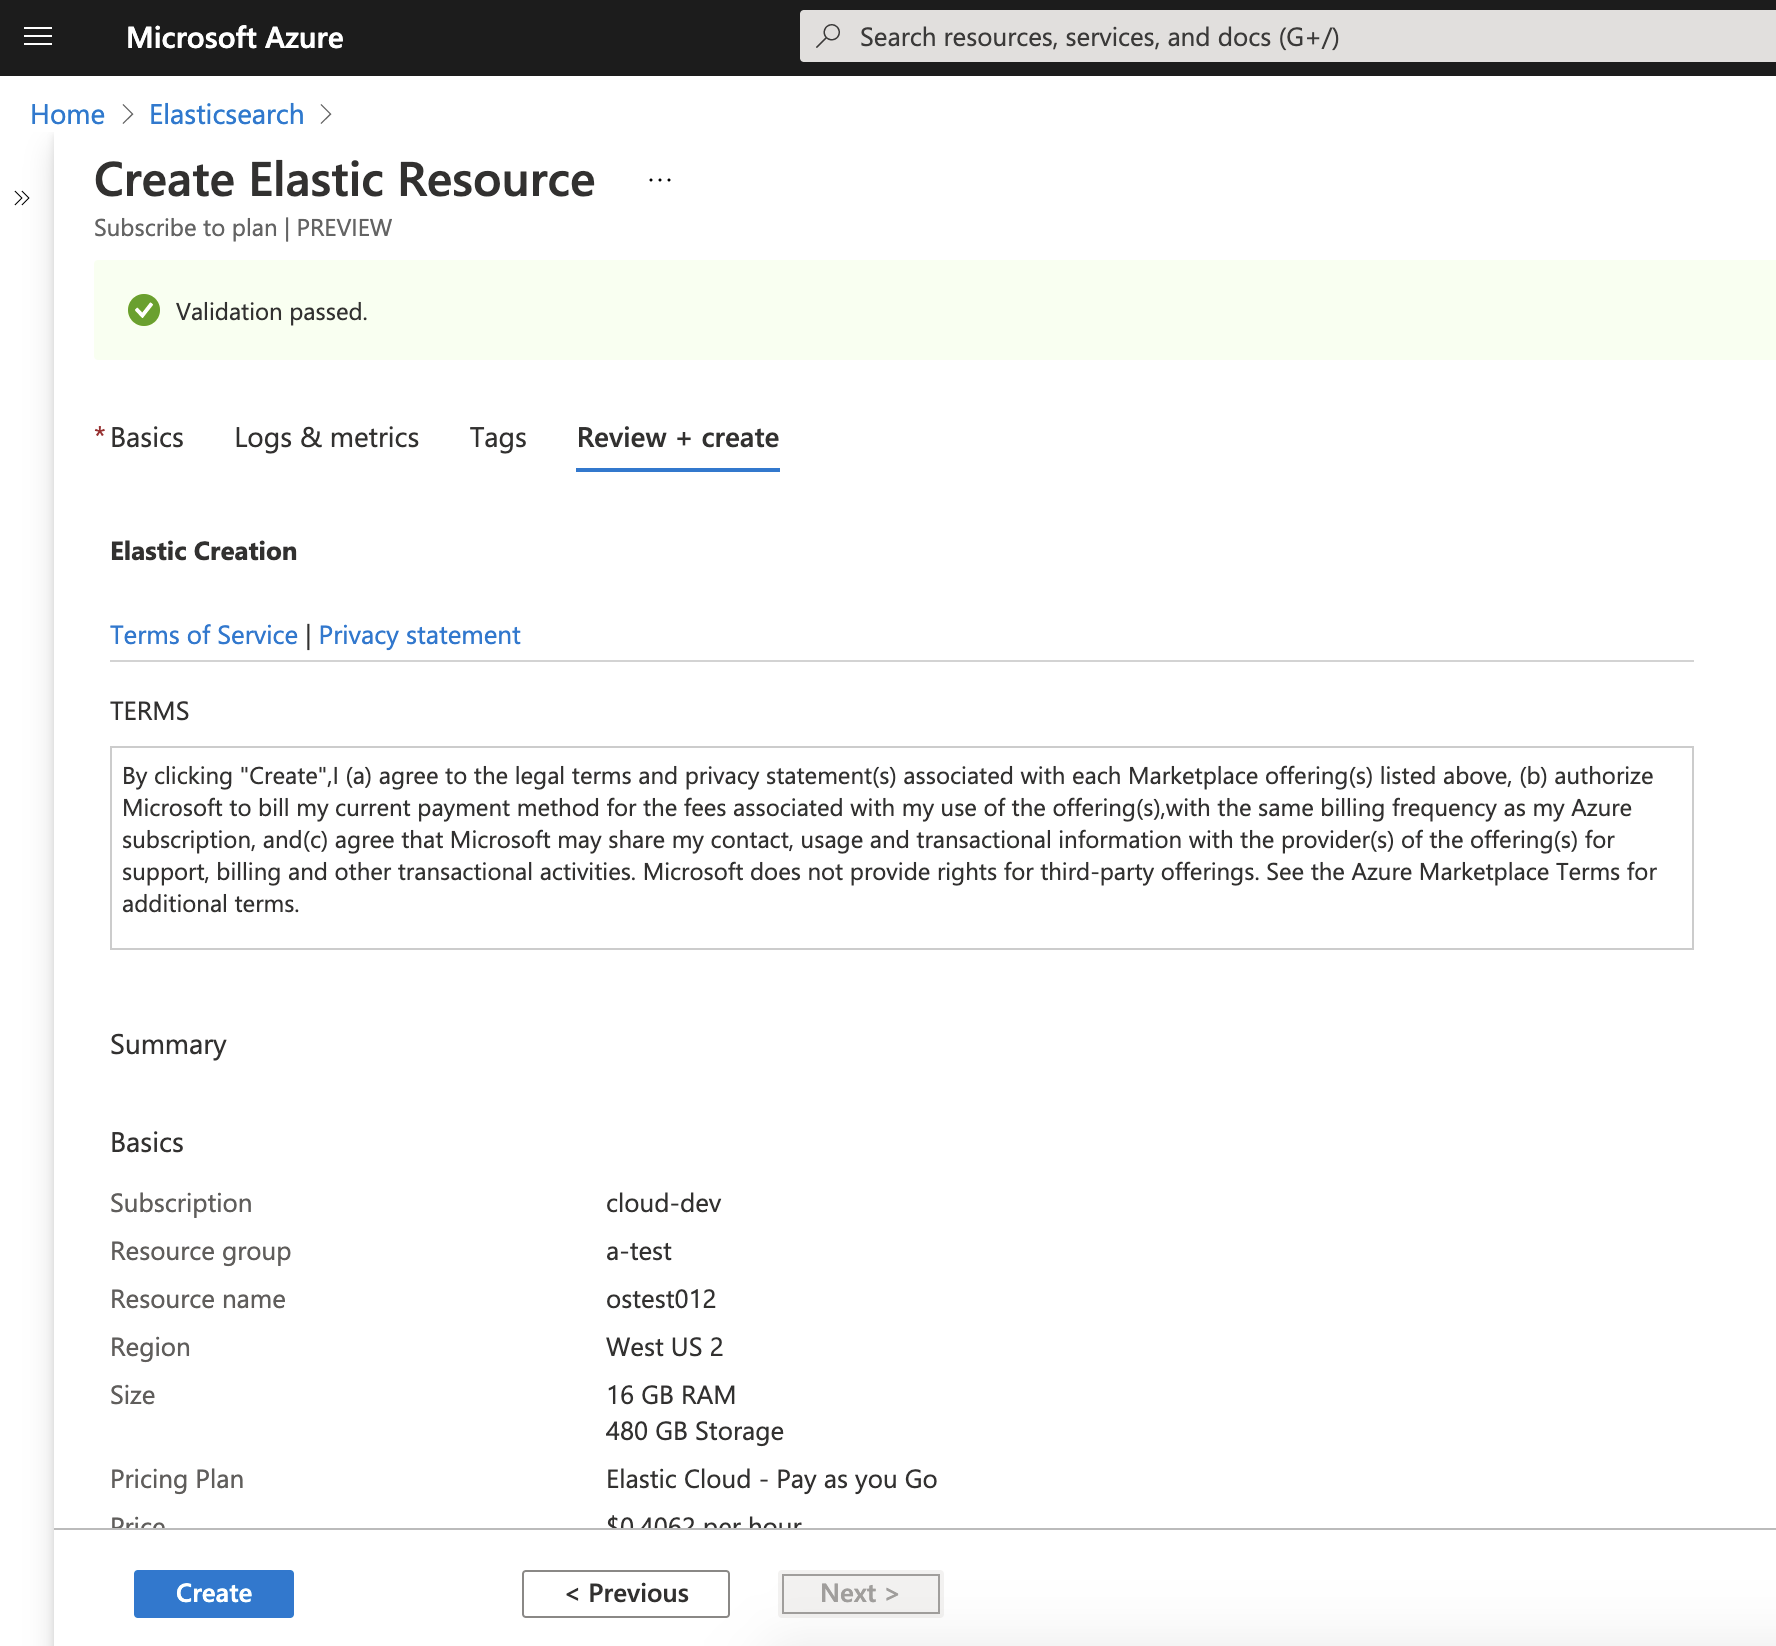
4. Enter the required resource details:

  • Subscription: The Azure subscription that this marketplace purchase will reside under
  • Resource group: A resource group is associated with the Elasticsearch resource
  • Resource name: The name of the Elasticsearch resource
  • Region: The region where Elasticsearch will be deployed (Additional Azure regions will be added over time. Check out our documentation to learn more.)
  • Version: The Elastic Stack version; defaults to the latest available version
  • Size: The size of the Elasticsearch resource (The default cluster size is 480GB of storage and 16GB of RAM. You can modify the size of the cluster after your resource has been created.)
  • Pricing plan: Elasticsearch employs pay-as-you-go pricing
  • Price: The approximate price, which is based on the region and deployment size (editable after the resource has been created) (For a full price listing, see the Elastic Cloud pricing calculator.)
create elastic resources basics

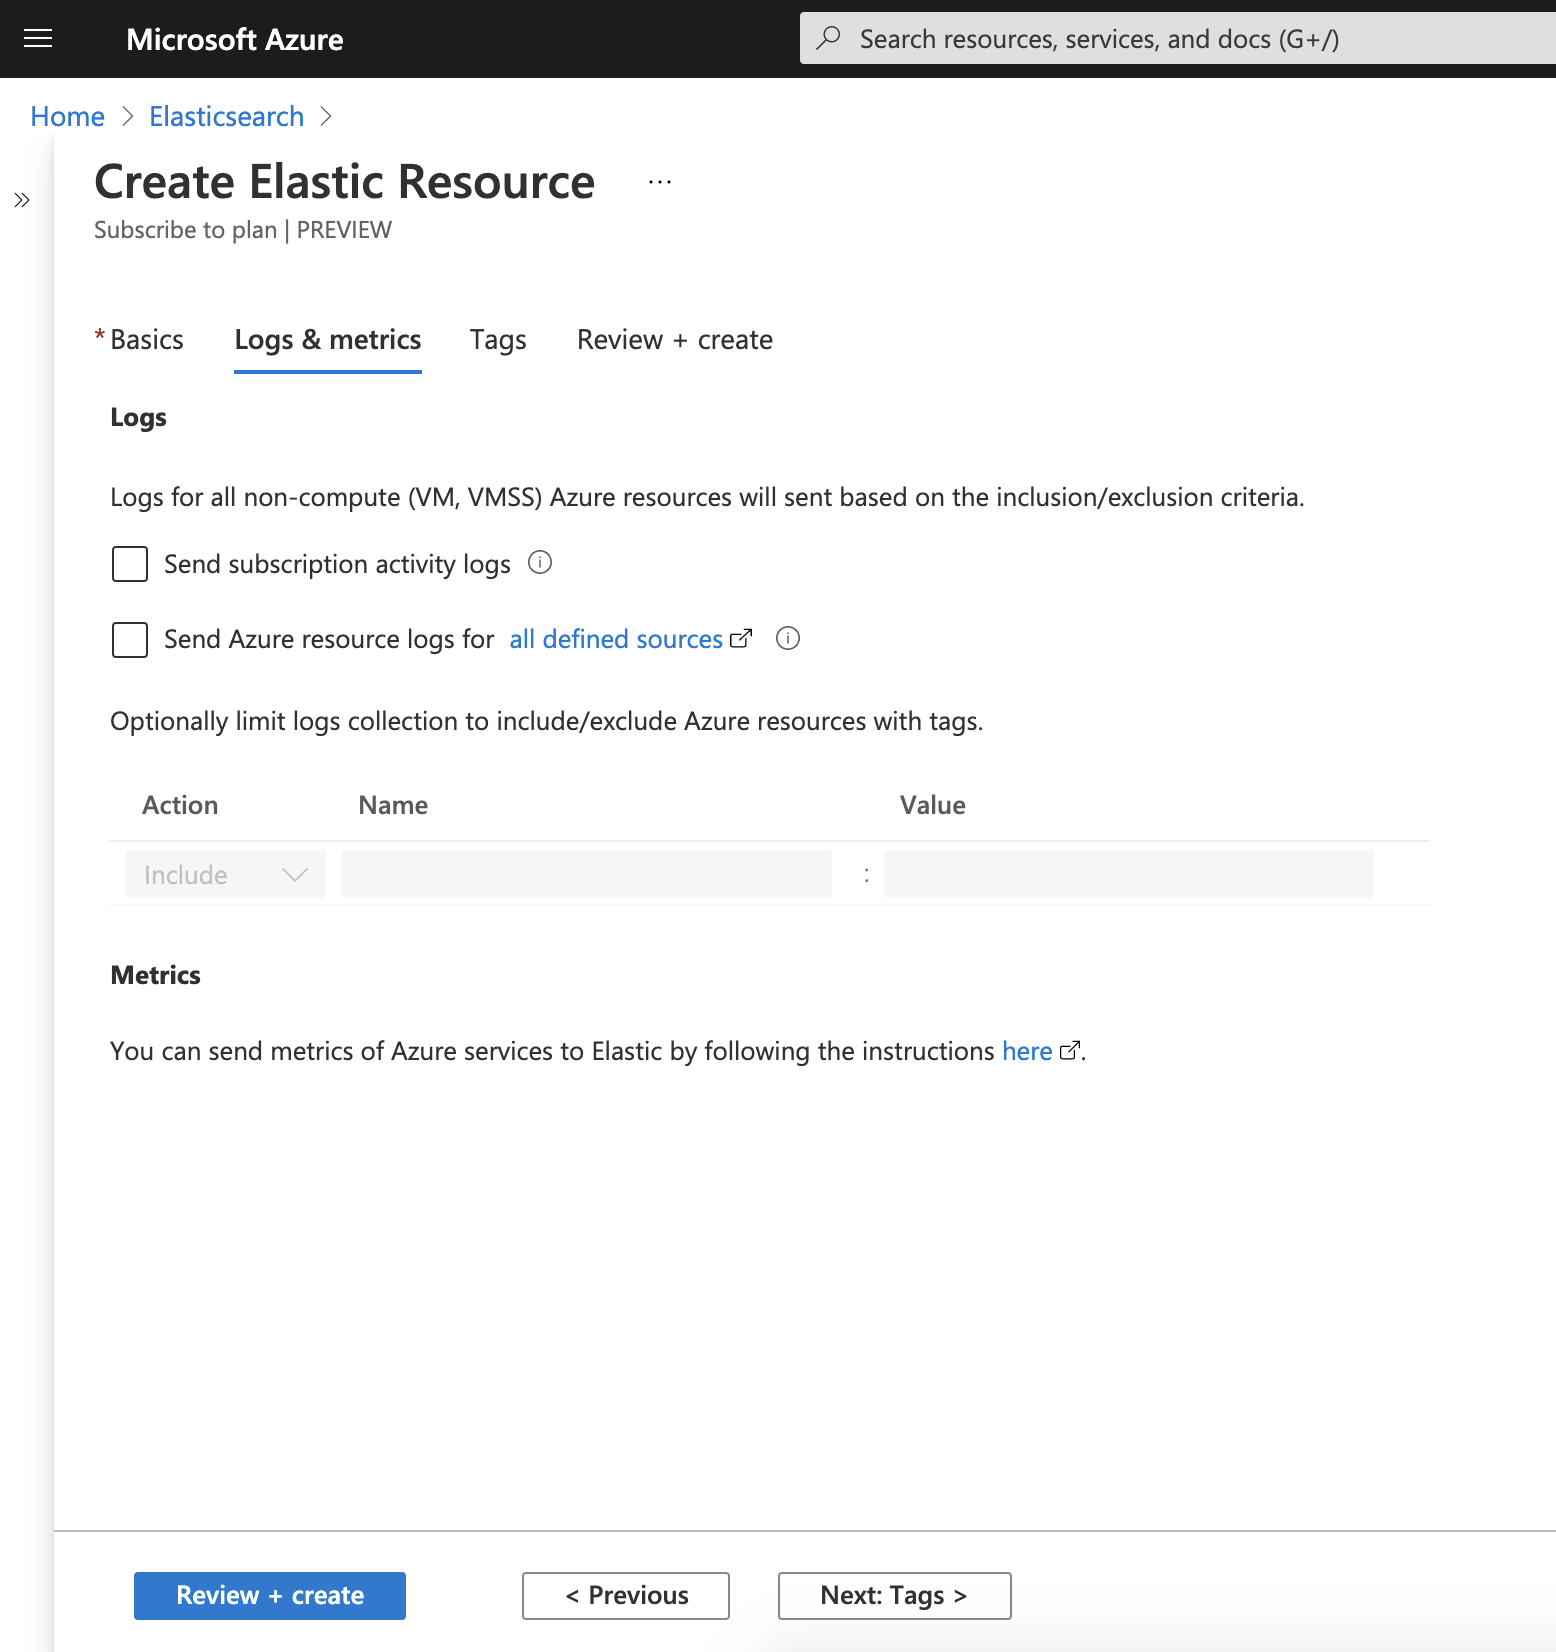
5. Configure logs and metrics. These flags enable automatic ingestion of Azure subscription activity logs and resource logs into your Elasticsearch cluster.

create elastic resource logs metrics

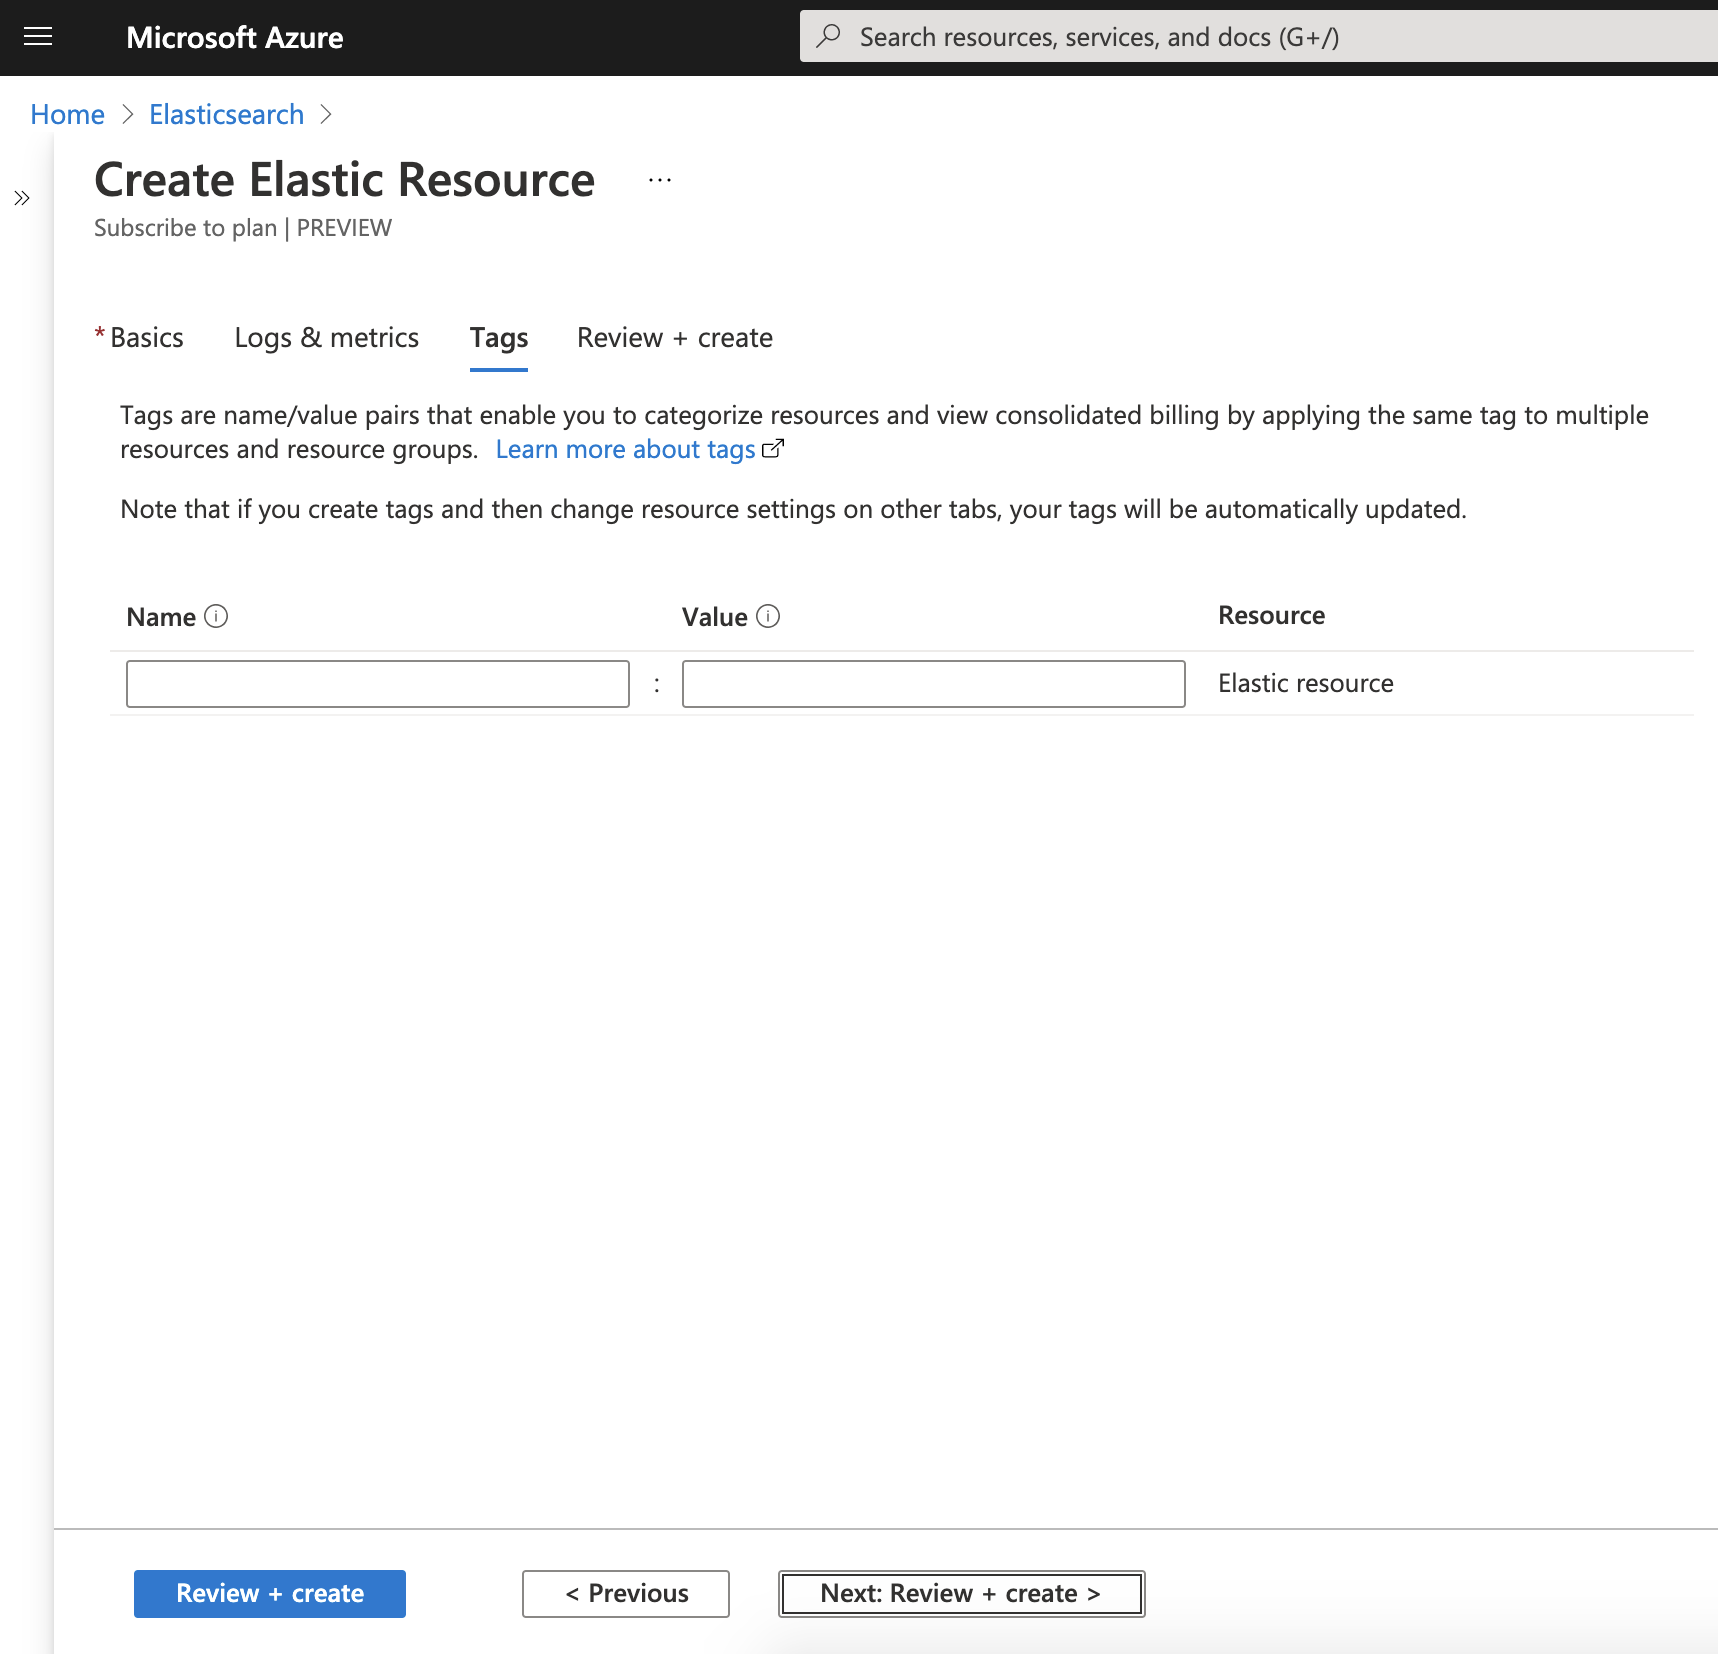
6. Specify resource tags — similar to any other Azure resource.

create elastic resource tags

7. Review your information and select Review + create. This will deploy Elasticsearch.

create elastic resource review create

Congratulations, you successfully deployed Elasticsearch from the Azure portal! Give it a few minutes and you will see the Elasticsearch resource overview page in the portal. You may also notice an Elastic subscription in your Azure account. Elasticsearch resources will also show up on your consolidated Azure bill.

Managing Elasticsearch in Azure

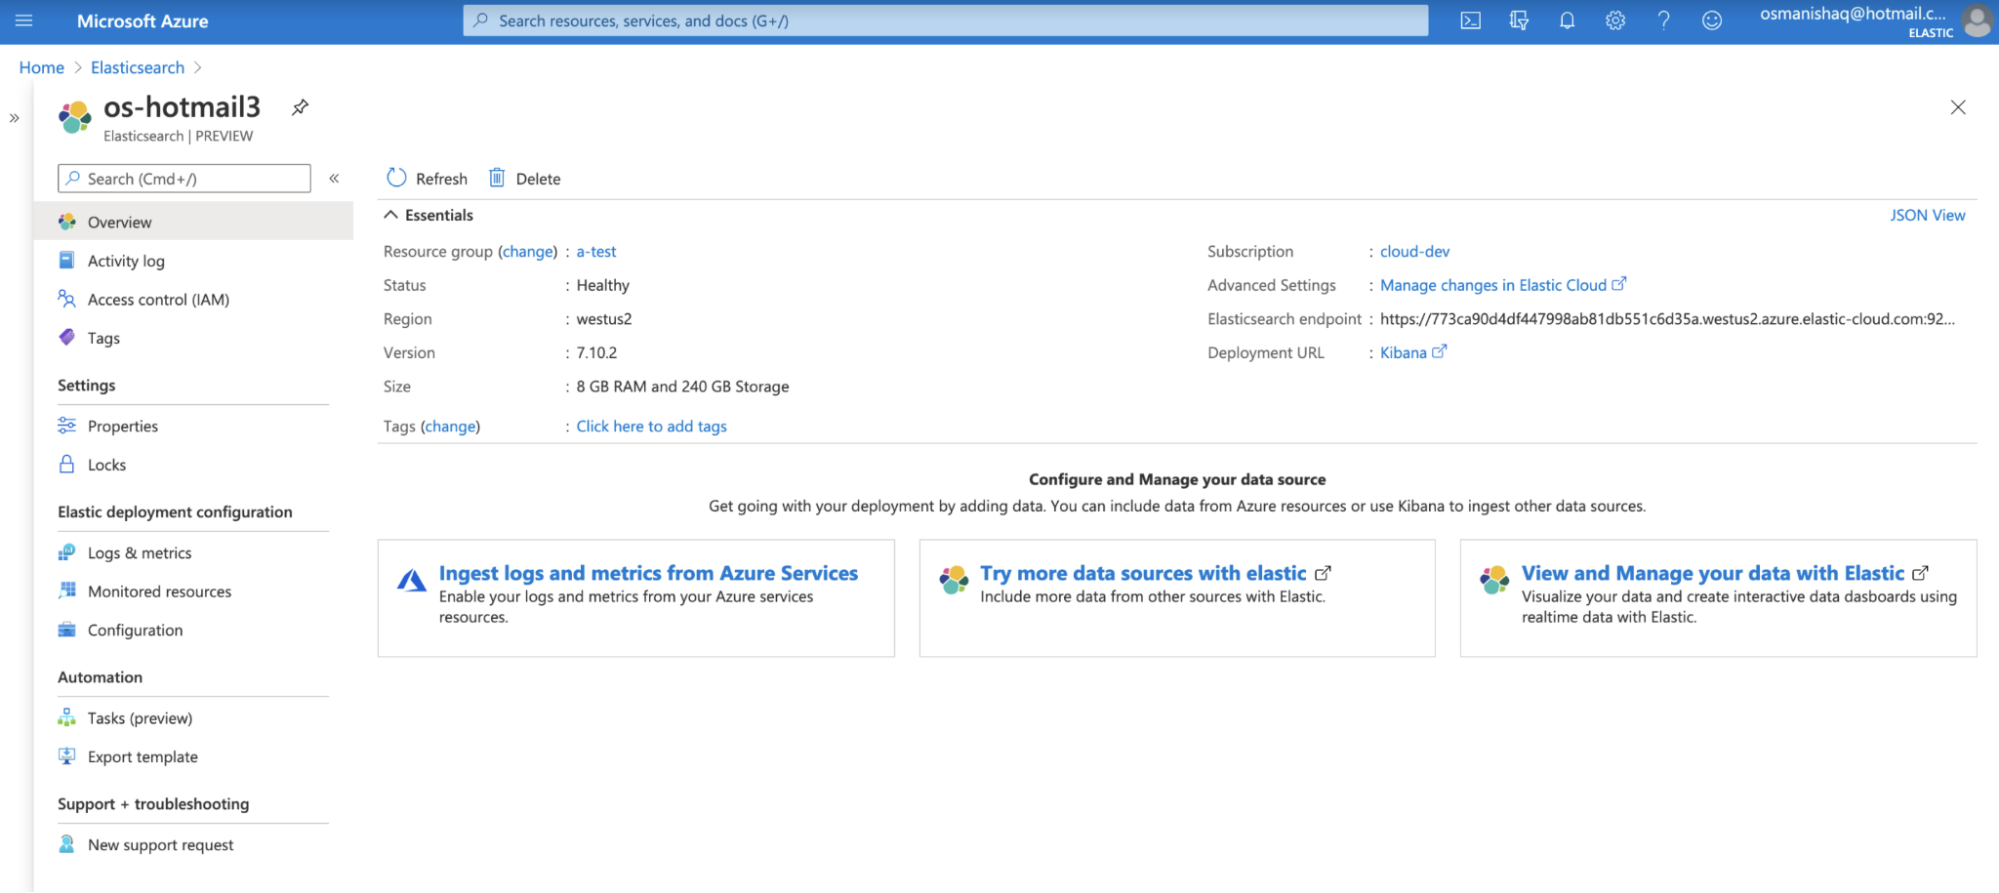
Now that your Elasticsearch resource has been provisioned, let’s take a closer look at the Elasticsearch resource overview page. You’re already familiar with fields we’ve covered above, but this page also displays a few other notable details:

  • Status: The status of the Elasticsearch resource — if your cluster is running smoothly, you will see Healthy
  • Version: The Elasticsearch version that is deployed (By default, Azure deploys the latest version available. If you are looking to deploy an older version, see Advanced settings just below.)
  • Advanced settings: A link to the Elastic Cloud console that allows you to make additional changes to your resource if you require it — the actions you can take in the Elastic Cloud console include:
    • Re-size the cluster
    • Enable autoscaling
    • Upgrade to a newer version of Elasticsearch
    • Set up a traffic filter to secure connectivity
  • Elasticsearch endpoint: The endpoint to the Elasticsearch API
  • Deployment URL: The Kibana® link that will help you get started with Elastic
azure deployment

Exploring Elastic solutions

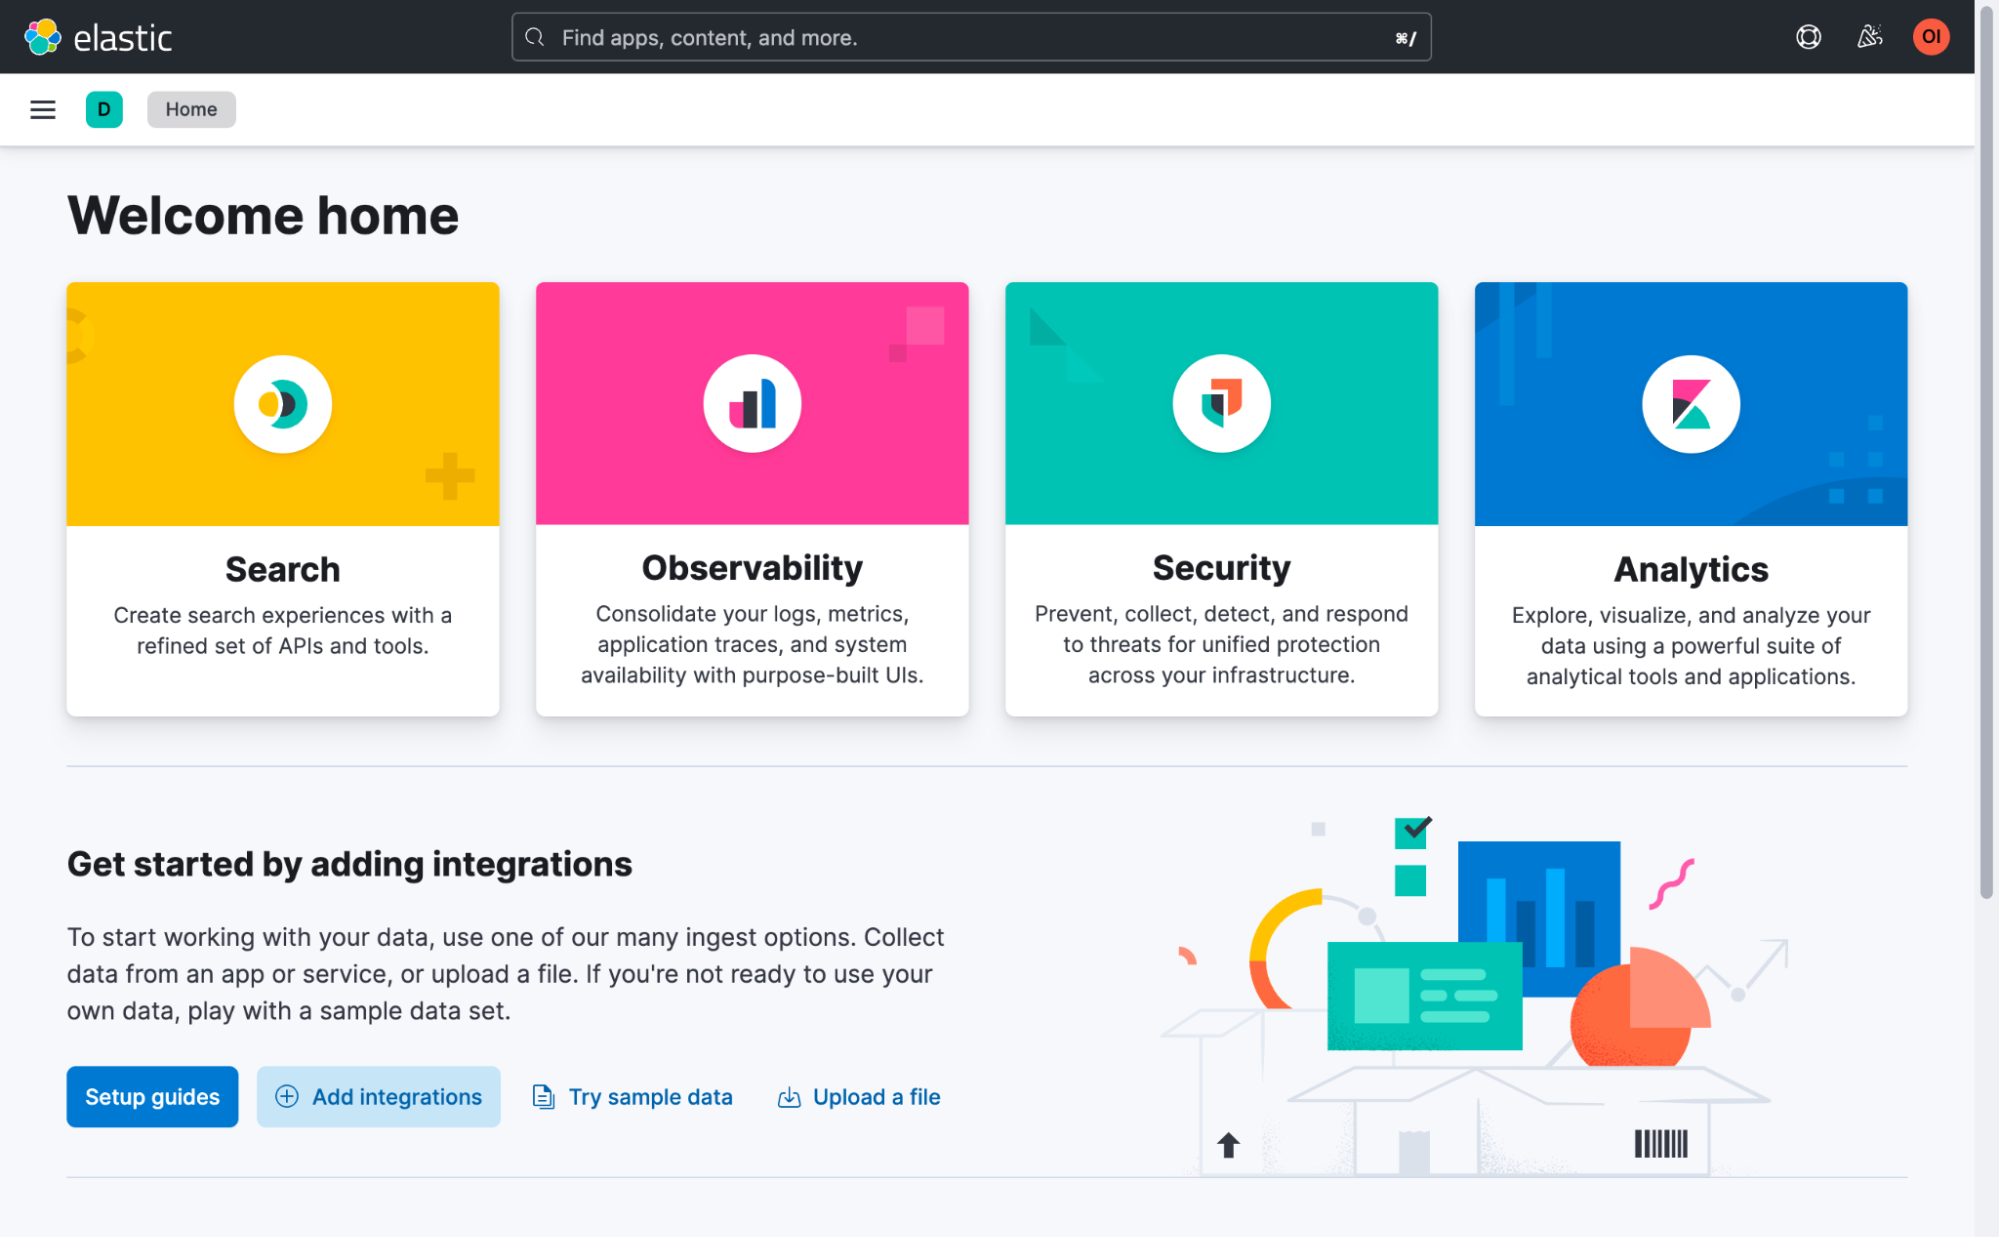
You can now explore all that Elastic has to offer for search, observability, security, and analytics use cases. To get started, click on Kibana from the Elasticsearch overview page in Azure. Select your Azure account to follow through with single sign-on directly into Elastic.

From Elastic, you can follow the in-product guides to configure an integration, ingest your data, and begin exploring your data to get meaningful insights. You can also optimize your data ingestion process by taking advantage of Fleet. Simply navigate to Fleet in the left menu and then select Integrations to view the various types of data you can ingest.

welcome home

Azure logs and metrics

The Elastic integration allows you to automate the ingestion of Azure logs and metrics into Elastic. There are two integration points:

Azure subscription and resource logs

Azure subscription logs provide insight into any subscription-level events. Azure resource logs describe the operation of those services or resources. Together, these logs provide an overview of the Azure platform to help analysts and administrators better audit activity within Azure. With this Elastic integration enhancement, these logs can easily be exported from Azure into Elastic with a few clicks, eliminating the need to manually deploy an agent or configure an ingest workload.

To get started with ingesting subscription and resource logs:

1. Navigate to the Logs & metrics tab. This can be accessed from the Create Elastic Resource flow or from an existing Elasticsearch resource from the overview page.

create elastic resource logs metrics

2. Click on the checkboxes for subscription activity logs and/or resource logs.

3. Optionally, you can specify tag rules to include or exclude specific resources from log collection. By default, if no tag rule is specified, the logs from all supported resources will be ingested.

4. Select Save (or finish creating your resource). Log data will begin to appear in Elastic shortly afterward.

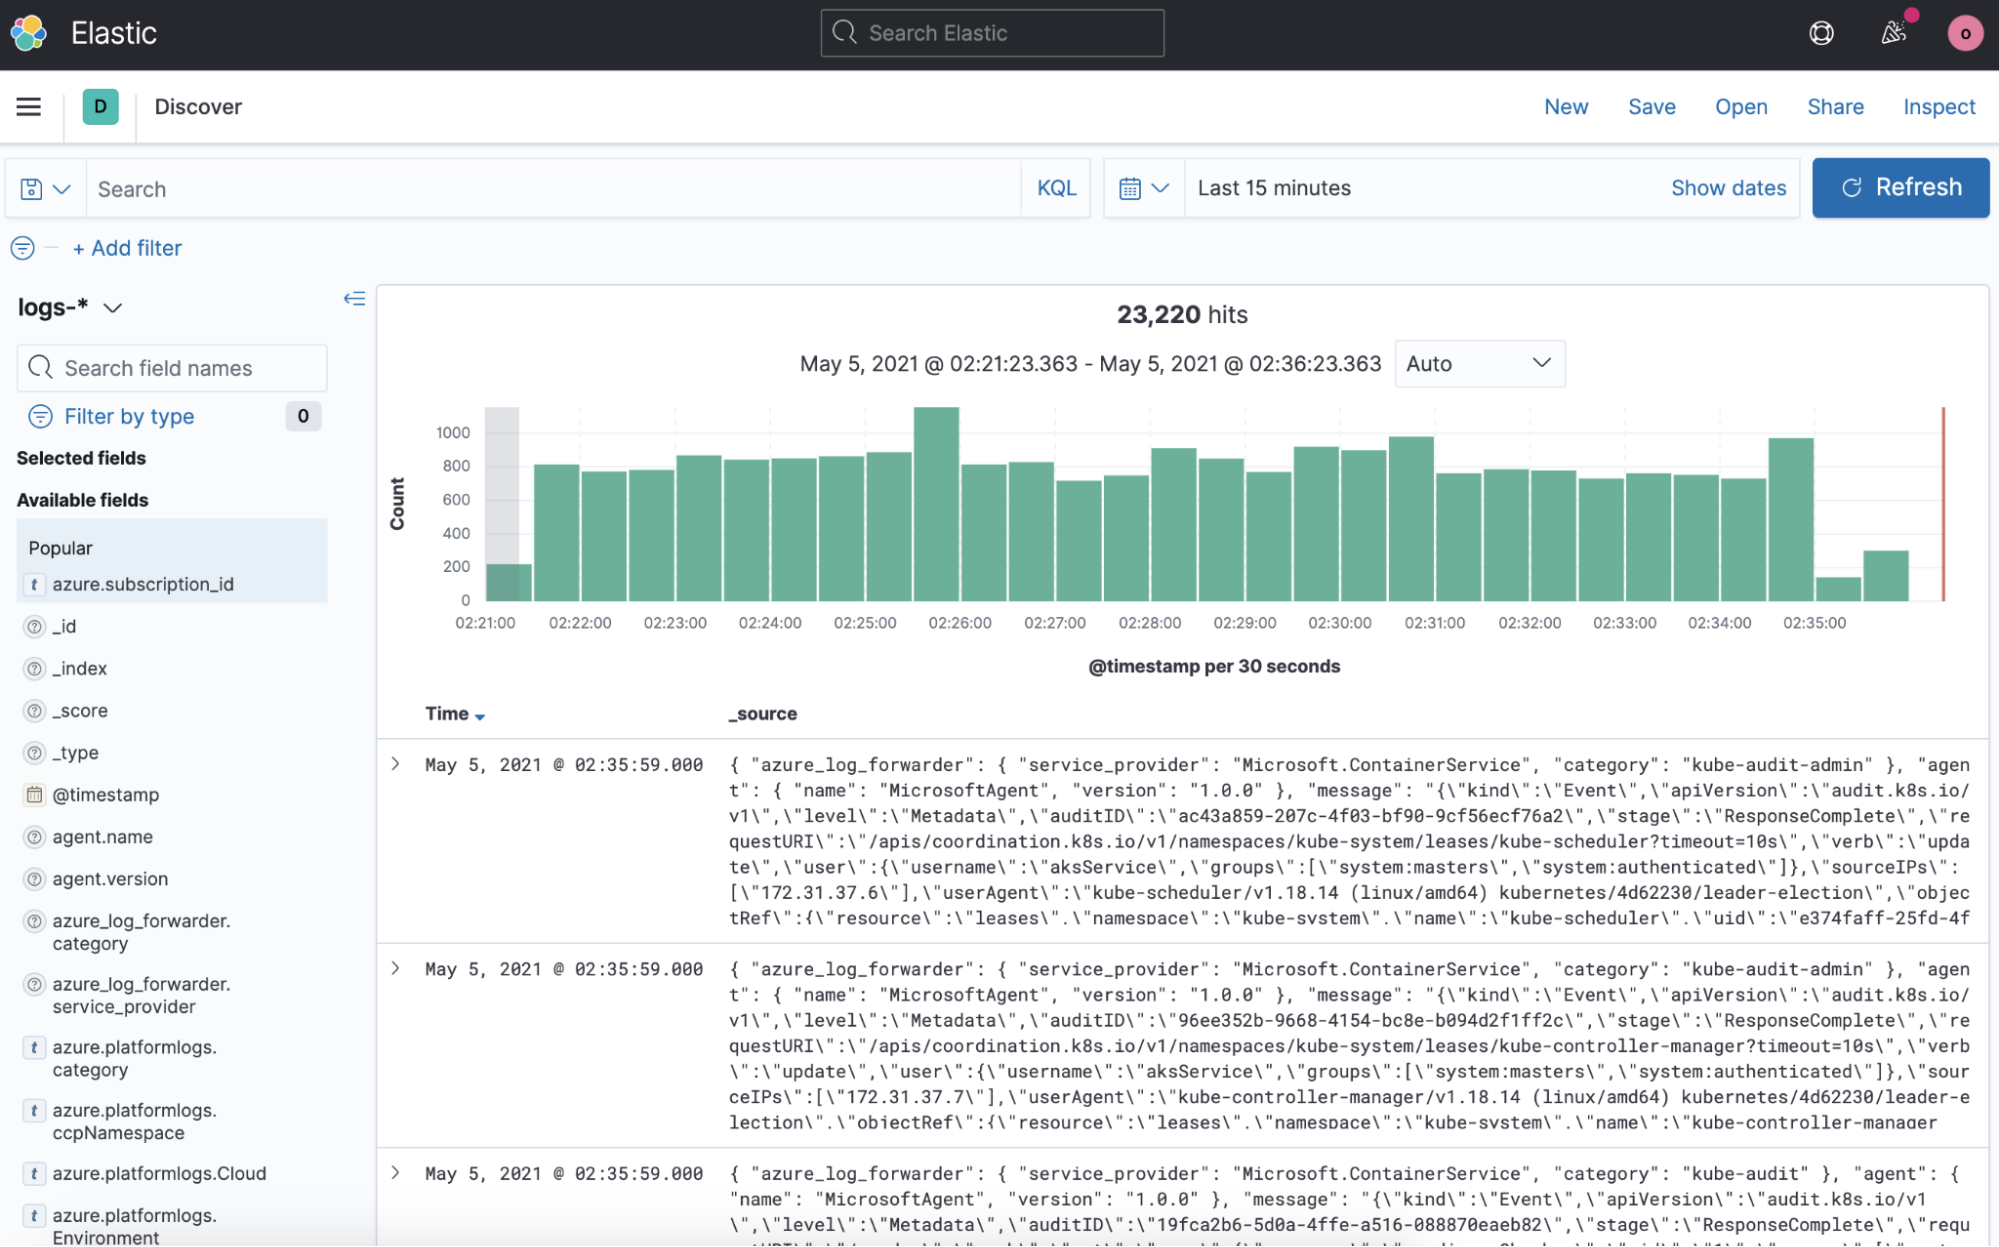
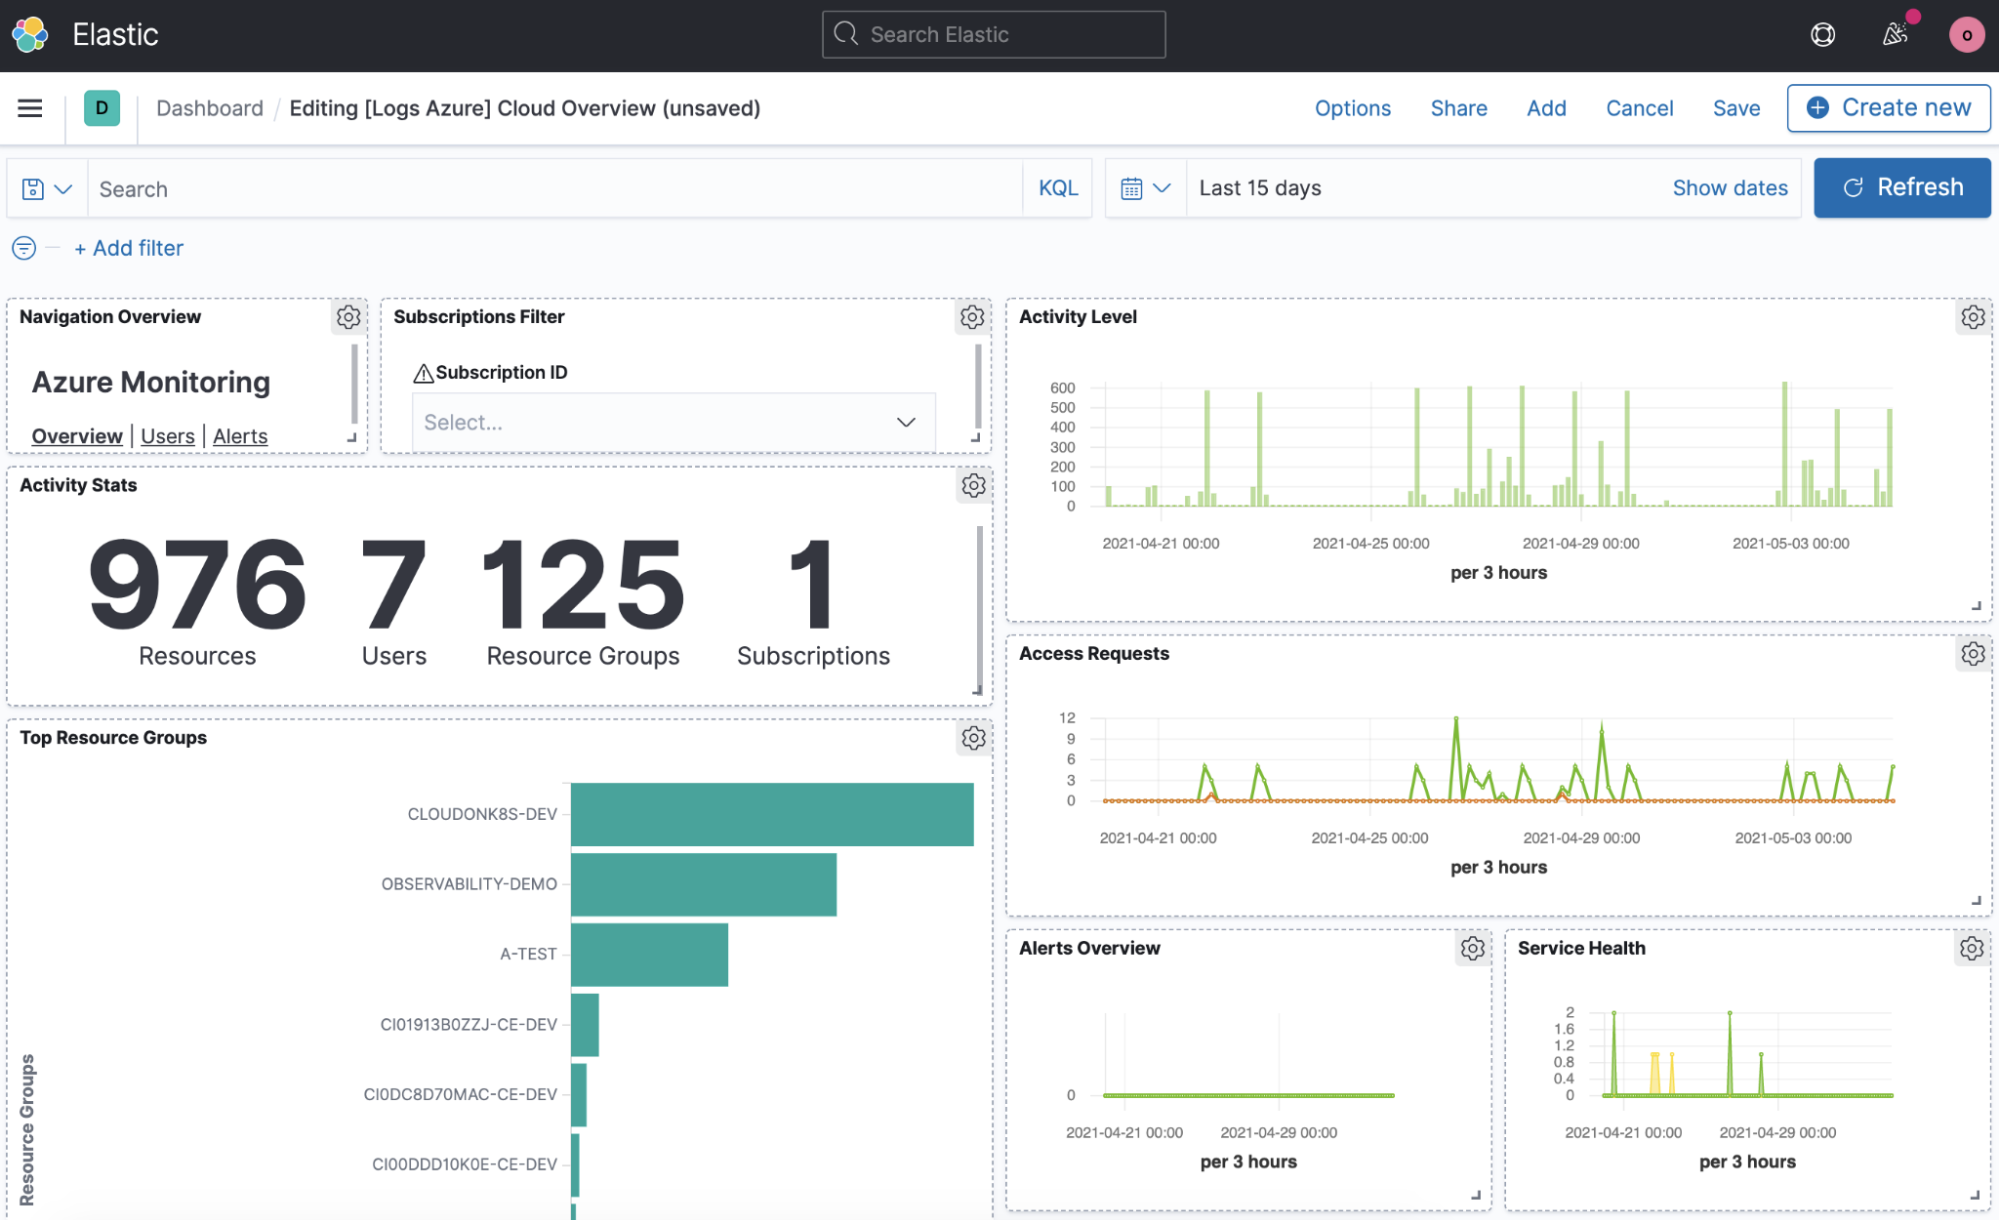
5. To view your log data, log in to Kibana, which you can access from the Elasticsearch overview page in Azure. Once in Kibana, you can view the Discover tab to view the raw log data. The Dashboard tab displays a few out-of-the-box dashboards preconfigured for Azure data.

dashboard tab
dashboard numbers

Note that log collection from this integration is dependent on whether the Azure service is supported and the regions in which the Azure service is deployed. See our documentation for more details.

Virtual machine logs and metrics

The system logs from your virtual machines can easily be sent over to Elastic for deeper analysis. From Elastic you can search, visualize, get alerted, and troubleshoot on your virtual machine data.

To get started:

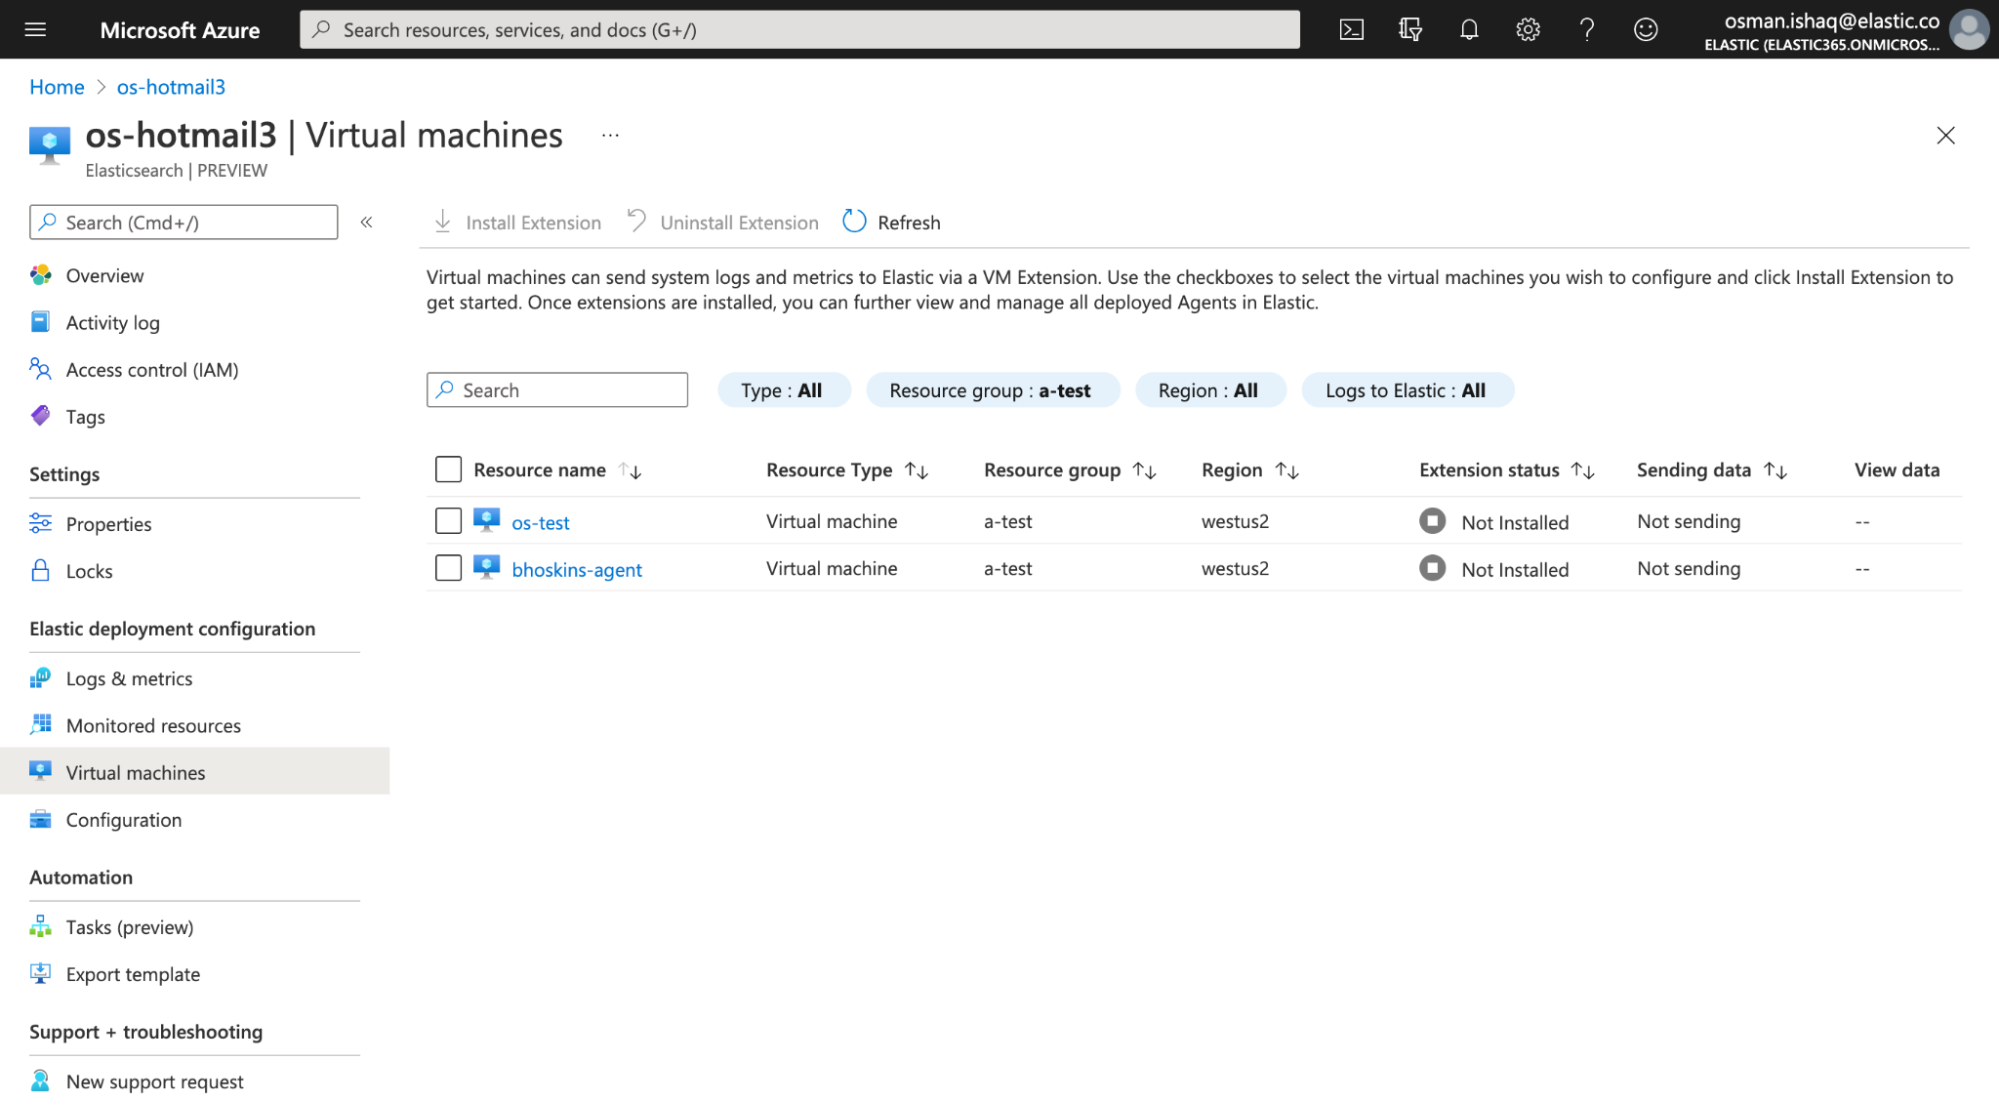
1. Navigate to the Virtual machines tab for your Elastic resource.

virtual machines azure

2. Select the virtual machine(s) you want to monitor and click Install Extension. This action will install the Elastic VM Extension on your virtual machine, which will deploy the Elastic Agent to collect system logs and metrics.

3. Once the extension is installed, logs and metrics will start flowing into Elastic. Under the View data column, you can find two quick links that will link you to Elastic so you can view your data:

  • Logs: This will link you to the Logs Stream in Elastic so you can view and search your log data.
  • Metrics: This will link you to a prefiltered dashboard that provides an overview of the health of your virtual machine.

4. You can further manage Elastic Agents, and the data they collect, directly within Elastic using Fleet.

Now that your platform logs and virtual machine data is in Elastic, explore what Elastic has to offer:

Consolidated billing

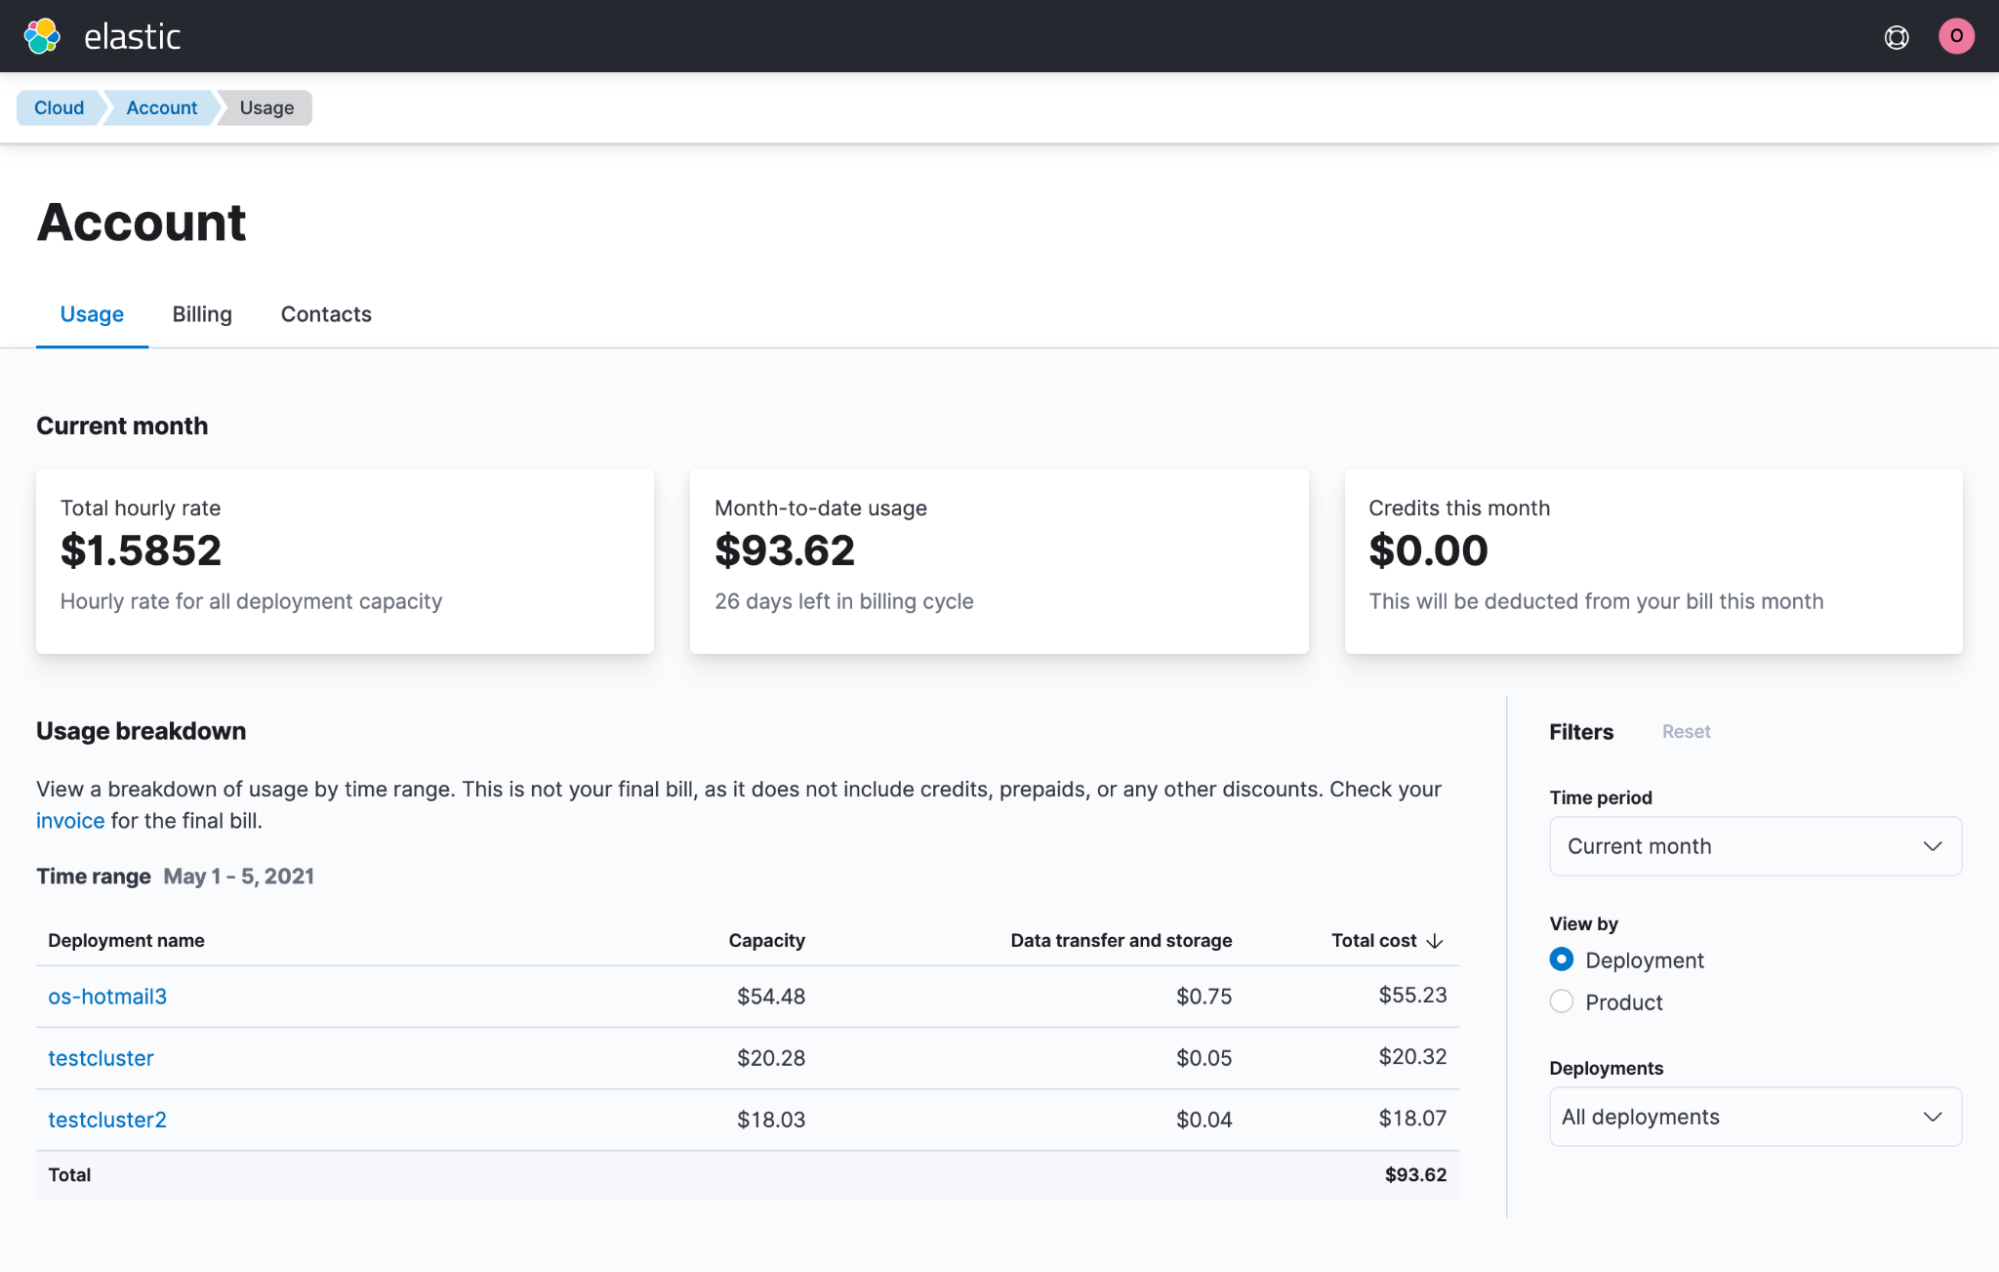
All of your Elastic usage will appear as a line item on your consolidated Microsoft invoice and will accrue toward your Azure spending commitment. You can explore your Elastic usage fees by region and deployment from the Elastic Cost Analysis page.

account billing

How to get support

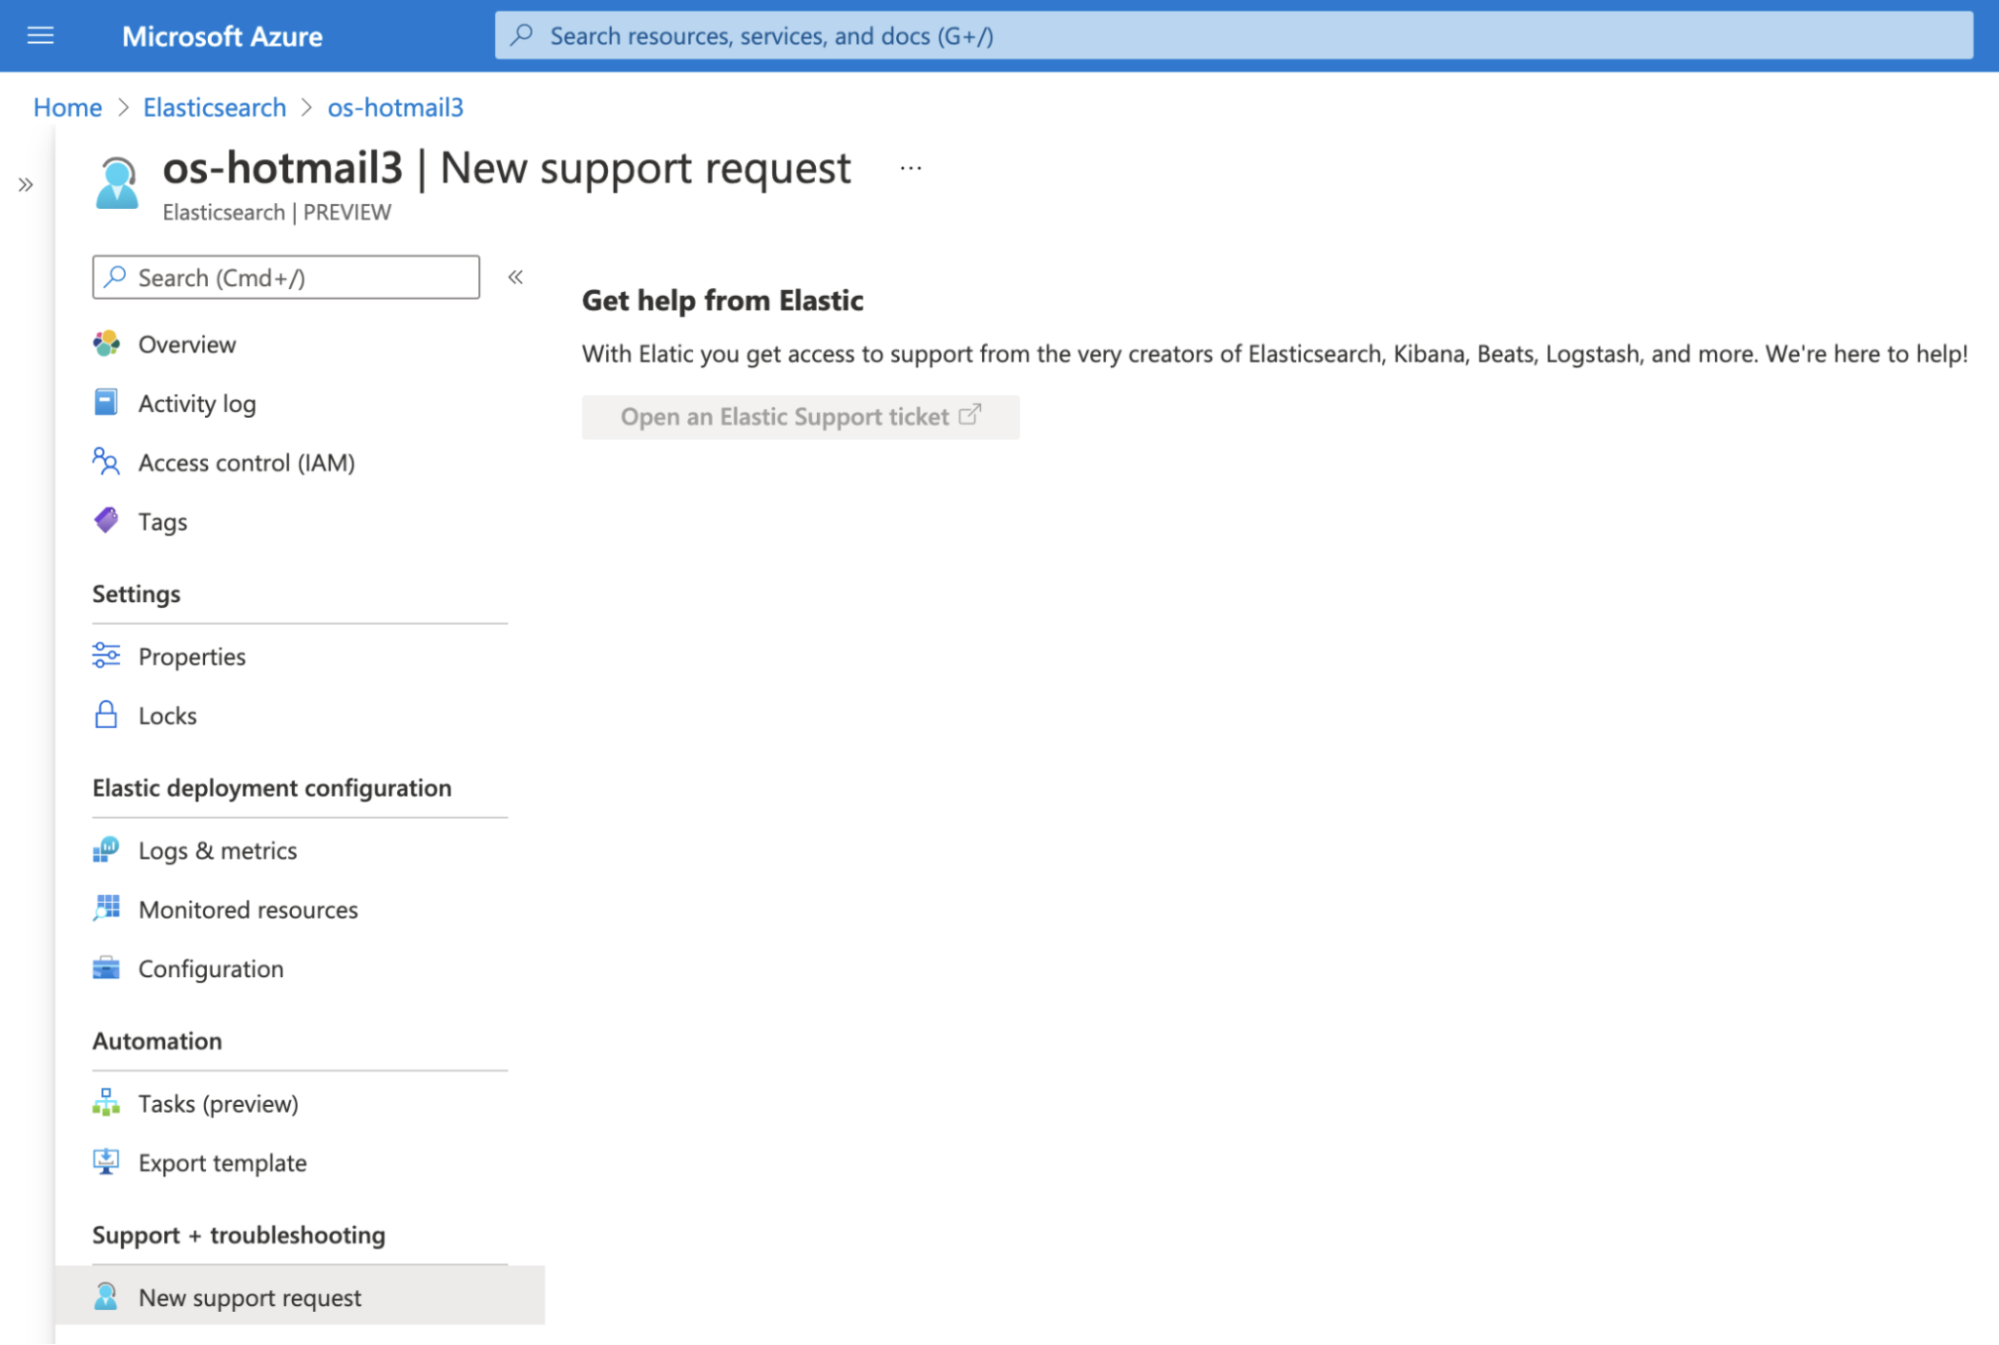
Support for this integration is provided by Elastic. We're here to help, and you can reach out to us from the Azure portal by clicking on New support request from the Elasticsearch resource overview. This will bring you to the Elastic Cloud console, where you can create a support case for the Elastic Support team.

new support request

Tuesday, 30 July 2024

New Datadog integration with Azure offers a seamless configuration experience

New Datadog integration with Azure offers a seamless configuration experience

Microsoft Azure enables customers to migrate and modernize their applications to run in the cloud, in coordination with many partner solutions. One such partner is Datadog, which provides observability and security tools for users to understand the health and performance of their applications across hybrid and multi-cloud environments. But configuring the necessary integrations often requires navigating between the Azure portal and Datadog.

This adds complexity, takes time, and makes it difficult to troubleshoot if things aren’t working. To reduce the burden of managing across multiple portals, we worked with Datadog to create an integrated Datadog solution on the Azure cloud platform. Available via the Azure Marketplace, this solution provides a seamless experience for using the Datadog’s cloud monitoring solution in Azure.

“The Microsoft cloud is the first to enable a seamless configuration and management experience for customers using third-party solutions like Datadog. With Datadog, customers are empowered to use this experience to monitor their Azure workloads and enable an accelerated transition to the cloud.”—Corey Sanders, Corporate Vice President, Microsoft Solutions

With the new Azure integration with Datadog, organizations can now fully map their legacy and cloud-based systems, monitoring real-time data during every phase of the cloud transition, and ensure that migrated applications meet performance targets. This integration combines Azure’s global presence, flexibility, security, and compliance with Datadog’s logging and monitoring capabilities to create the best experience for enterprises.

Through this unified experience, customers will be able to:

  • Provision a new Datadog organization and configure their Azure resources to send logs and metrics to Datadog—a fully managed setup with no infrastructure for customers to setup and operate.
  • Seamlessly send logs and metrics to Datadog. The log-forwarding process has been completely automated; rather than building out a log-forwarding pipeline with Diagnostic Settings, Event Hubs, and Functions, you can configure everything with just a few clicks.
  • Easily install the Datadog agent on VM hosts and App Services through a single-click.
  • Streamline single-sign on (SSO) to Datadog—a separate sign in from the Datadog portal is no longer required.
  • Get unified billing for the Datadog service through Azure subscription invoicing.

“Observability is a key capability for any successful cloud migration. Through our new partnership with Microsoft Azure, customers will now have access to the Datadog platform directly in the Azure console, enabling them to migrate, optimize and secure new and migrated workloads.”—Amit Agarwal, Chief Product Officer, Datadog

Here’s a quick look at this integrated experience:

Acquire and setup the Datadog solution

Now let’s follow the step-by-step process to acquire and setup the Datadog solution:

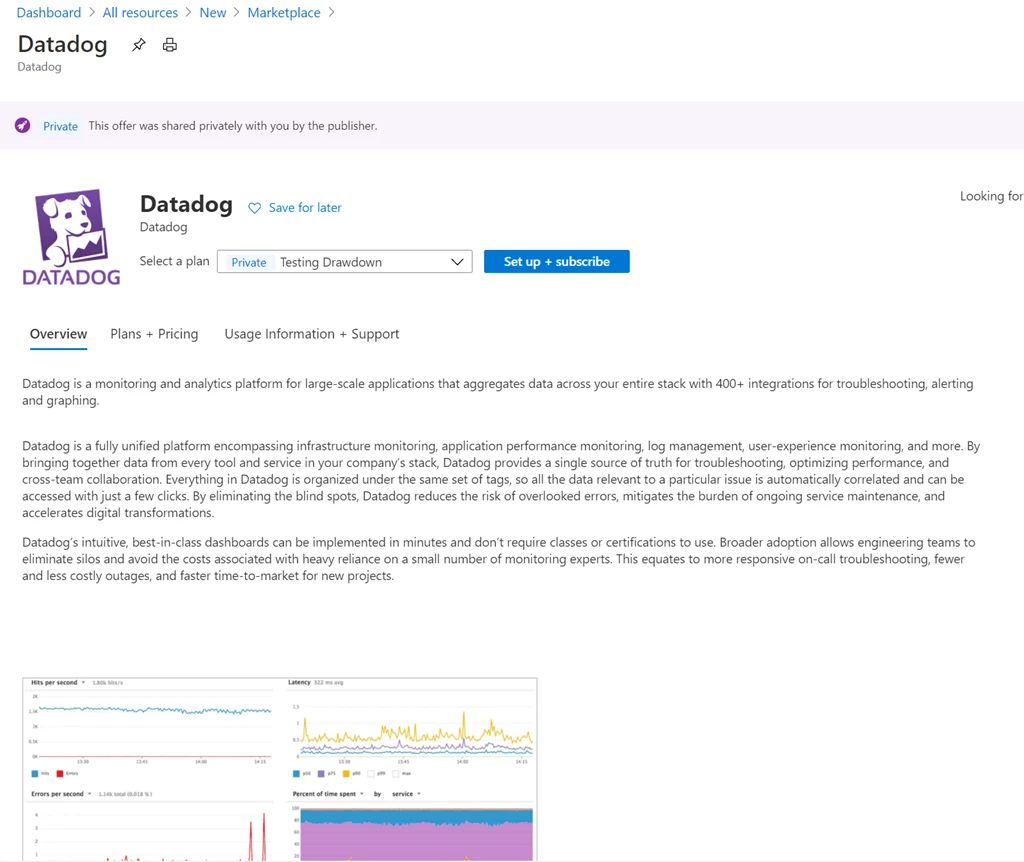
Procuring the Datadog app: Azure customers can procure the Datadog app through the Azure Marketplace.

Datadog app on marketplace 1

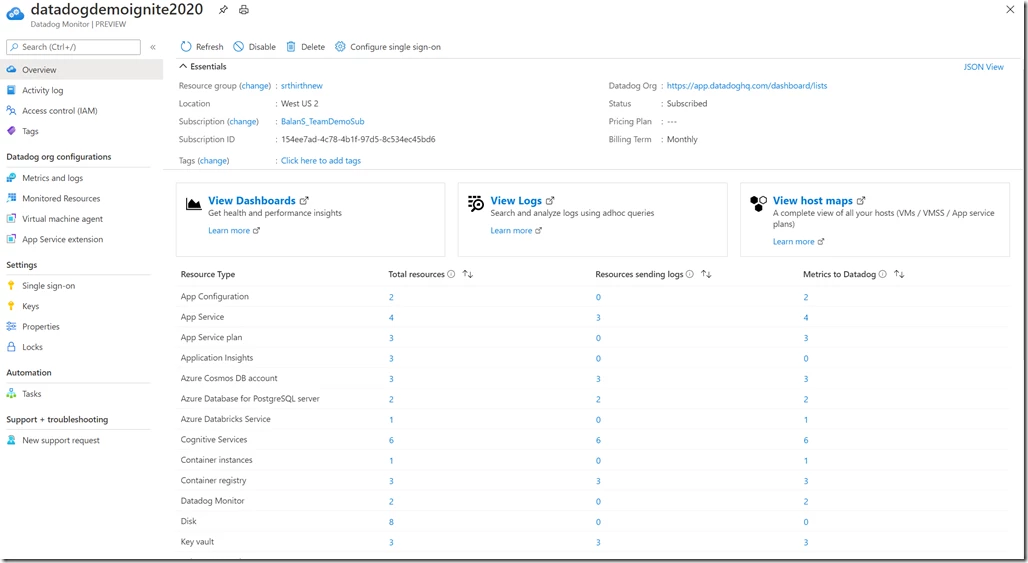
Provisioning in the Azure portal: After procuring in Azure Marketplace, customers can seamlessly provision Datadog as an integrated service on Azure via the Azure portal.

Datadog overview page

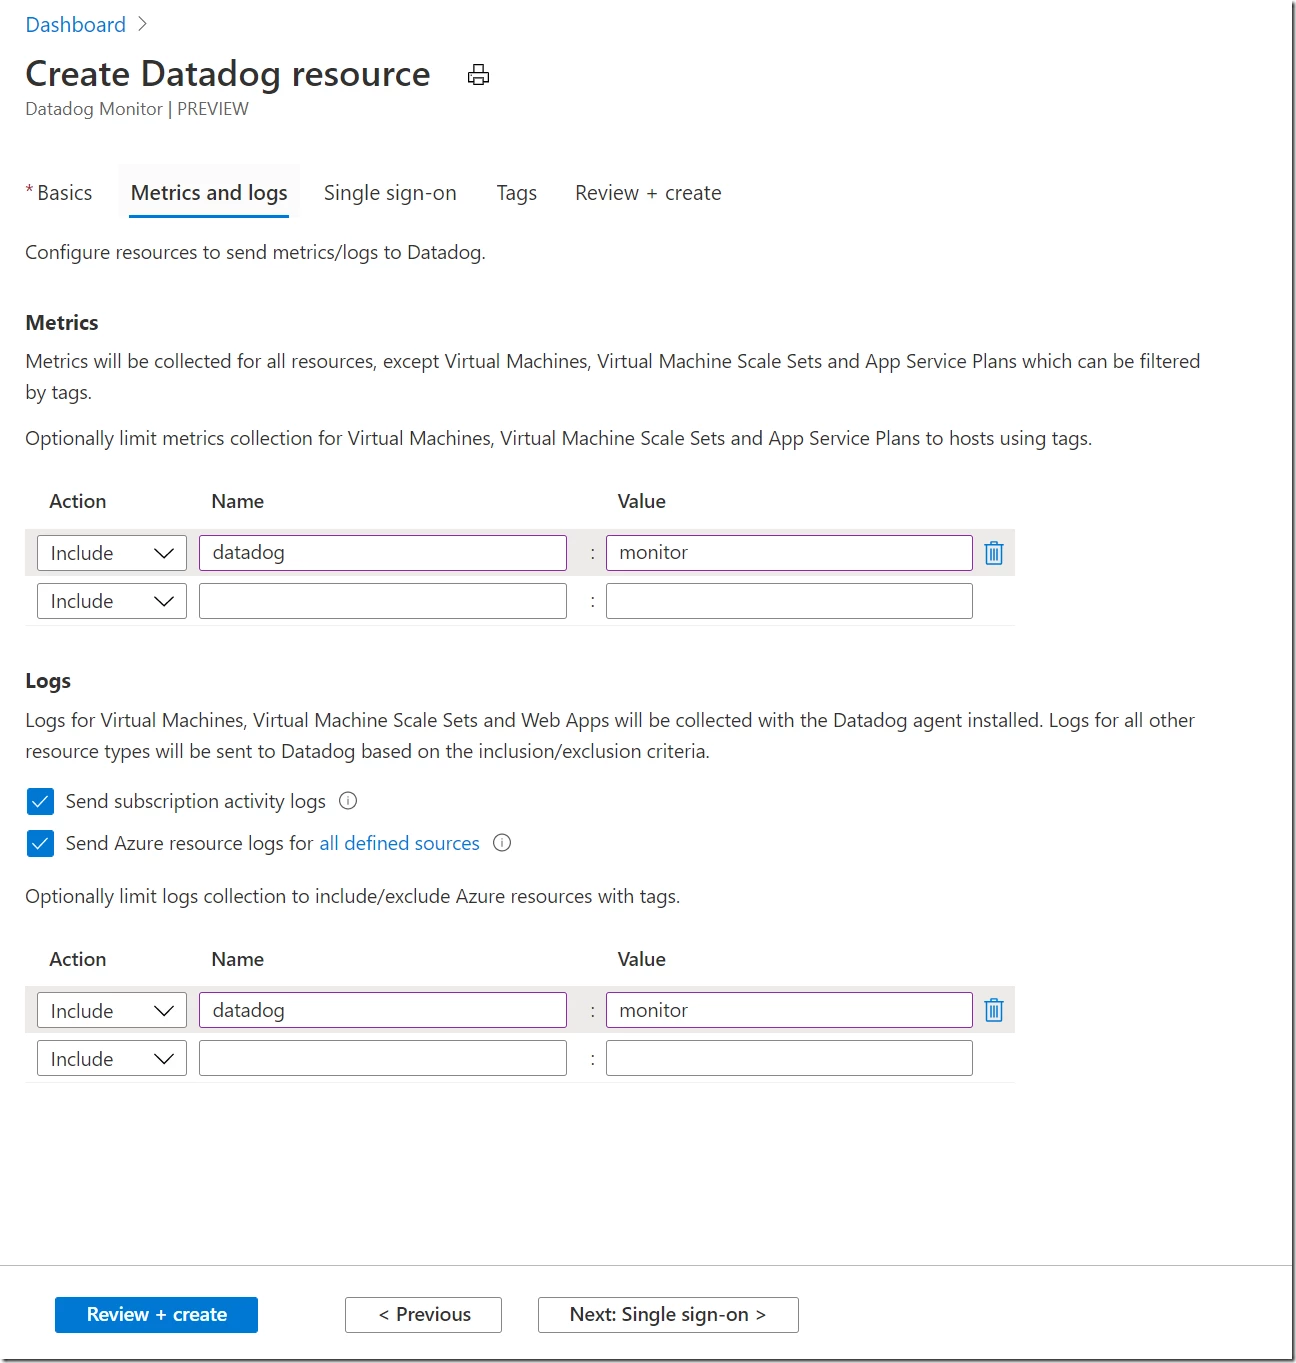
Configuring logs and metrics: Customers create a Datadog resource in Azure and configure which Azure resources send logs and metrics and to Datadog.

Create datadog resource

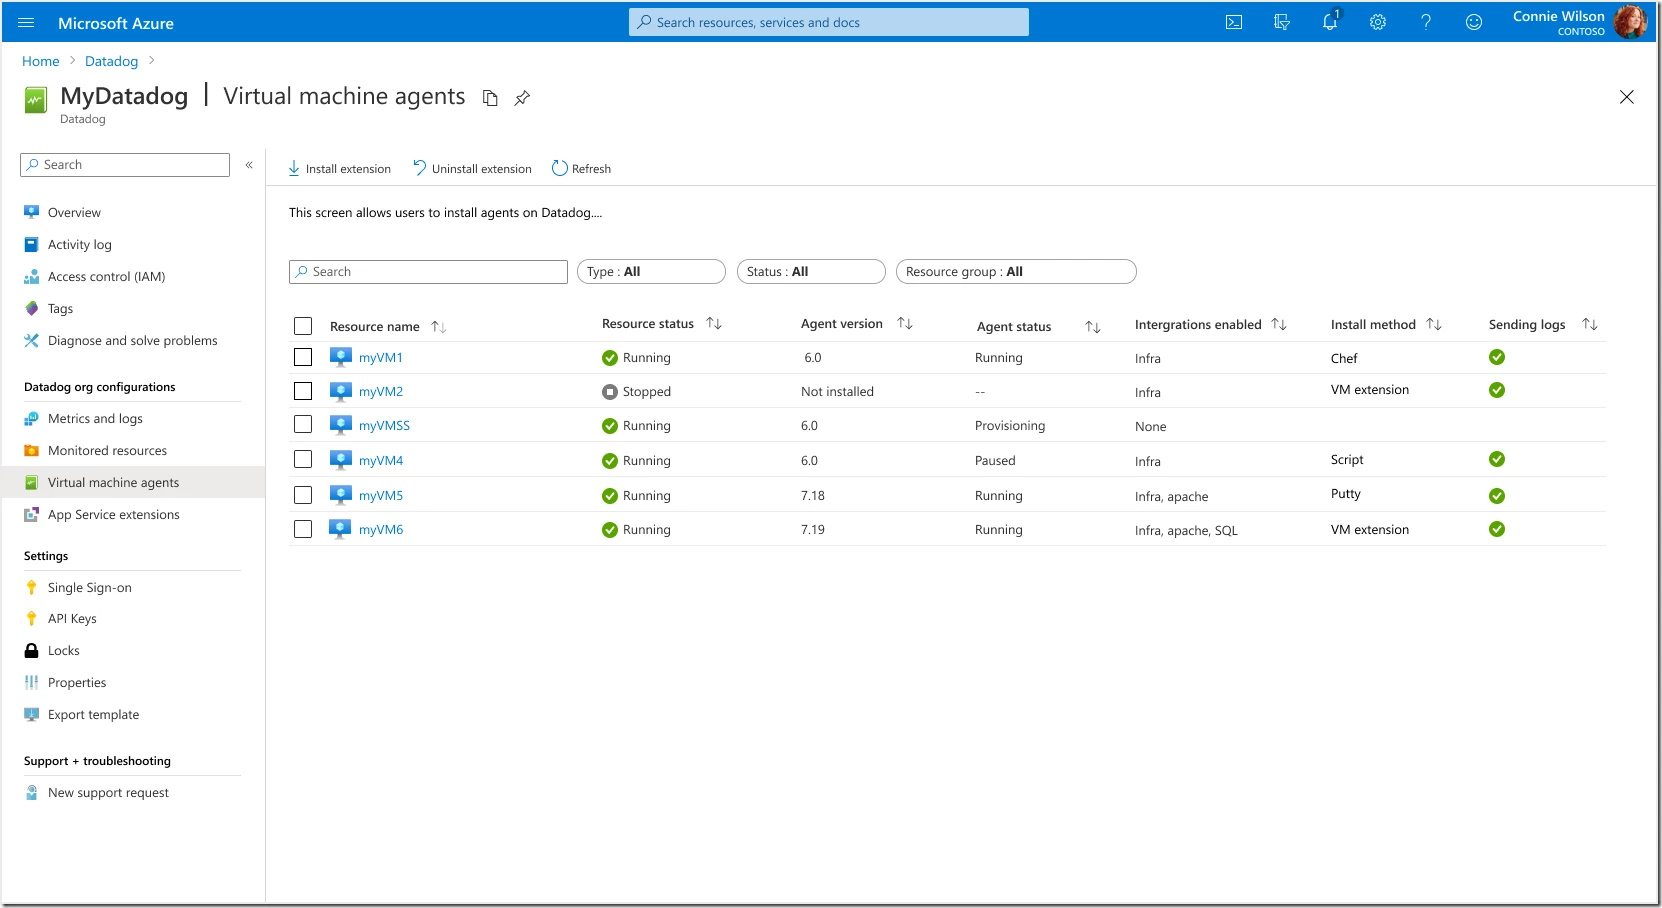
Installing Datadog agent: Customers can install the Datadog agent as an extension on virtual machines (VMs) and app services with a single click.

Installing Diagnostic Agent.

Access via SSO: Customers access Datadog from the Azure portal through a streamlined SSO experience and configure Datadog as a destination for logs and metrics from Azure services.

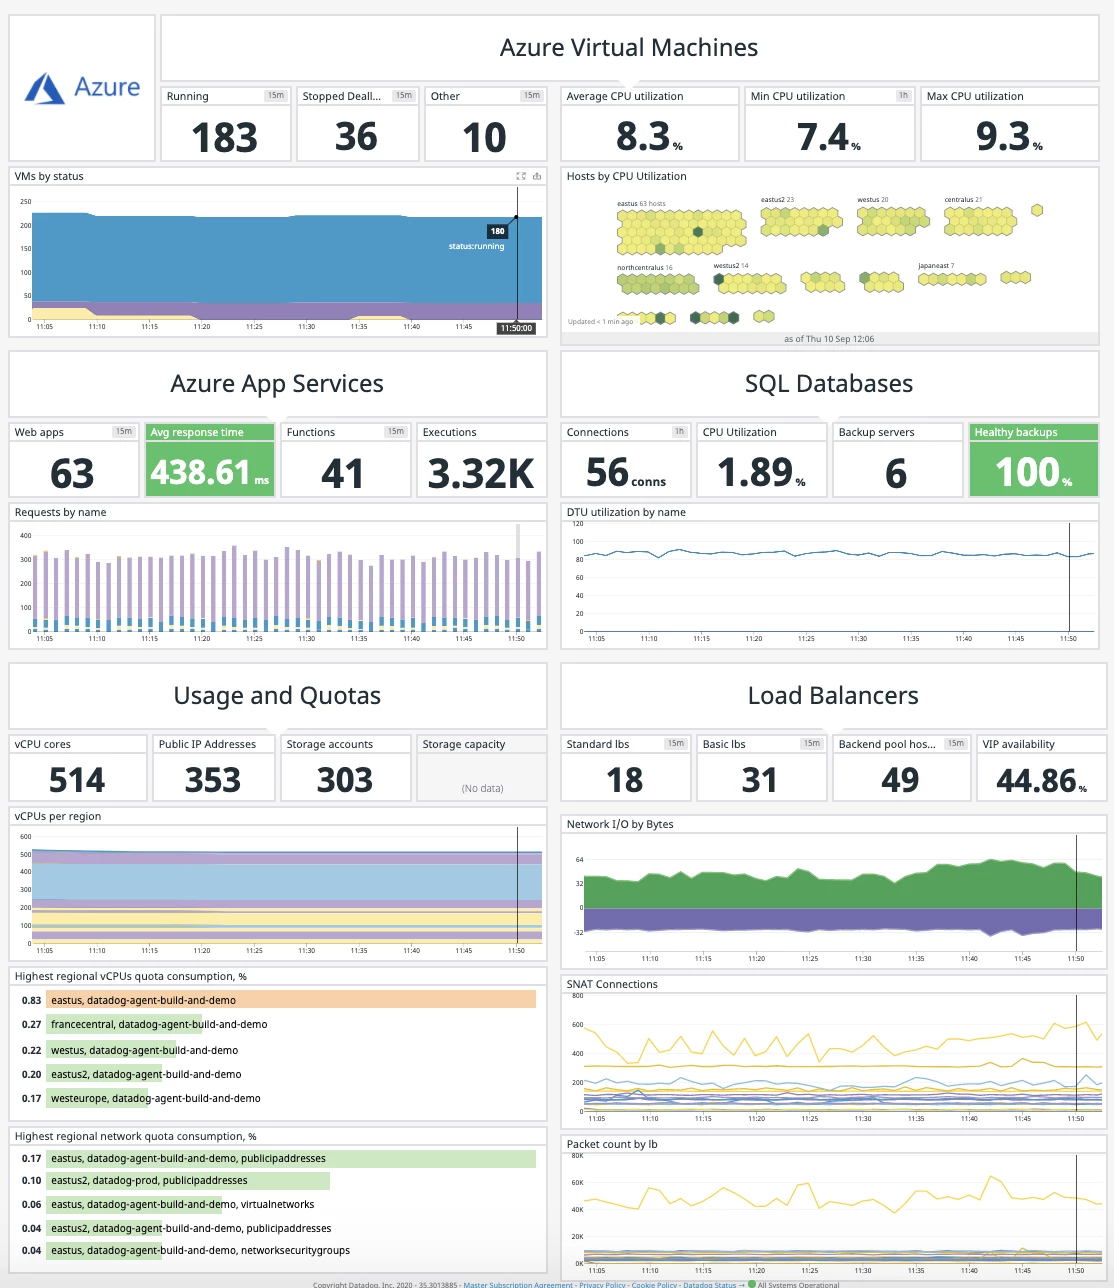
Datadog Azure virtual machines dashboard.