Deploy your Azure API Management instance to a virtual network - internal mode
APPLIES TO: Developer | Premium
Azure API Management can be deployed (injected) inside an Azure virtual network (VNet) to access backend services within the network. For VNet connectivity options, requirements, and considerations, see:
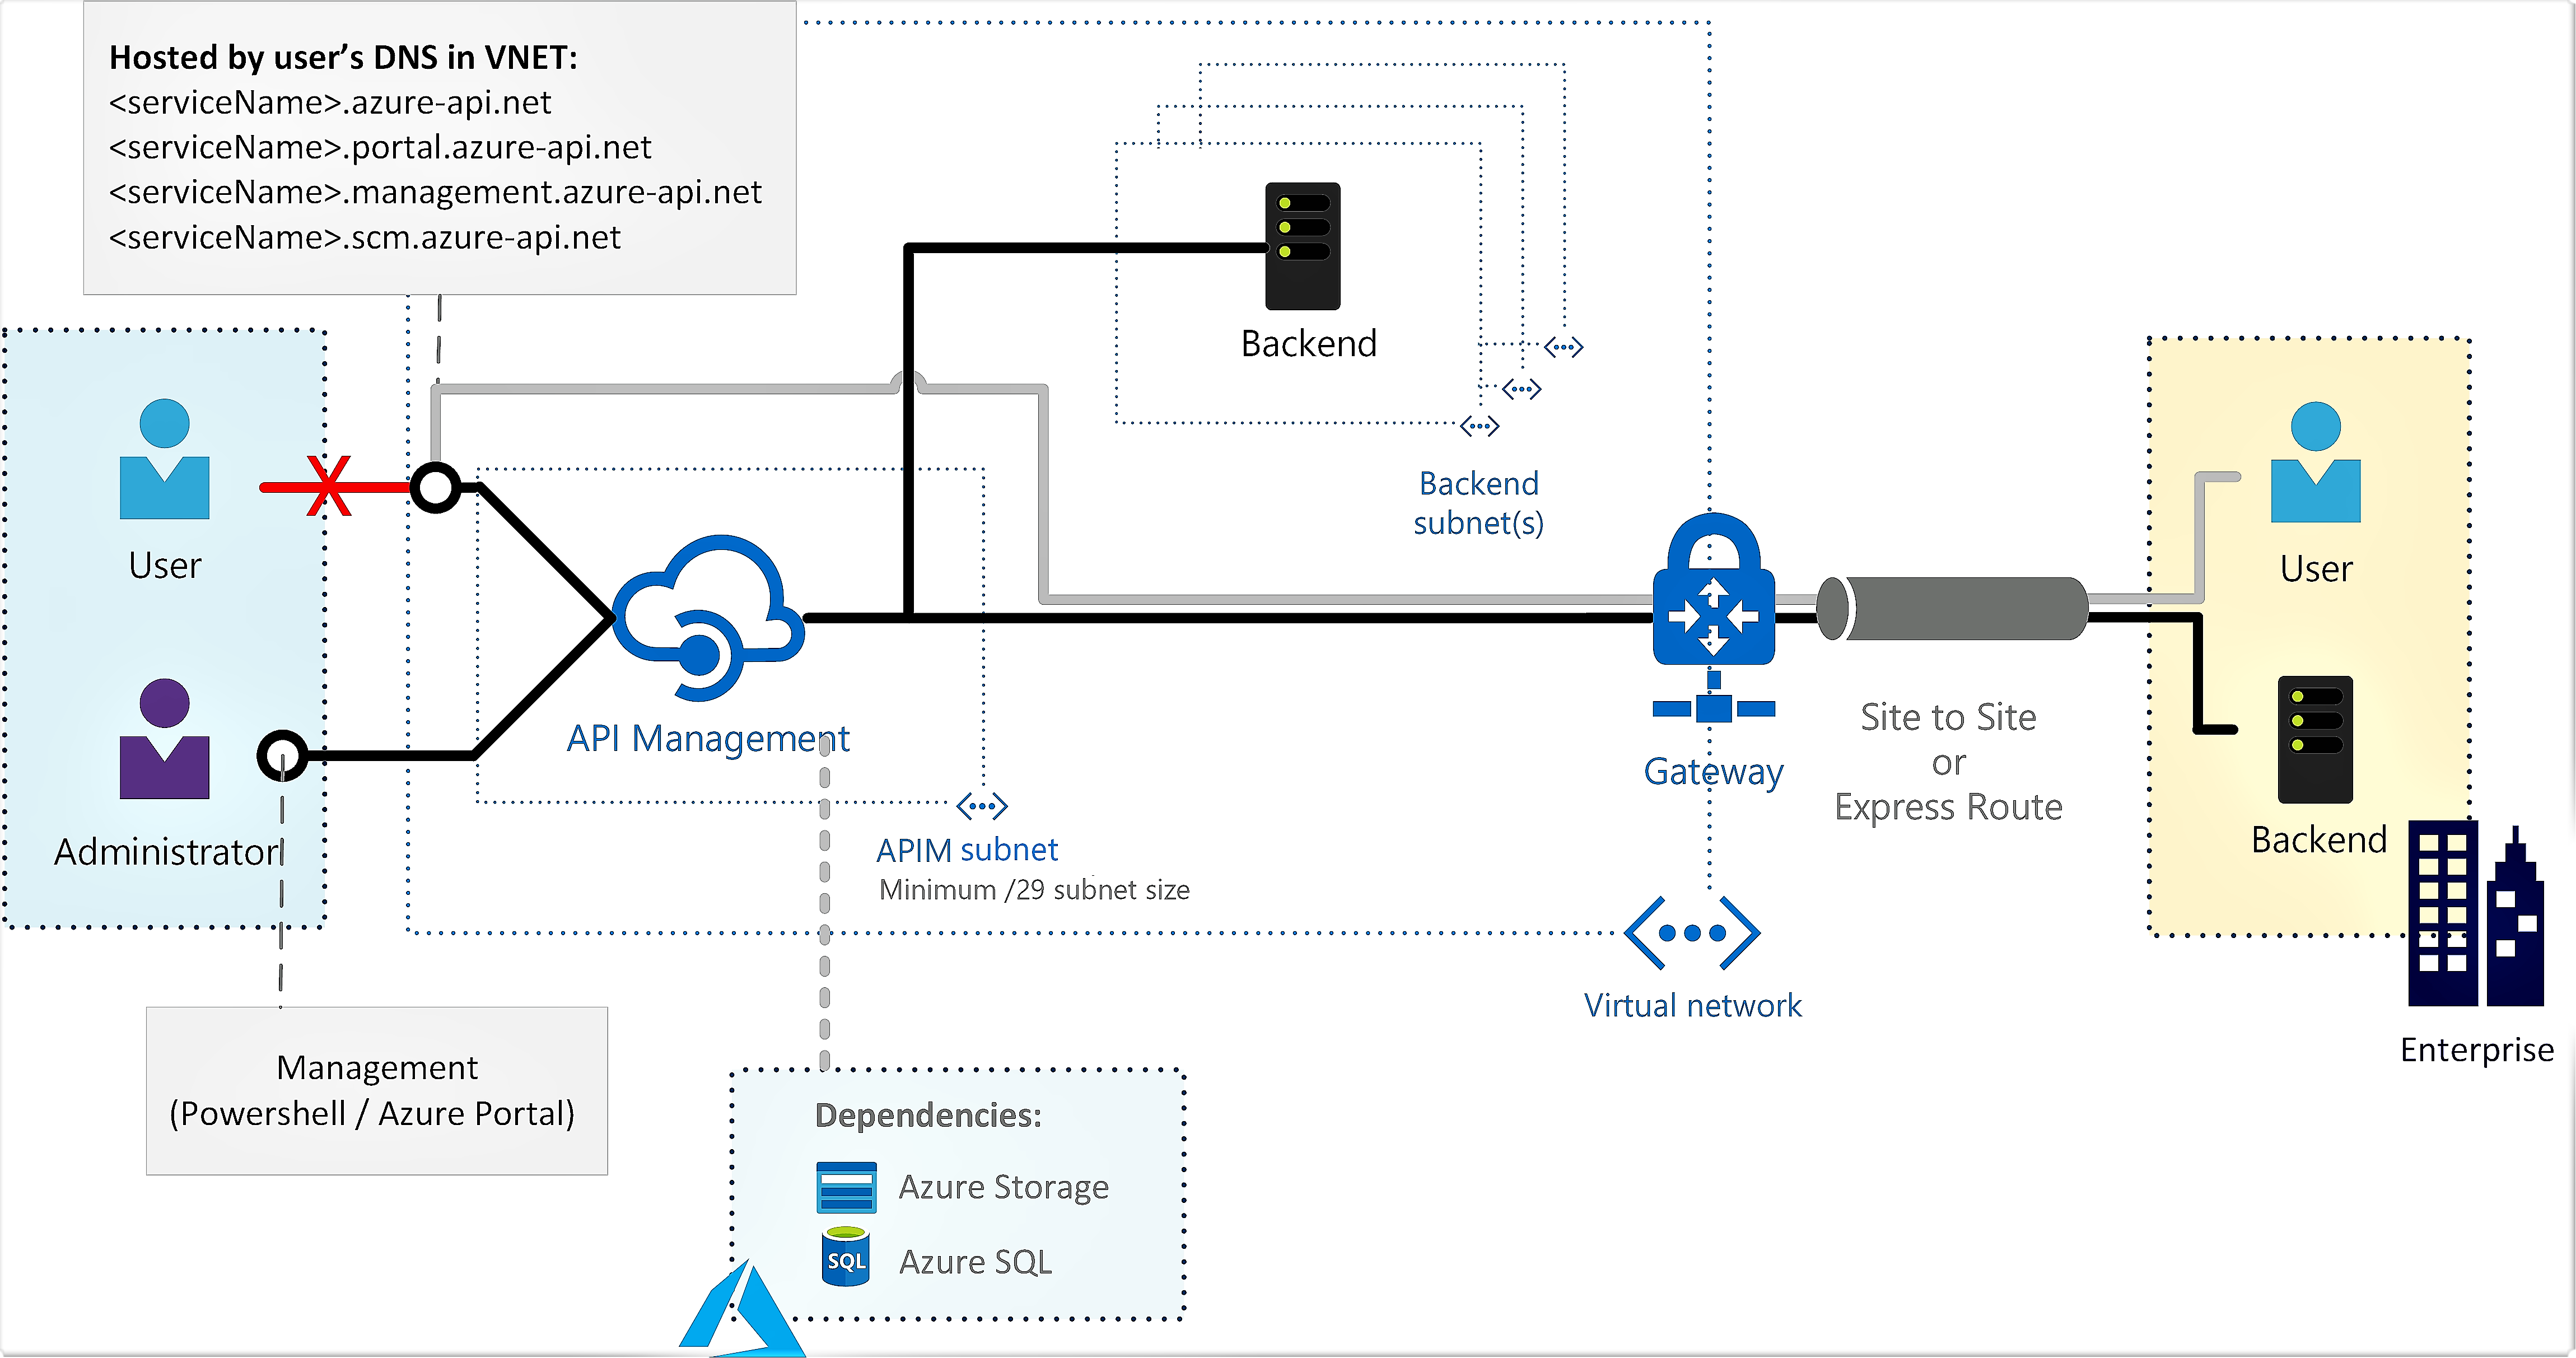
This article explains how to set up VNet connectivity for your API Management instance in the internal mode. In this mode, you can only access the following API Management endpoints within a VNet whose access you control.
- The API gateway
- The developer portal
- Direct management
- Git
Use API Management in internal mode to:
- Make APIs hosted in your private datacenter securely accessible by third parties outside of it by using Azure VPN connections or Azure ExpressRoute.
- Enable hybrid cloud scenarios by exposing your cloud-based APIs and on-premises APIs through a common gateway.
- Manage your APIs hosted in multiple geographic locations, using a single gateway endpoint.
For configurations specific to the external mode, where the API Management endpoints are accessible from the public internet, and backend services are located in the network, see Deploy your Azure API Management instance to a virtual network - external mode.
Prerequisites
Review the network resource requirements for API Management injection into a virtual network before you begin.
Some prerequisites differ depending on the version (stv2 or stv1) of the compute platform hosting your API Management instance.
- An API Management instance. For more information, see Create an Azure API Management instance.
A virtual network and subnet in the same region and subscription as your API Management instance.
- The subnet used to connect to the API Management instance may contain other Azure resource types.
- The subnet shouldn't have any delegations enabled. The Delegate subnet to a service setting for the subnet should be set to None.
A network security group attached to the subnet above. A network security group (NSG) is required to explicitly allow inbound connectivity, because the load balancer used internally by API Management is secure by default and rejects all inbound traffic. For specific configuration, see Configure NSG rules, later in this article.
For certain scenarios, enable service endpoints in the subnet to dependent services such as Azure Storage or Azure SQL. For more information, see Force tunnel traffic to on-premises firewall using ExpressRoute or network virtual appliance, later in this article.
(Optional) A Standard SKU public IPv4 address.
Important
- Starting May 2024, a public IP address is no longer needed when deploying (injecting) an API Management instance in a VNet in internal mode or migrating the internal VNet configuration to a new subnet. In external VNet mode, specifying a public IP address is optional; if you don't provide one, an Azure-managed public IP address is automatically configured. In external VNet mode, the public IP address is used for runtime API traffic.
- Currently, if you enable zone redundancy for an API Management instance in a VNet in either internal mode or external mode, you must specify a new public IP address.
If provided, the IP address must be in the same region and subscription as the API Management instance and the virtual network.
When creating a public IP address resource, ensure you assign a DNS name label to it. In general, you should use the same DNS name as your API Management instance. If you change it, redeploy your instance so that the new DNS label is applied.
For best network performance, it's recommended to use the default Routing preference: Microsoft network.
When creating a public IP address in a region where you plan to enable zone redundancy for your API Management instance, configure the Zone-redundant setting.
The value of the IP address is assigned as the virtual public IPv4 address of the API Management instance in that region.
For multi-region API Management deployments, configure virtual network resources separately for each location.
Enable VNet connection
Enable VNet connectivity using the Azure portal (stv2 platform)
Go to the Azure portal to find your API management instance. Search for and select API Management services.
Choose your API Management instance.
Select Network > Virtual network.
Select the Internal access type.
In the list of locations (regions) where your API Management service is provisioned:
- Choose a Location.
- Select Virtual network and Subnet.
- The VNet list is populated with Resource Manager VNets available in your Azure subscriptions, set up in the region you are configuring.
Select Apply. The Virtual network page of your API Management instance is updated with your new VNet and subnet choices.
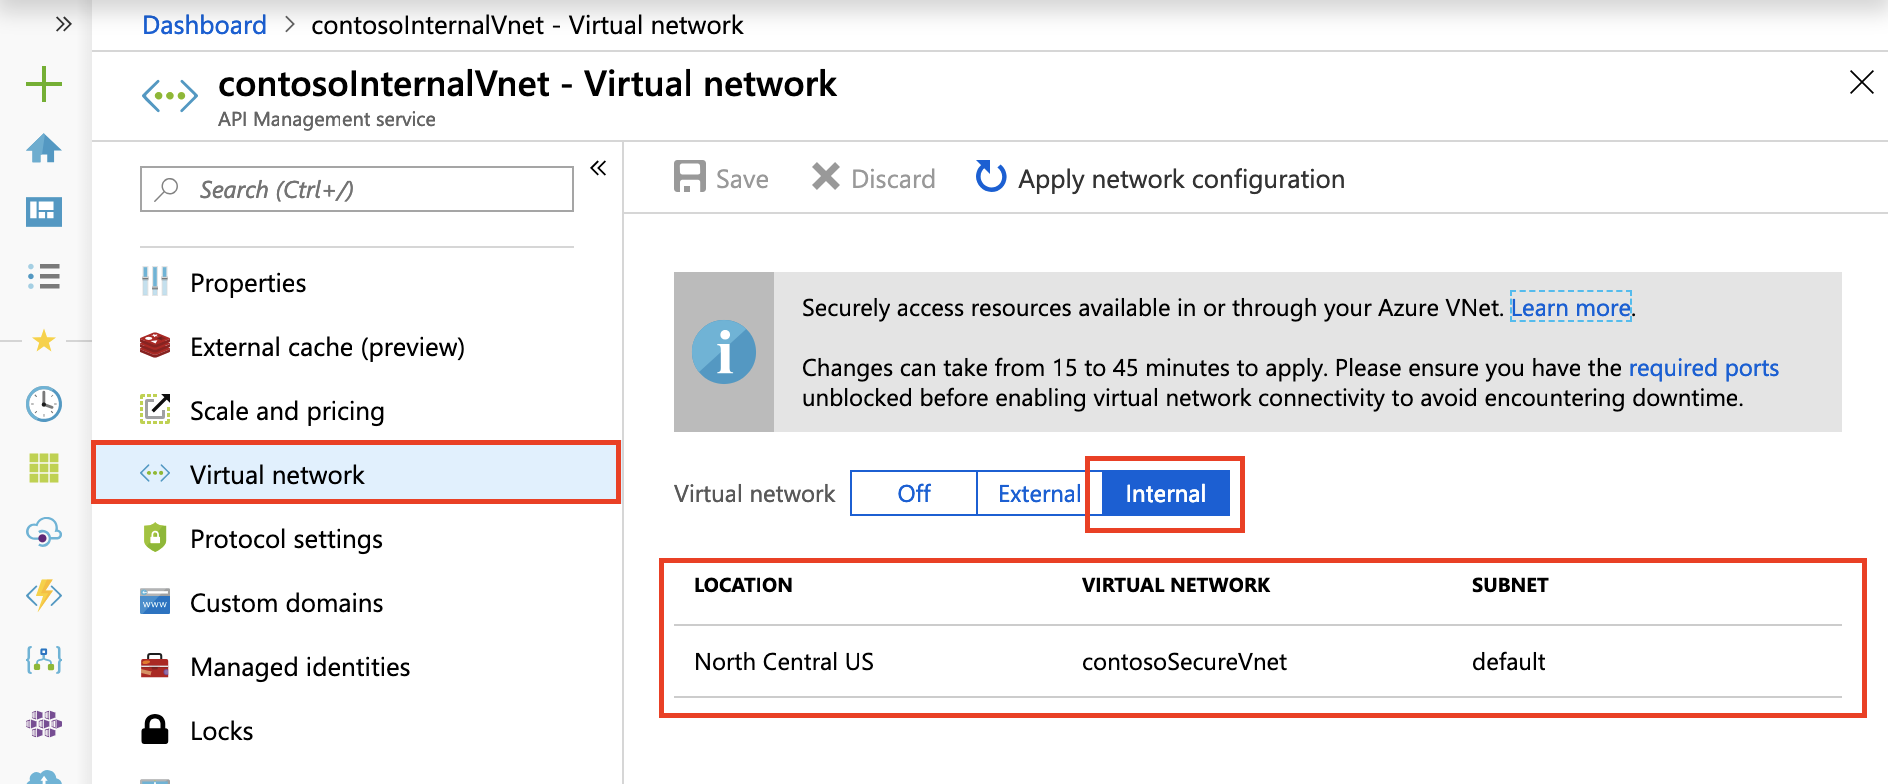
Continue configuring VNet settings for the remaining locations of your API Management instance.
In the top navigation bar, select Save.
It can take 15 to 45 minutes to update the API Management instance. The Developer tier has downtime during the process. The Basic and higher SKUs don't have downtime during the process.
After successful deployment, you should see your API Management service's private virtual IP address and public virtual IP address on the Overview blade. For more information about the IP addresses, see Routing in this article.

Note
Since the gateway URL is not registered on the public DNS, the test console available on the Azure portal will not work for an internal VNet deployed service. Instead, use the test console provided on the developer portal.
Enable connectivity using a Resource Manager template (stv2 platform)
Azure Resource Manager template (API version 2021-08-01 )
Enable connectivity using Azure PowerShell cmdlets (stv1 platform)
Create or update an API Management instance in a VNet.
Configure NSG rules
Configure custom network rules in the API Management subnet to filter traffic to and from your API Management instance. We recommend the following minimum NSG rules to ensure proper operation and access to your instance. Review your environment carefully to determine more rules that might be needed.
- For most scenarios, use the indicated service tags instead of service IP addresses to specify network sources and destinations.
- Set the priority of these rules higher than that of the default rules.
| Source / Destination Port(s) | Direction | Transport protocol | Service tags Source / Destination | Purpose | VNet type |
|---|---|---|---|---|---|
| * / [80], 443 | Inbound | TCP | Internet / VirtualNetwork | Client communication to API Management | External only |
| * / 3443 | Inbound | TCP | ApiManagement / VirtualNetwork | Management endpoint for Azure portal and PowerShell | External & Internal |
| * / 6390 | Inbound | TCP | AzureLoadBalancer / VirtualNetwork | Azure Infrastructure Load Balancer | External & Internal |
| * / 443 | Inbound | TCP | AzureTrafficManager / VirtualNetwork | Azure Traffic Manager routing for multi-region deployment | External only |
| * / 443 | Outbound | TCP | VirtualNetwork / Storage | Dependency on Azure Storage for core service functionality | External & Internal |
| * / 1433 | Outbound | TCP | VirtualNetwork / SQL | Access to Azure SQL endpoints for core service functionality | External & Internal |
| * / 443 | Outbound | TCP | VirtualNetwork / AzureKeyVault | Access to Azure Key Vault for core service functionality | External & Internal |
| * / 1886, 443 | Outbound | TCP | VirtualNetwork / AzureMonitor | Publish Diagnostics Logs and Metrics, Resource Health, and Application Insights | External & Internal |
DNS configuration
In internal VNet mode, you have to manage your own DNS to enable inbound access to your API Management endpoints.
We recommend:
- Configure an Azure DNS private zone.
- Link the Azure DNS private zone to the VNet into which you've deployed your API Management service.
Learn how to set up a private zone in Azure DNS.
Access on default host names
When you create an API Management service (contosointernalvnet, for example), the following endpoints are configured by default:
| Endpoint | Endpoint configuration |
|---|---|
| API Gateway | contosointernalvnet.azure-api.net |
| Developer portal | contosointernalvnet.portal.azure-api.net |
| The new developer portal | contosointernalvnet.developer.azure-api.net |
| Direct management endpoint | contosointernalvnet.management.azure-api.net |
| Git | contosointernalvnet.scm.azure-api.net |
Access on custom domain names
If you don't want to access the API Management service with the default host names, set up custom domain names for all your endpoints, as shown in the following image:

Configure DNS records
Create records in your DNS server to access the endpoints accessible from within your VNet. Map the endpoint records to the private virtual IP address for your service.
For testing purposes, you might update the hosts file on a virtual machine in a subnet connected to the VNet in which API Management is deployed. Assuming the private virtual IP address for your service is 10.1.0.5, you can map the hosts file as follows. The hosts mapping file is at %SystemDrive%\drivers\etc\hosts (Windows) or /etc/hosts (Linux, macOS).
| Internal virtual IP address | Endpoint configuration |
|---|---|
| 10.1.0.5 | contosointernalvnet.azure-api.net |
| 10.1.0.5 | contosointernalvnet.portal.azure-api.net |
| 10.1.0.5 | contosointernalvnet.developer.azure-api.net |
| 10.1.0.5 | contosointernalvnet.management.azure-api.net |
| 10.1.0.5 | contosointernalvnet.scm.azure-api.net |
You can then access all the API Management endpoints from the virtual machine you created.
Routing
The following virtual IP addresses are configured for an API Management instance in an internal virtual network.
| Virtual IP address | Description |
|---|---|
| Private virtual IP address | A load balanced IP address from within the API Management instance's subnet range (DIP), over which you can access the API gateway, developer portal, management, and Git endpoints. Register this address with the DNS servers used by the VNet. |
| Public virtual IP address | Used only for control plane traffic to the management endpoint over port 3443. Can be locked down to the ApiManagement service tag. |
The load-balanced public and private IP addresses can be found on the Overview blade in the Azure portal.
For more information and considerations, see IP addresses of Azure API Management.
VIP and DIP addresses
Dynamic IP (DIP) addresses will be assigned to each underlying virtual machine in the service and used to access endpoints and resources in the VNet and in peered VNets. The API Management service's public virtual IP (VIP) address will be used to access public-facing resources.
If IP restriction lists secure resources within the VNet or peered VNets, we recommend specifying the entire subnet range where the API Management service is deployed to grant or restrict access from the service.
Learn more about the recommended subnet size.
Example
If you deploy 1 capacity unit of API Management in the Premium tier in an internal VNet, 3 IP addresses will be used: 1 for the private VIP and one each for the DIPs for two VMs. If you scale out to 4 units, more IPs will be consumed for additional DIPs from the subnet.
If the destination endpoint has allow-listed only a fixed set of DIPs, connection failures will result if you add new units in the future. For this reason and since the subnet is entirely in your control, we recommend allow-listing the entire subnet in the backend.
Force tunnel traffic to on-premises firewall using ExpressRoute or network virtual appliance
Forced tunneling lets you redirect or "force" all internet-bound traffic from your subnet back to on-premises for inspection and auditing. Commonly, you configure and define your own default route (0.0.0.0/0), forcing all traffic from the API Management subnet to flow through an on-premises firewall or to a network virtual appliance. This traffic flow breaks connectivity with API Management, since outbound traffic is either blocked on-premises, or NAT'd to an unrecognizable set of addresses that no longer work with various Azure endpoints. You can solve this issue via the following methods:
Enable service endpoints on the subnet in which the API Management service is deployed for:
- Azure SQL (required only in the primary region if the API Management service is deployed to multiple regions)
- Azure Storage
- Azure Event Hubs
- Azure Key Vault (required when API Management is deployed on the
stv2platform)
By enabling endpoints directly from the API Management subnet to these services, you can use the Microsoft Azure backbone network, providing optimal routing for service traffic. If you use service endpoints with a force tunneled API Management, traffic for the preceding Azure services isn't force tunneled. However, the other API Management service dependency traffic remains force tunneled. Ensure that your firewall or virtual appliance doesn't block this traffic, or the API Management service may not function properly.
Note
We strongly recommend enabling service endpoints directly from the API Management subnet to dependent services such as Azure SQL and Azure Storage that support them. However, some organizations may have requirements to force tunnel all traffic from the API Management subnet. In this case, ensure that you configure your firewall or virtual appliance to allow this traffic. You will need to allow the complete IP address range of each dependent service, and keep this configuration up to date when the Azure infrastructure changes. Your API Management service may also experience latency or unexpected timeouts because of the force tunneling of this network traffic.
All the control plane traffic from the internet to the management endpoint of your API Management service is routed through a specific set of inbound IPs, hosted by API Management, encompassed by the ApiManagement service tag. When the traffic is force tunneled, the responses won't symmetrically map back to these inbound source IPs and connectivity to the management endpoint is lost. To overcome this limitation, configure a user-defined route (UDR) for the ApiManagement service tag with next hop type set to "Internet", to steer traffic back to Azure.
Note
Allowing API Management management traffic to bypass an on-premises firewall or network virtual appliance isn't considered a significant security risk. The recommended configuration for your API Management subnet allows inbound management traffic on port 3443 only from the set of Azure IP addresses encompassed by the ApiManagement service tag. The recommended UDR configuration is only for the return path of this Azure traffic.
(External VNet mode) Data plane traffic for clients attempting to reach the API Management gateway and developer portal from the internet will also be dropped by default because of asymmetric routing introduced by forced tunneling. For each client that requires access, configure an explicit UDR with next hop type "Internet" to bypass the firewall or virtual network appliance.
For other force tunneled API Management service dependencies, resolve the hostname and reach out to the endpoint. These include:
- Metrics and Health Monitoring
- Azure portal diagnostics
- SMTP relay
- Developer portal CAPTCHA
- Azure KMS server
For more information, see Virtual network configuration reference.
This section has moved. See Virtual network configuration reference.
Troubleshooting
Unsuccessful initial deployment of API Management service into a subnet
- Deploy a virtual machine into the same subnet.
- Connect to the virtual machine and validate connectivity to one of each of the following resources in your Azure subscription:
- Azure Storage blob
- Azure SQL Database
- Azure Storage Table
- Azure Key Vault (for an API Management instance hosted on the
stv2platform)
Important
After validating the connectivity, remove all the resources in the subnet before deploying API Management into the subnet (required when API Management is hosted on the stv1 platform).


