Azure networking services overview
- Networking foundation: Azure networking foundation services provide core connectivity for your resources in Azure - Virtual Network (VNet), Private Link, Azure DNS, Azure Virtual Network Manager, Azure Bastion, Route Server, NAT Gateway, Traffic Manager, Azure Network Watcher, and Azure Monitor.
- Load balancing and content delivery: Azure load balancing and content delivery services allow for management, distribution, and optimization of your applications and workloads - Load balancer, Application Gateway, and Azure Front Door.
- Hybrid connectivity: Azure hybrid connectivity services secure communication to and from your resources in Azure - VPN Gateway, ExpressRoute, Virtual WAN, and Peering Service.
- Network security: Azure network security services protect your web applications and IaaS services from DDoS attacks and malicious actors - Firewall Manager, Firewall, Web Application Firewall, and DDoS Protection.
Networking foundation
This section describes services that provide the building blocks for designing and architecting a network environment in Azure - Virtual Network (VNet), Private Link, Azure DNS, Azure Virtual Network Manager, Azure Bastion, Route Server, NAT Gateway, Traffic Manager, Azure Network Watcher, and Azure Monitor.
Virtual network
Azure Virtual Network (VNet) is the fundamental building block for your private network in Azure. You can use VNets to:
- Communicate between Azure resources: You can deploy virtual machines, and several other types of Azure resources to a virtual network, such as Azure App Service Environments, the Azure Kubernetes Service (AKS), and Azure Virtual Machine Scale Sets. To view a complete list of Azure resources that you can deploy into a virtual network, see Virtual network service integration.
- Communicate between each other: You can connect virtual networks to each other, enabling resources in either virtual network to communicate with each other, using virtual network peering or Azure Virtual Network Manager. The virtual networks you connect can be in the same, or different, Azure regions. For more information, see Virtual network peering and Azure Virtual Network Manager.
- Communicate to the internet: All resources in a virtual network can communicate outbound to the internet, by default. You can communicate inbound to a resource by assigning a public IP address or a public Load Balancer. You can also use Public IP addresses or public Load Balancer to manage your outbound connections.
- Communicate with on-premises networks: You can connect your on-premises computers and networks to a virtual network using VPN Gateway or ExpressRoute.
- Encrypt traffic between resources: You can use Virtual network encryption to encrypt traffic between resources in a virtual network.
Network security groups
You can filter network traffic to and from Azure resources in an Azure virtual network with a network security group. For more information, see Network security groups.
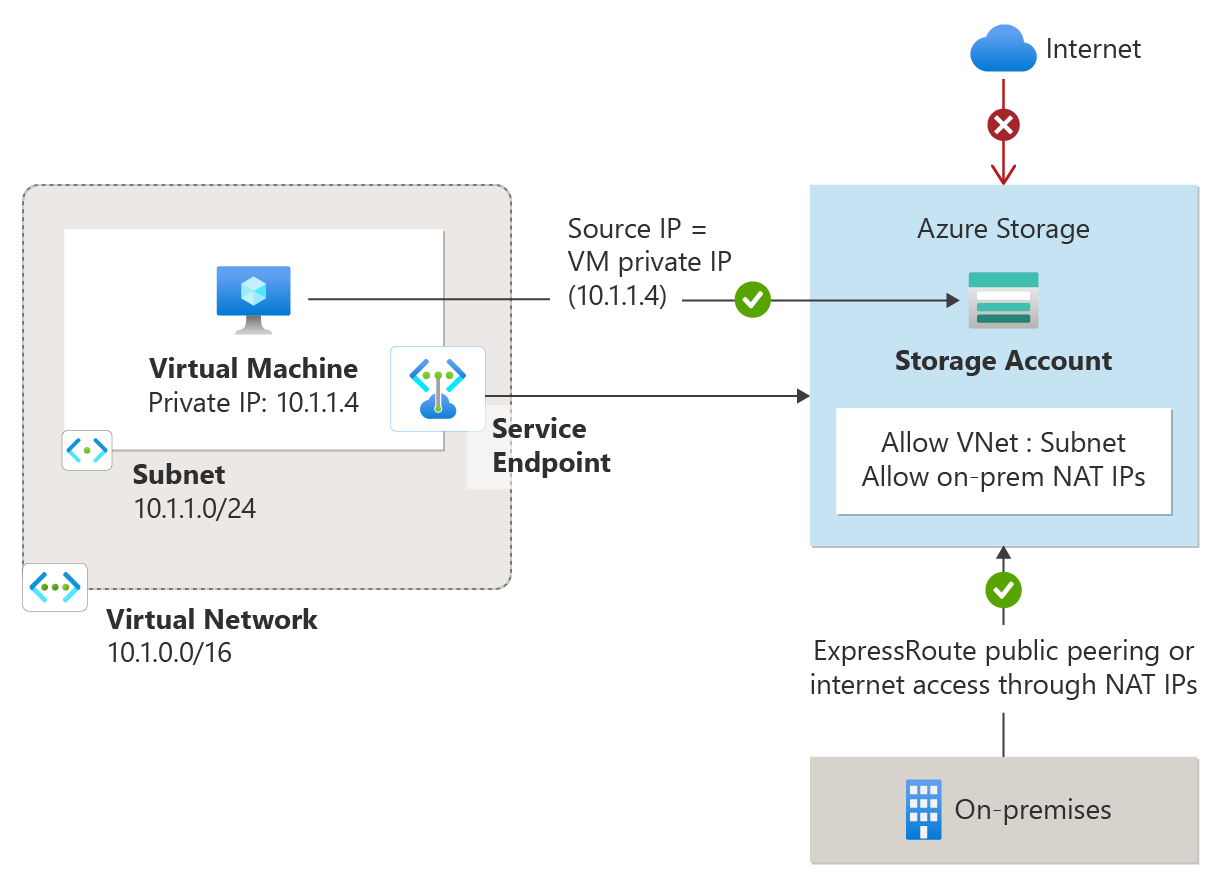
Service endpoints
Virtual Network (VNet) service endpoints extend your virtual network private address space and the identity of your virtual network to the Azure services, over a direct connection. Endpoints allow you to secure your critical Azure service resources to only your virtual networks. Traffic from your virtual network to the Azure service always remains on the Microsoft Azure backbone network.
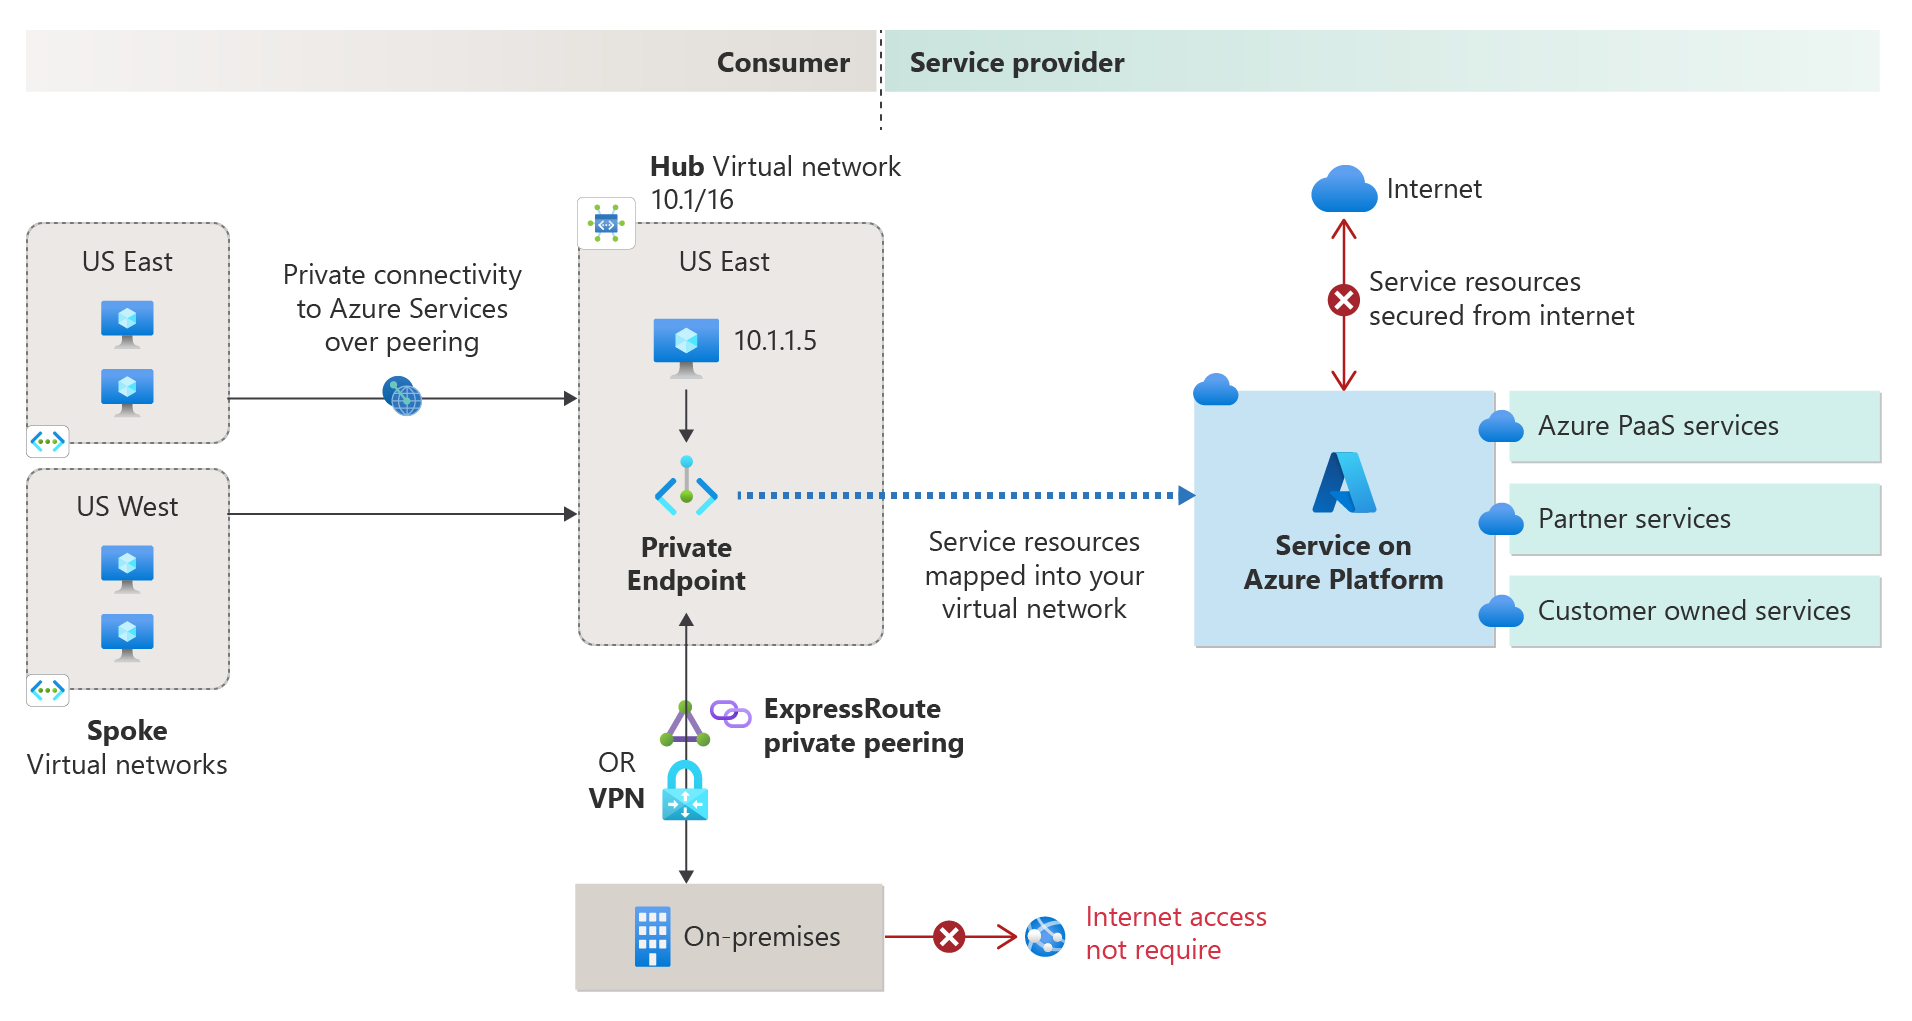
Azure Private Link
Azure Private Link enables you to access Azure PaaS Services (for example, Azure Storage and SQL Database) and Azure hosted customer-owned/partner services over a private endpoint in your virtual network. Traffic between your virtual network and the service travels through the Microsoft backbone network. Exposing your service to the public internet is no longer necessary. You can create your own private link service in your virtual network and deliver it to your customers.
Azure DNS
Azure DNS provides DNS hosting and resolution using the Microsoft Azure infrastructure. Azure DNS consists of three services:
- Azure Public DNS is a hosting service for DNS domains. By hosting your domains in Azure, you can manage your DNS records by using the same credentials, APIs, tools, and billing as your other Azure services.
- Azure Private DNS is a DNS service for your virtual networks. Azure Private DNS manages and resolves domain names in the virtual network without the need to configure a custom DNS solution.
- Azure DNS Private Resolver is a service that enables you to query Azure DNS private zones from an on-premises environment and vice versa without deploying VM based DNS servers.
Using Azure DNS, you can host and resolve public domains, manage DNS resolution in your virtual networks, and enable name resolution between Azure and your on-premises resources.
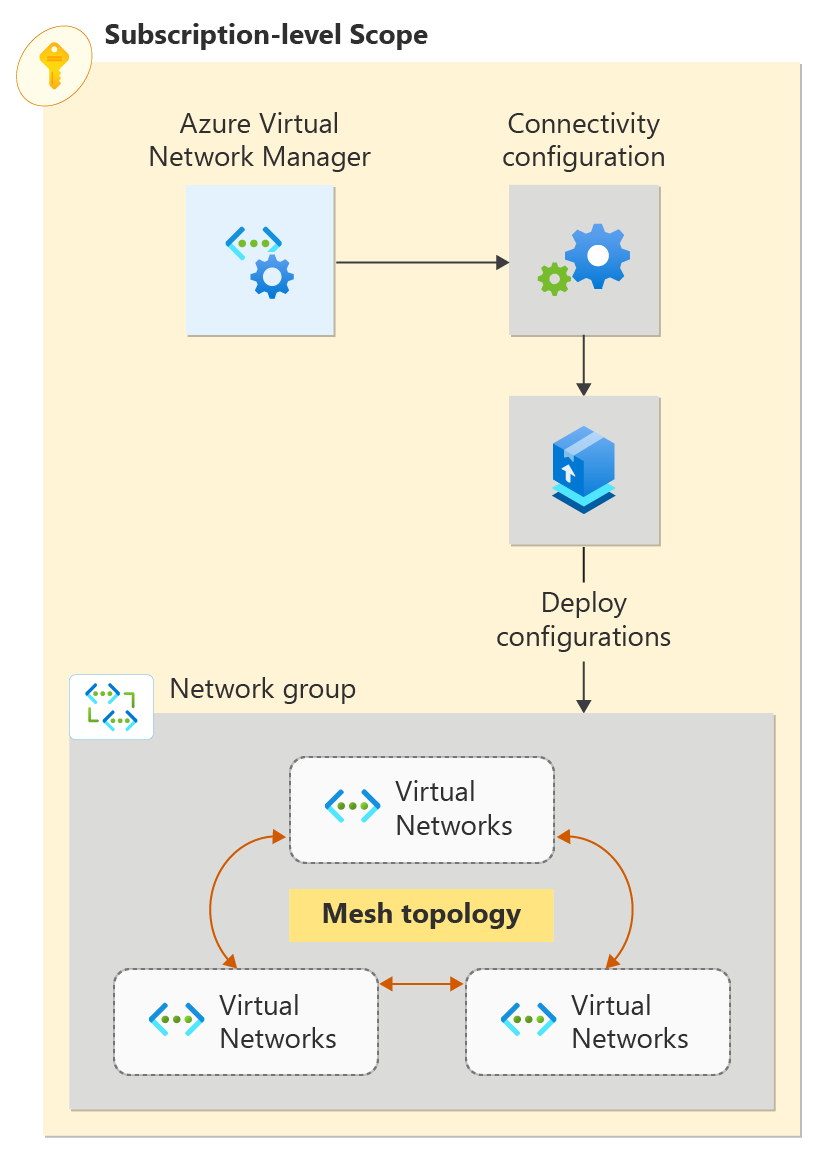
Azure Virtual Network Manager
Azure Virtual Network Manager is a management service that enables you to group, configure, deploy, and manage virtual networks globally across subscriptions. With Virtual Network Manager, you can define network groups to identify and logically segment your virtual networks. Then you can determine the connectivity and security configurations you want and apply them across all the selected virtual networks in network groups at once.
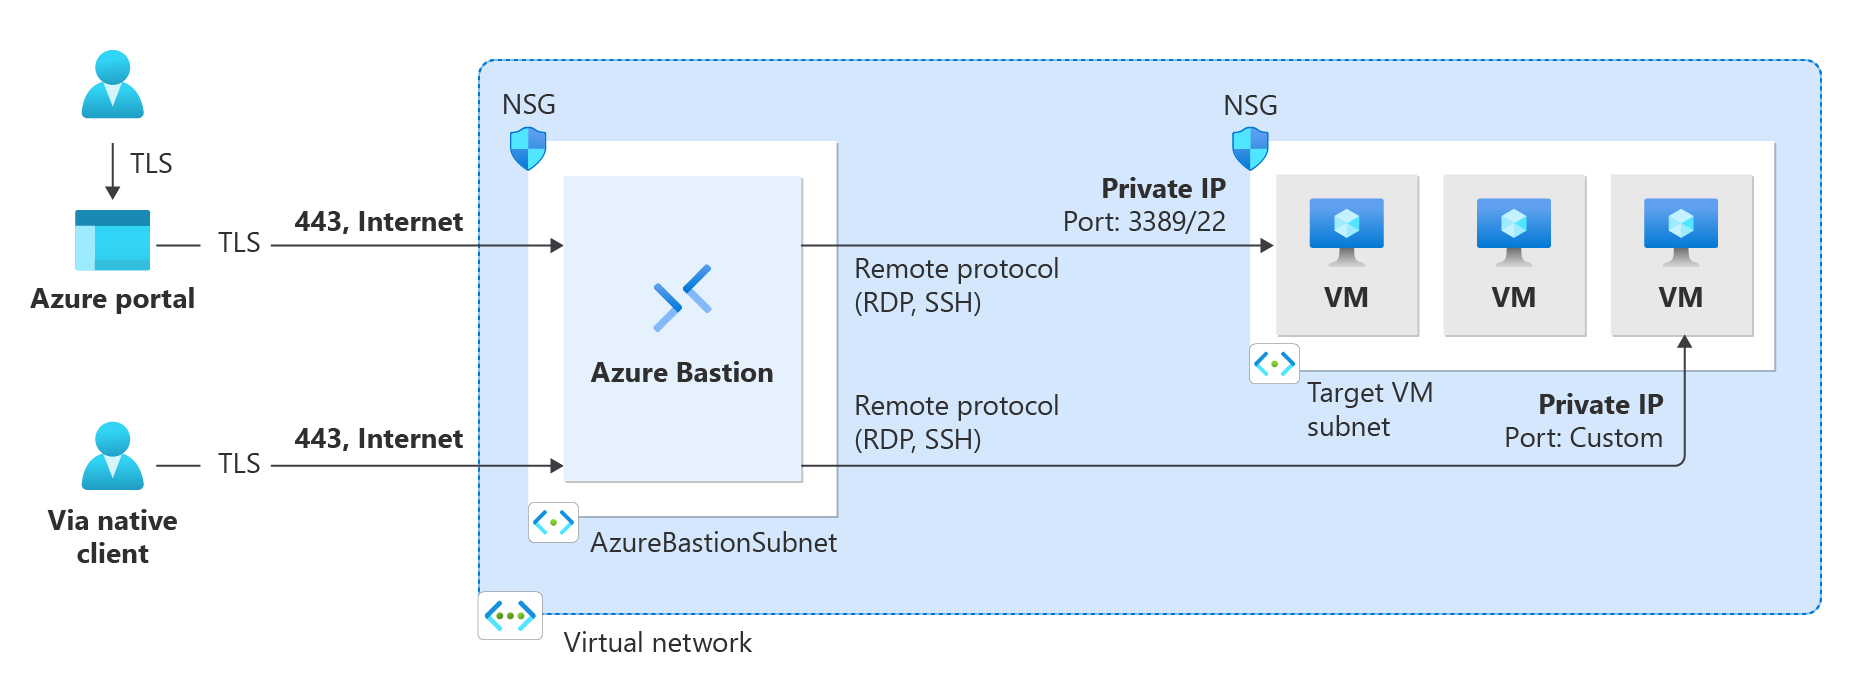
Azure Bastion
Azure Bastion is a service that you can deploy in a virtual network to allow you to connect to a virtual machine using your browser and the Azure portal. You can also connect using the native SSH or RDP client already installed on your local computer. The Azure Bastion service is a fully platform-managed PaaS service that you deploy inside your virtual network. It provides secure and seamless RDP/SSH connectivity to your virtual machines directly from the Azure portal over TLS. When you connect via Azure Bastion, your virtual machines don't need a public IP address, agent, or special client software. There are various different SKU/tiers available for Azure Bastion. The tier you select affects the features that are available. For more information, see About Bastion configuration settings.
Route Server
Azure Route Server simplifies dynamic routing between your network virtual appliance (NVA) and your virtual network. It allows you to exchange routing information directly through Border Gateway Protocol (BGP) routing protocol between any NVA that supports the BGP routing protocol and the Azure Software Defined Network (SDN) in the Azure Virtual Network (VNet) without the need to manually configure or maintain route tables.
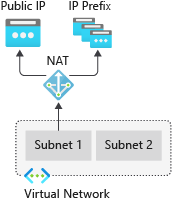
NAT Gateway
Virtual Network NAT(network address translation) simplifies outbound-only Internet connectivity for virtual networks. When configured on a subnet, all outbound connectivity uses your specified static public IP addresses. Outbound connectivity is possible without load balancer or public IP addresses directly attached to virtual machines. For more information, see What is Azure NAT gateway?
Traffic Manager
Azure Traffic Manager is a DNS-based traffic load balancer that enables you to distribute traffic optimally to services across global Azure regions, while providing high availability and responsiveness. Traffic Manager provides a range of traffic-routing methods to distribute traffic such as priority, weighted, performance, geographic, multi-value, or subnet.
The following diagram shows endpoint priority-based routing with Traffic Manager:
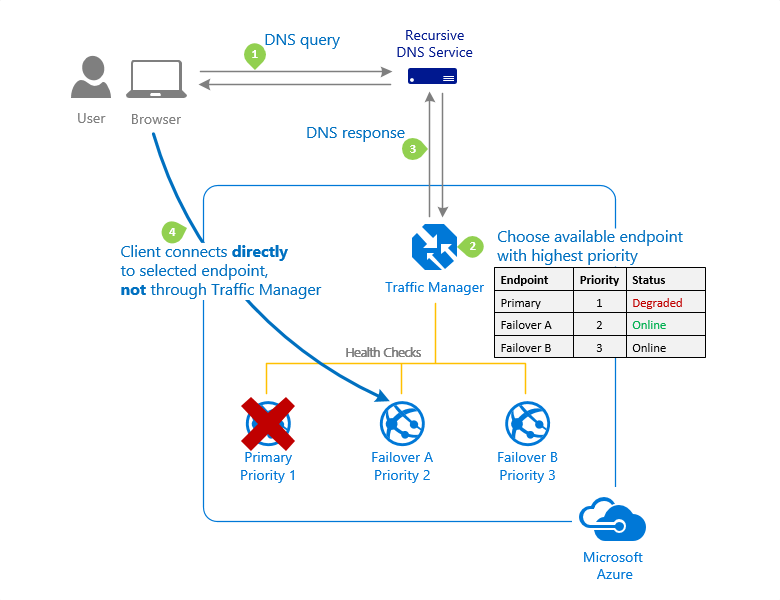
For more information about Traffic Manager, see What is Azure Traffic Manager?.
Azure Network Watcher
Azure Network Watcher provides tools to monitor, diagnose, view metrics, and enable or disable logs for resources in an Azure virtual network.
Azure Monitor
Azure Monitor maximizes the availability and performance of your applications by delivering a comprehensive solution for collecting, analyzing, and acting on telemetry from your cloud and on-premises environments. It helps you understand how your applications are performing and proactively identifies issues affecting them and the resources they depend on.
Load balancing and content delivery
This section describes networking services in Azure that help deliver applications and workloads - Load Balancer, Application Gateway, and Azure Front Door Service.
Load Balancer
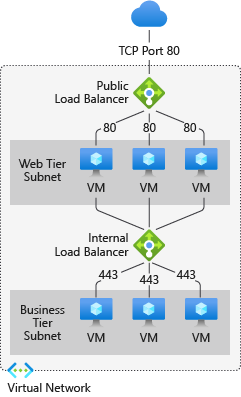
Azure Load Balancer provides high-performance, low-latency Layer 4 load-balancing for all UDP and TCP protocols. It manages inbound and outbound connections. You can configure public and internal load-balanced endpoints. You can define rules to map inbound connections to back-end pool destinations by using TCP and HTTP health-probing options to manage service availability.
Azure Load Balancer is available in Standard, Regional, and Gateway SKUs.
The following picture shows an Internet-facing multi-tier application that utilizes both external and internal load balancers:
Application Gateway
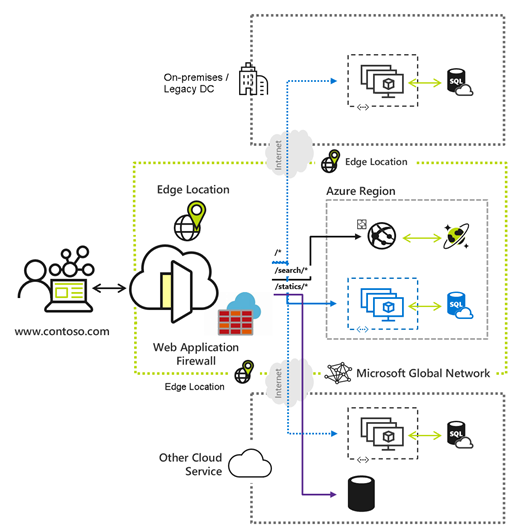
Azure Application Gateway is a web traffic load balancer that enables you to manage traffic to your web applications. It's an Application Delivery Controller (ADC) as a service, offering various layer 7 load-balancing capabilities for your applications.
The following diagram shows url path-based routing with Application Gateway.

Azure Front Door
Azure Front Door enables you to define, manage, and monitor the global routing for your web traffic by optimizing for best performance and instant global failover for high availability. With Front Door, you can transform your global (multi-region) consumer and enterprise applications into robust, high-performance personalized modern applications, APIs, and content that reach a global audience with Azure.
Hybrid connectivity
This section describes network connectivity services that provide a secure communication between your on-premises network and Azure - VPN Gateway, ExpressRoute, Virtual WAN, and Peering Service.
VPN Gateway
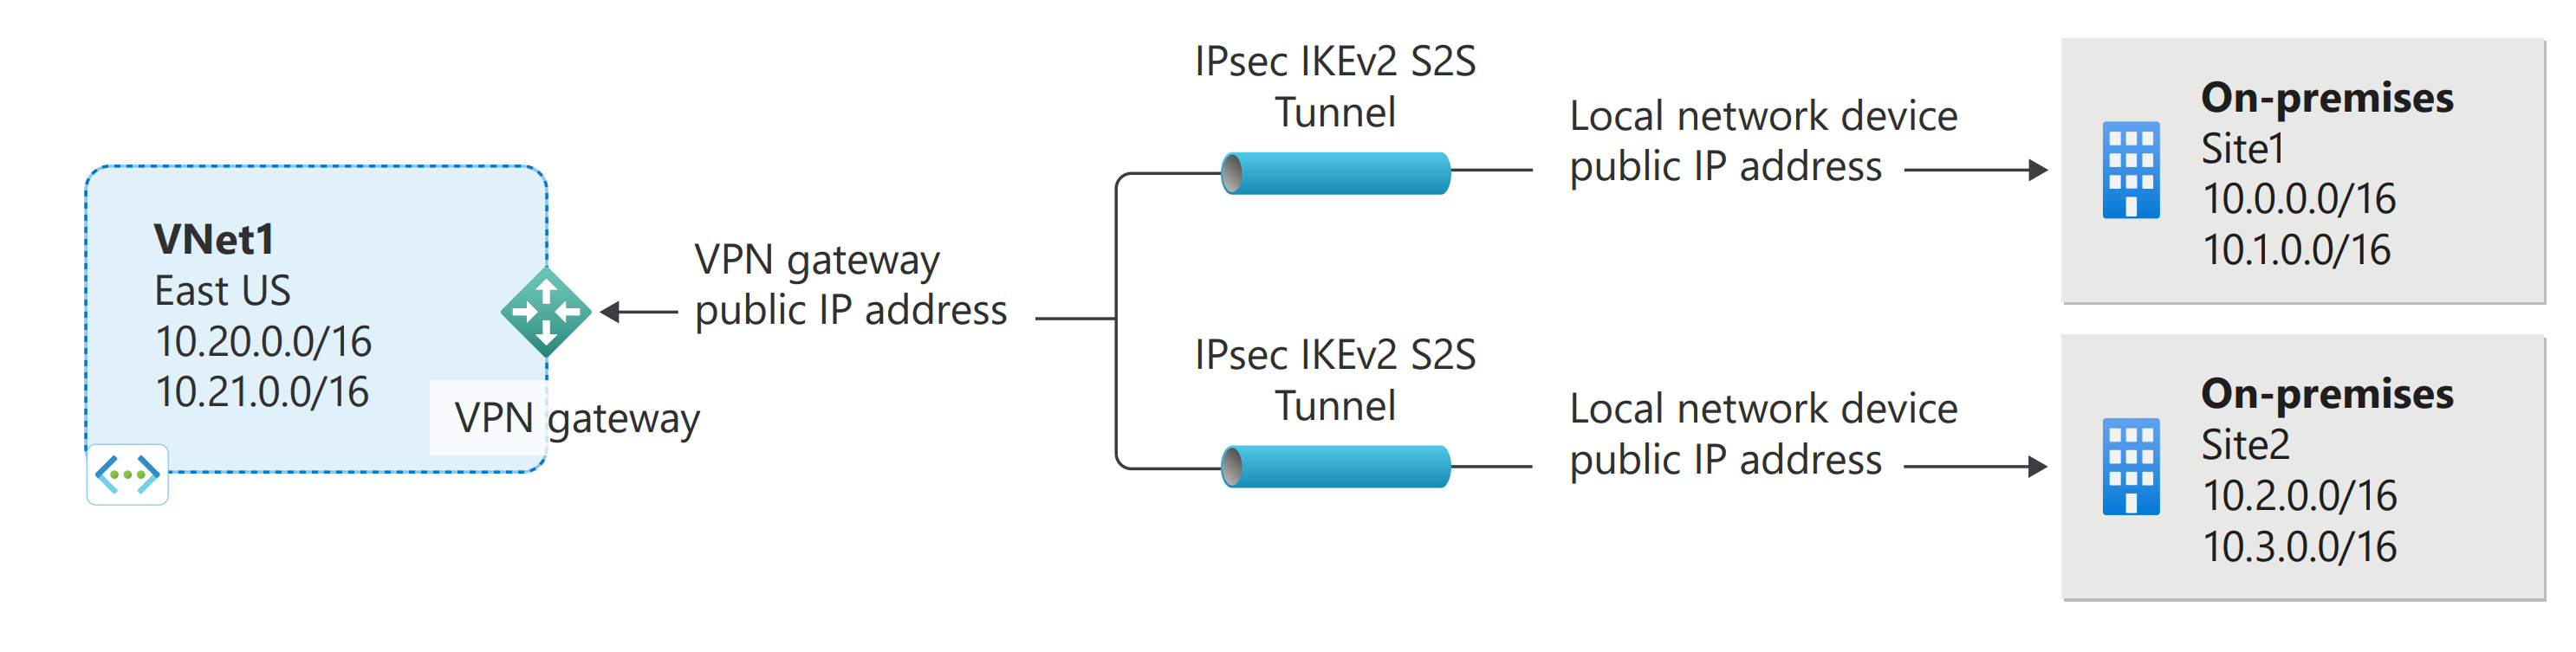
VPN Gateway helps you create encrypted cross-premises connections to your virtual network from on-premises locations, or create encrypted connections between VNets. There are different configurations available for VPN Gateway connections. Some of the main features include:
- Site-to-site VPN connectivity
- Point-to-site VPN connectivity
- VNet-to-VNet VPN connectivity
The following diagram illustrates multiple site-to-site VPN connections to the same virtual network. To view more connection diagrams, see VPN Gateway - design.
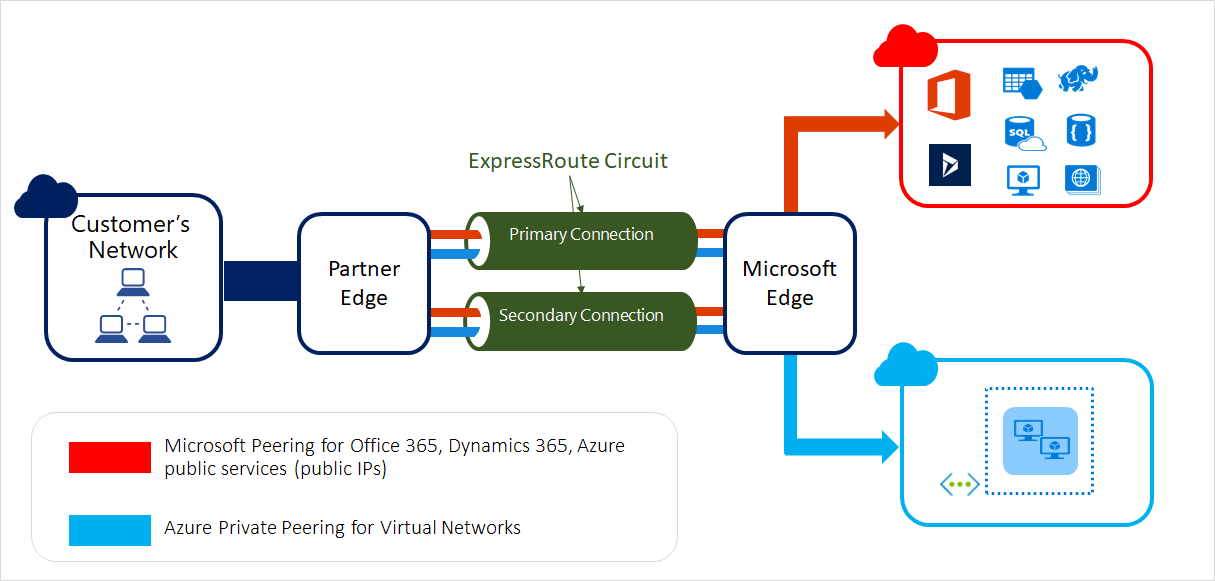
ExpressRoute
ExpressRoute enables you to extend your on-premises networks into the Microsoft cloud over a private connection facilitated by a connectivity provider. This connection is private. Traffic doesn't go over the internet. With ExpressRoute, you can establish connections to Microsoft cloud services, such as Microsoft Azure, Microsoft 365, and Dynamics 365.
Virtual WAN
Azure Virtual WAN is a networking service that brings many networking, security, and routing functionalities together to provide a single operational interface. Connectivity to Azure VNets is established by using virtual network connections. Some of the main features include:
- Branch connectivity (via connectivity automation from Virtual WAN Partner devices such as SD-WAN or VPN CPE)
- Site-to-site VPN connectivity
- Remote user VPN connectivity (point-to-site)
- Private connectivity (ExpressRoute)
- Intra-cloud connectivity (transitive connectivity for virtual networks)
- VPN ExpressRoute inter-connectivity
- Routing, Azure Firewall, and encryption for private connectivity

Peering Service
Azure Peering Service enhances customer connectivity to Microsoft cloud services such as Microsoft 365, Dynamics 365, software as a service (SaaS) services, Azure, or any Microsoft services accessible via the public internet.
This section describes networking services in Azure that help protect your network resources - Protect your applications using any or a combination of these networking services in Azure - DDoS protection, Private Link, Firewall, Web Application Firewall, Network Security Groups, and Virtual Network Service Endpoints.
Network security
This section describes networking services in Azure that protects and monitor your network resources - Firewall Manager, Firewall, Web Application Firewall, and DDoS Protection.
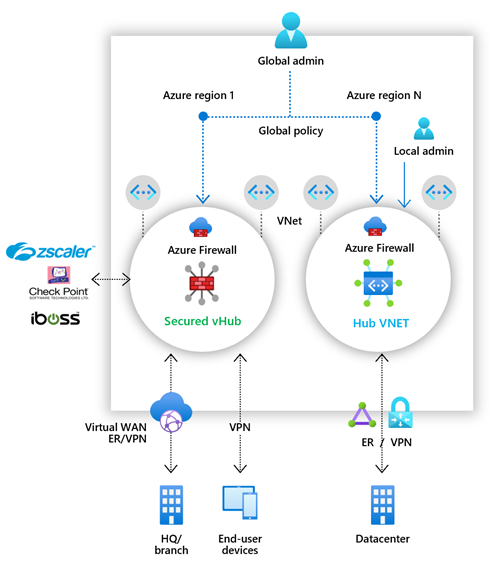
Firewall Manager
Azure Firewall Manager is a security management service that provides central security policy and routing management for cloud based security perimeters. Firewall manager can provide security management for two different types of network architecture: secure virtual hub and hub virtual network. With Azure Firewall Manager, you can deploy multiple Azure Firewall instances across Azure regions and subscriptions, implement DDoS protection plans, manage web application firewall policies, and integrate with partner security-as-a-service for enhanced security.
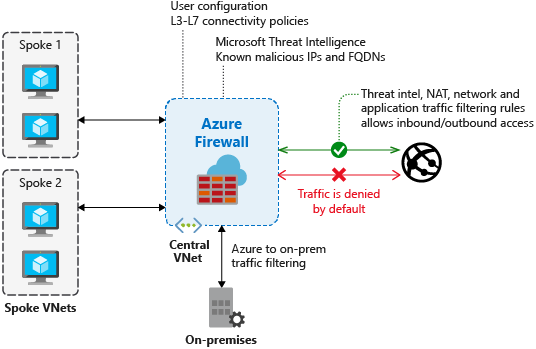
Azure Firewall
Azure Firewall is a managed, cloud-based network security service that protects your Azure Virtual Network resources. Using Azure Firewall, you can centrally create, enforce, and log application and network connectivity policies across subscriptions and virtual networks. Azure Firewall uses a static public IP address for your virtual network resources allowing outside firewalls to identify traffic originating from your virtual network.
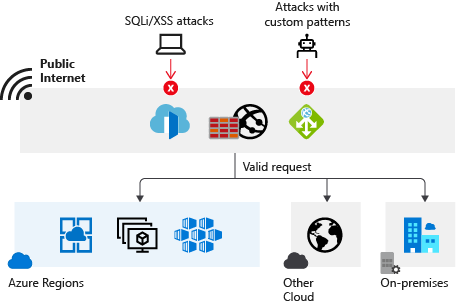
Web Application Firewall
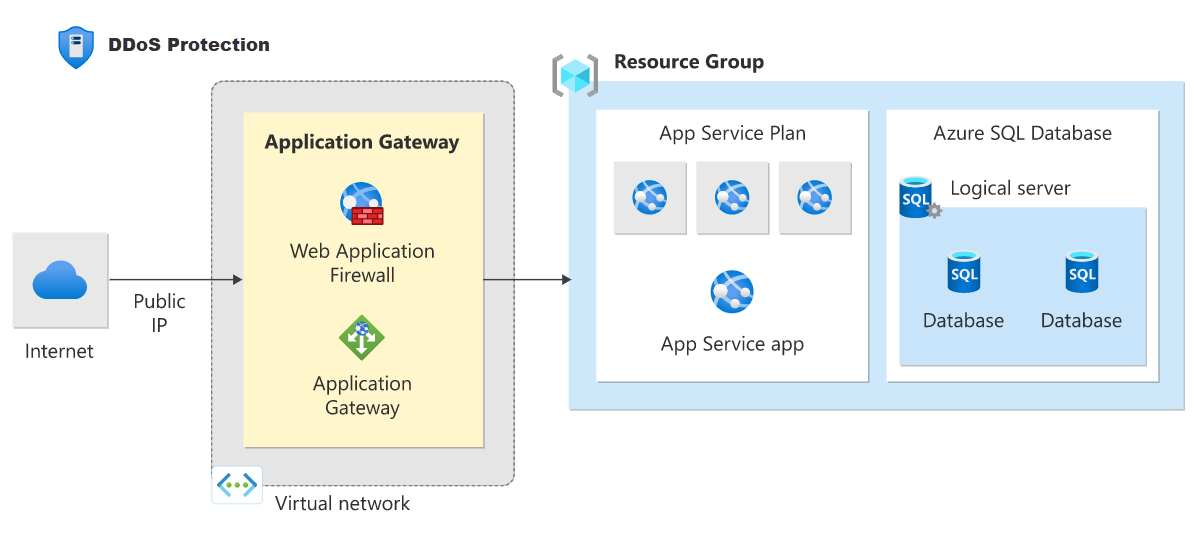
Azure Web Application Firewall (WAF) provides protection to your web applications from common web exploits and vulnerabilities such as SQL injection, and cross site scripting. Azure WAF provides out of box protection from OWASP top 10 vulnerabilities via managed rules. Additionally customers can also configure custom rules, which are customer managed rules to provide extra protection based on source IP range, and request attributes such as headers, cookies, form data fields, or query string parameters.
Customers can choose to deploy Azure WAF with Application Gateway, which provides regional protection to entities in public and private address space. Customers can also choose to deploy Azure WAF with Front Door which provides protection at the network edge to public endpoints.
DDoS Protection
Azure DDoS Protection provides countermeasures against the most sophisticated DDoS threats. The service provides enhanced DDoS mitigation capabilities for your application and resources deployed in your virtual networks. Additionally, customers using Azure DDoS Protection have access to DDoS Rapid Response support to engage DDoS experts during an active attack.
Azure DDoS Protection consists of two tiers:
- DDoS Network Protection, combined with application design best practices, provides enhanced DDoS mitigation features to defend against DDoS attacks. It's automatically tuned to help protect your specific Azure resources in a virtual network.
- DDoS IP Protection is a pay-per-protected IP model. DDoS IP Protection contains the same core engineering features as DDoS Network Protection, but differs in the following value-added services: DDoS rapid response support, cost protection, and discounts on WAF.