Create, change, or delete a route table
Azure automatically routes traffic between Azure subnets, virtual networks, and on-premises networks. If you want to change Azure's default routing, you do so by creating a route table. If you're new to routing in virtual networks, you can learn more about it in virtual network traffic routing or by completing a tutorial.
Prerequisites
If you don't have one, set up an Azure account with an active subscription. Create an account for free. Then complete one of these tasks before starting steps in any section of this article:
Portal users: Sign in to the Azure portal with your Azure account.
PowerShell users: Either run the commands in the Azure Cloud Shell, or run PowerShell from your computer. The Azure Cloud Shell is a free interactive shell that you can use to run the steps in this article. It has common Azure tools preinstalled and configured to use with your account. In the Azure Cloud Shell browser tab, find the Select environment dropdown list, then choose PowerShell if it isn't already selected.
If you're running PowerShell locally, use Azure PowerShell module version 1.0.0 or later. Run
Get-Module -ListAvailable Az.Networkto find the installed version. If you need to upgrade, see Install Azure PowerShell module. Also runConnect-AzAccountto create a connection with Azure.Azure CLI users: Run the commands via either the Azure Cloud Shell or the Azure CLI running locally. Use Azure CLI version 2.0.31 or later if you're running the Azure CLI locally. Run
az --versionto find the installed version. If you need to install or upgrade, see Install Azure CLI. Also runaz loginto create a connection with Azure.Assign the Network contributor role or a Custom role with the appropriate Permissions.
Create a route table
There's a limit to how many route tables you can create per Azure location and subscription. For details, see Networking limits - Azure Resource Manager.
On the Azure portal menu or from the Home page, select Create a resource.
In the search box, enter Route table. When Route table appears in the search results, select it.
In the Route table page, select Create.
In the Create route table dialog box:
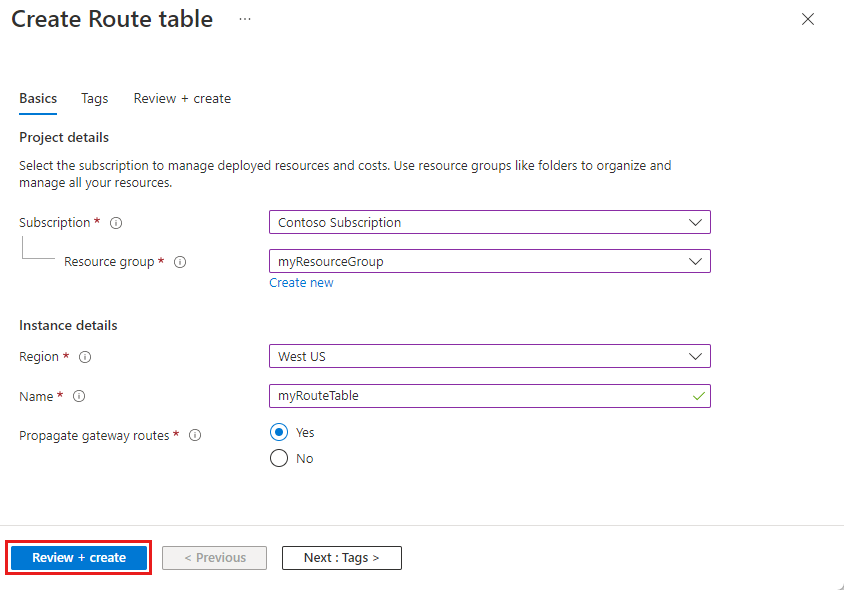
Setting Value Name Enter a name for the route table. Subscription Select the subscription to deploy the route table in. Resource group Choose an existing Resource group or select Create new to create a new resource group. Location Select a region to deploy the route table in. Propagate gateway routes If you plan to associate the route table to a subnet in a virtual network that's connected to your on-premises network through a VPN gateway, and you don't want to propagate your on-premises routes to the network interfaces in the subnet, set Virtual network gateway route propagation to Disabled. Select Review + create and then Create to create your new route table.
Create route table - commands
Tool Command Azure CLI az network route-table create PowerShell New-AzRouteTable
View route tables
To manage your virtual network, access the Azure portal and use the search function to locate "Route tables." Here, you'll find a list of all the route tables available within your subscription.
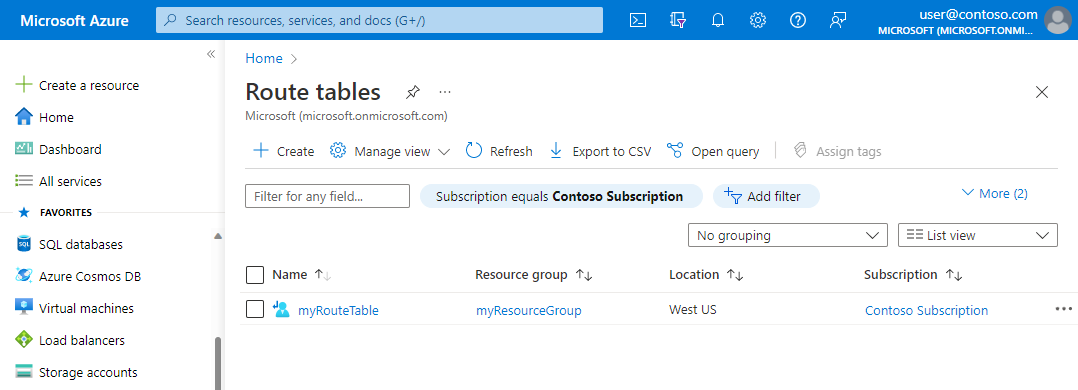
Go to the Azure portal to manage your virtual network.
Search for and select Route tables. The route tables that exist in your subscription are listed.
View route table - commands
Tool Command Azure CLI az network route-table list PowerShell Get-AzRouteTable
View details of a route table
Follow the below steps:
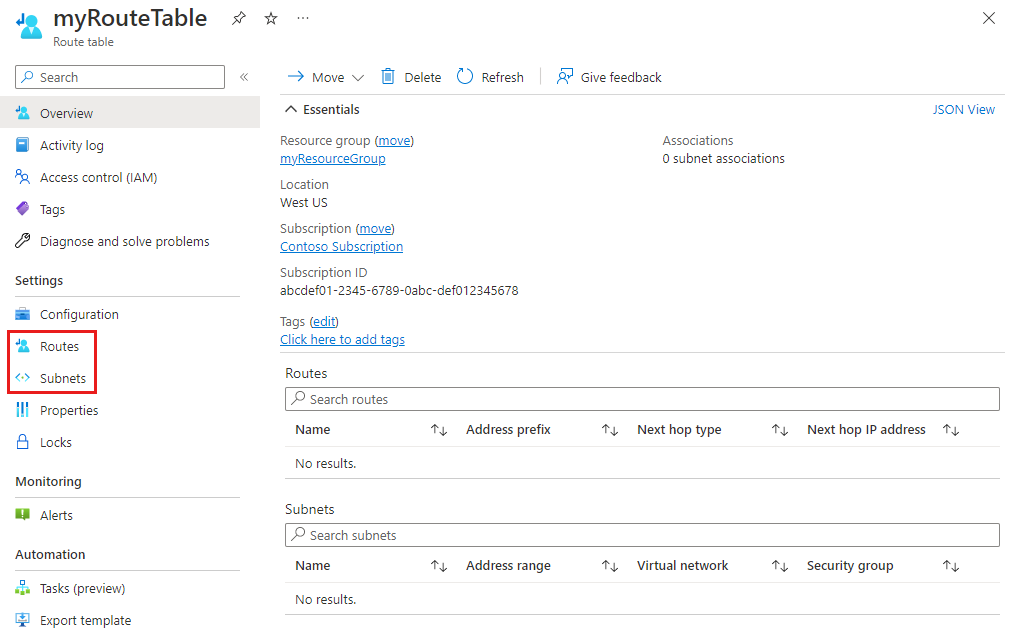
Go to the Azure portal to manage your virtual network. Search for and select Route tables.
In the route table list, choose the route table that you want to view details for.
In the route table page, under Settings, view the Routes in the route table or the Subnets the route table is associated to.
To learn more about common Azure settings, see the following information:
View details of route table - commands
Tool Command Azure CLI az network route-table show PowerShell Get-AzRouteTable
Change a route table
Follow the below steps:
Go to the Azure portal to manage your virtual network. Search for and select Route tables.
In the route table list, choose the route table that you want to change.
The most common changes are to add routes, remove routes, associate route tables to subnets, or dissociate route tables from subnets.
Change a route table - commands
Tool Command Azure CLI az network route-table update PowerShell Set-AzRouteTable
Associate a route table to a subnet
You can optionally associate a route table to a subnet. A route table can be associated to zero or more subnets. Route tables aren't associated to virtual networks. You must associate a route table to each subnet you want the route table associated to.
Azure routes all traffic leaving the subnet based on routes you've created:
Within route tables
Routes propagated from an on-premises network, if the virtual network is connected to an Azure virtual network gateway (ExpressRoute or VPN).
You can only associate a route table to subnets in virtual networks that exist in the same Azure location and subscription as the route table.
Go to the Azure portal to manage your virtual network. Search for and select Virtual networks.
In the virtual network list, choose the virtual network that contains the subnet you want to associate a route table to.
In the virtual network menu bar, choose Subnets.
Select the subnet you want to associate the route table to.
In Route table, choose the route table you want to associate to the subnet.
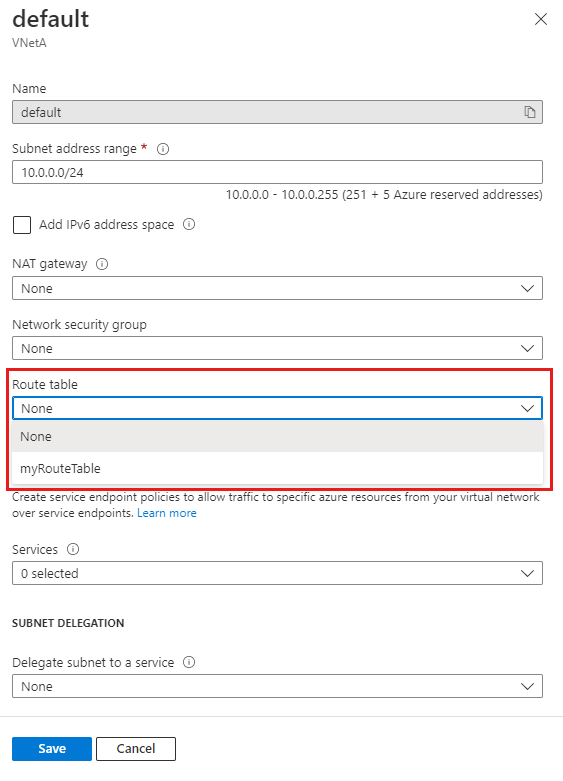
Select Save.
If your virtual network is connected to an Azure VPN gateway, don't associate a route table to the gateway subnet that includes a route with a destination of 0.0.0.0/0. Doing so can prevent the gateway from functioning properly. For more information about using 0.0.0.0/0 in a route, see Virtual network traffic routing.
Associate a route table - commands
Tool Command Azure CLI az network vnet subnet update PowerShell Set-AzVirtualNetworkSubnetConfig
Dissociate a route table from a subnet
When you dissociate a route table from a subnet, Azure routes traffic based on its default routes.
Go to the Azure portal to manage your virtual network. Search for and select Virtual networks.
In the virtual network list, choose the virtual network that contains the subnet you want to dissociate a route table from.
In the virtual network menu bar, choose Subnets.
Select the subnet you want to dissociate the route table from.
In Route table, choose None.
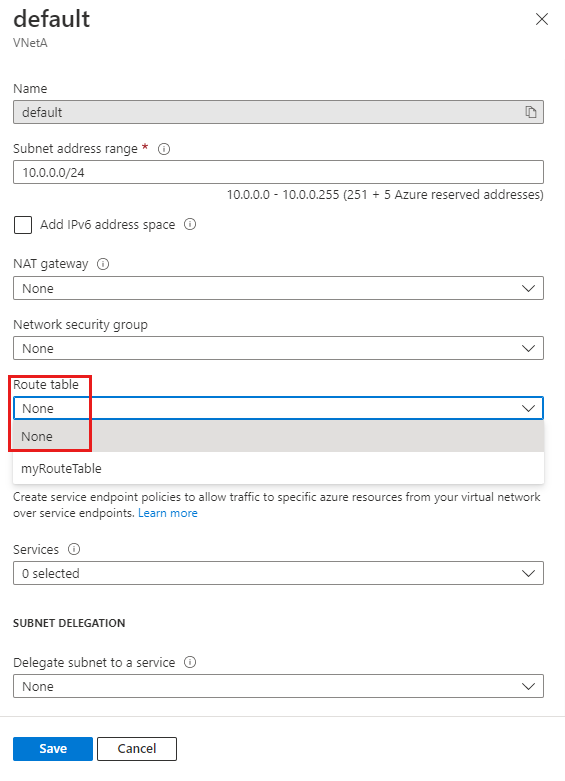
Select Save.
Dissociate a route table - commands
Tool Command Azure CLI az network vnet subnet update PowerShell Set-AzVirtualNetworkSubnetConfig
Delete a route table
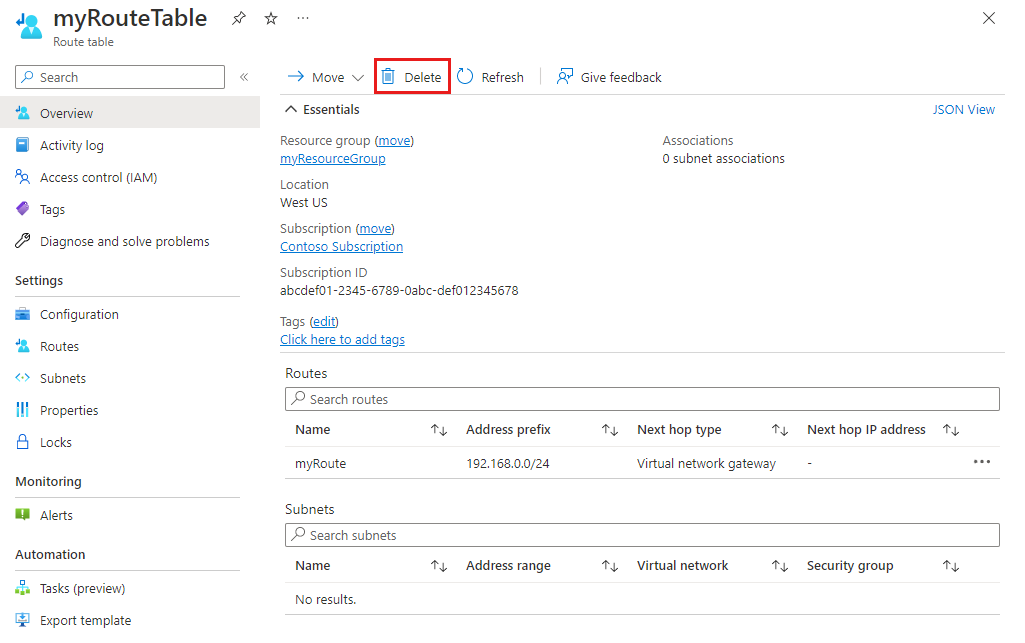
You can't delete a route table that's associated to any subnets. Dissociate a route table from all subnets before attempting to delete it.
Go to the Azure portal to manage your route tables. Search for and select Route tables.
In the route table list, choose the route table you want to delete.
Select Delete, and then select Yes in the confirmation dialog box.
Delete a route table - commands
Tool Command Azure CLI az network route-table delete PowerShell Remove-AzRouteTable
Create a route
There's a limit to how many routes per route table can create per Azure location and subscription. For details, see Networking limits - Azure Resource Manager.
Go to the Azure portal to manage your route tables. Search for and select Route tables.
In the route table list, choose the route table you want to add a route to.
From the route table menu bar, choose Routes and then select + Add.
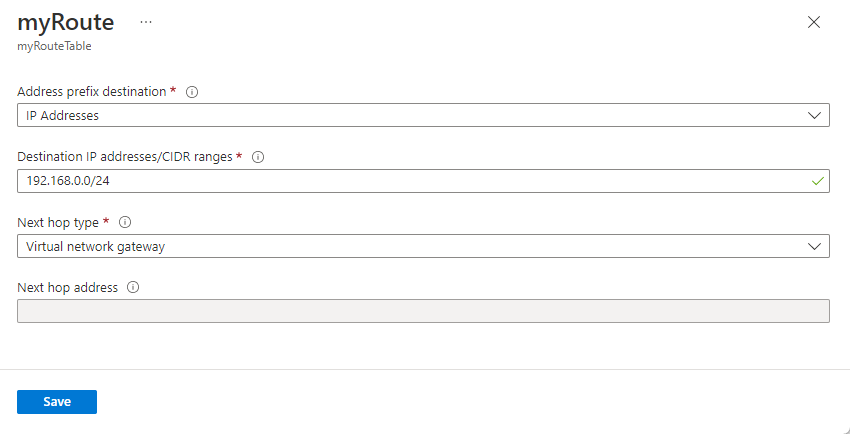
Enter a unique Route name for the route within the route table.
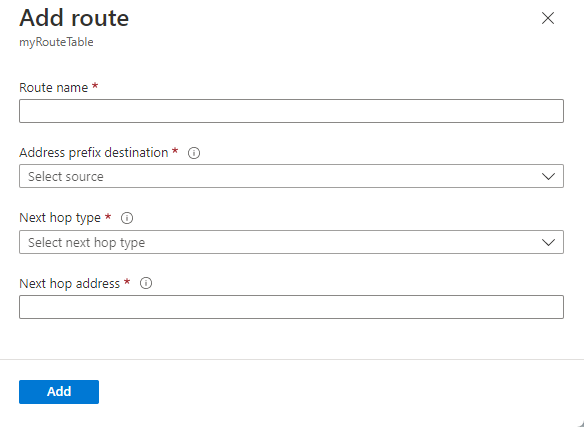
Enter the Address prefix, in Classless Inter-Domain Routing (CIDR) notation, that you want to route traffic to. The prefix can't be duplicated in more than one route within the route table, though the prefix can be within another prefix. For example, if you defined 10.0.0.0/16 as a prefix in one route, you can still define another route with the 10.0.0.0/22 address prefix. Azure selects a route for traffic based on longest prefix match. To learn more, see How Azure selects a route.
Choose a Next hop type. To learn more about next hop types, see Virtual network traffic routing.
If you chose a Next hop type of Virtual appliance, enter an IP address for Next hop address.
Select OK.
Create a route - commands
Tool Command Azure CLI az network route-table route create PowerShell New-AzRouteConfig
View routes
A route table contains zero or more routes. To learn more about the information listed when viewing routes, see Virtual network traffic routing.
Go to the Azure portal to manage your route tables. Search for and select Route tables.
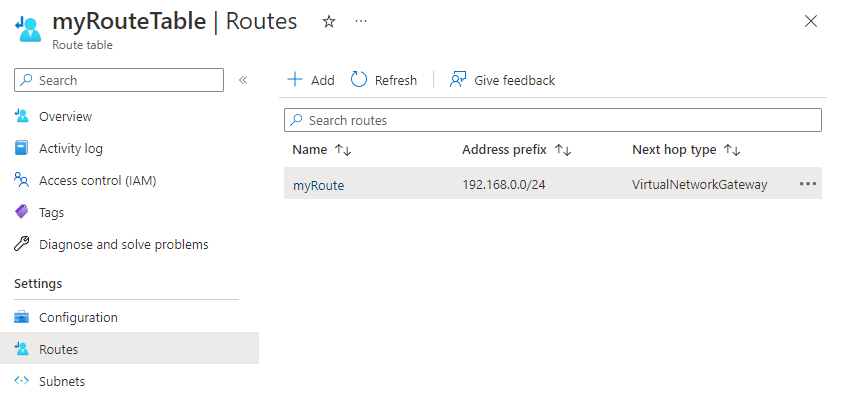
In the route table list, choose the route table you want to view routes for.
In the route table menu bar, choose Routes to see the list of routes.
View routes - commands
Tool Command Azure CLI az network route-table route list PowerShell Get-AzRouteConfig
View details of a route
Follow the below steps:
Go to the Azure portal to manage your route tables. Search for and select Route tables.
In the route table list, choose the route table containing the route you want to view details for.
In the route table menu bar, choose Routes to see the list of routes.
Select the route you want to view details of.
View details of a route - commands
Tool Command Azure CLI az network route-table route show PowerShell Get-AzRouteConfig
Change a route
Follow the below steps:
Go to the Azure portal to manage your route tables. Search for and select Route tables.
In the route table list, choose the route table containing the route you want to change.
In the route table menu bar, choose Routes to see the list of routes.
Choose the route you want to change.
Change existing settings to their new settings, then select Save.
Change a route - commands
Tool Command Azure CLI az network route-table route update PowerShell Set-AzRouteConfig
Delete a route
Follow the below steps:
Go to the Azure portal to manage your route tables. Search for and select Route tables.
In the route table list, choose the route table containing the route you want to delete.
In the route table menu bar, choose Routes to see the list of routes.
Choose the route you want to delete.
Select the ... and then select Delete. Select Yes in the confirmation dialog box.

Delete a route - commands
Tool Command Azure CLI az network route-table route delete PowerShell Remove-AzRouteConfig
View effective routes
The effective routes for each VM-attached network interface are a combination of route tables that you've created, Azure's default routes, and any routes propagated from on-premises networks via the Border Gateway Protocol (BGP) through an Azure virtual network gateway. Understanding the effective routes for a network interface is helpful when troubleshooting routing problems. You can view the effective routes for any network interface that's attached to a running VM.
Go to the Azure portal to manage your VMs. Search for and select Virtual machines.
In the virtual machine list, choose the VM you want to view effective routes for.
In the VM menu bar, choose Networking.
Select the name of a network interface.
In the network interface menu bar, select Effective routes.
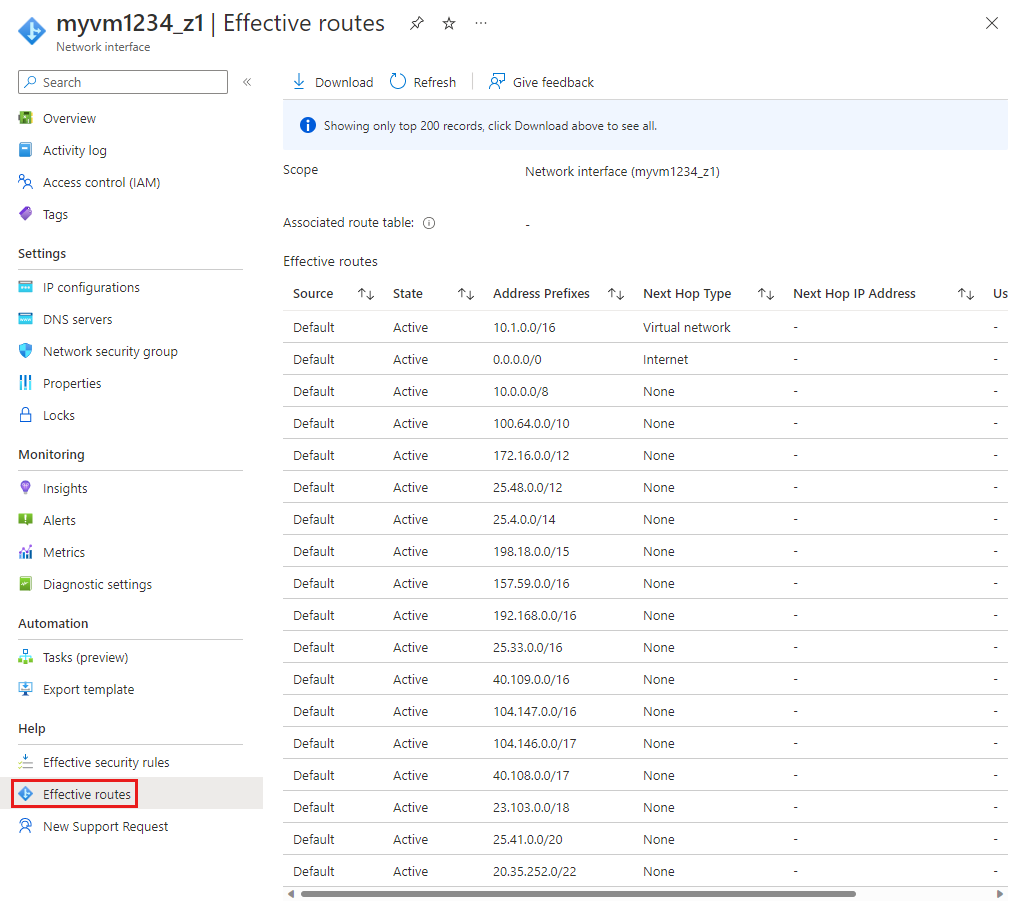
Review the list of effective routes to see whether the correct route exists for where you want to route traffic to. Learn more about next hop types that you see in this list in Virtual network traffic routing.
View effective routes - commands
Tool Command Azure CLI az network nic show-effective-route-table PowerShell Get-AzEffectiveRouteTable
Validate routing between two endpoints
You can determine the next hop type between a virtual machine and the IP address of another Azure resource, an on-premises resource, or a resource on the Internet. Determining Azure's routing is helpful when troubleshooting routing problems. To complete this task, you must have an existing network watcher. If you don't have an existing network watcher, create one by completing the steps in Create a Network Watcher instance.
Go to the Azure portal to manage your network watchers. Search for and select Network Watcher.
In the network watcher menu bar, choose Next hop.
In the Network Watcher | Next hop page: