Monday 17 June 2024

Manage a public IP address by using Azure Firewall


Manage a public IP address by using Azure Firewall

In this article, you learn how to manage public IP addresses for Azure Firewall by using the Azure portal. You learn how to create an Azure Firewall by using an existing public IP in your subscription, change the IP configuration, and finally, add an IP configuration to the firewall.

Azure Firewall is a cloud-based network security service that protects your Azure Virtual Network resources. Azure Firewall requires at least one public static IP address to be configured. This IP or set of IPs is the external connection point to the firewall.

Azure Firewall supports Standard SKU public IP addresses. Basic SKU public IP address and public IP prefixes aren't supported.

Prerequisites

  • An Azure account with an active subscription. Create one for free.
  • Three Standard SKU public IP addresses that aren't associated with any resources. For more information on creating a Standard SKU public IP address, see Quickstart: Create a public IP address by using the Azure portal.
    • For the purposes of the examples in this article, create three new public IP addresses: myStandardPublicIP-1myStandardPublicIP-2, and myStandardPublicIP-3.

Create an Azure firewall with an existing public IP

In this section, you create an Azure firewall. Use the first IP address you created in the prerequisites as the public IP for the firewall.

  1. In the Azure portal, search for and select Firewalls.

  2. On the Firewalls page, select Create.

  3. In Create firewall, enter or select the following information.

    SettingValue
    Project details
    SubscriptionSelect your subscription.
    Resource groupCreate a new resource group named myResourceGroupFW.
    Instance details
    NameEnter myFirewall.
    RegionSelect West US 2.
    Availability zoneLeave the default of None.
    Firewall SKUSelect Standard.
    Firewall managementLeave the default of Use a Firewall Policy to manage this firewall.
    Firewall policyCreate a new firewall policy named myFirewallPolicy in West US 2, and set the Policy tier to Standard.
    Choose a virtual networkLeave default of Create new.
    Virtual network nameEnter myVNet.
    Address spaceEnter 10.0.0.0/16.
    Subnet address spaceEnter 10.0.0.0/26.
    Public IP addressSelect myStandardPublicIP-1 or your public IP.
    Forced tunnelingLeave the default of Disabled.
  4. Select Review + create.

  5. Select Create.

The following image shows the Create firewall page with the example information.

Screenshot that shows the Create firewall page with the example information.

Change the public IP address for a firewall

In this section, you change the public IP address associated with the firewall. A firewall must have at least one public IP address associated with its configuration. You can't update the IP address if the firewall's existing IP has any destination network address translation (DNAT) rules associated with it.

  1. In the Azure portal, search for and select Firewalls.

  2. On the Firewalls page, select myFirewall.

  3. On the myFirewall page, go to Settings, and then select Public IP configuration.

  4. In Public IP configuration, select myStandardPublicIP-1.

  5. Select the Public IP address dropdown, and then select myStandardPublicIP-2.
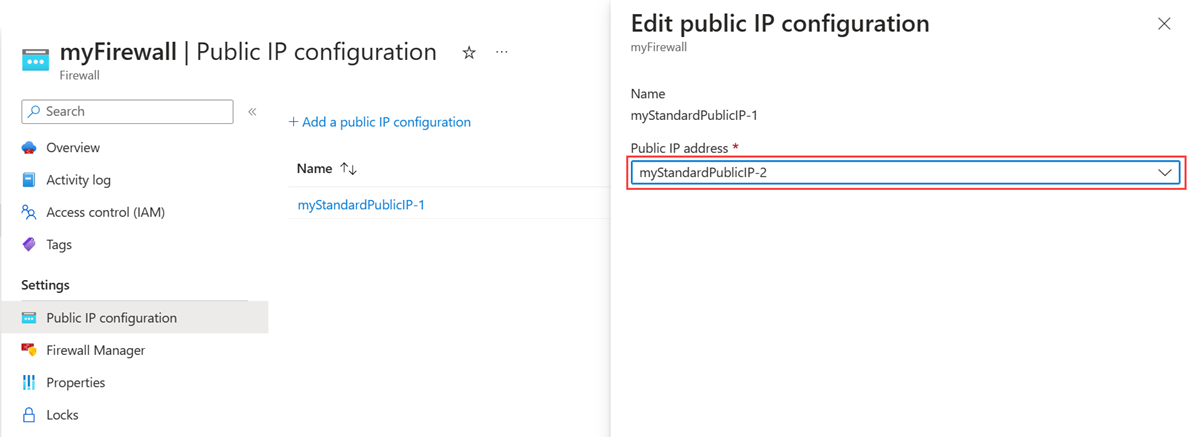
    Screenshot that shows the Edd public IP configuration pane and highlights the Public IP address field.

  6. Select Save.

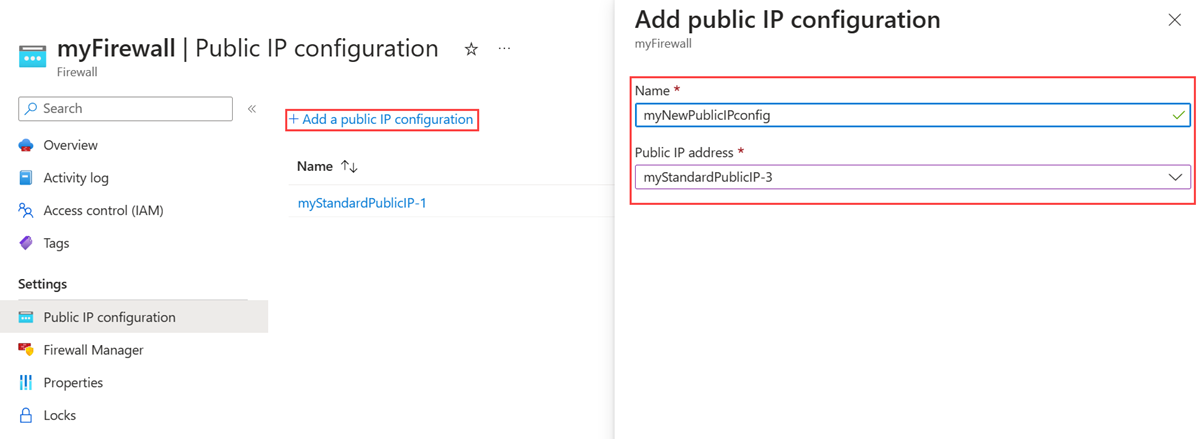
Add a public IP configuration to a firewall

In this section, you add a public IP configuration to Azure Firewall. For more information about multiple IPs, see Multiple public IP addresses.

  1. In the Azure portal, search for and select Firewalls.

  2. On the Firewalls page, select myFirewall.

  3. On the myFirewall page, go to Settings, and then select Public IP configuration.

  4. Select Add a public IP configuration.

  5. In Name, enter myNewPublicIPconfig.

  6. In Public IP address, select myStandardPublicIP-3.

    Screenshot that shows the Add public IP configuration pane and highlights the Name and Public IP address fields.

IP Groups in Azure Firewall


IP Groups in Azure Firewall

IP Groups allow you to group and manage IP addresses for Azure Firewall rules in the following ways:

  • As a source address in DNAT rules
  • As a source or destination address in network rules
  • As a source address in application rules

An IP Group can have a single IP address, multiple IP addresses, one or more IP address ranges or addresses and ranges in combination.

IP Groups can be reused in Azure Firewall DNAT, network, and application rules for multiple firewalls across regions and subscriptions in Azure. Group names must be unique. You can configure an IP Group in the Azure portal, Azure CLI, or REST API. A sample template is provided to help you get started.

Sample format

The following IPv4 address format examples are valid to use in IP Groups:

  • Single address: 10.0.0.0
  • CIDR notation: 10.1.0.0/32
  • Address range: 10.2.0.0-10.2.0.31

Create an IP Group

An IP Group can be created using the Azure portal, Azure CLI, or REST API. For more information, see Create an IP Group.

Browse IP Groups

  1. In the Azure portal search bar, type IP Groups and select it. You can see the list of the IP Groups, or you can select Add to create a new IP Group.

  2. Select an IP Group to open the overview page. You can edit, add, or delete IP addresses or IP Groups.

    IP Groups overview

Manage an IP Group

You can see all the IP addresses in the IP Group and the rules or resources that are associated with it. To delete an IP Group, you must first dissociate the IP Group from the resource that is using it.

  1. To view or edit the IP addresses, select IP Addresses under Settings on the left pane.
  2. To add a single or multiple IP address(es), select Add IP Addresses. This opens the Drag or Browse page for an upload, or you can enter the address manually.
  3. Selecting the ellipses () to the right to edit or delete IP addresses. To edit or delete multiple IP addresses, select the boxes and select Edit or Delete at the top.
  4. Finally, can export the file in the CSV file format.


Use an IP Group

You can now select IP Group as a Source type or Destination type for the IP address(es) when you create Azure Firewall DNAT, application, or network rules.

IP Groups in Firewall

Parallel IP Group updates (preview)

You can now update multiple IP Groups in parallel at the same time. This is particularly useful for administrators who want to make configuration changes more quickly and at scale, especially when making those changes using a dev ops approach (templates, ARM, CLI, and Azure PowerShell).

With this support, you can now:

  • Update 20 IP Groups at a time
  • Update the firewall and firewall policy during IP Group updates
  • Use the same IP Group in parent and child policy
  • Update multiple IP Groups referenced by firewall policy or classic firewall simultaneously
  • Receive new and improved error messages
    • Fail and succeed states

      For example, if there is an error with one IP Group update out of 20 parallel updates, the other updates proceed, and the errored IP Group fails. In addition, if the IP Group update fails, and the firewall is still healthy, the firewall remains in a Succeeded state. To check if the IP Group update has failed or succeeded, you can view the status on the IP Group resource.

To activate Parallel IP Group support, you can register the feature using either Azure PowerShell or the Azure portal.

It can take several minutes for this to take effect. Once the feature is completely registered, consider performing an update on Azure Firewall for the change to take effect immediately.

Azure portal

  1. Navigate to Preview features in the Azure portal.
  2. Search and register AzureFirewallParallelIPGroupUpdate.
  3. Ensure the feature is enabled.

Screenshot showing the parallel IP groups feature.

IP Groups in Azure Firewall policy


IP Groups in Azure Firewall policy

IP Groups allow you to group and manage IP addresses for Azure Firewall policy in the following ways:

  • As a source type in DNAT rules
  • As a source or destination type in network rules
  • As a source type in application rules

An IP Group can have a single IP address, multiple IP addresses, or one or more IP address ranges.

IP Groups can be reused in Azure Firewall DNAT, network, and application rules for multiple firewalls across regions and subscriptions in Azure. Group names must be unique. You can configure an IP Group in the Azure portal, Azure CLI, or REST API. A sample template is provided to help you get started.

Sample format

The following IPv4 address format examples are valid to use in IP Groups:

  • Single address: 10.0.0.0
  • CIDR notation: 10.1.0.0/32
  • Address range: 10.2.0.0-10.2.0.31

Create an IP Group

An IP Group can be created using the Azure portal, Azure CLI, or REST API. For more information, see Create an IP Group.

Browse IP Groups

  1. In the Azure portal search bar, type IP Groups and select it. You can see the list of the IP Groups, or you can select Add to create a new IP Group.

  2. Select an IP Group to open the overview page. You can edit, add, or delete IP addresses or IP Groups.

    IP Groups overview

Manage an IP Group

You can see all the IP addresses in the IP Group and the rules or resources that are associated with it. To delete an IP Group, you must first dissociate the IP Group from the resource that is using it.

  1. To view or edit the IP addresses, select IP Addresses under Settings on the left pane.
  2. To add a single or multiple IP address(es), select Add IP Addresses. This opens the Drag or Browse page for an upload, or you can enter the address manually.
  3. Selecting the ellipses () to the right to edit or delete IP addresses. To edit or delete multiple IP addresses, select the boxes and select Edit or Delete at the top.
  4. Finally, can export the file in the CSV file format.

 Bemærk

If you delete all the IP addresses in an IP Group while it is still in use in a rule, that rule is skipped.

Use an IP Group

You can now select IP Group as a Source type or Destination type for the IP address(es) when you create a policy with DNAT, application, or network rules.

IP Groups in Firewall

IP Groups in Azure Firewall policy


IP Groups in Azure Firewall policy

IP Groups allow you to group and manage IP addresses for Azure Firewall policy in the following ways:

  • As a source type in DNAT rules
  • As a source or destination type in network rules
  • As a source type in application rules

An IP Group can have a single IP address, multiple IP addresses, or one or more IP address ranges.

IP Groups can be reused in Azure Firewall DNAT, network, and application rules for multiple firewalls across regions and subscriptions in Azure. Group names must be unique. You can configure an IP Group in the Azure portal, Azure CLI, or REST API. A sample template is provided to help you get started.

Sample format

The following IPv4 address format examples are valid to use in IP Groups:

  • Single address: 10.0.0.0
  • CIDR notation: 10.1.0.0/32
  • Address range: 10.2.0.0-10.2.0.31

Create an IP Group

An IP Group can be created using the Azure portal, Azure CLI, or REST API. For more information, see Create an IP Group.

Browse IP Groups

  1. In the Azure portal search bar, type IP Groups and select it. You can see the list of the IP Groups, or you can select Add to create a new IP Group.

  2. Select an IP Group to open the overview page. You can edit, add, or delete IP addresses or IP Groups.

    IP Groups overview

Manage an IP Group

You can see all the IP addresses in the IP Group and the rules or resources that are associated with it. To delete an IP Group, you must first dissociate the IP Group from the resource that is using it.

  1. To view or edit the IP addresses, select IP Addresses under Settings on the left pane.
  2. To add a single or multiple IP address(es), select Add IP Addresses. This opens the Drag or Browse page for an upload, or you can enter the address manually.
  3. Selecting the ellipses () to the right to edit or delete IP addresses. To edit or delete multiple IP addresses, select the boxes and select Edit or Delete at the top.
  4. Finally, can export the file in the CSV file format.

 Obs!

If you delete all the IP addresses in an IP Group while it is still in use in a rule, that rule is skipped.

Use an IP Group

You can now select IP Group as a Source type or Destination type for the IP address(es) when you create a policy with DNAT, application, or network rules.

IP Groups in Firewall