Tuesday, 28 May 2024

Deploy Application to Azure Kubernetes Service


In this lab we will create an Azure Kubernetes Service (AKS) cluster using the Azure CLI. We will deploy an application to the cluster, it will be a a multi-container application that includes a web front end and a Redis Cache instance. We will then see monitor the health of the cluster and pods that run the sample application.

DevOps Course Source

This lab is used in the following course:

  • AZ-400T05: Implementing Application infrastructure

Pre-requisites:

  • An Azure Subscription

Lab Tasks:

  • Task 1: Setup the environment and create an Azure resource group
  • Task 2: Create AKS cluster
  • Task 3: Connect to the cluster
  • Task 4: Create sample application and deploy it to the AKS cluster
  • Task 5: Test the running application
  • Task 6: Monitor application and cluster health

Estimated Lab Time:

  • approx. 45 minutes

Task 1: Setup the environment and create an Azure resource group

We will use Azure Cloud Shell for ease of use and because many of the elements we need such as Azure CLI and the Kubernetes command line client are pre-installed, ready for use.

  1. Open Azure Cloud Shell by going to https://shell.azure.com, or using the Azure Portal and selecting Bash as the environment option.

    Screenshot of the Azure Cloud Shell signed in in a Bash terminal

  2. Create an Azure resource group by running the following command:

     az group create --name myResourceGroup --location < datacenter nearest you >
    

Task 2: Create AKS cluster

  1. Create an AKS cluster by running the following command:

     az aks create `
         --resource-group myResourceGroup `
         --name myAKSCluster `
         --node-count 1 `
         --enable-addons monitoring `
         --generate-ssh-keys
    

    Screenshot of the Azure Cloud Shell with the azure cli command to create a cluster running

  2. It can take up to 5 minutes to deploy the AKS cluster. After a few minutes, the command completes and returns JSON-formatted information about the cluster.

    Screenshot of the Azure Cloud Shell with the azure cli command having completed and provisioning state of succeeded highlighted

  3. You can also go into the Azure Portal and vew the created Azure Kubernetes cluster

    Screenshot of the Azure Portal with the deployed Azure Kubernetes cluster highlighted

Task 3: Connect to the cluster

  1. To manage a Kubernetes cluster, you use kubectl, the Kubernetes command-line client. If you use Azure Cloud Shell, kubectl is already installed. To install kubectl locally, use the following command:

     az aks install-cli
    
  2. To configure kubectl to connect to your Kubernetes cluster, use the az aks get-credentials command. This command downloads credentials and configures the Kubernetes CLI to use them:

     az aks get-credentials --resource-group myResourceGroup --name myAKSCluster
    

    Screenshot of the Azure Cloud Shell with the azure cli command to download credentials and configure the Kubernetes client highlighted

  3. Verify the connection to your cluster by running the following command. Make sure that the status of the node is Ready:

     kubectl get nodes
    

    Screenshot of the Azure Cloud Shell with the kubectl get nodes command highlighted

Task 4: Create sample application and deploy it to the AKS cluster

  1. We define our application in a yaml file and we will apply thsi application definition to the AKS cluster using an already created file at https://raw.githubusercontent.com/Microsoft/PartsUnlimited/master/Labfiles/AZ-400T05_Implementing_Application_Infrastructure/M03/azure-vote.yaml. Open the file and have a look at its contents to get a feeling for what it is doing.

    • Note the following items in the .yaml definition:
      • The presence of different Kind values to designate deployments and services
      • The delimeter --- needs to be present to separate the deployments and services When copying the code ensure it is present in your yaml file. This demarcates the services and deployments.
      • The definition of container resources for ports, cpu and memory limits, container images to use and other configuration values

    Note: In general if you are using the Azure Cloud Shell, you could also create this or any other configuration file needed by using the vi or nano editors, in either the bash or PowerShell terminals. Another option is to use the built in Editor in the Azure Cloud Shell by clicking the editor icon in the Azure Cloud Shell taskbar. A final option is to create the file locally, and the use the Upload/Download file option within the Azure Cloud Shell, to upload the file.

    Screenshot of the Azure Cloud Shell with the upload/download file and editor icons in the taskbar highlighted

  2. Deploy the application by running the following command in Azure Cloud Shell:

     kubectl apply -f https://raw.githubusercontent.com/Microsoft/PartsUnlimited/master/Labfiles/AZ-400T05_Implementing_Application_Infrastructure/M03/azure-vote.yaml
    

    You should receive output showing the Deployments and Services were created successfully after it runs as per the below.

     deployment "azure-vote-back" created
     service "azure-vote-back" created
     deployment "azure-vote-front" created
     service "azure-vote-front" created
    

    Screenshot of the Azure Cloud Shell with the .yaml file having been run and deployments and services successfully created

Task 5: Test the running application

  1. When the application runs, a Kubernetes service exposes the application front end to the internet. This process can take a few minutes to complete. To monitor progress run the command

     kubectl get service azure-vote-front --watch
    
  2. Initially the EXTERNAL-IP for the azure-vote-front service is shown as pending.

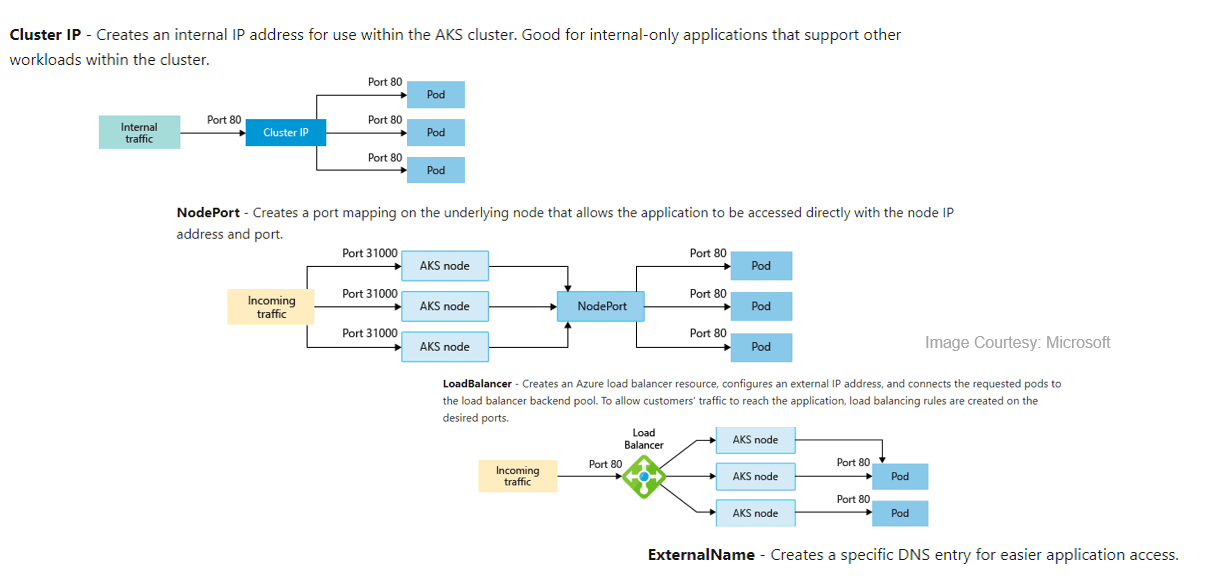
     NAME               TYPE           CLUSTER-IP   EXTERNAL-IP   PORT(S)        AGE
     azure-vote-front   LoadBalancer   10.0.37.27   < pending >     80:30572/TCP   6s
    
  3. When the EXTERNAL-IP address changes from pending to an actual public IP address, use CTRL-C to stop the kubectl watch process. The following example output shows a valid public IP address assigned to the service:

     azure-vote-front   LoadBalancer   10.0.37.27   52.179.23.131   80:30572/TCP   2m
    

    Screenshot of the Azure Cloud Shell kubectl get service watch command running

  4. To see the Azure Vote app in action, open a web browser to the external IP address of your service. You can click the Cats and Dogs and Reset buttons to verify functionality and generate some workload.

    Screenshot of the deployed voting app in a web browser with the external IP address that we obtained earlier highlighted

Task 6: Monitor application and cluster health

When the AKS cluster was created, Azure Monitor for containers was enabled to capture health metrics for both the cluster nodes and pods. These health metrics are available in the Azure portal. To see current status, uptime, and resource usage for the Azure Vote pods, complete the following steps in the Azure portal:

  1. Open the azure portal at https://portal.azure.com

  2. Select your resource group, such as myResourceGroup, then select your AKS cluster, such as myAKSCluster.

    Screenshot of the Azure Portal with the deployed Azure Kubernetes cluster highlighted

  3. Under Monitoring on the left-hand side, choose Insights and then across the top, choose to + Add Filter

    Screenshot of the AKS cluster in the Monitoring Insights section

  4. Select Namespace as the property, then choose < All but kube-system >

    Screenshot of the AKS cluster in the Monitoring Insights section with filter added for namespace and all but kube system highlighted

  5. Select the Containers tab. There are two containers present, azure-vote-back and azure-vote-front

    Screenshot of the AKS cluster in the Monitoring Insights section the containers tab selected and the two containers highlighted

  6. View logs for the azure-vote-front pod by selecting the View container logs link on the right-hand side of the containers list.

    Screenshot of the AKS cluster in the Monitoring Insights section the containers tab with the azure-vote-front selected and the View container logs link highlighted

  7. These logs include the stdout and stderr streams from the container.

    Screenshot of the AKS cluster in the Monitoring Insights section the containers tab selected and the two containers highlighted

    If you have time you can click around some more within the settings to get a feel for structure and configuration, looking at the ClusterNodeController and Container settings. Also go to the Settings > scale section to view how to configure scale. You can scale the number of nodes in your cluster to increase the total amount of cores and memory available for your container applications. Having at least 3 nodes is recommended for a more resilient cluster.

Congratulations! You have created and deployed a sample Application to an Azure Kubernetes cluster

Note: If you are not continuing to use the Azure resources, remember to delete them to avoid incurring costs.

Summary

In this lab you have:

  • Setup the environment and created an Azure resource group
  • Created Azure Kubernetes Service (AKS) cluster
  • Connected to the cluster
  • Created a sample application and deployed it to the AKS cluster
  • Tested the running sample application
  • Monitored application and cluster health

Azure Kubernetes Service (AKS) – Cluster Management Tutorial


What are Azure Kubernetes Services (AKS)?

At the heart of modern application development lies the concept of containerization, a method that packages software in a way that’s abstracted from the environment in which it actually runs. This abstraction facilitates consistent, efficient, and scalable deployments. Azure Kubernetes Services (AKS) is Microsoft’s managed container orchestration service, designed to simplify the deployment, management, and operations of containerized applications through Microsoft Azure.

Azure, AKS, Diagram, Framework, Architecture, Infrastructure, Kubernetes Clusters,
Source: Microsoft

How Azure Complements Kubernetes

Kubernetes, originally developed by Google, has set the standard for container orchestration, offering the tools necessary to manage containers at scale. Azure Kubernetes Services extends Kubernetes’ functionality with a suite of features that enhance its efficiency, scalability, and manageability.

What are Kubernetes Clusters in Azure?

A Kubernetes cluster consists of at least one master and multiple worker nodes. The master node manages the cluster, while the worker nodes run the containerized applications.

In Azure, these clusters are fully managed, reducing the operational overhead for users. It adds value to Kubernetes clusters with additional features like integrated logging and monitoring, seamless integration with Azure services, and advanced security features.


Azure Kubernetes Services Architecture Diagram

AKS architecture weaves together several critical components, each playing a pivotal role in the service’s operation and efficiency. Here’s an in-depth look at the key architectural elements that form the backbone of AKS:

Azure AKS Architecture Diagram, Node, Pool, Regulatory, Services,
ARCHITECTURE COMPONENTDESCRIPTION
Control PlaneThe central management entity of AKS, the control plane includes managed Kubernetes components like the API server, etcd, controller manager, and scheduler. It maintains the cluster’s state, configuration, and ensures seamless integration with Azure services.
Node PoolsCollections of virtual machines or VM scale sets acting as worker nodes. Each node pool can have specific configurations (e.g., VM sizes, operating systems, availability zones) to suit different workload requirements.
PodsThe smallest deployable units in a Kubernetes cluster, consisting of one or more containers that share storage and network. AKS schedules and runs containers within these pods across the worker nodes.
ServicesAbstractions that define logical sets of pods and a policy by which to access them. They facilitate communication within the application and with external users, ensuring connectivity between different application components.
IngressA set of rules that manage external access to the services in a cluster, providing capabilities like load balancing, SSL termination, and name-based virtual hosting. In AKS, Ingress can be managed using Azure Application Gateway or Kubernetes-native ingress controllers.

Azure Kubernetes Services (AKS) Use Cases

Microservices Architectures
AKS provides a dynamic and scalable environment to host microservices, offering rich features for service discovery, autoscaling, and load balancing. This makes it an ideal platform for organizations adopting microservices to accelerate development cycles and improve service reliability.

Batch Processing
For workloads that require processing large volumes of data in batches, AKS can dynamically allocate resources to match the workload demands. This capability is essential for scenarios like financial modeling, scientific simulations, and big data analytics.

Machine Learning and AI
AKS facilitates the deployment and scaling of machine learning models by providing a flexible platform that can handle variable computational loads. Integration with Azure AI and Machine Learning services further streamlines the development and deployment of AI-driven applications.

DevOps and Continuous Delivery
AKS integrates seamlessly with CI/CD pipelines, enabling teams to automate the build, test, and deployment phases of application development. This accelerates time-to-market and improves the overall quality of software releases.


How to Create an Azure Kubernetes Services Cluster – Tutorial

Creating an Azure Kubernetes Service (AKS) cluster is a straightforward process, designed to set you up with a fully managed Kubernetes environment in a few simple steps. Before beginning, ensure you have an active Azure subscription. If not, sign up for a free account on the Azure website.

Creating an AKS Cluster : Step-by-Step Guide

  • Login and Resource Creation
    • Navigate to the Azure portal and log in.
    • On the Azure portal menu or Home page, select “Create a resource.”
    • Choose “Containers” and then “Kubernetes Service.”
  • Configure Cluster Basics
    • Under the “Basics” tab, fill out the following:
      • Project details: Select your Azure Subscription and either pick an existing Azure Resource Group or create a new one, such as myResourceGroup.
      • Cluster details: Choose the “Standard ($$)” option for Preset configuration (for details on presets, refer to Azure’s documentation). Name your Kubernetes cluster (e.g., myAKSCluster) and select a region. Leave the Kubernetes version at its default setting and ensure API server availability is set to 99.5%.
  • Primary Node Pool Settings
    • Click “Next: Node pools” and keep the default settings for the primary node pool.
  • Access Configuration
    • In the “Access” tab, keep “System-assigned managed identity” for Resource identity. This setup provides a secure identity for applications to use with Azure AD-authenticated resources.
    • Ensure Kubernetes role-based access control (RBAC) is set to default for enhanced security and granular control over resource access within your AKS cluster.
  • Networking and Integrations
    • Proceed to “Next: Networking” and retain the default network settings.
    • In the “Integrations” tab, activate “Enable recommended alert rules” for AKS clusters to set up essential alerts out-of-the-box. This feature will automatically enable a list of critical alerts for monitoring cluster health and performance.
Azure Create Cluster AKS Tutorial, View resource, Manage Clusters, Microsoft Azure
Source: Microsoft
  • Review and Create
    • After configuring the settings, navigate to “Review + create.” Azure will validate your configuration. If successful, you can create the AKS cluster by clicking “Create.” If there are issues, Azure will highlight the necessary adjustments.
    • Cluster creation takes a few minutes. Once completed, you can access your AKS cluster by either clicking “Go to resource” or by going to your AKS cluster resource group and selecting the AKS resource, in this case, myAKSCluster.

By following these steps, you’ll have successfully deployed an AKS cluster, ready for containerized applications.


Frequently Asked Questions (FAQs)

AKS vs ACS: What’s the Difference?

Azure Kubernetes Service (AKS) and Azure Container Service (ACS) are both container orchestration services provided by Microsoft Azure. While ACS offered support for multiple orchestrators (Kubernetes, Docker Swarm, and Mesosphere DC/OS), AKS is solely focused on Kubernetes, providing a more streamlined and Kubernetes-centric experience. ACS has been deprecated in favor of AKS, which offers enhanced management features, deeper integration with Azure services, and a simplified user interface.

Is Azure Kubernetes Services Serverless Computing?

AKS itself is not considered serverless computing because it involves managing container instances and their associated resources. However, AKS supports serverless Kubernetes workloads via virtual nodes and Azure Container Instances (ACI), allowing applications to scale without managing the underlying servers, thus providing a serverless experience within a Kubernetes environment.

How Secure is AKS?

AKS offers integrated security features that include network policies, role-based access control (RBAC), Azure Active Directory integration, and secure access to resources using managed identities. It also provides security monitoring and threat protection through Azure Security Center, ensuring that AKS clusters are protected from a wide range of threats.

What Are the Cost Implications of Running AKS?

While AKS does not charge for the Kubernetes management infrastructure, users pay for the compute instances, storage, and networking resources consumed by their applications and Kubernetes nodes. The cost can vary based on the resources provisioned, making it important to optimize resource usage and select the appropriate VM sizes and services based on your application needs.

What Is the Best Way to Monitor AKS Clusters?

The best way to monitor AKS clusters is by using Azure Monitor for containers, which provides a centralized view of your Kubernetes clusters’ performance, health, and monitoring data. It integrates with AKS to collect metrics, logs, and events, helping you track the health and performance of your applications and infrastructure.

Azure Kubernetes Service & Azure Container Instances For Beginners

 Azure Kubernetes Service & Azure Container Instances For Beginners


Kubernetes is an open-source platform for managing containerized workloads and services in this we need to manage master & worker. Azure provides managed Kubernetes service Azure Kubernetes Service in which azure manages the master nodes and end-user needs to manage the worker nodes.


What is Azure Container Instances (ACI)

Azure Container Instances (ACI) is Microsoft PaaS (Platform as service) solution that offers the fastest and simplest way to run a container in Azure, without having to manage any underlying infrastructure. For container orchestration in Azure (build, manage, and deploy multiple containers) use Azure Kubernetes Service (AKS). You can deploy Azure Container Instances using Azure Portal, Azure CLI, Powershell, or ARM Template. Same as the docker registry we can push our images to Azure Container Registry (ACR) which is a private secure registry propose by the Azure platform.


Azure-Container-Instances

What Is Kubernetes? 

In organizations, multiple numbers of containers running on multiple hosts at a time so it is very hard to manage all the containers together we use Kubernetes. Kubernetes is an open-source platform for managing containerized workloads and services. Kubernetes takes care of scaling and failover for your application running on the containe

Kubernetes_Architecture


Azure Kubernetes Service (AKS)

Azure Kubernetes Service (AKS) is a managed Kubernetes service in which the master node is managed by Azure and end-users manages worker nodes. Users can use AKS to deploy, scale, and manage Docker containers and container-based applications across a cluster of container hosts. As a managed Kubernetes service AKS is free – you only pay for the worker nodes within your clusters, not for the masters. You can create an AKS cluster in the Azure portal, with the Azure CLI, or template-driven deployment options such as Resource Manager templates and Terraform.


Azure Kubernetes Service

ACI vs AKS

Pricing

ACI charges are based on the runtime of container groups, with pricing determined by the allocated vCPUs and memory resources. For instance, in the Central US region, Linux VMs cost $0.0000135 per vCPU per second and $0.0000015 per GB of RAM per second. If a container group utilizes 10 vCPUs and 100 GB of RAM, the memory resources would cost $0.009 per hour, and the vCPUs would cost $0.0081 per hour, resulting in a total of $0.0171 per hour.

On the other hand, AKS does not impose any additional charges for managing your Kubernetes environment. The billing is based on the VMs running your worker nodes, along with the associated storage and networking resources used by your clusters. The costs incurred are the same as running the equivalent VMs without AKS. To estimate expenses accurately, you need to consider the VM type, the number of required nodes, and their duration of operation. For up-to-date pricing information for Azure VMs, it is recommended to refer to Azure’s official documentation.

Scale

ACI employs container groups to facilitate scaling, where multiple containers operate on the same host and share resources, networks, and storage volumes. This concept resembles a Kubernetes pod, where containers within the group have synchronized lifecycles.

In contrast, AKS leverages the scaling functionalities provided by Kubernetes. Users have the flexibility to manually scale their AKS pods or utilize horizontal pod autoscaling (HPA), which automatically adjusts the number of pods in a deployment based on metrics like CPU utilization or other specified criteria.

Security

ACI offers the ability to utilize Azure Virtual Networks, which enable secure networking for Azure resources and on-premises workloads. By deploying container groups into Virtual Networks, ACI allows for secure communication between ACI containers and various entities, such as other container groups within the same subnet, databases located in the same Virtual Network, and on-premises resources accessed through a VPN gateway or ExpressRoute.

On the other hand, AKS provides access to the comprehensive security features of native Kubernetes, augmented by Azure capabilities like network security groups and orchestrated cluster upgrades. Keeping software components up to date is crucial for security, and AKS automatically ensures that clusters run the latest versions of operating systems and Kubernetes, including necessary security patches. Additionally, AKS prioritizes the security of sensitive credentials and the traffic within pods, ensuring secure access to these resources.

When to Use ACI

Azure Container Instances (ACI) is a suitable choice in several scenarios, including:

  1. Quick application development and testing: ACI allows for rapid deployment of containers without the need to manage underlying infrastructure. It is ideal for short-lived development and testing environments, enabling quick iteration and experimentation.
  2. Bursting workloads: ACI provides the ability to scale up or down rapidly based on workload demands. It is useful for handling peak traffic periods or sudden spikes in workload, allowing you to quickly scale your containerized applications without the need for long-term resource commitments.
  3. Task and batch execution: ACI is well-suited for running individual tasks or batch jobs that need to be executed without the overhead of managing a full-fledged container orchestration platform. It simplifies running one-off tasks, scheduled jobs, or data processing tasks.
  4. Microservices deployment: ACI can be used to deploy and manage individual microservices that require isolation and independent scaling. It allows you to run different microservices as separate container groups, providing flexibility and granular control over their resource allocation and lifecycles.
  5. Event-driven workloads: ACI can be integrated with various event-driven architectures and serverless computing models. It can serve as the execution environment for event-driven functions or as a component within a serverless architecture, allowing you to respond to events and triggers with container-based workloads.

Remember, ACI is a lightweight container execution environment and does not provide all the features of a full container orchestration platform like Azure Kubernetes Service (AKS). If you require advanced orchestration, scheduling, and management capabilities or have complex multi-container applications, AKS might be a more suitable choice.

When to use AKS

Azure Kubernetes Service (AKS) is an excellent choice in several scenarios, including:

  1. Containerized application deployment: AKS is designed for deploying and managing containerized applications at scale. If you have complex multi-container applications that require orchestration, scaling, and management capabilities, AKS provides a robust platform for running and managing these workloads.
  2. Production-grade workloads: AKS is well-suited for running production workloads that require high availability, scalability, and resilience. It offers features like automated scaling, load balancing, self-healing, and rolling updates, ensuring that your applications can handle production-level traffic and demands.
  3. Microservices architecture: AKS supports the deployment of microservices-based applications. It allows you to break down your application into smaller, decoupled services that can be independently deployed, scaled, and managed. AKS offers advanced networking capabilities, service discovery, and load balancing, enabling seamless communication and coordination between microservices.
  4. Continuous integration and deployment (CI/CD): AKS integrates well with popular CI/CD tools and provides a streamlined workflow for building, testing, and deploying containerized applications. It allows you to automate the deployment process, easily roll out updates, and ensure a consistent and reliable delivery pipeline.
  5. DevOps collaboration: AKS promotes collaboration between development and operations teams. It provides a consistent environment across development, testing, and production stages, enabling seamless collaboration and smoother application lifecycle management.
  6. Hybrid and multi-cloud deployments: AKS supports hybrid and multi-cloud scenarios, allowing you to run your Kubernetes workloads on both Azure and on-premises infrastructure. It offers integration with Azure Arc, enabling you to manage and govern your Kubernetes clusters across different environments from a centralized location.

Create Azure Kubernetes Cluster

Azure Kubernetes Service (AKS) is a managed Kubernetes service that lets you quickly deploy and manage master and worker nodes in clusters.

We can Deploy Azure Kubernetes cluster In Three ways:

A) Azure Portal B) Azure CLI C) Azure power shell


Note: We will cover how to Create Azure Kubernetes cluster in our next blog.

Also Read: Our previous blog post on az 104 certification: A complete step-by-step guide.

Service Types In K8S

To simplify the network configuration for application workloads, Kubernetes uses Services to logically group a set of pods together and provide network connectivity.

We can Deploy Azure Kubernetes cluster In Three ways:

A) Cluster IP B) NodePort C) LoadBalancer D) ExternalName

Services

Azure Kubernetes Service Networking

In AKS, we can deploy a cluster using the following networking models:

A) kubenet (Basic Networking)

B) CNI (Advanced Networking)


AKS kubenet (Basic Networking)

By default, Azure Kubernetes Service (AKS) clusters use kubenet, and this will create an Azure virtual network and subnet for you. Using kubenet, only the nodes receive an IP address in the virtual network subnet and pods can’t communicate directly with each other. Instead, User Defined Routing (UDR) and IP forwarding are used for connectivity between pods across nodes. In basic networking pod, IP natted inside subnet. Network address translation (NAT) is used so that the pods can reach resources on the Azure virtual network.

kubenet (Basic Networking)


AKS CNI (Advanced Networking)

In Azure Container Networking Interface (CNI) every pod gets an IP address from the subnet and can be accessed directly via their private IP address from connected networks. These IP addresses must be unique across your network space.  These IP’s must be planned in advance. Advance networking requires more planning if all IP addresses used then we need to rebuild clusters in a larger subnet as your application demands.


CNI (Advanced Networking)


Azure Kubernetes Service Storage

In AKS, There are two types of storage options available:

A) Azure Disk

B) Azure Files

These stores are used to provide persistent storage to store data and images persistently. Azure disks can be used to create a Kubernetes DataDisk resource and mounted as ReadWrite, so the disks are only available to a single pod. we can’t share this with multiple pods. Azure Files are SMB based shared file system mounted across different machines. Using Azure files we can share data across multiple nodes and pods.


Azure Kubernetes Service Security

Azure Active Directory with AKS, We can integrate Azure Kubernetes with Azure Active Directory so the users in Azure Active Directory for user authentication. Using this user in Azure Active Directory can access the AKS cluster using an Azure AD authentication token. we can also configure Kubernetes role-based access control (RBAC) based on a user’s identity. Azure AD legacy integration can only be enabled during cluster creation.


Azure Active Directory


Azure Kubernetes Service With CI/CD

We can deploy AKS in CI/CD environment, using this we can continuously build and deploy applications in Azure Kubernetes Service. By deploying these using Azure Kubernetes Service (AKS), we can achieve replicable, manageable clusters of containers.

Note: Read More about the CI/CD in detail 


AKS_CI/CD