Linux Training in Coimbatore & Best Linux Server Administration Training Institute NUX SOFTWARE SOLUTIONS FREE DEMO CLASSES AVAILABLE Call us 096263 53489
Create a private container instance within its own VNET
Create a Test VM within the same VNET as container instance
Test connection to container instance from Test VM using ping or nslookup
Configure Private End point for ACR but before that few things to keep in mind, private acr works only with premium plan, system will prompt you during setup and also make sure to enable admin user. Disable public access, allow trusted Microsoft services to access acr and setup private endpoints as shown below- |
Test connection to ACR from Test VM same using nslookup or ping, after that do a az acr login --name arkocr.azurecr.io to login to your acr, then pull your image and finally deploy your image.
Confirm that the ACR has a private link set up correctly.
Make sure the DNS zone is linked properly to the VNET expected to contain the ACI.
Before you can deploy a Docker image, the image must be uploaded to a container registry. The image can be uploaded to Docker Hub, Azure Container Registry (ACR) or another registry. You can follow the same steps to push the image regardless of whether you're pushing to Docker Hub, Azure Container Registries, or any other registry. If you don't already have an Azure Container Registry, you can create one during the Push step.
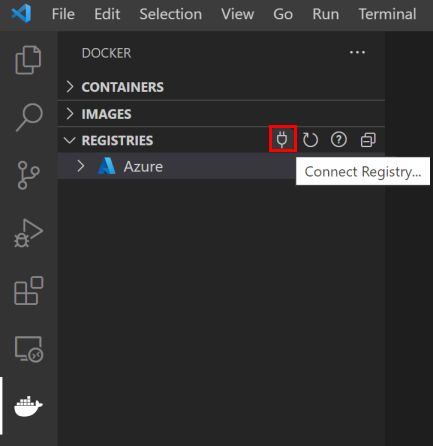
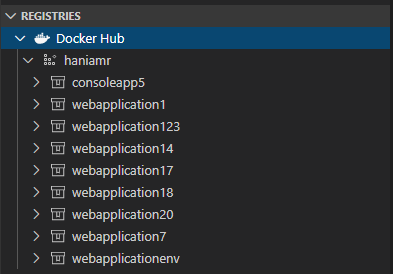
Open the Docker Explorer, select Connect Registry... icon under the Registries group, and follow the prompt. Choose the provider (for example, Azure or Docker Hub) and provide the credential to connect to the registry. If prompted, install the Azure Resources extension.
Now the registry will be visible under Registries.
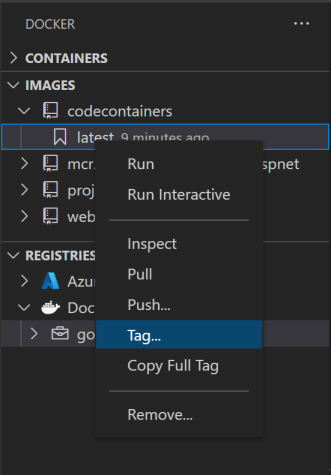
Optionally, tag the image. In order to upload an image to a registry, the image needs to be tagged with registry name so that the docker push will upload it to the right registry. If the image isn't tagged when you try to push it, VS Code asks you what registry you want to associate with the image.
Images you previously built appear in the Docker Explorer under the Images tab. Right-click and choose Tag....
Specify the new name <your registry or username>/<image name>:<tag> and complete the tag action. For example, new image name for ACR would be mainacr.azurecr.io/webapp6:latest and for Docker Hub it would be myusername/webapp6:latest.
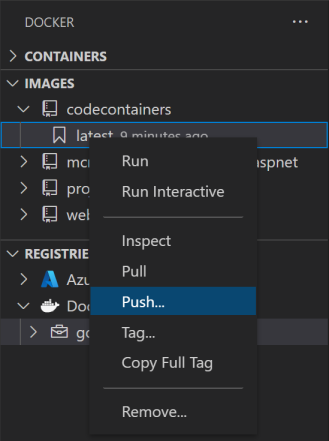
The image shows up in the Docker Explorer in the Images tab under the registry that the image tag points to. Select this image and choose Push. If the image has not yet been tagged, you're prompted to choose a registry to push to, or create a new registry, and the image is tagged based on the selection.
Once the push command is completed, refresh the registry node where the image is pushed to and the uploaded image will show up.
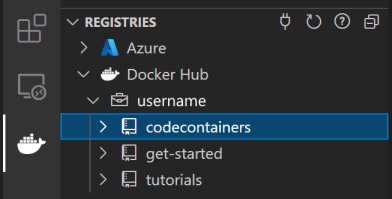
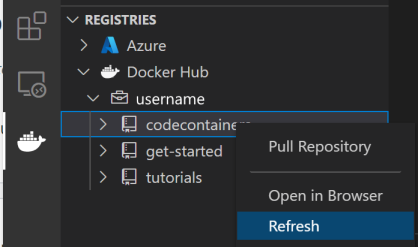
This connects to Docker Hub and lists all of the repositories and images under the given account. Once you select this option, you will be required to type in your Docker Hub credentials.
For each repository in the Docker Hub registry, here are the actions that can be performed:
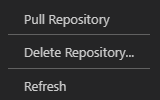
Pull repository: copies all of the images in a given repository locally
Open in browser: opens the browser and navigates to the given repository on Docker Hub
Refresh: refreshes the repository to reflect changes
For each tagged image in a repository, here are the actions that can be performed:
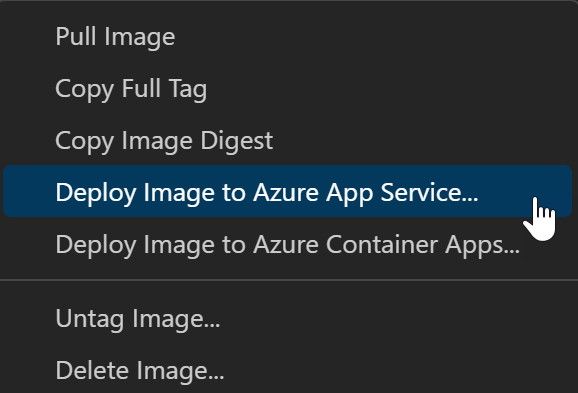
Pull image: copies the latest version of the image locally
Copy Full Tag: copies the full tag to the clipboard
Deploy Image to Azure App Service: deploys the image to Azure App Service, see Deploy images to Azure page
Deploy Image to Azure Container Apps: deploys the image to Azure Container Apps, see Deploy images to Azure page
Open in browser: opens the browser and navigates to the given image on Docker Hub
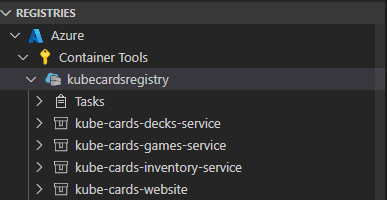
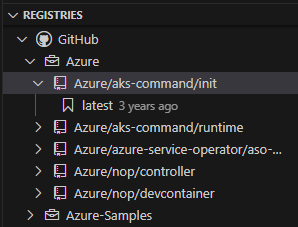
This option requires the Azure Resources extension to be able to connect to your Azure account and display all of the different subscriptions and registries. Once authenticated, the node Azure will display the subscriptions along with registries each have:
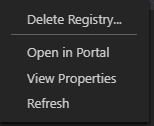
For each registry, users have different actions that can be performed using the context menu:
Delete Registry: deletes the registry permanently
Open in Portal: opens the browser and navigates to the registry in Azure Portal
View Properties: opens the registry properties in a json format
Refresh: refreshes the registry to reflect changes
For each repository in a given registry, here are the actions that can be performed:
Pull Repository: copies all of the images in a given repository locally
Delete Repository: deletes the repository permanently
Refresh: refreshes the repository to reflect changes
For each tagged image in a repository, here are the actions that can be performed:
Pull Image: copies the latest version of the image locally
Copy Full Tag: copies the full tag to the clipboard
Copy Image Digest: copies the image digest, which is a SHA256 hash identifier that Docker uses, to the clipboard. See Docker Docs for more info on image digests
Inspect Image Manifest: inspects the image's registry manifest. This is not the same as inspecting the image when it is pulled locally.
Deploy Image to Azure App Service: deploys the image to Azure App Service, see Deploy images to Azure page
Deploy Image to Azure Container Apps: deploys the image to Azure Container Apps, see Deploy images to Azure page
Deploying Containers has been a widespread trend in many businesses in recent years. Applications are Containerized and deployed on the Cloud. Containerization provides an operating system and application isolation. These can even get scaled automatically based on the traffic it gets. There are many cloud platforms that developers can work with to host running Containers. These Containers can be anything from APIs to data science apps to static websites. GCP, AWS, and Microsoft Azure are the well-known cloud platforms that provide these services. In this article, we will look at one of Azure’s services called Azure Container Instances that developers can work with to deploy Containers in the cloud.
Learning Objectives
Understand the workings of Azure Container Instances
Learn how to push Images to Azure Container Registry
Learn how to create Resource Groups
Learn how to deploy Containers to Azure Container Instances
Microsoft Azure’s Azure Container Instances (ACI) cloud service allows users to run containers in the cloud without maintaining virtual machines. It provides a quick and seamless way for deploying and managing Containers on Azure. It is important to make it perfect for various situations, including simple apps, automating tasks, and building jobs. When compared to virtual machines, Containers are faster during launch. Without the need to provision and manage virtual machines, ACI may launch Containers in Azure in a matter of seconds. This makes it possible for containerized apps to be deployed quickly and effectively.
With an IP address and a Fully Qualified Domain Name (FQDN), users of ACI can immediately expose their container groups to the internet. Additionally, users can give a unique DNS name label to make their applications visible at a unique URL. ACI has an interactive shell that allows running commands in a container and can be used for application development and troubleshooting. Container access is protected using HTTPS over TLS for communication with Clients.
Azure Container Instance: Pricing
The Azure Container Instance follows the pay-for-compute-capacity by the second rule. We are billed for every computational second the Container is run. And the prices for these computations purely rely on the number of vCPUs we have allocated and the memory allocated to them. There is no upfront cost involved. It even depends on the operating system that the Container is built on, i.e. Linux or Windows. Windows Containers tend to have higher prices when compared to the Linux Containers.
And finally, note that the prices for computations defer from Region to Region. For example, if the location selected is East US and the operating system is Linux, the computation costs would be something like the below:
Memory Cost: $0.0000013 Per GB-s
CPU Cost: $0.0000113 Per vCPU-s
These costs displayed are per-second costs. These costs are then multiplied by the total seconds the Container has run and the final bill is produced. And note that the bill generated will be lower because these Containers only run when they receive a Request, thus low costs.
Creating a Streamlit Application
In this section, we will be creating a Streamlit application in Python. After creating the application, we will convert it into an Image and host it in the Container Instance. Before starting this, make sure you have an active Microsoft Azure account. Do not worry, you will not be charged, as when creating an Azure account, we get a free $200 to use.
The streamlit app we are going to create is a simple application where the user inputs a range of values for the X variable. Then the user selects a function to calculate Y from X. Like if the selects the function Y = log(X), then the Y will contain the log values for each element present in X. Like these, we will provide 4 different functions, which include log(), sin(), e^(), and tan().
The code for creating the streamlit application described above can be referred to below:
import streamlit as st
import pandas as pd
import numpy as np
# Setting up the website title and icon
st.set_page_config(page_title="Data Visualization",
page_icon=":chart_with_upwards_trend:")
# setting the title name
st.title('Multi Function Graph')
# user inputs the x values and they are converted into a list
st.write("### X Data")
x = st.text_input(label="Provide X values with spaces").split()
x = list(map(int,x))
# user selects the function to calculate y
func = st.selectbox("Function: ",['y = log(x)', 'y = sin(x)', 'y = e^(x)', 'y = tan(x)'])
# the function is then run to get the y valuesif func == 'y = log(x)':
changed_y = [np.log2(x), 'y = log(x)']
elif func == 'y = sin(x)':
changed_y = [np.sin(x), 'y = sin(x)']
elif func == 'y = e^(x)':
changed_y = [np.exp(x), 'y = e^(x)']
elif func == 'y = tan(x)':
changed_y = [np.tan(x), 'y = tan(x)']
# dataframe is constructed on X and Y data and the plot is made
data = pd.DataFrame({'x':x,changed_y[1]:changed_y[0]})
st.write("### X vs Y Graph")
st.line_chart(data=data,x='x',y=changed_y[1])
Let’s test our streamlit application by running it with the below command:
$ streamlit run app.py
Now we will be able to access the website application that we have created:
Now let’s provide values for x and keep the function y = log(x) and see the output:
Now for the same x values let’s keep the function y = tan(x) and see the below graph:
Let’s write a docker file to containerize our streamlit application. The Dockerfile will look like the below:
# Setting the Base Image
FROM python:3.7.9-slim

# Copy all files from current directory to app directory
COPY . /app

# Change working directory to app directory
WORKDIR /app

# Run below command to install all the libraries
RUN pip install -r requirements.txt

# Exposes PORT 8080
EXPOSE 80

#Running the application
ENTRYPOINT ["streamlit", "run", "--server.port=80","--server.enableCORS","false", "app.py"]
The following Dockerfile will be used to create the Image for the application. The base Image being used is the python:3.7.9-slim. Then we install the dependencies present in the requirements.txt using the pip. Here we expose PORT 80 because we want our streamlit application to run at PORT 80. Finally, the ENTRYPOINT runs the command provided for the application to run. The requirements.txt will contain the following:
streamlit
pandas
Creating Azure Container Registry and Pushing the Docker Image
In this section, we will create a Resource Group. After that, we will create an Azure Container Registry to push our streamlit Image to it. To create the Resource Group, click on the Resource Group Icon on the Dashboard(), click on Create, and then provide the resource name. After providing the resource name, click on the Next button present below and finally click on the Create button.
After creating the Resource Group, now we will create a Container Registry to store our Images. The Container Registry can be found through the Search Box. Click on it to create a new Container Registry. We have named the ACR streamregistry (Registry Name). Select the Resource Group that we have created before. Follow the Images and keep clicking on Next (let the Configuration be set to default), until we reach the Create button. Then finally click on Create button to create our Container Registry.
After clicking on Create, the deployment process for creating the Azure Container Registry will start. After it’s completed, the screen will show something similar to the below pic. Click on Go to Resource. Finally, we have our Container Registry ready.
Now, it’s time to build the Image. So use the below commands in the command line to build the Image for the streamlit application:
$ docker build -t streamregistry.azurecr.io/stream_function_graph .$ az login$ az acr login -n streamregistry$ docker push streamregistry.azurecr.io/stream_function_graph
In the first command, replace streamlitregistry with the name of your Azure Container Registry. And replace stream_function_graph with the name of your application. This will then build our Image (Don’t forget the dot(.) at the end of the command).
The second command will prompt you to log in to your Azure account.
Then, through the third command, we log into the Container Registry that we have just created.
Finally, the fourth command will push the Image to the Azure Container Registry
Now, in the above section, we have created the Azure Container Registry. In that, in the left pane, we will find a service called Repositories. Click on that; we will be able to view the Image that we have pushed.
Hosting the Streamlit Application in Azure Container Instances
In this section, we will work with the Image pushed to the Azure Container Registry. We will create a Container Instance service and host the Streamlit Image in the ACR. To create an Azure Container Instance, either search in the search bar or directly click on the Container Instance Icon in the dashboard and then click Create Container Instance Button.
Now, we must select the Resource Group, give our Container a name, then set the Image Source to Azure Container Registry. Select the Resource Group that we have created in this article. Here then we can select the streamlit Image that we have pushed to the ACR. Let remaining configurations be set to default. Then click on next.
If you get an Admin-related error, run the command below in your command line. Replace <acrName> with the name that you have used to create the Azure Container Registry.
az acr update-n <acrName>--admin-enabled true
After clicking on Next, we will enter the Network Configuration. Here we see that PORT 80 is open, hence our application will be able to Run. Now if we want, we can provide a Domain Name. After this, keep clicking on Next, until we reach the Create Button. Finally, click on Create to create the Container.
After clicking on Create, we get to see Deployment in Progress status. And after a few minutes, the deployment will be complete. When it’s completed, we can click on the Go to Resource to access the link to our running Container.
Now we see the IP address and the FQDN. Copy one of these and paste it into a new tab in the browser.
Now finally, we can view the application. We see that the application is working properly. Finally, we have successfully hosted a running Container in the Azure Container Instance. The same steps can be used to deploy the Container of your choice through the ACI service.


 |
|