Citrix Virtual Apps Essentials
Citrix Virtual Apps Essentials allows you to deliver Windows applications and shared hosted desktops from Microsoft Azure to any user on any device. The service combines the industry-leading Citrix Virtual Apps service with the power and flexibility of Microsoft Azure. You can also use Virtual Apps Essentials to publish Windows Server desktops.
Server OS machines run multiple sessions from a single machine to deliver multiple applications and desktops to multiple, simultaneously connected users. Each user requires a single session from which they can run all their hosted applications.
The service is delivered through Citrix Cloud and helps you to deploy your application workloads within your Azure subscription with ease. When users open applications from the workspace experience, the application appears to run locally on the user computer. Users can access their apps securely from any device, anywhere.
Virtual Apps Essentials includes the workspace experience and the Citrix Gateway service, in addition to its core management services. Your app workloads run in your Azure subscription.
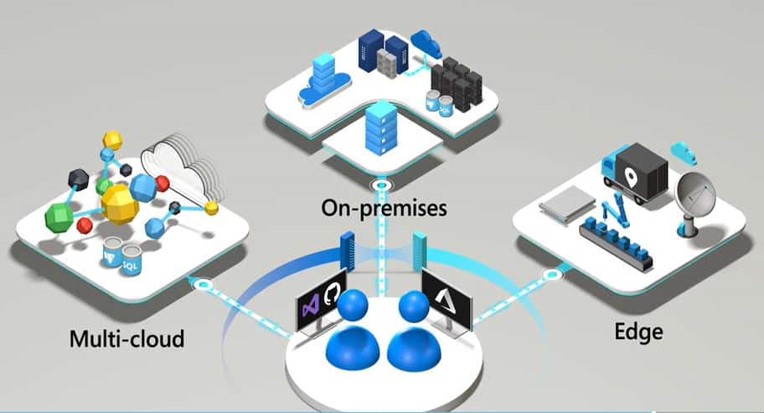
Deployment architecture
The following diagram shows an architectural overview of a basic Virtual Apps Essentials cloud deployment: 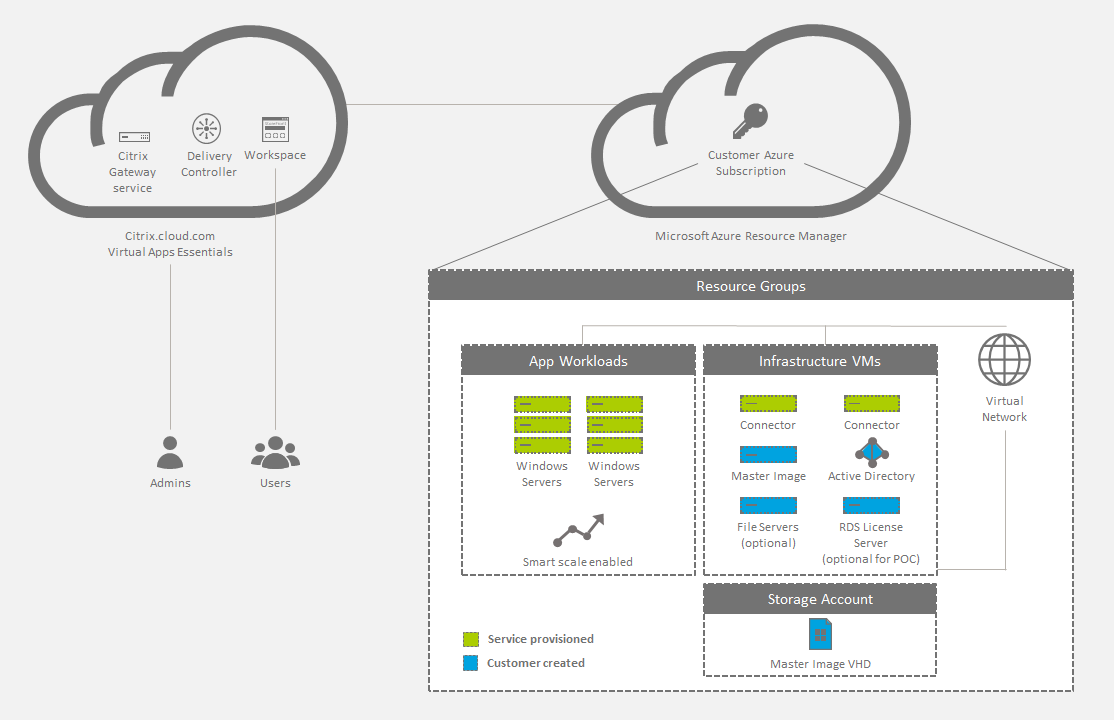
You can also allow users to connect to your on-premises data center. Connections between the Azure cloud and your on-premises data center occur through a VPN connection. Users connect through Virtual Apps Essentials to your license server, file servers, or Active Directory over the VPN connection. 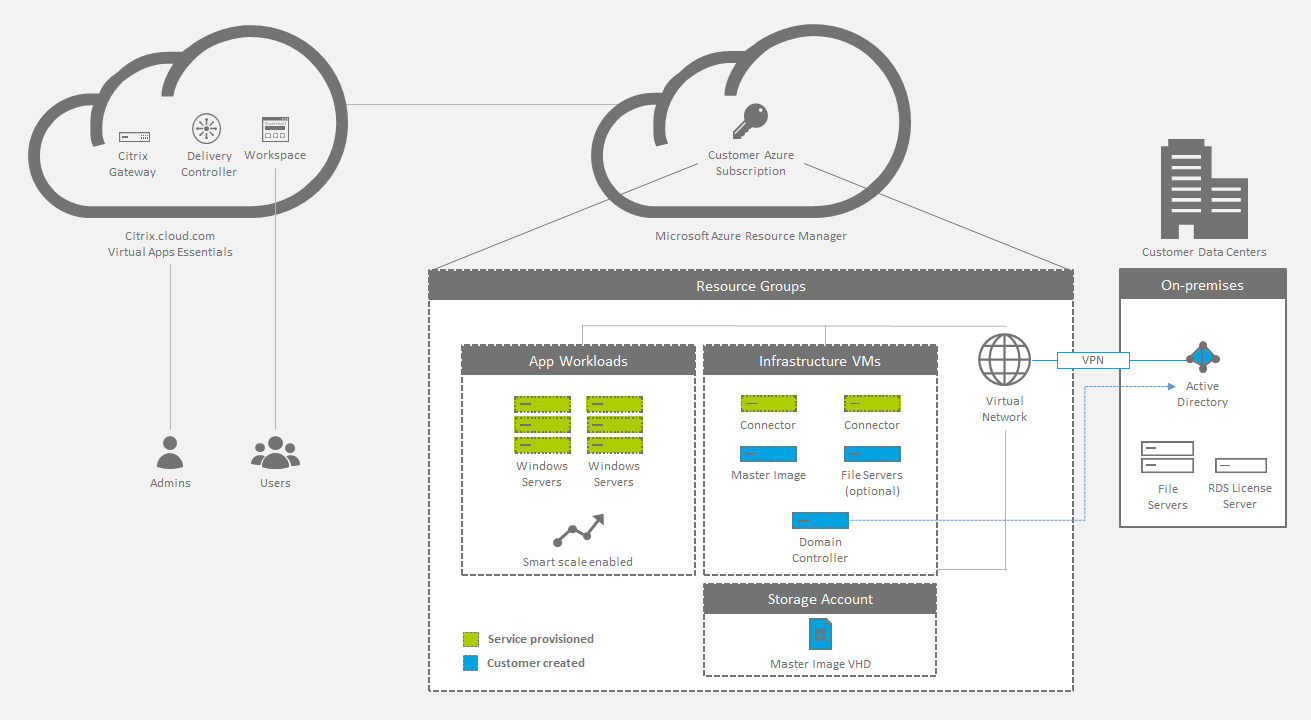
Deployment summary
Follow these steps to deploy Citrix Virtual Apps Essentials:
- Buy Citrix Virtual Apps Essentials from the Azure Marketplace.
- Prepare and link your Azure subscription.
- Create and upload your master image.
- Deploy a catalog, publish apps and desktops, and assign subscribers
What’s new
December 2018: Cloud-hosted StoreFront removed
Cloud-hosted StoreFront is no longer available for use with Virtual Desktops Essentials. Customers who purchased Virtual Desktops Essentials (formerly XenDesktop Essentials) before December 2017 can use Citrix Workspace as described in this article to provide subscriber access to desktops.
August 2018: New product names
If you’ve been a Citrix customer or partner for a while, you’ll notice new names in our products and product documentation. If you’re new to this Citrix product, you might see different names for a product or component.
The new product and component names stem from the expanding Citrix portfolio and cloud strategy. This article uses the following names.
Citrix Virtual Apps Essentials: XenApp is part of our workspace strategy, where many types of apps come together in the preferred place to access work tools. As part of a unified, contextual, secure workspace, XenApp Essentials is now Citrix Virtual Apps Essentials.
Citrix Workspace app: The Citrix Workspace app incorporates existing Citrix Receiver technology as well as the other Citrix Workspace client technologies. It has been enhanced to deliver more capabilities to provide end users with a unified, contextual experience where they can interact with all the work apps, files, and devices they need to do their best work.
Citrix Gateway: The NetScaler Unified Gateway, which allows secure, contextual access to the apps and data you need to do your best work, is now Citrix Gateway.
In-product content might still contain former names. For example, you might see instances of earlier names in console text, messages, and directory/file names. It is possible that some items (such as commands and MSIs) might continue to retain their former names to prevent breaking existing customer scripts.
Related product documentation, other resources (such as videos and blog posts), and other sites (such as Azure Marketplace) might still contain former names. Your patience during this transition is appreciated. For more detail about our new names, see https://www.citrix.com/about/citrix-product-guide.html.
May 2018: Building additional images from the Virtual Apps Essentials interface
After creating a production image from the Azure Resource Manager interface, you can create additional images through Azure, as needed. Now, as an optional alternative to creating additional images through the Azure interface, you can build a new master image from the Virtual Apps Essentials interface. For details, see Prepare and upload a master image.
May 2018: Monitor display enhancements
The Monitor display now includes usage information about applications and top users. For details, see Monitor the service.
System requirements
Microsoft Azure
Citrix Virtual Apps Essentials supports configuring machines only through Azure Resource Manager.
Use Azure Resource Manager to:
- Deploy resources such as virtual machines (VMs), storage accounts, and a virtual network.
- Create and manage the resource group (a container for resources that you want to manage as a group).
To provision and deploy resources in Microsoft Azure, you need:
- An Azure account.
- An Azure Resource Manager subscription.
- An Azure Active Directory global administrator account in the directory associated with your subscription. The user account must have Owner permission for the Azure subscription to use for provisioning resources. For more information about how to set up an Azure Active Directory tenant, see How to get an Azure Active Directory tenant.
Citrix Cloud
Virtual Apps Essentials is delivered through Citrix Cloud and requires a Citrix Cloud account to complete the onboarding process. You can create a Citrix Cloud account on the Citrix Cloud Sign Up page before going to Azure Marketplace to complete the transaction.
The Citrix Cloud account you use cannot be affiliated with an existing Citrix DaaS (formerly Citrix Virtual Apps and Desktops service) or Citrix Virtual Desktops Essentials service account.
Virtual Apps Essentials console
You can open the Virtual Apps Essentials administration console in the Google Chrome web browser.
Known issues
Virtual Apps Essentials has the following known issues:
- On Windows Server 2019 VDAs, some application icons might not appear correctly during configuration and in the users’ workspace. As a workaround, after the app is published, use the Change icon feature to assign a different icon that displays correctly.
- If you use Azure AD Domain Services: Workspace logon UPNs must contain the domain name that was specified when enabling Azure AD Domain Services. Logons cannot use UPNs for a custom domain you create, even if that custom domain is designated as primary.
- When you configure users for a catalog and select a domain, you can see and choose the users from the Builtin\users group.
- Creating the catalog fails if the virtual machine size is not available for the selected region. To check the virtual machines that are available in your area, see the chart at Products available by region on the Microsoft website.
- You cannot create and publish multiple instances of the same app from the Start menu at the same time. For example, from the Start menu you publish Internet Explorer. Then, you want to publish a second instance of Internet Explorer that opens a specific website on startup. To do so, publish the second app by using the path for the app instead of the Start menu.
- Virtual Apps Essentials supports linking a subscription by using an Azure Active Directory user account. Virtual Apps Essentials does not support Live.com authenticated accounts.
- Users cannot start an application if there is an existing Remote Desktop Protocol (RDP) session on the VDA. This behavior only happens if the RDP session starts when no other users are logged on to the VDA.
- You cannot enter a license server address longer than server.domain.subdomain.
- If you perform multiple sequential updates to capacity management, there is a possibility that the updated settings do not properly propagate to the VDAs.
- If you use a non-English web browser, the text appears as a combination of English and the browser language.
How to buy the service
NOTE:
The information in this section is also available as a PDF. That content contains earlier product names.
Buy Citrix Virtual Apps Essentials directly from the Azure Marketplace, using your Microsoft Azure account. Citrix Virtual Apps Essentials requires at least 25 users.
The service is delivered through Citrix Cloud and requires a Citrix Cloud account to complete the onboarding process. See System requirements > Citrix Cloud for details.
When buying Citrix Virtual Apps Essentials, ensure that you enter correct information for all details, including address fields, to ensure fast processing of your order. Before you configure Virtual Apps Essentials, ensure that you complete the following in the Azure Marketplace:
- Provide contact information and your company details.
- Provide your billing information.
- Create your subscription.
To configure the customer and pricing:
- In Select a customer, select the customer name.
- Under Pricing, in Number of users, type the number of users who have access to Virtual Apps Essentials.
- Under Price per month, select the agreement check box and then click Create.
The summary page appears and shows the details of the resource.
After your account is provisioned, click Manage through Citrix Cloud.
IMPORTANT:
Wait for Microsoft Azure to provision your service. Do not click the Manage through Citrix Cloud link until provisioning is complete. This process can take up to four hours.
When you click the link, Citrix Cloud opens in the web browser, and you can begin the configuration process described below.
Prepare your Azure subscription
Choose your Azure subscription to be the host connection for your VDAs and related resources. These resources can incur charges based on your consumption.
NOTE:
This service requires you to log on with an Azure Active Directory account. Virtual Apps Essentials does not support other account types, such as live.com.
To prepare your Azure subscription, configure the following in Azure Resource Manager:
Create a resource group and provide:
- Resource group name
- Subscription name
- Location
- In Azure Resource Manager, create a virtual network in the resource group and provide a name for the network. You can leave all other default settings. You create a storage account when you create the master image.
- Use an existing domain controller or create one. If you create a domain controller:
- Use the A3 Standard or any other size Windows Server 2012 R2 virtual machine in the Resource Group and virtual network. This virtual machine becomes the domain controller. If you plan to create multiple domain controllers, create an availability set and put all the domain controllers in this set.
- Assign a private static IP address to the network adapter of the virtual machine. You can assign the address in the Azure portal. For more information, see Configure private IP addresses for a virtual machine using the Azure portal on the Microsoft documentation website.
- [Optional] Attach a new data disk to the virtual machine to store the Active Directory users and Groups and any Active Directory logs. For more information, see Attach a managed data disk to a Windows VM by using the Azure portal. When you attach the disk, select all the default options to complete the settings.
- Add the domain controller virtual machine’s private IP address to the virtual network DNS server. For more information, see Manage DNS servers used by a virtual network (Classic) using the Azure portal (Classic).
- Add a public DNS server in addition to the Microsoft DNS server. Use the IP address 168.63.129.16 for the second DNS server.
- Add the Active Directory Domain Services role to the domain controller virtual machine. When this step is complete, promote the domain controller virtual machine to a domain controller and DNS.
- Create a forest and add some Active Directory users. For more information, see Install a new Active Directory forest on an Azure virtual network.
If you prefer to use Azure Active Directory Domain Services instead of a domain controller, Citrix recommends reviewing the documentation Azure Active Directory Domain Services for Beginners on the Microsoft website.
Link Your Azure subscription
In Citrix Cloud, link your Citrix Virtual Apps Essentials to your Azure subscription.
- Sign in to Citrix Cloud. In the upper left menu, select My Services > Virtual Apps and Desktops.
- On the Manage tab, click Azure Subscriptions.
- Click Add Subscription. The Azure portal opens.
- Log on to your Azure subscription with your global administrator Azure credentials.
- Click Accept to allow Virtual Apps Essentials to access your Azure account. The subscriptions available in your account are listed.
- Select the subscription you want to use and then click Link.
- Return to the Virtual Apps Essentials console to see the subscription in a linked state.
After you link your Azure subscription to Virtual Apps Essentials, upload your master image.
Prepare and upload a master image
Catalog creation uses a master image to deploy VMs containing applications and desktops. This can be a master image you prepare (with applications and VDA installed), or an image prepared by Citrix. For production deployments, Citrix recommends preparing and using your own master image. Citrix-prepared images are intended only for pilot or test deployments.
The first production image must be prepared from the Azure Resource Manager interface. Later, you can create additional images through Azure, as needed.
As an alternative to creating additional images through the Azure interface, you can build a new master image from the Virtual Apps Essentials interface.
This method uses a previously created master image. You can obtain the network settings from an existing catalog or manually specify them.
After you use an existing master image to create a new image, you connect to the new image and customize it, adding or removing apps that were copied from the template. The VDA is already installed, so you don’t have to do that again.
This method lets you stay with the Essentials service. You don’t need to navigate to Azure to create the new image, and then return to the Essentials service to import the image.
For example, let’s say you have a catalog named HR that uses a master image containing several HR apps. Recently, a new app released that you want to make available to the HR catalog users. Using the build-an-image feature in Virtual Apps Essentials, you select the current master image as a template to create a new master image. You also select the HR catalog so that the new master image uses the same network connection settings. After the initial image setup, install the new app on the new image. After testing, update the HR catalog with the new master image, making it available to that catalog’s users. The original HR master image is retained in the My Images list, in case it’s ever needed again.
The following sections describe how to prepare and upload a master image through the Azure interface. For details about building an image from within Virtual Apps Essentials, see Prepare a master image in Virtual Apps Essentials.
Procedure summary
- Prepare a master image VM in Azure or Virtual Apps Essentials.
- Install apps on the master image.
- Install a Citrix VDA on the master image.
- Upload the master image from Azure Resource Manager to Virtual Apps Essentials (if needed).
Citrix recommends installing the latest Current Release (CR) of the server VDA or the latest Cumulative Update (CU) for Server VDA 7.15 Long Term Service Release (LTSR) on Windows Server 2016 or Windows Server 2012 R2 machines. If you have a Windows Server 2008 R2 machine, you must install server VDA 7.15 LTSR (latest CU recommended), which is also available on the download page. See Lifecycle Policy for Citrix Virtual Apps and Desktops Service to learn about the lifecycle policy for CR and LTSR VDAs.
Create a master image VM in Azure
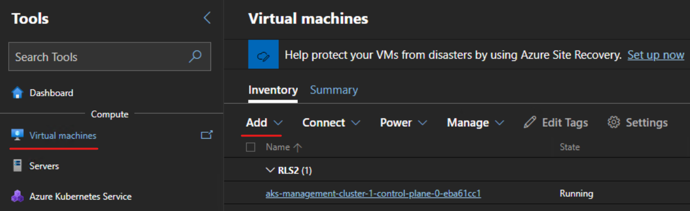
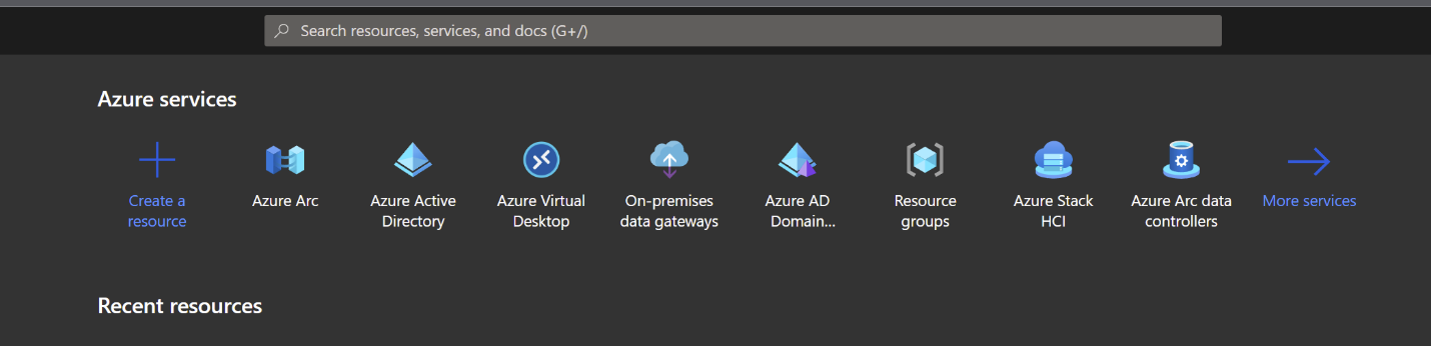
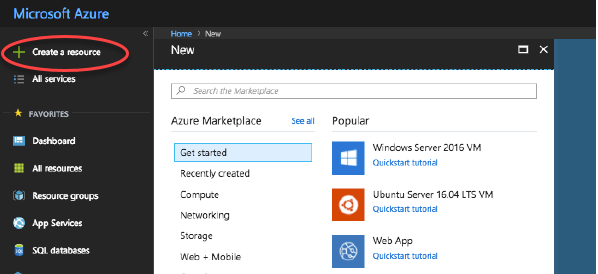
- Sign in to the Azure portal.
- Click Create a Resource in the navigation pane. Select or search for a Windows Server 2008 R2, Windows Server 2012 R2, or Windows Server 2016 entry. Click Create.
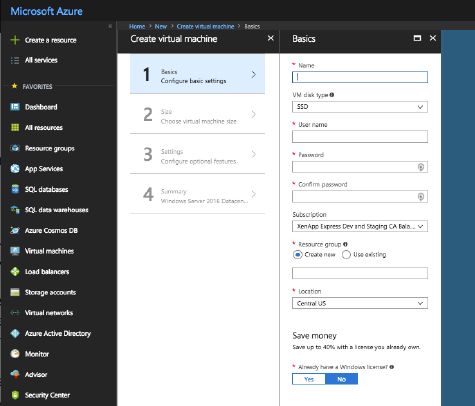
On the Create virtual machine page, in panel 1 Basics:
- Enter a name for the VM.
- Select a VM disk type (optional). Create a standard disk.
- Enter the local user name and password, and confirm the password.
- Select your subscription.
- Create a new resource group or select an existing resource group.
- Select the location.
- Select the resource group and location.
- Choose whether you will use a Windows license that you already own.
- Click OK.
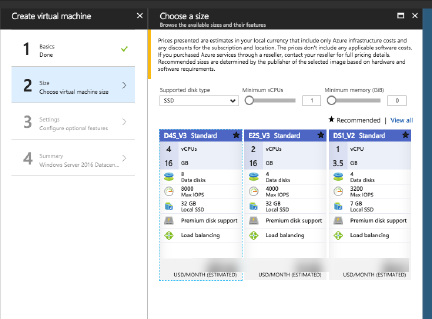
On the Create virtual machine page, in panel 2 Size, choose the virtual machine size:
- Select a VM type, then indicate the minimum number of vCPUs and minimum memory. The recommended choices are displayed. You can also display all choices.
- Choose a size and then click Select.
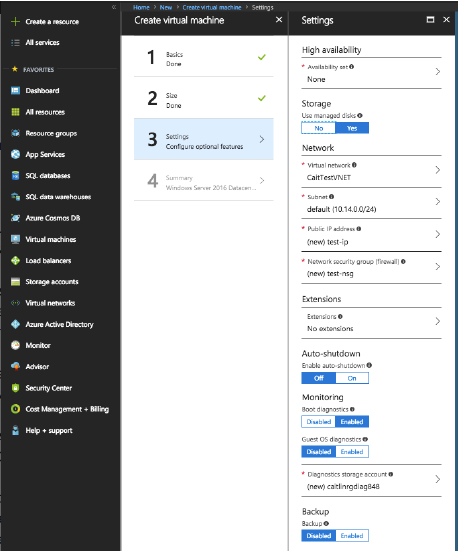
On the Create virtual machine page, In panel 3 Settings:
- Indicate whether you want to use high availability.
- Provide the virtual network name, subnet, public IP address, and network security.
- Optionally, select extensions.
- Enable or disable auto-shutdown, monitoring (boot diagnostics, guest OS diagnostics, diagnostics storage account).
- Enable or disable backup.
- Click OK.
- In panel 4 Summary, click OK to begin creation of the VM.
Do not Sysprep the image.
Install apps on the master image
On the master image VM you just created, add the apps that will be available to users when they log on with the workspace URL. (Later, after you create the catalog that uses this master image, you’ll specify exactly which of these apps will be available to the users you specify.)
- Connect to the master image VM after you create it and while it is running.
- Install applications.
Install a VDA on the master image
- Connect to the master image VM (if you’re not already connected).
- You can download a VDA for Server OS by using the Downloads link on the Citrix Cloud navigation bar. Or, use a browser to navigate to the Citrix DaaS download page. Download a VDA for Server OS onto the VM. (See guidance above for VDA version information.)
- Launch the VDA installer by double-clicking the downloaded file. The installation wizard launches.
- On the Environment page, select Create a master image using MCS and then click Next.
- On the Core Components page, click Next.
- On the Delivery Controller page, select Let Machine Creation Services do it automatically and then click Next.
- Leave the default settings on the Additional Components, Features, and Firewall pages, unless Citrix instructs you otherwise. Click Next on each page.
- On the Summary page, click Install. Prerequisites begin to install. When prompted to restart, agree.
- The VDA installation resumes automatically. Prerequisite installation completes and then the components and features are installed. On the Call Home page, leave the default setting (unless Citrix instructs you otherwise), and then click Next.
- Click Finish. The machine restarts automatically.
- To ensure that the configuration is correct, launch one or more of the applications you installed.
- Shut down the VM. Do not Sysprep the image.
Upload the master image
In this procedure, you upload the master image from Azure Resource Manager to Virtual Apps Essentials.
- If you are not already in Citrix Cloud, sign in. In the upper left menu, select My Services > Virtual Apps and Desktops
- On the Manage tab, click Master Images.
- Click Add Master Image.
- On the Add an image page, specify the location of the image by selecting the subscription, resource group, storage account, VHD, and region.
- Enter a name for the master image.
- Click Save.
The service verifies the master image. After verification, the uploaded image appears under Master Images > My Images.
Tip: As an alternative to uploading the master image before creating the catalog, you can import a master image from Azure Resource Manager when you create the catalog.
Prepare a master image in Virtual Apps Essentials
This method uses an existing master image as a template (and optionally, connection details from an existing catalog) to build another master image. You can then customize the new master image. This procedure is completed entirely through the Virtual Apps Essentials interface.
- Sign in to Citrix Cloud, if you haven’t already. In the upper left menu, select My Services > Virtual Apps and Desktops.
- Click Manage and then select the Master Images tab.
- Click Build Image.
- On the Build Image page, in the Select an image panel, select a master image. Specify a name for your new image. Click Next.
In the Specify network connectivity settings panel, you can either use the settings from an existing catalog, or you can specify the settings. The settings are: subscription, virtual network, region, subnet, domain, and VM instance type. (If you don’t have a catalog, you must enter the settings.)
If you select Copy settings from a catalog, select the catalog. The network connection settings display, so you can visually verify that you want to use them with your new master image. Enter your service account username and password to join the domain. Click Save.
If you select Enter new settings, select values in the appropriate settings fields. Enter your service account username and password to join the domain. Click Save.
- Click Start Provisioning.
- When the new image has been created, it appears in the Manage > Master Images list with a status of Input Required. Click Connect to VM. An RDP client downloads. Use RDP to connect to the newly created VM. Customize the new image by adding or removing applications and other software. As with all master images, do not Sysprep the image.
- When you’re done customizing your new image, return to the Manage > Master Images page and click Finish for your new master image. The new image is then sent to the verification process.
- When the verification process completes, the new image appears in the My Images list with a status of Ready.
Later, when you create a catalog, and select Link an existing image on the Choose master image page, the new image appears among the Image Name choices.
Deploy a catalog, publish apps and desktops, and assign subscribers
A catalog lists the apps and desktops that you choose to share with selected users.
If you’re familiar with other Citrix app and desktop delivery products, a catalog in this service is similar to combining a machine catalog and a delivery group. However, the machine catalog and delivery group creation workflows in other services are not available in this service.
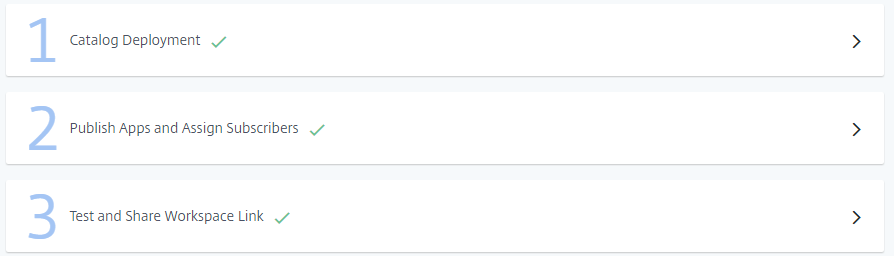
Deploying a catalog and sharing apps with subscribers is a multi-step process.
- Create a catalog
- Publish apps and assign subscribers for that catalog
- Test and share the workspace link your subscribers will use
Create a catalog
When creating a catalog, have Azure Active Directory account credentials and your subscription name available.
- If you are not already in Citrix Cloud, sign in. In the upper left menu, select My Services > Virtual Apps and Desktops.
- On the Manage tab, click Catalogs and then Add Catalog.
- Provide information in the following panels. Click Save when you’re done with each panel. A warning sign appears in a panel’s header if required information is missing or invalid. A check mark indicates that the information is complete.
Pick a name
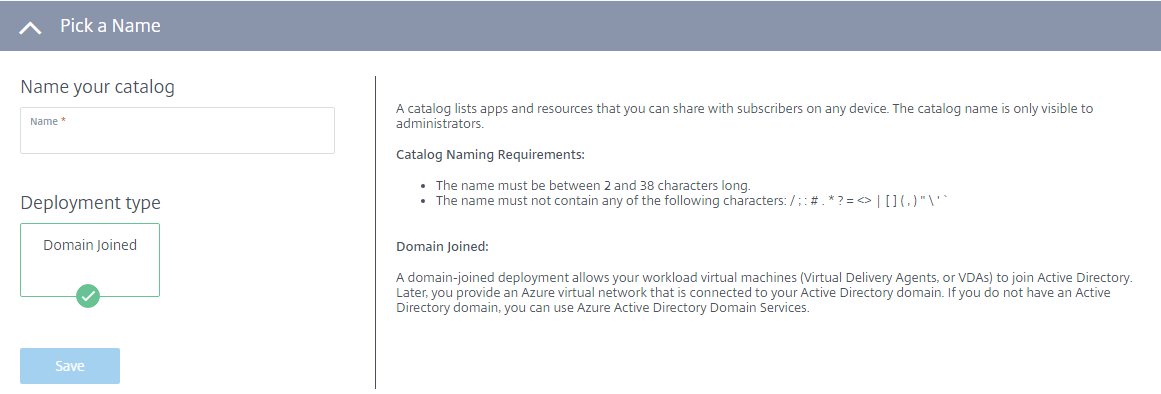
- Type a 2-38 character name for the catalog. (Letters and numbers only, no special characters.) This name is visible only to administrators.
- Select Domain Joined if it isn’t already selected. A domain-joined deployment allows VDAs to join Active Directory. Later, you provide an Azure virtual network that is connected to your domain. If you don’t have a domain, you can use Azure Active Directory Domain services.
- Click Save.
Link your Azure subscription
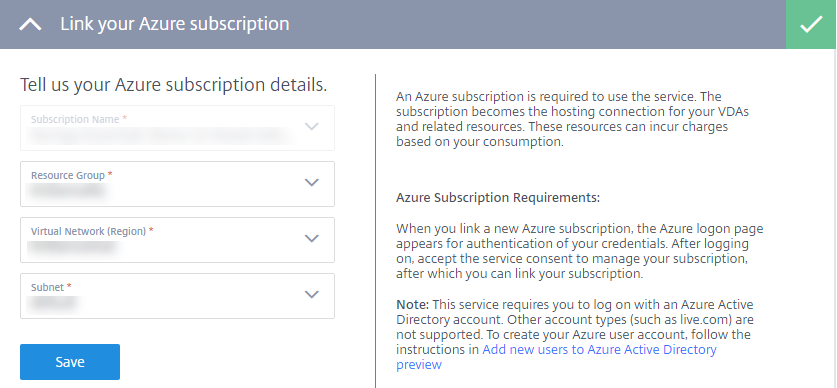
- Select your Azure subscription. When you link a new Azure subscription, the Azure sign-in page appears for authentication of your Azure credentials. After signing in, accept the service consent to manage your subscription. Then, you can link a subscription. Virtual Apps Essentials requires you to log on with an Azure Active Directory account. Other account types (such as live.com) are not supported.
- Select your resource group, virtual network (VNET), and subnet. The VNET determines the Azure region where your resources are deployed. The subnet must be able to reach your domain controller.
- Click Save.
Join local domain
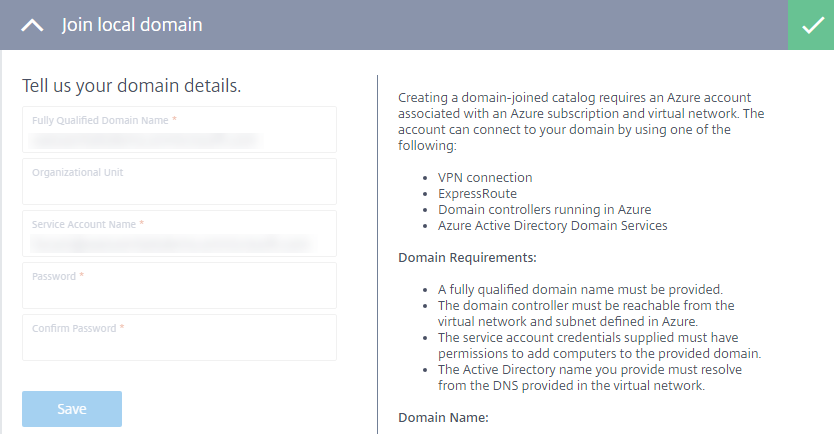
Enter domain information:
- Fully Qualified Domain Name: Enter the domain name. The name must resolve from the DNS provided in the virtual network.
- Organizational Unit: (optional) Ensure that Active Directory contains the specified OU. If you leave this field blank, machines are placed in the default Computers container.
- Service Account Name, Password, and Confirm Password: Enter the User Principal Name (UPN) of the account that has permissions to add machines to the domain. Then enter and confirm the password for that account.
Click Save.
You can test connectivity through the virtual network by creating a VM in your Azure subscription. The VM must be in the same resource group, virtual network, and subnet that you use to deploy the catalog. Ensure that the VM can connect to the internet. Also ensure that you can reach the domain by joining the VM to the domain. You can test using the same credentials that were used for deploying this catalog.
Connect to a resource location
Each resource location must have two or more Cloud Connectors, which communicate with Citrix Cloud. The service handles the Cloud Connector deployment automatically when a catalog deploys. The two Windows Server VMs are created in Azure Resource Manager and then a Cloud Connector is installed automatically on each server. If the selected resource location is available, connection occurs automatically. Simply click Save. To create a resource location, enter a name for it.
- To create Cloud Connectors in a specific Azure resource group, click Edit next to Azure Resource Group to change the resource location. Otherwise, the service uses the resource group you specified when you linked your Azure subscription.
- To put the Cloud Connectors into a separate OU, click Edit next to Organizational Unit to change the OU. Otherwise, Virtual Apps Essentials uses the resource group you specified when you linked your Azure subscription.
Choose a master image
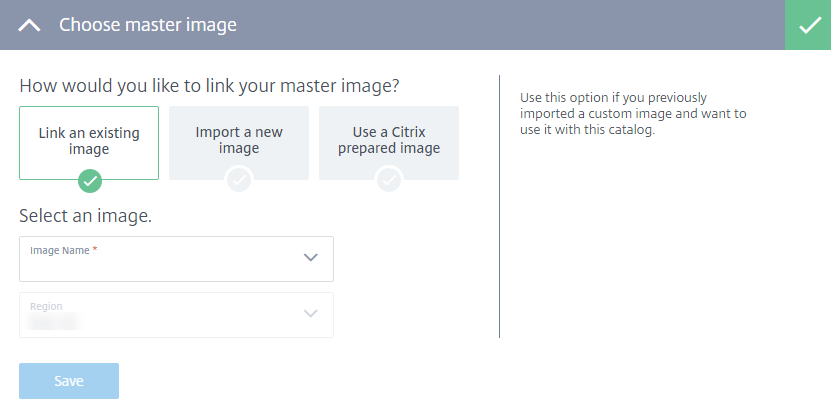
Select one of the following:
- Link an existing image: Use this option if you previously imported a custom image and want to use it with this catalog. Select the image and optionally, a region.
- Import a new image: Use this option if you want to use a custom image with this catalog, but have not yet imported it. Select the subscription, resource group, storage account, and VHD. Enter a friendly name for the image.
- Use a Citrix prepared image: Use this option to test the service without using your own custom image. These images are suitable only for demonstration environments, and are not recommended for production. Select a prepared image.
Click Save.
Pick storage and compute type
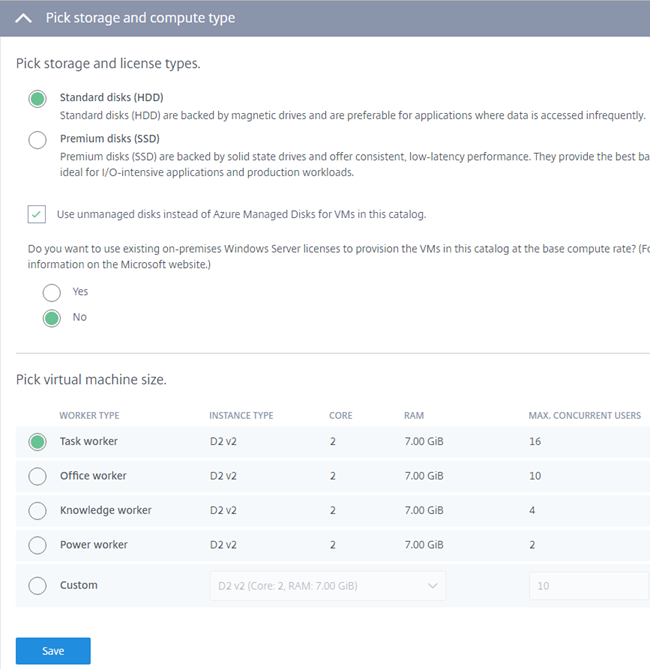
Configure the following items:
- Standard or premium disks: Standard disks (HDD) are backed by magnetic drives. They are preferable for applications where data is accessed infrequently. Premium disks (SDD) are backed by solid state drives. They are ideal for I/O-intensive applications.
- Use Azure Managed Disks or unmanaged disks: Learn more about Azure Managed Disks at https://docs.microsoft.com/en-us/azure/virtual-machines/windows/managed-disks-overview.
Azure Hybrid Use Benefit: Select whether or not to use existing on-premises Windows Server licenses. Enabling this feature and using existing on-premises Windows Server images uses Azure Hybrid Use Benefits (HUB). For details, see https://azure.microsoft.com/pricing/hybrid-use-benefit/.
HUB reduces the cost of running VMs in Azure to the base compute rate, because it waives the price of additional Windows Server licenses from the Azure gallery. You need to bring your on-premises Windows Servers images to Azure to use HUB. Azure gallery images are not supported. On-premises Windows Client licenses are currently not supported. See Azure Hybrid Benefit for Windows Server on the Microsoft web site.
- Pick a virtual machine size: Select a worker role (for example, task, office, knowledge, power). The worker role defines the resources used. When you specify a worker role, the service determines the correct load per instance. You can select an option or create your own custom option.
Click Save.
Manage costs with power management settings
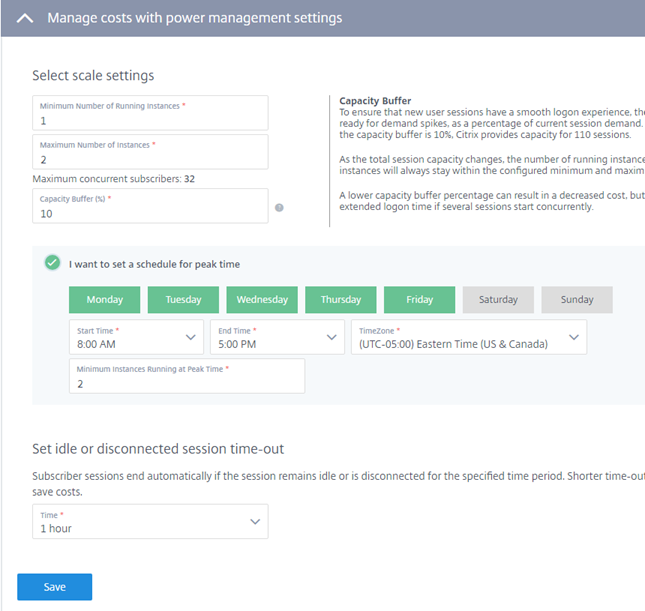
Enter the following information:
Scale settings:
- Minimum number of running instances: The service ensures that this many VMs are powered on all the time.
- Maximum number of running instances: The service does not exceed this number of VMs.
- Maximum concurrent users: The service does not allow concurrent users beyond this limit.
Capacity buffer: Enables extra sessions to be ready for demand spikes, as a percentage of current session demand. For example, if there are 100 active sessions and the capacity buffer is 10%, the service provides capacity for 110 sessions.
As the total session capacity changes, the number of running instances for this catalog scales up or down. The number of running instances always stays within the configured minimum and maximum values. A lower capacity buffer percentage can result in a decreased cost. However, it might also result in some sessions having an extended logon time if several sessions start concurrently.
Schedule for peak time: Select this option if you want a different number of VMs running during peak times than in non-peak times. Select the days of the week for the peak time, start and end times, and time zone. Specify the minimum number of running instances during peak time.
Idle or disconnected session time-out: Set the time for when the session ends. User sessions end automatically if the session remains idle or is disconnected for the specified time period. Shorter time-out values allow unused VDAs to power off and save costs.
Click Save.
Deploy the catalog
After you complete the configuration panels, click Start Deployment to start the catalog creation. Creating a catalog can take 1 to 2 hours (or longer, if you specified a large number of VMs).
When a catalog is created:
- A resource group (and a storage account in that resource group) for the workload machines are created automatically in Azure.
- The VMs are named Xenappxx-xx-yyy, where xx is derived from an environmental factor and yy is an ordinal number.
Publish apps and assign subscribers for a catalog
To complete the catalog after it is deployed, you must publish one app or desktop, and assign at least one subscriber.
The image you used to create the catalog includes the applications (or desktop) that you can publish. You can select applications from the Start menu or specify a directory path on the machine.
- If you are not already in Citrix Cloud, sign in. In the upper left menu, select My Services > Virtual Apps and Desktops.
- On the Manage tab, click Catalogs.
- In the ellipsis menu (…) for the catalog that was created, select Manage Catalog.
Select Publish Apps and Assign Subscribers. The following page displays.
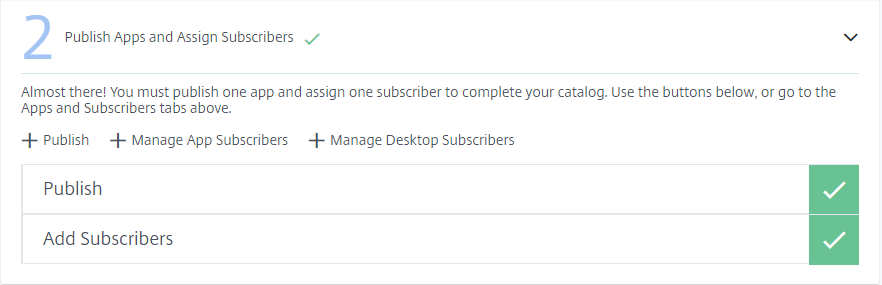
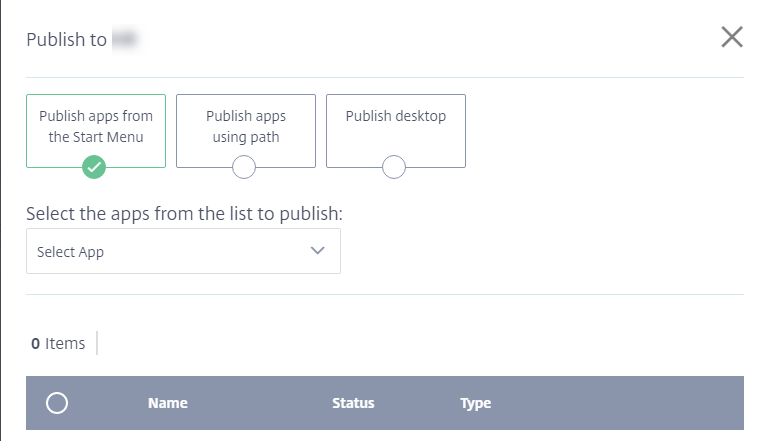
- In the Publish Apps and Assign Subscribers dialog box, click Publish. The Publish to catalog-name page contains three choices. Complete at least one. Optionally, you can then choose another (for example, to publish both apps and desktops using this catalog).
- To publish apps located on the Start menu:
- Select Publish from Start Menu.
- Select the applications from the list.
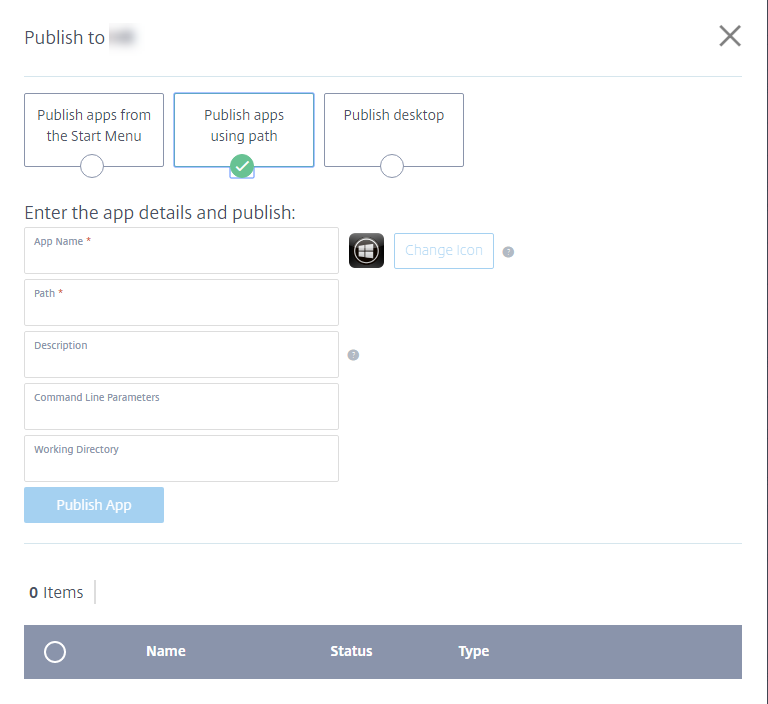
- To publish apps by specifying their location and other information:
- Select Publish using Path.
- Enter each application’s name and path (for example, c:\Windows\system1\app.exe).
- Optionally, enter a description that will appear in the user’s workspace, command line parameters, and working directory.
- To change the icon that represents the published app, click Change icon and then navigate to the location of the icon. A message appears if the selected icon cannot be extracted. In that case, you can retry or continue using the existing icon.
Click Publish App.
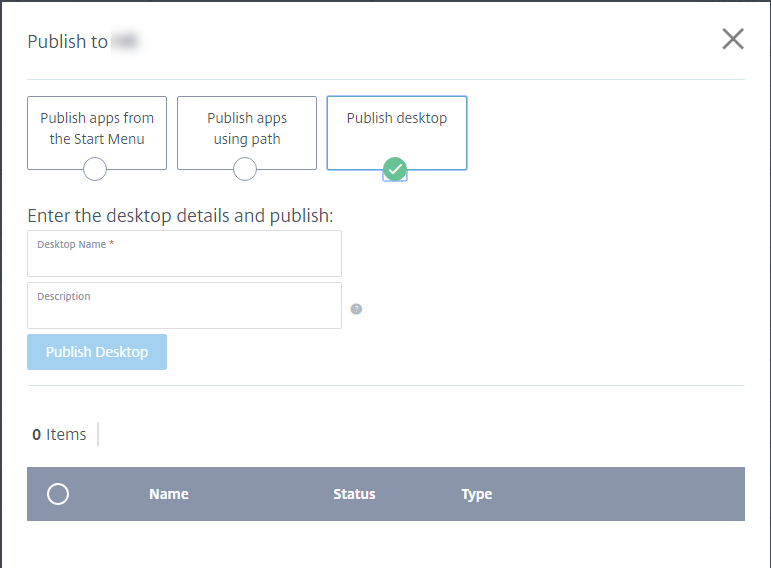
- To publish a desktop:
- Select Publish desktop.
- Enter the name of the desktop.
- Optionally, enter a description that will appear in the user’s workspace.
Click Publish Desktop.
After you add apps or desktops, they appear in the list under the selectors. To delete an app or desktop you added, select the button to the left of the entry (or click the trash icon next to the entry) and then click Remove. Later, if you want to unpublish an app or desktop, select the button to the left of the entry and then click Unpublish.
In the Publish Apps and Assign Subscribers dialog box, click either Manage App Subscribers or Manage Desktop Subscribers.
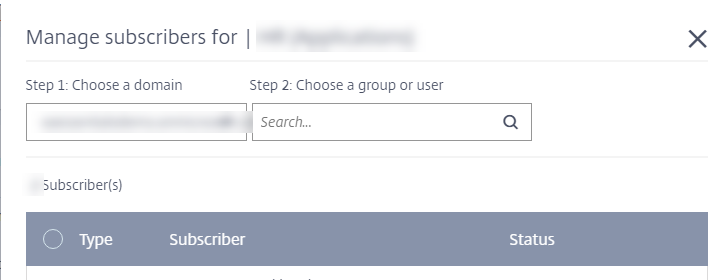
- Select a domain and then search for a user or user group.
User assignments for apps and desktops are separate. To assign a user access to both apps and desktops, assign that user with Manage App Subscribers and with Manage Desktop Subscribers.
After you add a user or group, it appears in the list under the selectors. To delete a user or group you selected, click the trash can icon next to the entry and click Remove. Later, if you want to remove users, select the button to the left of the entry and then click Remove Selected.
Test and share the workspace link
After you deploy a catalog, publish apps, and assign subscribers, you’re provided the link that your subscribers use to access the apps and desktops you published for them.
- If you are not already in Citrix Cloud, sign in. In the upper left menu, select My Services > Virtual Apps and Desktops.
- On the Manage tab, click Catalogs.
- In the ellipsis menu (…) for the catalog, select Manage Catalog.
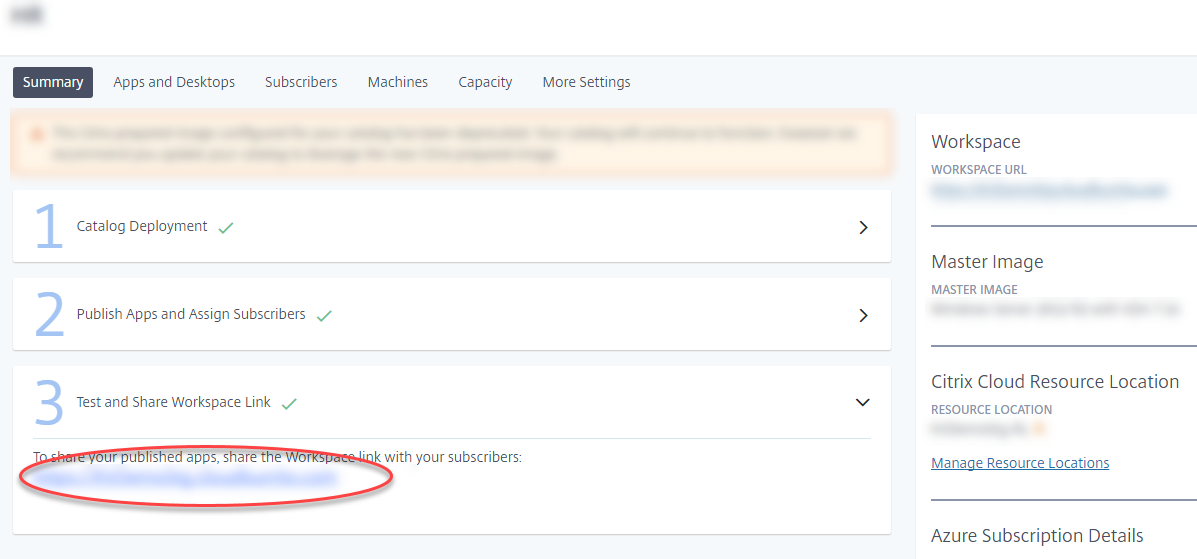
- Select Test and Share Workspace Link.
In the following graphic, the workspace link appears in the circled area. Share this link with your subscribers. The right portion of the page lists the workspace URL, plus information about the catalog’s master image, resource location, Azure subscription, and domain.
See Workspace experience for more information.
Update master images and catalogs
To update or add applications, update the virtual machine that you used to create the catalog’s master image.
Update the master image
- Power on the master image VM. Powering on the machine does not affect the master image installed in Azure Resource Manager.
- Install any updates or applications on the VM.
- Shut down the VM.
- In the Virtual Apps Essentials console, add the new image that includes the path to the VM’s VHD image.
Update a catalog with a new image
- If you are not already in Citrix Cloud, sign in. In the upper left menu, select My Services > Virtual Apps and Desktops.
- On the Manage tab, click Catalogs.
- Click the ellipsis menu for the catalog and then click Update Catalog Image.
- Select either Link an existing image or Import a new image. Enter the information that is appropriate for your choice.
- In Time until automatic log-off, choose the amount of time before the session ends.
- Click Update.
When you start the catalog update, users can continue to work until the initial processing completes. Then, users receive a warning message to save their work and close applications. After closing all active sessions on the VDA, the update finishes on that VDA. If users do not log off in the amount of time given, the session closes automatically.
Update the number of VDAs in a catalog
- If you are not already in Citrix Cloud, sign in. In the upper left menu, select My Services > Virtual Apps and Desktops.
- Click the Manage tab.
- On the Catalogs tab, select a catalog.
- On the Capacity tab, under Select scale settings, click Edit.
- Change the Maximum number of running instances value to the desired VDA count for the catalog.
- Click Save.
Monitor machine states
When you select a catalog, the Machines tab on the catalog summary page lists all of the machines in that catalog. The display includes each machine’s power and registration states, and the current session count. 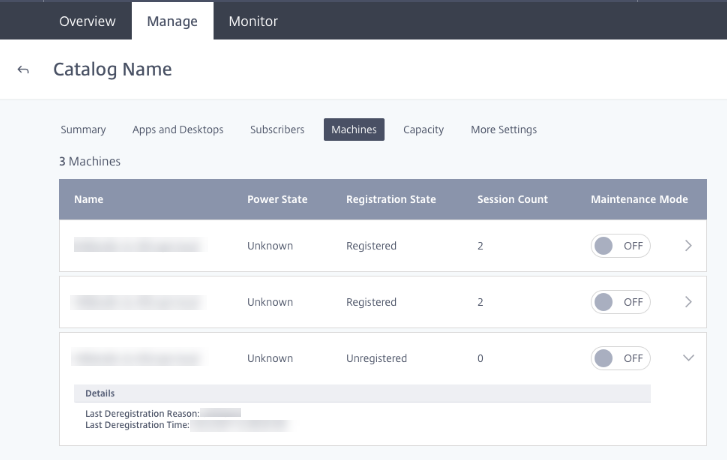
You can turn maintenance mode on or off for a machine. Turning on maintenance mode prevents new connections from being made to the machine. Users can connect to existing sessions, but they cannot start new sessions. You might want to place a machine in maintenance mode before applying patches.
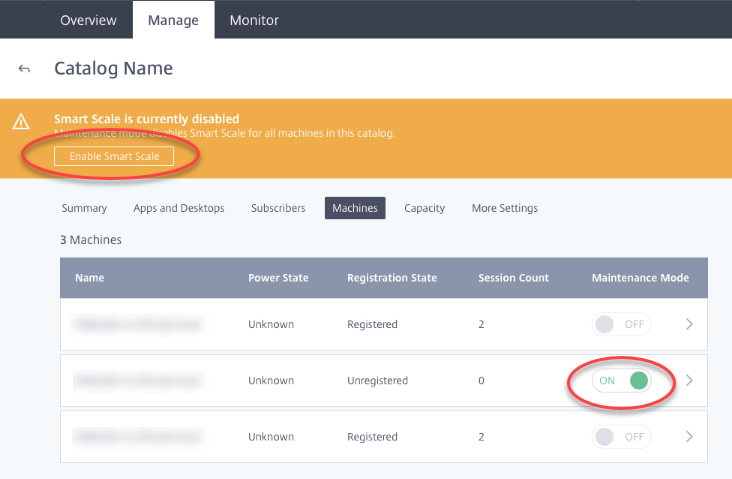
If you turn on maintenance mode for one or more machines, Smart Scale is temporarily disabled for all machines in that catalog. Either of the following actions will enable Smart Scale again:
- Click Enable Smart Scale in the warning at the top of the screen. This action automatically turns off maintenance mode for all machines in the catalog that have maintenance mode turned on.
- Explicitly turn off maintenance mode for each machine that currently has maintenance mode turned on.
Monitor the service
- If you are not already in Citrix Cloud, sign in. In the upper left menu, select My Services > Virtual Apps and Desktops.
- Click the Monitor tab.
Session information
To monitor the overall performance of Citrix Virtual Apps Essentials:
Select the catalog that you want to monitor. You can view information on sessions, logon duration, and other information.
Choose a session and then:
- Disconnect the session
- Log off from the session
- Send a message
Click each session to view extra details about the session such as processes, applications running, and more.
Usage information
Usage information shows aggregated data for all catalogs (rather than a specified catalog).
- Usage Overview displays the total number of application launches and the number of unique users who launched apps over the past six weeks.
- Top Apps lists the most frequently used apps for the current and previous months. Hovering over an entry displays the number of times that application was launched.
- Top Users lists the top ten users for the current and previous months, with the number of times they launched applications.
Weekly data intervals are Monday (UTC 00:00) through the query time. Monthly data intervals are the first day of the month (UTC 00:00) through the query time.
Profile Management
Profile Management ensures that personal settings apply to users’ virtual applications, regardless of the location of the user device.
Configuring Profile Management is optional.
You can enable Profile Management with the profile optimization service. This service provides a reliable way for managing these settings in Windows. Managing profiles ensures a consistent experience by maintaining a single profile that follows the user. It consolidates automatically and optimizes user profiles to minimize management and storage requirements. The profile optimization service requires minimal administration, support, and infrastructure. Also, profile optimization provides users with an improved log on and log off experience.
The profile optimization service requires a file share where all the personal settings persist. You must specify the file share as a UNC path. The path can contain system environment variables, Active Directory user attributes, or Profile Management variables. To learn more about the format of the UNC text string, see To specify the path to the user store.
You configure Profile Management in Citrix Cloud.
To configure Profile Management
- If you are not already in Citrix Cloud, sign in. In the upper left menu, select My Services > Virtual Apps and Desktops.
- On the Manage tab, click Catalogs.
- Click the name of the catalog.
- Click More Settings.
- In Set up Profile Management in Azure subscription, enter the path to the profile share. For example, \fileserver\share#sAMAccountName#
- Click Save.
When enabling Profile Management, consider further optimizing the user’s profile by configuring folder redirection to minimize the effects of the user profile size. Applying folder redirection complements the Profile Management solution. For more information, see Microsoft Folder Redirection.
Configure the Microsoft RDS License Server
Citrix Virtual Apps Essentials accesses Windows Server remote session capabilities that would typically require a Remote Desktop Services client access license (RDS CAL). The VDA must be able to contact an RDS license server to request RDS CALs. Install and activate the license server. For more information, see Activate the Remote Desktop Services License Server. For proof of concept environments, you can use the grace period provided by Microsoft.
With this method, you can have Virtual Apps Essentials apply the license server settings. You can configure the license server and per user mode in the RDS console on the master image. You can also configure the license server using Microsoft Group Policy settings. For more information, see License your RDS deployment with client access licenses (CALs).
To configure the RDS license server using Group Policy settings
- Install a Remote Desktop Services License Server on one of the available VMs. The VM must always be available. The Citrix service workloads must be able to reach this license server.
- Specify the license server address and per user license mode using Microsoft Group Policy. For details, see Specify the Remote Desktop Licensing Mode for an RD Session Host Server.
- If you purchased CAL licenses from Microsoft Remote Access, you do not have to install the licenses. You can purchase licenses from Microsoft Remote Access in the Azure Marketplace, along with Virtual Apps Essentials.
To configure the RDS license server
- If you are not already in Citrix Cloud, sign in. In the upper left menu, select My Services > Virtual Apps and Desktops.
- On the Manage tab, click Catalogs.
- Select the catalog and then select More Settings.
- In Enter the FQDN of the license server, type the fully qualified domain name of the license server.
- Click Save.