Monday, 27 May 2024

Create a Batch account in the Azure portal


Create a Batch account in the Azure portal

This article shows how to use the Azure portal to create an Azure Batch account that has account properties to fit your compute scenario. You see how to view account properties like access keys and account URLs. You also learn how to configure and create user subscription mode Batch accounts.

For background information about Batch accounts and scenarios, see Batch service workflow and resources.

Create a Batch account

When you create a Batch account, you can choose between user subscription and Batch service pool allocation modes. For most cases, you should use the default Batch service pool allocation mode. In Batch service mode, compute and virtual machine (VM)-related resources for pools are allocated on Batch service managed Azure subscriptions.

In user subscription pool allocation mode, compute and VM-related resources for pools are created directly in the Batch account subscription when a pool is created. In scenarios where you create a Batch pool in a virtual network that you specify, certain networking related resources are created in the subscription of the virtual network.

To create a Batch account in user subscription pool allocation mode, you must also register your subscription with Azure Batch, and associate the account with Azure Key Vault. For more information about requirements for user subscription pool allocation mode, see Configure user subscription mode.

To create a Batch account in the default Batch service mode:

  1. Sign in to the Azure portal.

  2. In the Azure Search box, enter and then select batch accounts.

  3. On the Batch accounts page, select Create.

  4. On the New Batch account page, enter or select the following details.

    • Subscription: Select the subscription to use if not already selected.

    • Resource group: Select the resource group for the Batch account, or create a new one.

    • Account name: Enter a name for the Batch account. The name must be unique within the Azure region, can contain only lowercase characters or numbers, and must be 3-24 characters long.

       Note

      The Batch account name is part of its ID and can't be changed after creation.

    • Location: Select the Azure region for the Batch account if not already selected.

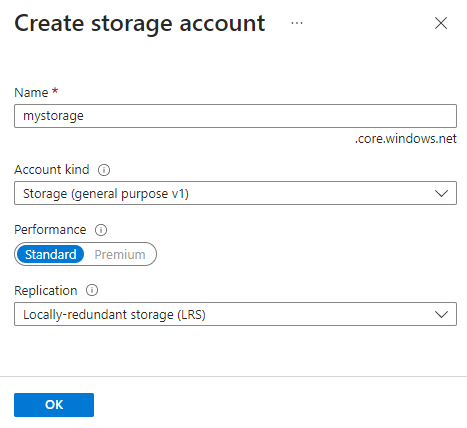
    • Storage account: Optionally, select Select a storage account to associate an Azure Storage account with the Batch account.

      Screenshot of the New Batch account screen.

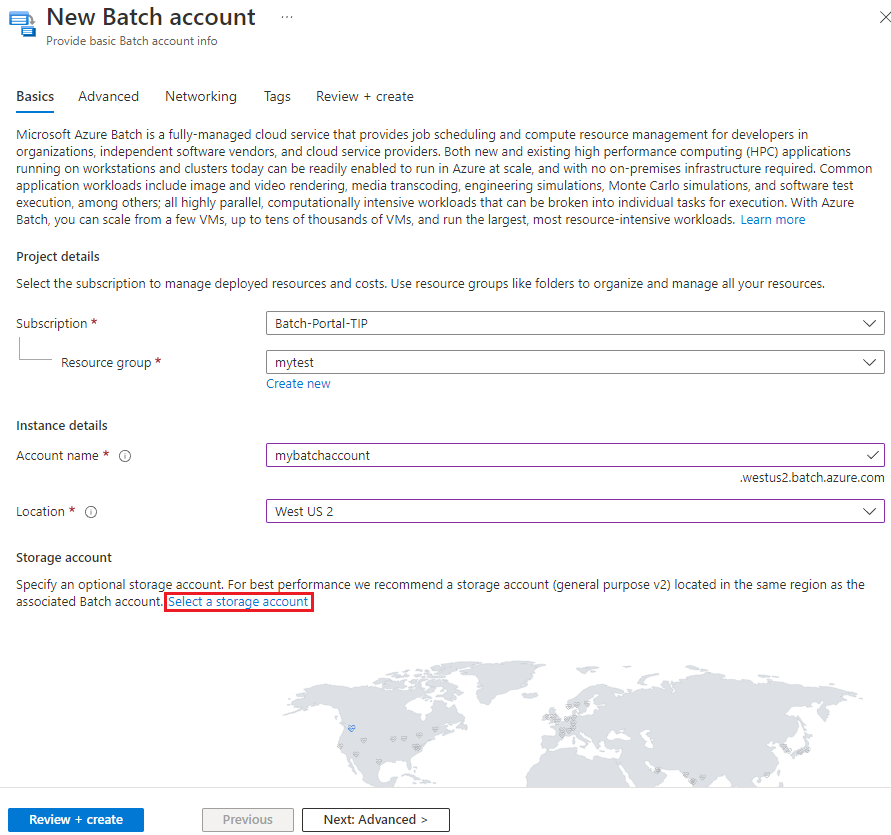
      On the Choose storage account screen, select an existing storage account or select Create new to create a new one. A general-purpose v2 storage account is recommended for the best performance.

      Screenshot of the Create storage account screen.

  5. Optionally, select Next: Advanced or the Advanced tab to specify Identity typePool allocation mode, and Authentication mode. The default options work for most scenarios. To create the account in User subscription mode, see Configure user subscription mode.

  6. Optionally, select Next: Networking or the Networking tab to configure public network access for your Batch account.

    Screenshot of the networking options when creating a Batch account.

  7. Select Review + create, and when validation passes, select Create to create the Batch account.

View Batch account properties

Once the account is created, select Go to resource to access its settings and properties. Or search for and select batch accounts in the portal Search box, and select your account from the list on the Batch accounts page.

Screenshot of the Batch account page in the Azure portal.

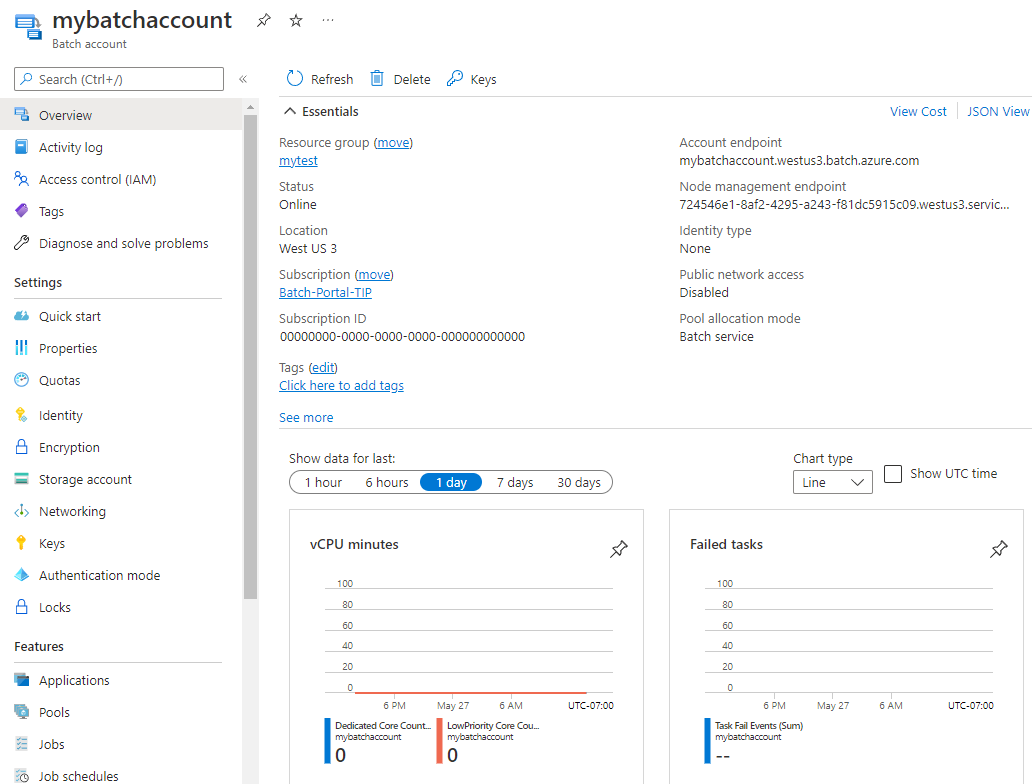
On your Batch account page, you can access all account settings and properties from the left navigation menu.

  • When you develop an application by using the Batch APIs, you use an account URL and key to access your Batch resources. To view the Batch account access information, select Keys.

    Screenshot of Batch account keys in the Azure portal.

    Batch also supports Microsoft Entra authentication. User subscription mode Batch accounts must be accessed by using Microsoft Entra ID. For more information, see Authenticate Azure Batch services with Microsoft Entra ID.

  • To view the name and keys of the storage account associated with your Batch account, select Storage account.

  • To view the resource quotas that apply to the Batch account, select Quotas.

Configure user subscription mode

You must take several steps before you can create a Batch account in user subscription mode.

 Important

To create a Batch account in user subscription mode, you must have Contributor or Owner role in the subscription.

You must accept the legal terms for the image before you use a subscription with a Batch account in user subscription mode. If you haven't done this action, you might get the error Allocation failed due to marketplace purchase eligibility when you try to allocate Batch nodes.

To accept the legal terms, run the commands Get-AzMarketplaceTerms and Set-AzMarketplaceTerms in PowerShell. Set the following parameters based on your Batch pool's configuration:

  • Publisher: The image's publisher
  • Product: The image offer
  • Name: The offer SKU

For example:

PowerShell
Get-AzMarketplaceTerms -Publisher 'microsoft-azure-batch' -Product 'ubuntu-server-container' -Name '20-04-lts' | Set-AzMarketplaceTerms -Accept

 Important

If you've enabled Private Azure Marketplace, you must follow the steps in Add new collection to add a new collection to allow the selected image.

Allow Batch to access the subscription

When you create the first user subscription mode Batch account in an Azure subscription, you must register your subscription with Batch. You need to do this registration only once per subscription.

 Important

You need Owner permissions in the subscription to take this action.

  1. In the Azure portal, search for and select subscriptions.

  2. On the Subscriptions page, select the subscription you want to use for the Batch account.

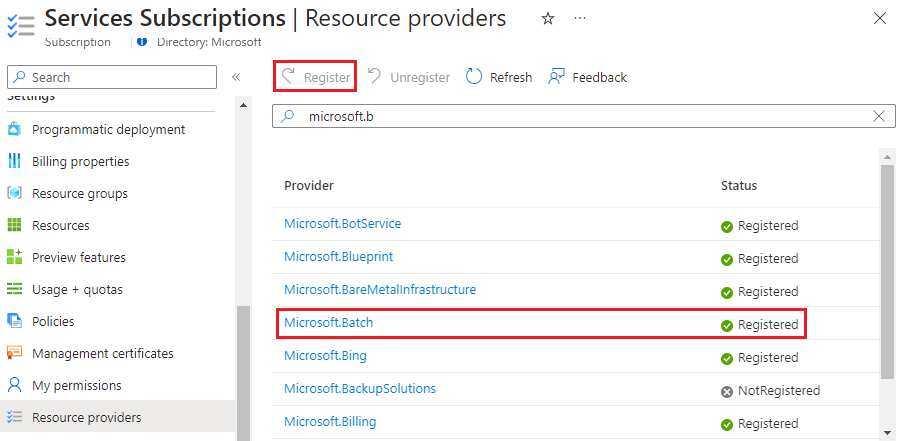
  3. On the Subscription page, select Resource providers from the left navigation.

  4. On the Resource providers page, search for Microsoft.Batch. If Microsoft.Batch resource provider appears as NotRegistered, select it and then select Register at the top of the screen.

    Screenshot of the Resource providers page.

  5. Return to the Subscription page and select Access control (IAM) from the left navigation.

  6. At the top of the Access control (IAM) page, select Add > Add role assignment.

  7. On the Add role assignment screen, under Assignment type, select Privileged administrator role, and then select Next.

  8. On the Role tab, select either the Contributor or Owner role for the Batch account, and then select Next.

  9. On the Members tab, select Select members. On the Select members screen, search for and select Microsoft Azure Batch, and then select Select.

For detailed steps, see Assign Azure roles by using the Azure portal.

Create a key vault

User subscription mode requires Azure Key Vault. The key vault must be in the same subscription and region as the Batch account and use a Vault Access Policy.

To create a new key vault:

  1. Search for and select key vaults from the Azure Search box, and then select Create on the Key vaults page.
  2. On the Create a key vault page, enter a name for the key vault, and choose an existing resource group or create a new one in the same region as your Batch account.
  3. On the Access configuration tab, select Vault access policy under Permission model.
  4. Leave the remaining settings at default values, select Review + create, and then select Create.

Create a Batch account in user subscription mode

To create a Batch account in user subscription mode:

  1. Follow the preceding instructions to create a Batch account, but select User subscription for Pool allocation mode on the Advanced tab of the New Batch account page.
  2. You must then select Select a key vault to select an existing key vault or create a new one.
  3. After you select the key vault, select the checkbox next to I agree to grant Azure Batch access to this key vault.
  4. Select Review + create, and then select Create to create the Batch account.

Create a Batch account with designated authentication mode

To create a Batch account with authentication mode settings:

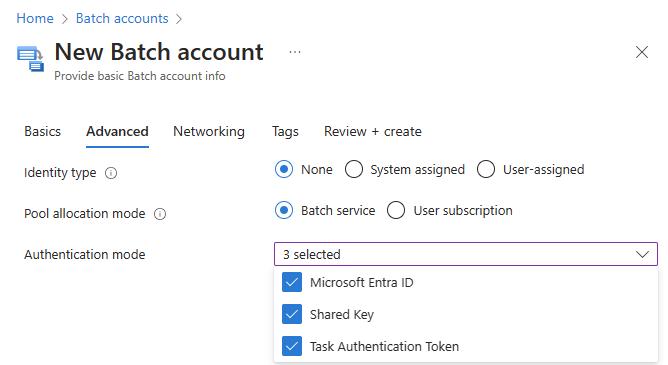
  1. Follow the preceding instructions to create a Batch account, but select Batch Service for Authentication mode on the Advanced tab of the New Batch account page.

  2. You must then select Authentication mode to define which authentication mode that a Batch account can use by authentication mode property key.

  3. You can select either of the 3 "Microsoft Entra IDShared KeyTask Authentication Token authentication mode for the Batch account to support or leave the settings at default values.

    Screenshot of the Authentication Mode options when creating a Batch account.

  4. Leave the remaining settings at default values, select Review + create, and then select Create.

 Tip

For enhanced security, it is advised to confine the authentication mode of the Batch account solely to Microsoft Entra ID. This measure mitigates the risk of shared key exposure and introduces additional RBAC controls. For more details, see Batch security best practices.

 Warning

The Task Authentication Token will retire on September 30, 2024. Should you require this feature, it is recommended to use User assigned managed identity in the Batch pool as an alternative.

Grant access to the key vault manually

You can also grant access to the key vault manually.

  1. Select Access policies from the left navigation of the key vault page.

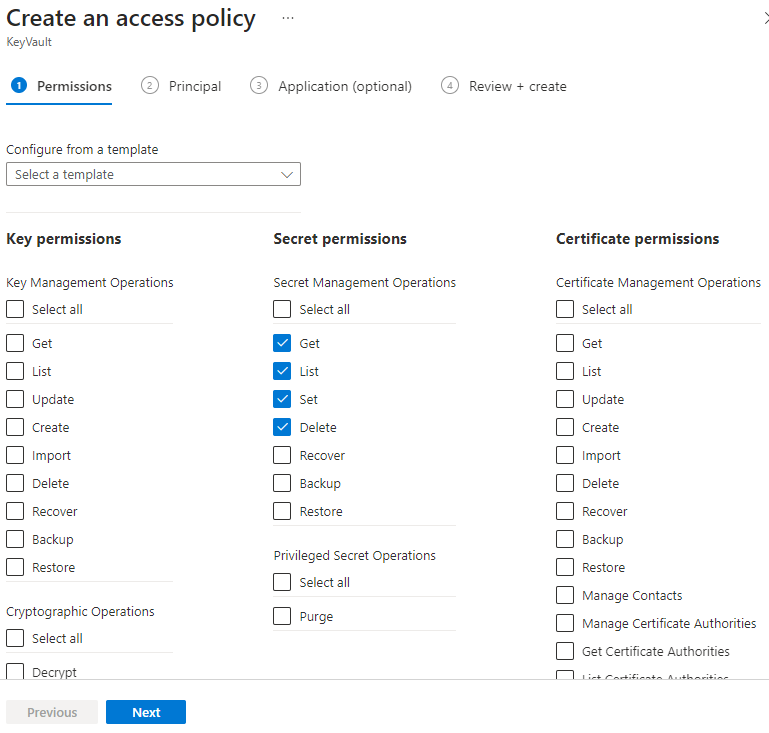
  2. On the Access policies page, select Create.

  3. On the Create an access policy screen, select a minimum of GetListSet, and Delete permissions under Secret permissions. For key vaults with soft-delete enabled, also select Recover.

    Screenshot of the Secret permissions selections for Azure Batch

  4. Select Next.

  5. On the Principal tab, search for and select Microsoft Azure Batch.

  6. Select the Review + create tab, and then select Create.

Integrating Megaport with SAP on Azure


Integrating Megaport with SAP on Azure

You can use Megaport to implement an ExpressRoute Layer 2 connection between your on-premises or colocation-based infrastructure and your SAP on Azure instance. You can also use ExpressRoute to connect to a cloud-only instance of SAP on Azure.

Before you begin, ensure that you have created a physical connection, or Port. After you create a Port, you will connect a Virtual Cross Connect (VXC) from the Port to the virtual gateway associated with the Azure VNet infrastructure. A VXC is a point-to-point Ethernet connection between an A-End (your Port) and a B-End (in this case, your SAP on Azure instance).

If you aren’t a Megaport customer, you can create a 1 Gbps, 10 Gbps, or 100 Gbps Port in one of our global data centers/Points of Presence. If your company isn’t located in one of our PoPs, you can procure a last mile circuit to one of the sites to connect to Megaport. Contact Megaport for more information.

Note

If you require a Port in a different location to physically separate this solution from other existing traffic traversing your Ports, we recommend that you create a new one before proceeding.

This high-level figure shows Megaport connectivity into an SAP Netweaver on Azure solution:

SAP Netweaver on Azure

You can achieve redundancy for the connectivity portion of this solution by deploying additional VXCs to the Azure environment. This image shows how you can achieve additional physical redundancy if the VXCs are implemented on separate Ports:

SAP Netweaver on Azure with two Ports

Prerequisites

Before you begin, you must have the following:

  • A Megaport connection, or Port – If you haven’t already created a Port, see Port. You will deploy a connection from the Port to the SAP on Azure instance using a VXC.

  • An ExpressRoute Service Key – Create a service key from your Azure portal by following the steps in the Azure documentation. Ensure that you choose Megaport as the Provider in the Create ExpressRoute Circuit window (Step 2 in the Azure documentation).

To integrate Megaport with SAP on Azure

  1. In the Megaport Portal, go to the Services page and select the Port you want to use.

  2. Add an Azure connection for the Port.

    If this is the first connection for the Port, click the Microsoft Azure tile. The tile is a shortcut to the configuration page. Alternatively, click +Connection, click Cloud, and then click Azure ExpressRoute as the Provider.
    Connection button

  3. Locate the ExpressRoute Service Key that you created in your Azure Console and paste it into the Microsoft Azure Service Key field.
    Select Port
    The Megaport Portal verifies the Service Key, and displays Primary and Secondary Azure on-ramps. For more information on adding a redundant connection, see Redundancy.

  4. Choose the Primary option and click Next.

  5. Specify the connection details:

    • Connection Name – The name of your VXC to be shown in the Megaport Portal.

    • Service Level Reference (optional) – Specify a unique identifying number for the VXC to be used for billing purposes, such as a cost center number or a unique customer ID. The service level reference number appears for each service under the Product section of the invoice. You can also edit this field for an existing service.

      Note

      Partner-managed accounts can apply a Partner Deal to a service. For more information, see Associating a Deal With a Service.

    • Rate Limit – The speed of your connection in Mbps. This value will be auto-populated with information from the Service Key.

    • VXC State – Select Enabled or Shut Down to define the initial state of the connection. For more information, see Shutting Down a VXC for Failover Testing.

      Note

      If you select Shut Down, traffic will not flow through this service and it will behave as if it was down on the Megaport network. Billing for this service will remain active and you will still be charged for this connection.

    • Preferred A-End VLAN – Specify an unused VLAN ID for this connection. This is the S-Tag, or outer tag, associated with the Port that transparently carries the inner C-Tags for ExpressRoute. This VLAN ID must be a unique ID on this Port and can range from 2 to 4093. If you specify a VLAN ID that is already in use, the system displays the next available VLAN number. The VLAN ID must be unique to proceed with the order. If you don’t specify a value, Megaport will assign one.

      Important

      Megaport delivers ExpressRoute services to Microsoft ports using Q-in-Q. For network devices that do not support Q-in-Q, you can Untag the A-End VLAN. Untagging removes the VLAN tag for the outer connection (S-Tag), and delivers the three inner tags (C-Tags) natively as 802.1Q VLANs. Be aware that using an untagged VLAN limits that VXC to one Port. Because you can’t deploy any other VXCs on the Port, such as a secondary ExpressRoute VXC, we don’t recommend this workaround as a long-term solution.

    • Minimum Term – Select No Minimum Term, 12 Months, 24 Months, or 36 Months. Longer terms result in a lower monthly rate. 12 Months is selected by default.
      Take note of the information on the screen to avoid early termination fees (ETF). See VXC Pricing and Contract Terms and VXC, Megaport Internet, and IX Billing for more information.

    Connection Details

  6. Click Next.

  7. Review the details and click Add VXC.
    New Connection Summary
  8. Click Order.
    Configured Services
  9. Review the Global Services Agreement and click Order Now.
    Order Services
    You have now created a Layer 2 connection into your Azure infrastructure.

  10. Connect the new VXC to the SAP on Azure instance.

    Log in to your Microsoft Azure portal. Specify the AS number, VLAN ID, and Primary and Secondary IP subnets for your Primary and Secondary BGP connections into your Azure infrastructure.

Note

Microsoft Azure requires that you use BGP to connect between your on-premises environment and your Azure infrastructure.

For more information on setting up Microsoft Peering and Private Peering from your Azure console, see Create and modify peering for an ExpressRoute circuit.

Redundancy

You can repeat the steps to create a second VXC connection into your Azure infrastructure, which will qualify the setup for Microsoft Azure’s SLA. When you paste your Microsoft Azure Service Key into the appropriate field, choose the Secondary on-ramp location (the Primary on-ramp location will be grayed out and unavailable).

At this point, you will have created the second Layer 2 connection from your Megaport to your Azure infrastructure and your work in the Megaport Portal is complete.

Background information

Planning for deployment of SAP on Azure

You can run SAP applications on Azure Virtual Machines (VMs) and bare metal instances as is the case with SAP Hana on Azure (large instance). SAP applications on VMs offer fast deployment of compute and storage as opposed to the relatively long process of procuring and installing equipment for premise-based installations. This can be on-premises, connected to a cloud solution, or run entirely as a cloud solution. Dividing the same SAP system between an on-premises and cloud infrastructure is not supported.

SAP on Azure Virtual Machines

SAP services such as NetWeaver, Business One, and HANA can run on Azure VMs, storage, and network. To use these services efficiently, it’s important to understand the sizes and capacities of the VMs in terms of vCPU, memory, and associated network and storage bandwidth. You will need adequate resources to ensure the performance of the SAP applications you are using.

The VMs are based on Hyper-V Virtual Hard Drives (VHD) that can run various operating systems as guest OSs. You can find details on Linux and Windows VM sizes on the Microsoft website.

There are two storage types associated with Azure VMs: non-persistent (volatile) and persistent. Microsoft Azure offers Standard and Premium Storage tiers; the Premium Storage tier delivers better I/O latency, better throughput, and less variability in I/O latency. For more information on Premium Storage, see Azure Premium Storage, now generally available.

SAP HANA (large instance)

SAP HANA (large instance) is a special solution for large enterprise customers that allows for the implementation of SAP HANA on bare metal servers that are dedicated to you. This solution removes any potential performance issues that may be associated with a shared multi-tenant environment. You have options ranging from 36 Intel CPU cores with 768 GB of memory to 480 Intel CPU cores with 24 TB of memory. Note that the bare metal servers are only designated to run the SAP HANA, while the workload middle layer will still operate on VMs.

The isolation of customer resources for the networking, storage, and servers are met through tenants. The bare metal solution of SAP on Azure is Tailored Datacenter Integration (TDI) certified.