Sunday, 26 May 2024

Azure Container Service (AKS) – A Detailed Intro


Azure Container Service (AKS) – A Detailed Intro


Over the last few years, people have increasingly been adopting containers. But to use containers at a large scale, you need to use an orchestrator to ease the administration of your applications. Kubernetes is the most popular orchestrator and, while there are many concepts you need to learn to make the most of it, the benefits of using Kubernetes are truly amazing.

These days, we no longer have to go through the hassle of installing, configuring, and maintaining all of the tools and services for our applications. With technologies like serverless architecture, we’re trending towards caring less and less about infrastructure so that we can focus on what’s really going to provide value. Microsoft understands this, which is why Azure provides many platform as a service (PaaS) solutions.

Azure has an offering for Kubernetes: Azure Kubernetes Service (AKS), previously known as Azure Container Service. In this post, I’ll talk more about AKS and show you two methods you can use with it to create a cluster.

What is Azure Container Service?

Installing, configuring, and maintaining a Kubernetes cluster could distract your company from the things that provide value. Wouldn’t it be nice not to waste time and resources managing Kubernetes? That’s where Azure Container Service (AKS) comes in. Now, your first thought might be that the abbreviation should have a C and not a K…but the idea behind using the K is to emphasize that it’s a Kubernetes-managed service.

Azure’s offerings for containers began with Azure Container Service (ACS), which gives you the option to choose between the most popular container orchestrators: Mesos, Swarm, and Kubernetes. With ACS, you have to pay for the master servers of the orchestrator, and some orchestrators need more resources than you might think.

AKS, on the other hand, does not charge you for Kubernetes masters—you only pay for the nodes (minions) where your containers will be deployed. But if you think starting right away with Kubernetes could be overwhelming, there’s also a cooler service called Azure Container Instances (ACI), which is the “serverless” offering for Docker containers in Azure. What’s nice about this service is that you can scale Kubernetes using ACI. ACI is still in preview, but AKS could become even more powerful with ACI.

The cool thing about AKS is that you can try out the service without using huge virtual machines. It’s important to mention that AKS—as of today—is still in preview, so the instructions below might change in time.

Prerequisites

Before you start, you need to have the following:

  1. Coffee. Lots and lots of coffee. (You know, we have to have priorities.)
  2. An Azure account with a subscription. You need a credit card, but don’t worry—you’ll get initial free credits when you start a subscription. You can also get some free credits if you have an MSDN subscription or if you sign up for the Dev Essentials program. If you know more ways to get free credits, let me know in the comments section.
  3. Azure CLI installed and configured.
  4. Kubernetes command-line tool kubectl installed.
  5. Lastly, make sure the Azure subscription you use has these required resources: Storage, Compute, Networking, and ContainerService. If you’re not sure how to register resources in the subscription, read on!

Register required resources in the subscription

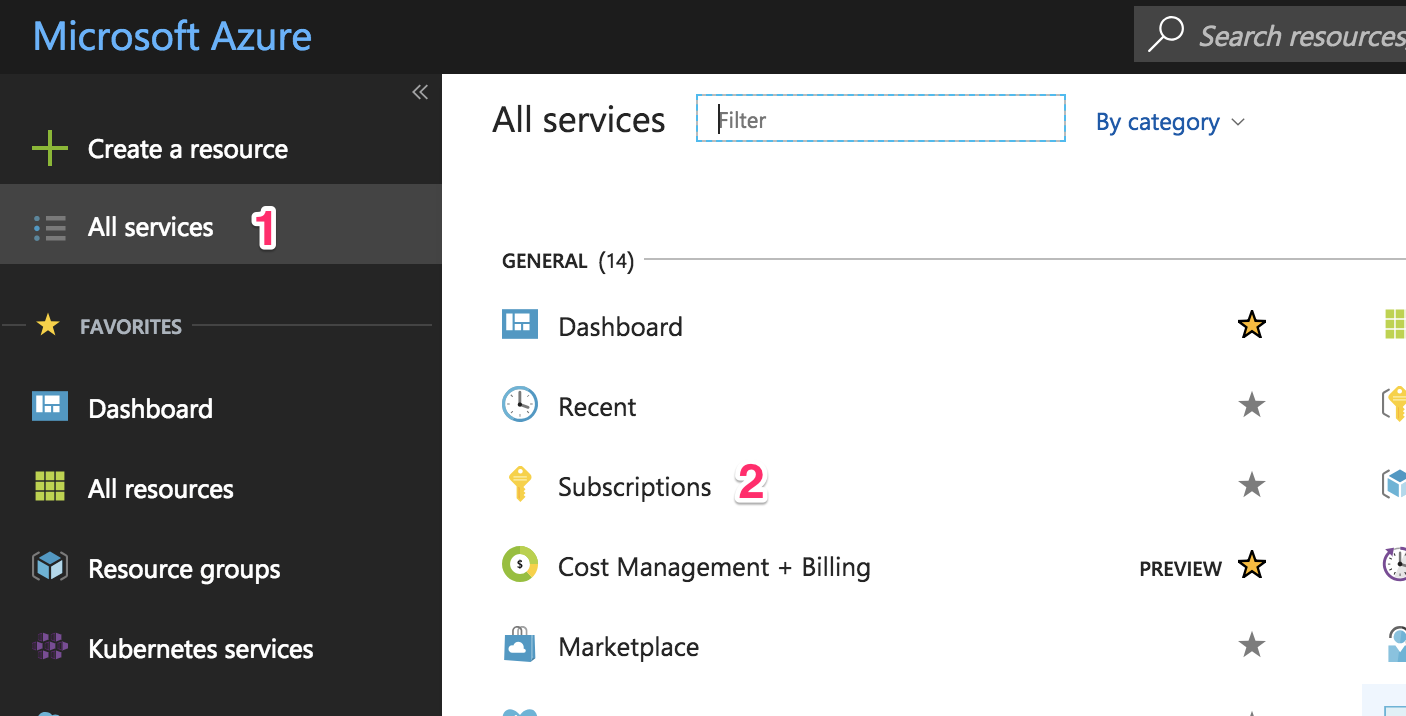
Go to the subscription page by clicking on the “All services” link (1) in the top-left panel, then click on the “Subscriptions” link (2). You can see the steps indicated in the screenshot below.

Microsoft Azure AKS

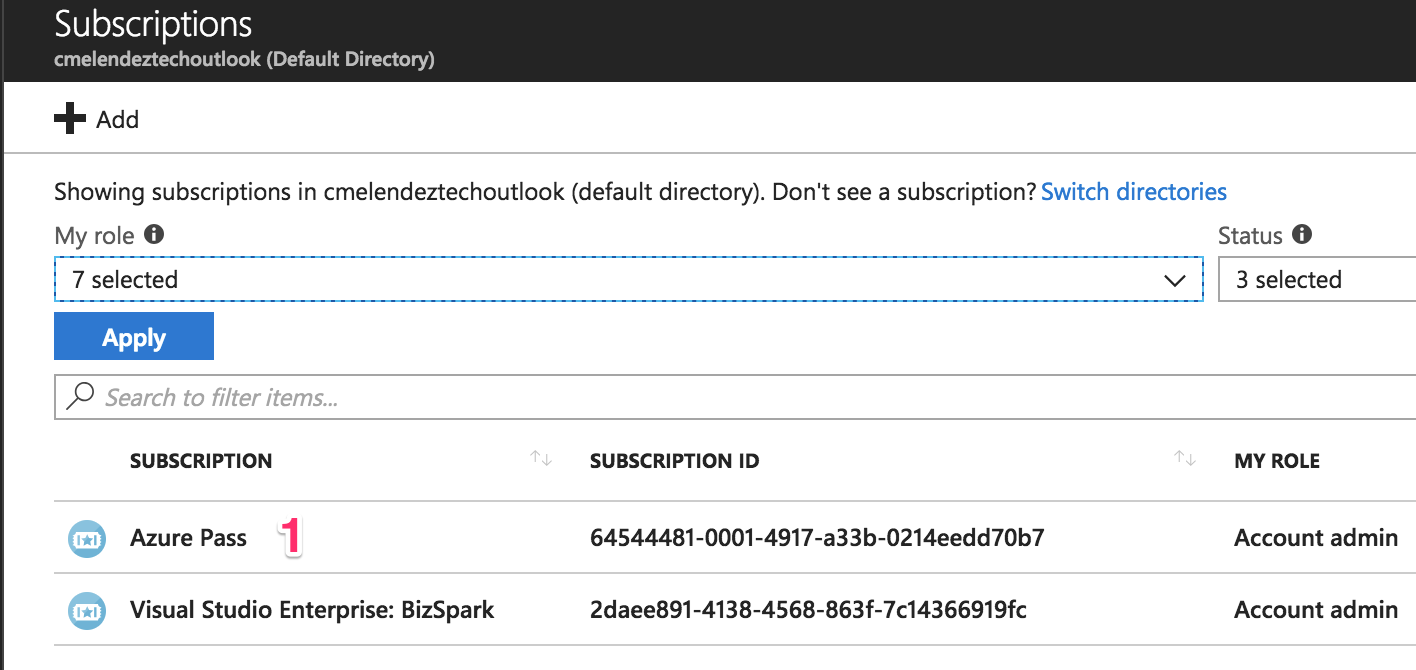
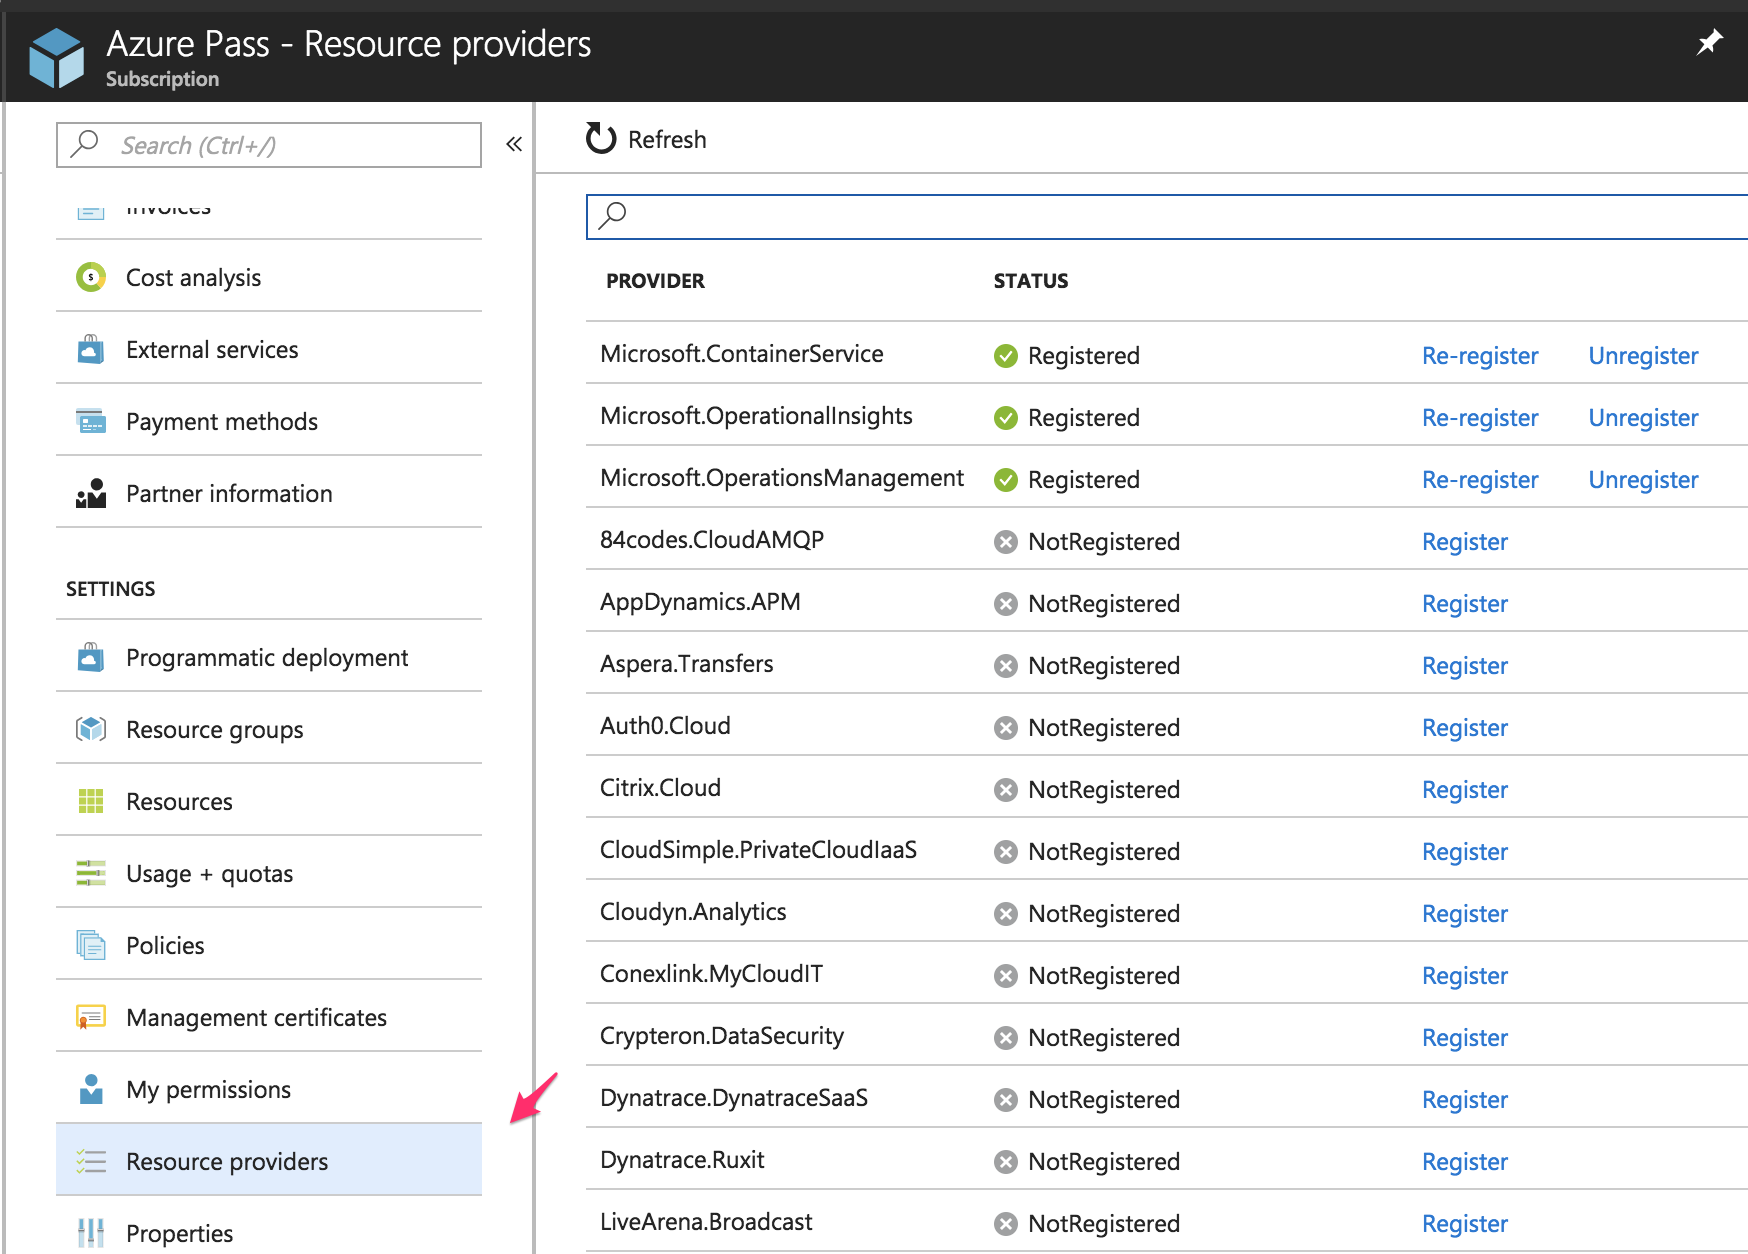
Select the subscription that you’ll use to create the AKS cluster. I’ll be using my “Azure Pass” (1) subscription.

Microsoft Azure AKS Subscriptions

Scroll down a little bit and click on the “Resource providers” link to register or review the resources needed.

Azure Pass AKS

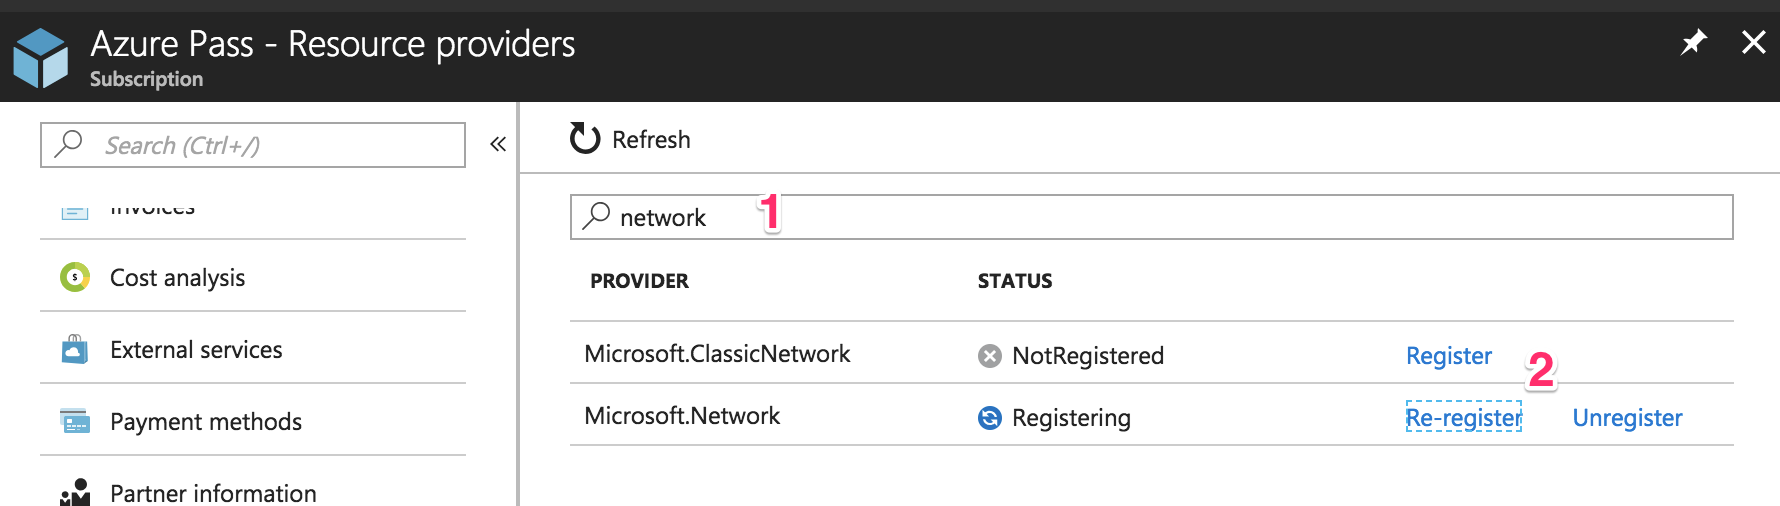
Search (1) for the resources I listed before: Storage, Compute, Networking, and ContainerService. If it’s not registered, click on the “Register” (2) link and wait a little bit.

Azure Pass AKS

Let’s cross our fingers—hopefully now you have everything you need to create an AKS cluster using the portal command line. Ready to move on? Did you double-check your coffee supply? Good. Here we go!

Method 1: Creating an AKS/Azure Container Service cluster using the Azure Portal

At the time of writing, AKS is in preview, meaning that the following screenshots and instructions might change by the time you’re reading this post. I recommend you look at the official AKS docs in case things look different in the Azure portal.

1. Create a new Azure resource

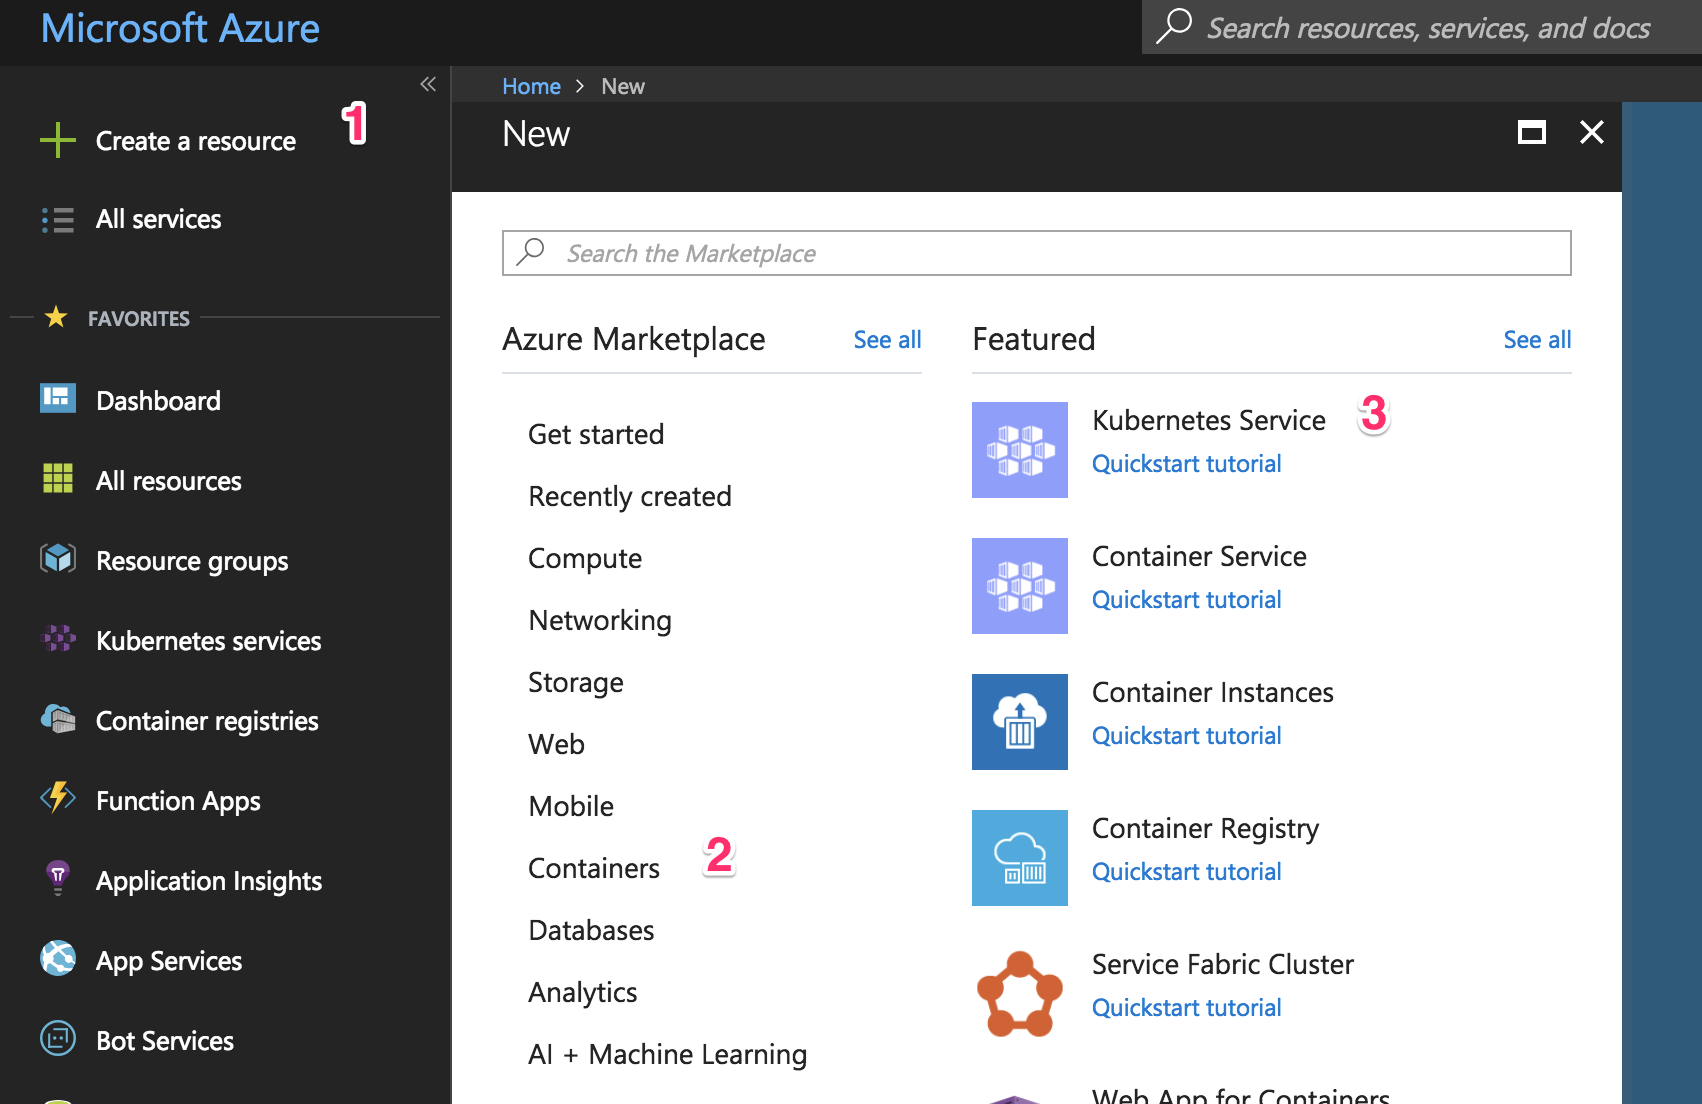
Go to your Azure portal and in the top-left panel, click the “Create a resource” (1) link. Then select “Containers” (2) and click on the “Kubernetes Service” (3) link.

AKS Cluster Resource

2. Fill In the Basics configuration

You should now see the image below:

Azure AKS Basics Configuration
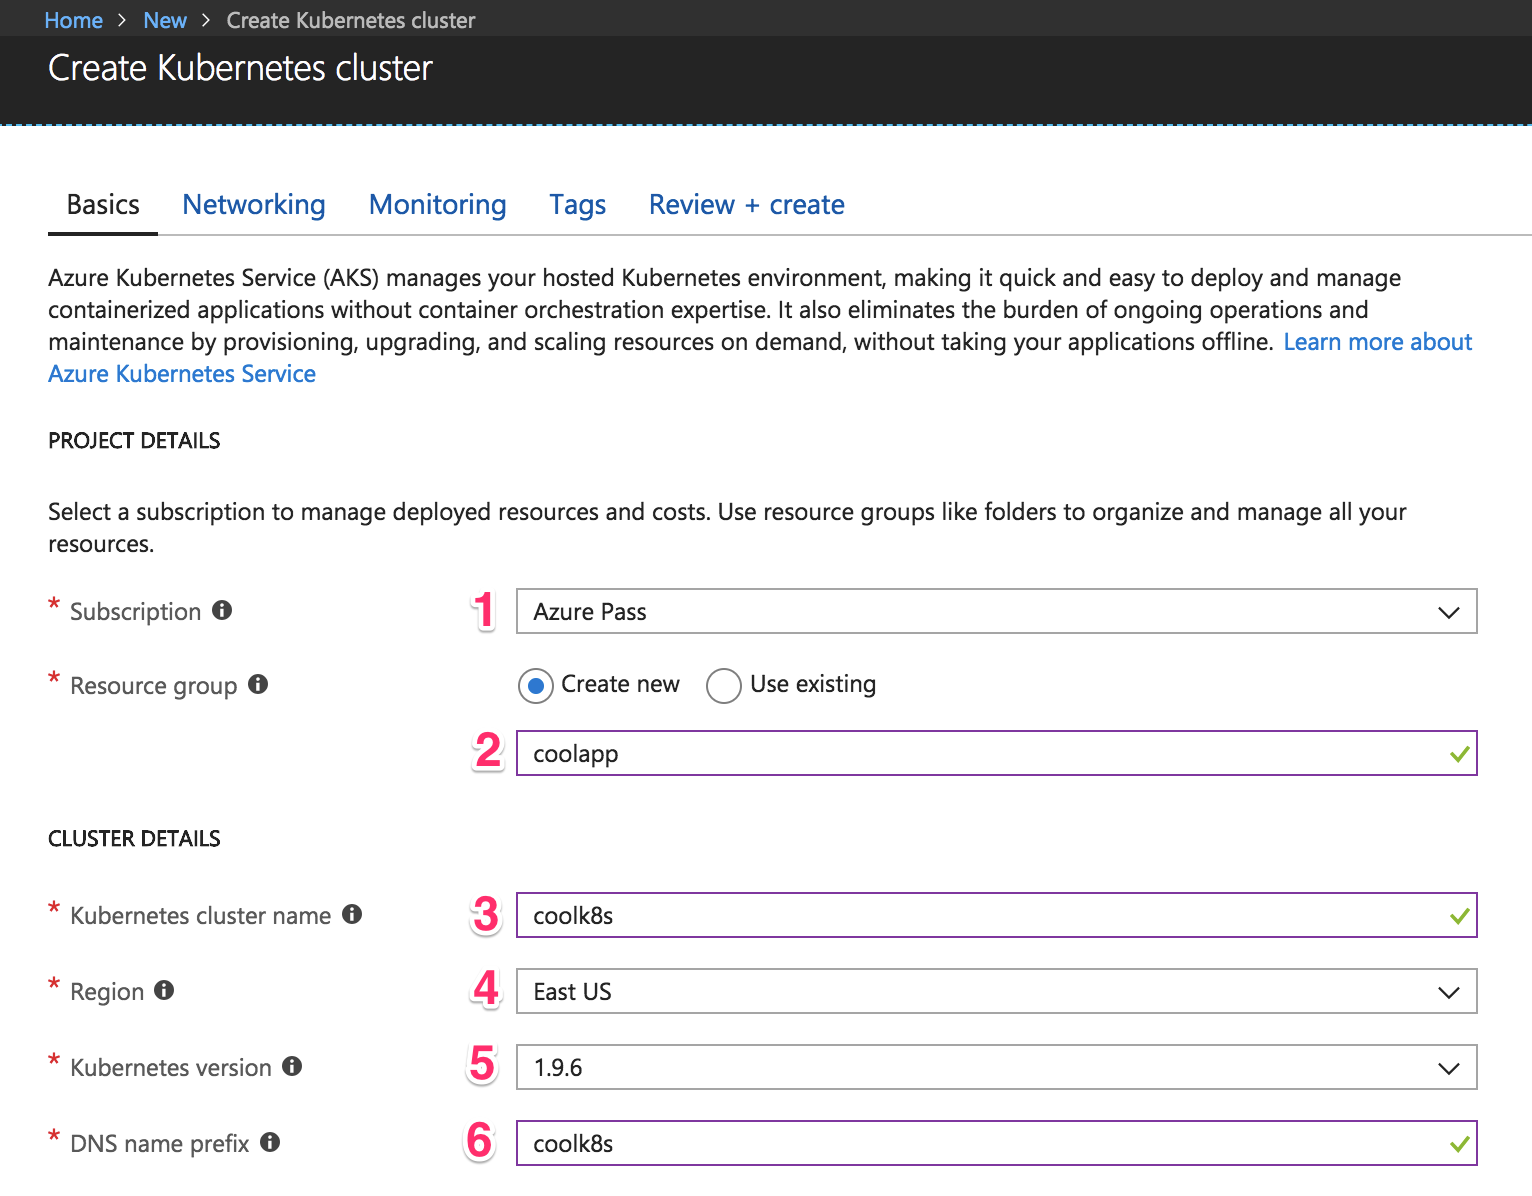
Choose your subscription. In my case, when I registered my Azure Pass (1), an “Azure Pass” subscription was created. You can use an existing resource group, but for our purposes let’s just create a new one. A resource group is a way for Azure to keep all related resources together so that you can make templates, share permissions and policies, or clean out everything by simply deleting the resource group. So choose “Create new” and name it—I put “coolapp” (2).

Choose a name for the cluster. I went with “coolk8s” (3). Choose a region where the cluster should be created (4). Ideally, it should be one that’s physically near your users (so if your users are based in the US, you want to create your virtual machine in a US region).

Select the latest version of Kubernetes (5) cluster. Then, write a DNS name (6) to identify your cluster—this should be unique across all Azure users, so if you’re getting an error, it could be because someone else has already chosen the name you used. Go to the “Authentication” tab to see this:

Kubernetes Cluster Azure AKS

Azure has made the service principal integration simpler—in case you’re just starting out, you can leave this option on default. A service principal is needed so that AKS can interact securely with Azure to create resources like load balancers. Kubernetes’ services will sometimes need to be configured as load balancers, so AKS will create a real load balancer from Azure. In case you want to have more control and reuse a service principal, you can create your own, too.

Now it’s time to select which type of instance the cluster will use. You might see an error screen like this:

AKS Instance Error

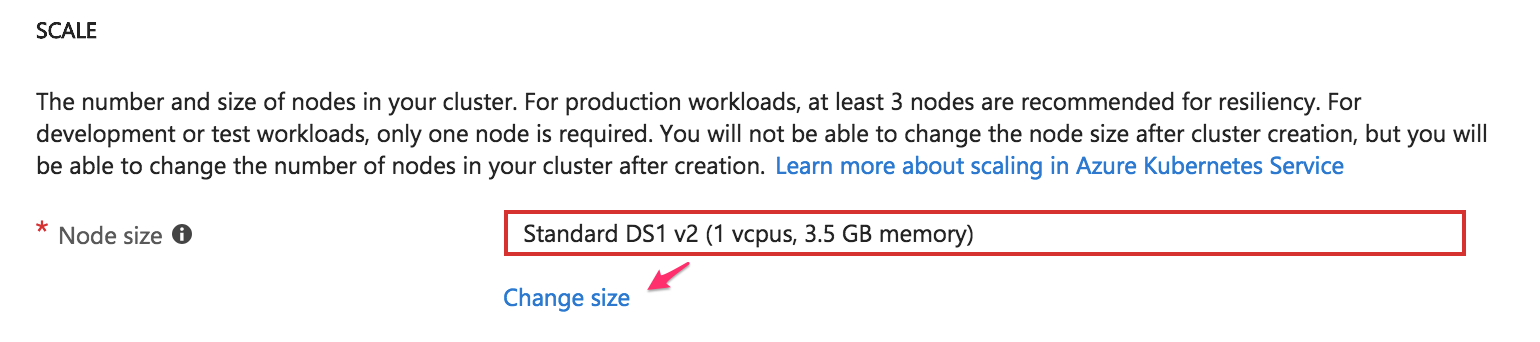
If you are having an “error,” I can tell you it happened to me, too. Don’t worry, it doesn’t necessarily mean that you’re doing something wrong—it might just be because your subscription has some limitations. It could also mean that you’ve reached the instances limit or that creating the cluster will put you over the limit. All you need to do to get rid of the error message is click on the “Change size” link and choose a different instance type.

A note on node size

When I was creating my cluster, I was having problems and I didn’t know why. Azure support guys are amazing, seriously—DM them and they will help you. Otherwise, you can post your question on StackOverflow and the community there will help you. I was having problems creating the cluster because I was using a small instance for AKS. According to the support guys, you need to select an instance with at least 3.5 GB of memory. If not, the cluster won’t come up and you’ll see weird errors.

Even if you don’t have this error, let’s change the size so that you don’t spend too much on this test. The following screen should appear:

AKS Azure Node Size

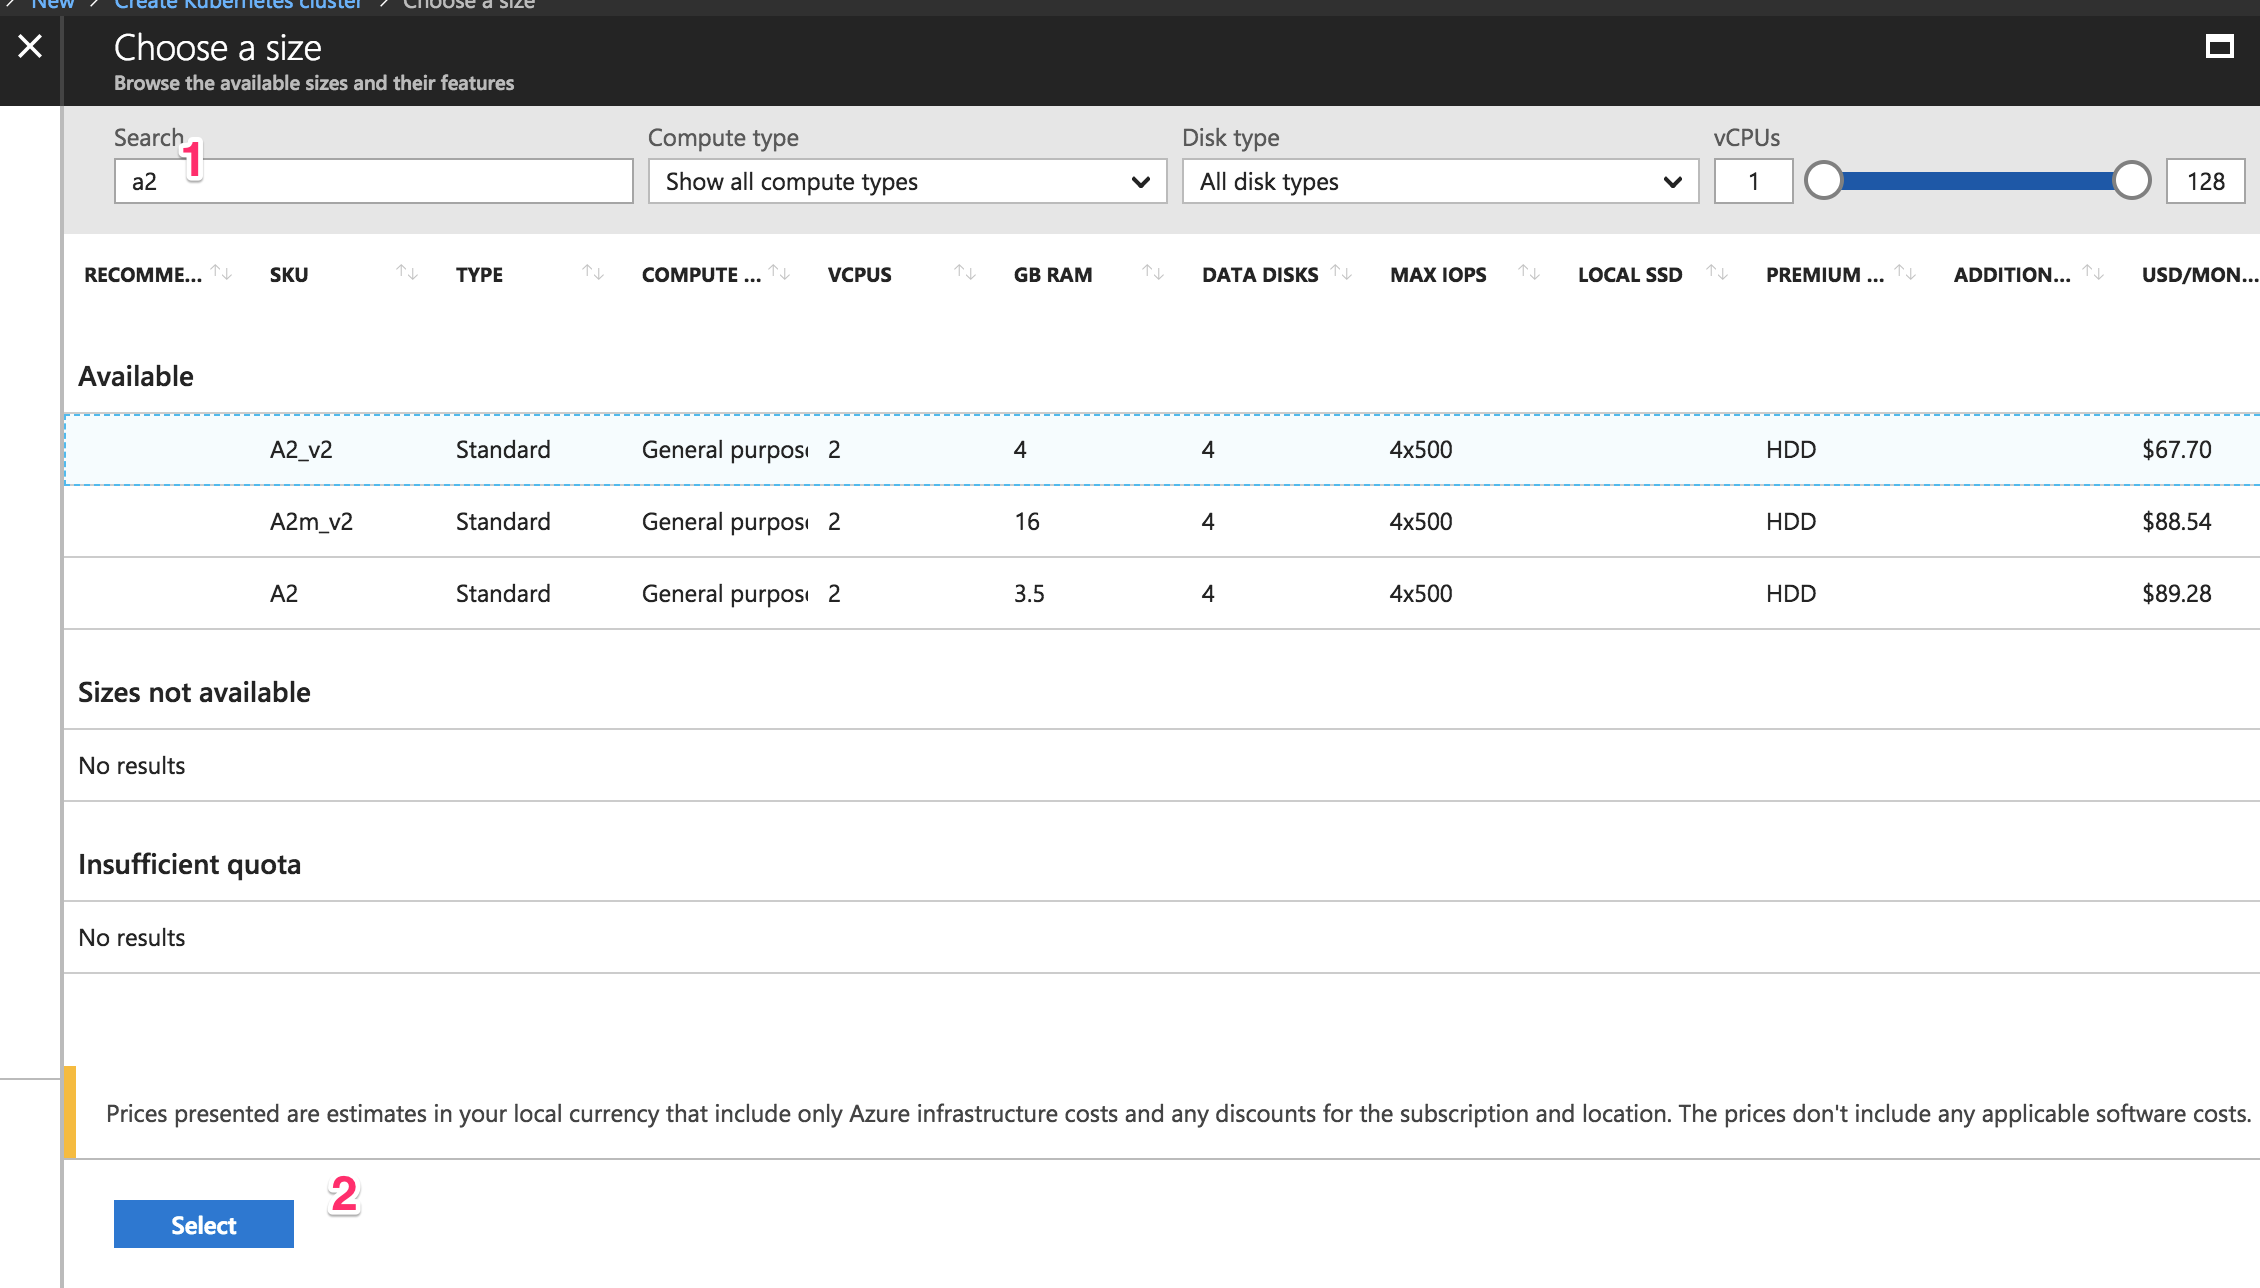
Type “a2” (1) so that the “Standard A2_v2″ instance type appears and click it. Next, click on the blue “Select” (2) button. It will take you back to the previous screen.

AKS Node Size

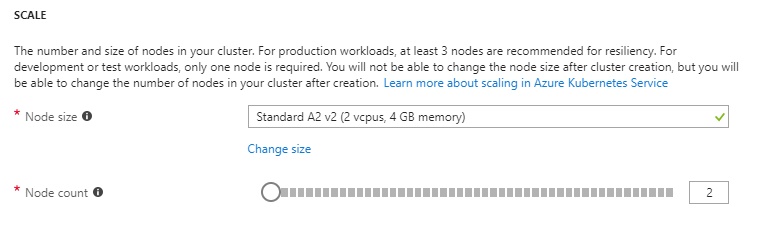
I set my “Node count” option to 2. Once you’ve set that, click on the “Next: Networking” button. I spent a lot of time here because it’s the most critical section to successfully creating the AKS cluster. Let’s continue.

3. Fill in the networking configuration

Networking is one of the most important things to configure when you start integrating services, or if you want to create a VPN tunnel where you need to avoid any networking conflict to access the Kubernetes nodes that AKS configures. Click on the “Networking” tab. You should now be seeing this screen:
AKS Networking Configuration

You can leave this section as default and continue with those settings, but let me explain a few things in case you want to do something specific with networking.

Let’s start with the HTTP application routing (1). When you create a Kubernetes “LoadBalancer” service type, a public IP address is assigned to you. At some point, you might have problems when creating a new service because you’ve reached an Azure limit. Kubernetes has “a collection of rules that allow inbound connections to reach the cluster services” called Ingress, as indicated in the official docs. Ingress will allow you to have SSL termination and DNS endpoints for your services. If you want to dive deeper into the subject, you can check out this post.

For networking configuration (2), choose “Basic” for now and let Azure configure the networking for you. This is where you’ll define network ranges to allocate IPs—usually known as CIDR. This section is crucial for avoiding network conflicts with your on-prem network or other network resources in Azure. Click on the “Next: Monitoring” button to continue.

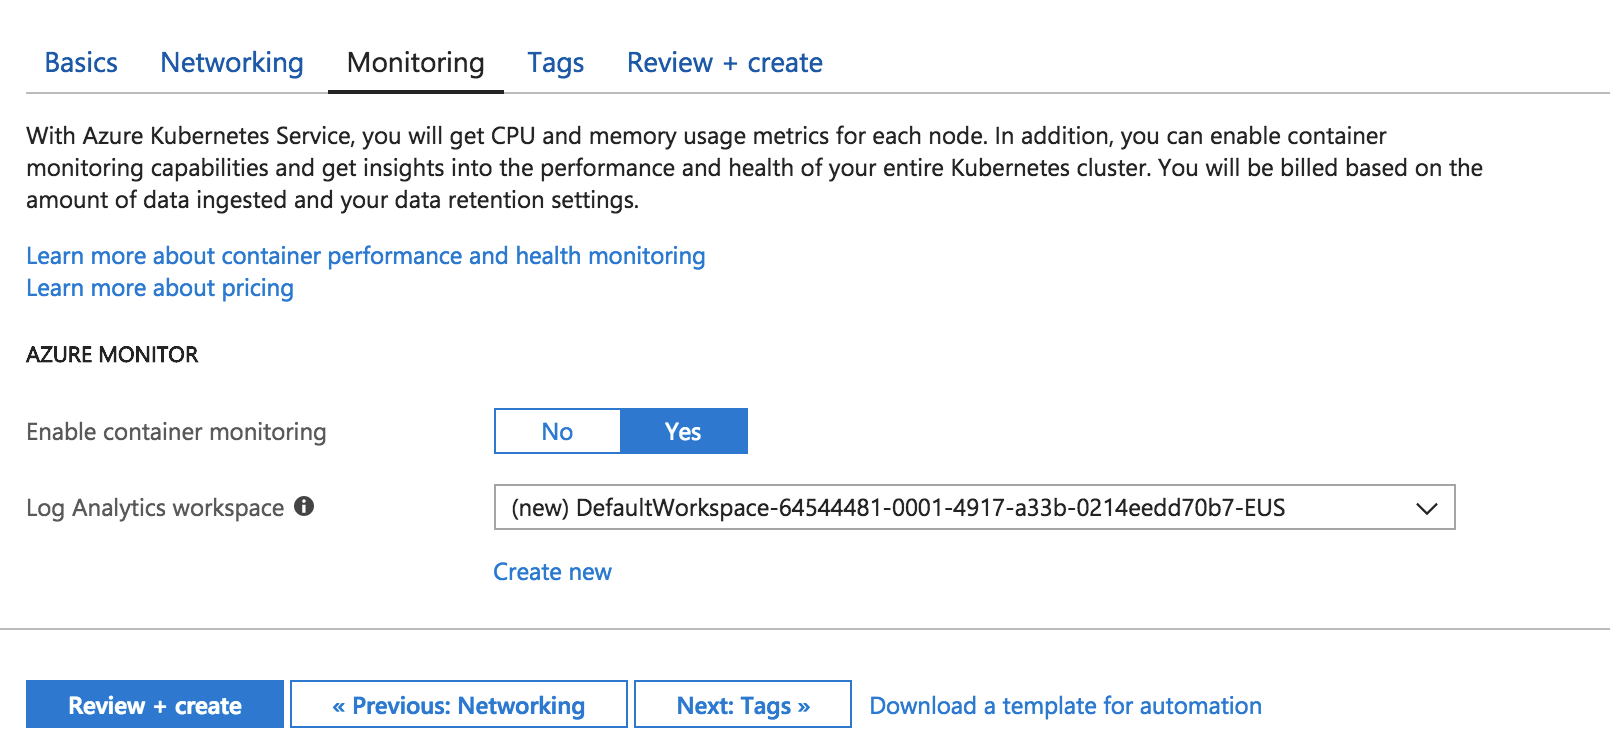
4. Fill in the monitoring configuration

There’s not a lot for me to say in this section other than, “This is freaking awesome!”

By default, AKS will give you metrics about the performance of the cluster, and if you choose (which I highly recommend you do!), you can get performance metrics for containers. You can also get logs to troubleshoot. These monitoring features are extremely useful when you integrate APM into your application.

AKS Monitoring Configuration

If you’d like to get an idea of what your monitoring results might look like, take a look at this document. Let’s not worry about the tags section for now, so click on the blue “Review + create” button to continue.

5. Review and create

We’re almost there!

Azure will start creating the service principal and will validate the information you entered, so the following screen should appear:

AKS Create Kubernetes Cluster Review and Create

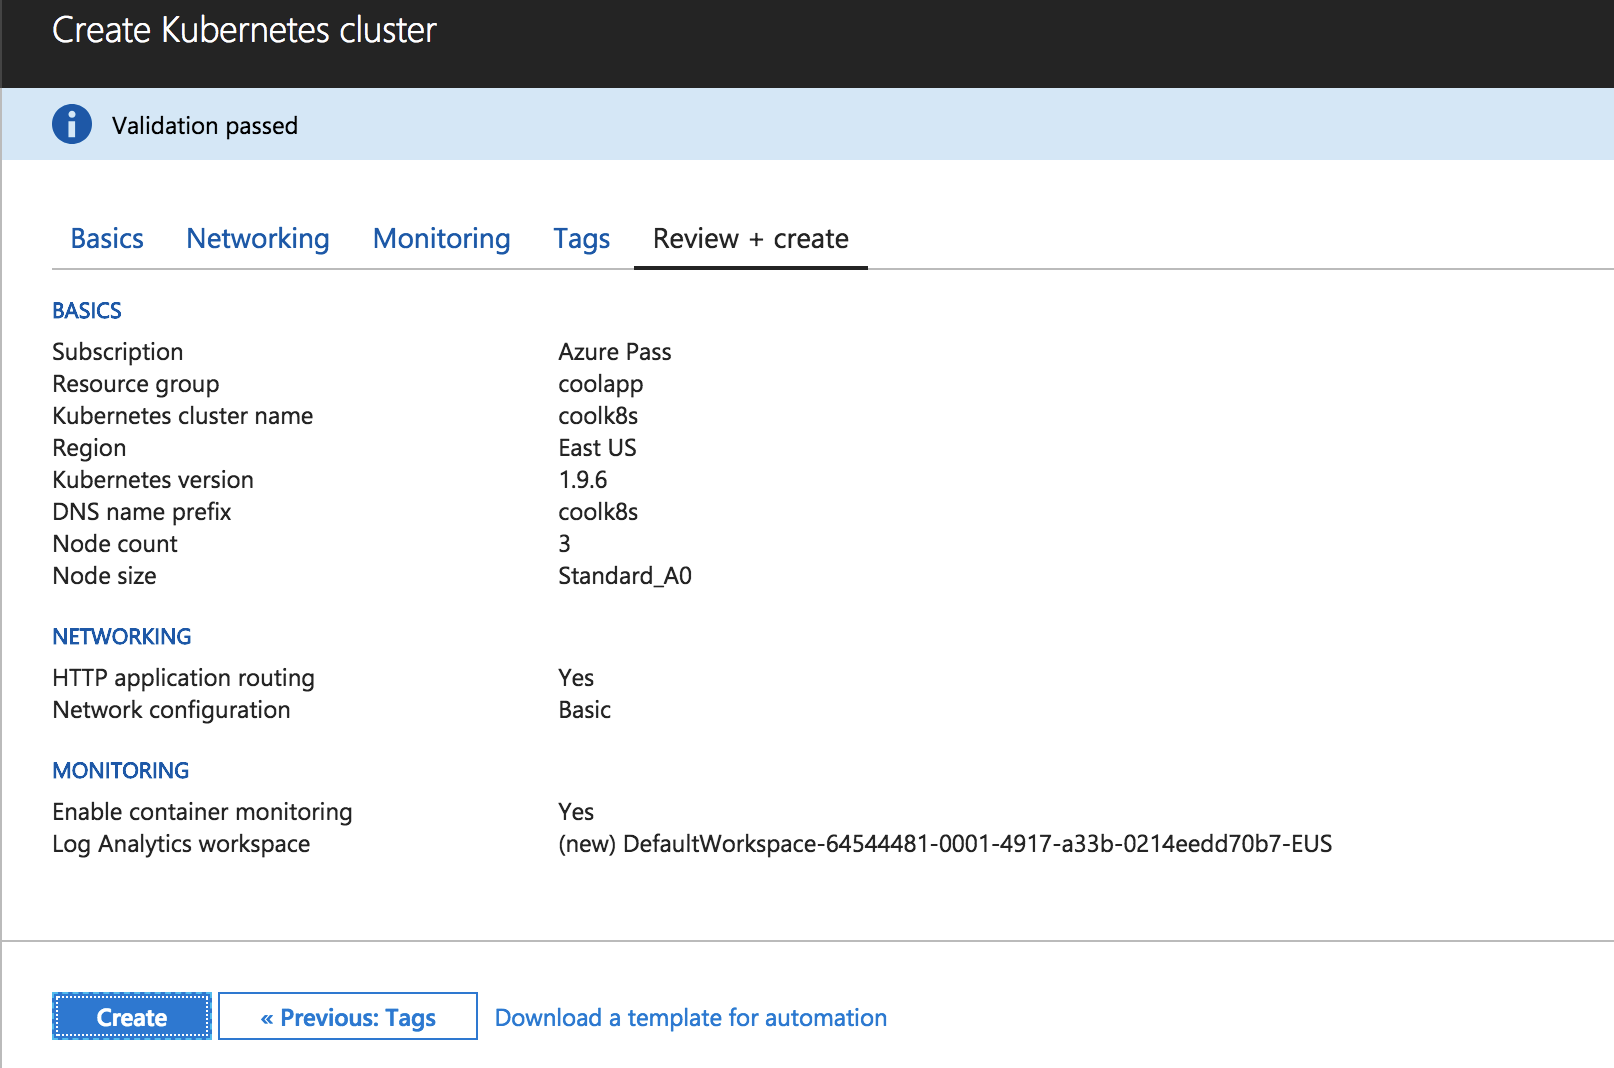
Click on the blue “Create” button to create the cluster. Now’s the time to pause and refill your cup with fresh coffee. It will take a little time for Azure to finish creating the cluster—mine took twenty minutes.

Congratulations! You’ve created a Kubernetes-managed cluster in Azure.

Method 2: Creating an Azure Container Service cluster using the command line

UI is changing all the time, but the command line has stayed pretty constant. I find it valuable to use the GUI because it gives me a chance to understand visually how to create the cluster. On the other hand, using the CLI will help you to automate this process or use tools like Terraform.

Before we start creating the cluster using the command line, make sure you have all of the prerequisites that I described above. Also, if you created a cluster using the portal from the previous steps, make sure you delete it or change the names of the resources in the commands you run.

1. Create a new resource group

As I said before, a resource group is a way for Azure to keep all related resources together so that you can make templates, share permissions and policies, or clean out everything by simply deleting the resource group. So run the following command to create it:

az group create --name coolapp --location eastus

2. Create the AKS cluster

Run the following command to create the cluster:

az aks create --resource-group coolapp --name coolk8s --node-count 2 --node-vm-size Standard_A2_v2 --generate-ssh-keys

So what exactly did we just do? Let’s explore the parameters and values we entered here:

  • –resource-group is the name of the resource group we just created.
  • –name is the name of the cluster to identify it.
  • –node-count is the number of nodes we want for our cluster.
  • –node-vm-size is the name of the instance type we choose. It’s better to be specific here to avoid potential problems with the limitations of our subscription.
  • –generate-ssh-keys will generate SSH keys on your local machine so it’s easier for you to connect to any node if need be.

Specifying only those arguments means that Azure will use the default values for things like networking or monitoring that we saw when creating the cluster in the portal. Let’s keep it simple for now, but in case you want to explore the other arguments, you can take a look at the docs.

In the meantime, Azure will create the cluster. Mine took twenty minutes or so to finish. And that’s it! You created the cluster with just two commands. Now let’s make sure the cluster is actually working.

Accessing the Kubernetes UI locally

Whether you created the cluster using the portal, the command line, or both, the following instructions will work to access the Kubernetes dashboard. This is where you need to have the latest version of Azure CLI and kubetcl installed and configured.

1. Download cluster credentials

Start by downloading the cluster credentials to your computer by running this command:

az aks get-credentials --resource-group=coolapp --name=coolk8s

Specify the resource group with the –resource-group parameter and the name of the cluster with the –name parameter. Doing this makes it easy to toggle between different Kubernetes clusters that you’ve connected previously (for example, a local version of Kubernetes).

2. Browse the cluster

Run the following command. A new browser tab or window will open with the Kubernetes dashboard automatically.

az aks browse --resource-group coolapp --name coolk8s

Wait a few more seconds, and the Kubernetes dashboard will appear:

Kubernetes Dashboard AKS

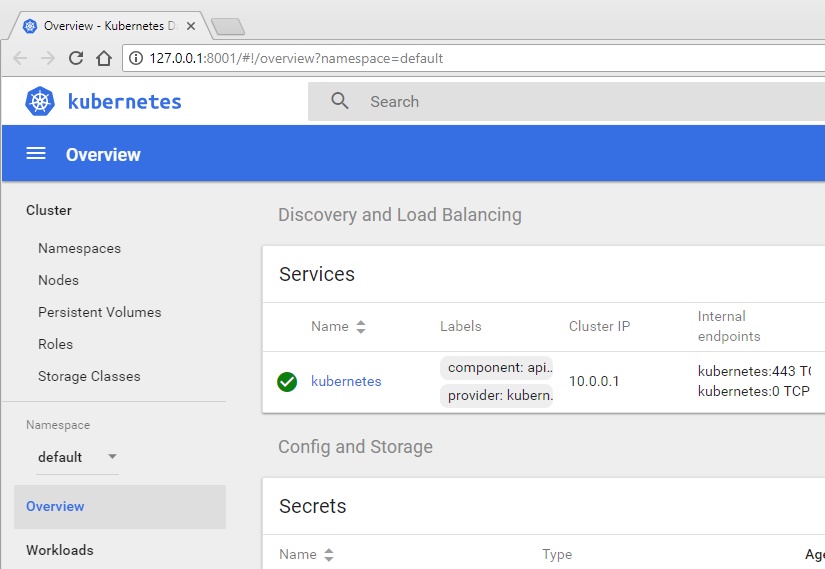
If your screen looks like this one, congratulations! That means your cluster works and you can connect to it.

How to deploy Azure Container Apps


How to deploy Azure Container Apps


Containerizing your application is the modern-day approach to application development. The most popular platform for hosting containers is Kubernetes. However, not everyone wants or needs to know how to operate a Kubernetes cluster. Some people just want to deploy their apps.

Azure Container Apps deploys containers to a Kubernetes cluster managed by Azure. This lets developers focus on what they do best, write code.

In this post, I show you how to deploy the eShopOnWeb application to Azure Container Apps with Octopus Deploy.

Getting started

Before you can deploy to Azure Container Apps, you need to configure:

  • A container registry for your containers
  • A build server to push your containers to the registry
  • An Octopus Docker Container Registry external feed
  • An Azure Container Apps environment

Configuring the container registry

First, you need a place to push your containers. Octopus is compatible with a variety of Docker container registries, but this post uses an Azure Container Registry. If you already have a Docker Container Registry configured, you can skip to the next section.

To create an Azure Container Registry, click Create a resource in the Azure Portal.

Azure Create Resource

Type Azure Container Registry in the search box and choose Container Registry from the list.

Azure Create Container Registry

Fill in the required inputs and click Create.

Azure Create Container Registry Create screen

After you create the resource, copy the login server information. You need this information when you configure the Docker build task and the Octopus Deploy external feed.

Newly created ACR resource

Configuring the build server

Now that you have a container registry, you need to configure a build server to push your containers to the registry.

For this post, I use Azure DevOps to show building the eShopOnWeb containers and pushing them to an Azure Container Registry. eShopOnWeb consists of 2 containers:

  • API
  • Web

My build consists of 2 Docker build tasks, both using the buildAndPush command.

Adding the Docker build task

Filter the list of tasks by typing docker into the search bar. Then choose the Docker task.

Add Docker task to build

The Docker task needs a Docker Registry service connection. Select New and fill in the form details.

  • Docker Registry: The login server from your ACR in URL format = https://<Login server>, example https://octopusdeploy.azurecr.io.
  • Docker ID: User ID for logging into your ACR. I chose to use an app registration, so the value of the ID is the application (client) ID of the app registration.
  • Docker Password: Password for the User ID. If you're using an app registration, this is the secret for the app registration.
  • The rest of the fields can use the defaults.

New Azure DevOps Service Connection

For the API Docker build task, use the following values:

  • Container repository: eshop-api
  • Command: buildAndPush
  • Dockerfile: src/PublicApi/Dockerfile
  • Build context: .
  • Tags: $(Build.BuildNumber) (Optional, I set my build format number to $(Year:yyyy).$(Month).$(DayOfYear)$(Rev:r))

Docker build task

The Web Docker build task will be identical with the following differences:

  • Container repository: eshop-web
  • Dockerfile: src/Web/Dockerfile

After you queue a new build, it should push your containers into your registry.

Container images in ACR

Configuring the Octopus Deploy external feed

Now the containers are hosted in ACR, you need to configure an external feed in Octopus. Navigate to Library, then External Feeds, then click ADD FEED.

Navigate to Libary, External Feed

Select the feed type. For this post, I'm using Azure Container Registry.

Select Azure Container Registry

Similar to the Service Connection in Azure DevOps, add the feed details:

  • Name: A meaningful name for the External Feed
  • URL: https://<Login Server> - example: https://octopusdeploy.azurecr.io
  • Credentials:
    • Feed Username: User to connect to the registry. I used an app registration.
    • Feed Password: Password for the user account. Mine was the secret for the app registration.

Next, click SAVE AND TEST.

Enter the image name, full or partial, you want to search for.

Test External Feed

Configuring project variables

This post assumes you know how to create an Octopus project and won't cover that topic. For the eShopOnWeb Octopus project, configure the following variables:

  • Project.Azure.Account: An Azure Service Prinicipal account variable. (Optional, the templates used can use Managed Identity)
  • Project.Azure.ContainerApp.Api.Name: Value to set for the Container Name, example: #{Octopus.Environment.Name}-eshop-api
  • Project.Azure.ContainerApp.Environment.Name: Name of the Azure Container App environment to create/use, example: #{Octopus.Environment.Name | ToLower} Note: Azure Container App environment names must be lower case.
  • Project.Azure.ContainerApp.Web.Name: Value to set for the Container Name, example: #{Octopus.Environment.Name | ToLower}-eshop-web
  • Project.Azure.Region.Code: The short name for the Azure Region, example: westus3
  • Project.Azure.ResourceGroup.Name: Name of the Azure Resource Group to create the resources in.
  • Project.Catalog.Database.Name: Name of the Catalog database for eShopOnWeb, example: #{Octopus.Environment.Name}-eshop-catalog
  • Project.Identity.Database.Name: Name of the Identity database for eShopOnWeb, example: #{Octopus.Environment.Name}-eshop-identity
  • Project.SQL.DNS: The DNS name for the SQL database server, example: <YourAzureSQLServer>.database.windows.net
  • Project.SQL.User.Name: Name of the SQL account for database access, example: eShopUser
  • Project.SQL.User.Password: Password for the SQL account

Octopus project variables

Configuring the deployment process

With the External Feed and project variables configured, you can now configure the deployment process. For the eShopOnWeb application, the process consists of the following steps:

  • Azure - Create Container App environment
  • Azure - Deploy api Container App
  • Get API DNS
  • Azure Deploy web Container App

Azure - Create Container App Environment step

To deploy to Azure Container App, you must first have an Azure Container App environment.

Add the Azure - Create Container App Environment community step template to your process. The template will first check to see if it already exists, if not, create it.

This template takes the following input:

  • Azure Resource Group Name: #{Project.Azure.ResourceGroup.Name}
  • Azure Account Subscription Id: #{Project.Azure.Account.SubscriptionNumber}
  • Azure Account Client Id: #{Project.Azure.Account.Client}
  • Azure Account Tenant Id: #{Project.Azure.Account.TenantId}
  • Azure Account Password: #{Project.Azure.Account.Password}
  • Container App Environment Name: #{Project.Azure.ContainerApp.Environment.Name}
  • Azure Location: #{Project.Azure.Region.Code}

Azure - Create Container App Environment

The template sets an output variable called ManagedEnvironmentId which is the ID value of the environment it created or found if it already exists.

Azure - Deploy api Container App step

Add an Azure - Deploy Container App community step template to your process.

  • Azure Resource Group Name: #{Project.Azure.ResourceGroup.Name}
  • Azure Account Subscription Id: #{Project.Azure.Account.SubscriptionNumber}
  • Azure Account Client Id: #{Project.Azure.Account.Client}
  • Azure Account Tenant Id: #{Project.Azure.Account.TenantId}
  • Azure Account Password: #{Project.Azure.Account.Password}
  • Container App Environment Name: #{Octopus.Action[Azure - Create Container App Environment].Output.ManagedEnvironmentId} Note: This uses the output variable from the Azure - Create Container App Environment step
  • Azure Location: #{Project.Azure.Region.Code}
  • Container Name: #{Project.Azure.ContainerApp.Api.Name}
  • Container Image: Choose eshop-api from feed list.
  • Environment Variables:
[
  {
    "name": "ConnectionStrings__CatalogConnection",
    "value": "Server=#{Project.SQL.DNS},1433;Integrated Security=false;Initial Catalog=#{Project.Catalog.Database.Name};User Id=#{Project.SQL.User.Name};Password=#{Project.SQL.User.Password};Trusted_Connection=false;Trust Server Certificate=True;"
  },
  {
    "name": "ConnectionStrings__IdentityConnection",
    "value": "Server=#{Project.SQL.DNS},1433;Integrated Security=false;Initial Catalog=#{Project.Identity.Database.Name};User Id=#{Project.SQL.User.Name};Password=#{Project.SQL.User.Password};Trusted_Connection=false;Trust Server Certificate=True;"
  },
  {
    "name": "ASPNETCORE_URLS",
    "value": "http://+:80"
  },
  {
    "name": "MyTest",
    "secretref": "mysecret"
  },
  {
    "name": "ASPNETCORE_ENVIRONMENT",
    "value": "Development"
  }
]

Secrets:

[
  {
    "name": "mysecret",
    "value": "#{Project.SQL.User.Password}"
  }
]
  • Container Ingress Port: 80
  • External Ingress: Unchecked (False)

Azure - Deploy Container App

Get API DNS step

The eShopOnWeb web container needs the URL to the API container. This step runs the following code to retrieve that value and sets an output variable. This code assumes that the Az PowerShell modules aren't installed, so it does it dynamically.

$PowerShellModuleName = "Az.App"
$LocalModules = (New-Item "$PWD/modules" -ItemType Directory -Force).FullName

Save-Module -Name $PowerShellModuleName -Path $LocalModules -Force
$env:PSModulePath = "$LocalModules$([IO.Path]::PathSeparator)$env:PSModulePath"

# Import modules
Import-Module Az.App

# Get reference to the container
$apiContainerApp = Get-AzContainerApp -Name "$($OctopusParameters["Project.Azure.ContainerApp.Api.Name"])" -ResourceGroupName $OctopusParameters["Project.Azure.ResourceGroup.Name"]

Set-OctopusVariable -name "DNS" -value $apiContainerApp.IngressFQDN

Azure - Deploy web Container App step

  • Azure Resource Group Name: #{Project.Azure.ResourceGroup.Name}
  • Azure Account Subscription Id: #{Project.Azure.Account.SubscriptionNumber}
  • Azure Account Client Id: #{Project.Azure.Account.Client}
  • Azure Account Tenant Id: #{Project.Azure.Account.TenantId}
  • Azure Account Password: #{Project.Azure.Account.Password}
  • Container App Environment Name: #{Project.Azure.ContainerApp.Environment.Name}
  • Azure Location: #{Project.Azure.Region.Code}
  • Container Name: #{Project.Azure.ContainerApp.Web.Name}
  • Container Image: Choose eshop-web from feed list.
  • Environment Variables:
[
  {
    "name": "ConnectionStrings__CatalogConnection",
    "value": "Server=#{Project.SQL.DNS},1433;Integrated Security=false;Initial Catalog=#{Project.Catalog.Database.Name};User Id=#{Project.SQL.User.Name};Password=#{Project.SQL.User.Password};Trusted_Connection=false;Trust Server Certificate=True;"
  },
  {
    "name": "ConnectionStrings__IdentityConnection",
    "value": "Server=#{Project.SQL.DNS},1433;Integrated Security=false;Initial Catalog=#{Project.Identity.Database.Name};User Id=#{Project.SQL.User.Name};Password=#{Project.SQL.User.Password};Trusted_Connection=false;Trust Server Certificate=True;"
  },
  {
    "name": "ASPNETCORE_URLS",
    "value": "http://+:80"
  },
  {
    "name": "baseUrls__apiBase",
    "value": "https://#{Octopus.Action[Get API DNS].Output.DNS}"
  },
  {
    "name": "ASPNETCORE_ENVIRONMENT",
    "value": "Development"
  }
]

  • Secrets: (blank)
  • Container Ingress Port: 80
  • External Ingress: Checked (True)

When done, your process should look like this:

Octopus Deployment Process

Deployment

After the deployment is complete, it should create the following Azure resources:

  • Catalog database
  • Identity database
  • Azure Container App environment
  • eshop-api container app
  • eshop-web container app

Azure resources

Click into the eshop-web Container App, then click on the application URL to see the application running.

Deploy a containerized app to Azure

 Deploy a containerized app to Azure

Prerequisites

Create the application image

If you already have an image, skip this step and proceed to Push the image to a container registry step.

  1. Open the application folder in VS Code.

  2. Open Command Palette (Ctrl+Shift+P) and use Docker Images: Build Image... command to build the image.

    Build container image

    You can find the image name in the output of the Build Image command, the same can be found in the Images pane of the Docker Explorer.

    Build image output

Push the image to a container registry

Before deploying the image to an App Service or a Container App, the image must be uploaded to a container registry. The image can be uploaded to either Azure Container Registry (ACR) or Docker Hub.

  1. Open the Docker Explorer and select Connect Registry... icon under Registries group and follow the prompt. Choose the provider (Azure or Docker Hub) and provide the credential to connect to the registry.

    Connect to Registry

  2. Now the registry will be visible under Registries.

    Registries

  3. Optionally, tag the image. In order to upload an image to a registry, the image needs to be tagged with registry name so that the docker push will upload it to the right registry.

    • To create a registry in Azure ACR, open the Registries section of the Docker view, sign in to Azure if not already signed in, and then right-click on the subscription you want to use, and choose Create Registry.

    • The image built in previous section will appear in the Docker Explorer under Images section. Right-click and choose Tag....

      Tag image

    • Specify the new name <your registry or username>/<image name>:<tag> and complete the tag action. For example, new image name for ACR named WebApp6 would be 'webapp6.azurecr.io/webapp6:latest' and for Docker Hub it would be 'myusername/webapp6:latest'.

  4. The image will show up in the Docker Explorer under the registry that the image tag points to. Select this image and choose Push. If the image has not yet been tagged, you will be prompted to choose a registry to push to, and the image will be tagged based on the selection.

    Push image

  5. Once the push command is completed. Refresh the registry node where the image is pushed to and the uploaded image will show up.

    Refresh registry

Deploy the image to Azure

In the previous section, the image is pushed to a remote container registry. Now deploy this image to Azure App Service or Azure Container Apps.

  1. In Docker Explorer, navigate to your image under Registries, right-click on the tag, and select Deploy Image To Azure App Service... or Deploy Image to Azure Container Apps....

    Deploy to Azure App Service

  2. When prompted, provide the values for the App Service or Container App.

    • New web app name: The name must be unique across Azure.
    • Resource group: Select an existing resource group or create a new one.
    • App Service plan: Select an existing App Service Plan or create a new one. (An App Service Plan defines the physical resources that host the website; you can use a basic or free plan tier for this tutorial).
  3. When deployment is complete, Visual Studio Code shows a notification with the website URL.

    Deployment complete notification

  4. You can also see the results in the Output panel of Visual Studio Code, in the Docker section.

    Deployment complete output

  5. To browse the deployed website, you can use Ctrl+click to open the URL in the Output panel. You might need to wait a little while for the app to be live in Azure. The new App Service or Container App also appears in the Azure view in Visual Studio Code, where you can right-click the website and select Browse Website.

    Web Application