Linux Training in Coimbatore & Best Linux Server Administration Training Institute NUX SOFTWARE SOLUTIONS FREE DEMO CLASSES AVAILABLE Call us 096263 53489
Build custom images using Azure VM Image Builder and Bicep
In this blog, we will talk about Azure VM Image Builder and see how VM image build process can be automated using Bicep.
Let’s have basic understanding on Azure VM Image builder before we proceed with the fun part.
What is Azure VM Image Builder?
Azure VM Image Builder is a tool that simplifies VM image building process on Azure. It is built on HashiCorp Packer technology.
It helps create custom Windows or Linux images by using either Azure Marketplace images or existing images as the base image source and then distribute the image to a distribution target such as VM Image Version, Managed Image and Storage Blob (VHD).
What are the components used for Azure VM Image Builder?
The following Azure resources are required when VM Image Version is the intended image distribution target.
Azure compute gallery
In simple term, Azure Compute Gallery is the storage where we store our images. It simplifies custom image sharing across the organization.
VM image definition
It is the definition of the type of image and it is created within the Azure compute gallery. It holds information about the image such as Windows or Linux, max and min memory/cpu requirements etc.
Image template
The image template basically tells Packer how to build the image. The template file contains all the customization required for creating the custom image. The template is associated with the VM image definition.
User assigned managed identity
A user assigned managed identity is necessary to associate with the Image template resource. This is required to grant permission to Packer to build the image.
VM image version
An image version is created within VM Image Definition after successful build of an Image template. VMs can be deployed using this image version.
Now, we will see how we can automate the image build process using Bicep.
Objective
The objective is to create a custom Windows 10 image for Azure Virtual Desktop using Azure marketplace image as the source and VM Image Version as the distribution type. We will use Bicep for the complete deployment and PowerShell scripts for the image customization.
Prepare environment
Install Git
At first we will install Git on the PC from the official site if we do not have it already.
Create a Git repository
Now we will create a Git repository to host the code. I created a public GitHub repository so that I can share the code with you easily instead of making this blog lengthy.
Setup code editor
I am using VS Code as the code editor. If you do not already have it, you can download it from the official site. Install the following extensions on VS Code — GitHub Pull Requests and Issues, Azure Account, Bicep, PowerShell.
Press ctrl + shift + P to go to Command Palette of VS Code and sign in to Azure account. If you have multiple tenants then also run “Select Tenant” command to choose the tenant.
Now sign in to the GitHub account from VS Code and clone the blank repository to get started.
Let’s code & deploy
I created the following bicep files and PowerShell scripts as shown in the picture below. Then I directly deployed the bicep file “azureDeploy.bicep” from VS Code to start deployment onto my Azure subscription. The entire code can be found under my GitHub Repository.
After successful deployment we can see the following resources on the Azure portal within the newly created resources group.
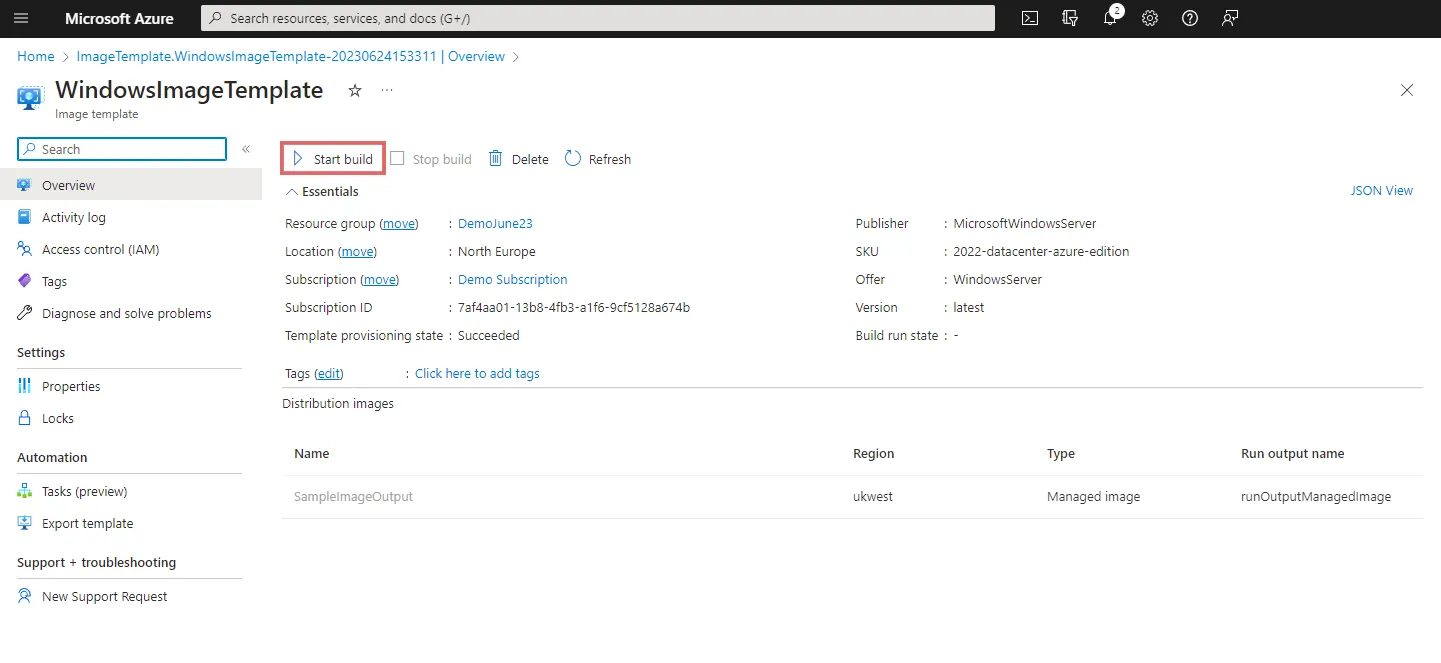
Start Build
Now, we can go to the Image template resource and “Start build” to create an image version as per the template within the “VM image definition” resource.
Alternatively, the following PowerShell script can be used to trigger image build and capture the build status.
The Image template creates a managed resource group to store the customization scripts within a storage account. During the image build process this resource group is used to provision temporary resources such as VM, disks etc. The packer log can be found within the storage account of this resource group.
It may take some time to compete the build based on the customization. Once the build is complete, a new VM Image Version resource will appear within the resource group.
We can provision VM or VMSS using the VM Image Version (which is basically the custom image that we just created) either via automation or from portal.
There are many base images that we can pick from when creating a new virtual machine. That said it is often the case that we need to customize the machine, by running PowerShell scripts, installing software, turning on windows features etc. If we want to use a scale set or create further VMs with the same setup we can use this machine to make our own new base image.
A typical manual process to do this would be to provision a new temporary virtual machine from a base image such as Windows Server. Login to the server using an RDP connection before manually installing and configuring the necessary components.
Once this is finally done, we can then shut the machine down and use the sysprep tool or azure cli tools to generalize the machine. This will create a new image that can be used to base future machines from.
Finally, we need to destroy our temporary virtual machine cleaning up all the resources. If we need to make any changes, we will have to repeat the entire (mostly) manual process.
Introducing Azure Image Builder
Azure Image Builder was released in June 2021 and it automates the entire process outlined above.
Creating your new image is a two step process. First you need to define an Image Template resource in Azure. This contains details of the type of staging virtual machine, base image, customization steps and finally the destination of the resulting image. The resulting output can be a managed image, shared image in the Azure Compute Gallery or a VHD in a storage account.
Once you have your image template resource in Azure you can then start/build the template to produce your generalized custom image.
Behind the scenes the Azure image builder process is using Packer and is extremely customizable. At the time of writing, you are only charged for the temporary staging virtual machine and associated assets, data transfer etc. with no cost for the image builder service itself.
There are some great getting started samples however since its release there have been several updates and new options available, which I hope to share in the rest of this post. We will cover how to use Bicep and Azure pipelines with Azure image builder to automate the complete image building process. Although there is a preview DevOps task, in this post we will be focusing on the CLI commands to allow for more control.
Building the Template
Before we can build a custom virtual machine image we need to create and configure an Image Template. We can do this in a range of ways, but lets first look how this can be done manually in the Azure Portal.
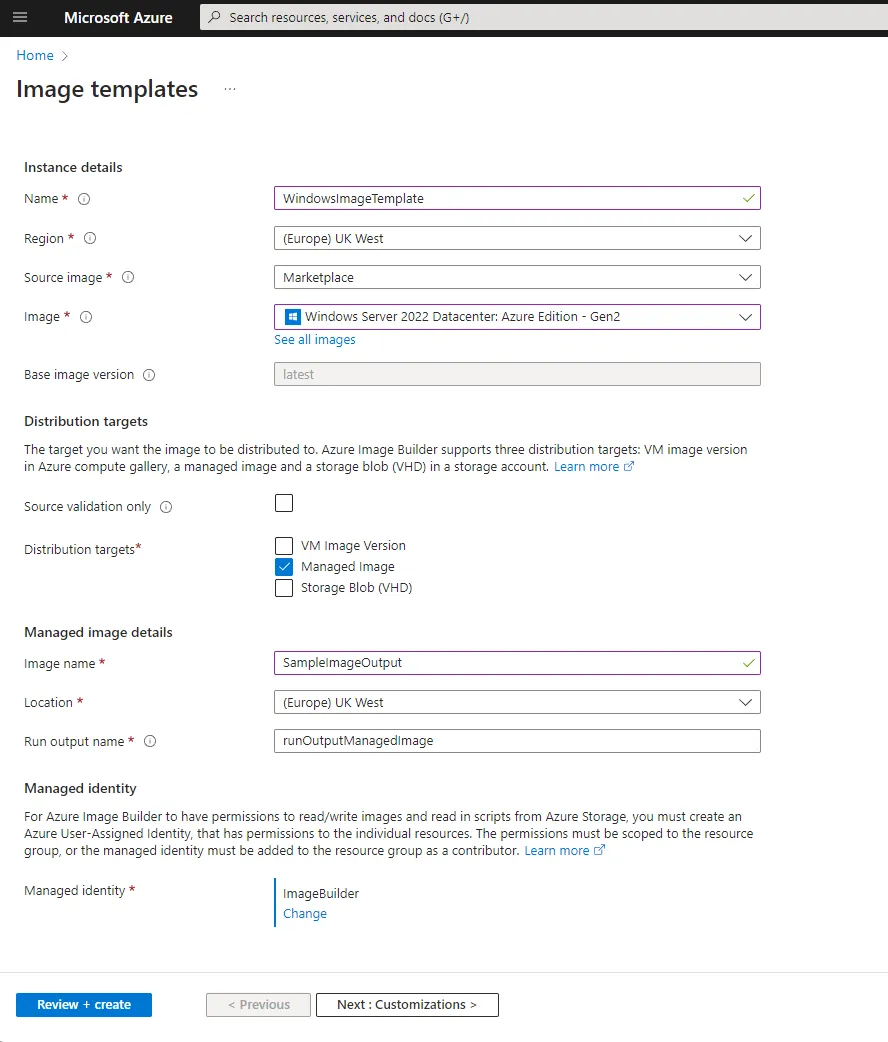
In the Azure Portal start by searching for Image templates and selecting the New option. During the creation process you are asked to select the base image, name for the template and other core details.
As part of the first page you will also need to select a pre-created managed identity to act on your behalf while the image template is building your new image. This must have the permissions needed to write the final image to the destination. It is recommended to create a custom role with the minimum required permissions in the target resource group, then assign this to the managed identity. If your managed identity does not have the correct permissions set, the portal will helpfully inform you.
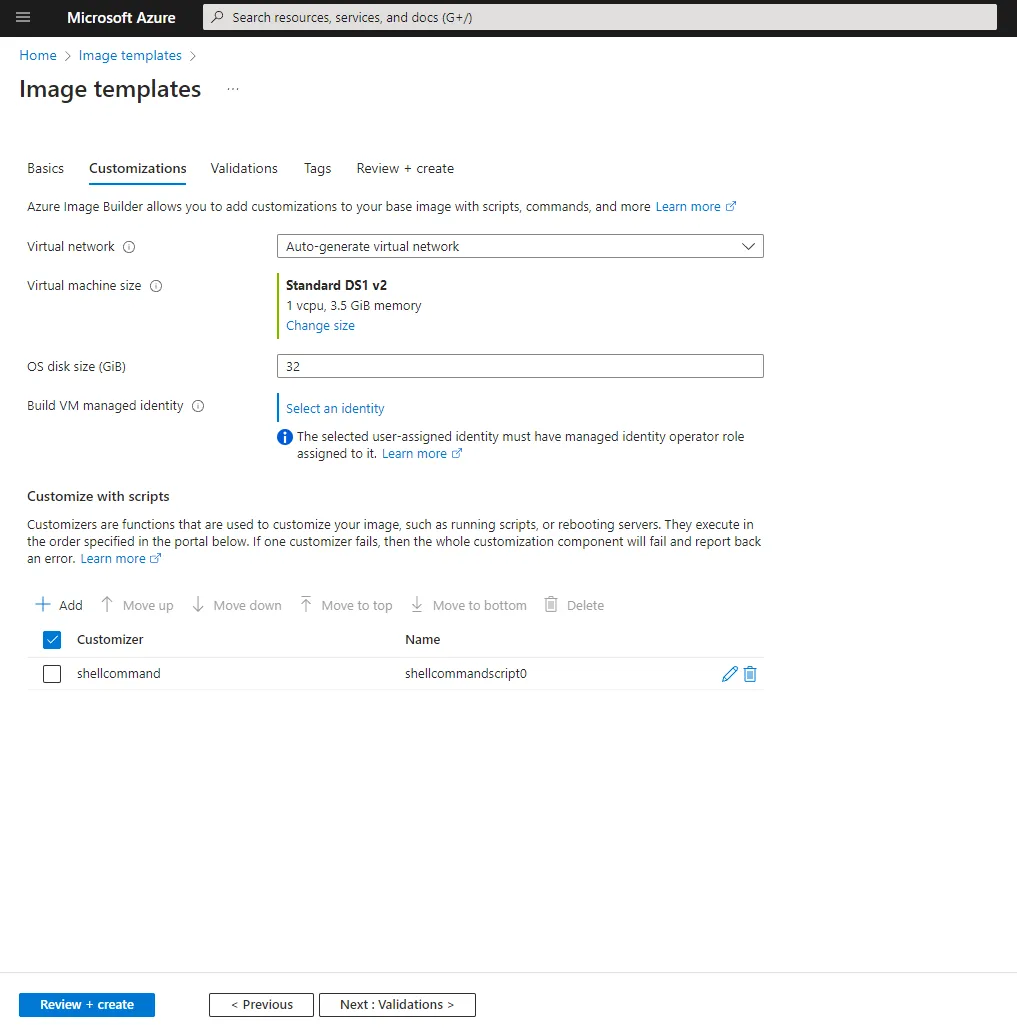
Next you have the option to customize the processes, including setting the size of the interim VM that will be used to build your image. Following this you can select to run a set of customization tasks such as running scripts and restarting the machine.
Finally you can choose any validation scripts to run which will check the image for any issues before it is finalized. This is a great feature and can be used to ensure that the image is built correctly and will work as expected.
Once you have created the template you can then select Run Build to build your image. The image build process, is much like the manual process outlined above and happens in a new resource group automatically created for you. This resource group will be prefixed IT_ followed by the name of the image template, we can change this when using a Bicep script but not in the portal. The resource group will contain the interim/staging virtual machine, storage account and other resources needed to build the image. The staging resources are removed as part of the process however the group is only removed if and when the image template resource is removed.
I have found for a Windows image this can take a minimum of 30 minutes to complete but with customizations can take hours.
It is worth noting that at this time templates are immutable and can not be edited once created. If you need to make changes you will need to create a new template and delete the old one, for this reason I would recommend looking to automate the template creation with Bicep as we will see later.
Failures, Errors and Issues
Feedback from the image template is often limited, and during the build process you may encounter failures or the build never completing. This can happen if there is a fault in your customization script, providers not being registered in your subscription and for many other reasons. If you find the build seems to never complete you can force stop it before reviewing the logs.
To find the source of any issues you must look a the packer logs which are not with the template but are in the storage account inside the temporary resource group. You will find a packer container with a log file named customization.log. If the build got far enough a validation.log file will also be available. Both files can be downloaded and viewed locally.
It is important that in the customization you do not trigger any actions that would force a machine restart. Any restarts need to be done using a restart task. It is also important that you do not leave the machine in a state that requires user input such as calling an MSI without /quiet.
Automating the Template Build
We can create our template in the same way as we would any other Azure resource using Bicep. We get all the same options as in the Azure portal however we can also set other items such as the name of the temporary staging resource group and override the default 4 hour timeout.
The following example will create a template that will build a Windows Server 2022 image without customizations. It has the assumption your managed identity has already been created and has the correct permissions.
@description('SubscriptionId')param subscriptionId string@description('Resource Group Name used to place the Template and resulting image')param resourceGroupName string@description('Name of empty resource group used to build the image from the template')param stagingResourceGroupName string@description('Name of the managed image resource to create')param imageName string@description('Name of the template resource to create')param templateName string@description('Name of the Identity to build the template')param identityName string = 'DevOpsImageBuilder'@description('Location of build the template')param location string = 'uksouth'@description('Full path to the image to be output when built')param imageId string = '/subscriptions/${subscriptionId}/resourceGroups/${resourceGroupName}/providers/Microsoft.Compute/images/${imageName}'resource azureImageBuilder 'Microsoft.VirtualMachineImages/imageTemplates@2022-02-14' = { name: templateName location: location identity:{ type: 'UserAssigned' userAssignedIdentities: { '/subscriptions/${subscriptionId}/resourcegroups/${resourceGroupName}/providers/Microsoft.ManagedIdentity/userAssignedIdentities/${identityName}': {} } } properties:{ customize: [ ] distribute: [ { type: 'ManagedImage' imageId: imageId location: location runOutputName: imageName } ] source: { type: 'PlatformImage' publisher : 'MicrosoftWindowsServer' offer : 'WindowsServer' sku : '2022-Datacenter' version : 'latest' } stagingResourceGroup: '/subscriptions/${subscriptionId}/resourceGroups/${stagingResourceGroupName}' validate: {} vmProfile:{ vmSize: 'Standard_D4_v2' osDiskSizeGB: 127 } }}
Customizing the Template
One of the biggest benefits of Azure image builder is being able to run sets of commands as part of the image building process. This can be used to install software, turn on windows features, run scripts and generally make changes to the image.
You can run one or more of the following tasks:
File - Download a file from Blob Storage or a Public URL (less than 20mb)
PowerShell - Execute a script file or inline script
Shell - Execute a shell script file or inline script
WindowsRestart - Restart the machine (this must be the only way you restart the machine during the process)
WindowsUpdate - Allows you to configure Windows Updates
I have found that a performing a lot of custom tasks, using inline scripts becomes very brittle and hard to debug. I would recommend using a script that is stored in a blob storage account, using a File task to download then a powershell script to execute it. This way you can easily update the script and debug it locally before uploading it to the blob storage account.
If you are using a private blob storage account you will need to add the identity of the image builder to the blob storage account with the Storage Blob Data Contributor role to allow access.
Unfortunately the --no-wait flag is not yet supported and this command could take hours to run. There is an open github issue to add this support if you wish to track it.
To get around this we can use the raw API for a fire and forget approach. The API documentation is not available however the contracts are published on GitHub.
az rest --method post --url https://management.azure.com/subscriptions/$(subscriptionId)/resourceGroups/$(resourceGroup)/providers/Microsoft.VirtualMachineImages/imageTemplates/$(templateName)/run?api-version=2020-02-14
Building DevOps Pipeline
Putting together our Bicep code and AZ CLI commands we can wrap this up into a DevOps pipeline. This means that if we have updated the required software in our customizations we can trigger a new build of the image template and re-build the image. Note that To run the Az Tasks we will need to set up a service connection named Azure Access.
trigger: batch: true branches: include: - mainvariables: - name: resourceGroup value : 'demo' - name: subscriptionId value : '00000000-0000-0000-0000-000000000000' - name: templateName value : 'demo-template' - name: imageName value : 'demo-image' - name: stagingResourceGroup value : 'demo-stage'jobs:- job: 'CreateVmImage' dependsOn: 'UploadSoftwareList' displayName: 'Build VM Image' pool: vmImage: 'ubuntu-latest' steps: - task: AzureCLI@2 name: buildTemplate displayName: 'Create Image Template' inputs: azureSubscription: 'Azure Access' scriptType: bash scriptLocation: inlineScript useGlobalConfig: false inlineScript: | #Remove Old Template (as they cannot be updated) az resource delete --subscription $(subscriptionId) \ --resource-group $(resourceGroup) \ --resource-type Microsoft.VirtualMachineImages/imageTemplates \ --name $(templateName); #Create Template az deployment group create \ --subscription $(subscriptionId) \ --resource-group $(resourceGroup) \ --template-file DeployVmImageTemplate.bicep \ --parameters subscriptionId="$(subscriptionId)" \ --parameters resourceGroupName="$(resourceGroup)" \ --parameters stagingResourceGroupName="$(stagingResourceGroup)" \ --parameters imageName="$(imageName)" \ --parameters templateName="$(templateName)" \ - task: AzureCLI@2 name: buildImage displayName: 'Run Image Builder' inputs: azureSubscription: 'Azure Access' scriptType: bash scriptLocation: inlineScript useGlobalConfig: false inlineScript: | #Run the template to make the Image #az resource invoke-action does not have a --no-wait option #https://github.com/Azure/azure-cli/issues/21190 #so we have to use az rest instead #az resource invoke-action \ #--subscription $(subscriptionId) \ #--resource-group $(resourceGroup) \ #--resource-type Microsoft.VirtualMachineImages/imageTemplates \ #--name $(templateName) \ #--action Run; az rest --method post --url https://management.azure.com/subscriptions/$(subscriptionId)/resourceGroups/$(resourceGroup)/providers/Microsoft.VirtualMachineImages/imageTemplates/$(templateName)/run?api-version=2020-02-14
We could extend this to upload a powershell script to a private blob storage, create a hash of the file then pass this as a parameter to the template. This would allow us have the template download and execute a more complex install script. As mentioned before the script would need to make sure there is no user interaction required and does not require the machine to be restarted.
Summary
In this post we looked at how we would create a custom virtual machine image. We then looked at how this could be simplified using Azure Image Builder and finally how we can automate the process using Bicep and DevOps pipelines.