Azure Dedicated Hosts
Azure Dedicated Host is a service that provides physical servers able to host one or more virtual machines assigned to one Azure subscription. Dedicated hosts are the same physical servers used in our data centers, provided instead as a directly accessible hardware resource. You can provision dedicated hosts within a region, availability zone, and fault domain. You can then place VMs directly into your provisioned hosts in whatever configuration best meets your needs.
Benefits
Reserving the entire host provides several benefits beyond those of a standard shared virtual machine host:
Cost Optimization: With the Azure hybrid benefit, you can bring your own licenses for Windows and SQL to Azure. For more information, see Azure Hybrid Benefit.
Reliability: You have near complete control over maintenance events initiated by the Azure platform. While most maintenance events have little to no impact on your virtual machines, there are some sensitive workloads where each second of pause can have an impact. With dedicated hosts, you can opt in to a maintenance window to reduce the impact to your service.
Performance Efficiency: Because you have control over a physical host, you can choose which applications share physical resources such as memory and storage. This can speed up certain workloads that benefit from low latency and high throughput on the host machine.
Security: Hardware isolation at the physical server level allows for sensitive memory data to remain isolated within a physical host. No other customer's VMs will be placed on your hosts. Dedicated hosts are deployed in the same data centers and share the same network and underlying storage infrastructure as other, non-isolated hosts.
Groups, hosts, and VMs
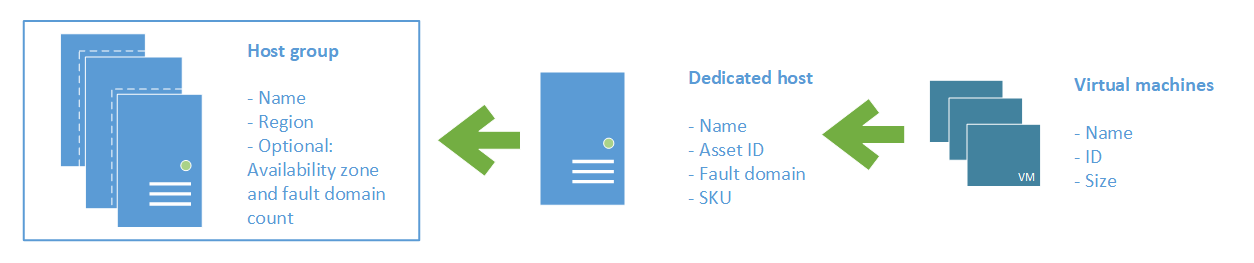
A host group is a resource that represents a collection of dedicated hosts. You create a host group in a region and an availability zone, and add hosts to it.
A host is a resource, mapped to a physical server in an Azure data center. The physical server is allocated when the host is created. A host is created within a host group. A host has a SKU describing which VM sizes can be created. Each host can host multiple VMs, of different sizes, as long as they are from the same size series.
High availability considerations
For high availability, you should deploy multiple VMs, spread across multiple hosts (minimum of 2). With Azure Dedicated Hosts, you have several options to provision your infrastructure to shape your fault isolation boundaries.
Use availability zones for fault isolation
Availability zones are unique physical locations within an Azure region. Each zone is made up of one or more datacenters equipped with independent power, cooling, and networking. A host group is created in a single availability zone. Once created, all hosts will be placed within that zone. To achieve high availability across zones, you need to create multiple host groups (one per zone) and spread your hosts between them accordingly.
If you assign a host group to an availability zone, all VMs created on that host must be created in the same zone.
Use Fault Domains for fault isolation
A host can be created in a specific fault domain. Just like VM in a scale set or availability set, hosts in different fault domains will be placed on different physical racks in the data center. When you create a host group, you're required to specify the fault domain count. When creating hosts within the host group, you assign fault domain for each host. The VMs don't require any fault domain assignment.
Fault domains aren't the same as colocation. Having the same fault domain for two hosts doesn't mean they are in proximity with each other.
Fault domains are scoped to the host group. You shouldn't make any assumption on anti-affinity between two host groups (unless they are in different availability zones).
VMs deployed to hosts with different fault domains, will have their underlying managed disks services on multiple storage stamps, to increase the fault isolation protection.
Using Availability Zones and Fault Domains
You can use both capabilities together to achieve even more fault isolation. To use both, specify the availability zone and fault domain count in for each host group, assign a fault domain to each host in the group, then assign an availability zone to each VM.
The Resource Manager sample template uses zones and fault domains to spread hosts for maximum resiliency in a region.
Manual vs. automatic placement
When creating a VM in Azure, you can select which dedicated host to use. You can also use the option to automatically place your VMs on existing hosts, within a host group.
When creating a new host group, make sure the setting for automatic VM placement is selected. When creating your VM, select the host group and let Azure pick the best host for your VM.
Host groups that are enabled for automatic placement don't require all the VMs to be automatically placed. You'll still be able to explicitly pick a host, even when automatic placement is selected for the host group.
Automatic placement limitations
Known issues and limitations when using automatic VM placement:
- You won't be able to redeploy your VM.
- You won't be able to use DCv2, Lsv2, NVasv4, NVsv3, Msv2, or M-series VMs with dedicated hosts.
Host service healing
In case of any failure relating to the underlying node, network connectivity or software issues can push the host and VMs on the host to a non-healthy state causing disruption and downtime to your workloads. The default action is for Azure to automatically service heal the impacted host to a healthy node and move all VMs to the healthy host. Once the VMs are service healed and restarted the impacted host will be deallocated. During the service healing process the host and VMs would become unavailable incurring a slight downtime.
The newly created host would have all the same constraints as the old host:
- Resource group
- Region
- Fault Domain
- Host Group
- ADH SKU
- Auto replace on failure setting
Users with compliance requirements might need a strong affinity between the host and underlying node and would not like to be automatically service healed, in such scenarios users can choose to opt out of auto service healing at host level by disabling the 'Automatically replace host on failure setting'.
Implications
If you decide to disable auto service healing and if the underlying node encounters a failure your host state will change to 'Host Pending Deallocate' and will eventually be deallocated.
To avoid deallocation, you would need to manually redeploy the host by creating a new dedicated host and moving all the VMs from the old host to the new host.
The auto replace host setting is a create time setting and cannot be changed once the host is created. VMs that are manually stopped/deallocated from the impacted host are not moved as part of the automatic service healing.
Virtual Machine Scale Set support
Virtual Machine Scale Sets let you treat a group of virtual machines as a single resource, and apply availability, management, scaling and orchestration policies as a group. Your existing dedicated hosts can also be used for Virtual Machine Scale Sets.
When creating a Virtual Machine Scale Set, you can specify an existing host group to have all of the VM instances created on dedicated hosts.
The following requirements apply when creating a Virtual Machine Scale Set in a dedicated host group:
- Automatic VM placement needs to be enabled.
- The availability setting of your host group should match your scale set.
- A regional host group (created without specifying an availability zone) should be used for regional scale sets.
- The host group and the scale set must be using the same availability zone.
- The fault domain count for the host group level should match the fault domain count for your scale set. The Azure portal lets you specify max spreading for your scale set, which sets the fault domain count of 1.
- Dedicated hosts should be created first, with sufficient capacity, and the same settings for scale set zones and fault domains.
- The supported VM sizes for your dedicated hosts should match the one used for your scale set.
Not all scale-set orchestration and optimizations settings are supported by dedicated hosts. Apply the following settings to your scale set:
- Overprovisioning isn't recommended, and it's disabled by default. You can enable overprovisioning, but the scale set allocation will fail if the host group doesn't have capacity for all of the VMs, including the overprovisioned instances.
- Use the ScaleSetVM orchestration mode
- Don't use proximity placement groups for co-location
Ultra disk support for virtual machines on dedicated hosts
Ultra disks offer higher IOPS (maximum of 160,00 IOPS per disk) and higher disk throughput (maximum of 4000 MBps per disk) depending on the disk size. All the limitations of ultra disks would still apply. To use ultra disks on dedicated hosts following requirements needs to be satisfied:
- Host group needs to have Ultra SSD 'Enabled', this property cannot be changed once the host group is created
- Dedicated host's virtual machine series should be compatible with ultra disks.
Dedicated hosts also support ultra disks with specialty VM sizes: LSv2, M, Mv2, Msv2, Mdsv2, NVv3, NVv4. However in these cases below listed additional limitations would apply:
- Host group should have Automatic Placement 'Disabled'
- Host group's fault domain count should be set to '1' only.
Maintenance control
The infrastructure supporting your virtual machines may occasionally be updated to improve reliability, performance, security, and to launch new features. The Azure platform tries to minimize the impact of platform maintenance whenever possible, however customers with maintenance sensitive workloads can't tolerate even few seconds that the VM needs to be shut down for maintenance.
Maintenance Control provides customers with an option to skip regular platform updates scheduled on their dedicated hosts, then apply it at the time of their choice within a 35-day rolling window. Within the maintenance window, you can apply maintenance directly at the host level, in any order. Once the maintenance window is over, Microsoft will move forward and apply the pending maintenance to the hosts in an order that may not follow the user defined fault domains.
For more information, see Managing platform updates with Maintenance Control.
Capacity considerations
Once a dedicated host is provisioned, Azure assigns it to physical server. Doing so guarantees the availability of the capacity when you need to provision your VM. Azure uses the entire capacity in the region (or zone) to pick a physical server for your host. It also means that customers can expect to be able to grow their dedicated host footprint without the concern of running out of space in the cluster.
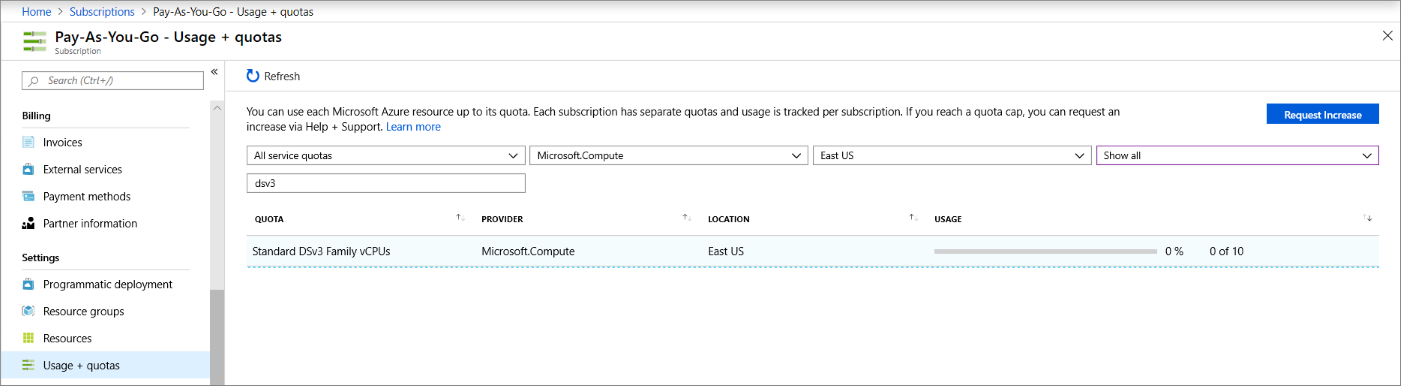
Quotas
There are two types of quota that are consumed when you deploy a dedicated host.
- Dedicated host vCPU quota. The default quota limit is 3000 vCPUs, per region.
- VM size family quota. For example, a Pay-as-you-go subscription may only have a quota of 10 vCPUs available for the Dsv3 size series, in the East US region. To deploy a Dsv3 dedicated host, you would need to request a quota increase to at least 64 vCPUs before you can deploy the dedicated host.
To request a quota increase, create a support request in the Azure portal.
Provisioning a dedicated host will consume both dedicated host vCPU and the VM family vCPU quota, but it won't consume the regional vCPU. VMs placed on a dedicated host won't count against VM family vCPU quota. Should a VM be moved off a dedicated host into a multi-tenant environment, the VM will consume VM family vCPU quota.
For more information, see Virtual machine vCPU quotas.
Free trial and MSDN subscriptions don't have quota for Azure Dedicated Hosts.
Pricing
Users are charged per dedicated host, regardless how many VMs are deployed. In your monthly statement, you'll see a new billable resource type of hosts. The VMs on a dedicated host will still be shown in your statement, but will carry a price of 0.
The host price is set based on VM family, type (hardware size), and region. A host price is relative to the largest VM size supported on the host.
Software licensing, storage and network usage are billed separately from the host and VMs. There's no change to those billable items.
For more information, see Azure Dedicated Host pricing.
You can also save on costs with a Reserved Instance of Azure Dedicated Hosts.
Sizes and hardware generations
A SKU represents the VM size series and type on a given host. You can mix multiple VMs of different sizes within a single host as long as they are of the same size series.
The type is the hardware generation. Different hardware types for the same VM series will be from different CPU vendors and have different CPU generations and number of cores.
The sizes and hardware types vary by region. Refer to the host pricing page to learn more.
Note
Once a Dedicated host is provisioned, you can't change the size or type. If you need a different size of type, you will need to create a new host.
Host life cycle
Azure monitors and manages the health status of your hosts. The following states will be returned when you query your host:
| Health State | Description |
|---|---|
| Host Available | There are no known issues with your host. |
| Host Under Investigation | We’re having some issues with the host that we’re looking into. This transitional state is required for Azure to try to identify the scope and root cause for the issue identified. Virtual machines running on the host may be impacted. |
| Host Pending Deallocate | Azure can’t restore the host back to a healthy state and ask you to redeploy your virtual machines out of this host. If autoReplaceOnFailure is enabled, your virtual machines are service healed to healthy hardware. Otherwise, your virtual machine may be running on a host that is about to fail. |
| Host Deallocated | All virtual machines have been removed from the host. You're no longer being charged for this host since the hardware was taken out of rotation. |