Monday, 20 May 2024

(LAB)Create virtual machines in a scale set using Azure portal


Create virtual machines in a scale set using Azure portal

 Caution

This article references CentOS, a Linux distribution that is nearing End Of Life (EOL) status. Please consider your use and plan accordingly. For more information, see the CentOS End Of Life guidance.

This article steps through using Azure portal to create a Virtual Machine Scale Set.

Log in to Azure

Sign in to the Azure portal.

Create a Virtual Machine Scale Set

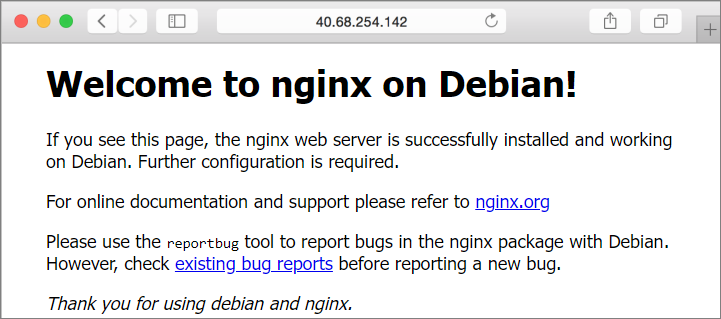
You can deploy a scale set with a Windows Server image or Linux image such as RHEL, CentOS, Ubuntu, or SLES.

  1. In the Azure portal search bar, search for and select Virtual Machine Scale Sets.

  2. Select Create on the Virtual Machine Scale Sets page.

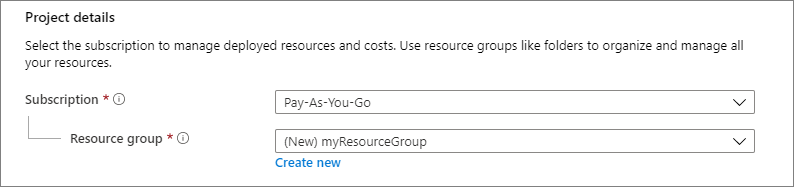
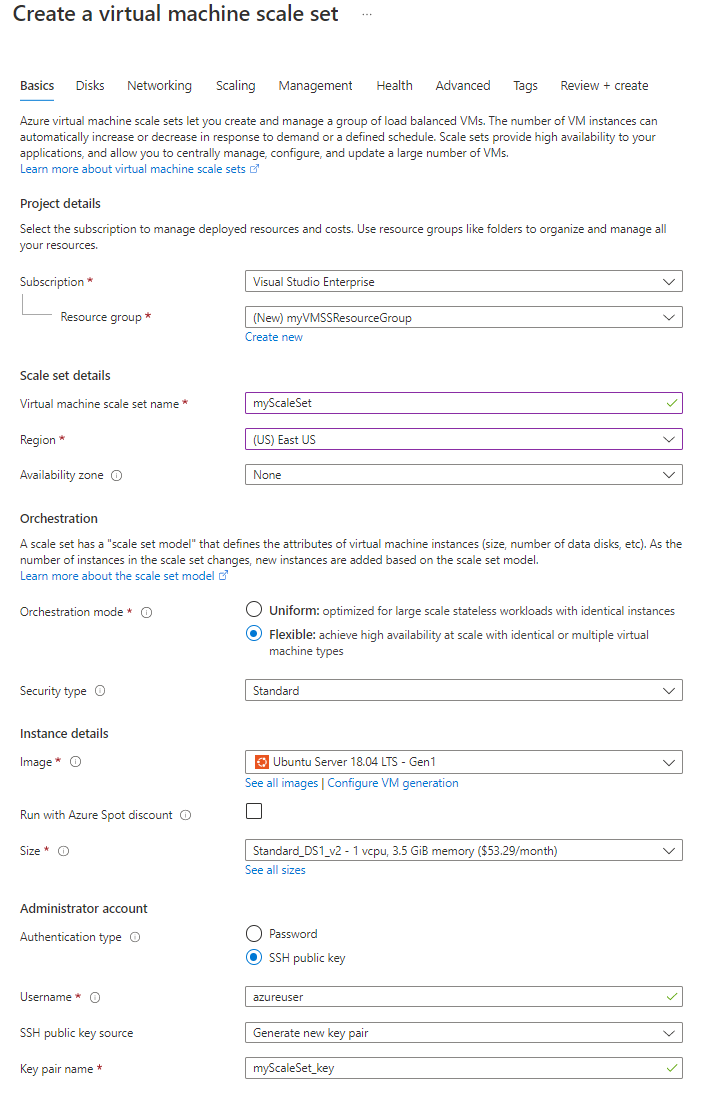
  3. In the Basics tab, under Project details, make sure the correct subscription is selected and create a new resource group called myVMSSResourceGroup.

  4. Under Scale set details, set myScaleSet for your scale set name and select a Region that is close to your area.

  5. Under Orchestration, select Flexible.

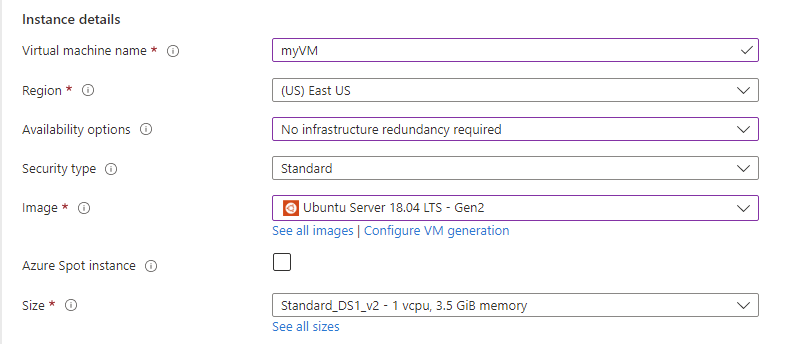
  6. Under Instance details, select a marketplace image for Image. Select any of the Supported Distros.

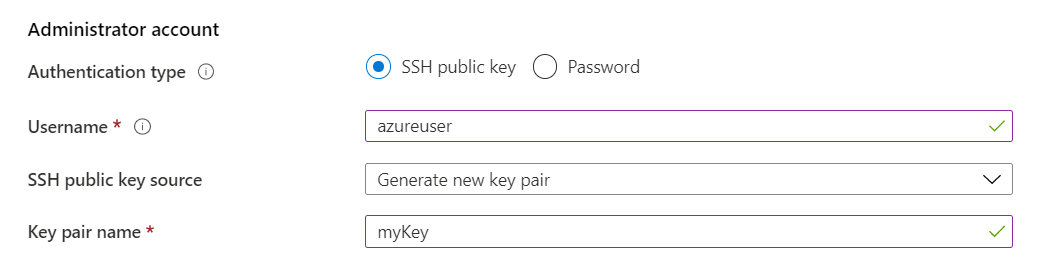
  7. Under Administrator account configure the admin username and set up an associated password or SSH public key.

    • Password must be at least 12 characters long and meet three out of the four following complexity requirements: one lower case character, one upper case character, one number, and one special character. For more information, see username and password requirements.
    • If you select a Linux OS disk image, you can instead choose SSH public key. You can use an existing key or create a new one. In this example, we will have Azure generate a new key pair for us. For more information on generating key pairs, see create and use SSH keys.

A screenshot of the Basics tab in the Azure portal during the Virtual Machine Scale Set creation process.

  1. Select Next: Disks to move the disk configuration options. For this quickstart, leave the default disk configurations.

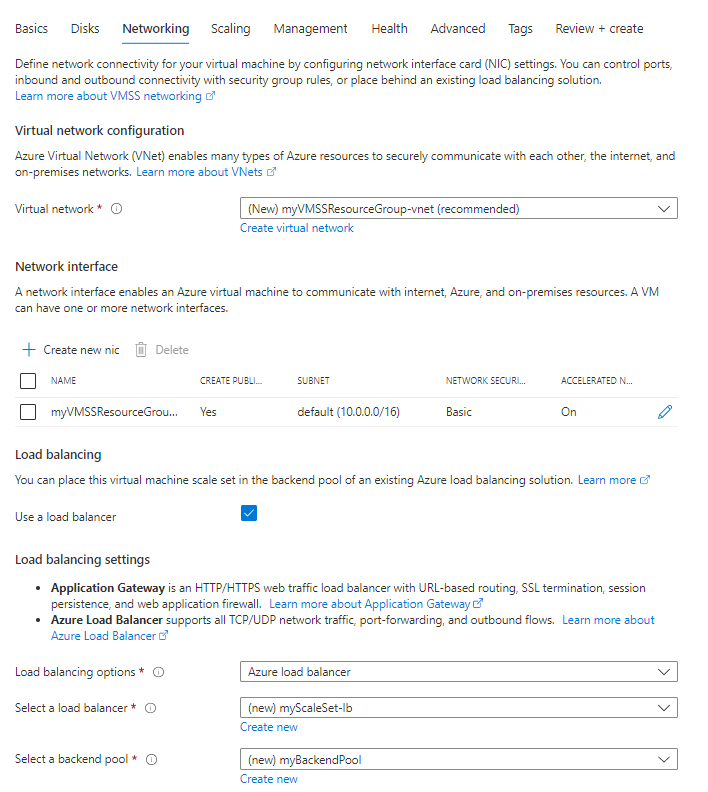
  2. Select Next: Networking to move the networking configuration options.

  3. On the Networking page, under Load balancing, select the Use a load balancer checkbox to put the scale set instances behind a load balancer.

  4. In Load balancing options, select Azure load balancer.

  5. In Select a load balancer, select a load balancer or create a new one.

  6. For Select a backend pool, select Create new, type myBackendPool, then select Create.

A screenshot of the Networking tab in the Azure portal during the Virtual Machine Scale Set creation process.

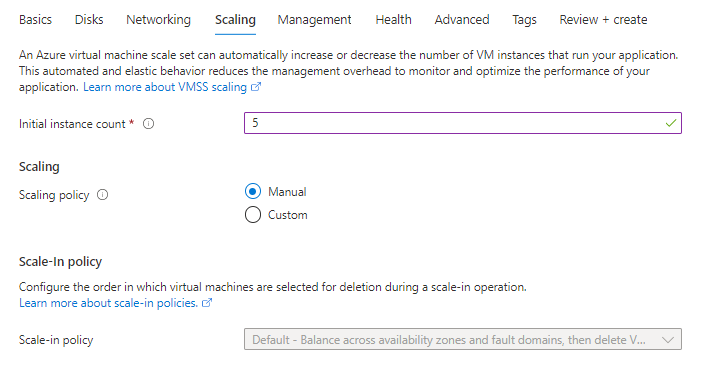
  1. Select Next: Scaling to move to the scaling configurations.

  2. On the Scaling page, set the initial instance count field to 5. You can set this number up to 1000.

  3. For the Scaling policy, keep it Manual.

A screenshot of the Scaling tab in the Azure portal during the Virtual Machine Scale Set creation process.

  1. When you're done, select Review + create.
  2. After it passes validation, select Create to deploy the scale set.

(LAB) Create a Linux virtual machine in Azure with PowerShell


Create a Linux virtual machine in Azure with PowerShell

Applies to: ✔️ Linux VMs

The Azure PowerShell module is used to create and manage Azure resources from the PowerShell command line or in scripts. This quickstart shows you how to use the Azure PowerShell module to deploy a Linux virtual machine (VM) in Azure. This quickstart uses the latest Debian marketplace image. To see your VM in action, you'll also SSH to the VM and install the NGINX web server.

If you don't have an Azure subscription, create a free account before you begin.

Launch Azure Cloud Shell

The Azure Cloud Shell is a free interactive shell that you can use to run the steps in this article. It has common Azure tools preinstalled and configured to use with your account.

To open the Cloud Shell, just select Try it from the upper right corner of a code block. Select Copy to copy the blocks of code, paste it into the Cloud Shell, and press enter to run it.

Create a resource group

Create an Azure resource group with New-AzResourceGroup. A resource group is a logical container into which Azure resources are deployed and managed:

Azure PowerShell
New-AzResourceGroup -Name 'myResourceGroup' -Location 'EastUS'

Create a virtual machine

We will be automatically generating an SSH key pair to use for connecting to the VM. The public key that is created using -GenerateSshKey will be stored in Azure as a resource, using the name you provide as SshKeyName. The SSH key resource can be reused for creating additional VMs. Both the public and private keys will also be downloaded for you. When you create your SSH key pair using the Cloud Shell, the keys are stored in a storage account that is automatically created by Cloud Shell. Don't delete the storage account, or the file share in it, until after you have retrieved your keys or you will lose access to the VM.

You will be prompted for a user name that will be used when you connect to the VM. You will also be asked for a password, which you can leave blank. Password log in for the VM is disabled when using an SSH key.

In this example, you create a VM named myVM, in East US, using the Standard_B2s VM size.

Azure PowerShel
New-AzVm `
    -ResourceGroupName 'myResourceGroup' `
    -Name 'myVM' `
    -Location 'East US' `
    -image Debian11 `
    -size Standard_B2s `
    -PublicIpAddressName myPubIP `
    -OpenPorts 80 `
    -GenerateSshKey `
    -SshKeyName mySSHKey

The output will give you the location of the local copy of the SSH key. For example:

OutputPrivate key is saved to /home/user/.ssh/1234567891
Public key is saved to /home/user/.ssh/1234567891.pub

Cost information isn't presented during the virtual machine creation process for PowerShell like it is for the Azure portal. If you want to learn more about how cost works for virtual machines, see the Cost optimization Overview page.

It will take a few minutes for your VM to be deployed. When the deployment is finished, move on to the next section.

Install NGINX

To see your VM in action, install the NGINX web server.

Azure PowerShell
Invoke-AzVMRunCommand `
   -ResourceGroupName 'myResourceGroup' `
   -Name 'myVM' `
   -CommandId 'RunShellScript' `
   -ScriptString 'sudo apt-get update && sudo apt-get install -y nginx'

The -ScriptString parameter requires version 4.27.0 or later of the Az.Compute module.

View the web server in action

Get the public IP address of your VM:

Azure PowerShell
Get-AzPublicIpAddress -Name myPubIP -ResourceGroupName myResourceGroup | select "IpAddress" 

Use a web browser of your choice to view the default NGINX welcome page. Enter the public IP address of the VM as the web address.

Screenshot showing the N G I N X default web page.

Clean up resources

When no longer needed, you can use the Remove-AzResourceGroup cmdlet to remove the resource group, VM, and all related resources:

Azure PowerShell
Remove-AzResourceGroup -Name 'myResourceGroup'

(LAB) Create a Linux virtual machine in the Azure portal


Create a Linux virtual machine in the Azure portal

Applies to: ✔️ Linux VMs

Azure virtual machines (VMs) can be created through the Azure portal. The Azure portal is a browser-based user interface to create Azure resources. This quickstart shows you how to use the Azure portal to deploy a Linux virtual machine (VM) running Ubuntu Server 22.04 LTS. To see your VM in action, you also SSH to the VM and install the NGINX web server.

If you don't have an Azure subscription, create a free account before you begin.

Sign in to Azure

Sign in to the Azure portal.

Create virtual machine

  1. Enter virtual machines in the search.

  2. Under Services, select Virtual machines.

  3. In the Virtual machines page, select Create and then Virtual machine. The Create a virtual machine page opens.

  4. In the Basics tab, under Project details, make sure the correct subscription is selected and then choose to Create new resource group. Enter myResourceGroup for the name.*.

    Screenshot of the Project details section showing where you select the Azure subscription and the resource group for the virtual machine

  5. Under Instance details, enter myVM for the Virtual machine name, and choose Ubuntu Server 22.04 LTS - Gen2 for your Image. Leave the other defaults. The default size and pricing is only shown as an example. Size availability and pricing are dependent on your region and subscription.

    Screenshot of the Instance details section where you provide a name for the virtual machine and select its region, image, and size.

     Note

    Some users will now see the option to create VMs in multiple zones. To learn more about this new capability, see Create virtual machines in an availability zoneScreenshot showing that you have the option to create virtual machines in multiple availability zones.

  6. Under Administrator account, select SSH public key.

  7. In Username enter azureuser.

  8. For SSH public key source, leave the default of Generate new key pair, and then enter myKey for the Key pair name.

    Screenshot of the Administrator account section where you select an authentication type and provide the administrator credentials

  9. Under Inbound port rules > Public inbound ports, choose Allow selected ports and then select SSH (22) and HTTP (80) from the drop-down.

    Screenshot of the inbound port rules section where you select what ports inbound connections are allowed on

  10. Leave the remaining defaults and then select the Review + create button at the bottom of the page.

  11. On the Create a virtual machine page, you can see the details about the VM you are about to create. When you are ready, select Create.

  12. When the Generate new key pair window opens, select Download private key and create resource. Your key file will be download as myKey.pem. Make sure you know where the .pem file was downloaded; you will need the path to it in the next step.

  13. When the deployment is finished, select Go to resource.

  14. On the page for your new VM, select the public IP address and copy it to your clipboard.

    Screenshot showing how to copy the IP address for the virtual machine

Connect to virtual machine

Create an SSH connection with the VM.

  1. If you are on a Mac or Linux machine, open a Bash prompt and set read-only permission on the .pem file using chmod 400 ~/Downloads/myKey.pem. If you are on a Windows machine, open a PowerShell prompt.

  2. At your prompt, open an SSH connection to your virtual machine. Replace the IP address with the one from your VM, and replace the path to the .pem with the path to where the key file was downloaded.

Console
ssh -i ~/Downloads/myKey.pem azureuser@10.111.12.123

 Tip

The SSH key you created can be used the next time your create a VM in Azure. Just select the Use a key stored in Azure for SSH public key source the next time you create a VM. You already have the private key on your computer, so you won't need to download anything.

Install web server

To see your VM in action, install the NGINX web server. From your SSH session, update your package sources and then install the latest NGINX package.

Bash
sudo apt-get -y update
sudo apt-get -y install nginx

When done, type exit to leave the SSH session.

View the web server in action

Use a web browser of your choice to view the default NGINX welcome page. Type the public IP address of the VM as the web address. The public IP address can be found on the VM overview page or as part of the SSH connection string you used earlier.

Screenshot showing the NGINX default site in a browser

Clean up resources

Delete resources

When no longer needed, you can delete the resource group, virtual machine, and all related resources.

  1. On the Overview page for the VM, select the Resource group link.
  2. At the top of the page for the resource group, select Delete resource group.
  3. A page will open warning you that you are about to delete resources. Type the name of the resource group and select Delete to finish deleting the resources and the resource group.

Auto-shutdown

If the VM is still needed, Azure provides an Auto-shutdown feature for virtual machines to help manage costs and ensure you are not billed for unused resources.

  1. On the Operations section for the VM, select the Auto-shutdown option.
  2. A page will open where you can configure the auto-shutdown time. Select the On option to enable and then set a time that works for you.
  3. Once you have set the time, select Save at the top to enable your Auto-shutdown configuration.