Monday, 20 May 2024

Azure deployment slots auto swap


Azure deployment slots auto swap


In this video we will discuss how to auto swap deployment slots in azure.

azure app service auto swap

Auto swap allows us to deploy our app continuously with zero downtime. When auto swap is configured, for example, from staging to production deployment slot, everytime we push code in to staging slot, it is automatically swapped into the production slot without any manual intervention and that too after it is warmed up in the source slot. This means we are able to deploy with zero downtime.

azure web app auto swap

How to configure auto swap

  1. In the azure portal navigate to your App Service
  2. Click on Deployment slots. We want to configure auto swap from staging to production slot.
  3. Navigate to the source slot, in our case staging slot.
  4. Click onConfiguration and then General settings.
  5. Scroll down and look for Auto swap enabled and select On radio button.
  6. Select your target slot from the dropdownlist. In our case it is production.
  7. Don't forget to save the changes.

Impact of azure deployment slot swap on application configuration settings


Impact of azure deployment slot swap on application configuration settings


In our previous video, we discussed deployment slots, how to create and their use. In this video we will discuss what happens to application configuration settings such as a database connection string for example, when we swap deployment slots in azure. 

Deployment Slots - Default Behaviour

azure deployment slots configuration

Let's say we have two deployment slots - staging and production. Staging slot points to the staging database and production slot points to the production database. Now, let's say we make a change to our application code. We deploy the new version of the application on the staging slot. We do all our testing. If we are happy with the results, we promote the build to production. The way we do this in azure is by swapping the two slots - staging to production and production to staging. Upon swapping the slots, by default, along with the content, some application configuration settings like the database connection strings are also swapped. So this means, production slot is now pointing to the staging database and the staging slot is pointing to the production database. 

azure deployment slots swap

This is definitely not the behaviour we want. Even after the swap, production slot should be pointing to the production database and staging slot should be pointing to the staging database.

azure deployment slots swap database connection string

Deployment Slot Setting

We want the database connection string to stick with the slot. We do not want it to be swapped during the swap operation. So to make the database connection string or any application configuration stick with the slot 

  1. Navigate to either production or staging deployment slot
  2. Under Settings section, cick on the Configuration tab
  3. Click on the Edit icon to edit the database connection string
  4. Check the checkbox - Deployment slot setting

azure deployment slot setting

With this setting in place, database connection strings are not swapped when the slots are swapped. So staging slot will always point to the staging database and production slot will always point to the production database.

Azure deployment slots


Azure deployment slots


In this video we will discuss azure deployment slots.

What is Azure App Service

We discussed App Service and the benefits it provides in Part 18 of azure tutorial. It is a Platform as a Service (PaaS) and we use it to host web applications, REST API's and backend services for mobile applications. It offers several benefits

  • Scalability - both manual and auto-scaling
  • Standards compliance like ISO, SOC, PCI etc
  • Easy security implementation including support for external authentication providers like Google, Facebook, Twitter, or Microsoft.
  • Support for Containerization and Docker
  • DevOps optimization
  • Deployment slots

What are azure deployment slots

Azure deployment slots are very useful. They allow you to run multiple versions of your application code on the same infrastructure. Let's understand the use of deployment slots with an example. 

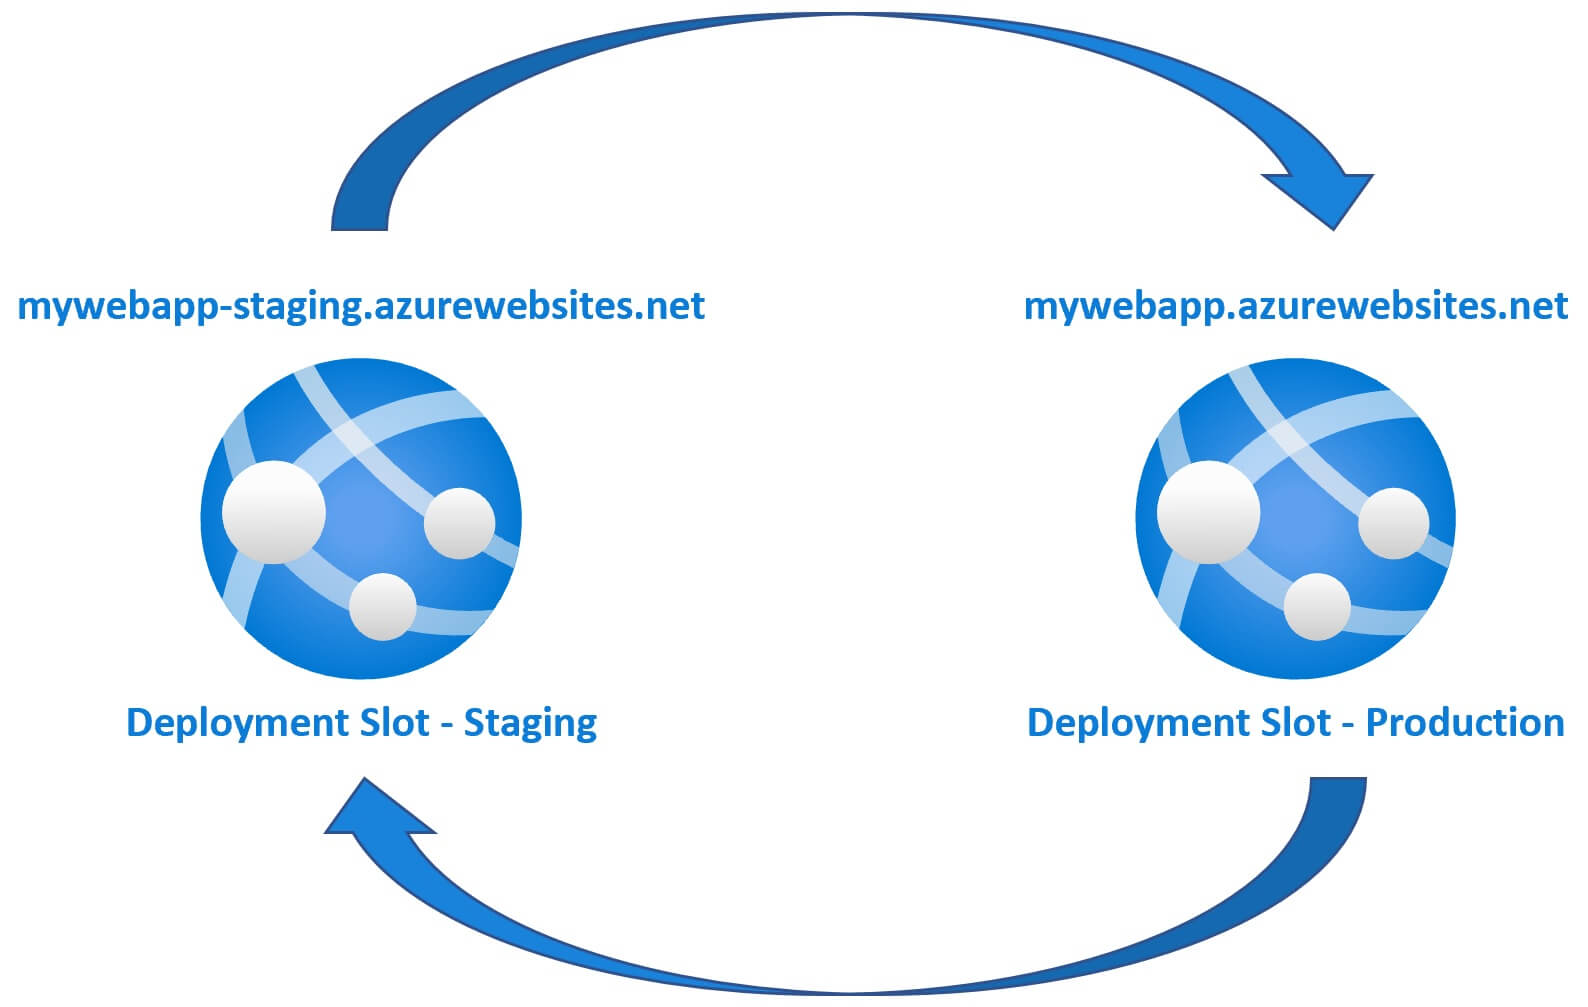
Let's say you have a web application (MyWebApp) deployed in azure. By default it gets the following URL. This is your production version of the application and your users are able to access and use it.

mywebapp.azurewebsites.net

Now, let's say you have to make a change to your application. Maybe, there is a bug that you are fixing or you are adding a new feature. The point is you are making a change to your application code and you want to test these changes in your production like environment. 

At this point, you might be wondering why can't we just test on our local machine. Why is there a need to test this changed version of the application on the same infrastructure as the production. Well, the simple answer is to test how your changed version of the application behaves on production environment. It's an opportunity for you to identify and fix any infrastructure or environment related issues.

We can create a deployment slot and deploy the changed version of our application. For example, if we name the deployment slot - staging, then we get the following URL.

mywebapp-staging.azurewebsites.net

How to create a deployment slot in azure

Not all azure app service plans support deployment slots. For example, the free app service plan does not support deployment slots. You have to upgrade to a standard or premium plan to add deployment slots. To see if your app service supports deployment slots, navigate to your app service in azure portal and click on Deployment Slots. If your current app service plan does not support deployment slots you will see the following screen.

azure deployment slots

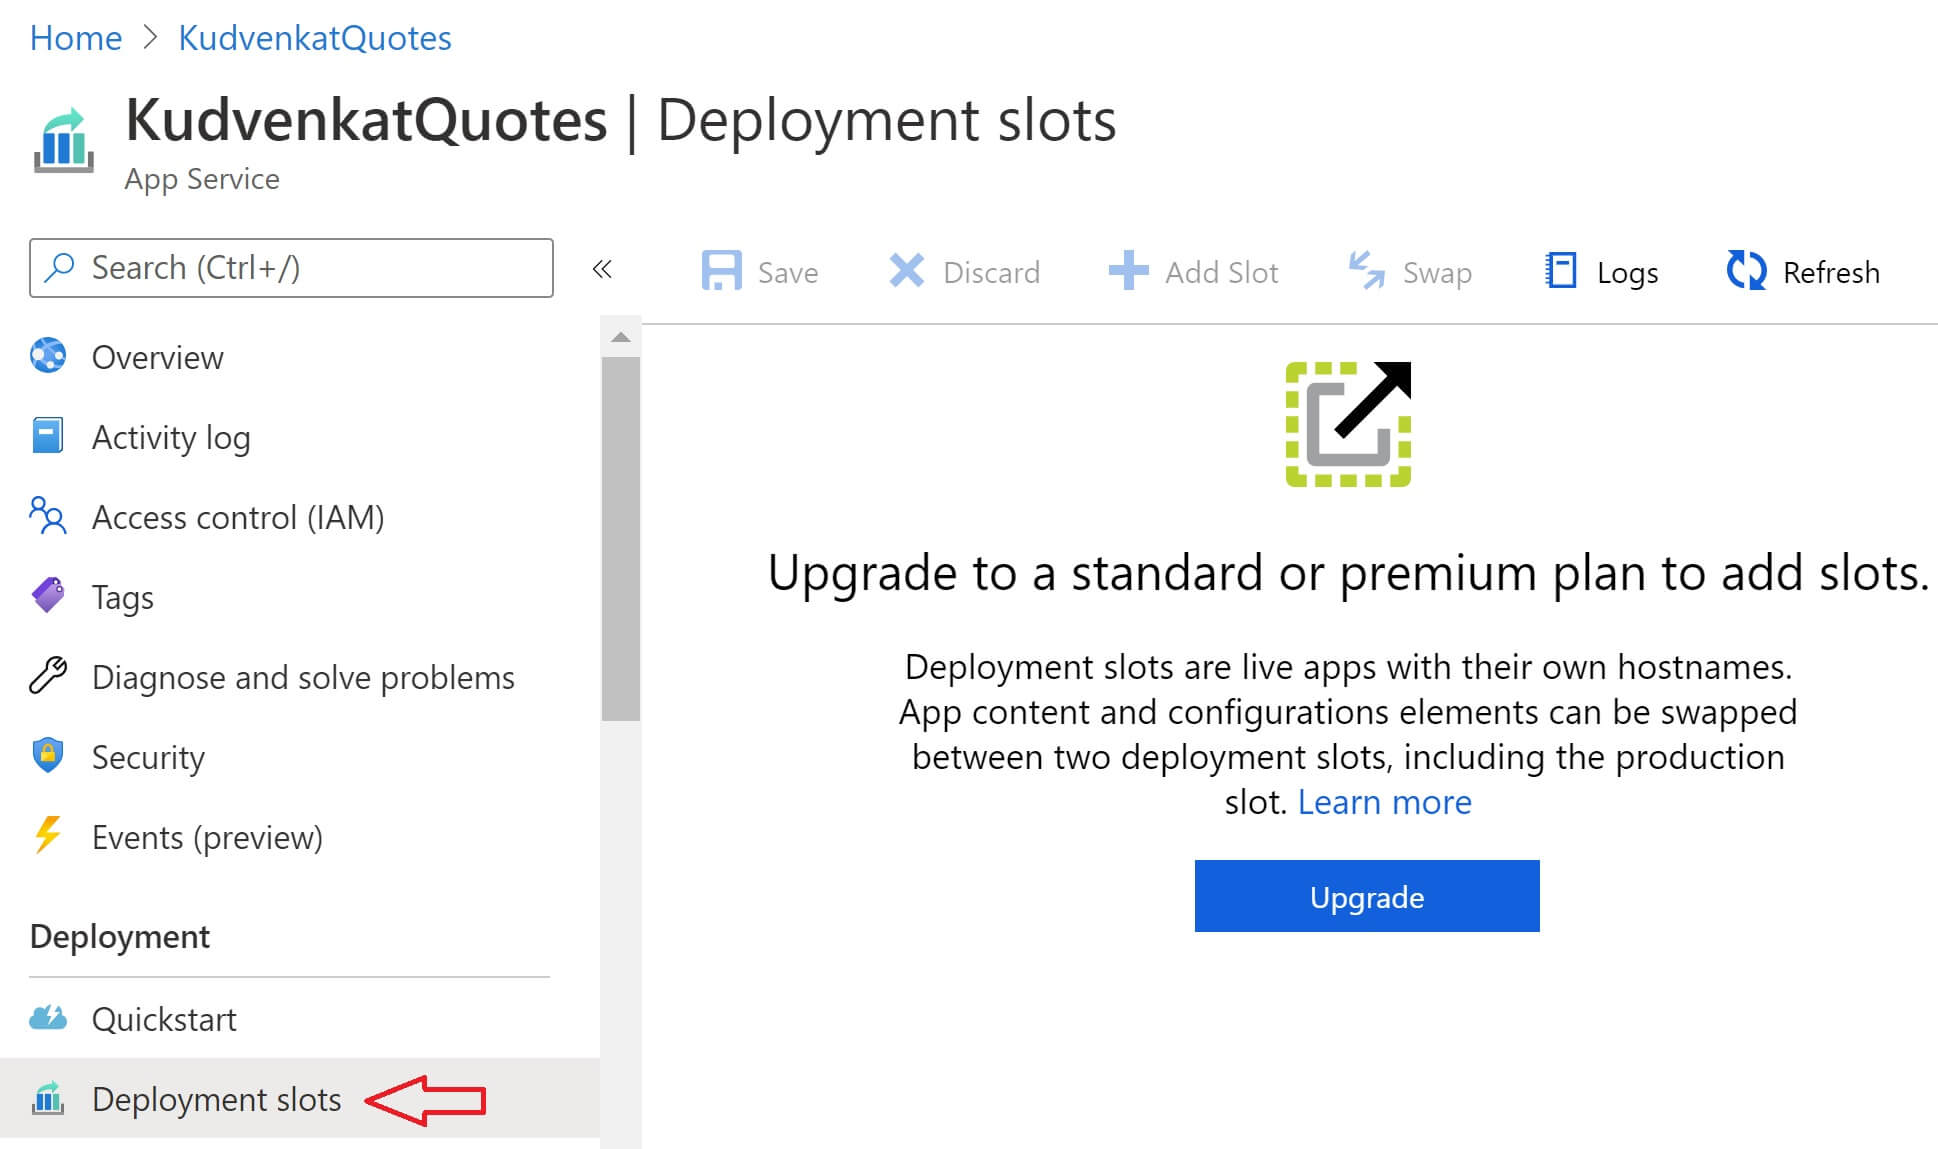
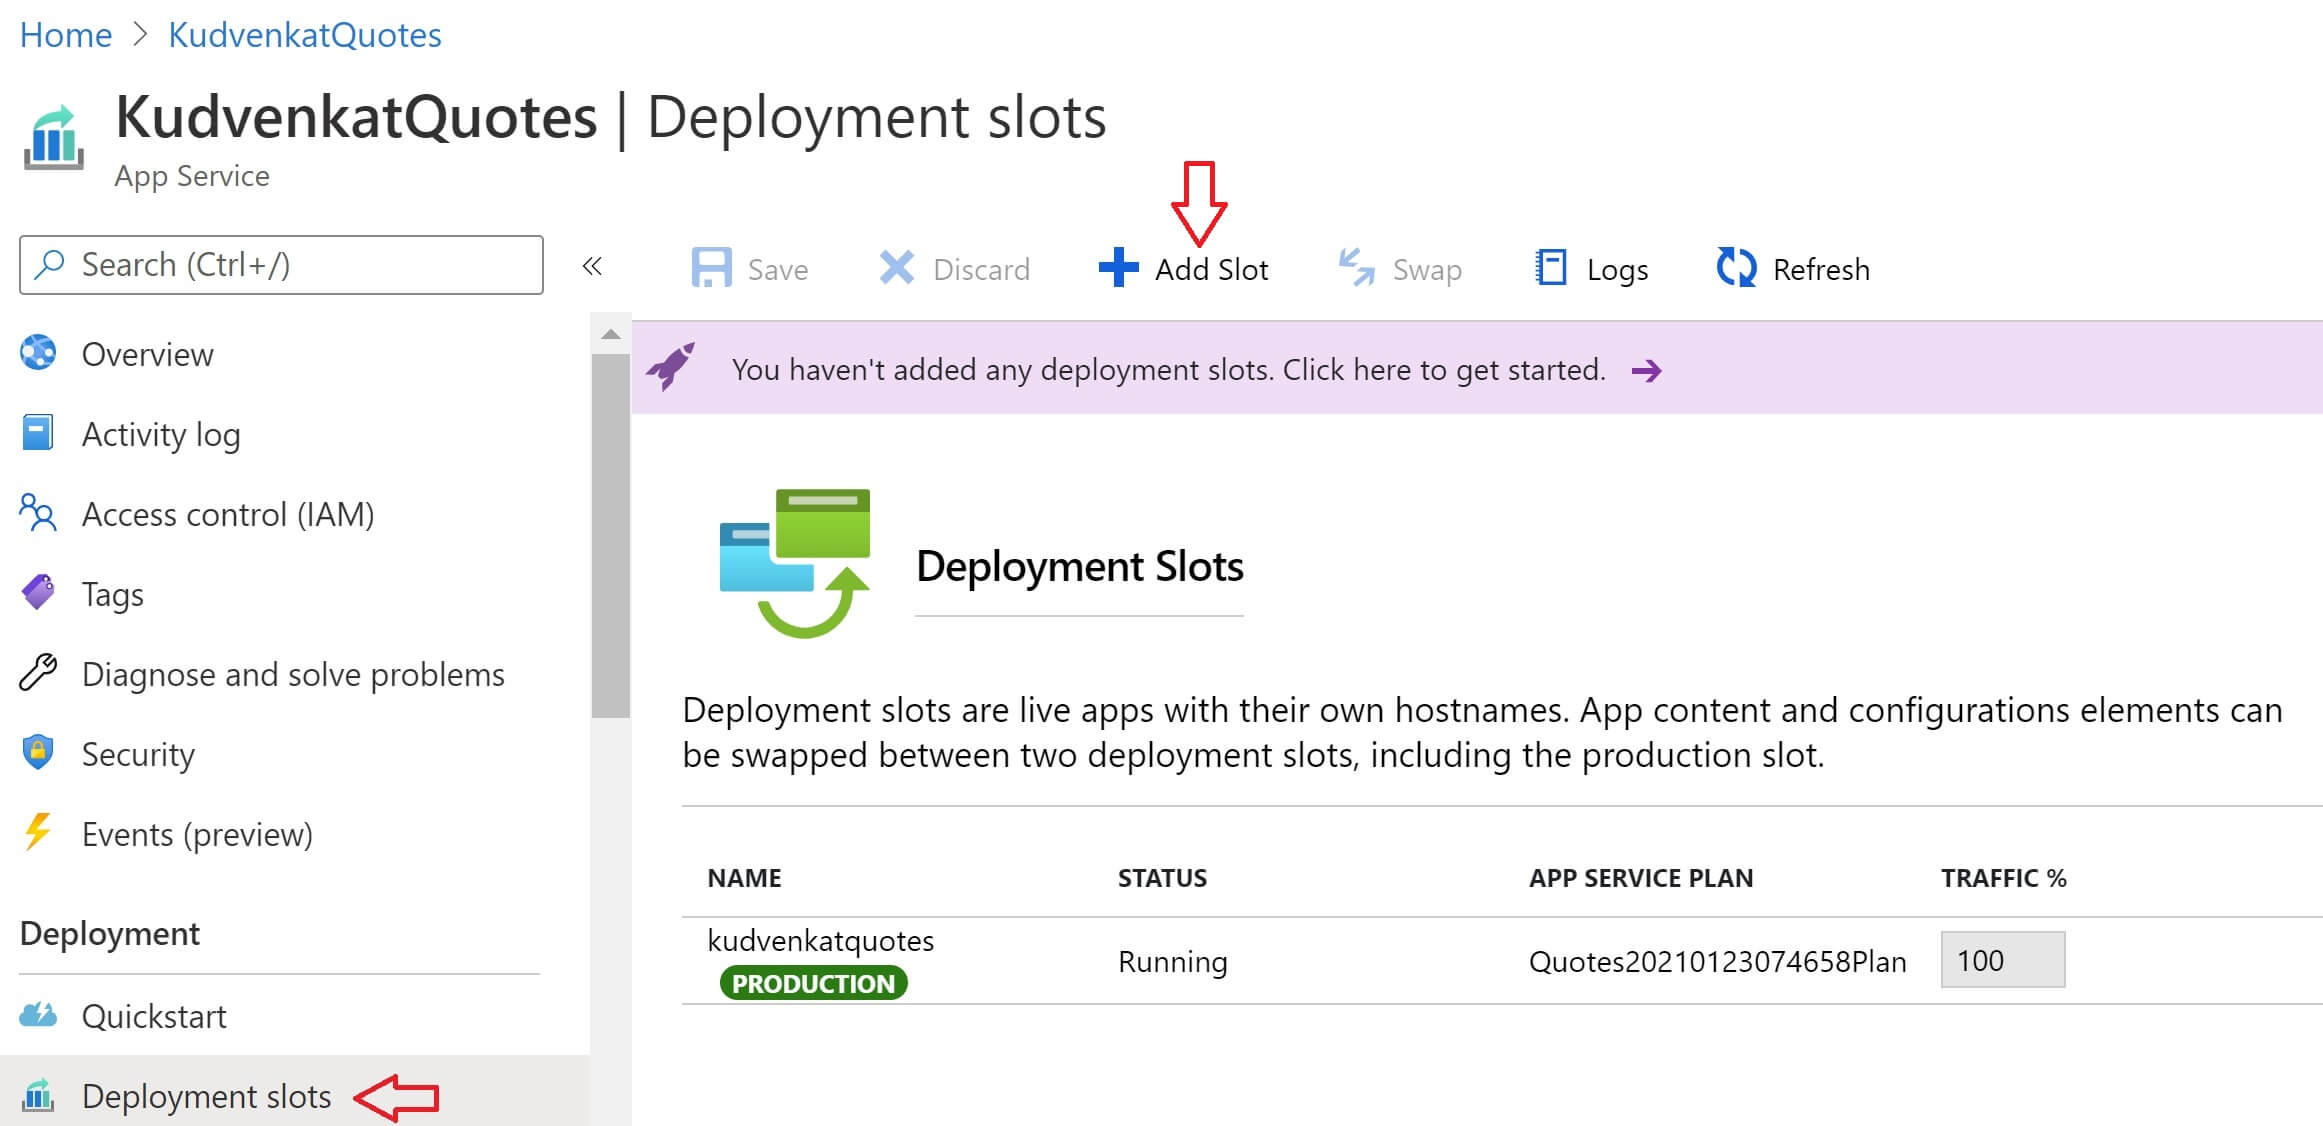
Click Upgrade button to upgrade to a plan that supports deployment slots. After you select a plan that supports deployment slots, navigate to your App Service and then click on Deployment Slots option. If your new plan supports deployment slots, you will see a screen similar to the one below. At the moment, we have only one deployment slot and it is the production slot. 100% of the traffic is going to this one production slot. To add a new deployment slot, click Add Slot button at the top.

azure app service deployment slots

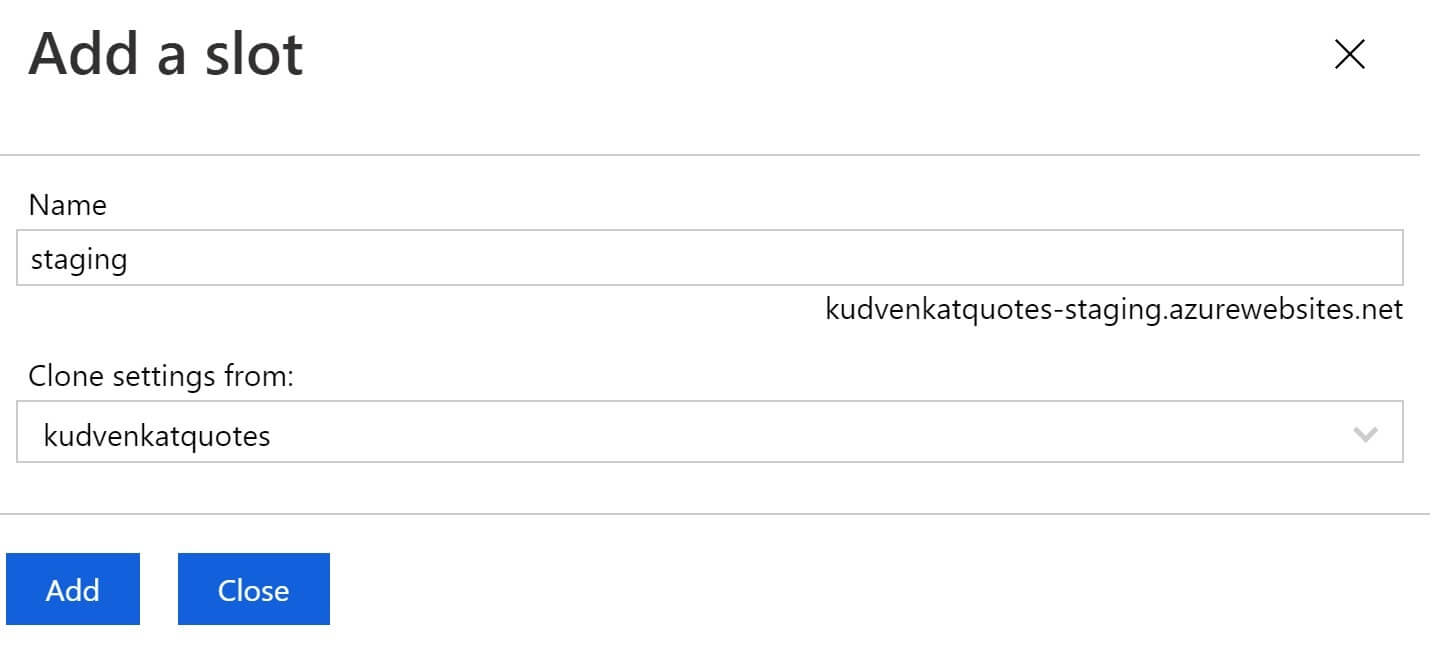
Provide name for the deployment slot. If the name is staging, azure generates the following URL. You can clone your application configuration settings from another already existing deployment slot if you want to. Click the Add button to add the new deployment slot.

kudvenkatquotes-staging.azurewebsites.net

azure app service slots

How to deploy code to a deployment slot in azure

In Visual Stduio, right click on the project name in the Solution Explorer and select Publish to get to the Publish window. This publish page allows you to create several Publish profiles. At the moment, I already have a Publish profile that allows me to deploy directly to the Production slot in azure.

We now have a staging slot in azure. So, create a new publish profile and publish to the staging slot. Click the New link button.

azure deploy to staging slot

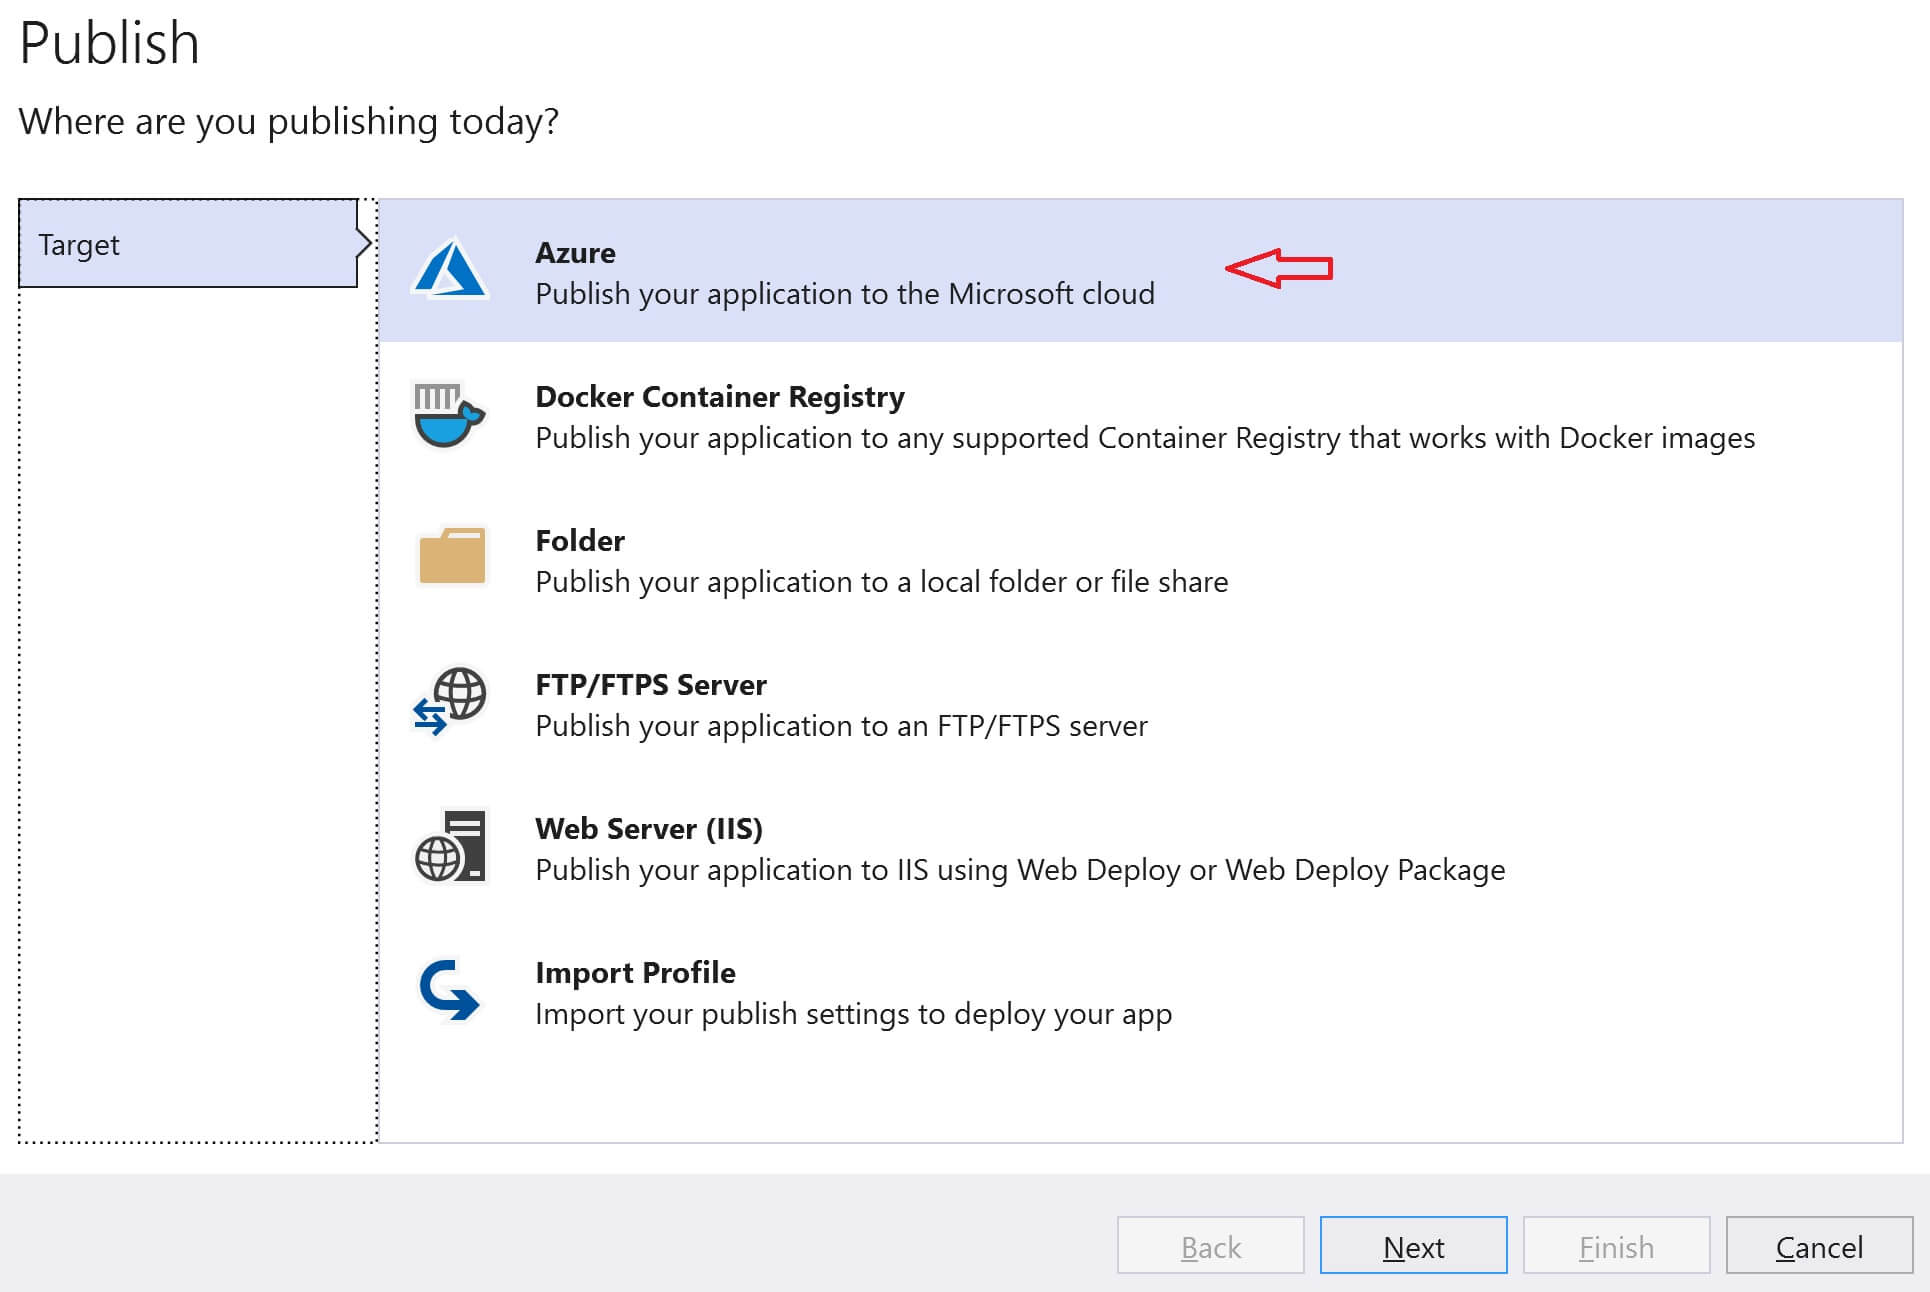
Select Azure and click Next.

publish to azure app service from visual studio

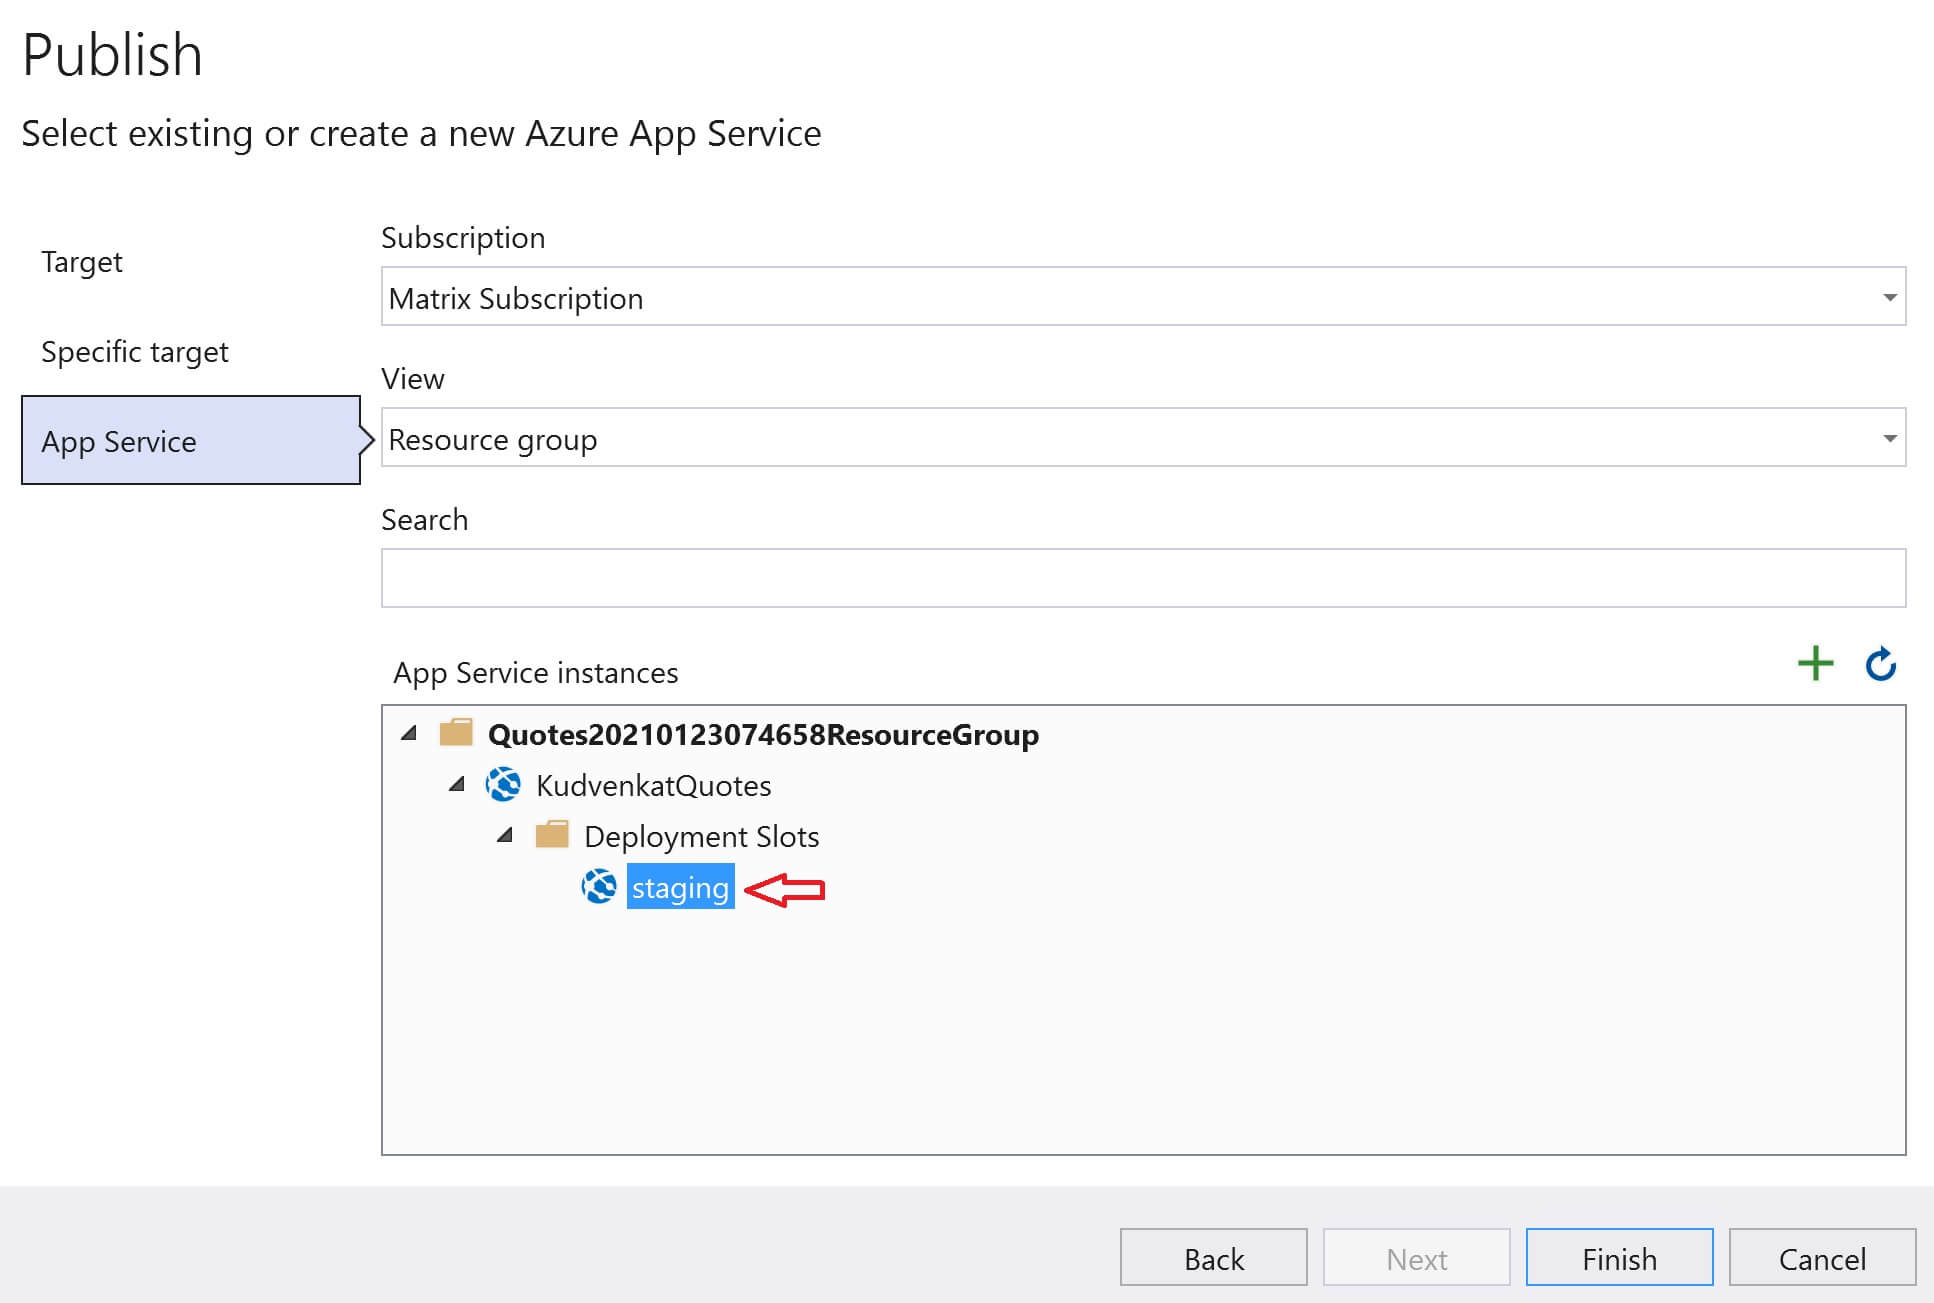
Select Azure App Service and click Next

deploy to azure staging slot from visual studio

Select Staging deployment slot and click Finish.

visual studio publish to azure staging slot

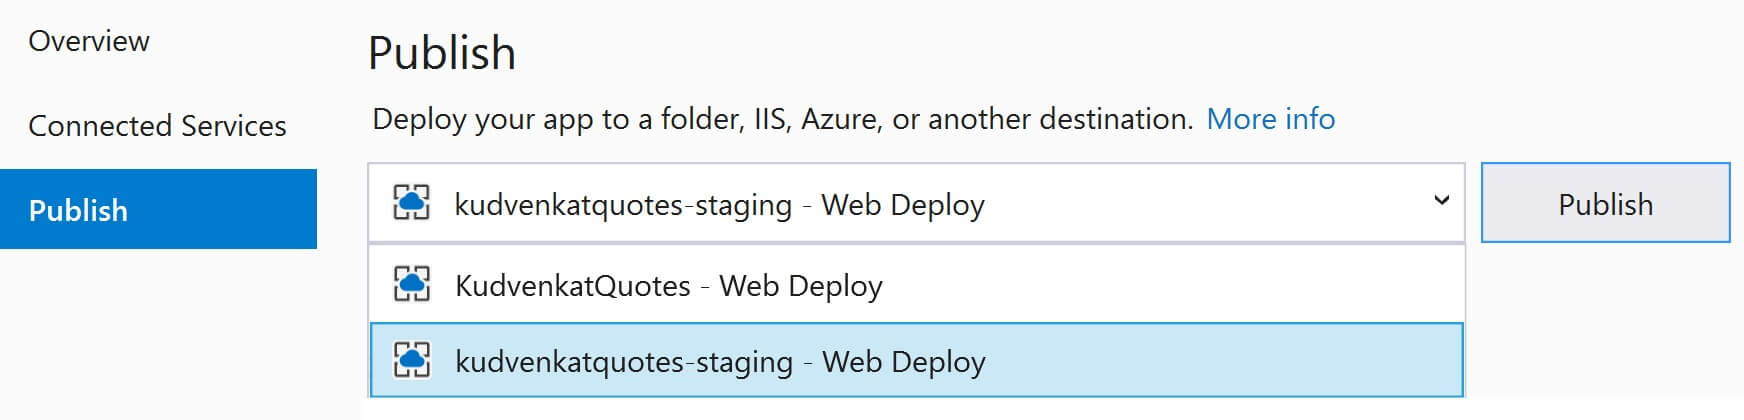
Finally, select the staging publish profile from the dropdownlist and click the Publish button to deploy the code to the Staging slot in Azure

visual studio publish profile

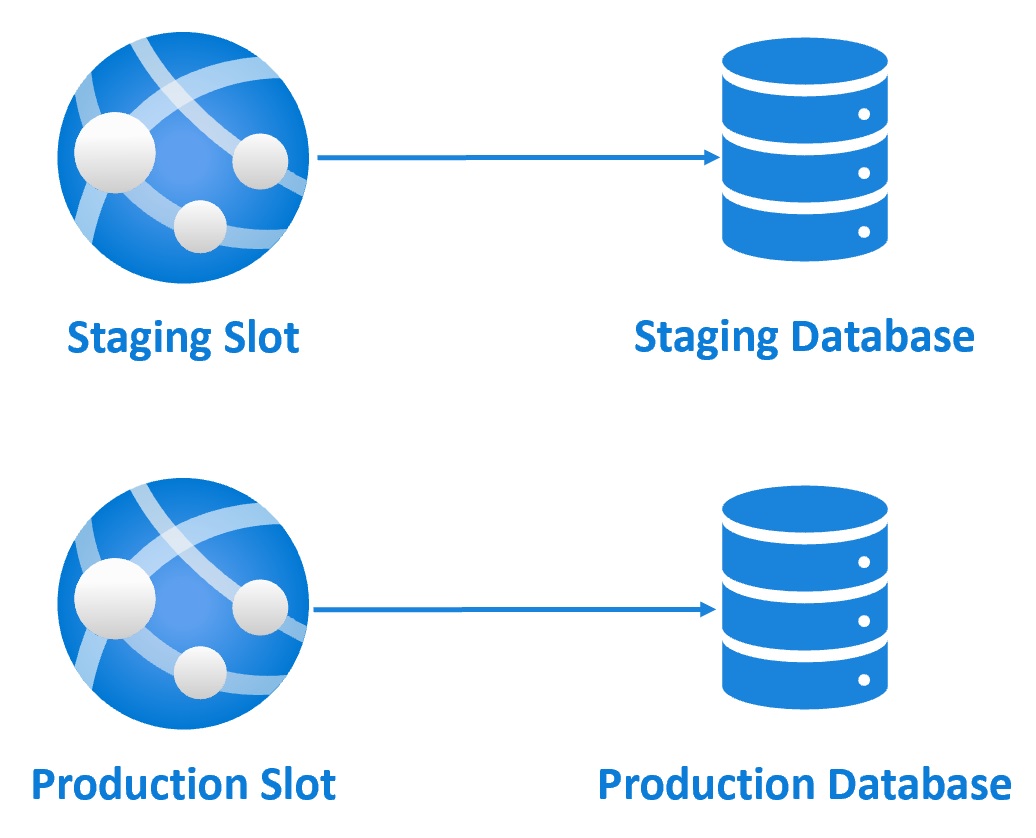
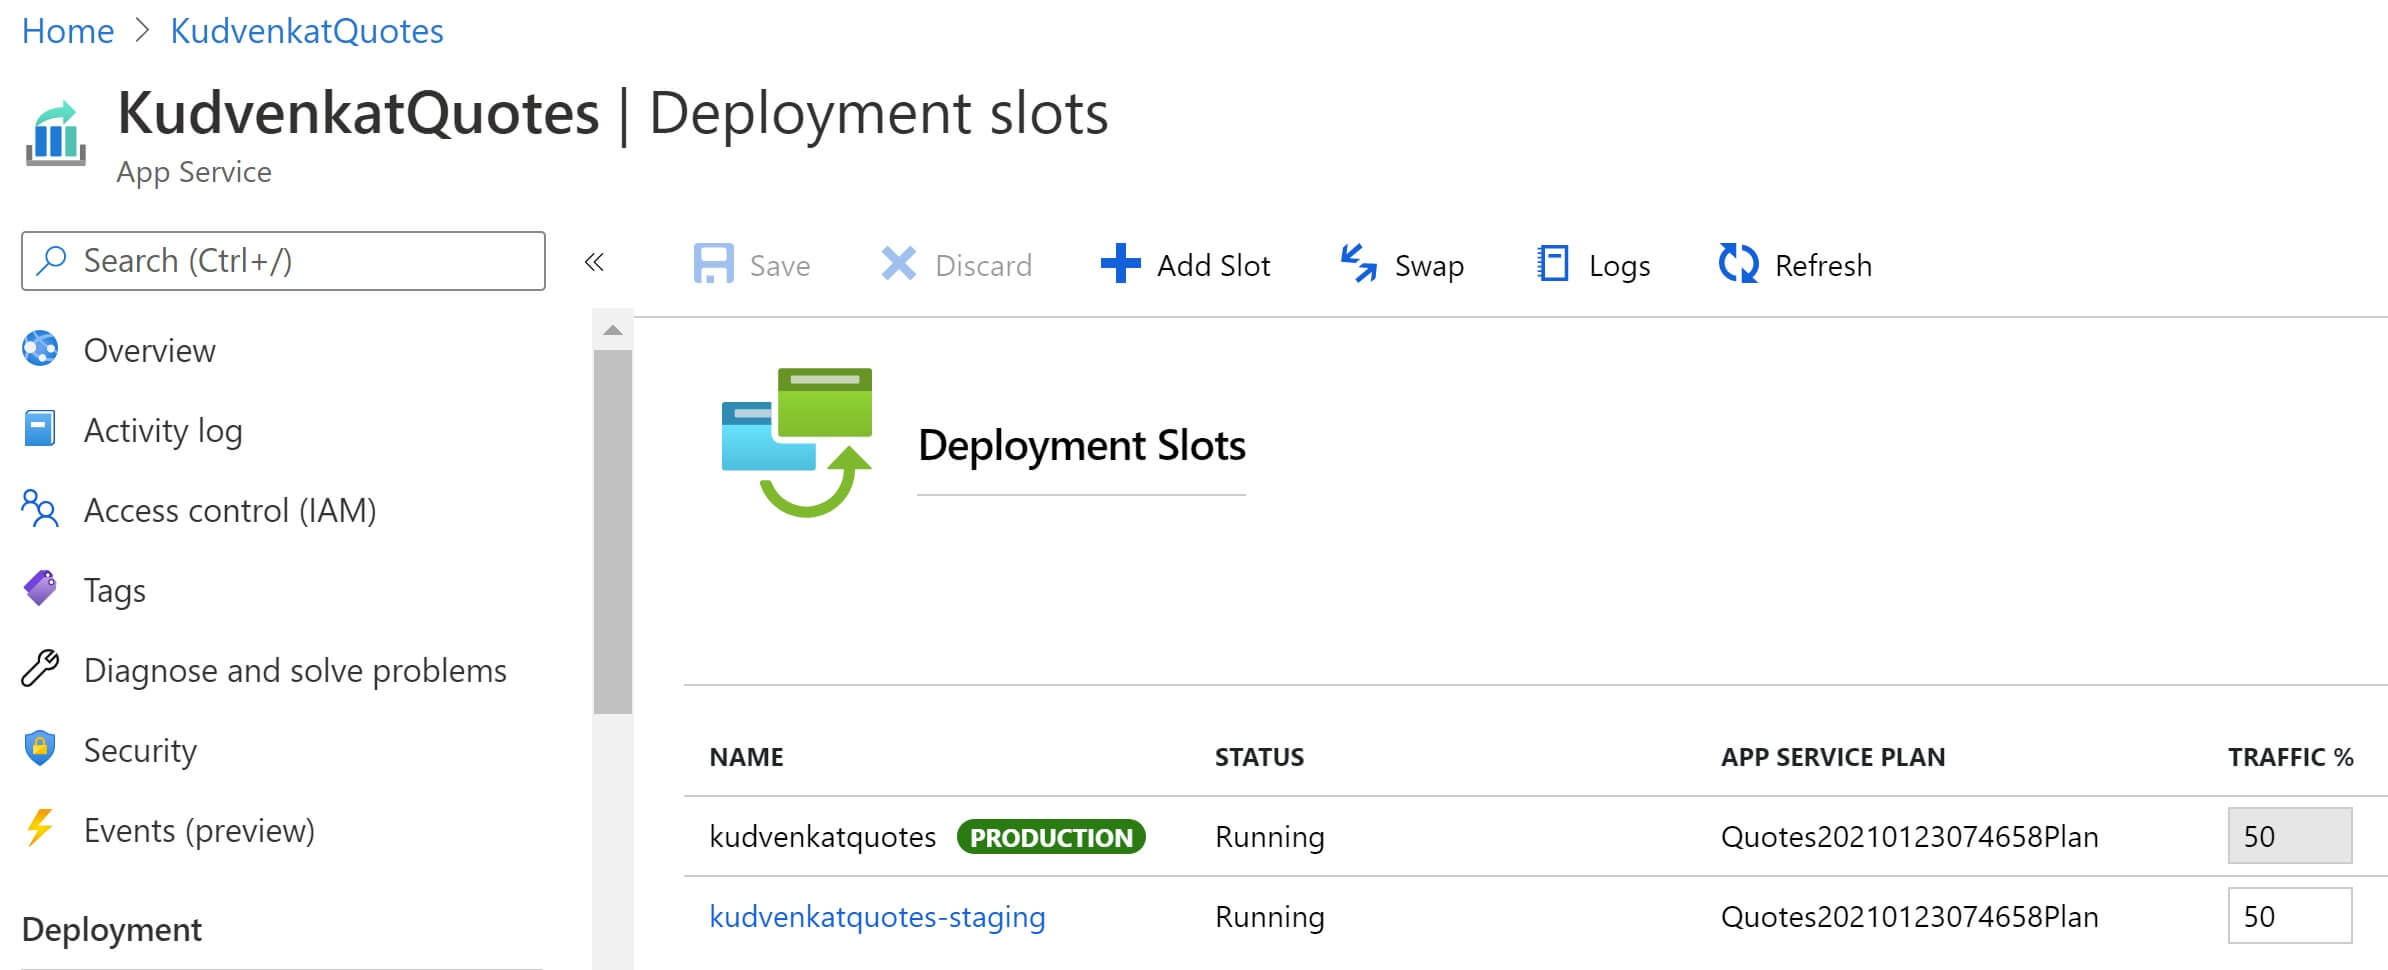
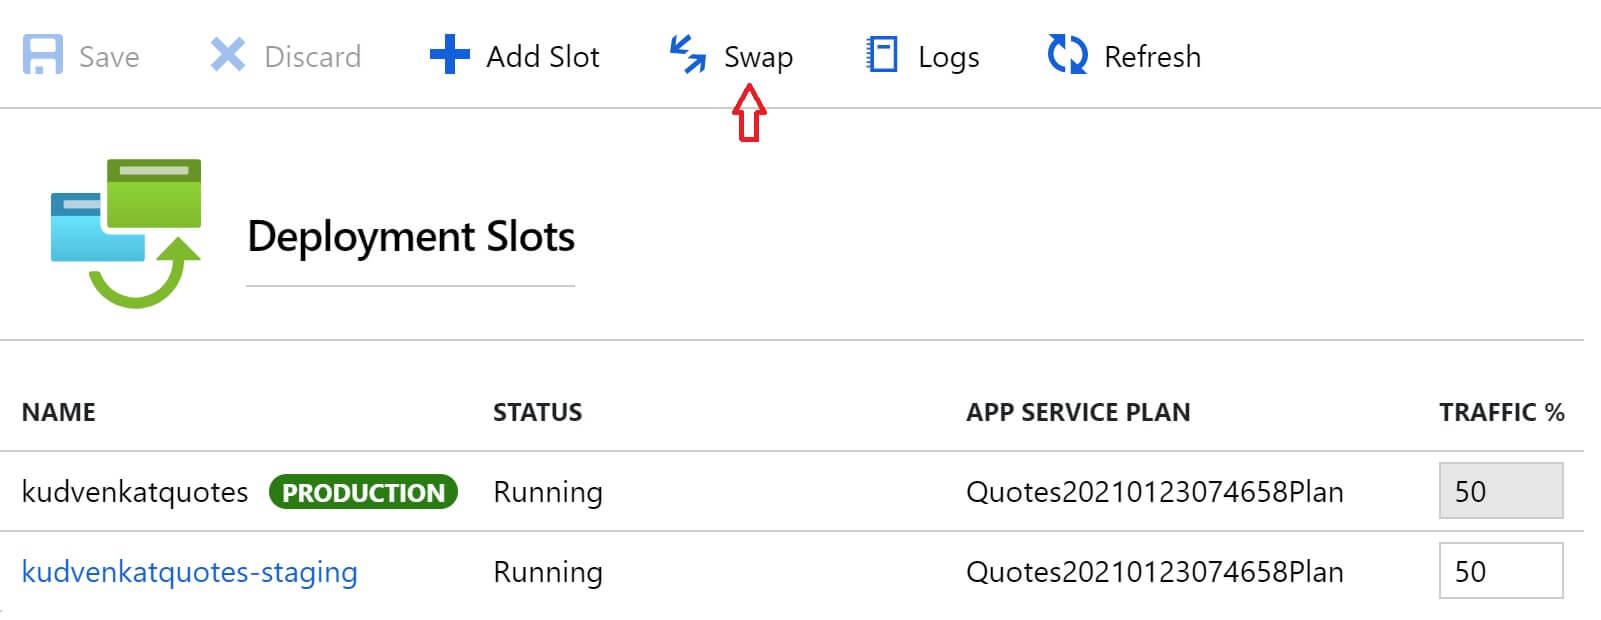
We now have 2 versions of our application code in azure. One version is the production version in the production slot and the second version is the staging version in the staging slot. You can even divert a percentage of your production traffic and see how your application behaves. You can configure to redirect a certain percentage of live traffic to the staging slot. You do this on the Deployment slots blade of your App Service instance in the azure portal. In the example below, 50% of the live traffic is being diverted to the staging slot.

divert live traffic to staging slot in azure

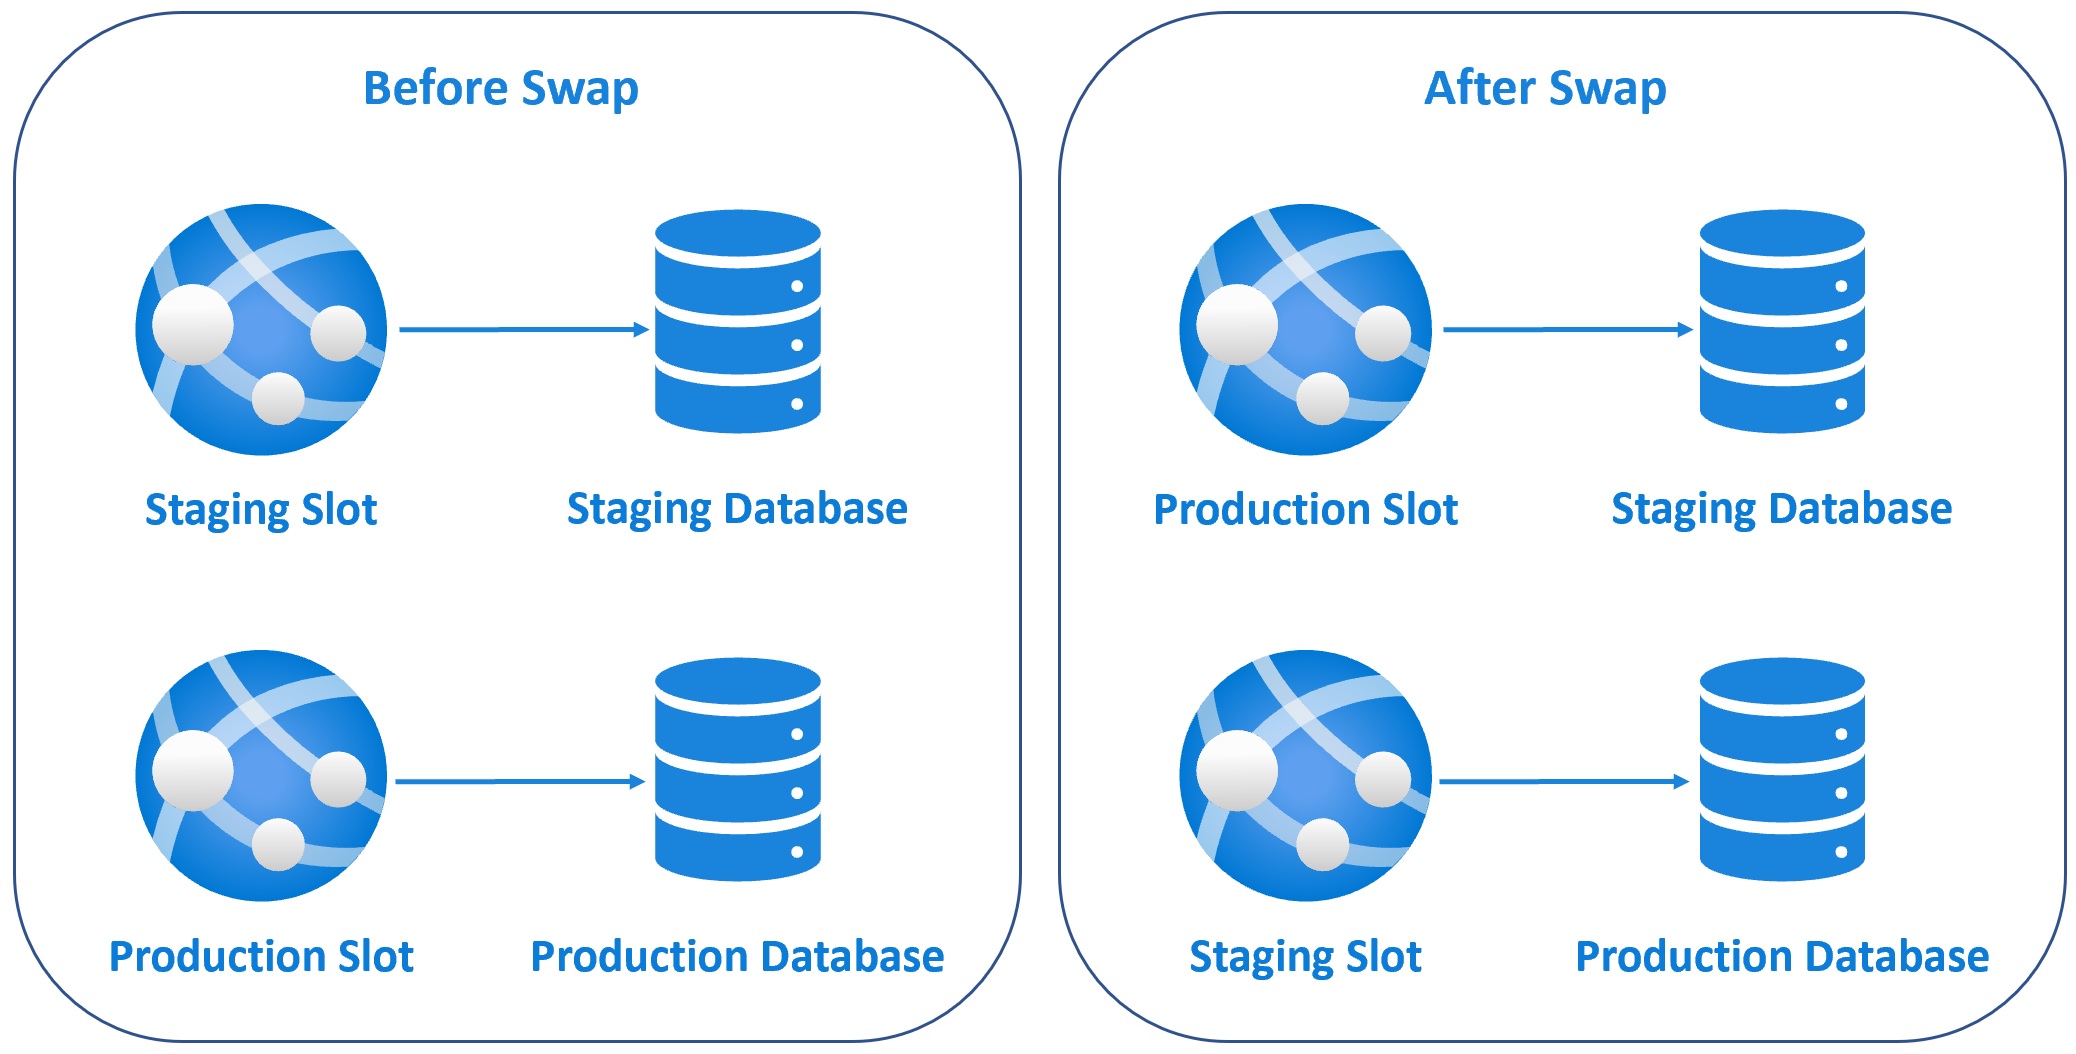
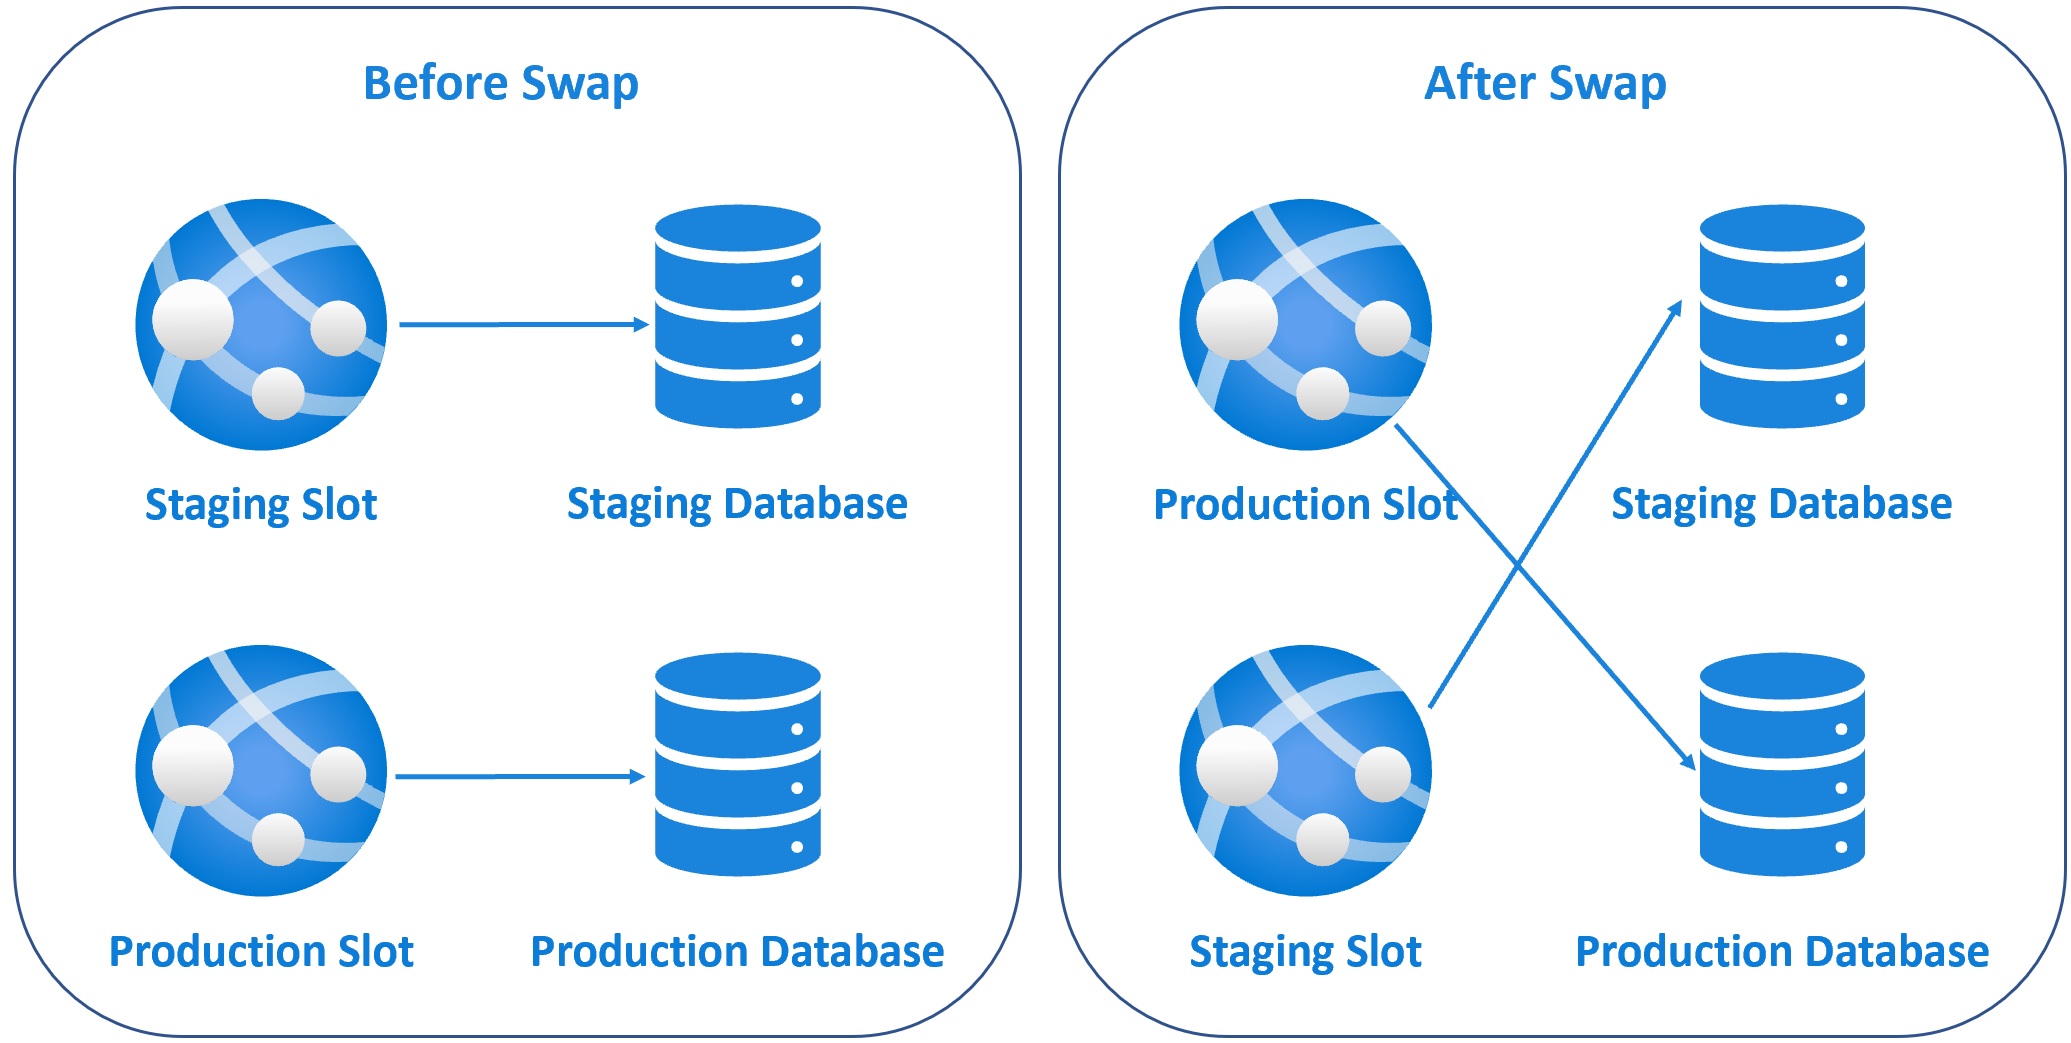
The new version of the app is now in the staging slot. It gives you an opportunity to test your application. If you are happy with the changes, you simply swap the staging deployment slot with the production deployment slot.

azure staging slots

To perform the swap operation, click the Swap link in the Azure portal.

azure swap deployment slotsSo your new version of the app is now in production and the version that was in production, is now in staging slot. The important point to keep in mind is, Azure warms up the production slot before the swap operation. So this means we get ZERO downtime deployments. How great is that? 

You can even undo the swap anytime you want. If for whatever reason, you change your mind and want to revert the deployment to a previous version, you can simply swap back again, staging to production and production to staging.

Azure deployment slots - Important points

  • With deployment slots you can run multiple versions of application code on the same infrastructure
  • Provides a great way to test your builds before promoting to production
  • By default you get one deployment slot - Production
  • You can create multiple deployment slots - Development, Staging, Testing etc
  • You can also route a percentage of live traffic to deployment slots other than production
  • Not all app service plans support deployment slots
  • Production deployment slot is automatically warmed up just before the swap operation
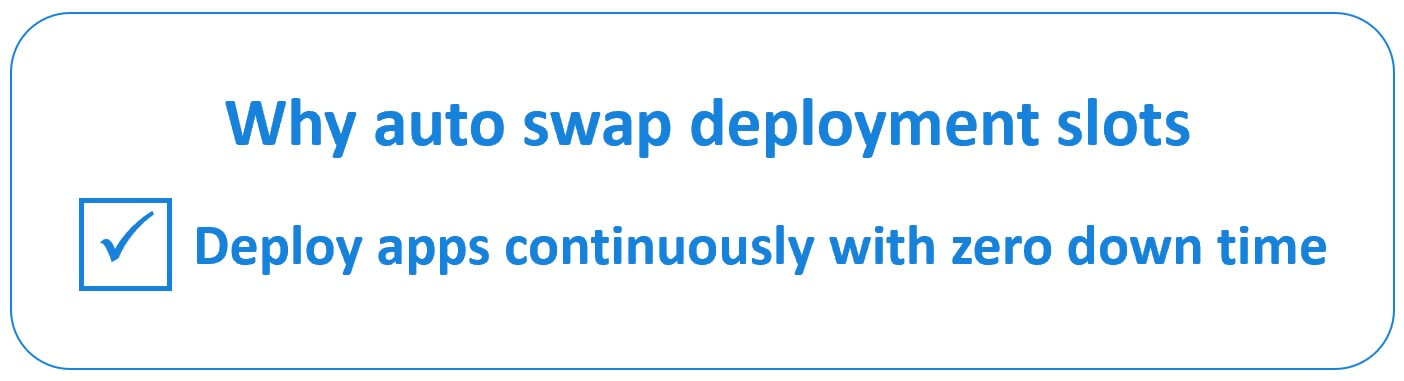
  • Zero downtime deployments
  • Traffic redirection is seamless and no requests are dropped because of swap operation
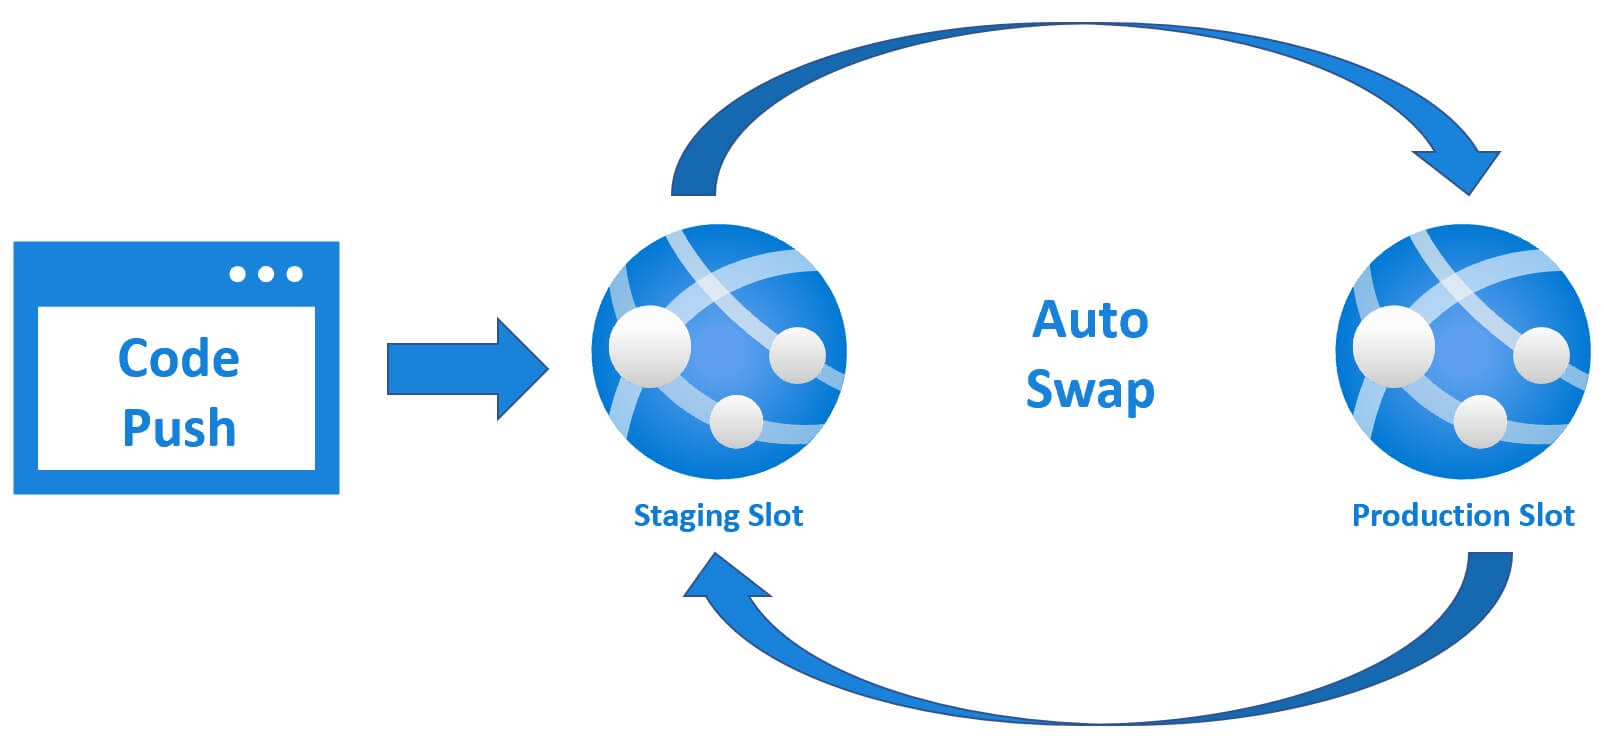
  • Swap manually through the azure portal or configure auto swap
  • You can rollback a swap

azure with code and database changes from your local machine


Update web application in azure with code and database changes from your local machine


In this video we will discuss how to push changes (i.e both code and database changes) and update web application that is already deployed in azure. To migrate local database changes to azure SQL database we use entity framework code first migrations.

Current state of the web application

If you have been following along this course. We have a web application that displays inspirational quotes as shown below.

random inspirational quotes

These quotes come from the following Quotes table.

sql database table example

At the moment, this app is already deployed in azure. We discussed how to do this in our previous videos in this series.

Changes being made on the local machine

Introduce Author column in the Quotes table and populate the values as shown below.

azure entity framework migrations

On the web page, along with the quote, the author name also must be displayed as shown below.

azure sql database entity framework code first

Changes on local development machine

Go to Package Manager Console (View - Other Windows - Package Manager Console) in Visual Studo and enable entity framework migrations using the following command.

Enable-Migrations

Add Author property to the Quote class

public class Quote
{
    public int Id { get; set; }
    public string QuoteText { get; set; }
    public string Author { get; set; }
}

Add a new migration using the following command. This creates the required code to add Author column to Quotes table.

Add-Migration Add_Quote_Author

In the Migrations folder, you will see a new file created (file name ends with Add_Quote_Author.cs). Modify this file to include values for the newly added author column as shown below.

namespace Quotes.Migrations
{
    using System;
    using System.Data.Entity.Migrations;
    
    public partial class Add_Quote_Author : DbMigration
    {
        public override void Up()
        {
            AddColumn("dbo.Quotes", "Author", c => c.String());

            System.Text.StringBuilder sbQuery = new System.Text.StringBuilder();
            sbQuery.Append("Update Quotes Set Author='Albert Einstein' Where Id = 1;");
            sbQuery.Append("Update Quotes Set Author='Billie Jean King' Where Id = 2;");
            sbQuery.Append("Update Quotes Set Author='Chinese Proverb' Where Id = 3;");
            sbQuery.Append("Update Quotes Set Author='Ralph Waldo Emerson' Where Id = 4;");
            sbQuery.Append("Update Quotes Set Author='Ralph Waldo Emerson' Where Id = 5;");

            Sql(sbQuery.ToString());
        }

        public override void Down()
        {
            DropColumn("dbo.Quotes", "Author");
        }
    }
}

Execute the following command to apply this migration to the database

Update-Database

Modify default.aspx to display Author name as shown below.

<div style="padding-top: 20px">
    <asp:Repeater ID="repeaterQuotes" runat="server">
        <ItemTemplate>
            <div class="alert alert-success" role="alert">
                <h3><%#Eval("QuoteText") %></h3>
                <p style="text-align: right; font-style: italic">
                    - <%#Eval("Author") %>
                </p>
            </div>
        </ItemTemplate>
        <AlternatingItemTemplate>
            <div class="alert alert-danger" role="alert">
                <h3><%#Eval("QuoteText") %></h3>
                <p style="text-align: right; font-style: italic">
                    - <%#Eval("Author") %>
                </p>
            </div>
        </AlternatingItemTemplate>
    </asp:Repeater>
</div>

Run the app locally and you should see the author name along with the quote itself.

How to access azure sql database from local machine


How to access azure sql database from local machine


In this video, we will discuss how to connect and access azure SQL database from your local machine using SQL Server Management Studio or Visual Studio. 

SSMS cannot connect to azure sql database

By default you cannot connect to azure SQL database from your local machine. It doesn't matter whether you are using 

  1. SQL Server Management Studio (SSMS)
  2. Visual Studio or
  3. Some other client tool

By default, the connection to azure SQL database will be blocked and you will see the following error message.

Your client IP address does not have access to the server azure. Sign in to an Azure account and create a new firewall rule to enable access.

Azure SQL database add firewall rule

Log into azure portal and navigate to your SQL Server instance.

Click on Firewalls and virtual networks under Security

azure sql database add firewall rule

The IP address of the machine from which you are trying to access azure sql database is displayed as client IP address

Click Add client IP button and then Save

connect to azure sql database from ssms

Connect to azure sql database from SSMS

You should now be able to connect to azure sql database from your local machine using SQL Server Management Studio (SSMS). Make sure you provide the complete name of your SQL Server. You can find this in the azure portal on your SQL Server instance Overview blade

azure sql server fully qualified domain name

Connect to azure sql database from visual studio

To connect to azure sql database from visual studio, use SQL Server Object Explorer. To get to it, click on View -> SQL Server Object Explorer

connect to azure sql database from visual studio 2019

Click on Add SQL Server icon.

visual studio 2019 connect to azure sql database

Expand Azure node. You will see all databases in Azure. 

Click on the Azure database you want to connect.

Fill in the detaila (Server name, Authentication, Username and Password)

Click Connect

visual studio connect to sql server azure