Monday, 20 May 2024

Database and Entity Framework to Azure


Deploy ASP.NET Web Application with SQL Database and Entity Framework to Azure


In this video we will discuss, how to deploy ASP.NET Web Application with SQL Server Database and Entity Framework to Azure.

You can download "Quotes" sample project from the following link. Please download Quotes.zip file.
https://drive.google.com/drive/folders/1z49q-8xkKu8N8VjdemYKTs_4IbzBeLWM

In Part 21 of this video series we discussed how to deploy ASP.NET Web Application that does not use a database to Azure. This is a one step process. Using visual studio Publish feature, we create an App Service and App Service Plan in Azure and then hit the Publish button to have our code deployed in azure. With just a few clicks, in just a few minutes we have our app up and running in azure.

Video | Text Article

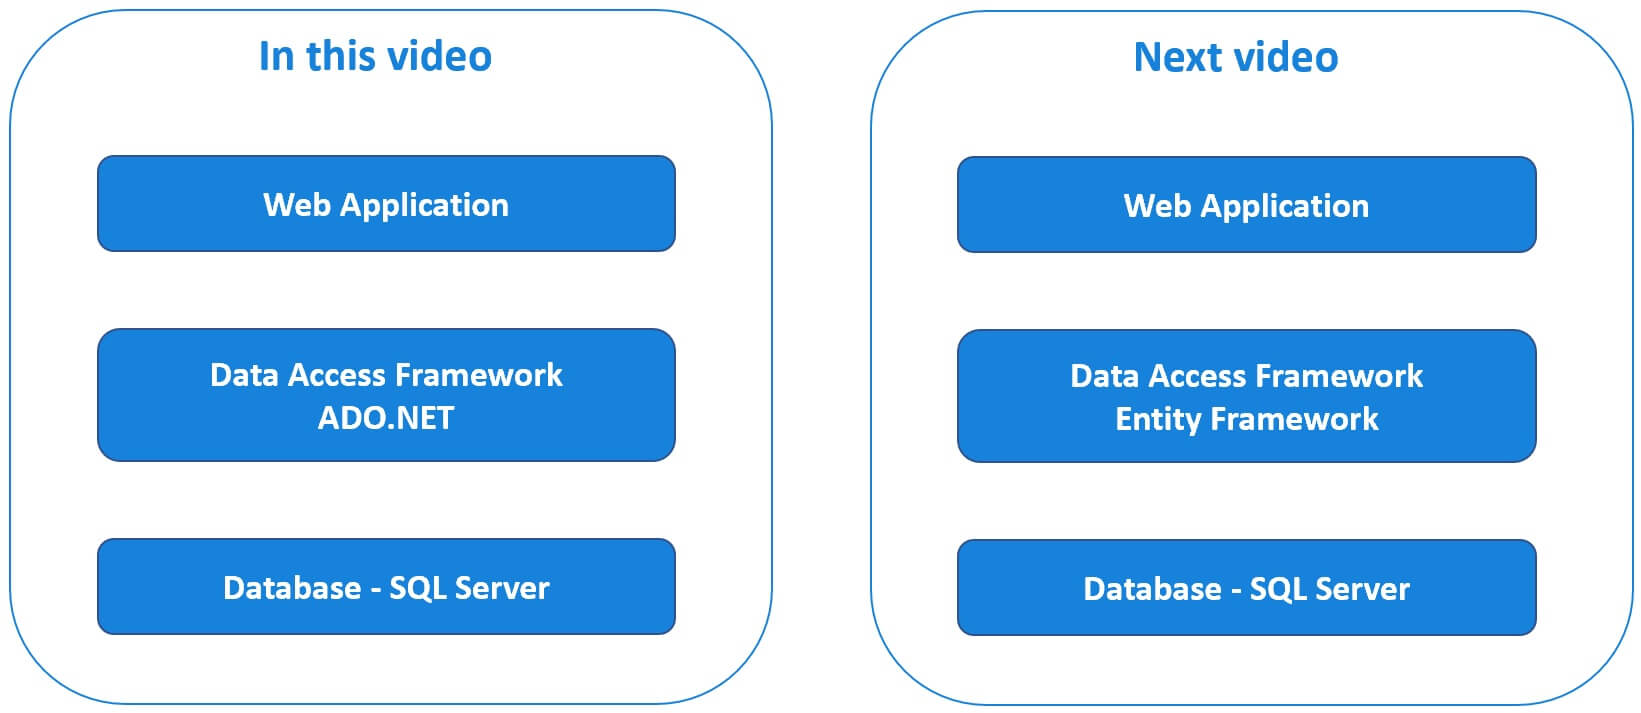
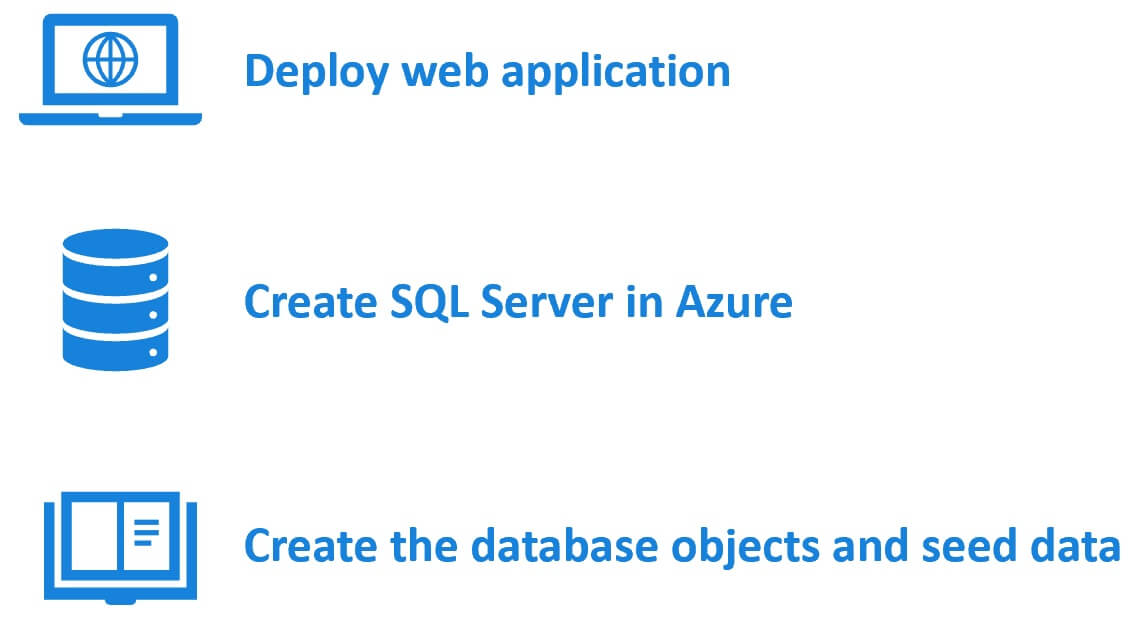
In Part 22 of this video series we discussed how to deploy ASP.NET Web Application that uses SQL Server database and ADO.NET as the data access framework. This is a 3 step process. First, deploy the web application itself. Second, create SQL Server and the database. Finally create the database objects like tables, views, stored procedure etc and seed the database tables with initial application data.

Video | Text Article

In this video we will discuss, how to deploy ASP.NET Web Application with SQL Server Database and Entity Framework as the data access framework to Azure. The following application retrieves and displays inspiration quotes from a sql server database. 
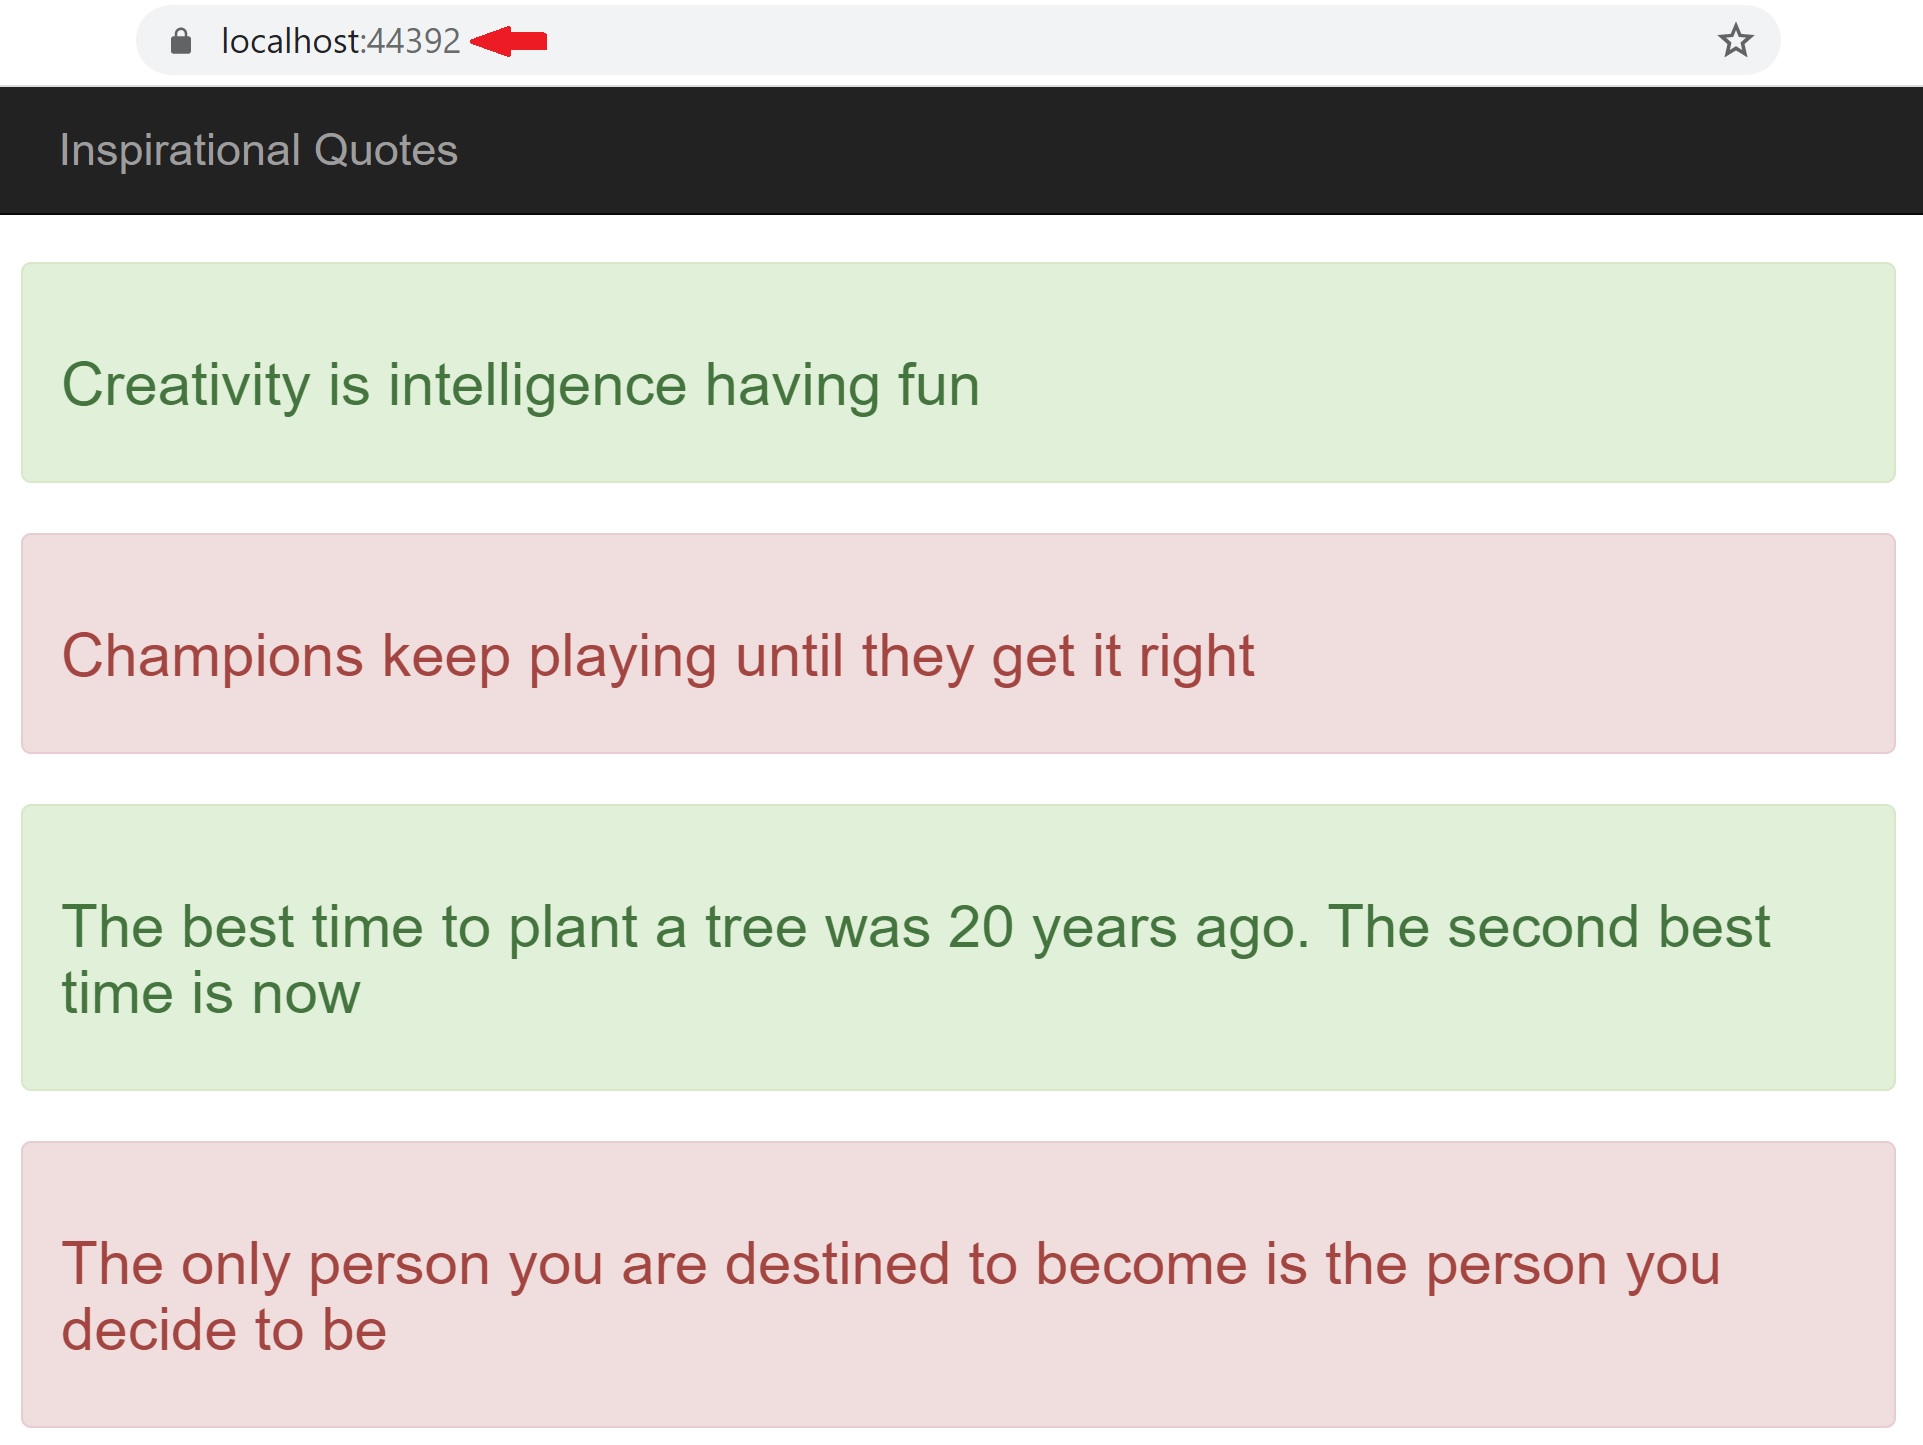
deploy data driven asp.net web application to azure

We are using entity framework as the data access framework. If you are new to entity framework, please check out our Entity Framework tutorial. At the moment, as you can see from the URL, this app is running on my local development machine.

This is a very simple application. The following are the steps to follow, if you want to create the same application. I am using Visual Studio 2019.

Create a new ASP.NET Web Forms application. Name it Quotes.

Connection String in Web.config

In web.config file include the following database connection string. As you can see from the connection string in web.config file, I am using SQL Server localDB on my local machine which is free. You can use a full blown sql server if you want. The process is still the same.

<connectionStrings>
  <add name="QuoteDBContext" 
        connectionString="Data Source=(localdb)\MSSQLLocalDB;Initial Catalog=QuotesDB;Integrated Security=True;Connect Timeout=30;Encrypt=False;TrustServerCertificate=False;ApplicationIntent=ReadWrite;MultiSubnetFailover=False" 
        providerName="System.Data.SqlClient"/>
</connectionStrings>

Quote Class

Add Quote.cs class file to the project and include the following code.

namespace Quotes
{
    public class Quote
    {
        public int Id { get; set; }
        public string QuoteText { get; set; }
    }
}

QuoteDBContext class

Add QuoteDBContext.cs class file to the project and include the following code.

using System.Data.Entity;

namespace Quotes
{
    public class QuoteDBContext : DbContext
    {
        public DbSet<Quote> Quotes { get; set; }
    }
}

QuoteRepository class

Add QuoteRepository.cs class file to the project and include the following code.

using System.Collections.Generic;
using System.Linq;

namespace Quotes
{
    public class QuoteRepository
    {
        public List<Quote> GetQuotes()
        {
            QuoteDBContext quoteDBContext = new QuoteDBContext();
            return quoteDBContext.Quotes.ToList();
        }
    }
}

QuoteDBContextSeeder class

Add QuoteDBContextSeeder.cs class file to the project and include the following code.

using System.Data.Entity;

namespace Quotes
{
    public class QuoteDBContextSeeder : DropCreateDatabaseIfModelChanges<QuoteDBContext>
    {
        protected override void Seed(QuoteDBContext context)
        {
            Quote q1 = new Quote()
            {
                Id = 1,
                QuoteText = "Creativity is intelligence having fun"
            };

            Quote q2 = new Quote()
            {
                Id = 2,
                QuoteText = "Champions keep playing until they get it right"
            };

            Quote q3 = new Quote()
            {
                Id = 3,
                QuoteText = "The best time to plant a tree was 20 years ago. The second best time is now"
            };

            Quote q4 = new Quote()
            {
                Id = 4,
                QuoteText = "The only person you are destined to become is the person you decide to be"
            };

            Quote q5 = new Quote()
            {
                Id = 5,
                QuoteText = "Believe you can and you’re halfway there"
            };

            context.Quotes.Add(q1);
            context.Quotes.Add(q2);
            context.Quotes.Add(q3);
            context.Quotes.Add(q4);
            context.Quotes.Add(q5);

            base.Seed(context);
        }
    }
}

Global.asax.cs

In Application_Start() method, call Database.SetInitializer() method as shown below.

using System;
using System.Data.Entity;
using System.Web;
using System.Web.Optimization;
using System.Web.Routing;

namespace Quotes
{
    public class Global : HttpApplication   
    {
        void Application_Start(object sender, EventArgs e)
        {
            // Code that runs on application startup
            RouteConfig.RegisterRoutes(RouteTable.Routes);
            BundleConfig.RegisterBundles(BundleTable.Bundles);

            Database.SetInitializer(new QuoteDBContextSeeder());
        }
    }
}

Default.aspx

<%@ Page Title="Home Page" MasterPageFile="~/Site.Master" AutoEventWireup="true" 
    Language="C#" CodeBehind="Default.aspx.cs" Inherits="Quotes._Default" %>

<asp:Content ID="BodyContent" ContentPlaceHolderID="MainContent" runat="server">
    <div style="padding-top: 20px">
        <asp:Repeater ID="repeaterQuotes" runat="server">
            <ItemTemplate>
                <div class="alert alert-success" role="alert">
                    <h3><%#Eval("QuoteText") %></h3>
                </div>
            </ItemTemplate>
            <AlternatingItemTemplate>
                <div class="alert alert-danger" role="alert">
                    <h3><%#Eval("QuoteText") %></h3>
                </div>
            </AlternatingItemTemplate>
        </asp:Repeater>
    </div>
</asp:Content>

Default.aspx.cs

using System;
using System.Web.UI;

namespace Quotes
{
    public partial class _Default : Page
    {
        protected void Page_Load(object sender, EventArgs e)
        {
            QuoteRepository quoteRepository = new QuoteRepository();
            
            repeaterQuotes.DataSource = quoteRepository.GetQuotes();
            repeaterQuotes.DataBind();
        }
    }
}

Deploying this application to azure is a 2 step process. First, deploy the web application itself. We discussed how to do this in detail in Part 21 of this video series. Next, create SQL Server and the database in azure. We can very easily achieve this using visual studio publish feature. The following are the steps.

Step 2 : Create SQL Server in Azure

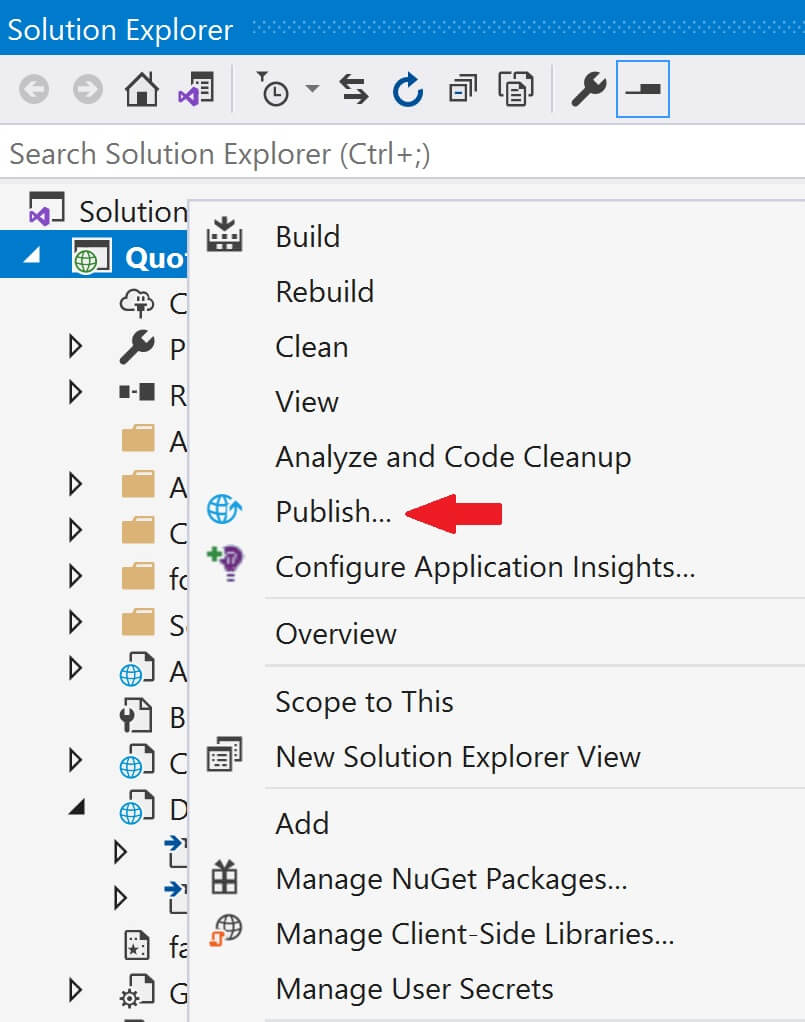
There are several ways to do this. We can do it directly in the azure portal or through visual studio. For this example, let's do it through Visual Stduio. Go to the Publish page in Visual Studio. To do this, right click on the web application project in Visual Studion and select Publish from the context menu.
deploy web app with database in azure

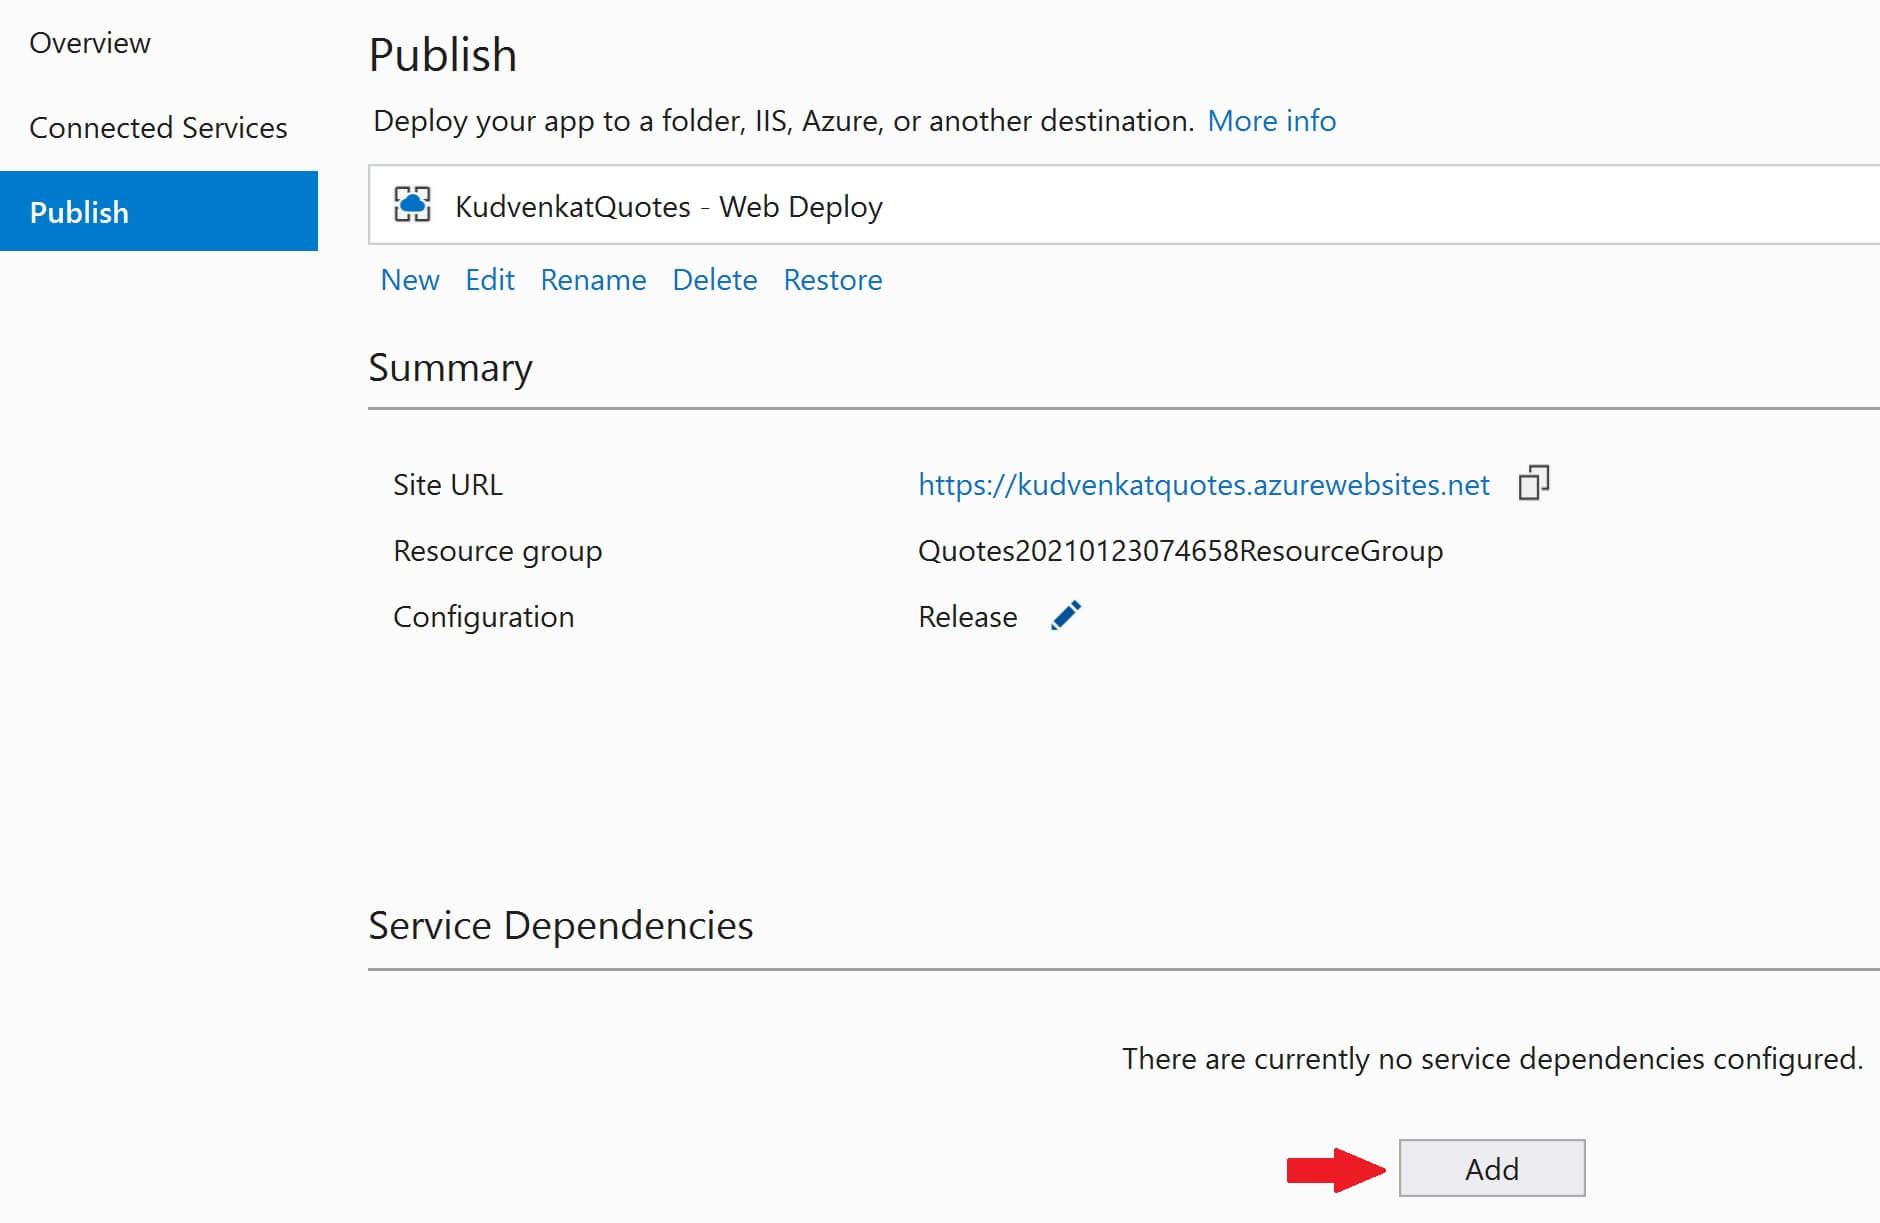
Under Service Dependencies, click the Add button to add SQL Server dependency.
visual studio deploy web app with database to azure

Select Azure SQL Database and click Next
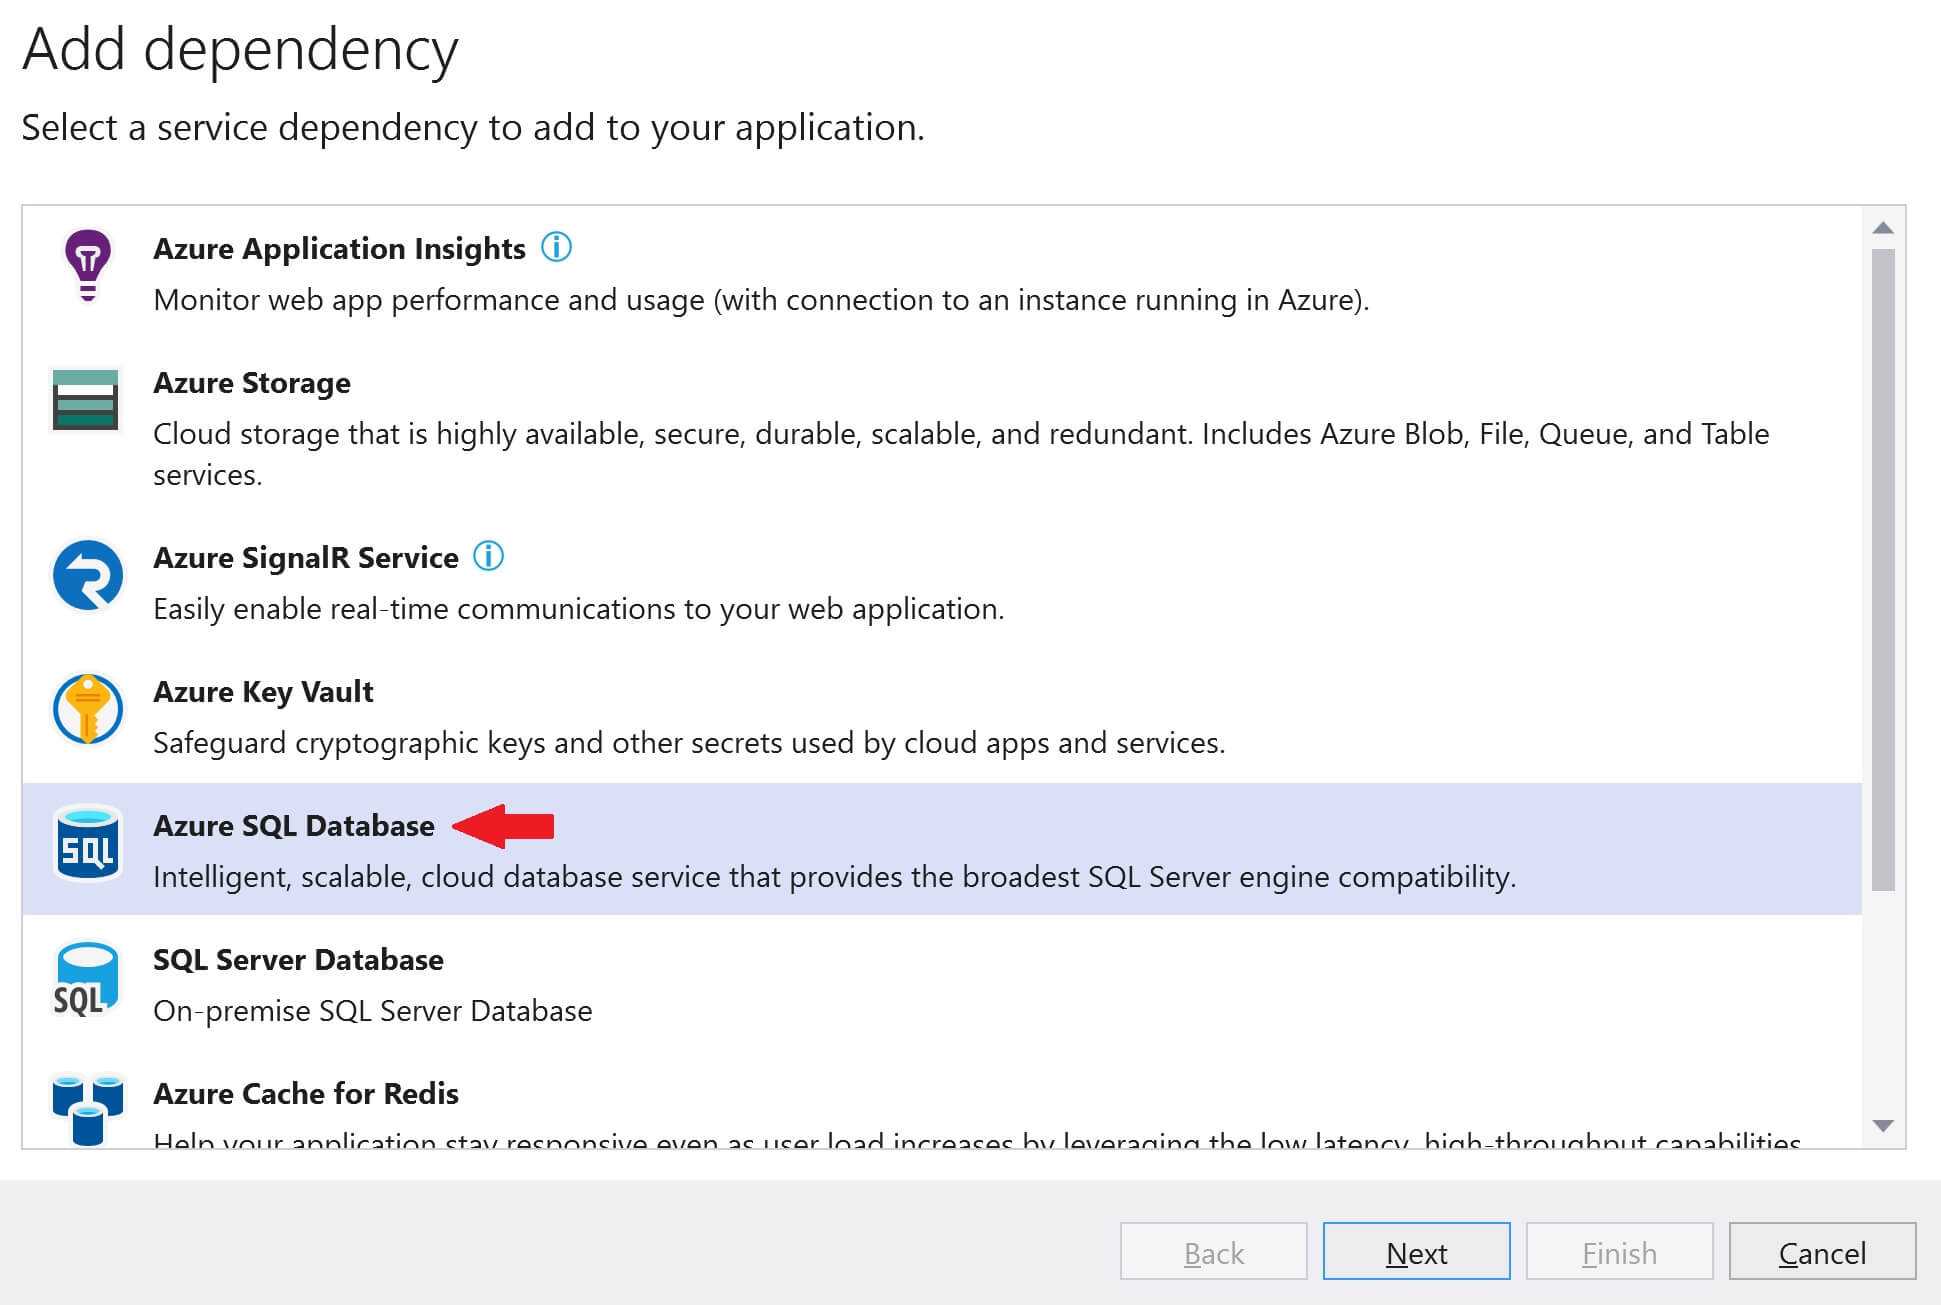
deploy sql database to azure from visual studio

Select your azure subscription from the Subscription dropdownlist and then click on the + sign to create a new SQL Database in Azure.

create azure sql database from visual studio

Before we can create a database, we need to create a database server. So, click on the New link, next to Database server dropdownlist.
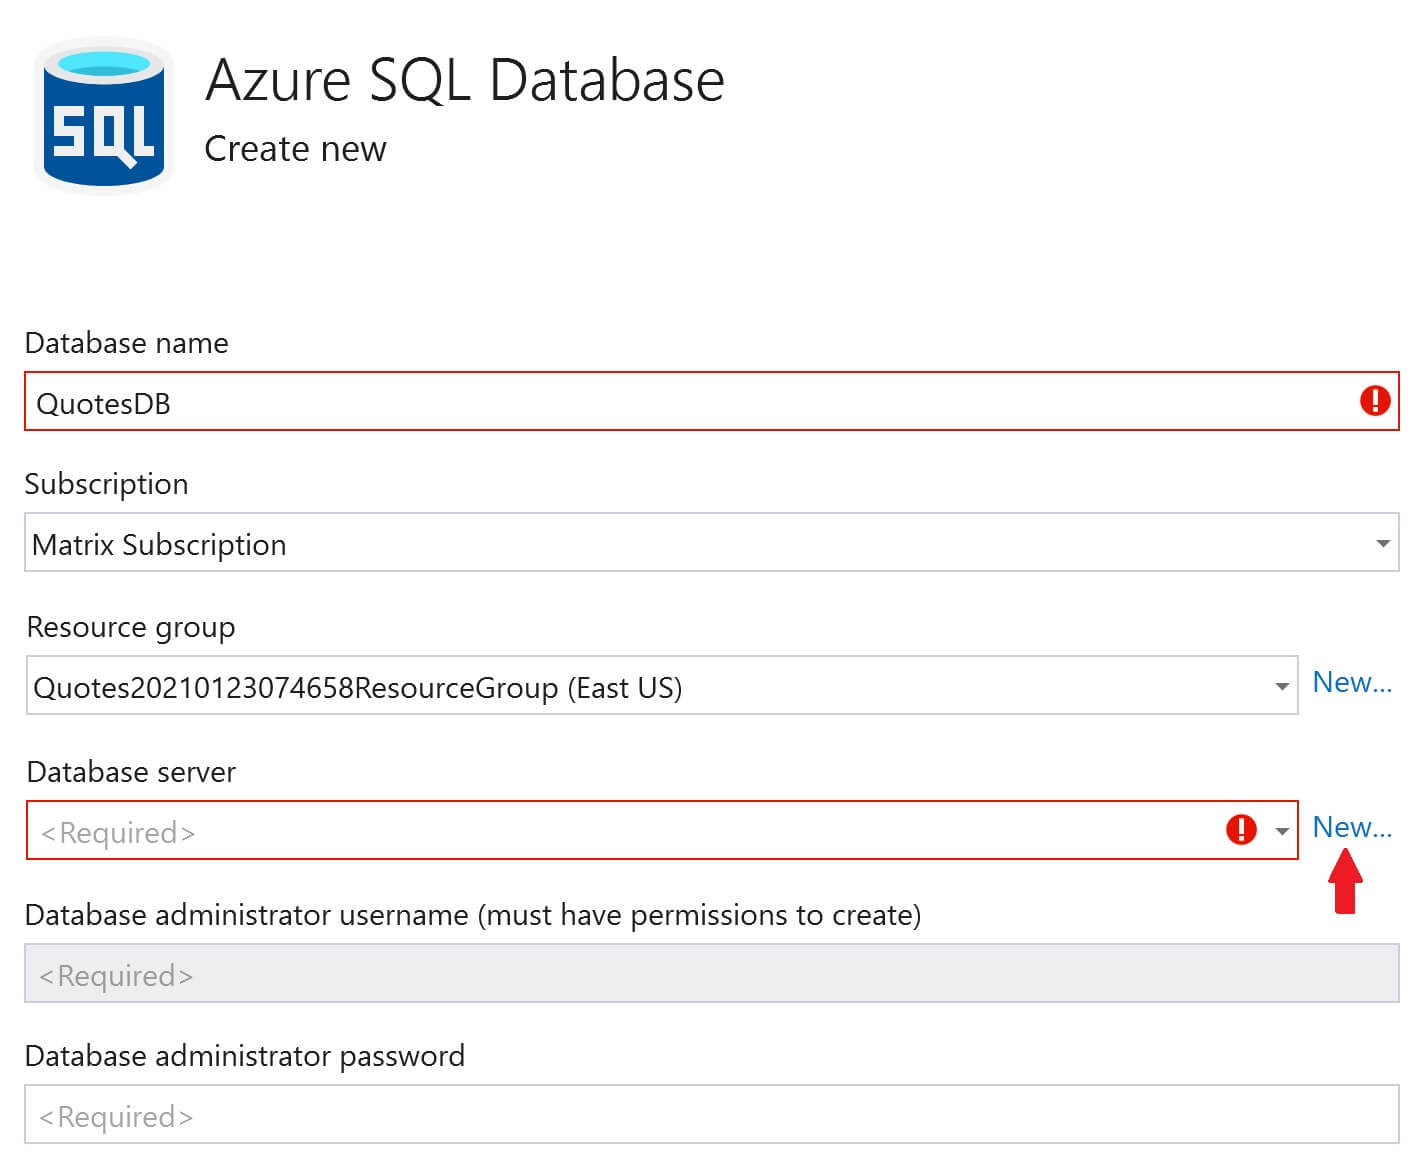
create azure database from visual studio

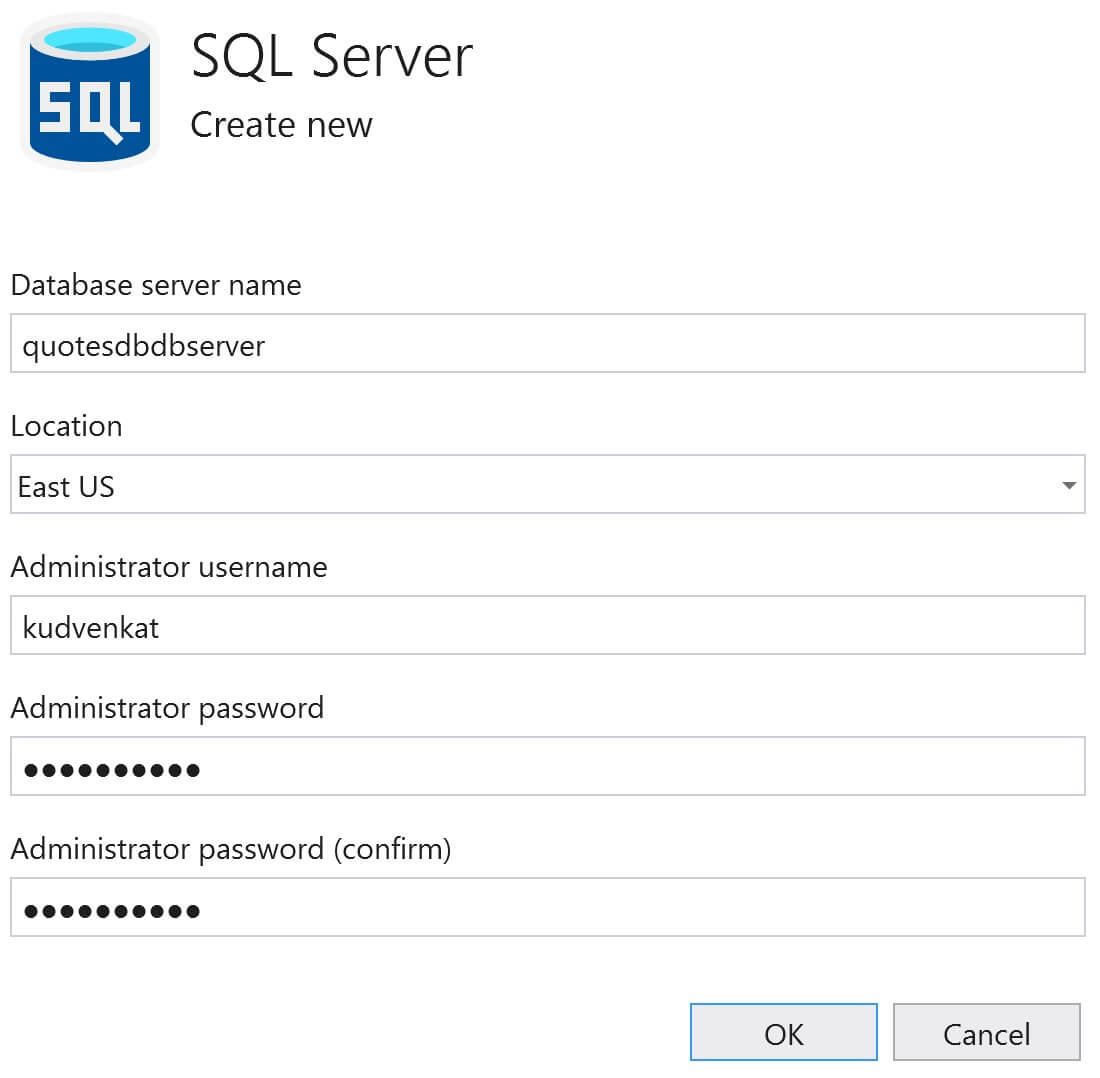
Fill the following details and click OK

  1. Database server name
  2. Location (Azure Region) where you want the server to be created
  3. Administrator username and password

provision azure sql database from visual studio

You will be back on Azure SQL Database window. Click Create. This creates both - Database server and the database itself.
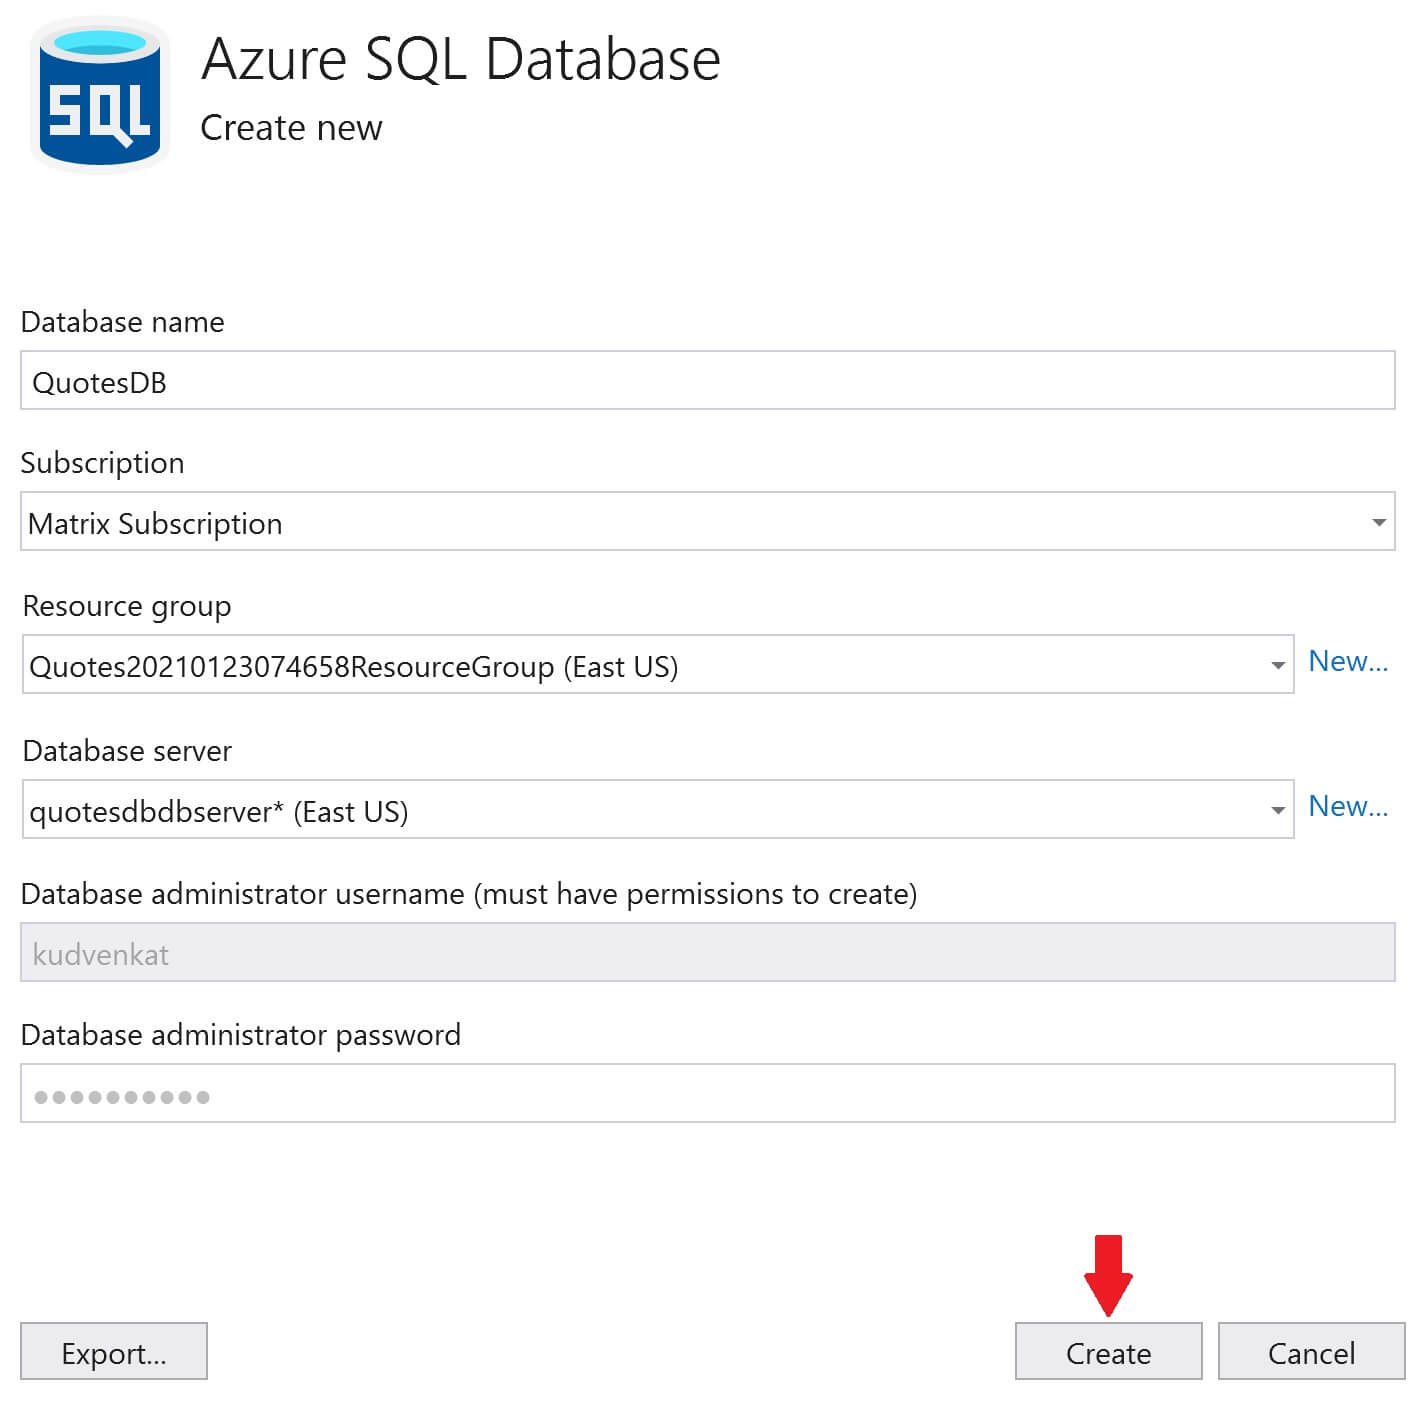
create sql database in azure from visual studio

Both the database server and the database are now created in azure. Click Next.
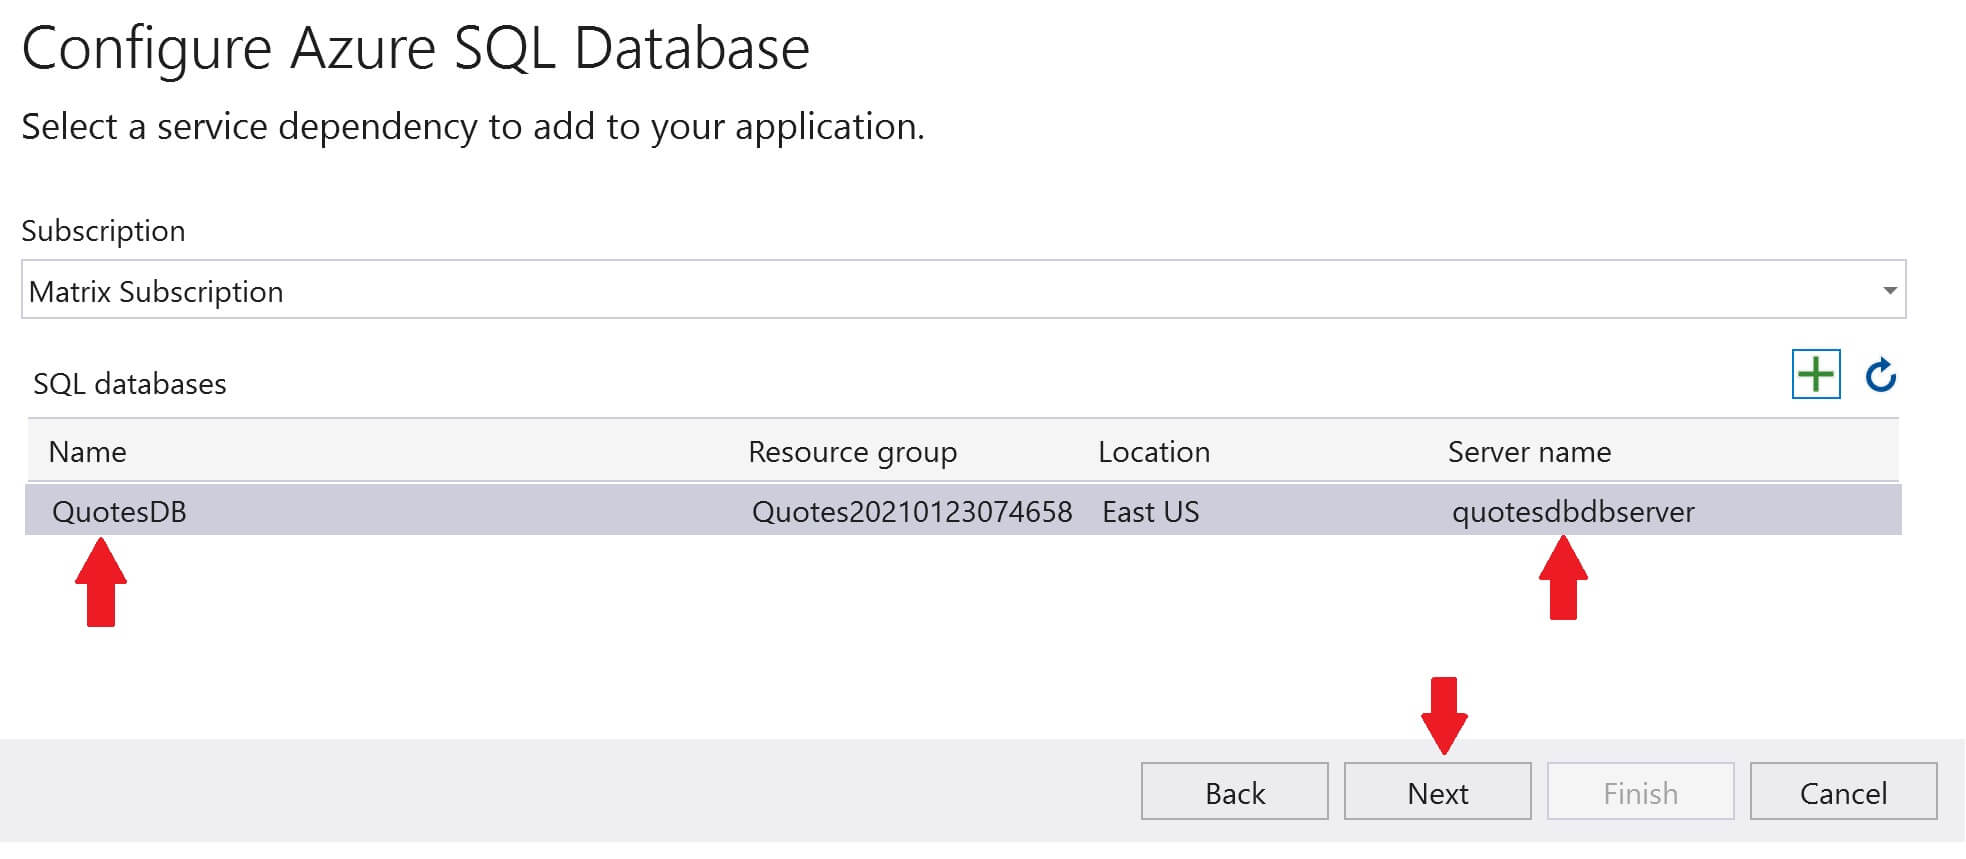
sql deploy database to azure

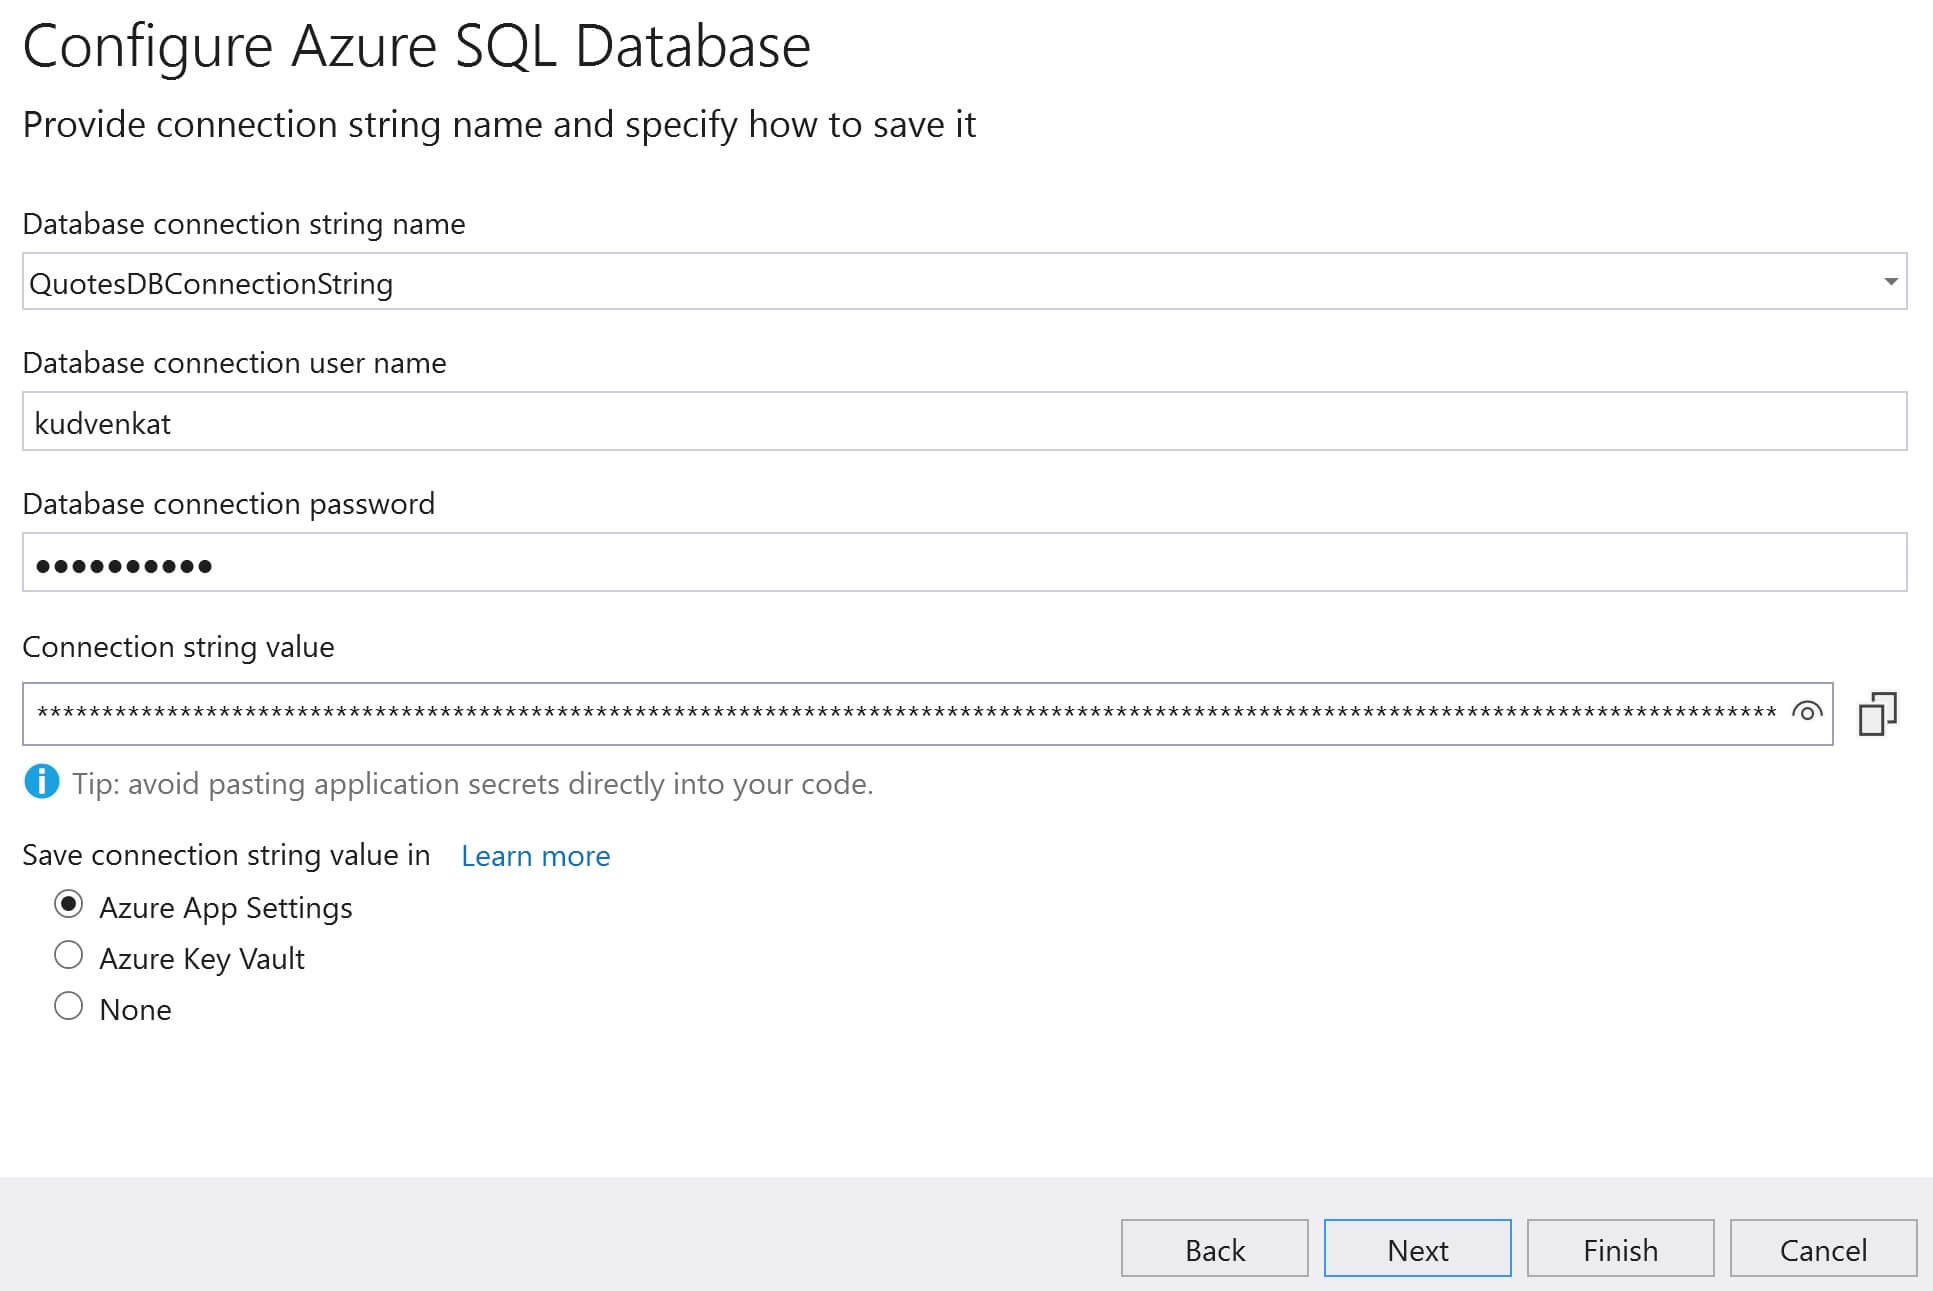
Specify the Database connection string, user name and password. This connection will be used by the web application to connect to the sql server database in azure. Click Next and then Finish.
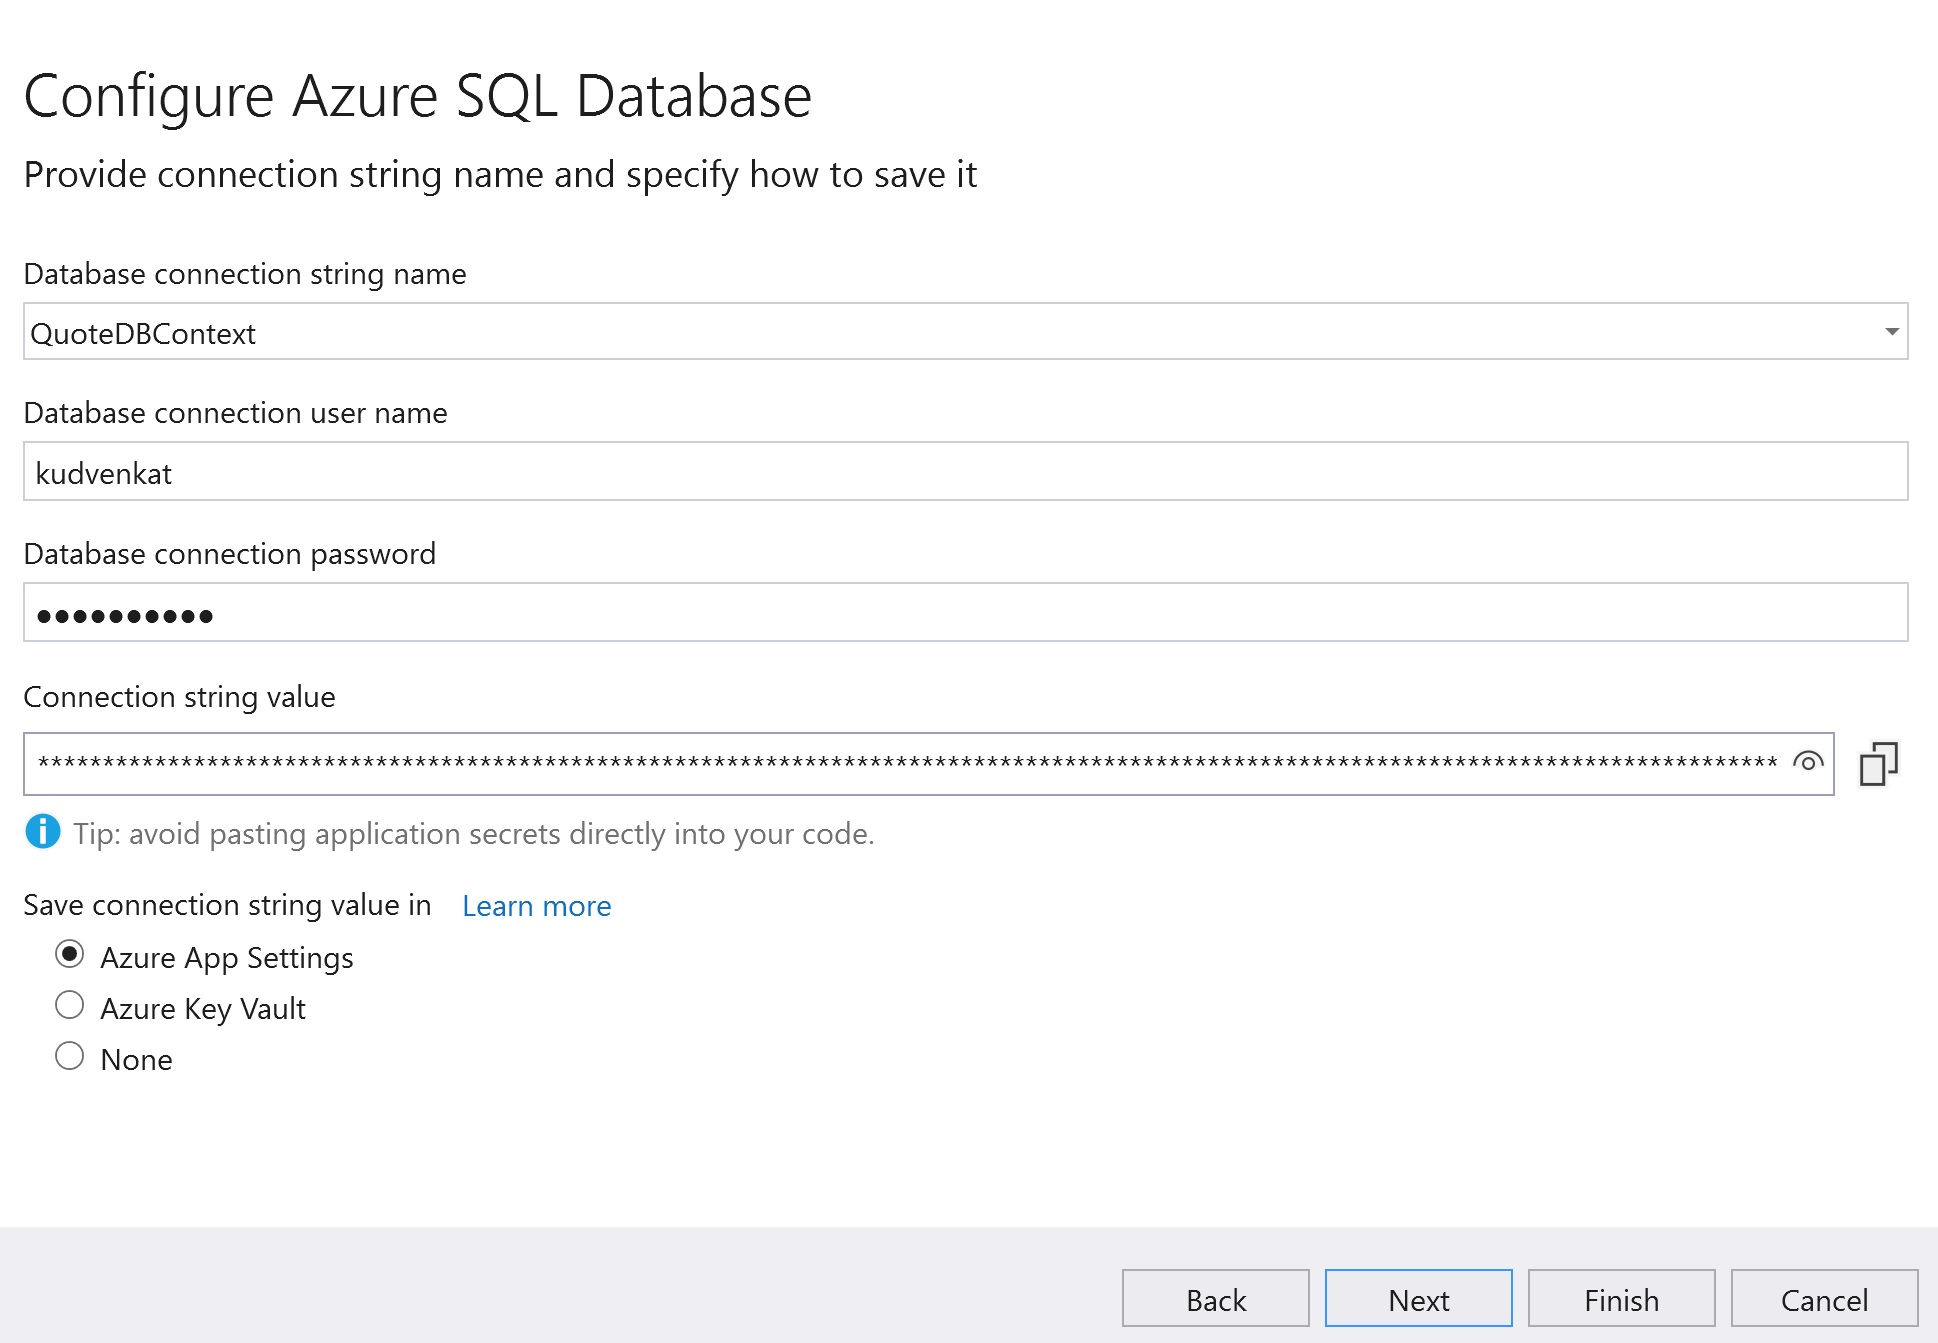
azure sql db connection string

How to deploy web application with sql database to azure


How to deploy web application with sql database to azure


In this video, we will discuss how to deploy a web application with sql database to azure.

There are several approaches to this. Which approach you choose really depends on the data access framework you are using in your web application. For example, if you are using entity framework code first approach, you can write code and execute sql migrations to create database, database objects like tables, views, stored procedures etc. You can also seed the database with data.

migrate asp.net web application to azure

What if you are not using entity framework in your application. Again, there are several approaches to migrate your SQL database to azure. In this video, we will migrate a web application that uses SQL server as the database and ADO.NET as the data access technology. In our next video, we will discuss how to migrate a web application that uses SQL server as the database and entity framework as the data access technology.

Deploy web application with SQL database and ADO.NET 

migrate asp.net website to azure

It's a three step process to deploy an ASP.NET web application with SQL Server as the database and ADO.NET as the data access framework.

Step 1 : Deploy web application

The first step is to deploye the web application itself. We discussed how to do this in our previous video. Please check out the following text article and video for details on how to do this.

Video | Text Article

Step 2 : Create SQL Server in Azure

There are several ways to do this. We can do it directly in the azure portal or through visual studio. For this example, let's do it through Visual Stduio. Go to the Publish page in Visual Studio. To do this, right click on the web application project in Visual Studion and select Publish from the context menu.

deploy web app with database in azure

Under Service Dependencies, click the Add button to add SQL Server dependency.

visual studio deploy web app with database to azure

Select Azure SQL Database and click Next

deploy sql database to azure from visual studio

Select your azure subscription from the Subscription dropdownlist and then click on the + sign to create a new SQL Database in Azure.

create azure sql database from visual studio

Before we can create a database, we need to create a database server. So, click on the New link, next to Database server dropdownlist.

create azure database from visual studio

Fill the following details and click OK

  1. Database server name
  2. Location (Azure Region) where you want the server to be created
  3. Administrator username and password

provision azure sql database from visual studio

You will be back on Azure SQL Database window. Click Create. This creates both - Database server and the database itself.

create sql database in azure from visual studio

Both the database server and the database are now created in azure. Click Next.

sql deploy database to azure

Specify the Database connection string, user name and password. This connection will be used by the web application to connect to the sql server database in azure. Click Next.

visual studio 2019 deploy sql database to azure

The connection string will be stored in Azure App Settings. If you are new to Azure App Settings and Azure Key Vault, we will discuss them in our upcoming videos.

Finally click Finish and then Close.

Step 3 : Create the database objects and seed data

The final step is to create the database tables and populate them with initial data for the app. Again, there are 2 ways to do this. Either you can use SQL Server Management Studio on your local machine or the built-in Query Editor in azure portal.

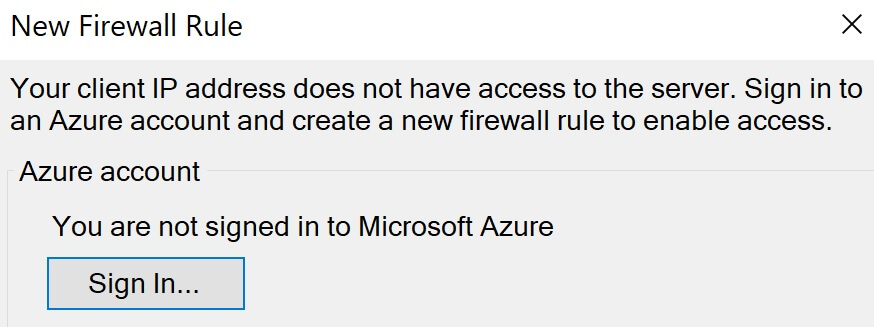
For security reasons, by default, the SQL Server in azure is locked down. If you want to be able to connect to it and execute SQL queries from your local machine, you have to create a firewall wall rule, that allows your laptop to connect. Otherwise you will get the following connection error.

your client ip address does not have access to the server azure

Configure azure sql server to allow remote connections

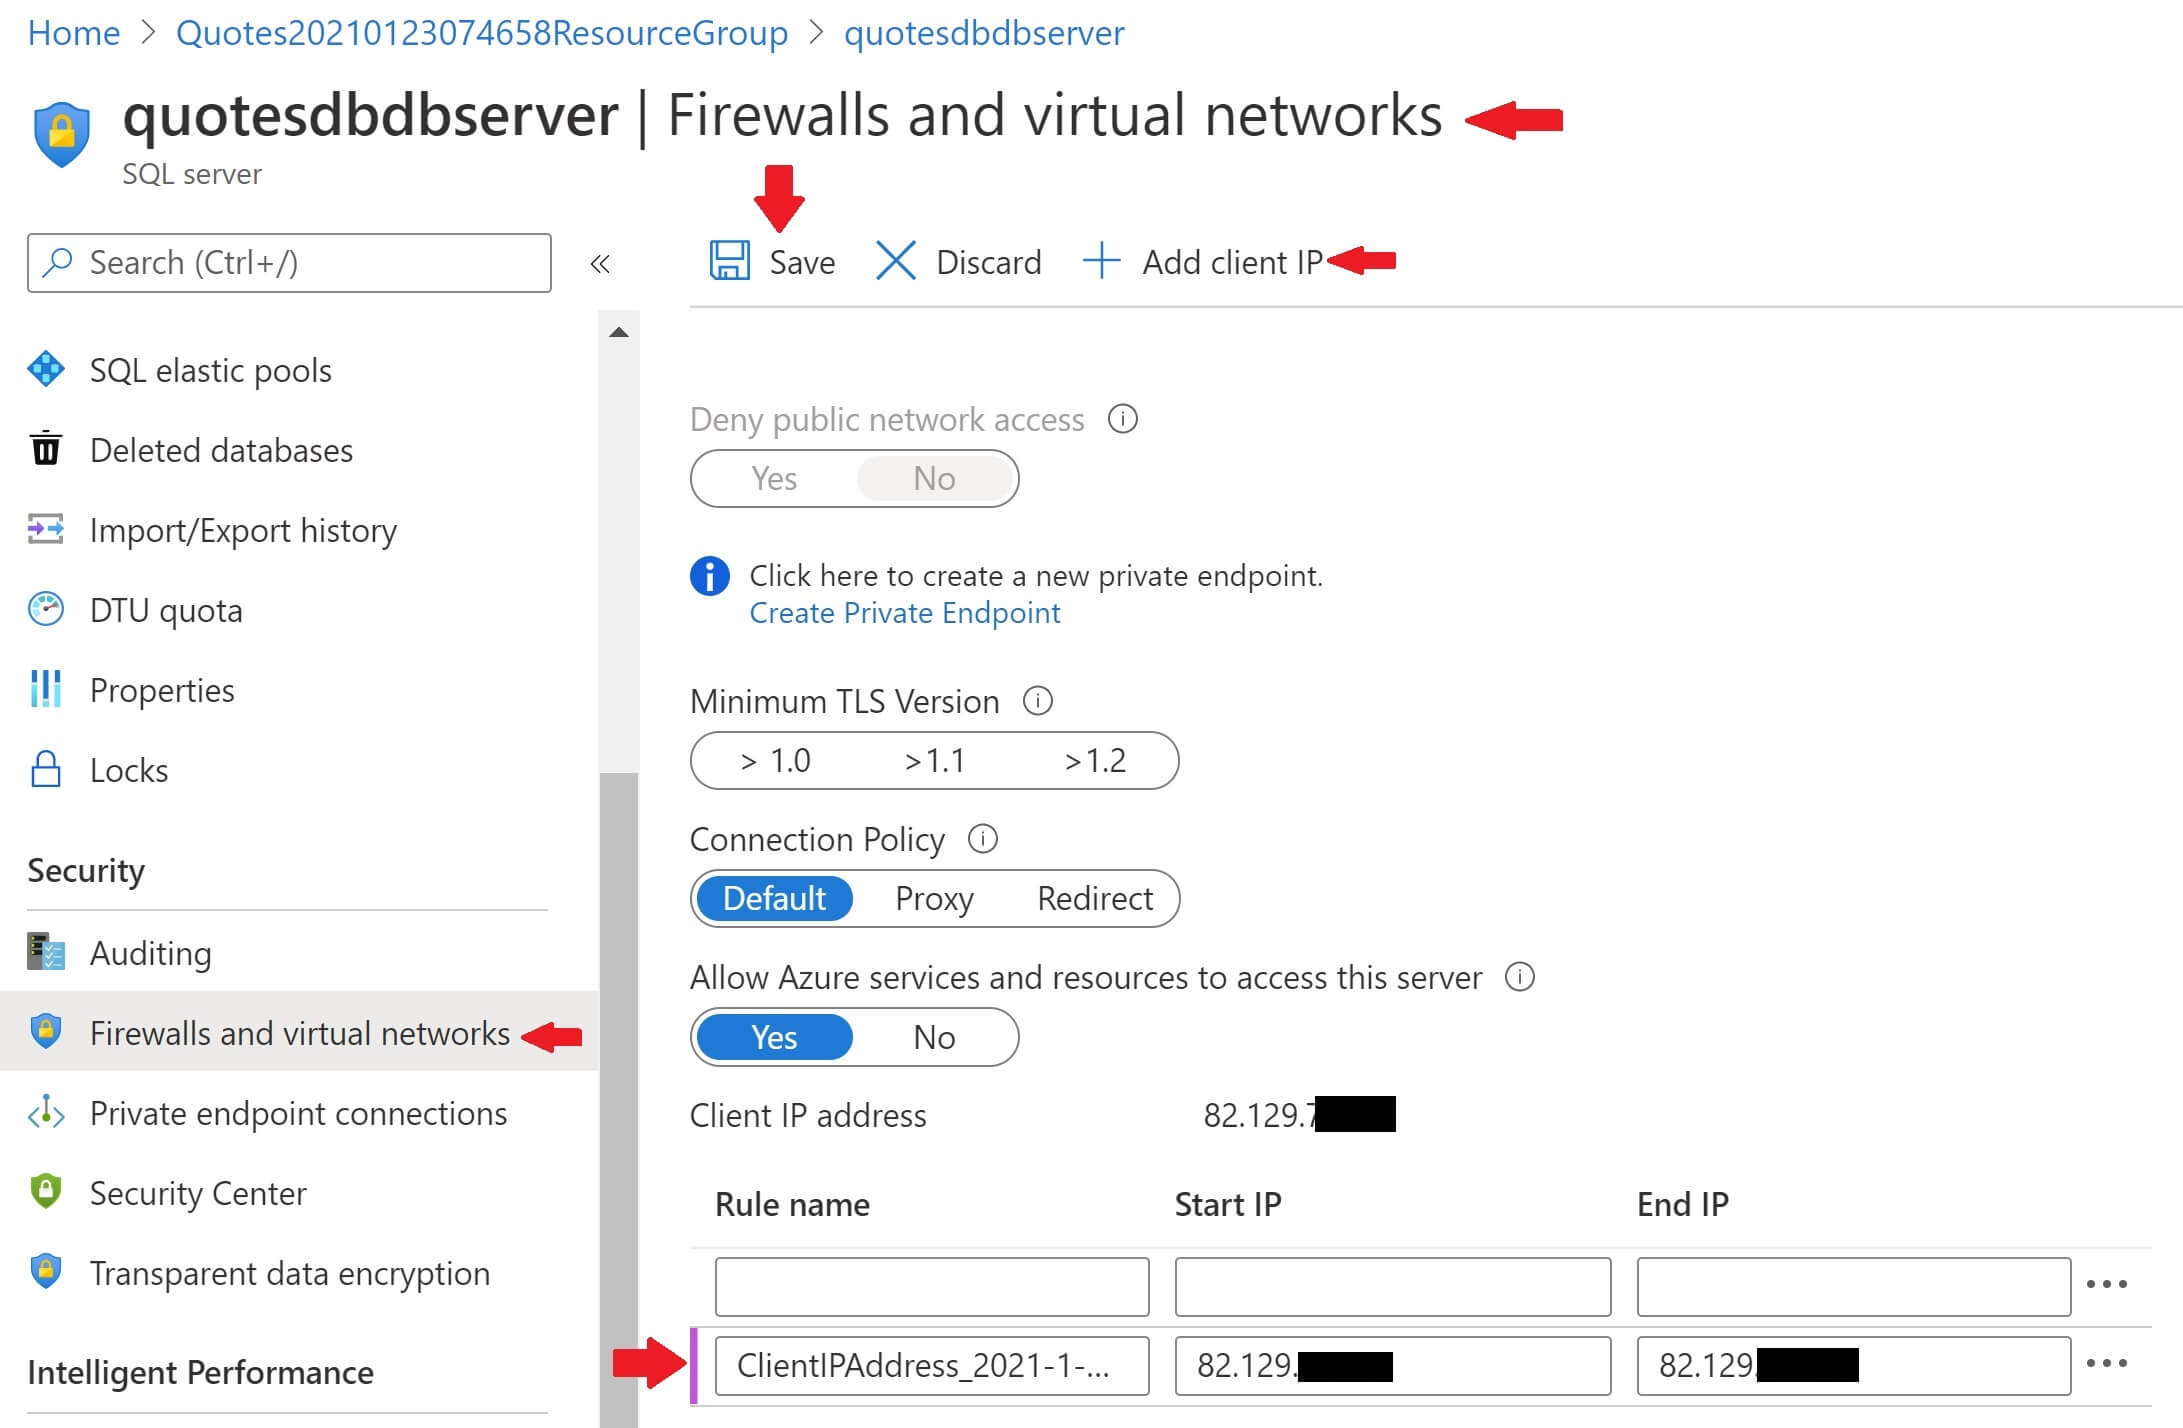
  1. Navigate to your SQL Server instance in Azure.
  2. Click on Firewalls and virtual networks under Security section.
  3. Your device IP address will be displayed. As you can see in the image, The device I am using to connect to azure sql server starts with 82.129.
  4. Click Add client IP link at the top and Save.

configure azure sql server to allow remote connections

With this firewall rule in place, you should be able to connect to azure sql server using SQL Server Management studio from you local machine.

Execute the following queries. Your web application with sql server are deployed to Azure and you should be able to access your application.

Create Table Quotes
(
	Id int identity primary key,
	Quote nvarchar(255)
)
Go

Insert into Quotes values ('Creativity is intelligence having fun')
Insert into Quotes values ('Champions keep playing until they get it right')
Insert into Quotes values ('The best time to plant a tree was 20 years ago. The second best time is now')
Insert into Quotes values ('The only person you are destined to become is the person you decide to be')
Insert into Quotes values ('Believe you can and you’re halfway there')

How to deploy asp.net web application in azure


How to deploy asp.net web application in azure


In this video we will discuss, how to deploy a web application (specifically asp.net webforms application) in azure. It doesn't really matter if it's web forms, MVC, or .NET core, the process is the same. You will see how easy it is. With just a few clicks, in just a few minutes, you have your app up and running.

Hosting web application in your own on-premises server

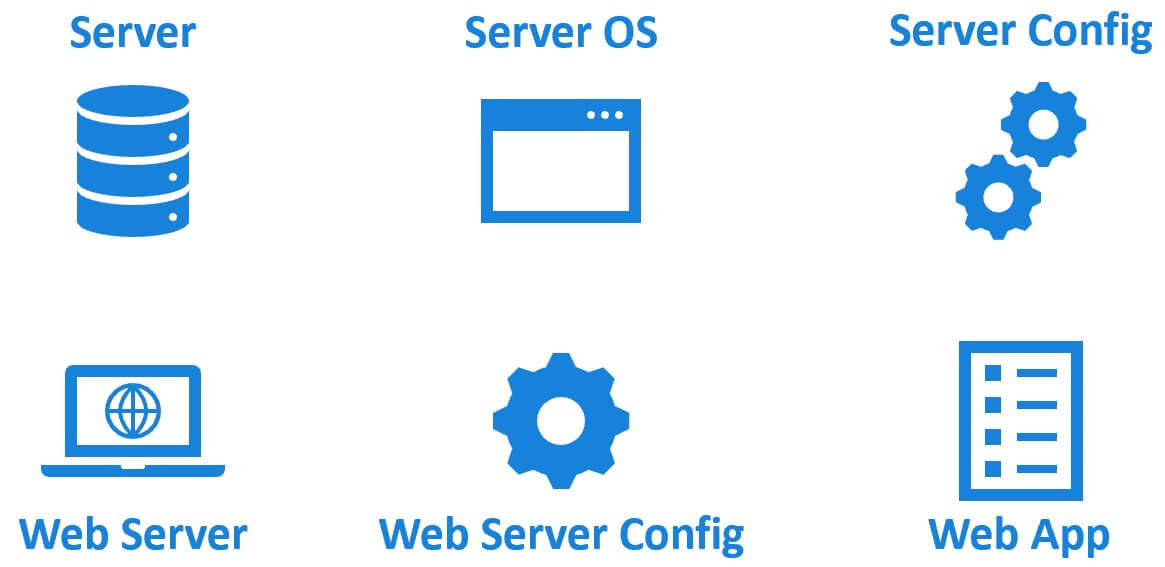
Compare this to hosting the application in your own on-premises server. It involves a lot of things.

on premise web hosting

  1. We need a physical or a virtual server
  2. Server operating system like windows or linux must be installed
  3. The server needs to be secured and configured. Install antivirus software, updates and patches. Configure firewall settings etc.
  4. To host a web application and make it available on the web, you need a web server like IIS, Tomcat, NGINX etc.
  5. You need to install and configure it correctly like security permissions, application pools, SSL setting etc.
  6. On top of this, you install your web application and any dependencies it may have.

Deploying asp.net web application from visual studio to azure

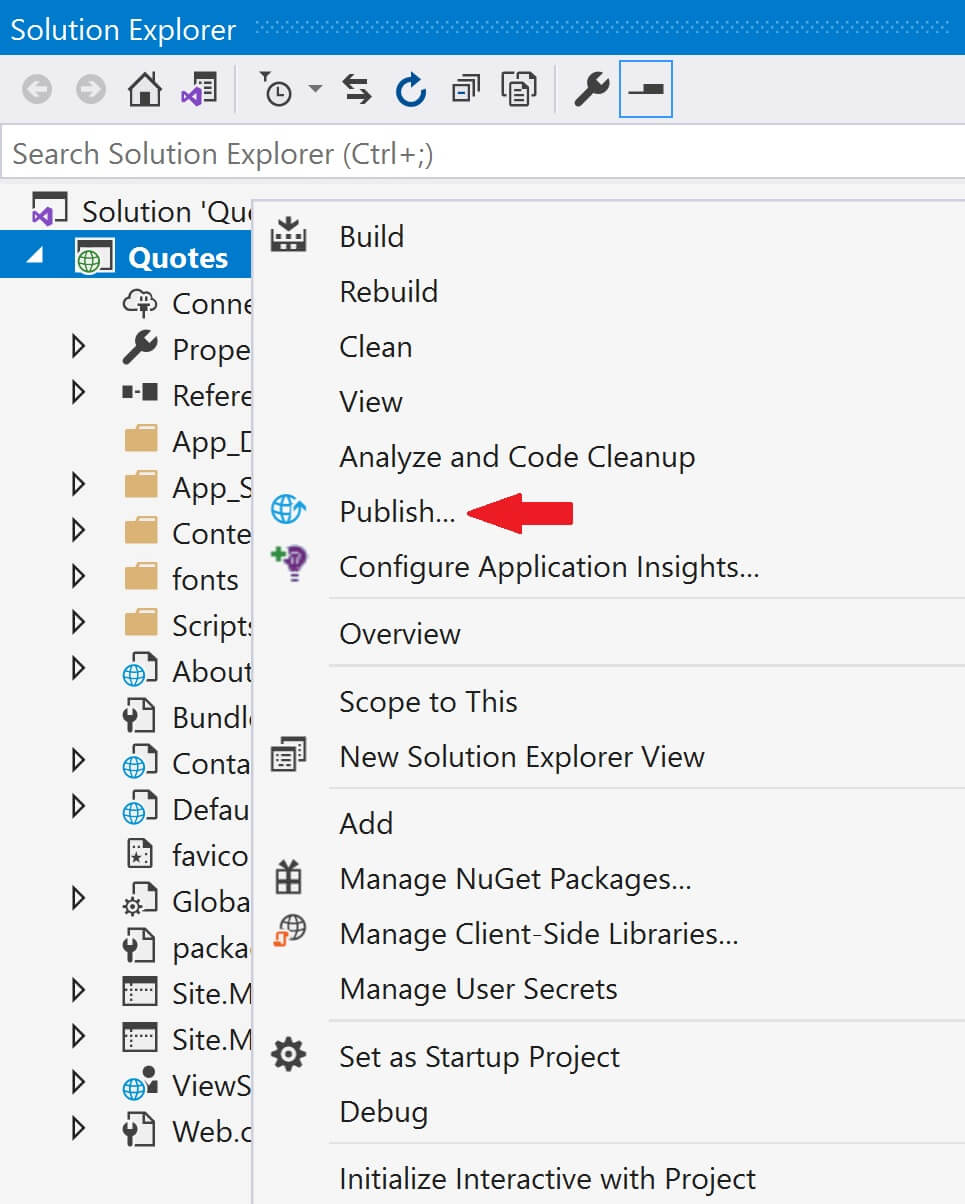
In the Solution Explorer, right click on the web application project and click on Publish 

deploy asp.net web application to azure

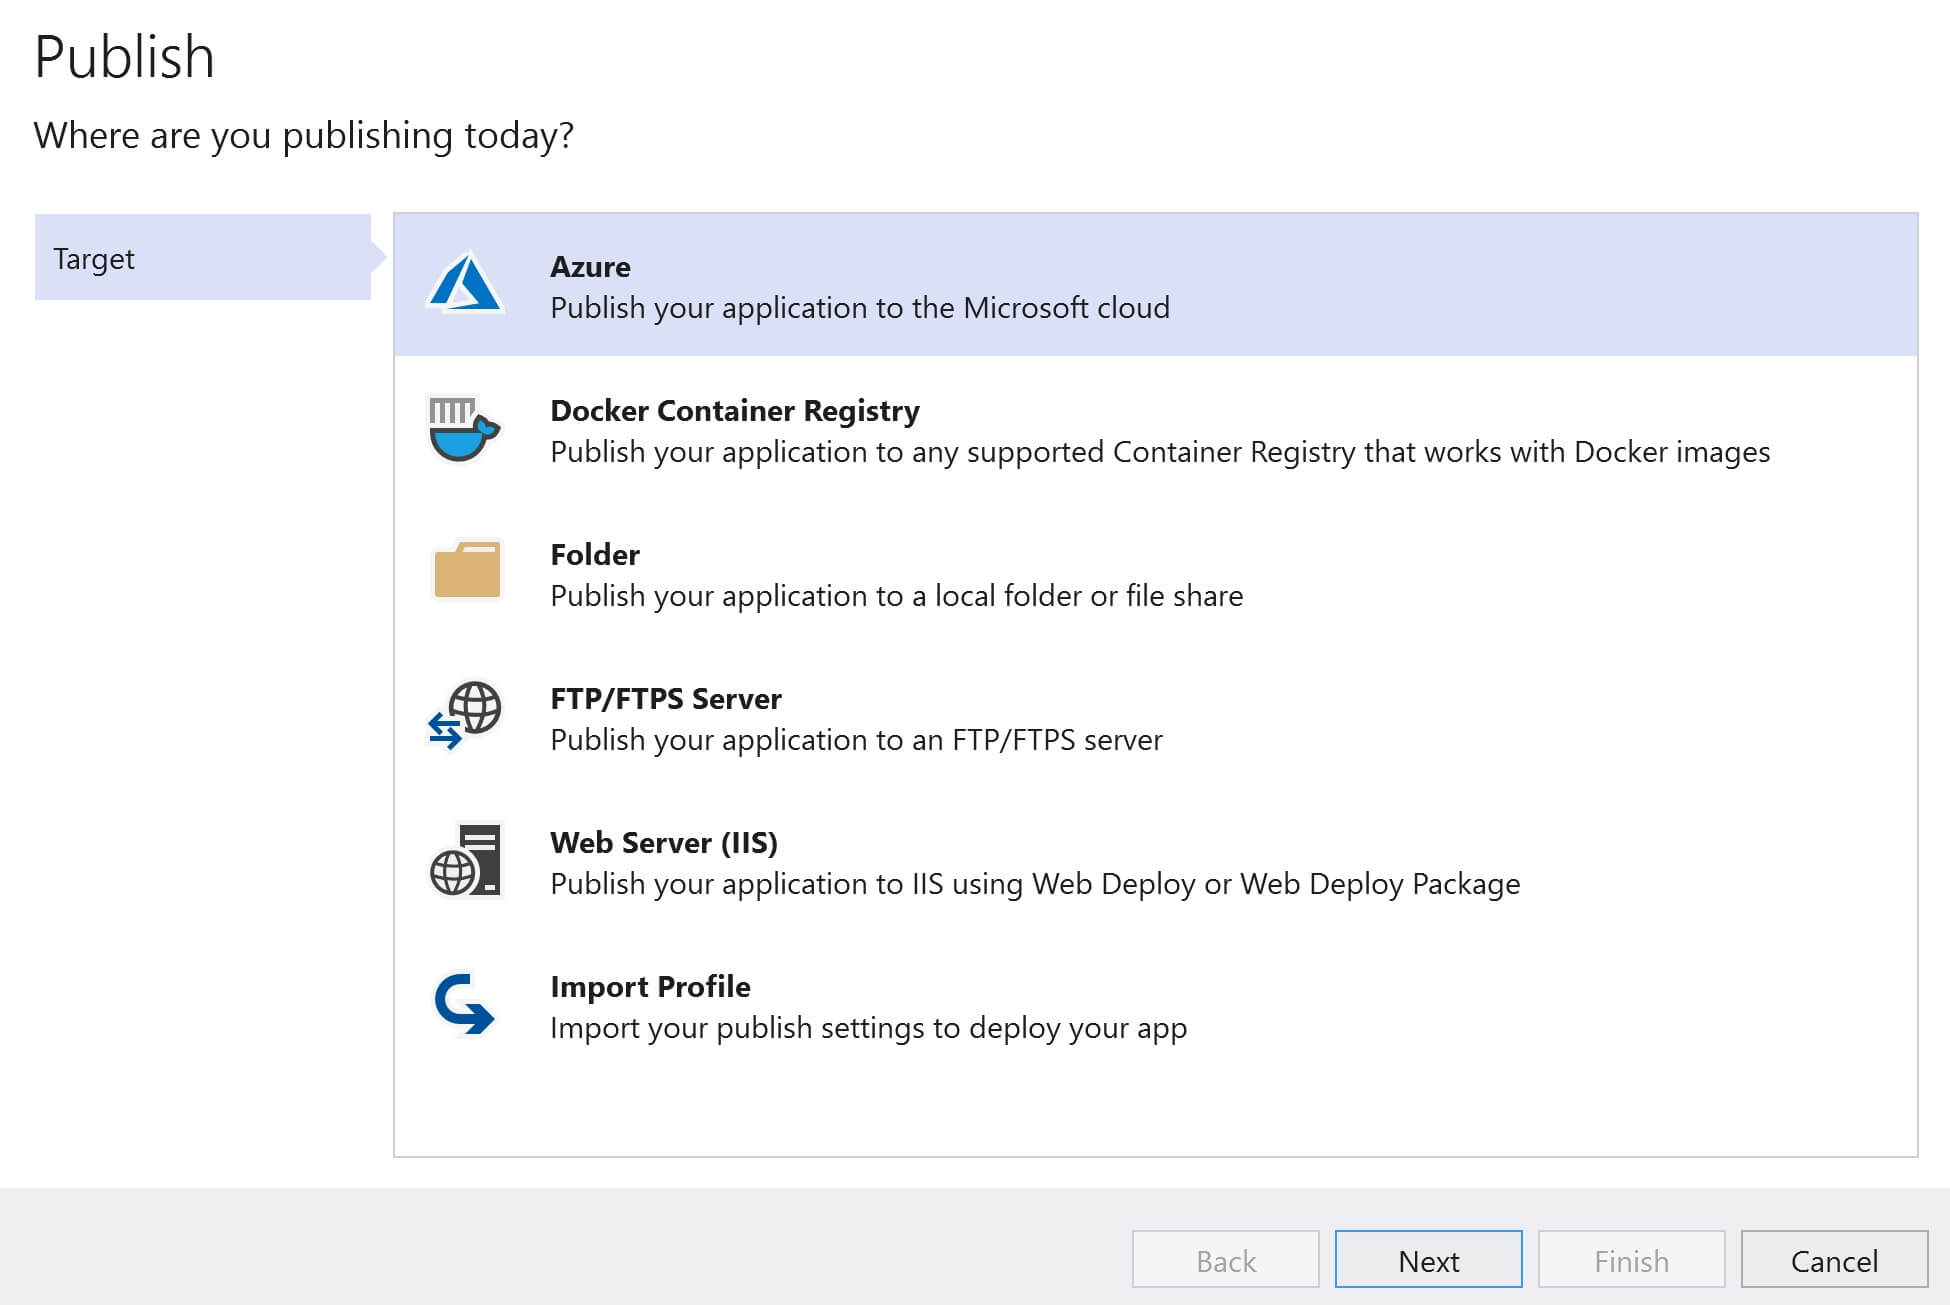
Select Azure and click Next

publish web app to azure

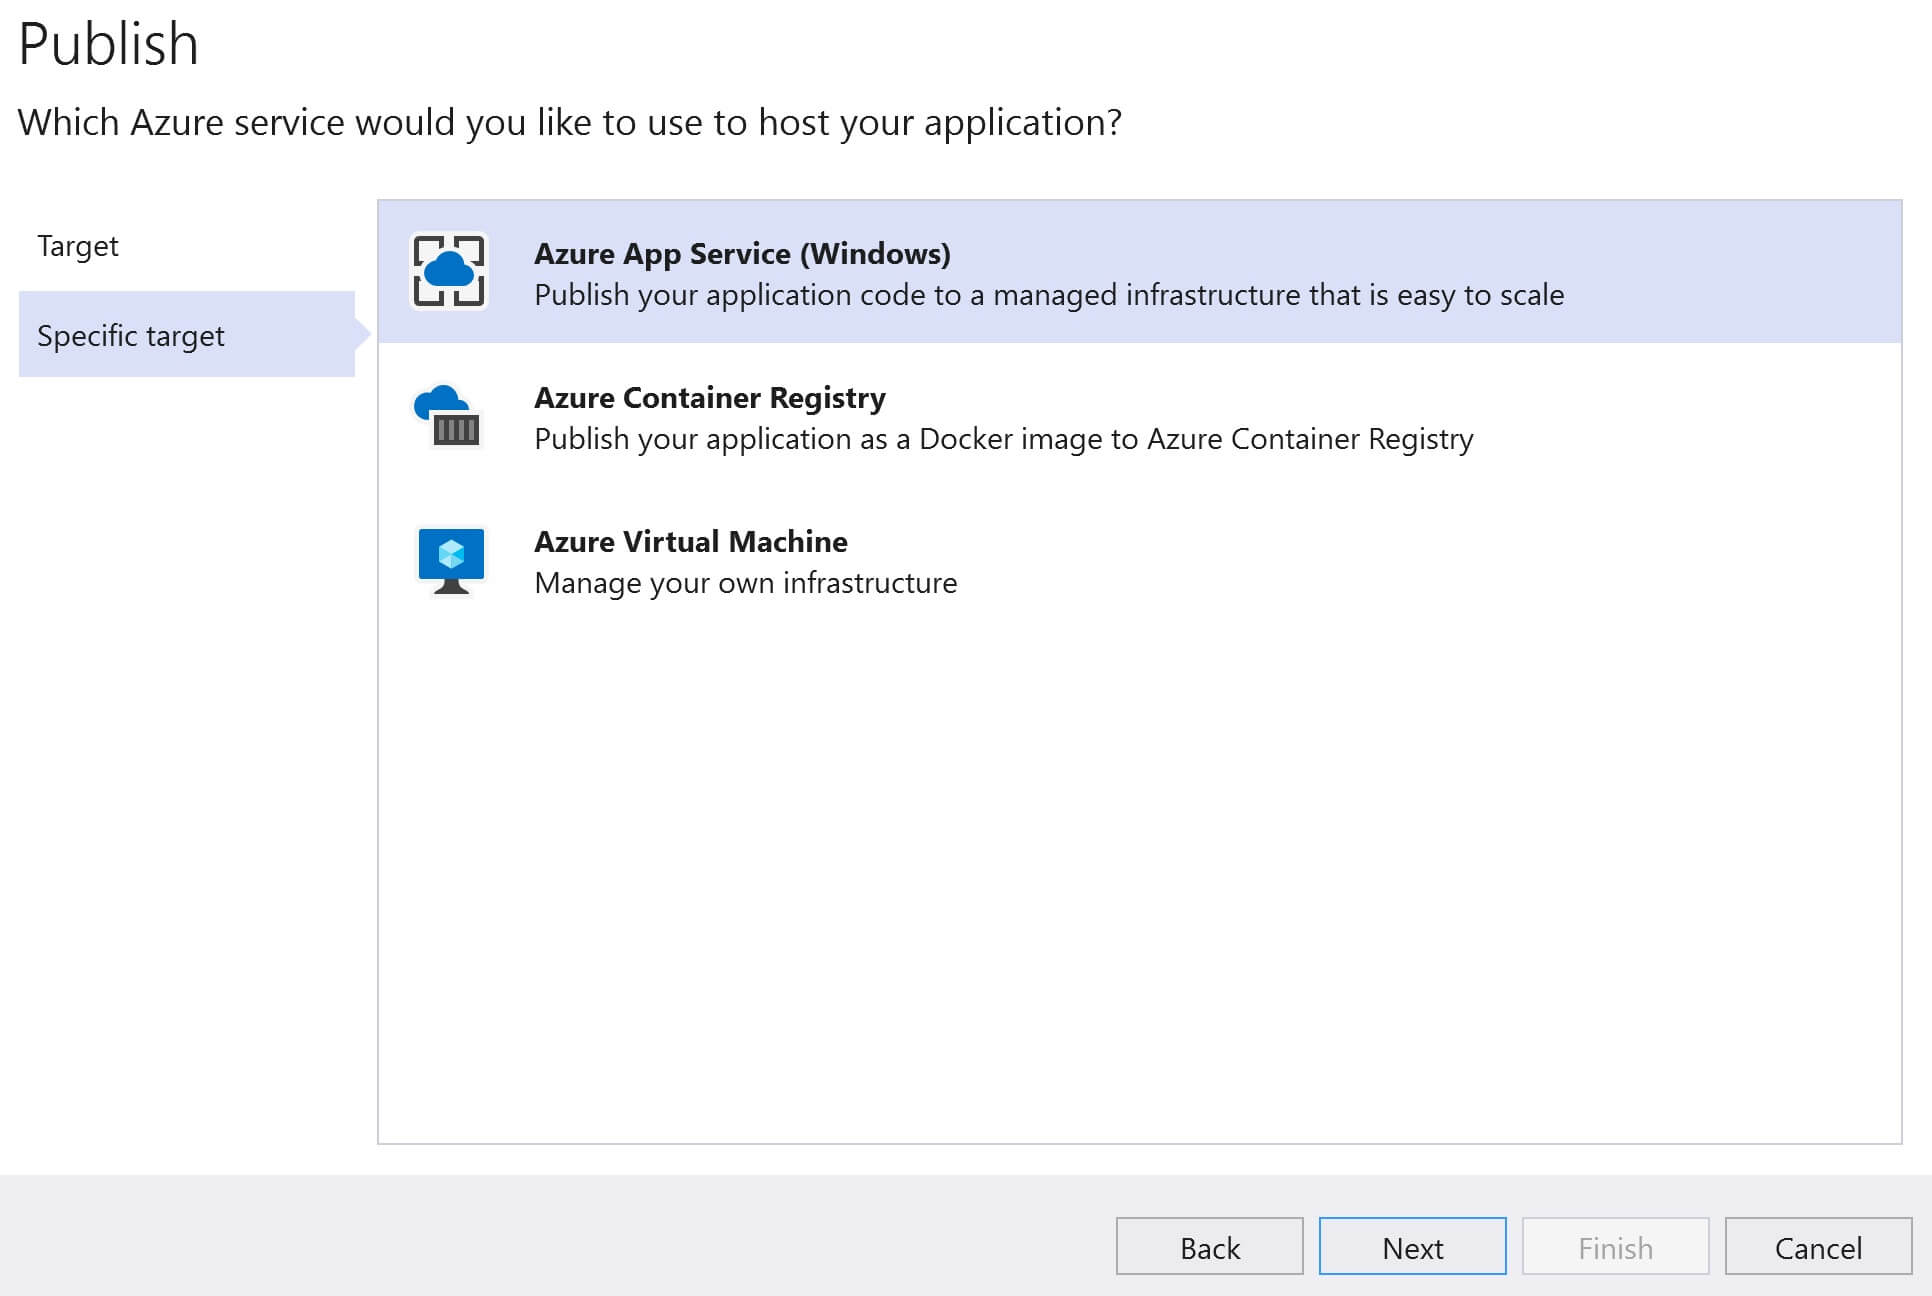
Select Azure App Service and click Next

visual studio 2019 deploy to azure

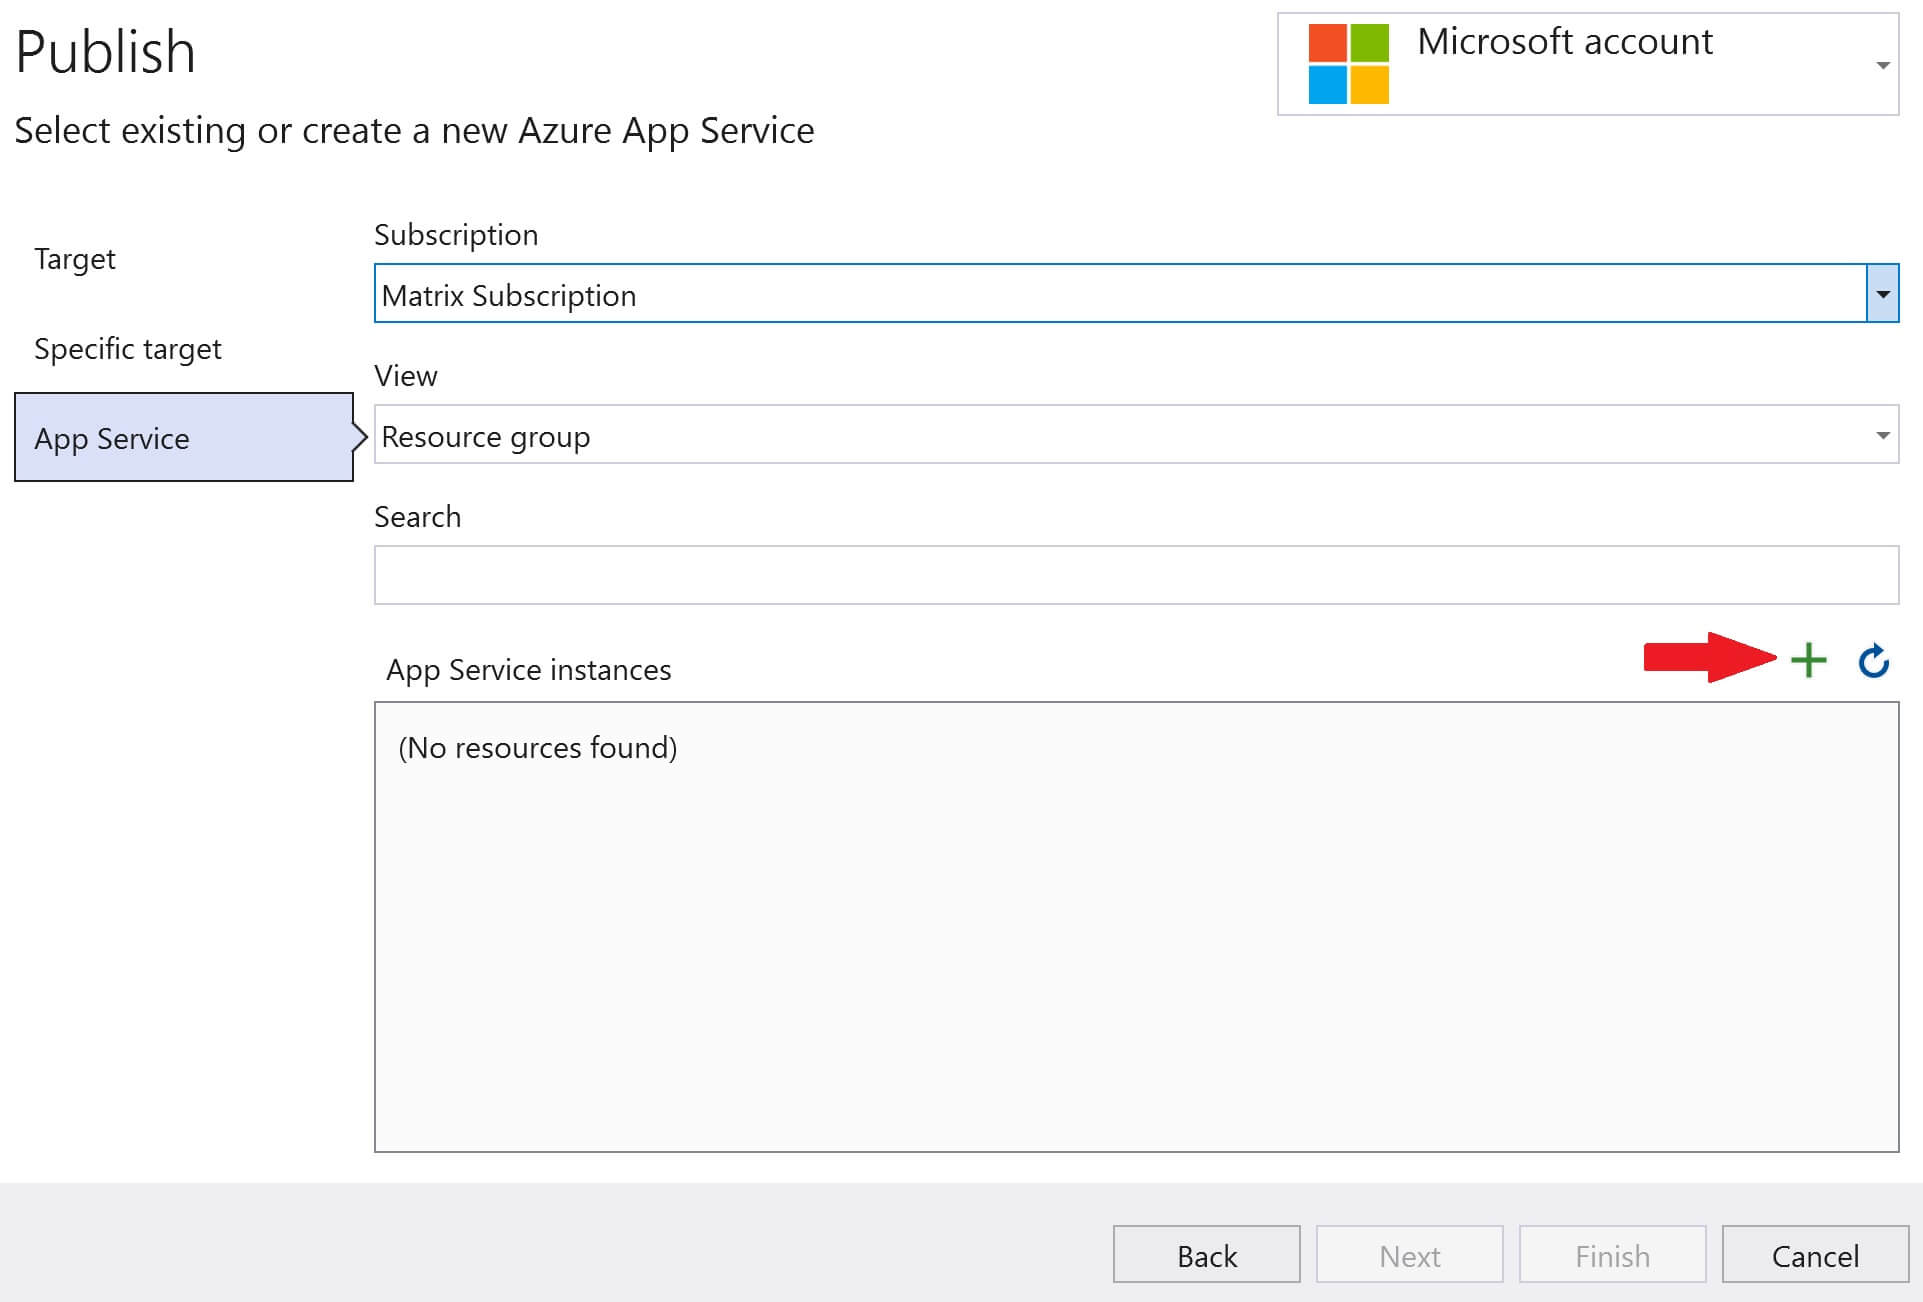
Click on the + sign

visual studio deploy to azure

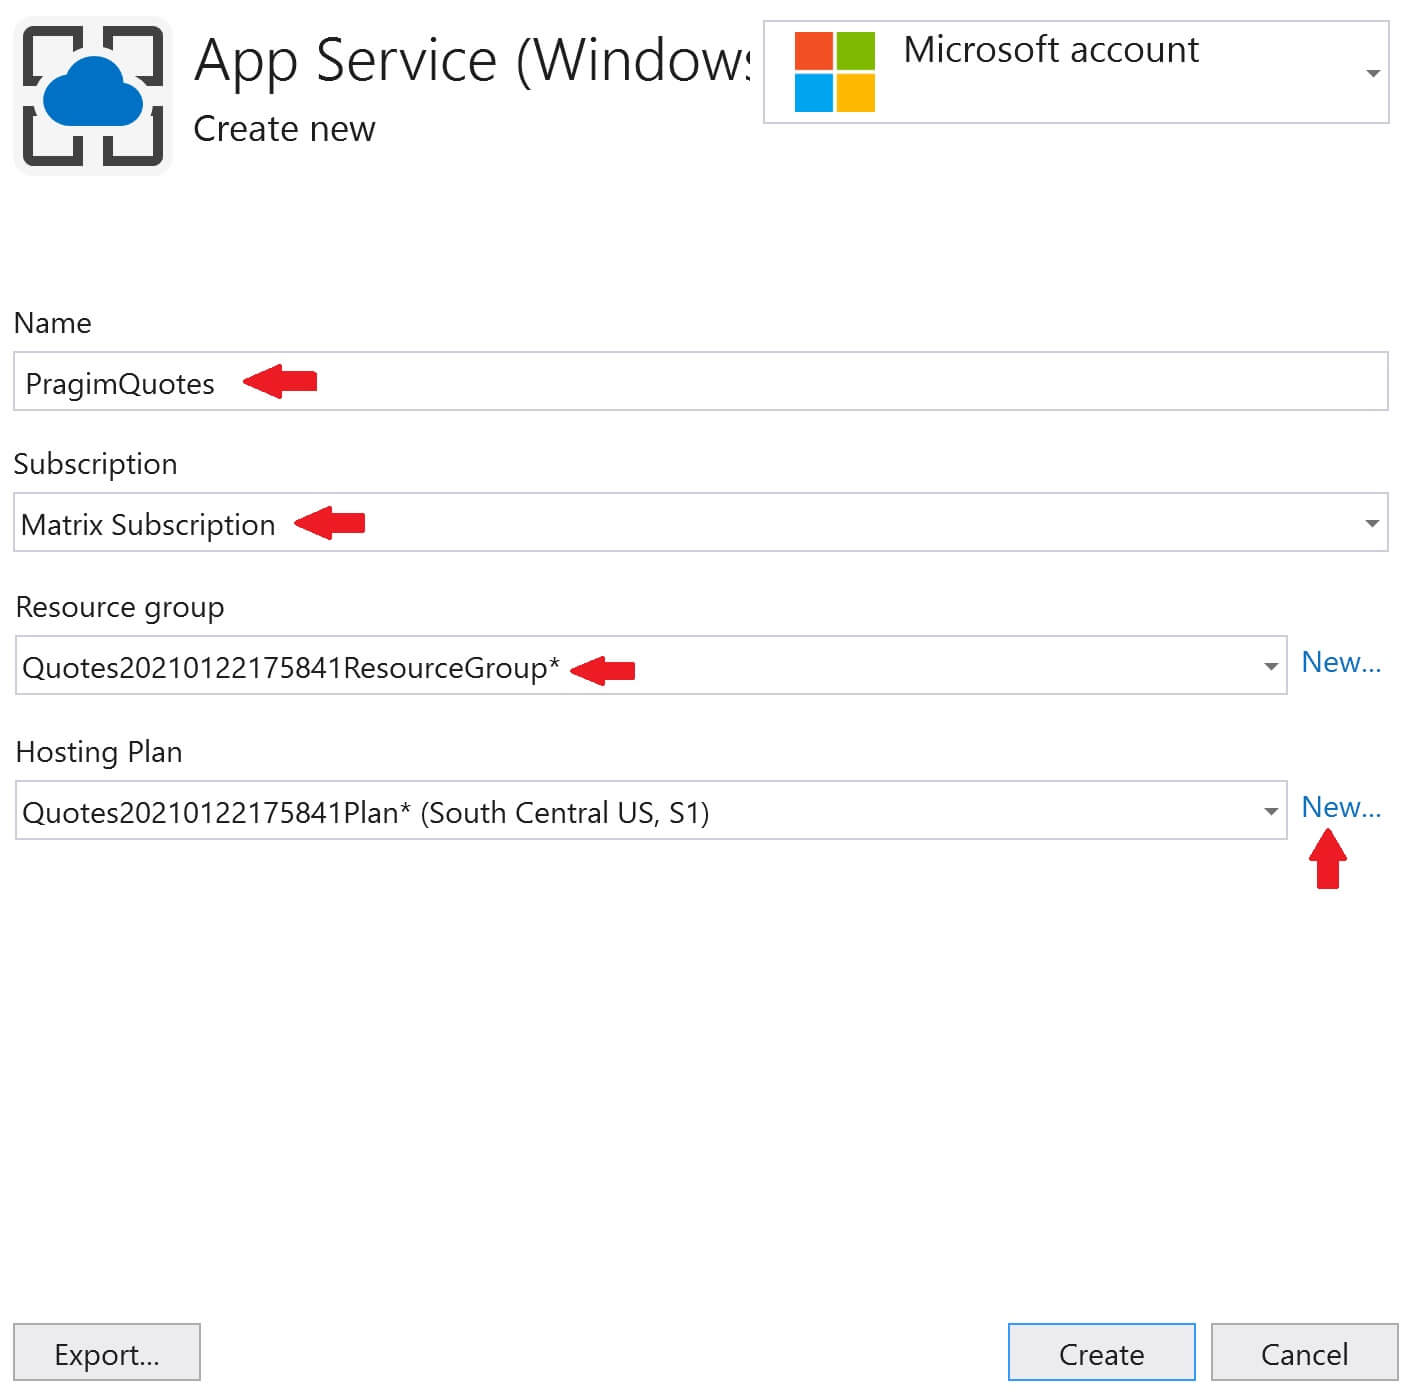
  • Provide a Name for the App Service. This is the name that will be used to access the web application. PragimQuotes is the name I used, so to access the application I use the following URL in the browser.
  • https://PragimQuotes.AzureWebSites.net
  • Select your Subscription and Resource Group.
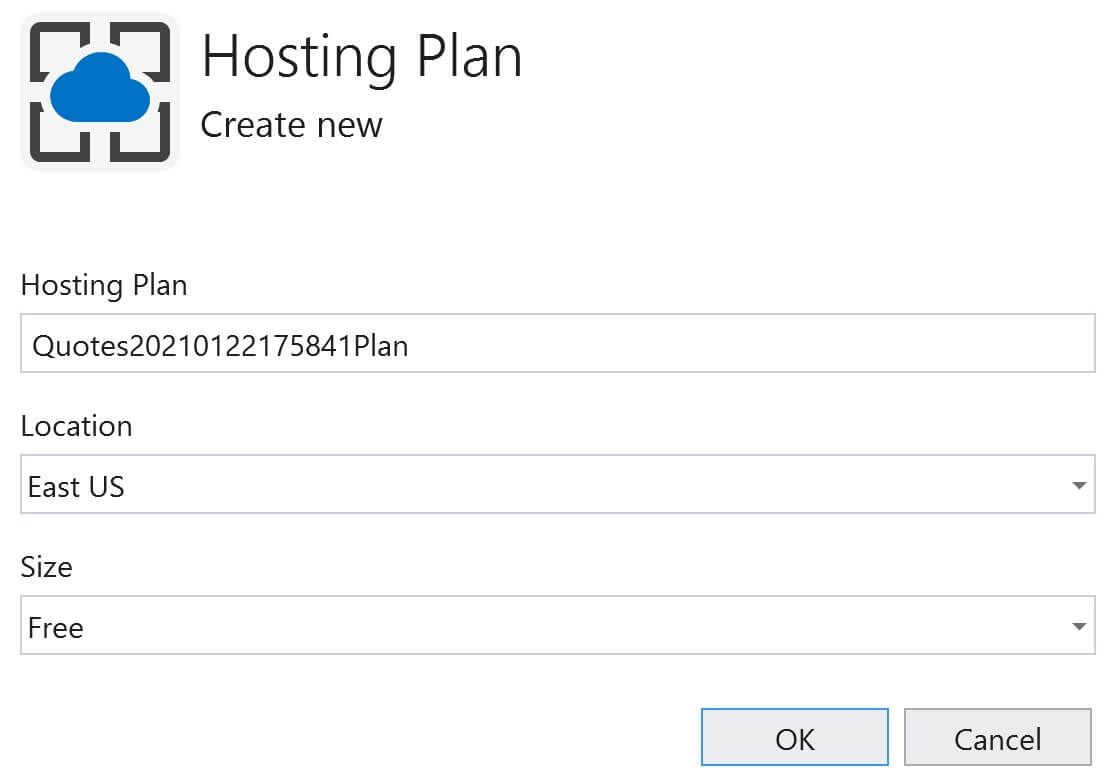
  • Finally hosting plan. We want to use a free hosting plan. Click on the New link.

visual studio deploy to azure app service

  • Provide a namelocation and the size for the Hosting Plan. It is the size that determines what you pay and what features you get. I selected the Free pricing tier.
  • Remember to host a web application in Azure we need App Service and an App Service Plan. We discussed App Service and App Service Plan, including how to create them in the Azure portal, in our previous videos in this series.
  • Right now, we are creating them (App Service and App Service Plan) from within visual studio instead of going through the azure portal.
  • Click OK and the Finish. 

deploy web app from visual studio to azure

You will then be back on the following Publish screen. In the dropdownlist, your App Service is selected. Click on the Publish button.

Azure pricing tiers


Azure pricing tiers


In our previous video, we discussed Azure App Service Plan. In this video we will discuss Azure pricing tiers.

When we create App Service Plan, one of the important decisions we have to make is selecting the appropriate pricing tier, becuase it is the pricing tier that determines what features are available for the applications that we deploy in azure, the hardware that is available and the price we pay. In general, the higher the pricing tier, the more features and capabilities we get. We discussed this in detail in our previous video.

azure pricing tiers explained

Azure Pricing Tier Categories

Azure Pricing tiers are classified into the following 3 broad categoris.

azure pricing tier categories

Shared compute

The free pricing tier (F1) and the shared pricing tier (D1) are in this category. With these 2 tiers, you cannot scale out resources and they use shared infrastructure. This means, all your apps run on the same Azure VM as other App Service apps, including apps of other customers.

Dedicated compute

For example, B1 and B2 pricing tiers are in this category and they run apps on dedicated Azure VMs. Only apps in the same App Service plan share the same compute resources. The higher the tier, the more VM instances are available for scale-out.

Isolated

With this tier you not only get dedicated VMs but also dedicated Virtual Networks. This means on top of compute isolation to your apps, you also get network isolation and that is made possible through virtual networks. It also provides the maximum scale-out capabilities.

Can I run more than one App in an App Service plan

Yes, you can. If multiple apps are in the same App Service plan, they all share the same VM instances. 

If you have multiple deployment slots for an app (a staging and production slot for example), all these deployment slots also run on the same VM instances. If you are new to deployment slots, we will discuss them in our upcoming videos.

Similarly, if you run WebJobs, enable diagnostic logs or perform backups, they also use CPU cycles and memory on these VM instances.

So the point is, if you have 3 VMs in your App Service Plan for example and you have deployed multiple apps, all the apps run on all the 3 VM instances. If the plan is configured to autoscale, then all apps in the plan are scaled out together based on the autoscale setting.

How many apps can I run in one App Service Plan

Well, there is no such limit. It really depends on the capabilities of your existing plan. The point is, as long as your existing plan has enough resources to handle the load, you can continue to add apps to it. However, keep in mind, deploying too many apps and overloading your plan can potentially cause downtime for both your new as well as existing apps.

How to determine if my new app needs a new plan or if I can use my already existing plan

  • For example, your new app needs resources in a different geographical region than your existing apps. This may be because, your national or regional regulations require you to do so.
  • May be your new app is resource inetensive and putting it in your exisitng app service plan can negatively affect already existing apps.
  • May be your new app needs different set of capabilities and features altogether. For example, you want to scale this new app independently from the other apps in the existing plan.

Can I change pricing tier after the app service plan is created

Yes, you can change the pricing tier anytime you want. If you want more features or more computing power you can change to a higher pricing tier. On the other hand, if you discover you are not using all the features or computing power, you can revert to a lower pricing tier. The point is you can scale your app service plan up or down anytime simply by changing the pricing tier of the plan.

For example, if you are not sure which pricing tier is right for you, you can get started by hosting your web application in a Free App Service plan and pay nothing. If you want to add more features like a custom domain for example, you can scale up to the next higher tier that supports custom binding. If you want to add even more features or computing power, scale up to the next higher tier and so on.

Azure app service plan


Azure app service plan


In our previous video we discussed what is App Service. In this video we will discuss App Service Plan.

What is App Service

App Service is a Platform as a Service (PaaS) offering and we use it to host web applications, REST API's and backend services for mobile applications.

What is App Service Plan

To create App Service, you need an App Service Plan. Without an App Service Plan you cannot create App Service. So, in the Azure portal, when you try to create app service, you will have to select an app service plan if you have one already or create a new one. The point is, without an App Service Plan, you cannot create App Service. This is beacuse it is the App Service Plan that defines the compute resources required for your application to run.

How to create App Service Plan

Well, just like any other resource in azure. Search for App Service Plans in the azure protal and click Create.

On Create App Service Plan screen, you specify the following

Name

A name for the App Service Plan. Common convetion is to use the prefix plan. I am going to use this plan for our web application PragimTech.com, so it makes sense to name it plan-pragimtech.

Operating System

The operating system that you want on the underlying virtual machine - Windows or Linux.

Region

The region where you want the App Service Plan to be created.

Pricing Tier

It is the pricing tier that determines what you pay and what you get. Basically the pricing tier you select, determines the following 3 things.

azure pricing tiers

Features available

For example the following are some of the features.

  • Custom Domains
  • SSL Bindings
  • Auto scale
  • Staging slots
  • Daily backups
  • Traffic manager integration

Which of these features are available to your application depends on the pricing tier you select. If you are new to these features and why we need them, please don't worry, we will discuss them in our upcoming videos. For now, what you need to understand is, the features that are available depends on the pricing tier you select. In general, the higher the tier, the more features are available and obviously you also pay more.

For example, if you select S1 pricing tier under production workload, you have all of the above features available. On the other hand, if you select the Free tier from Dev/Test workload, you don't have any of these features available. For example, if you want to be able to scale rescources up and down depending on the demand for your application, you may want to select a pricing tier that supports auto scale feature. With the free pricing tier, you cannot auto scale.

Included hardware

The hardware resources that are available (like memory, storage and the compute power) also depend on the pricing tier you select. One thing I should point out here is, in Azure compute (i.e CPU) performance is compared using something called Azure Compute Unit (ACU for short).

For example, as of this course recording, if you select S1 pricing tier under production workload, you have the following hardware resources available.

  • 100 Aazure Compute Units
  • 1.75 GB memory per VM instance. For example, the S1 pricing tier supports auto scale feature up to 10 VM instances. Let's say based on the demand for your app and the scaling rules, you have 4 VMs configured. 1.75 GB memory is per VM instance. So this means you have 4 times 1.75 GM memory available for your apps.
  • 50 GB Storage - If you want to, you can run multiple applications using a single App Service Plan, but the improtant point to keep in mind is, these hardware resources are shared by all the apps. So this means, each app that is deployed in an App Service Plan gets a slice of computing power, memory and storage.

What is azure app service


What is azure app service


In this article we will discuss what is azure app service.

App Service is a Platform as a Service (PaaS) offering from Microsoft. We use it to host web applications, REST API's and backend services for mobile applications.

It doesn't really matter which programming language or framework you have used. Web applications and services that are developed using any of the following programming languages or frameworks can be hosted using azure app service. It could be 

  • .NET
  • .NET Core 
  • Java 
  • Ruby
  • Node.js
  • PHP
  • Python

Azure App Service v/s On-premise Hosting

How is hosting on azure app service different from hosting on your own on-premise server. In other words, why would anyone use azure app service instead of using other alternatives to host their applications.

Well, to understand this, it is very important you understand the difference between IaaS and Paas. We discussed these 2 concepts in detail in Parts 11 and 12 of our cloud computing tutorial.

With on-premise web hosting, you or your organisation is reponsible for managing pretty much everything. 

  • You may have to spec out and procure physical servers, storage, networking equipment and all the related hardware.
  • Make sure there is main power supply, back-up power supply, cooling system etc are in place.
  • Install and set up the network
  • Install and configure virtualization software, operating system, any middleware or runtime components that your application needs
  • Install and configure a web server like IIS, Apache, Nginx etc.

Azure App Service is a Platform as a Service (PaaS) offering. This means you or your organization is only responsible for managing your business application and it's data. Everything else is managed by Azure. You don't have to worry about any of the things like, managing the network or underlying infrastructure. Installing the operating system updates, critical patches, runtime or middleware components. All these are taken care by Azure. This gives you, even more time to concentrate on what matters to your business. 

Benefits of using azure app service

Fully managed environment

It's a fully managed environment, meaning App Service automatically patches and maintains the OS and language frameworks for you. You get the time to focus on designing, developing and maintaining your application and data.

Multiple programming languages and frameworks are supported

Azure App Service supports a wide variety of programming languages and frameworks. 

  • .NET
  • .NET Core 
  • Java 
  • Ruby 
  • Node.js
  • PHP
  • Python

You can also run PowerShell and other scripts or executables as background services.

Scalability

Based on the demand for your application, App Service can scale resources up and down or in and out. You can do this either manually if you want to or automatically based on metrics like CPU utilization for example.

Compliance

App Service is ISO (International Organization for Standardization), SOC (Service Organization Controls), and PCI (Payment Card Industry) compliant.

Security

Authenticate users with Azure Active Directory or any of the external authentication providers like Google, Facebook, Twitter, or Microsoft.

Support for Containerization and Docker

You can also host a custom Windows or Linux container in App Service. So, if you want to, you can dockerize your app and host it in App Service. You can also run multi-container apps with Docker Compose. We will discuss how to do all these in our upcoming videos.