Monday, 20 May 2024

Public IP address vs private IP address


Public IP address vs private IP address


In this video we will discuss the differene between, public IP address and private IP address and more importantly why do we need 2 IP addresses.

Public and Private IP addresses

We need both private and public IP addresses to connect and do anything on the internet. For example, when you fireup your favourite browser and navigate to PragimTech.com, how does the internet know it has to deliver the content to your laptop and not to someone else laptop or phone in your office or home. Well, this is made possible by public and private IP addresses working together.

For example, let's say in your home you have 2 computers and 3 mobile phones, all devices connected to the same network.

public ip address vs private ip address

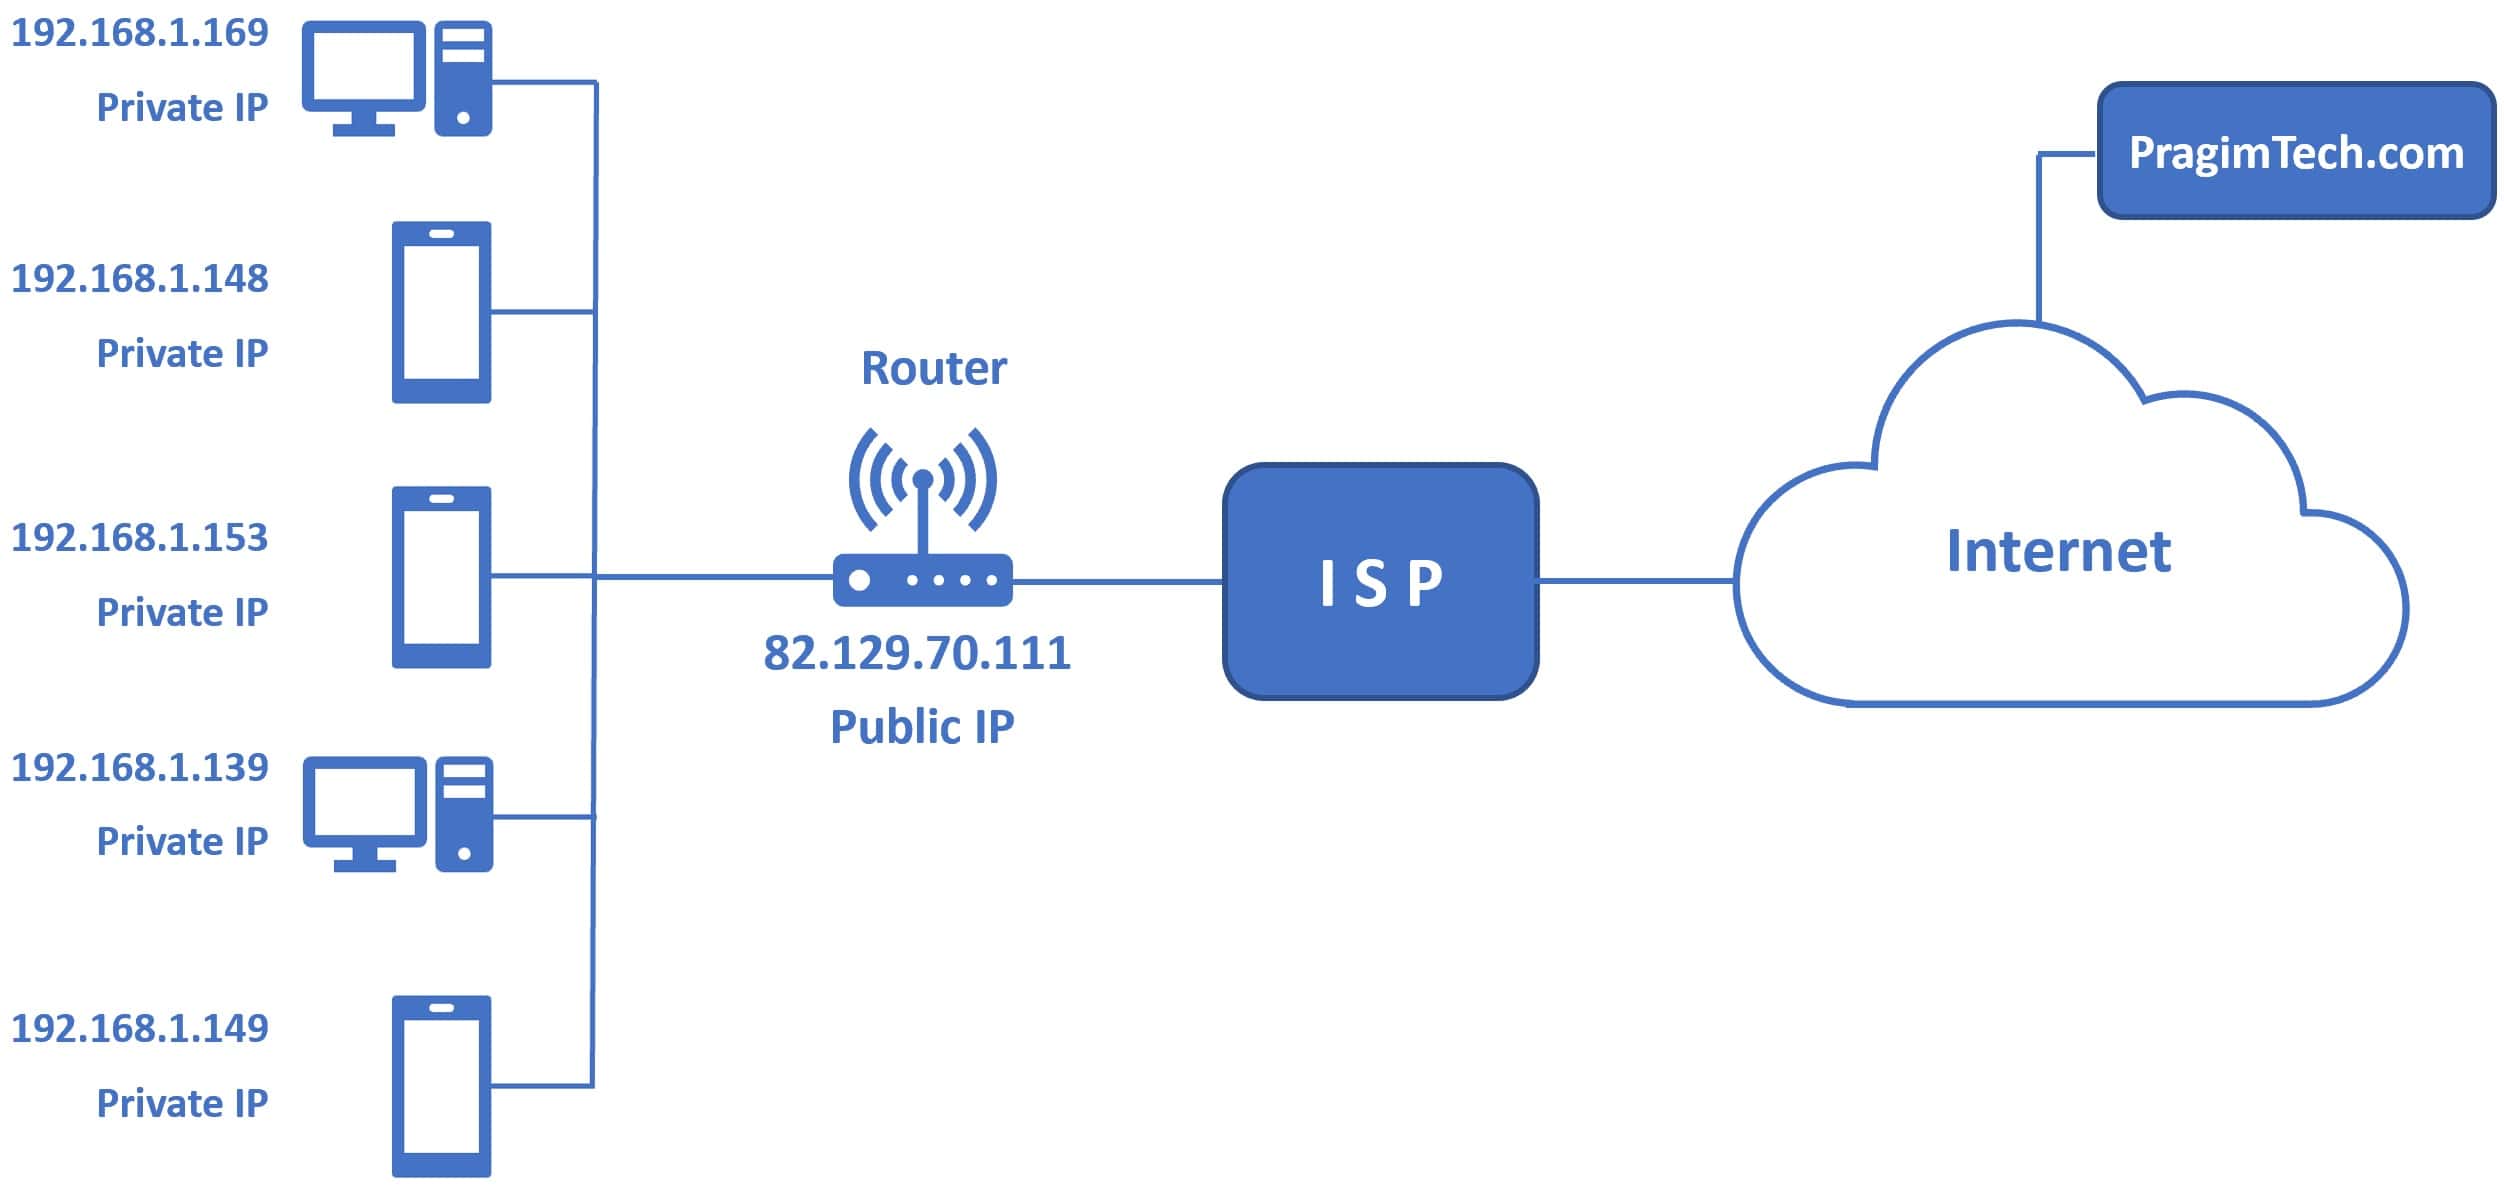
The router which you use to connect to the internet, assigns a private ip address to each device on your home network (in our example for the 2 computers and 3 mobile phones).

The router itself, gets a public ip address assigned to it from the internet service provider (like BT: British Telecom or Virgin Media if you are in the UK, or Comcast if you are in the US). If you are in a different country, you may have different internet service providers. The importnant point to keep in mind is, it is this internet service provider that assigns a public ip address to your router and it is the router that assigns private ip addresses to all the devices on your home or office network.

  1. With this setup, let's say from one of our computers, we request an article from a website like PragimTech.com on the internet. 
  2. The internet knows, your router public ip address. So, it sends the response from PragimTech.com to your router.
  3. Your router knows, the private ip address of each of your devices. So, the router then forwards the response to that respective device.

In our example, we have 5 devices (2 computers and 3 mobile phones). So, all the 5 devices have the same public ip addresss, but a unique and different private ip address. This is how the router is able to send the response it received from the internet to the device that made the request.

IP addresses - terminology

There are different terms that people use interchangably to refer to Private and Public IP addresses.

Private IPPublic IP
Internal IPExternal IP
LAN (Local Area Network) IP
WAN (Wide Area Network) IP

How to find private ip address

In the run window, type cmd and click OK

open command prompt on windows 10

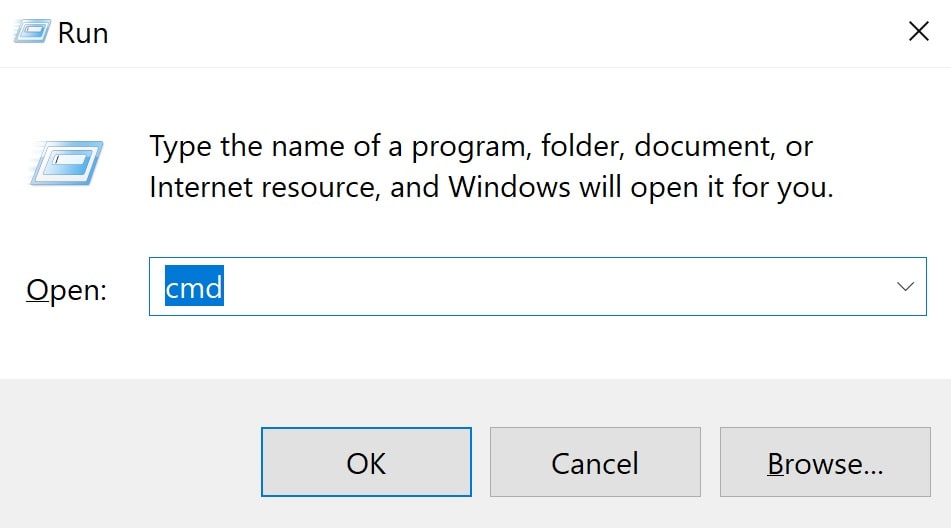
In the command prompt type the following command and press enter

ipconfig

In the output, you should see IPv4. This is your private ip address

How to find public ip address

  1. On your laptop fire up the command prompt and use the command ipconfig
  2. Find the default gateway IP address 
  3. Type the default gateway IP address in the browser (http://192.168.1.254)
  4. This takes you to the admin router page and you should see the WAN IP address here.
  5. WAN IP address is your public ip address. WAN IP is just another term for public IP

OR

Simply navigate to the following website and it displays your WAN IP address.

http://wanip.info

Public and Private IP address - Important points to remember

Public IP address

  1. Public IP address is also commonly called as internet IP addresss.
  2. It is by this public IP address your computer is indetified on the internet.
  3. If you connect to the internet from an airport or hotel your public IP address changes.

Azure just in time VM access


Azure just in time VM access


In this video we will discuss, Azure just in time VM access feature.

What is Just-in-time VM access

Hackers always scan the internet for open ports like RDP or SSH. If you have a port open all the time, it's a potential target for an attack. When one of the VM's in your network is breached, it can be used as the entry point to attack other servers and resources within your environment.

Just-in-time VM access reduces the attack surface area by opening the inbound ports just when you need them and are automatically closed after the specified duration has elapsed.

Enable Just-in-time VM access

You can enable JIT VM access from the VM itself or from Azure Security center.

Enable JIT VM access from an individual VM

In the Azure portal navigate to the VM

Click on the Configuration blade (Under Settings)

Click the button Enable just-in-time

When you enable JIT VM access, it adds deny inbound rule. This deny rule blocks all traffic to port 3389. If you need to access and remotely login to the VM, you need to request access.

What if you already have an inbound port rule that allows access to port 3389? Well, the priority of that exisiting rule will be modified automatically so it has a higher number than the deny rule. Rule with lower priority number wins.

azure jit vm access

Enable JIT VM access from Azure Security Center

  1. In Azure portal, navigate to Azure Security Center (You will find the link to Azure Security Center on the VM Configuragtion tab)
  2. On "Not Configured" tab, select the VMs and click Enable JIT on VMs button.

Request Access to VM

If you need to access the VM, you need to request it. You can do this either from the Connect tab on the VM itself or from the azure security center.

Request Access from the Connect tab

azure vm just in time access

Request Access from Azure Security Center

On the Configured tab, select the VMs for which you want to request access and then click Request Access button.

azure just in time access vm

This opens another page, where you configure an inbound port rule. 

azure just in time access

Unable to connect to azure VM using RDP


Unable to connect to azure VM using RDP


In this video we will discuss why you are not able to connect to a virtual machine in azure using RDP (Remote Desktop Protocol) and more importantly how to fix it.

Azure RDP connection failed

You might not have configured an inbound rule for RDP connection. This is one of the main reasons why you are not able to connect to your VM using RDP.

In the Azure portal, on your virtual machine blade (Settings - Connect - RDP tab) you will see the port that is being used for RDP connection.

unable to connect to azure vm using rdp
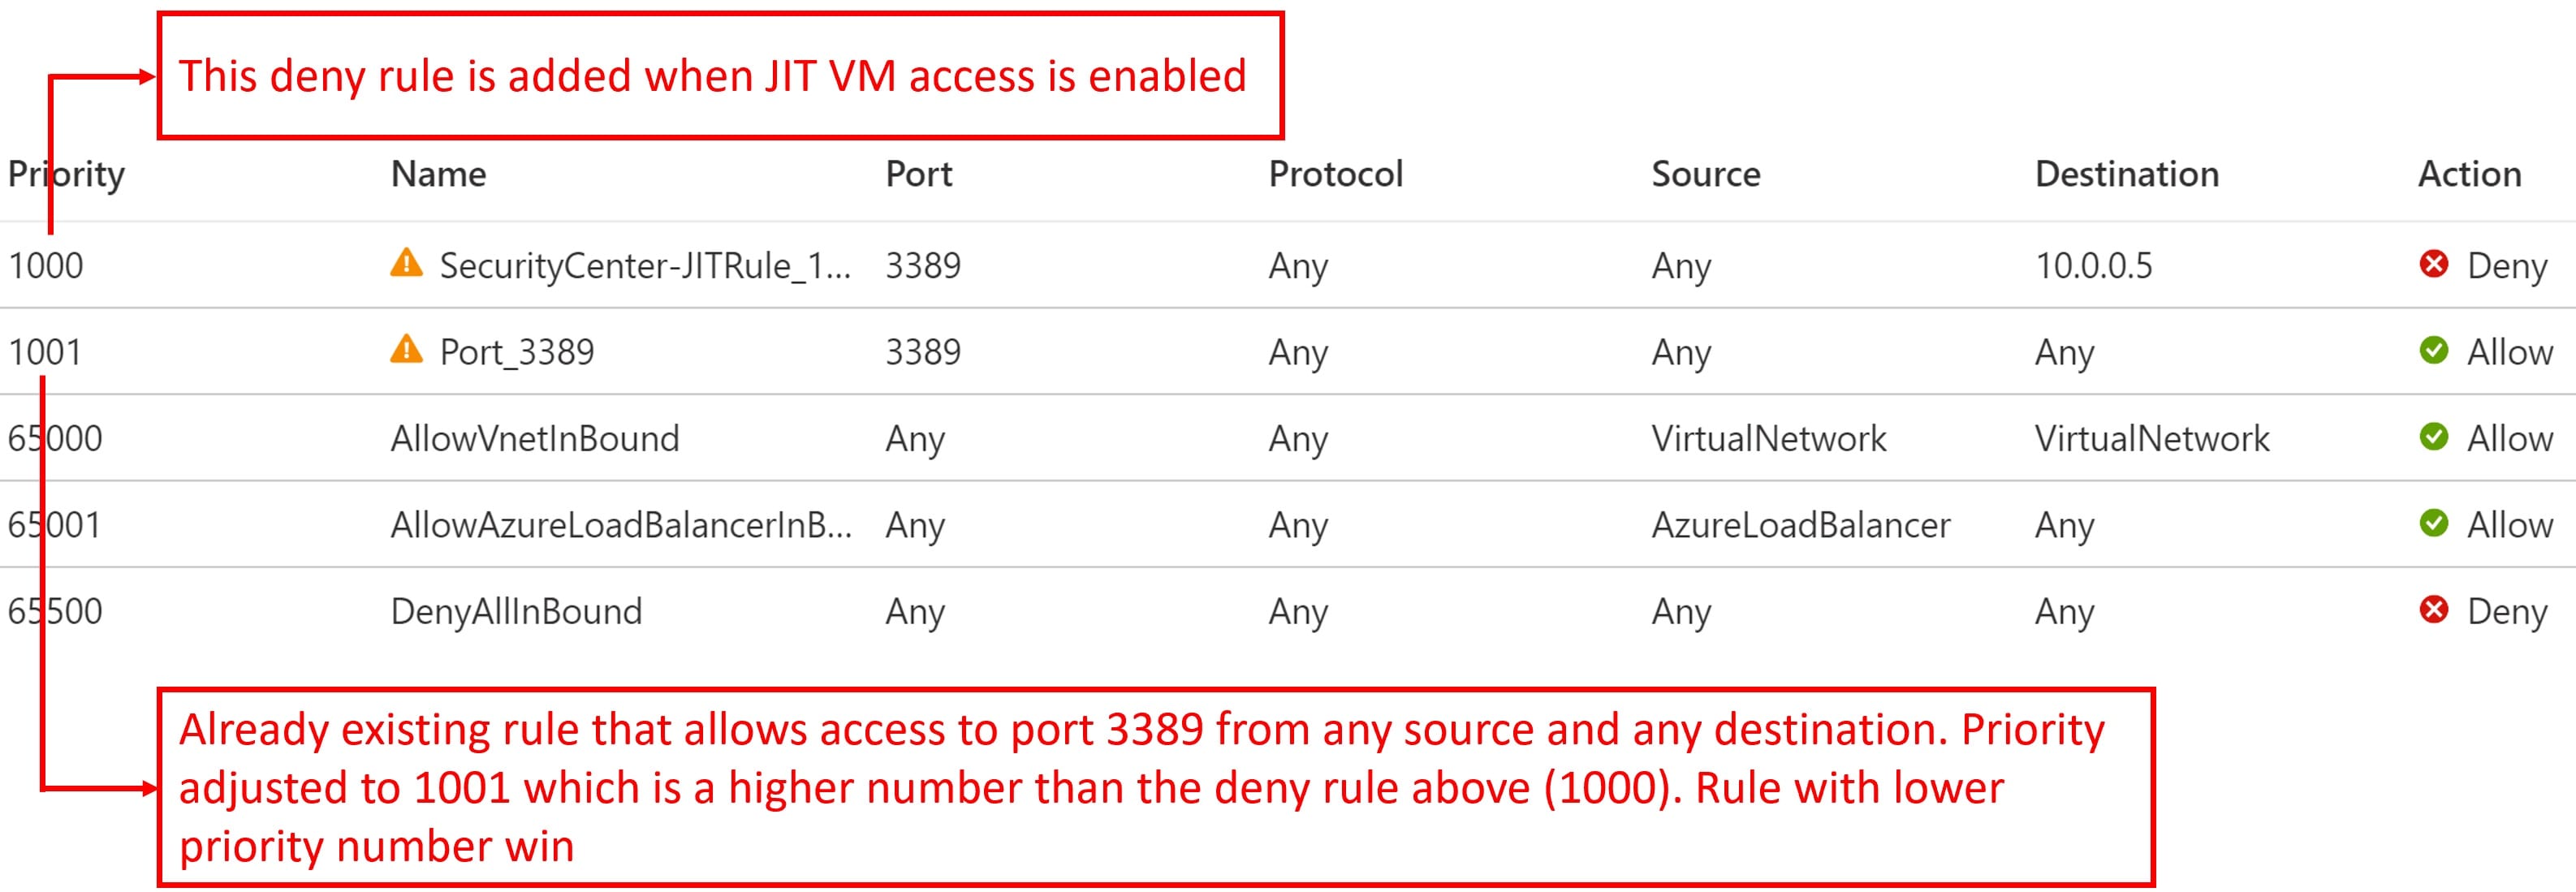
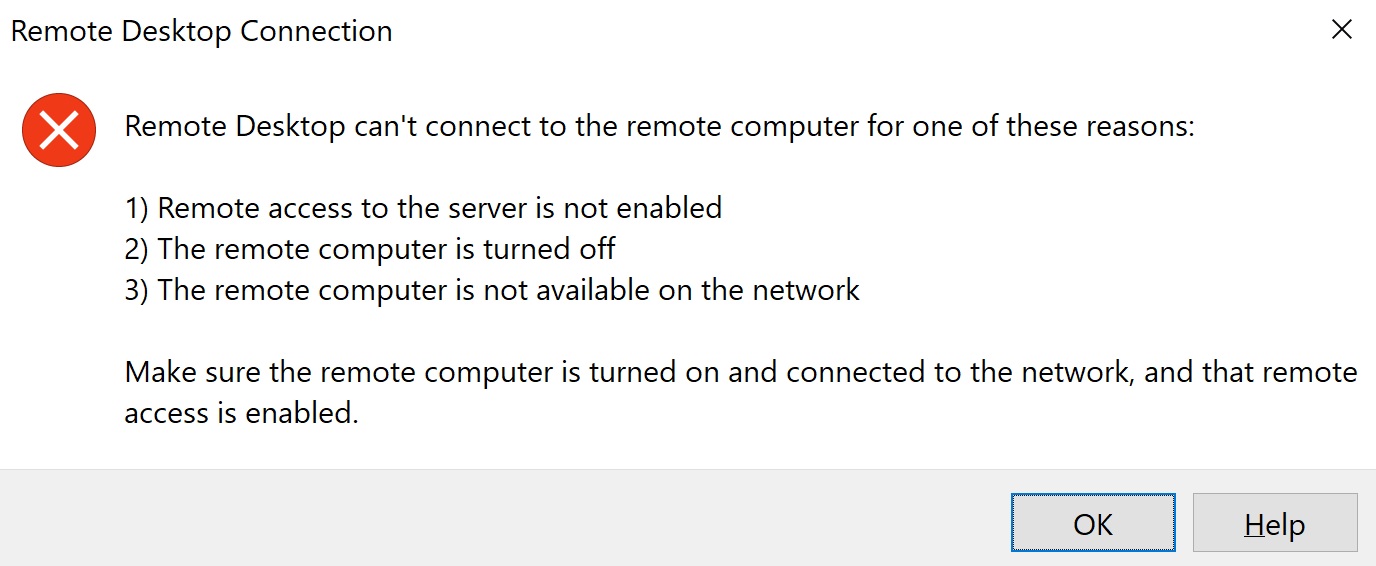
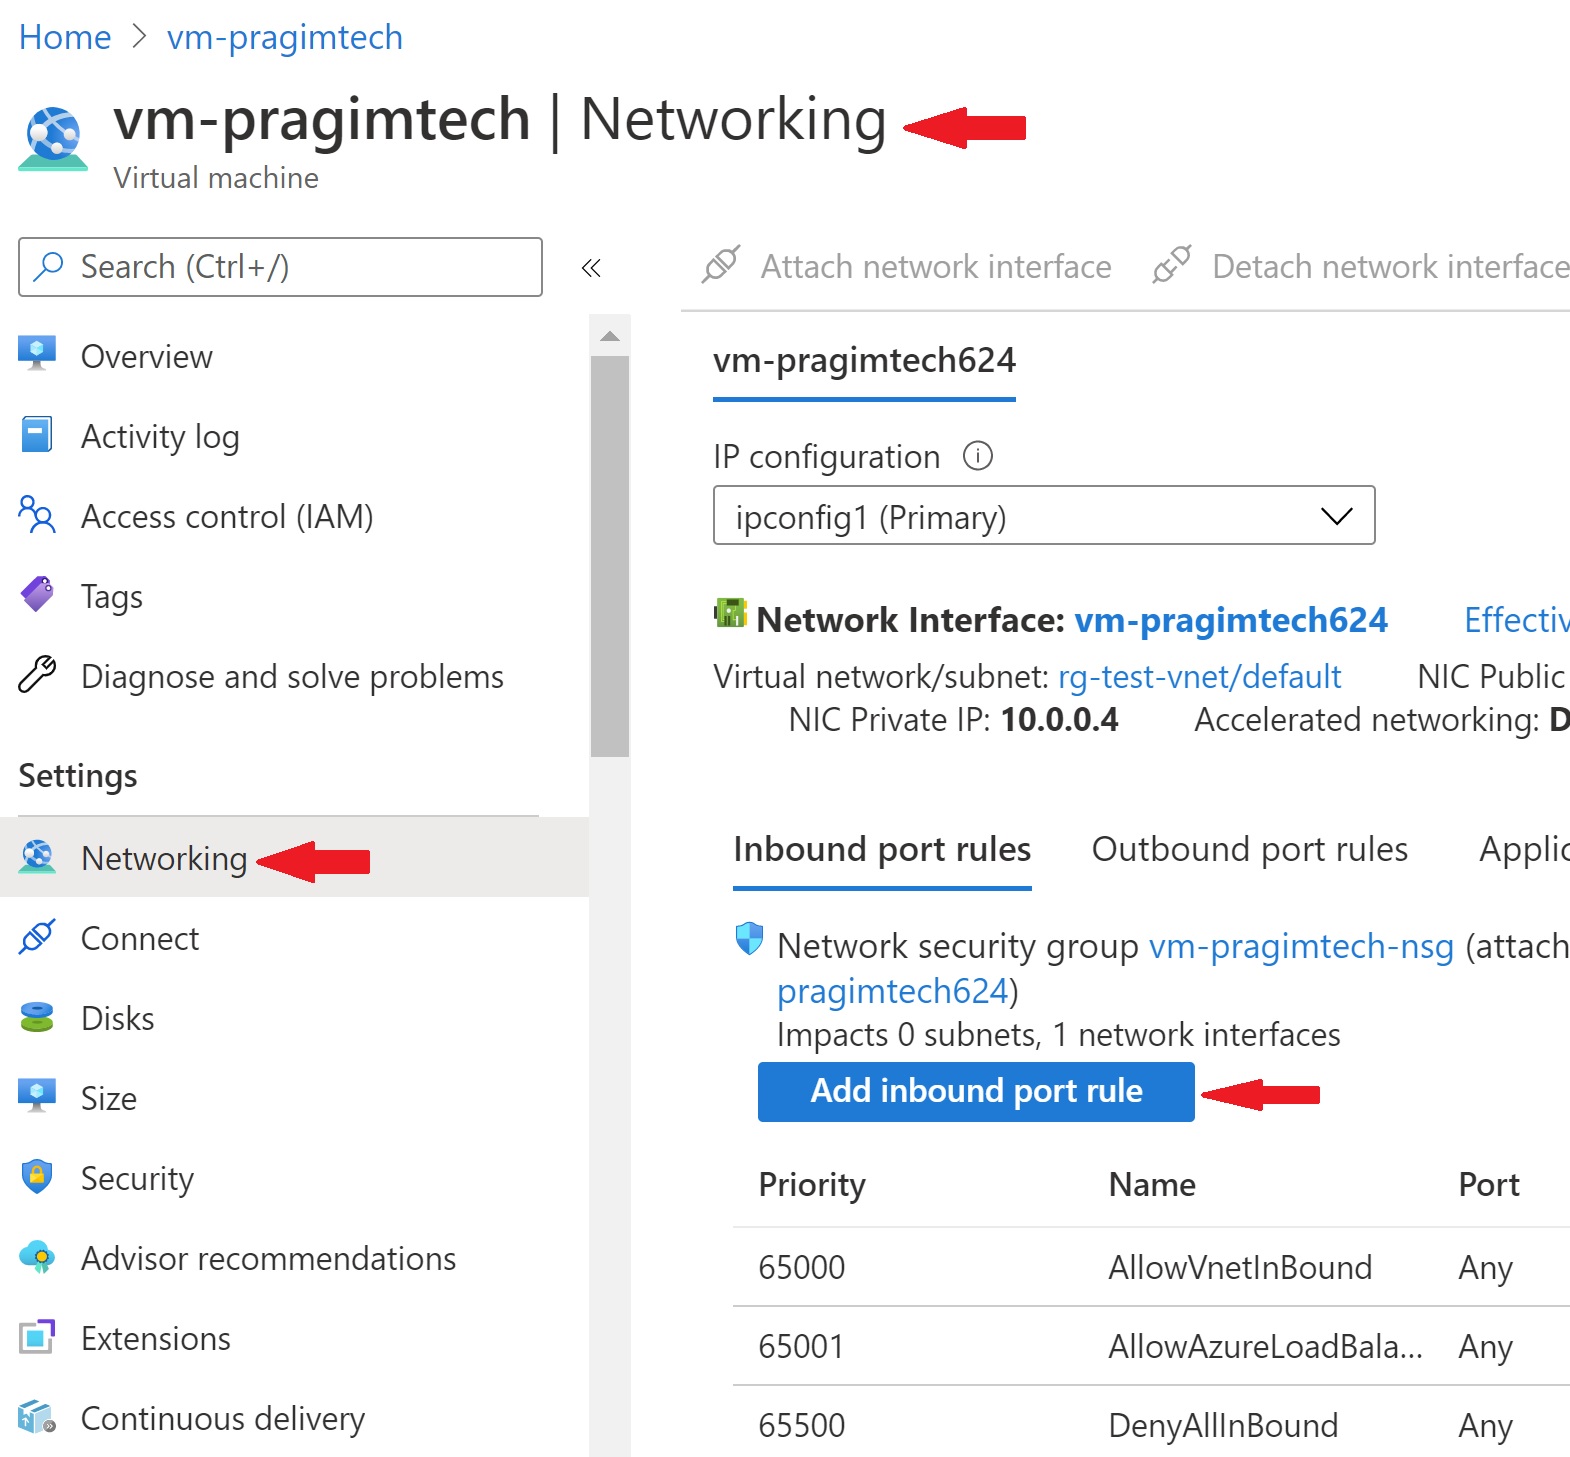
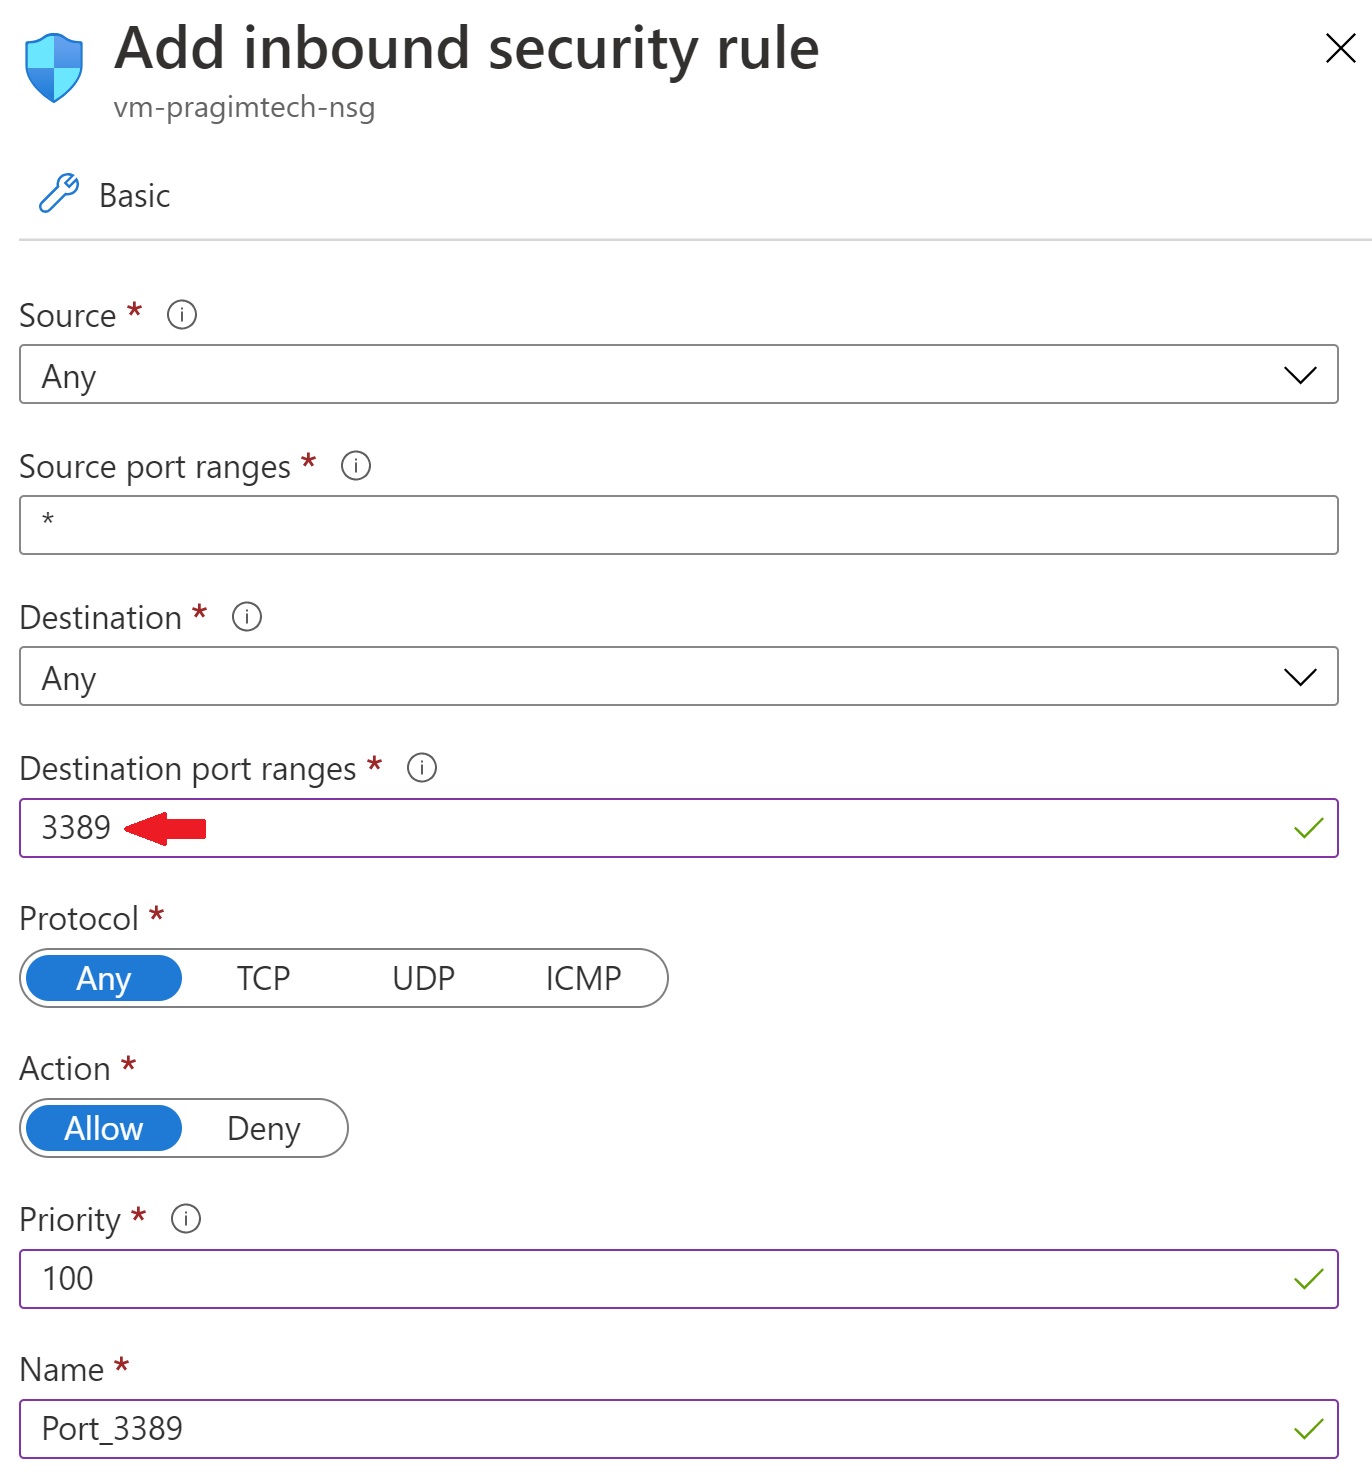
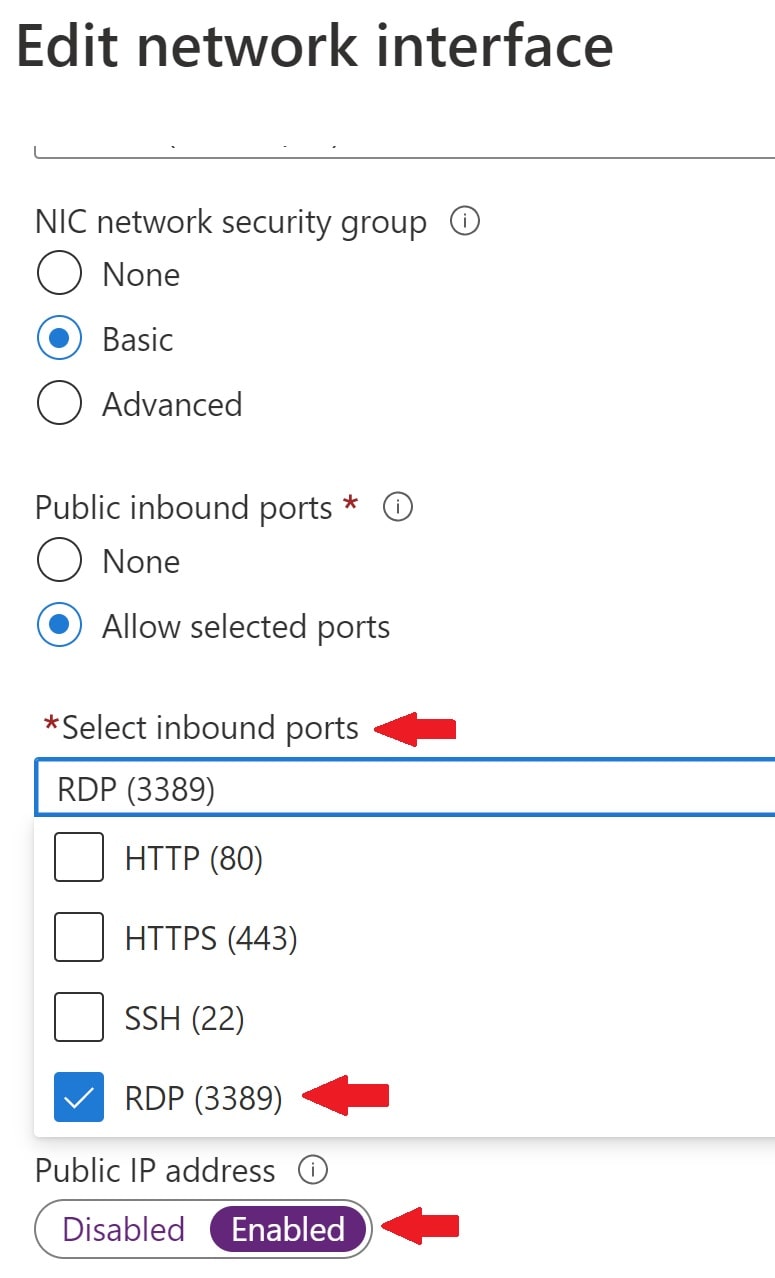
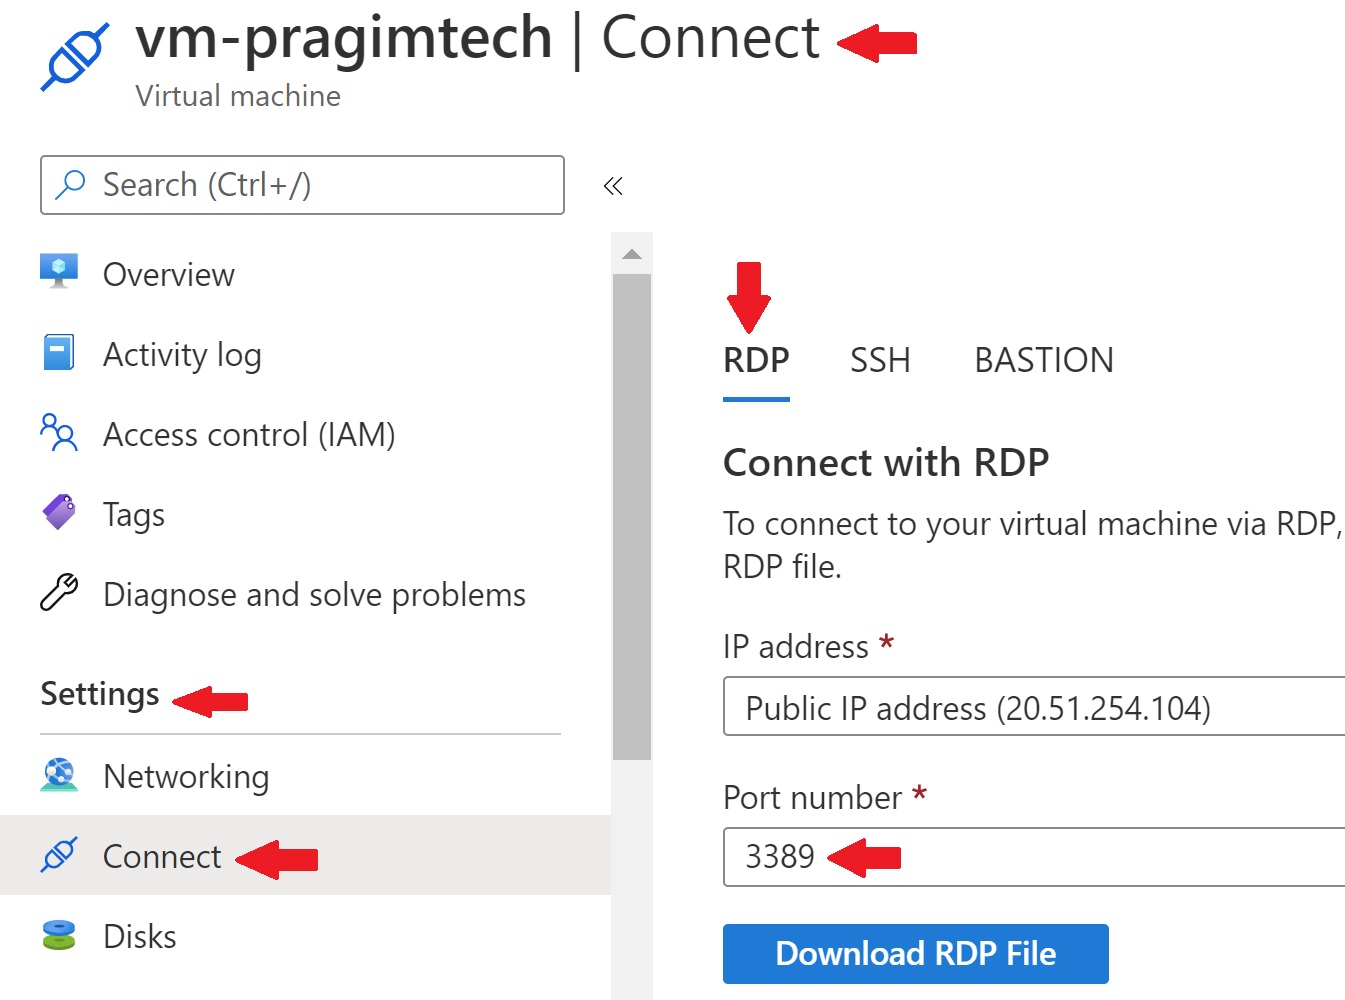
In this example, the port 3389 is being used for RDP. This port must be opened on your virtual machine for inbound connection. If it's not, you will see the following generic RDP connection failed error.

azure rdp connection failed

Configure Inbound rule for RDP Remote Desktop Protocol

On your VM open the port 3389 for RDP connection. You do this on the Networking tab. Click "Add inbound port rule" button.

unable to rdp to azure vm

Azure VM - Inbound rule for RDP

azure vm inbound rule for rdp

Source : Source is the machine from which you are trying to connect. The value Any, allows any machine on the internet to connect to your VM which obviusly is least secure. You can specify which machines can connect by an IP address, application security group or a default tag. When you specify a range of IP address or a specific IP address, only a machine with that IP address can connect which is far more secure than allowing everyone.

The most important configuration is the Detination port i.e the port on your VM which you want to open for RDP connection. In our example we are opening port 3389.

With this inbound rule, you should be able to successfully connect to your VM using RDP.

Security Risk

RDP port 3389 is exposed to the Internet. This is a security risk and only recommended for testing as hackers constantly scan public cloud IP ranges for open ports. Once they find a port open they attempt attacks using common passwords and known unpatched vulnerabilities.

How to create a virtual machine in azure portal


How to create a virtual machine in azure portal


In this video we will discuss how to create a virtual machine in azure portal. 

Navigate to portal.azure.com and search for Virtual Machine and click Create.

Subscription - Select your azure subscription

Resource Group - Select one of your existing resource groups or create a new one.

Virtual machine name - Provide a name for the VM. Common convention is to use the prefix vm. 

Region - Azure region where you want the VM to be created.

Availability options - If you are creating multiple VMs, replicate them in Availability Zones or Availability Sets to protect your applications and data from datacenter failures and maintenance events. If you are new to Availability Sets and Availability Zones, we discussed them in detail in Parts 8 and 9 of this video series.

Image - The base operating system you want on the VM. You have several choices - Windows or Linux. When you click on the link "See all images", you have even more options in the azure market place. For example, you can create a VM with visual studio or SQL server pre-installed.

Please note : As of this course recording, I haven't found a VM image with both SQL Server and Visual Studio. However, you can create a custom image and use that if you want. We will discuss how to do that in our upcoming videos.

Azure Spot instance - This option is great for cost saving. Basically it allows us to use unused azure capacity at a significantly low price. However, at any point in time, when Azure needs the capacity back, the Spot VMs are evicted with just 30 seconds notice. Therefore, Spot VMs are only good for workloads that can handle interruptions like batch processing jobs, development/test environments, large compute workloads etc.

Size - The size of the VM. It determines processing power, memory, and storage capacity. An hourly price is charged based on the VM's size and operating system.

Username - Administrator username for the VM

Password - Administrator password for the VM

When to use azure virtual machines


When to use azure virtual machines


In this video we will discuss when to create and use a virtual machine over serveral other services offered by Azure like App Service, Function Apps, Container instances, Service Fabric etc.

Let's say I have a standard web application. Something like a typical n-tier application, with a RESTful service accessing a database server.

why use virtual machines

It doesn't really matter what technology we have used to build this web application. ASP.NET Web forms, MVC, Java, PHP, or Python. If you want to host your web application, you may use an Azure App Service. There is no need for you to use a Virtual Machine. However, there are several use cases, why we may want to create and use a virtual machine.

What is an Azure App Service

what is azure app service

Well, we will discuss it in detail in our upcoming articles. For now, you can think of it as a managed service for hosting web apps, mobile app back ends, RESTful APIs, or even automated business processes.

Azure App Service v/s Virtual Machine

Azure App Service is a "Platform as a Service" offering. It is a fully managed environment. The cloud service provider (in this case Azure) manages the underlying infrastructure (i.e Servers, Networking, Storage and even Virtualization). They are also responsible for installing the operating system updates, critical patches, runtime or middleware components. We just manage the application that we are building and it's data. 

azure app service vs virtual machine

Virtual Machine on the other hand is an "Infrastructure as a Service" offering. The following are some of the reasons why you may choose to create a virtual machine over using a platform as a service offering, such as an Azure App Service.

why use azure virtual machines

Complete control over your development, test and staging environments

You want to have complete control over your computing environment like development, test or staging. May be you want to use your own custom operating system image or the application that you are developing is such that, you may want to install your own custom middleware and runtime components. So, basically, the application that you are developing has strong dependencies on the server and you want to take infrastructure related things like networking, load-balancer, scale-out and scale-in, web server management, and so on into your own hands. In short, you want to have total control over your development environment.

Migrate legacy apps to the cloud

May be you have an on-premise legacy app that depends on custom middleware and runtime components. You want to migrate this app to the cloud, but since this is a legacy app with it's own custom middleware and runtime requirements, it does not have an equivalent platform as a service offering. So you may want to create and use a VM instead. With the VM you have complete control. You can install any custom software components you want. Basically it provides the easiest migration path i.e you can even lift and shift an on-premise custom legacy app to a VM in the cloud.

Extend on-premise datacenter

Extend your on-premise datacenter and create hybrid cloud to which we can burst through if there are spikes in demand for our application, or may be you just want to use it as a back up, fail over or disaster recovery site.

Azure offers several compute services like the following

  • App Service
  • App Service Container
  • Virtual Machines
  • Azure Batch
  • Azure Functions
  • Service Fabric
  • Container Instances
  • Azure Kubernetes Service

Which compute services to use depends on several factors like the following 

  • Are you creating a new application or migrating an existing application?
  • If you are migrating an existing application do you want to just lift and shift your existing application to cloud? or
  • Do you want to optimise to cloud and then migrate?
  • Does your app have any dependencies on the server?
  • Can those server dependencies be containerized?
  • Do you want to use microservices architecture?

Which compute services to use really depends on the answers to these questions. If your application consists of multiple workloads, evaluate each workload separately. A complete solution may require two or more compute services.

The following flowchart from MSDN really useful to decide which compute services to use for your solution. We will discuss these compute services in our upcoming articles.

which azure compute service to use

Autoscale azure virtual machine scale set


Autoscale azure virtual machine scale set


In our previous video, we discussed how to create a virtual machine scale set. In this video we will discuss the scaling options we have i.e how to increase or decrease VM instances in a scale set.

Why increase or decrease VMs in a scale set

Well, there are a number of reasons. 

One reason could be, most of your customers use your application during specific times of a day. May be 10:00 AM to 12:00 noon and then again from 3:00 PM to 5:00 PM for example. During these 2 windows, you want your application to be fast and performant. So you may want to increase the number of VM instances that run your application. Outside of these 2 windwows, your application does not have that much demand. So, to save on cost you want to reduce the number of VMs that run your application.

Another reason could be, next week, you are launching a new product or a business line. So starting next week, you are going to have a heavy peak may be for 3 days. So during the heavy peak season, you want more VMs to run your application. Once the peak subsides, again to save on cost, you want to fall back to your baseline configuration.

Another reason could be, you are in a situation, where you cannot predict the demand for your application. So you don't really know, when you need more procesing power and when you can fall back to that baseline configuration. Well, for this we can use metric based auto-scaling.

Virtual machine scale set scaling options

In Azure, there are 3 options for scaling VM instances up and down. 

  1. Manually through the Azure portal
  2. Auto scale based on metrics or 
  3. Auto scale based on a defined schedule

azure vmss scale out

You can configure scaling options either at the time of creating the virtual machine scale set or after it is created. At the time of creating the scale-set, you configure scaling on the Scaling tab as you can see from the image below.

manual upgrade virtual machine scale set

Virtual machine scale set - Manual Scale

azure vmss manual scale

In the azure portal, navigate to your virtual machine scale set. Click on Scaling tab under Settings. To scale manually, specify the number of VM instances in the textbox provided. In a real world, it's a bit tedious and time consuming if we have to manually scale-out and scale-in everytime the demand for our application changes. However, it's an option, just in case, if you want to manually scale.

Virtual machine scale set - Custom Auto Scale

There are 2 ways to auto-scale. Auto scale based on metrics. For example, the following auto-scale condition increase the VM instance count by 1, when the average CPU utilization is greater than 70%. The instance count is decreased by 1, when the average CPU utilization falls below 25%.

virtual machine scale set autoscale

Auto scale based on a schedule to a specific instance count. The following scale condition increases the total instance count to 3 on Jan 1, 2021 and on Jan 5, 2021 it falls back to the baseline configuration.

vmss autoscale

Scale to a specific instance count can be repeated on specific days of the week.

virtual machine scale set scaling

If you get the error - The subscription is not registered to use namespace 'microsoft.insights

  1. Navigate to your Subscription blade in the azure portal
  2. Click on Resource Providers
  3. Search for Microsoft.Insights
  4. Select it and click Register

the subscription is not registered to use namespace 'microsoft.insights'

Failed to update configuration for 'vmss-demo'. {"error":{"code":"MissingSubscriptionRegistration","message":"The subscription is not registered to use namespace 'microsoft.insights'. See https://aka.ms/rps-not-found for how to register subscriptions.","details":[{"code":"MissingSubscriptionRegistration","target":"microsoft.insights","message":"The subscription is not registered to use namespace 'microsoft.insights'. See https://aka.ms/rps-not-found for how to register subscriptions."}]}}.

Summary

If your application demand increases, the load on the VM instances in your scale set also may increase. If this increased load is consistent, rather than just a brief demand, you can configure autoscale rules, both to increase and reduce the number of VM instances in the scale set.

Create azure virtual machine scale set


Create azure virtual machine scale set


In our previous article, we discussed what is a virtual machine scale set and why we need it. In this article, we will discuss how to create a virtual machine scale set.

As usual in the azure portal search for virtual machine scale set or it's acronym VMSS.

azure portal create vmss

Click on "Virtual machine scale sets" and then "Add"

Create a virtual machine scale set - Basics tab

create virtual machine scale set

Subscription - Select your azure subscription

Resource Group - Select one of your existing resource group or create a new one. A Resource Group is a group of related azure resources. This grouping allows us to manage all the resources that belong to a specific application and deployment environment as one unit. We can even automate deployments using Azure Resource Manager Templates. We discussed Resource Groups in detail in Part 5 of this video series.

Virtual machine scale set name - Provide a name for the VM scale set. Common convention is to use the prefix vmss. As we are using this virtual machine scale set for a demo, I am going to name it vmss-demo.

Region - Azure region where you want the VMSS to be created. The region you select determines the further options and features available. For example, if you select "South India" region, you don't have availability zones supported. So, if you are building high availability systems and you need availability zones, you may have to select a different region that supports availability zones. I know East US region supports availability zones, so I have selected it.

Availability zone - Check all the availability zones into which you want your VMs to be placed. If you select 3 availability zones and you create 3 virtual machines in your scale-set, each VM will be placed in a separate availability zone. If you have 6 VMs, in your scale-set, then each availability zone will contain 2 VMs.

Image - The base operating system you want on the VMs. You have several choices - Windows or Linux.

Azure Spot instance - This option is great for cost saving. Basically it allows us to use unused azure capacity at a significantly low price. However, at any point in time, when Azure needs the capacity back, the Spot VMs are evicted with just 30 seconds notice. Therefore, Spot VMs are great for workloads that can handle interruptions like batch processing jobs, development/test environments, large compute workloads etc.

Size - The size of the VM. It determines processing power, memory, and storage capacity. An hourly price is charged based on the VM's size and operating system.

Username - Administrator username for the VM

Password - Administrator apssword for the VM

Disks tab

Leave the default settings on the Disks tab

Netwroking tab

On the Netwroking tab we configure three things for our VMSS

  1. Virtual network
  2. Network interface
  3. Load balancing

Virtual network -  Virtual network or VNet as it is commonly called allows Virtual Machines to securely communicate with each other, the internet, and on-premises networks. It is similar to a traditional network that you see in your own on-premise data center.

Network interface - A VM can have one or more Network interface. It is this Network interface that enables a VM to communicate with other VMs, internet and on-premises servers. By default, the virtuak machines we create in azure are not accessible over the internet for obvious security reasons. However, you can override this by opening an inbound port. For example, let's say, we want to access the VM over the internet using RDP (Remote Desktop Protocol). For this we need to open the RDP inbound port. If you don't have this port open, you will not be able to RDP into the VM. Click on the pencil icon under Network interface category.

not able to rdp to azure vm

This takes you the following Edit network interface page

azure windows vm enable remote desktop

  • Under "Public inbound ports", select "Allow selected ports"
  • Check RDP (3389) checkbox
  • Enable Public IP address - Without this, we won't be able to communicate with the virtual machine from outside the virtual network.

With this configuration we are basically opening up port number 3389 for RDP communication.

Load balancer

If you want a load balance to be created, check "Use a load balancer" checkbox.

azure vmss load balancer

This automatically creates a new load balancer and distributes the traffic among all the VMs in our scale set.

Scaling tab

Initial instance count - This is where we specify the number of identical VMs we want in our scale-set. We can create upto 1000 VMs. Leave the rest of the defaults and click "Review + create"

After a few minutes our virtual machine scale set must be created. After you see the message, your deployment is complete, search for VMSS and navigate to Virtual machine scale sets. You should see a Virtual machine scale set with the name vmss-testing

Click on vmss-testing and then on Instances, you will see the 3 VMs in the scale-set.

virtual machines scale sets