Tuesday, 30 May 2023

Types of Ec2 Instances

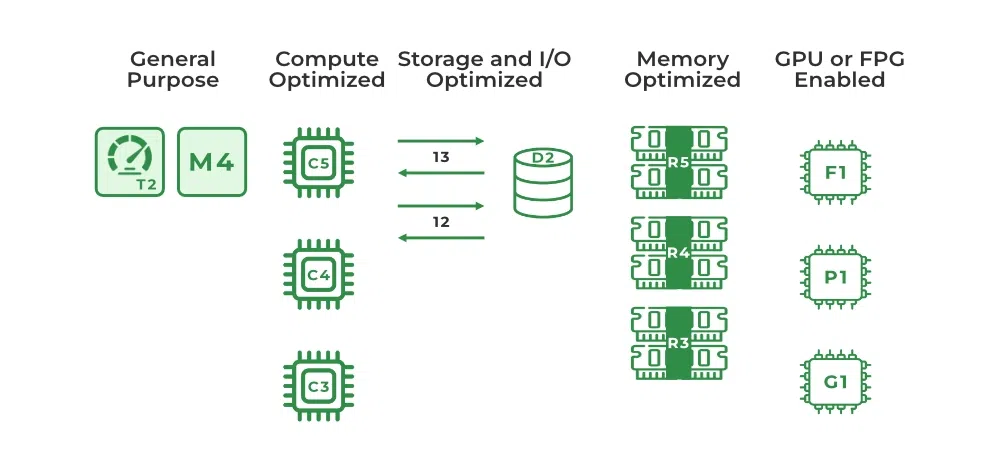
 Different Amazon EC2 instance types are designed for certain activities. Consider the unique requirements of your workloads and applications when choosing an instance type. This might include needs for computing, memory, or storage.

What are the AWS EC2 Instance Types?

The AWS EC2 Instance Types are as follows:

  1. General Purpose Instances
  2. Compute Optimized Instances
  3. Memory-Optimized Instances
  4. Storage Optimized Instances
  5. Accelerated Computing Instances
Instance types


1. General-Purpose Instances

The computation, memory, and networking resources in general-purpose instances are balanced. Scenarios, where you can use General Purpose Instances, are gaming servers, small databases, personal projects, etc. Assume you have an application with a kind of equal computing, memory, and networking resource requirements. Because the program does not require optimization in any particular resource area, you can use a general-purpose instance to execute it.

Examples:

  • The applications that require computing, storage, networking, server performance, or want something from everything, can utilize general-purpose instances.
  • If high-performance CPUs are not required for your applications, you can go for general-purpose instances.

EC2 General-Purpose Instance Types

Here are several general-purpose examples from which we can pick:

T2. micro: The most well-known instance in AWS is t2. micro, which gives 1 CPU and 1 GB of memory with low to moderate network performance. It is also free and highly helpful for individuals first starting AWS.
M6a Instance: The third-generation AMD EPYC processors used in the M6 instance are perfect for general-purpose tasks. In m6a there are different sizes like m6a.large, m6a.2xlarge, m6a.4xlarge, and so on. m6a large offers 2 CPUs, 8GiB memory, and network performance up to 12.5 Gigabit.
M5 instance: The newest generation of general-purpose instances, known as M5, are powered by Intel’s Xeon Platinum 8175 processors. Its M5 divisions include m5. large, m5.12xlarge, and m5.24 large, and the sort of M5 service we select will depend on memory, CPUs, storage, and network speed.

Features

  • Powered by specifically designed AWS Graviton3 processors.
  • Default optimized with EBS.
  • It consists of dedicated hardware and a lightweight hypervisor.
  • The bandwidth is higher when compared to other types.

Applications

  1. Web Servers: The web servers can be hosted in General-purpose instances.EC2 instances provide a flexible and scalable platform for web applications.
  2. Development and Test Environment: The developers can use these General-purpose instances to build, test and deploy the applications. It is a cost-effective solution for running this environment. 
  3. Content delivery: The hosting of content delivery networks (CDNs) that distribute content to users all over the world is possible using general-purpose instances. EC2 instances can be set up to provide content with low latency and great performance.

A popular option for many businesses, AWS EC2 general-purpose instances offer a versatile and scalable platform for a variety of applications.

2. Compute-Optimized Instances 

Compute-optimized instances are appropriate for applications that require a lot of computation and help from high-performance CPUs. You may employ compute-optimized instances for workloads including web, application, and gaming servers just like general-purpose instances. This instance type is best suited for high-performance applications like web servers, Gaming servers.

Examples

  • Applications that require high server performance or that employ a machine-learning model will benefit from compute-optimized instances.
  • If you have some batch processing workloads or high-performance computing.

Compute-Optimized Some Instance Types

  1. c5d.24large: The c5d instance, which has 96 CPUs, 192 GiB of RAM, 3600 GB of SSD storage, and 12 Gigabit of network performance, was selected primarily for its excellent web server performance. There are other instance types, including giant and extra-large. Depending on our needs, we will choose between the c5a big and extra-large instance types.

Features

  • Powered by specifically designed AWS Graviton3 processors.
  • It will use DDR5 memory, by which it will get 50% more bandwidth than DDR4.
  • By default EBS optimisation.

Applications

  1. Machine learning: Machine learning operations can be performed on Compute-optimized instances because it will manage heavy workloads. The processing capacity required to swiftly and effectively train massive machine learning models can be provided by compute-optimized instances.
  2. Gaming: Compute-optimised is well suited for heavy workloads so it can easily manage the Gaming operations easily. Compute-optimized will decrease the latency and it can deliver a high-quality gaming experience.

3. Memory-Optimized Instances

Memory-optimized instances are geared for workloads that need huge datasets to be processed in memory. Memory here defines RAM which allows us to do multiple tasks at a time. Data stored is used to perform the central processing unit (CPU) tasks it loads from storage to memory to run. This process of preloading gives the CPU direct access to the computer program. Assume you have a workload that necessitates the preloading of significant volumes of data prior to executing an application. A high-performance database or a task that requires real-time processing of a significant volume of unstructured data might be involved in this scenario. In this case, consider using a memory-optimized instance. It is used to run applications that require a lot of memory with high performance.

Examples:

  • Helpful for databases that need to handle quickly.
  • Processes that do not need a large quantity of data yet require speedy and real-time processing. 

Memory-Optimized Some Instance Types

The R and X categories belong to memory-optimized. let’s discuss any one-off them.

R7g.medium: It is run on AWS Gravitation processors with ARM architecture. with 1 CPU, 8 (GiB) of memory, an EBS storage type, and a maximum of 12.5% network bandwidth.

x1: X1 is mainly suited for enterprise edition databases with memory applications and comes with 64 vCPU, 976 GiB of memory, 1 x 1,920 GB of SSD storage, 7,000 Mbps of dedicated EBS bandwidth, and 10 Gbps of network performance.

Features

  • Elastic Fabric Adapter (EFA) is supported on the r7g.16xlarge and r7g.metal instances.
  • Includes the newest DDR5 memory, which provides 50% more bandwidth than DDR4.
  • Compared to R6g instances, improved networking bandwidth is 20% more.

Applications

  1. In-Memory Databases: Memory-optimized instances are mostly suited for databases that contain high bandwidth and memory capacity is high.  
  2. Big Data Processing: For big data processing workloads like Apache Spark and Apache Hadoop that demand high memory capacity and bandwidth, memory-optimized instances can be deployed. Instances that have been optimized for memory can offer the memory space and bandwidth required to process huge amounts of data fast and effectively.

4. Storage Optimized Instances

Storage-optimized instances are made for workloads that demand fast, sequential read and write access to huge datasets. Distributed file systems, data warehousing applications, and high-frequency online transaction processing (OLTP) systems are examples of workloads that are suited for storage-optimized instances. Storage-optimized instances are built to provide applications with the lowest latency while accessing the data.

Examples:

  • The applications which high processing of databases can utilize storage-optimized instances.
  • Data Warehousing applications or distributed file systems can use it.

Storage Optimized Instance Types

  1. Im4gn: Because Im4gn is powered by AWS Graviton processors, it offers the best pricing performance for workloads in Amazon EC2 that demand a lot of storage. Im4gn.large’s base configuration has 2 CPUs, 8 GiB of memory, and EBS storage with a network bandwidth of up to 25 Gbps. It offers some other instance types of ls4gn, l4i, D, and H. 

Features

  • Using AWS Graviton2 processors, which provide the best price/performance for workloads in Amazon EC2.
  • Geared at tasks that correspond to 4 GB of RAM per vCPU.
  • Improved Networking (ENA)-based Elastic Network Adapter (ENA)-based up to 100 Gbps of network bandwidth.

Applications

  1. Amazon EC2 C5d Instance: It is suitable for applications which are having very high intensive workloads. It can deliver high input and output performance with low latency.
  2. Amazon EC2 I3 instance: The storage-optimized instance is well-suited for applications with high storage needs. It also provides local NVMe storage.

5. Accelerated Computing Instances

Coprocessors are used in accelerated computing instances to execute specific operations more effectively than software running on CPUs. Floating-point numeric computations, graphics processing, and data pattern matching are examples of these functions. A Hardware-Accelerator/ Co-processor is a component in computing that may speed up data processing. Graphics applications, game streaming, and application streaming are all good candidates for accelerated computing instances.

Examples:

  •  If the application utilizes floating-point calculations or graphics processing, accelerated computing instances will be the best among all.
  •  Also, data pattern matching can be done more efficiently with this instance type.

Accelerated Computing Instance Types

  1. Accelerated computing consists of mainly P1, Inf2, G5, G5g, G4dn, G4ad, G3, F1 and VT1.
  2. P4: It offers 3.0 GHz 2nd Generation Intel Xeon Processors. of 8 GPUs, 96 CPUs, and memory of 1152(GiB) with network bandwidth of 400ENA and EFA.

Features

  • 2nd Generation Intel Xeon Scalable processors, 3.0 GHz (Cascade Lake P-8275CL).
  • 8 NVIDIA A100 Tensor Core GPUs maximum.
  • 400 Gbps instance networking with support for NVIDIA GPUDirect RDMA and Elastic Fabric Adapter (EFA) (remote direct memory access).

Applications

  1. Amazon EC2 P3 Instances: High-performance computing, rendering, and machine learning workloads are all well-suited to these instances. Its NVIDIA V100 GPUs enable them to deliver up to 1 petaflop of mixed-precision performance per instance, which makes them perfect for simulations of computational fluid dynamics, molecular dynamics, and complicated deep learning models.
  2. Amazon EC2 G4 Instances: These instances are designed for graphically demanding tasks like video transcoding, virtual desktops, and gaming. They provide up to 65 teraflops of single-precision performance per instance and are driven by NVIDIA T4 GPUs.

AWS Instance Types Pricing

AWS Free tier offers EC2 instances for free. t2.micro instance was for up to a certain limit like 750 hours. If you want to go for a premium plan then it offers three types of plans. They are

On-Demand

On-Demand it charges based on the no.of hours or seconds you use. With the help of on-demand instances, you can avoid maintaining infrastructure costs.

On-Demand Instances are recommended for:

  1. Low cost without any upfront payment or long-term commitment.
  2. For testing applications that are being developed. 

Saving Plan 

When compared to on-demand you can reduce the bill by up to 72%. In order to do that you need to give a commitment to AWS of using for such an amount of time like up to 1 to 3-year term.

Types of saving plans:

  1. Compute Savings Plans.
  2.  EC2 Instance Savings Plans.
  3. SageMaker Savings Plans.

Savings Plans are recommended for:

  1. For faster and newest families.
  2. Steady and consistent usage. 

Amazon EC2 Spot Instances

When compared to other instance plans you can cheaper upto 90% discount. These are unused instances.

Spot Instances are recommended for:

  1. Applications which doesn’t want to save their state.
  2. Application flexible start and end time.

AWS Instance Type Cost Calculator

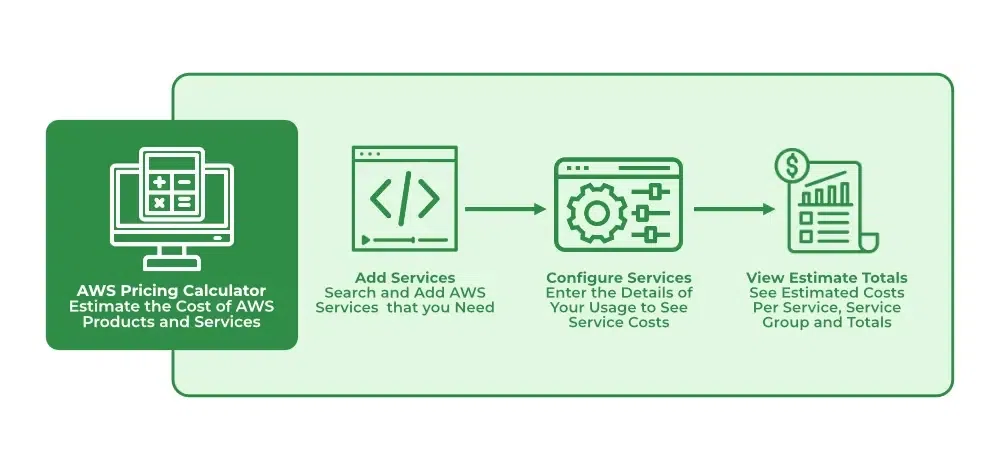
Aws cost calculator is used for calculating the cost of AWS instances based on the types. This AWS instance-type calculator is a service provided by Amazon itself.
AWS cost calculator


By using the AWS Pricing Calculator you can estimate the cost of services offered by AWS of its pricing. It is very simple to use first you need to open the AWS console and search for AWS Pricing Calculator after that add the service to the calculator that you want to know the cost. After all the configuration is done you will get the estimated cost as a graph or documented format.

Conclusion

Selecting the appropriate Amazon instance type is crucial when installing apps. If the Amazon instance type you selected is inappropriate for the application you intend to install, we may experience a variety of issues, including latency and insufficient storage. When choosing the type of instance, be selective.


Computing in AWS

This article will educate you all about Amazon EC2. EC2 or Elastic Compute Cloud is a scalable computing service launched on the AWS cloud platform. In simpler words, EC2 is nothing but a virtual computer on which we can perform all our tasks and we have the authority to configure, launch or even dissipate this virtual computer. Hereby configuration, I mean RAM, ROM, storage, and so on, along with an extra secured environment. In return, AWS asks us to pay the bill for using their platform and their resources. 

Advantages of EC2

  • EC2 instances can be easily scaled up or down as per the requirement, providing a highly scalable and flexible infrastructure.
  • EC2 instances are charged based on usage, making it cost-effective as you only pay for what you use.
  • It can be easily deployed and managed using Amazon Web Services (AWS) management console, APIs, or CLI.
  • It can be deployed in multiple availability zones to ensure high availability and data durability.
  • It can be customized with different operating systems, applications, and network configurations.

Disadvantages of EC2  instances

  • EC2 instances have limited customization options, which may not be sufficient for some applications.
  • it can be expensive, especially when scaling up, and it can be challenging to control costs.
  •  This is vulnerable to security risks, such as unauthorized access, data breaches, and cyberattacks.
  • EC2 instances can be complex to set up and manage, especially for non-technical users.
  • It may experience latency due to the location of the instances and the data center, which can affect application performance.

Use cases of EC2  instances

  • EC2 instances can be used to host websites, applications, and APIs in the cloud.
  • It can be used to process large amounts of data using tools like Apache Hadoop and Apache Spark.
  • It can be used to perform demanding computing tasks, such as scientific simulations and financial modeling.
  • EC2 instances can be used to develop, test, and deploy software, allowing teams to quickly spin up resources as needed.

Now, let us look at the step-by-step process for creating an EC2 instance.

Step 1: First, login into your AWS account and click on “services” present on the left of the AWS management console, i.e. the primary screen. And from the drop-down menu of options, tap on “EC2”. Here is the image attached to refer to.

Under Resources >> Click on “Instances running” — It will show if any EC2 instances are running or not.

Click on launch instance

Click on launch instance, after clicking on it you will be redirected to a launch page where we can create instance.

Create a name for the instance.

Naming instance

Name the instance.

Select AMI – Required operating system from the available.

Selecting AMI

Amazon Machine Image

I am selecting windows AMI as we need to create windows instance.

By default, it selects a free tier storage.(IF YOU ARE ELIGIBLE FOR FREE TIER)

From the available storage specifications, select a free tier eligible storage service.

Select instance type

Select instance type

By default, instance type is “t2.micro” which is free tier eligible service.

Do not select any other which leads to billing amount.

Now, create a key value pair, by clicking on “Create new key pair”. A window will pop for creating key-pair as shown below.

Creating key pair

Create Key-Pair

Enter name>>Select “.pem” and create. Automatically key-pair which was created will be downloaded.

Select the created key-pair.

Keep the network settings as default settings and make changes if required.
Storage

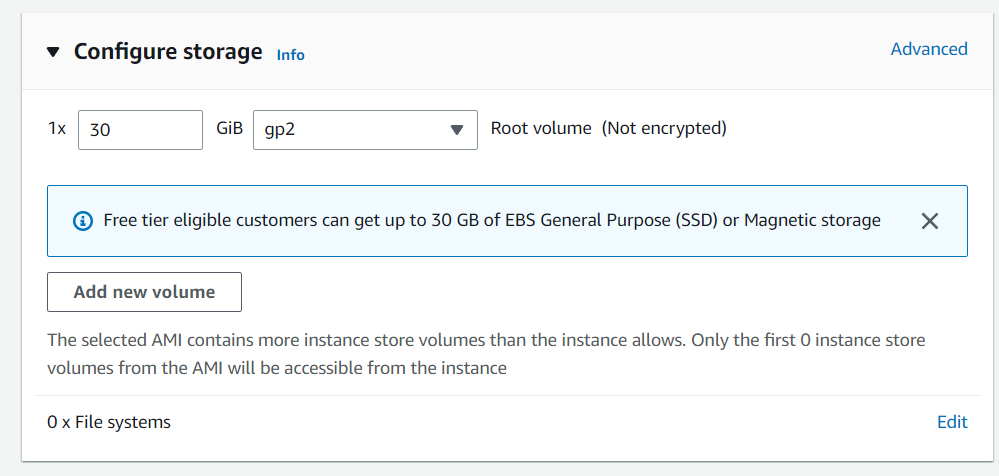
As mentioned in the picture, Free tier eligible can get up-to 30 GB of EBS Storage. Keep it as default.

Configuring Storage

Launching Instance

Launching instance

At last, Check if all the selected are eligible for free tier or not and click on “Launch instance”.

That’s it, an instance will be created.

EC2 Instance All State in AWS :-

The common EC2 instance states are Pending, Running, Stopping, Stopped, Terminated, Shutting Down and Reebooted. It is important to keep track of the state of your EC2 instances so that you can manage them properly. You can view the state of your instances in the EC2 Console, AWS CLI, or AWS SDKs.

In AWS, EC2 (Elastic Compute Cloud) instances can have different states, which indicate what operations can be performed on them. Here are some of the common EC2 instance states:

 1. Pending: When you launch an EC2 instance, it enters the pending state. This means that AWS is in the process of creating the instance and initializing all of the necessary components, such as the virtual machine and the associated networking resources. During this time, you won’t be able to access the instance, as it is not yet ready to be used.

  2. Running: Once an EC2 instance has finished initializing, it enters the running state. This means that the instance is up and running and is ready to be used. In this state, you can log in to the instance and start using it to run your applications and services.

  3. Stopping: If you manually stop an EC2 instance, or if it is part of an auto-scaling group and is being terminated, it enters the stopping state. During this state, AWS prepares the instance for shutdown by stopping any processes or applications running on the instance and disconnecting it from the network. However, the instance’s configuration and data are preserved, so you can start the instance again later if you need to.

  4. Stopped: Once an EC2 instance has been stopped, it enters the stopped state. In this state, the instance is not running and is not available for use. However, the instance’s configuration and data are preserved, so you can start the instance again later if you need to. You might stop an instance if you don’t need it for a period of time but don’t want to terminate it entirely.

  5. Terminated: If you manually terminate an EC2 instance, or if it is part of an auto-scaling group and is being terminated, it enters the terminated state. In this state, the instance is permanently deleted, and all of its configuration and data are lost. You might terminate an instance if you no longer need it, or if you want to replace it with a new instance.

  6. Shutting-down: If AWS is retiring an instance, it goes into the “Shutting-down” state for a brief period before the instance is terminated. During this time, the instance is no longer available for use, and the data and configuration are preserved. This state is similar to the stopping state, but with an added step of preparing the instance for retirement.

  7. Rebooting: If you choose to reboot an EC2 instance, it enters the rebooting state. During this state, the instance’s operating system is shut down and then restarted, but the instance’s configuration and data are preserved. You might reboot an instance if you need to apply updates or make changes to the instance’s configuration.

You can view the state of your EC2 instances in the EC2 Console, AWS CLI, or AWS SDKs. It is important to keep track of the state of your instances so that you can manage them properly, such as starting, stopping, or terminating instances as needed. When you use Amazon Web Services (AWS) to run virtual servers, or instances, these instances can be in different states depending on what’s happening with them. For example, an instance might be “running” when it’s up and running properly, or “stopped” when it’s not currently being used.

AWS CloudWatch to monitor your EC2 instances and their associated resources in real-time. CloudWatch provides a wealth of data on your instances, including CPU usage, disk activity, and network traffic, which can help you identify performance issues and other problems before they have a chance to impact your users.

Another important aspect of managing EC2 instances is understanding the various instance types available in AWS. Different instance types have different performance characteristics and are optimized for different types of workloads. For example, some instances are optimized for CPU-intensive workloads, while others are better suited for memory-intensive applications. By choosing the right instance type for your workload, you can ensure that your applications are running efficiently and cost-effectively.

Overall, understanding the different states of EC2 instances in AWS is just one aspect of effectively managing your infrastructure in the cloud. By taking advantage of tools like AWS CloudWatch, choosing the right instance types for your workloads, and following best practices for security and maintenance, you can ensure that your applications and services are always available to your users, and that you’re getting the most out of your investment in the cloud.

Set up Free Tier Account

 Amazon Web Service(AWS) is the world’s most comprehensive and broadly adopted cloud platform, offering over 200 fully featured services from data centers globally. Millions of customers including the fastest-growing startups, largest enterprises, and leading government agencies are using AWS to lower costs, become more agile, and innovate faster. AWS offers new subscribers a 12-month free tier to get hands-on experience with all AWS cloud services.

Steps to Creating a Free Tier AWS Account:

Step 1: Open https://portal.aws.amazon.com/billing/signup#/start/email in any browser, then enter your mail address and AWS account name. Click on “Verify Email Address”.

Sign up page for AWS


Step 2: Enter the verification code received in the email address entered and click on ‘Verify’.

Step 3: Enter the Root user Password and Confirm the Root user Password, then click on ‘Continue (step 1 of 5)’.


Step 4: Select ‘Personal – for your own projects’ and fill in the details including the full name, contact number, country or region, and address for communication, and then click on ‘Continue (Step 2 of 5)’.


Step 5: Now in this step enter the Billing Information, and then click on ‘Verify and Continue.

Step 6: Confirm your identity by entering your mobile number or email address. You will receive a verification code which you have to enter to confirm your identity.

Step 7: Select the support plan. For Free Tier, we have to select ‘Basic Support: Free’. Finally, the AWS account has been created and is ready for implementation.


Set Up an AWS Account

Amazon web services is a cloud service platform that provides on-demand computational services, databases, storage space, and many more services. AWS allows its user to choose products from its wide variety of services and use them on-demand with no upfront payment for most of the services. Individually an AWS service may lack some functionality but, given the right AWS architecture, AWS services can be easily integrated to make highly complex and robust applications. 

In this article, we will look into the process of creating & setting up an AWS Free Tier Account. Amazon is providing a number of various services in this AWS Free Tier account with some restrictions so that users can gain practical experience and a deeper understanding of AWS Cloud services. The AWS Free Tier’s main objective is to give users a year(12 months) of free access to AWS Cloud Services so they may get experience in how to use the services. There is a limit on how much we may utilize of each service included in the AWS Free Tier account before being charged.

Note: You’re not charged for any AWS services that you sign up for unless you’re exceeding the free Tier limit. (Turn off or Delete the services once you have done with your practice)

Set Up A AWS Free Tier Account

Step 1: First Open your web browser and search for AWS Login Console and click on the first link. As shown in the picture below 

AWS Login Console


Step 2: An AWS Login Console page will open now click on  Create an AWS Account.

Create an AWS Account


Step 3: A new AWS sign-in page will now open after selecting Create an AWS Account. Choose to Create a new AWS account. As shown in the image below

Create a new AWS aacount


Step 4: In order to use the feature to log into an AWS Free Tire Account, we must validate the email address and have to provide the AWS account name in this stage. After clicking on “Verify Email Address,” you will receive a verification code at the address you provided. Next, you must create a password for this account. Finally, click “Continue” to move on to the next stage. The pictures below show every step of the process.

Verify the email address


After clicking on “Verify Email Address,” you will receive a verification code at the address you provided.

Verification code


Next, you must create a password for this account. Finally, click “Continue” to move on to the next stage.

Creating Password


Step 5: We must include all of our contact information in this phase to make it easier for Amazon support personnel to get in touch with us about our AWS Account and any feature references. As shown in the image below.

Contact Information


Step 6: We must provide the credit/debit card information in this step. There is no reason to panic at this time. AWS won’t deduct any amount unless you pay it on your own. AWS may temporarily keep your identification that they will charge you only  2 Indian rupees.

Billing Information


Step 7: We have to verify our phone number in this phase. As seen in the image below, select “TEXT or Voice call” as the method for receiving your verification number, then complete the captcha by clicking on “Send SMS.”You will be sent to a screen where you must confirm the verification code you have received and click continue to proceed to the following stage. As seen in the pictures below.

Identity verification


Step 8: Enter the verification code you received on your mobile device, validate it, and then click Continue to move on to the following stage.

Code verification


Step 9: Choose the support strategy you want to use. We are setting up an AWS Free Tier Account so select the Basic Support option, which is cost-free and which AWS also suggests for new customers. The Basic Support Plan includes following

  • 24*7 self-service access to AWS resources 
  • Can access personal health dashboard 
  • It is free of cost
Support plan


After selecting a plan, click “Complete the sign up” as shown in the image.

Step 10: “Congratulation” Upon the creation of your AWS account, you can sign in by clicking Click Sign into the console once more, input the email address that you provided, your password, and then click Sign in as shown in the accompanying image, where you can see AWS Management Console’s home page for certain of its offering services.

Aws account created


Sign into console


Enter your email address and previously-configured password.

Crendentials


And this is the Amazon Console Home page, where you may access some of the most popular AWS services, including EC2VPCAUTOSCALING, etc.

AWS Console Home


After setting up our AWS Free Tier account, we are now ready to begin using the services that AWS offers.