Friday, 26 May 2023

ec2

    Amazon EC2 – Creating an Elastic Cloud        Compute Instance


This article will educate you all about Amazon EC2. EC2 or Elastic Compute Cloud is a scalable computing service launched on the AWS cloud platform. In simpler words, EC2 is nothing but a virtual computer on which we can perform all our tasks and we have the authority to configure, launch or even dissipate this virtual computer. Hereby configuration, I mean RAM, ROM, storage, and so on, along with an extra secured environment. In return, AWS asks us to pay the bill for using their platform and their resources. 

Advantages of EC2

  • EC2 instances can be easily scaled up or down as per the requirement, providing a highly scalable and flexible infrastructure.
  • EC2 instances are charged based on usage, making it cost-effective as you only pay for what you use.
  • It can be easily deployed and managed using Amazon Web Services (AWS) management console, APIs, or CLI.
  • It can be deployed in multiple availability zones to ensure high availability and data durability.
  • It can be customized with different operating systems, applications, and network configurations.

Disadvantages of EC2  instances

  • EC2 instances have limited customization options, which may not be sufficient for some applications.
  • it can be expensive, especially when scaling up, and it can be challenging to control costs.
  •  This is vulnerable to security risks, such as unauthorized access, data breaches, and cyberattacks.
  • EC2 instances can be complex to set up and manage, especially for non-technical users.
  • It may experience latency due to the location of the instances and the data center, which can affect application performance.

Use cases of EC2  instances

  • EC2 instances can be used to host websites, applications, and APIs in the cloud.
  • It can be used to process large amounts of data using tools like Apache Hadoop and Apache Spark.
  • It can be used to perform demanding computing tasks, such as scientific simulations and financial modeling.
  • EC2 instances can be used to develop, test, and deploy software, allowing teams to quickly spin up resources as needed.

Now, let us look at the step-by-step process for creating an EC2 instance.

Step 1: First, login into your AWS account and click on “services” present on the left of the AWS management console, i.e. the primary screen. And from the drop-down menu of options, tap on “EC2”. Here is the image attached to refer to.

Under Resources >> Click on “Instances running” — It will show if any EC2 instances are running or not.

Click on launch instance

Click on launch instance, after clicking on it you will be redirected to a launch page where we can create instance.

Create a name for the instance.

Naming instance

Name the instance.

Select AMI – Required operating system from the available.

Selecting AMI

Amazon Machine Image

I am selecting windows AMI as we need to create windows instance.

By default, it selects a free tier storage.(IF YOU ARE ELIGIBLE FOR FREE TIER)

From the available storage specifications, select a free tier eligible storage service.

Select instance type

Select instance type

By default, instance type is “t2.micro” which is free tier eligible service.

Do not select any other which leads to billing amount.

Now, create a key value pair, by clicking on “Create new key pair”. A window will pop for creating key-pair as shown below.

Creating key pair

Create Key-Pair

Enter name>>Select “.pem” and create. Automatically key-pair which was created will be downloaded.

Select the created key-pair.

Keep the network settings as default settings and make changes if required.
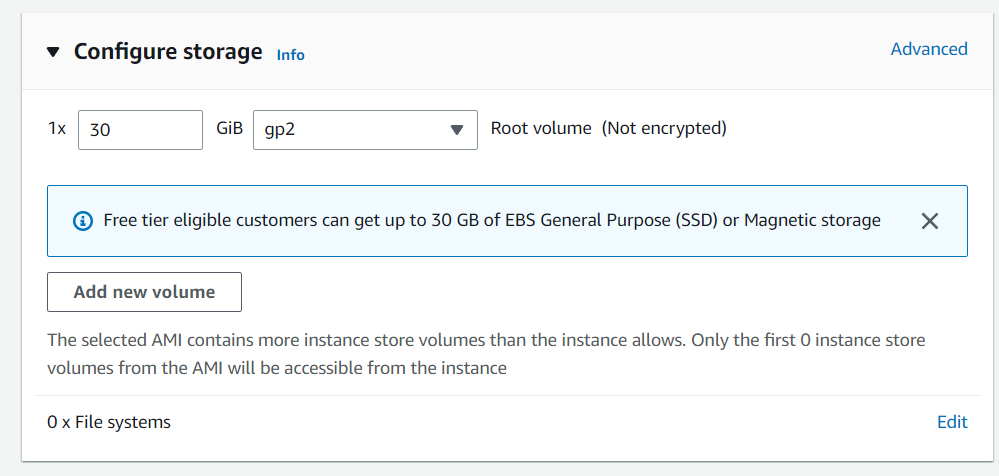
Storage

As mentioned in the picture, Free tier eligible can get up-to 30 GB of EBS Storage. Keep it as default.
Configuring Storage

Launching Instance

Launching instance

At last, Check if all the selected are eligible for free tier or not and click on “Launch instance”.

That’s it, an instance will be created.

EC2 Instance All State in AWS :-

The common EC2 instance states are Pending, Running, Stopping, Stopped, Terminated, Shutting Down and Reebooted. It is important to keep track of the state of your EC2 instances so that you can manage them properly. You can view the state of your instances in the EC2 Console, AWS CLI, or AWS SDKs.

In AWS, EC2 (Elastic Compute Cloud) instances can have different states, which indicate what operations can be performed on them. Here are some of the common EC2 instance states:

 1. Pending: When you launch an EC2 instance, it enters the pending state. This means that AWS is in the process of creating the instance and initializing all of the necessary components, such as the virtual machine and the associated networking resources. During this time, you won’t be able to access the instance, as it is not yet ready to be used.

  2. Running: Once an EC2 instance has finished initializing, it enters the running state. This means that the instance is up and running and is ready to be used. In this state, you can log in to the instance and start using it to run your applications and services.

  3. Stopping: If you manually stop an EC2 instance, or if it is part of an auto-scaling group and is being terminated, it enters the stopping state. During this state, AWS prepares the instance for shutdown by stopping any processes or applications running on the instance and disconnecting it from the network. However, the instance’s configuration and data are preserved, so you can start the instance again later if you need to.

  4. Stopped: Once an EC2 instance has been stopped, it enters the stopped state. In this state, the instance is not running and is not available for use. However, the instance’s configuration and data are preserved, so you can start the instance again later if you need to. You might stop an instance if you don’t need it for a period of time but don’t want to terminate it entirely.

  5. Terminated: If you manually terminate an EC2 instance, or if it is part of an auto-scaling group and is being terminated, it enters the terminated state. In this state, the instance is permanently deleted, and all of its configuration and data are lost. You might terminate an instance if you no longer need it, or if you want to replace it with a new instance.

  6. Shutting-down: If AWS is retiring an instance, it goes into the “Shutting-down” state for a brief period before the instance is terminated. During this time, the instance is no longer available for use, and the data and configuration are preserved. This state is similar to the stopping state, but with an added step of preparing the instance for retirement.

  7. Rebooting: If you choose to reboot an EC2 instance, it enters the rebooting state. During this state, the instance’s operating system is shut down and then restarted, but the instance’s configuration and data are preserved. You might reboot an instance if you need to apply updates or make changes to the instance’s configuration.

You can view the state of your EC2 instances in the EC2 Console, AWS CLI, or AWS SDKs. It is important to keep track of the state of your instances so that you can manage them properly, such as starting, stopping, or terminating instances as needed. When you use Amazon Web Services (AWS) to run virtual servers, or instances, these instances can be in different states depending on what’s happening with them. For example, an instance might be “running” when it’s up and running properly, or “stopped” when it’s not currently being used.

AWS CloudWatch to monitor your EC2 instances and their associated resources in real-time. CloudWatch provides a wealth of data on your instances, including CPU usage, disk activity, and network traffic, which can help you identify performance issues and other problems before they have a chance to impact your users.

Another important aspect of managing EC2 instances is understanding the various instance types available in AWS. Different instance types have different performance characteristics and are optimized for different types of workloads. For example, some instances are optimized for CPU-intensive workloads, while others are better suited for memory-intensive applications. By choosing the right instance type for your workload, you can ensure that your applications are running efficiently and cost-effectively.

Overall, understanding the different states of EC2 instances in AWS is just one aspect of effectively managing your infrastructure in the cloud. By taking advantage of tools like AWS CloudWatch, choosing the right instance types for your workloads, and following best practices for security and maintenance, you can ensure that your applications and services are always available to your users, and that you’re getting the most out of your investment in the cloud.

IAM in AWS

Amazon Web Services – Denying Access using IAM policy for EC2 and EBS Instance


In this article, we will look into how to use AWS identity and access management policy conditions to create an IAM policy that denies access to create amazon elastic compute cloud instances and amazon elastic block store volumes when the required tags are not passed along with the creation request.

We will also look into how you can use the IAM policy tags to restrict the launch of EC2 instances by using Deny with the StringNotLike condition operator. 

If your policy operates under multiple conditions or has multiple keys attached to a single condition operator then all the conditions are evaluated by making the use of the AND logic. In the case of Deny multiple tags, each tag key needs to be used in a separate statement to get the same AND logic.  We’ll demonstrate the below use case. For launching any new instance from the EC2 console you need to have all four tags present to successfully launch it.

  • The cost_center tag must have a null value.
  • The EC2 instance has a tag key named production.
  • The identifier tag must be a combination of any five characters.
  • The value must be one among sandboxdev, or prod.

Now log into the AWS management console and navigate to the IAM console. In the IAM navigation page under policies choose to Create policy.

Now choose JSON view and then copy and paste the policy mentioned below: 

{
    "Version": "2012-10-17",
    "Statement": [
        {
            "Sid": "AllowToDescribeAll",
            "Effect": "Allow",
            "Action": [
                "ec2:Describe*"
            ],
            "Resource": "*"
        },
        {
            "Sid": "AllowRunInstances",
            "Effect": "Allow",
            "Action": "ec2:RunInstances",
            "Resource": [
                "arn:aws:ec2:*::image/*",
                "arn:aws:ec2:*::snapshot/*",
                "arn:aws:ec2:*:*:subnet/*",
                "arn:aws:ec2:*:*:network-interface/*",
                "arn:aws:ec2:*:*:security-group/*",
                "arn:aws:ec2:*:*:key-pair/*"
            ]
        },
        {
            "Sid": "AllowRunInstancesWithRestrictions1",
            "Effect": "Deny",
            "Action": [
                "ec2:CreateVolume",
                "ec2:RunInstances"
            ],
            "Resource": [
                "arn:aws:ec2:*:*:volume/*",
                "arn:aws:ec2:*:*:instance/*"
            ],
            "Condition": {
                "StringNotLike": {
                    "aws:RequestTag/cost_center": "?*"
                }
            }
        },
        {
            "Sid": "AllowRunInstancesWithRestrictions2",
            "Effect": "Deny",
            "Action": [
                "ec2:CreateVolume",
                "ec2:RunInstances"
            ],
            "Resource": [
                "arn:aws:ec2:*:*:volume/*",
                "arn:aws:ec2:*:*:instance/*"
            ],
            "Condition": {
                "ForAllValues:StringNotLike": {
                    "aws:TagKeys": "Production"
                }
            }
        },
        {
            "Sid": "AllowRunInstancesWithRestrictions3",
            "Effect": "Deny",
            "Action": [
                "ec2:CreateVolume",
                "ec2:RunInstances"
            ],
            "Resource": [
                "arn:aws:ec2:*:*:volume/*",
                "arn:aws:ec2:*:*:instance/*"
            ],
            "Condition": {
                "StringNotLike": {
                    "aws:RequestTag/identifier": "?????"
                }
            }
        },
        {
            "Sid": "AllowRunInstancesWithRestrictions4",
            "Effect": "Deny",
            "Action": [
                "ec2:CreateVolume",
                "ec2:RunInstances"
            ],
            "Resource": [
                "arn:aws:ec2:*:*:volume/*",
                "arn:aws:ec2:*:*:instance/*"
            ],
            "Condition": {
                "StringNotLike": {
                    "aws:RequestTag/env": [
                        "sandbox",
                        "dev",
                        "prod"
                    ]
                }
            }
        },
        {
            "Sid": "AllowRunInstances1",
            "Effect": "Allow",
            "Action": [
                "ec2:CreateVolume",
                "ec2:RunInstances"
            ],
            "Resource": [
                "arn:aws:ec2:*:*:volume/*",
                "arn:aws:ec2:*:*:instance/*"
            ]
        },
        {
            "Sid": "AllowCreateTagsOnRunInstance",
            "Effect": "Allow",
            "Action": "ec2:CreateTags",
            "Resource": "*",
            "Condition": {
                "StringEquals": {
                    "ec2:CreateAction": "RunInstances"
                }
            }
        }
    ]
}

All four request tags must be present for the EC2 instance to launch successfully.

The first request stack contains a tag key cost_center and a tag value with a question mark followed by a wildcard. This value enforces that at least one character is present in the value field so that if two instances can’t launch with an empty tag.

The AWS stack keys have a value production. The AWS stack keys value enforces checks on case sensitivity of production.

The third request stack contains a tag key identifier and a tag value with 5 question mark. This value enforces that the combination of any 5 characters can be used leading or trailing spaces are ignored.

The fourth aws request stack contains tag key as env and tag value as sandboxdev or prod.

Then next choose review and enter a name for your policy and then choose the Create policy option.

Now go to the Users tab in the left navigation pane and choose users. We already have a user named user1. For this choose the Add permissions option and then choose the Attach existing policies directly tab. Then choose the check box next to your policy and then choose the Next review option. 

And then choose the Add permissions.

Now let’s demonstrate the policy valuation by logging in with my user user1 now navigate to the EC2 console. Now let’s add the missing tag by choosing back to the review screen. Now scroll down and choose the Edit tags option and choose Add another tag. Then provide tag key as env and provide one value among sandbox, dev or prod.

Here we’ll provide prod and choose the Next configure security group option. Finally, select the existing security group.

At this stage, we can now launch the instance, and we’ll see the message your instances are now launching. Choose View instances option to see the launched instance.


IAM in AWS


 How to Create IAM roles for Amazon EC2?


In this article, we will cover how we can easily create an IAM role and can use it with an EC2 instance easily, and provide the required permissions with the S3 policies. These IAM Roles are the identities that we are creating in our account so that we can provide specific permissions to the users. So these Roles provide us the temporary credentials of security for our session.

Use of Roles:

Consider the Scenario in which we want to grant access to our account to third parties which can perform operations such as audits of our resources or consider another scenario in which we want to access users who have identities prior outside the Aws like in our corporate Directory.

So we can use the roles for access to users’ services or applications that don’t have access to AWS resources.

How To Use Roles:

The followings are the methods for using Roles:

  1. AWS Management Console 
  2. Assume-Role CLI
  3. Assume-role-with-web-identity
  4. Console URL Construct with AssumeRoleWithSAML

Steps to Create an IAM role for the EC2 Instance:

Step 1. First, we need to go to the IAM table Dashboard, and then we will go to the roles option and click on create roles.

IAM Roles dashboard


Step 2. Next under trusted entity type we will select AWS services and under Use case, we will select EC2 and click on next:

Roles dashboard


Step 3. Next under permission policies, we will search for S3 policies and will select S3readonly policy, and click on next.

Adding Permissions


Step 4. Next we will give our role a name and review all the changes and will click on next.

Adding Rolename and its details


Now we need to add Permission 

adding policy name to provide readaccess


Step 5. Now our IAM roles are created and if we click on the role that we just created we will be welcomed to this screen. Here we can see the details of our role. We can see that our myS3Role has been created

Details of AccessRole


Step 6. Next, we will go to the EC2 dashboard and create an EC2 instance:

Selecting EC2 dashboard


We need to create a new instance 

EC2


Step 7. While creating the EC2 instance under configure instance we will select the IAM role that we just created and we will proceed with our EC2 instance creation:

Note: we have to select IAM role we created earlier inside Iam role tab
select IAM role we created earlier


while creating EC2 in Add storage add 8 GB(GIB) and volume type General purpose SSD

Storage selection


During launching the instance download the key pair RSA file and launch the instance

Review your  instance


Step 8. Next, we will connect to the EC2 instance that we just created

Secure Shell also known as SSH is a cryptographic network protocol that helps secure network services over an unsecured network.  It securely helps users to log in to a server with SSH than using a password alone. SSH keys are nearly impossible to decipher by brute force alone unlike passwords

Connect EC2 instance


Step 9. Now we will use the command “aws s3 ls” which will then let us see all the S3 buckets we created because we have set the policies of the IAM role to S3readonly through this we can just read our S3 buckets:


Step 10. Now in order to avoid any charges we will delete our ec2 instance and our s3 bucket.

IAM in AWS


Identity and Access Management (IAM) in Amazon Web Services (AWS)


Identity and Access Management (IAM) manages Amazon Web Services (AWS) users and their access to AWS accounts and services. It controls the level of access a user can have over an AWS account & set users, grant permission, and allows a user to use different features of an AWS account. Identity and access management is mainly used to manage users, groups, roles, and Access policies The account we created to sign in to Amazon web services is known as the root account and it holds all the administrative rights and has access to all parts of the account. The new user created an AWS account, by default they have no access to any services in the account & it is done with the help of IAM that the root account holder can implement access policies and grant permission to the user to access certain services. 

How IAM Works?

IAM verifies that a user or service has the necessary authorization to access a particular service in the AWS cloud. We can also use IAM to grant the right level of access to specific users, groups, or services. For example, we can use IAM to enable an EC2 instance to access S3 buckets by requesting fine-grained permissions. 

IAM Work Flow


What Does IAM Do?

With the help of IAM, we perform the following 

IAM Identities

IAM Identities assists us in controlling which users can access which services and resources in the AWS Console and also we can assign policies to the users, groups, and roles. The IAM Identities can be created by using the Root user 

IAM Identities Classified As

  1. IAM Users
  2. IAM Groups
  3. IAM Roles

Root user 

The root user will automatically be created and granted unrestricted rights. We can create an admin user with fewer powers to control the entire Amazon account.

IAM Users

We can utilize IAM users to access the AWS Console and their administrative permissions differ from those of the Root user and if we can keep track of their login information.

Example

With the aid of IAM users, we can accomplish our goal of giving a specific person access to every service available in the Amazon dashboard with only a limited set of permissions, such as read-only access. Let’s say user-1 is a user that I want to have read-only access to the EC2 instance and no additional permissions, such as create, delete, or update. By creating an IAM user and attaching user-1 to that IAM user, we may allow the user access to the EC2 instance with the required permissions.

IAM Groups

A group is a collection of users, and a single person can be a member of several groups. With the aid of groups, we can manage permissions for many users quickly and efficiently.

Example

Consider two users named user-1 and user-2. If we want to grant user-1 specific permissions, such as the ability to delete, create, and update the auto-calling group only, and if we want to grant user-2 all the necessary permissions to maintain the auto-scaling group as well as the ability to maintain EC2, we can create groups and add this user to them. If a new user is added, we can add that user to the required group with the necessary permissions.

IAM Roles

While policies cannot be directly given to any of the services accessible through the Amazon dashboard, IAM roles are similar to IAM users in that they may be assumed by anybody who requires them. By using roles, we can provide AWS Services access rights to other AWS Services.

Example

Consider Amazon EKS. In order to maintain an autoscaling group, AWS eks needs access to EC2 instances. Since we can’t attach policies directly to the eks in this situation, we must build a role and then attach the necessary policies to that specific role and attach that particular role to EKS

IAM Policies 

IAM Policies can manage access for AWS by attaching them to the IAM Identities or resources IAM policies defines permissions of AWS identities and AWS resources when a user or any resource makes a request to AWS will validate these policies and confirms whether the request to be allowed or to be denied. AWS policies are stored in the form of Jason format the number of policies to be attached to particular IAM identities depends upon no.of permissions required for one IAM identity. IAM identity can have multiple policies attached to them.  

IAM Features

Shared Access to your Account: A team working on a project can easily share resources with the help of the shared access feature.

  • Free of cost: IAM feature of the Aws account is free to use & charges are added only when you access other Amazon web services using IAM users.
  • Have Centralized control over your Aws account: Any new creation of users, groups, or any form of cancellation that takes place in the Aws account is controlled by you, and you have control over what & how data can be accessed by the user.
  • Grant permission to the user: As the root account holds administrative rights, the user will be granted permission to access certain services by IAM.
  • Multifactor Authentication: Additional layer of security is implemented on your account by a third party, a six-digit number that you have to put along with your password when you log into your accounts.

IAM in AWS


                    SAML Authentication


SAML is an XML based framework that stands for Security Assertion Markup Language. Let us see how SAML is used to enable SSO (Single-Sign-On). SSO is a term used for a type of login method where a company configures all of its web apps in such a way that the user can log in to all of these apps by just signing in once.

Example – When one logs in on gmail.com, they can visit YouTube, Google Drive, and other Google services without having to sign in to each service separately.

The SAML authentication flow is based on two entities –

  1. Service Providers (SP) – The SP receives the authentication from the IdP and grants the authorisation to the user.
  2. Identity Providers (IdP) – The IdP authenticates a user and sends their credentials along with their access rights for the service to the SP.

In the example given above, SP will be Gmail and IdP will be Google. SAML enables SSO, and as it is explained above, a user can log in once and the same credentials will be used to log into other SPs.


SAML Authentication Workflow –

  1. A user tries to log in to Gmail.
  2. Gmail generates a SAML request.
  3. The SAML request is sent to Google by the browser, which parses this request, authenticates the user and creates a SAML response. This SAML response is encoded and sent back to the browser.
  4. The browser sends this SAML response back to Gmail for verification.
  5. If the user is successfully verified, they are logged in to Gmail.


SAML Request –

Some of the important terms in the SAML request are defined below –

  1. ID – Identifier for a particular SAML request.
  2. Issuer – The name of the service provider (SP).
  3. NameID – The username/email address or phone number which is used to identify a user.
  4. AssertionConsumerServiceURL – The SAML URL interface of the SP where the IP sends the auth token.


SAML Response –

A SAML response consists of two parts –

  1. Assertion –
    It is an XML document that has the details of the user. This contains the timestamp of the user login event and the method of authentication used (eg. 2 Factor Authentication, Kerberos, etc.)
  2. Signature –
    It is a Base64 encoded string which protects the integrity of the assertion. (If an attacker tries to change the username in the assertion to the victim’s username, the signature will prevent the hacker from logging in as the user).

Key Generation –

The Identity Provider (IdP) generates a private key and a public key. It signs the assertion with the private key. The public key is shared with the Service Provider (SP) which uses it to verify the SAML response and then log the user in.


SAML Vulnerabilities Exploited by Hackers –

  1. Signature not checked –
    If someone is able to change the name id (username) in the SAML response and log in as someone else due to the lack of a signature checking process.
  2. Signature only checked when it exists –
    If someone changes the name id value and removes the signature before the response is received by the browser and is still able to log in as the victim.
  3. Comment Injection –
    A user can be registered with an XML comment in the username as follows –
    email: prerit<!--notprerit-->@test.com

    While processing the SAML response, the SP will ignore the comment and log us in as the victim. The entire SAML response can be intercepted by using a proxy like a burp suite. Note that it has to be decoded first by the URL format and then by the Base64 format in order to be viewed.

  4. SAML Replay –
    The attacker captures the SAML response and uses it multiple times to log in as the victim.