tep 2) On top use the search bar and search for Load Balancer and then choose Load Balancer
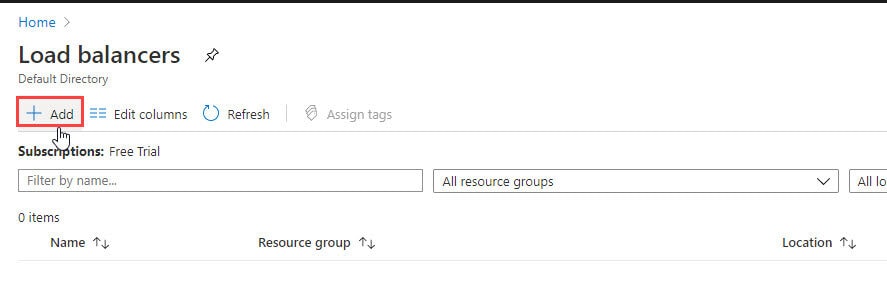
Step 3) On the top left-hand side of the screen, click Add
Step 4) In the Basics tab of the Create load balancer page, enter or select the following information, accept the defaults for the remaining settings, and then select Review + create.
- Subscription: Select your subscription.
- Resource group: Select Create new and type LBresourcegroup in the text box.
- Name: Enter myLoadBalancer
- Region: Select East US
- Type: Select Public.
- SKU: Select Basic
- Public IP address: Select Create new. If you have an existing Public IP you would like to use, select Use existing.
- Public IP address name: Type myPublicIP in the text box.
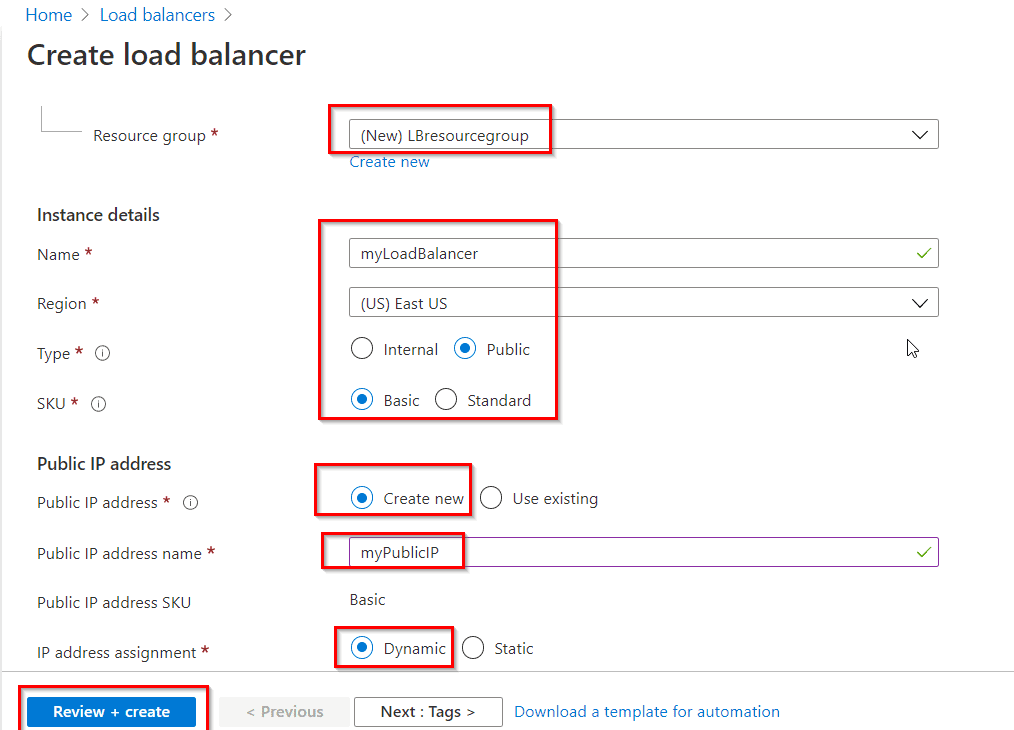
Step 5) Now Click On Create and check your Load Balancer Is Created.
Task 2: Create a Virtual Network
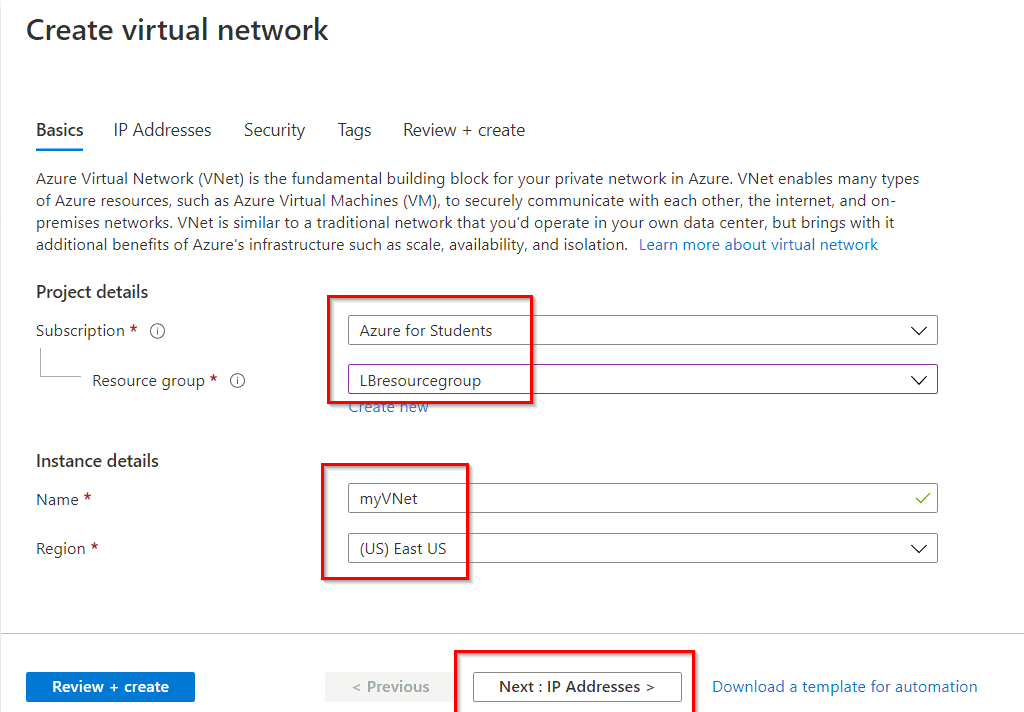
Step 1) On the upper-left side of the screen, select Create a resource > Networking > Virtual network or search for Virtual network in the search box.
Step 2) In Create virtual network, enter or select the following information in the Basics tab:
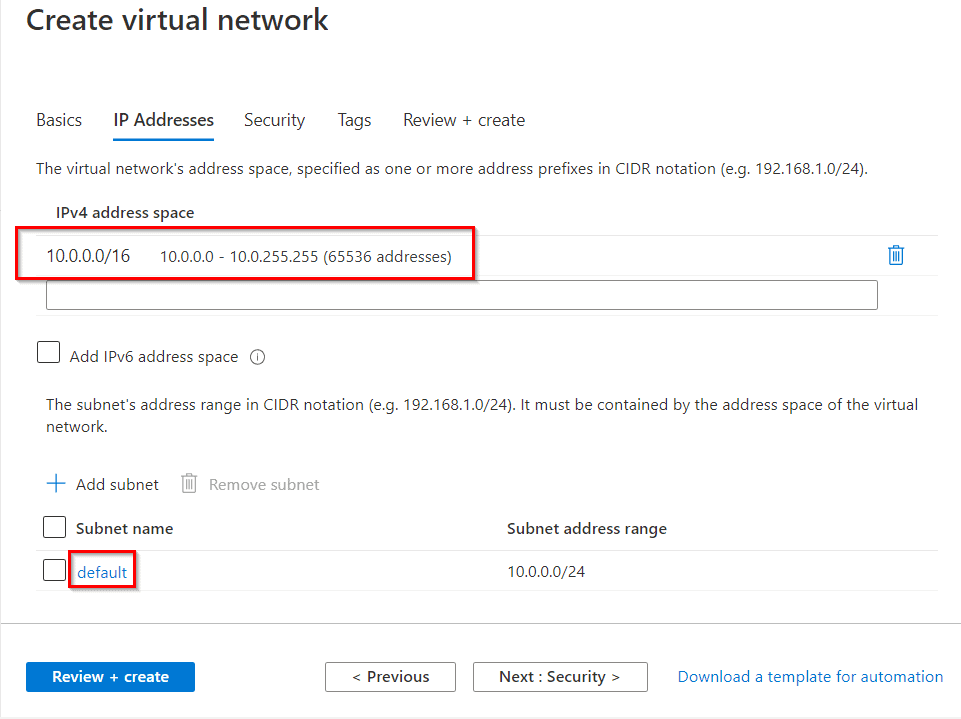
Step 3) Select the Next: IP Addresses button at the bottom of the page. In the IP Addresses tab, enter this information:
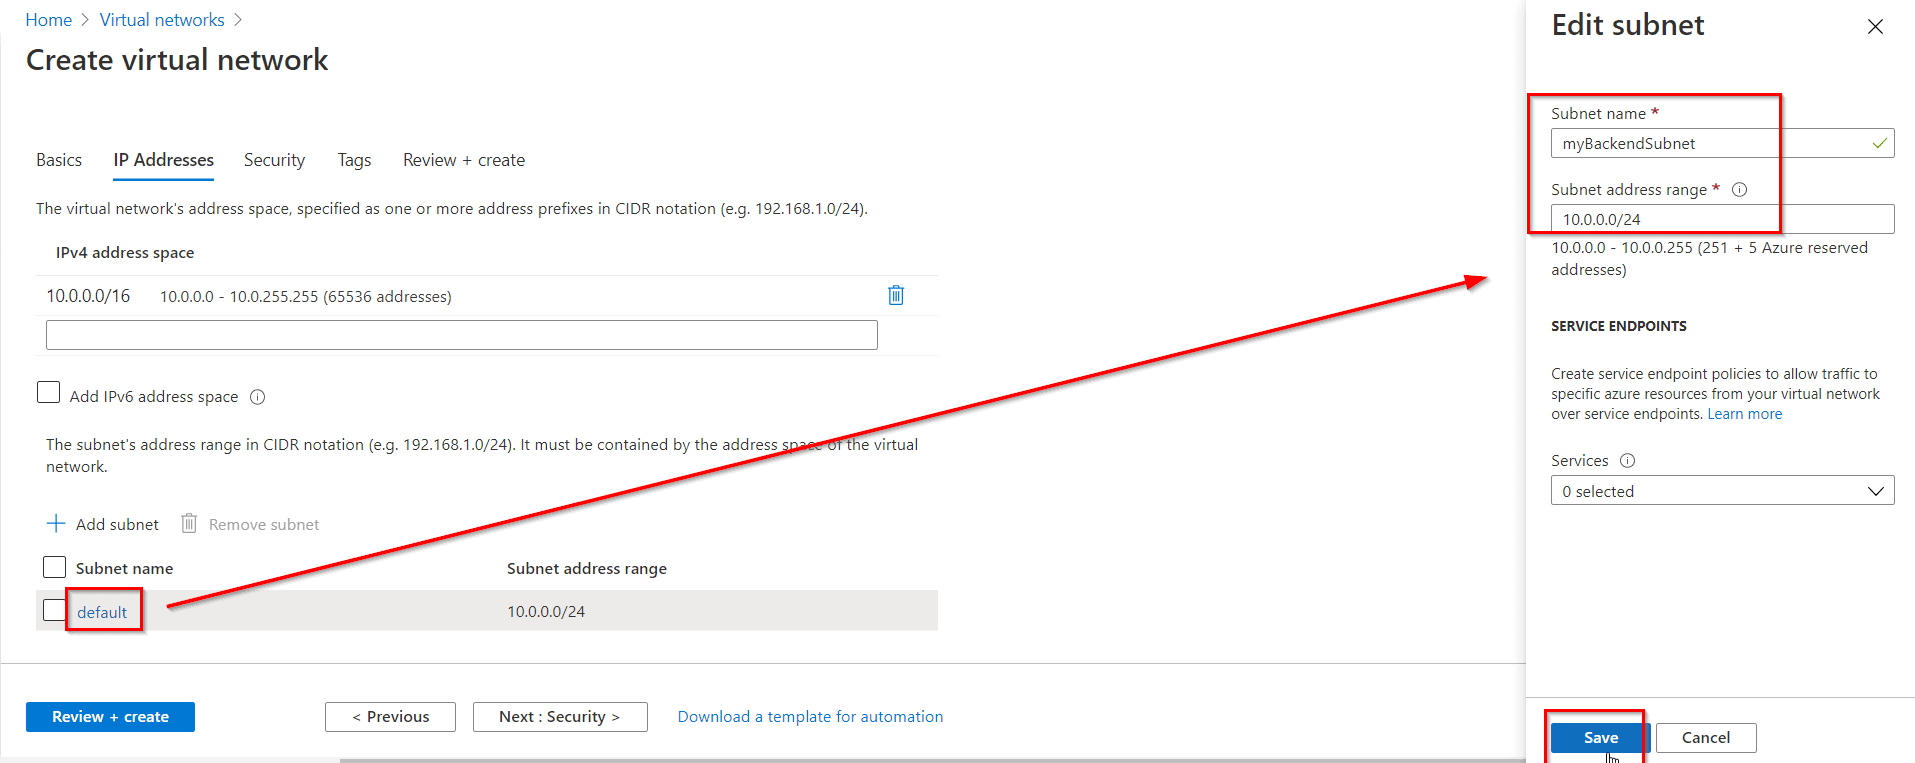
Step 4) Under Subnet name, select the word default. In Edit subnet, enter this information and select Save then select the Review + create tab.
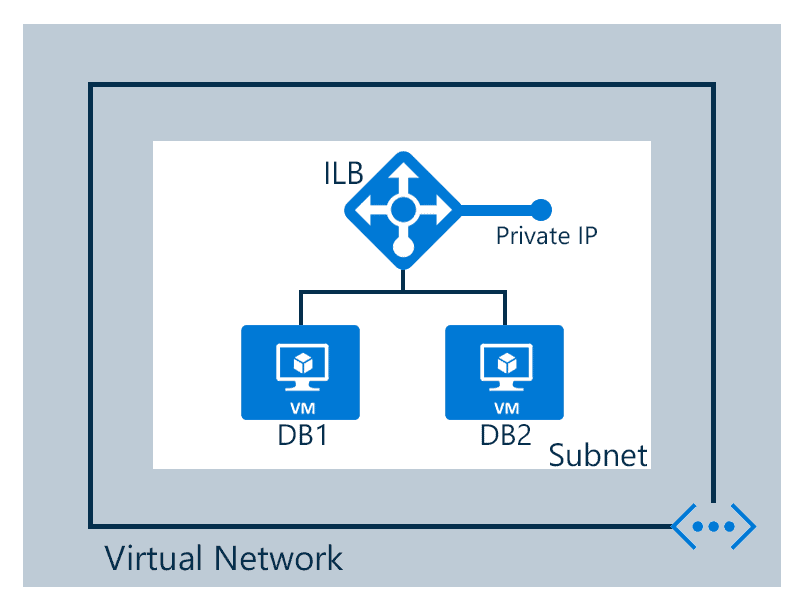
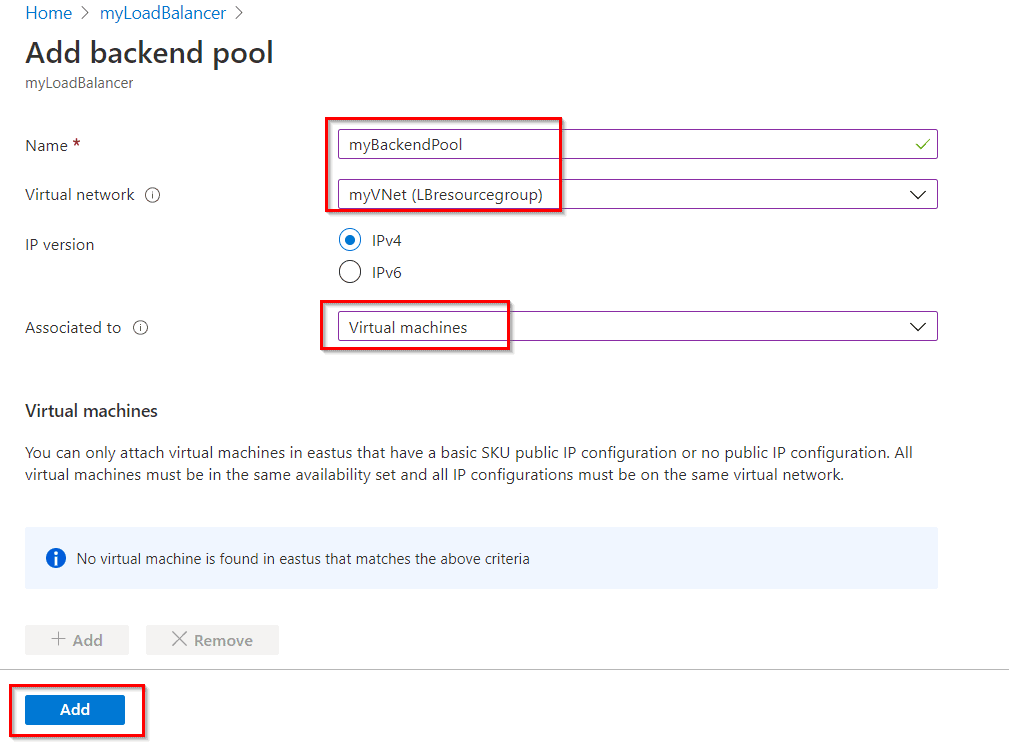
Task 3: Create a Backend Pool
A backend address pool contains the IP addresses of the virtual (NICs) connected to the load balancer.
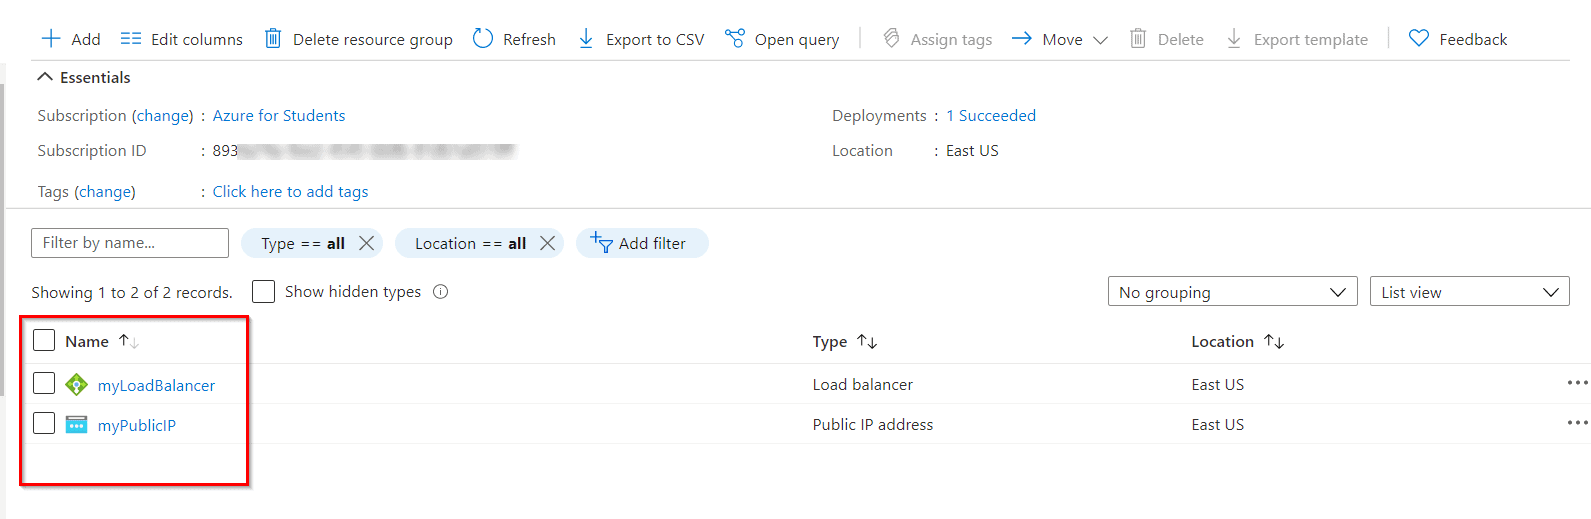
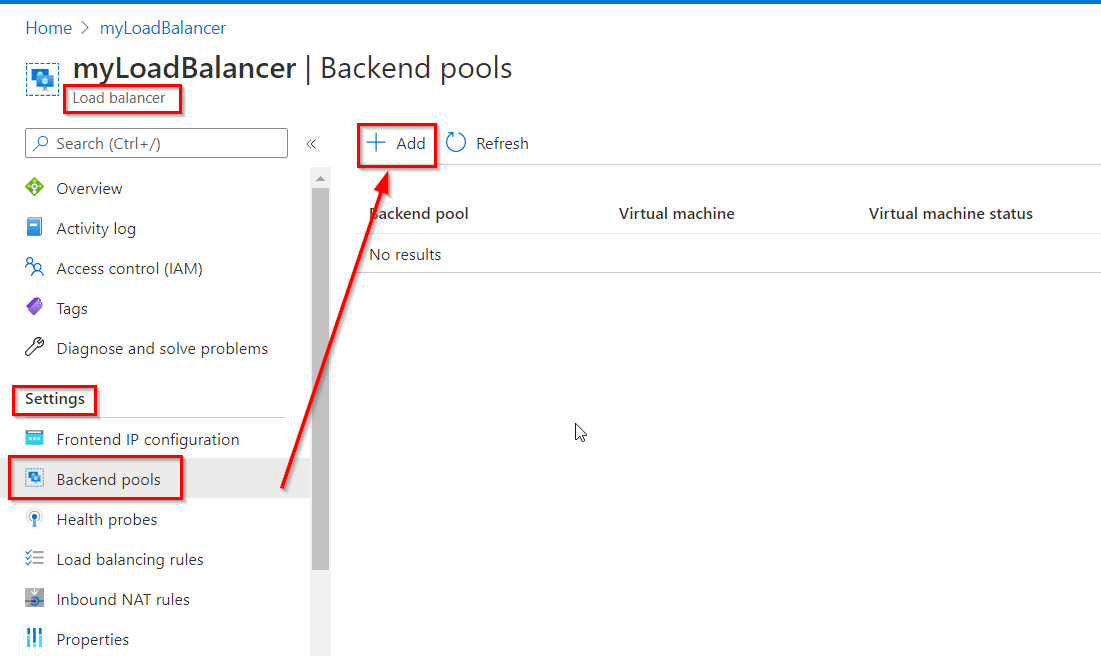
Step 1) Select All services in the left-hand menu, select All resources, and then select myLoadBalancer from the resources list.
Step 2) Under Settings, select Backend pools, then select Add.
Step 3) In the Add a backend pool page, enter the following information and then select Add.
Task 4: Create a Health Probe
The load balancer monitors the status of your app with a health probe. The health probe adds or removes VMs from the load balancer based on their response to health checks.
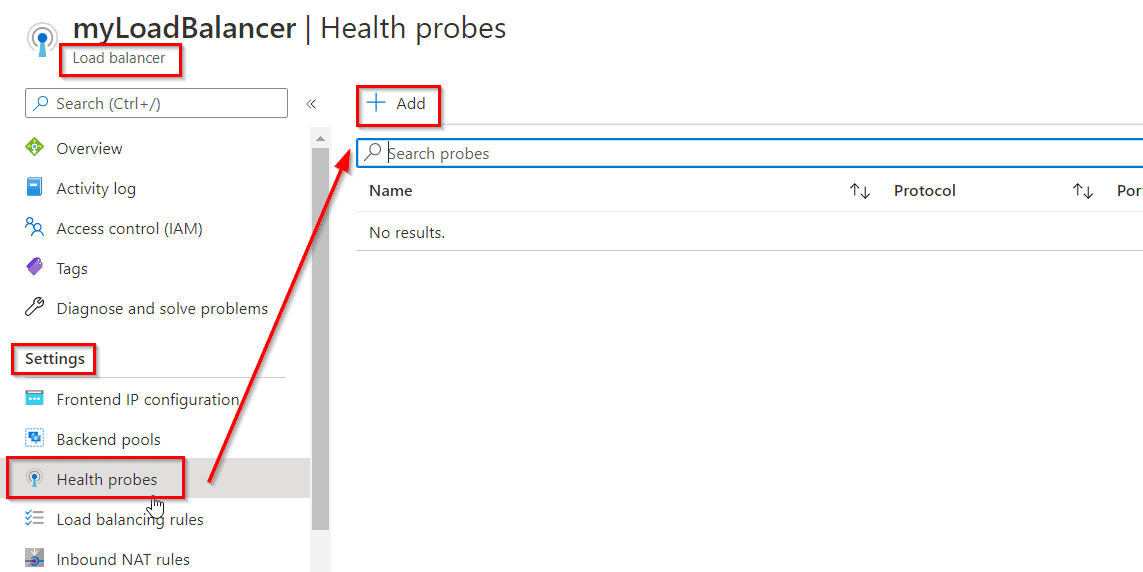
Step 1) Select All services in the left-hand menu, select All resources, and then select myLoadBalancer from the resources list.
Step 2) Under Settings, select Health probes, then select Add.
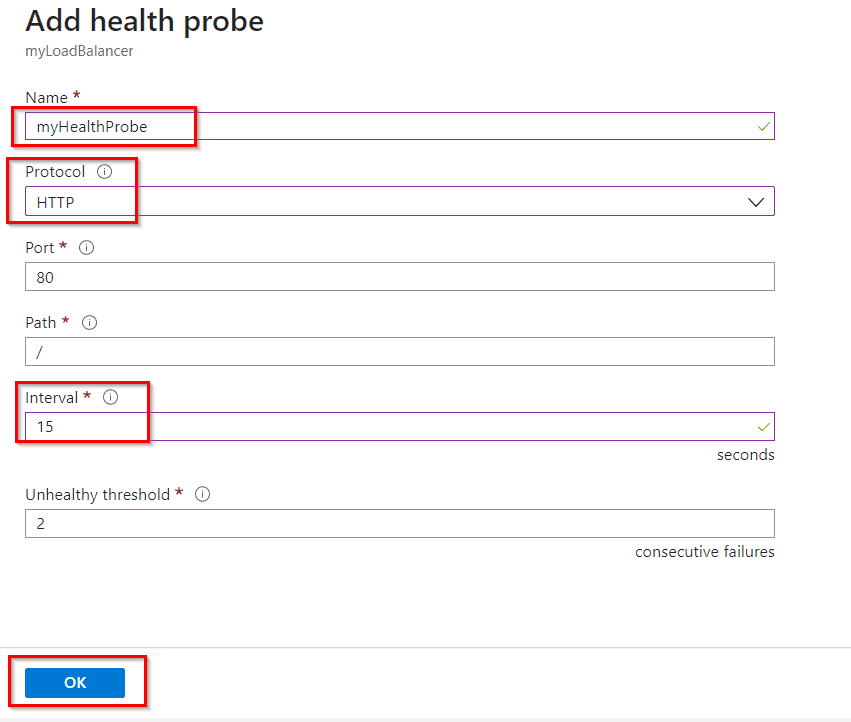
Step 3) Enter the below information in the Add health probe page and then select OK.
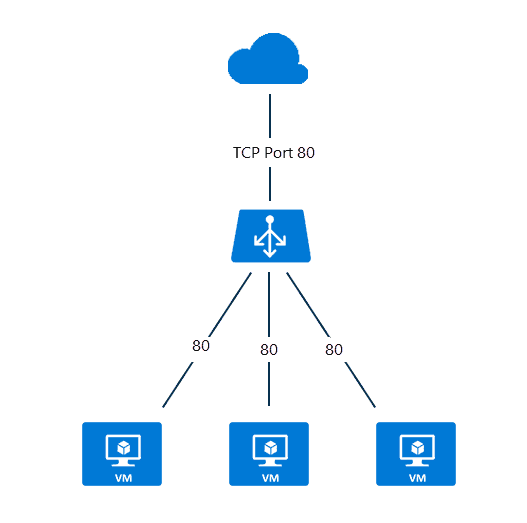
Task 5: Create a Load Balancer Rule
A load balancer rule is used to define how traffic is distributed to the VMs. You define the frontend IP configuration for the incoming traffic and the backend IP pool to receive the traffic. The source and destination ports are defined in the rule.
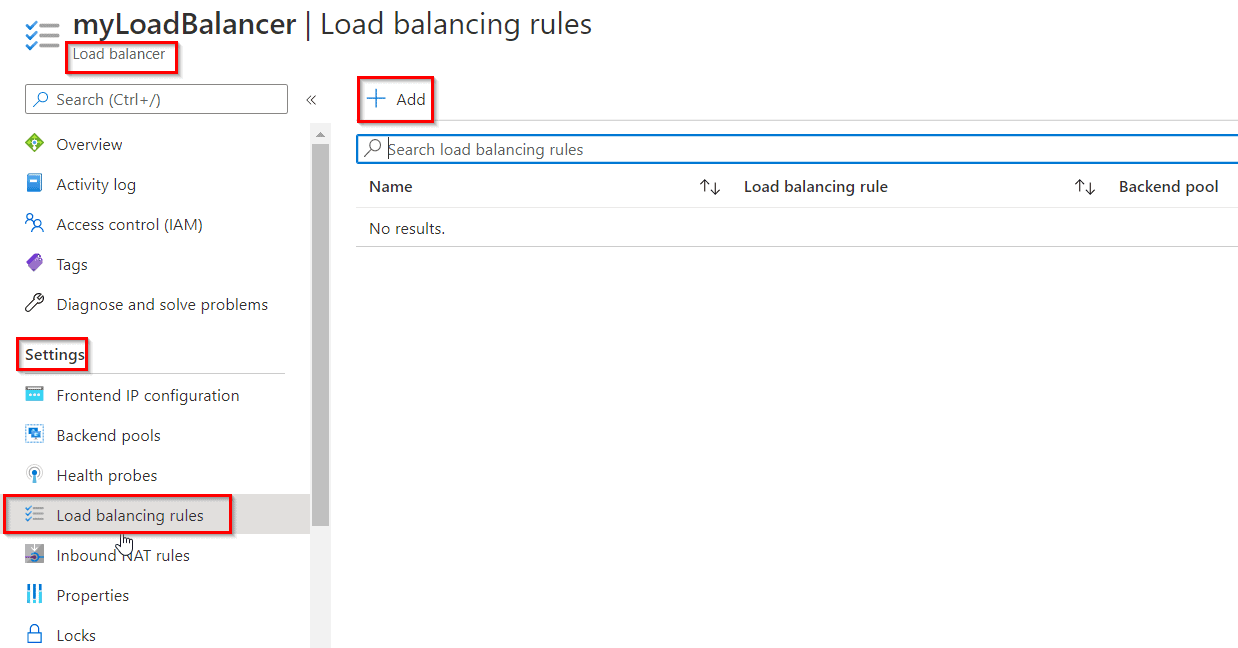
Step 1) Select All services in the left-hand menu, select All resources, and then select myLoadBalancer from the resources list.
Step 2) Under Settings, select Load balancing rules, then select Add.
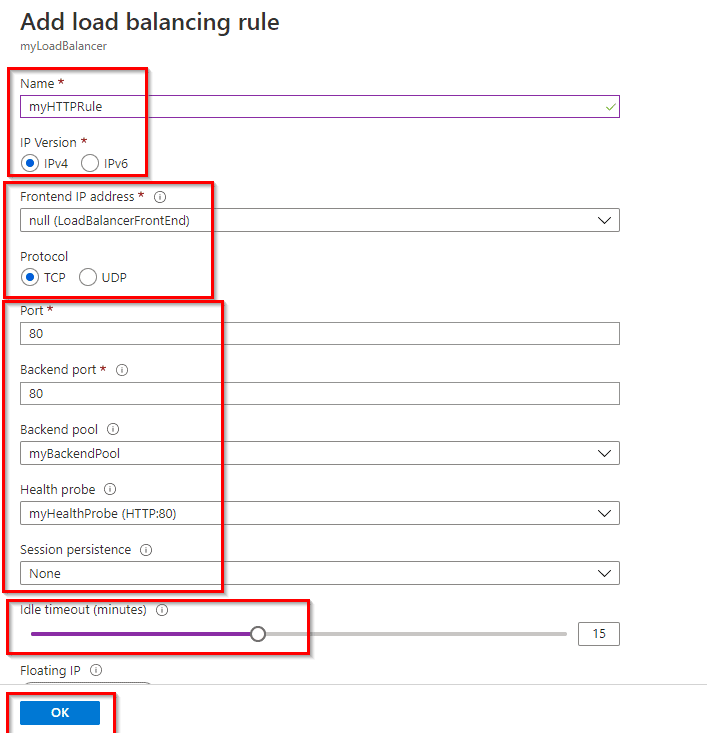
Step 3) Use these values to configure the load-balancing rule and then select OK.
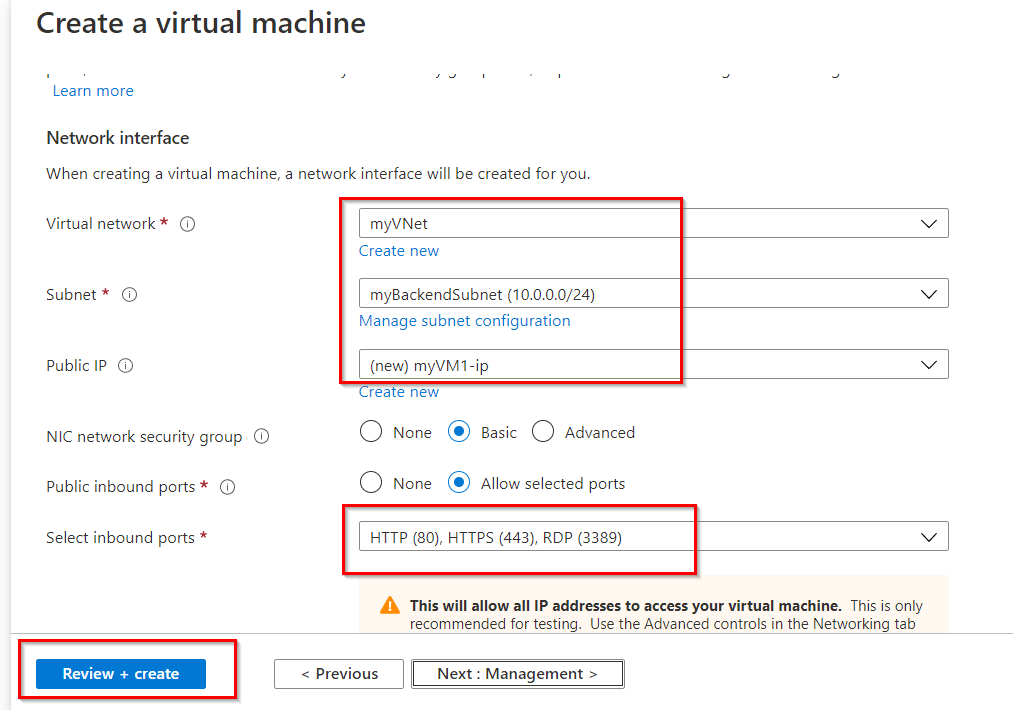
Task 6: Setup Two New windows VM
Now you have to create two different ‘Windows Server’ Virtual Machines and to do so you can follow the steps given in this Documentation.
Note: Create both the VMs in an Availability Set and Select the previously created VNet named “myVNet” under the Networking tab.
Task 7: Install IIS for Testing
Install IIS Web Server on the virtual machines to test the load balancer.
Step 1) Run the following command in the Azure Cloud Shell (PowerShell) to install IIS on the virtual machine. Change the Location and Resource Group parameter according to the VM in which you have deployed:
Set-AzVMExtension `
-ResourceGroupName LBresourcegroup `
-ExtensionName IIS `
-VMName myVM1 `
-Publisher Microsoft.Compute `
-ExtensionType CustomScriptExtension `
-TypeHandlerVersion 1.4 `
-SettingString ‘{“commandToExecute”:”powershell Add-WindowsFeature Web-Server; powershell Add-Content -Path \”C:\\inetpub\\wwwroot\\Default.htm\” -Value $($env:computername)”}’ `
-Location EastUS
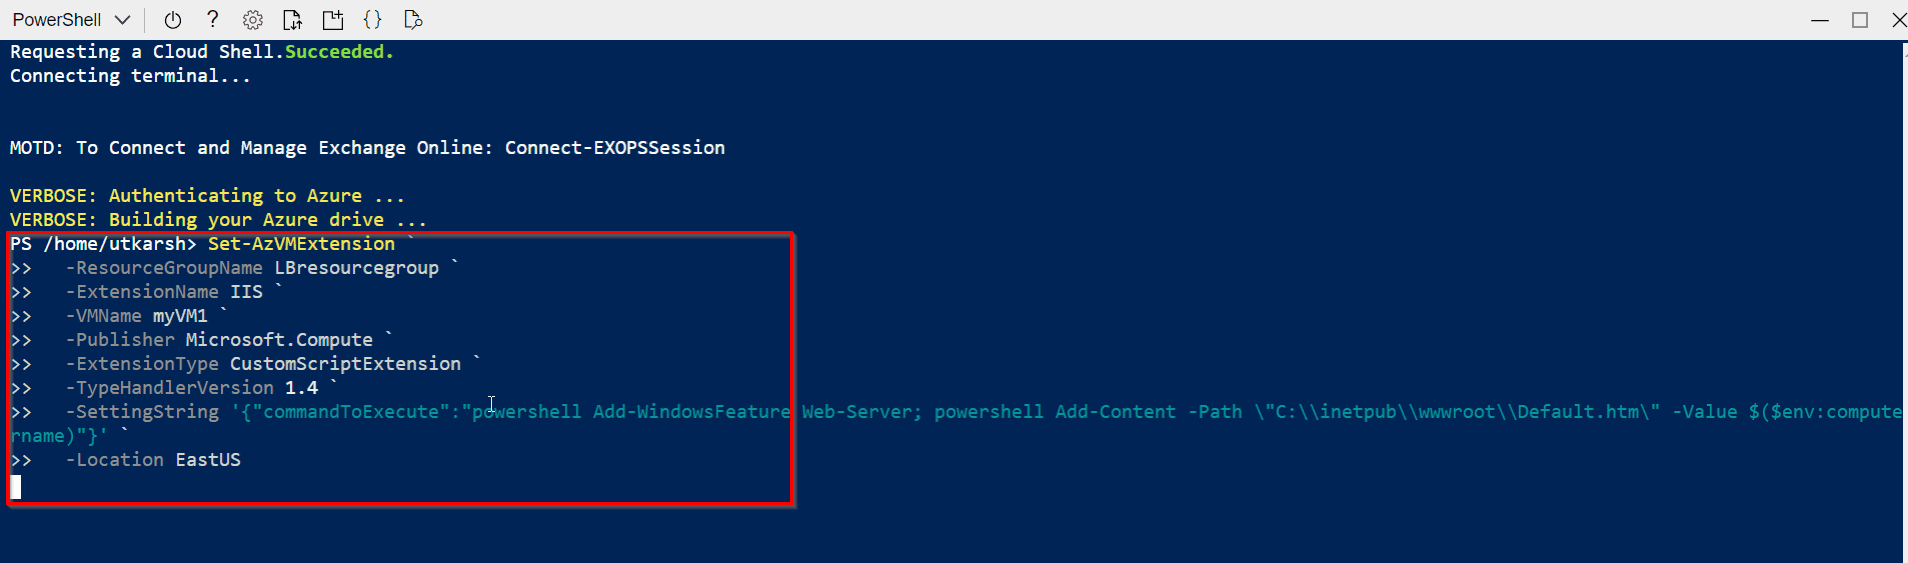
Note: Change the -VMName line to “myVM2” for installing IIS on the second Virtual Machine.
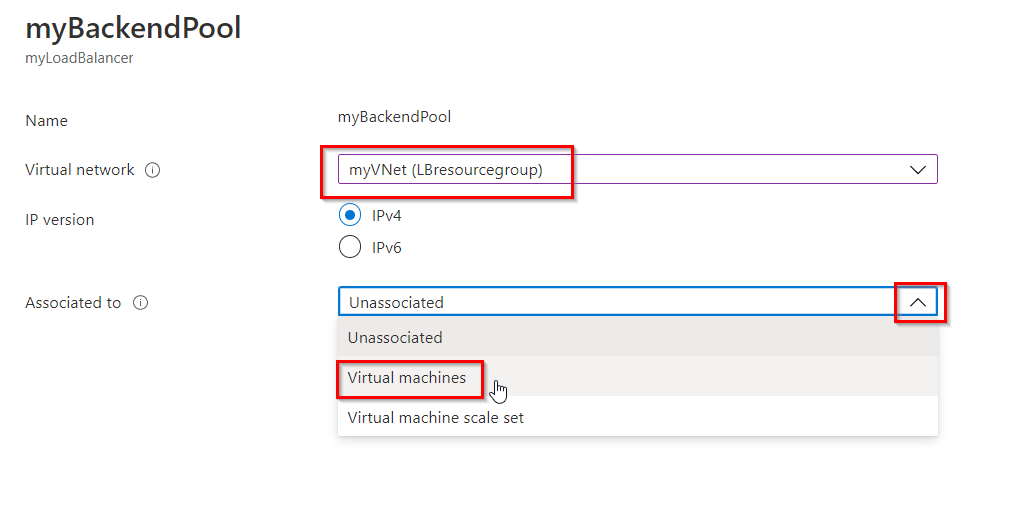
Task 8: Add Virtual Machines to the Backend Pool
Step 1) Select All services in the left-hand menu, select All resources, and then select myLoadBalancer from the resources list.
Step 2) Under Settings, select Backend pools, then select myBackendPool.
Step 3) Select the myVNet in the Virtual Network and Select Virtual machines in Associated to.
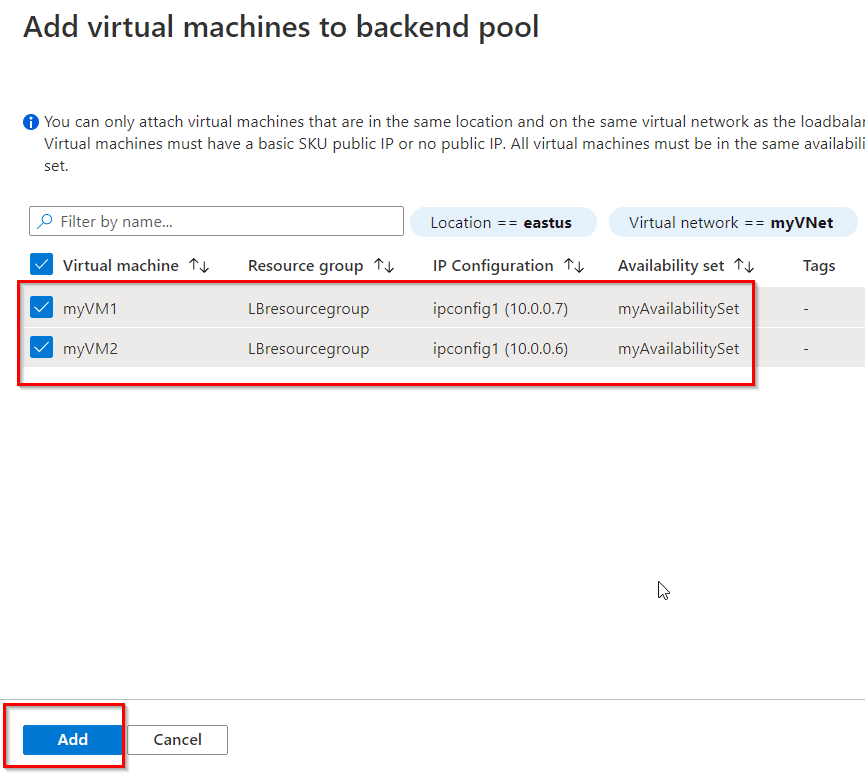
Step 4) In the Virtual machines section, select + Add and then select the newly created both VMs, Select Save.
Task 9: Test the Load Balancer
Step 1) Find the public IP address for the load balancer on the Overview screen of the Load Balancer.
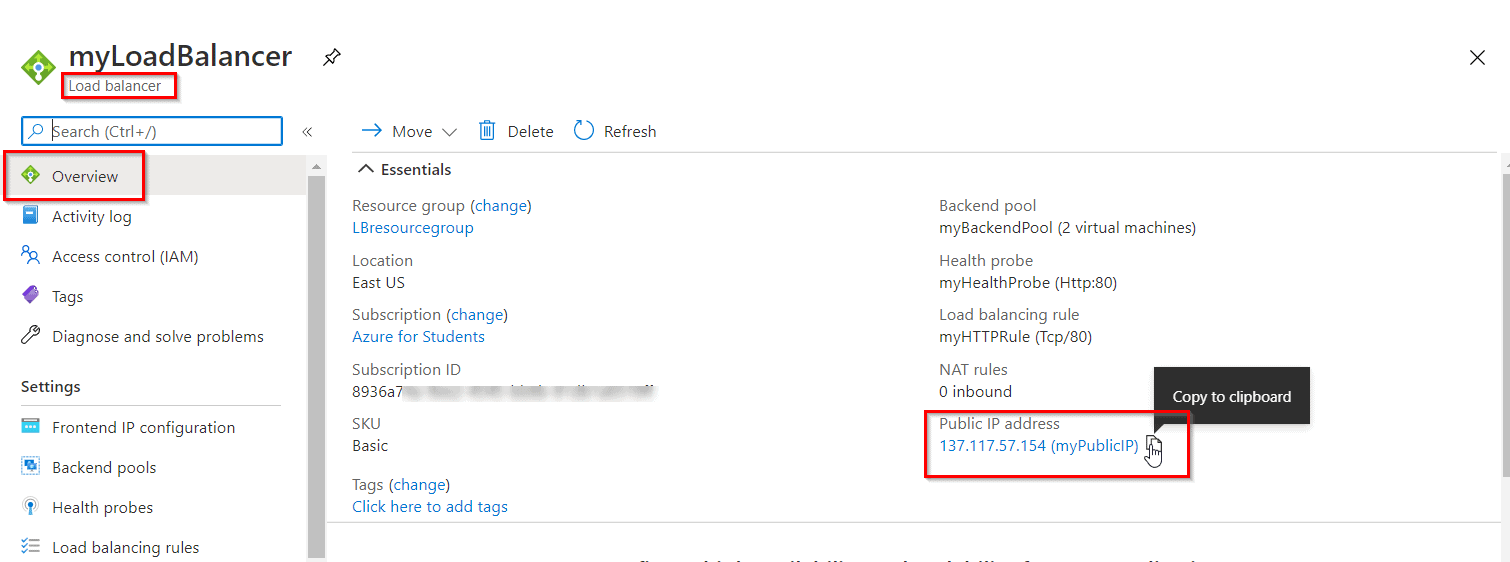
Step 2) Copy the public IP address, and then paste it into the address bar of your browser. Check the response. A valid response verifies that the load balancer was successfully created and can successfully connect with the backend VMs.
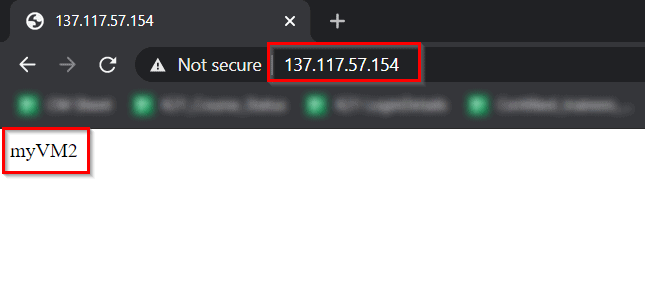
Refresh the browser multiple times and you should see connections to both myVM1 and myVM2.
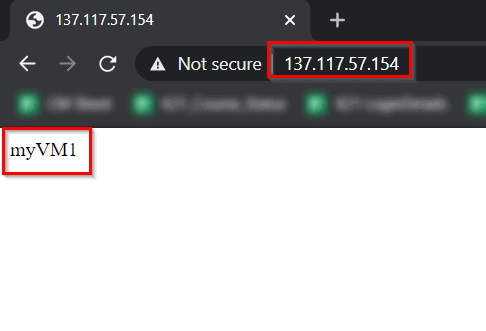
And hence, this confirms the load balancer is working as expected.