Thursday, 22 December 2022

AZURE CLOUD SERVICE (classic)

Cloud Service (classic) :

 Azure Cloud Services is an example of a platform as a service (PaaS). Like Azure App Service, this technology is designed to support applications that are scalable, reliable, and inexpensive to operate. In the same way that App Service is hosted on virtual machines (VMs), so too is Azure Cloud Services. However, you have more control over the VMs. You can install your own software on VMs that use Azure Cloud Services, and you can access them remotely.

Azure Cloud Services diagram

More control also means less ease of use. Unless you need the additional control options, it's typically quicker and easier to get a web application up and running in the Web Apps feature of App Service compared to Azure Cloud Services.

There are two types of Azure Cloud Services roles. The only difference between the two is how your role is hosted on the VMs:

  • Web role: Automatically deploys and hosts your app through IIS.

  • Worker role: Does not use IIS, and runs your app standalone.

For example, a simple application might use just a single web role, serving a website. A more complex application might use a web role to handle incoming requests from users, and then pass those requests on to a worker role for processing. (This communication might use Azure Service Bus or Azure Queue storage.)

As the preceding figure suggests, all the VMs in a single application run in the same cloud service. Users access the application through a single public IP address, with requests automatically load balanced across the application's VMs. The platform scales and deploys the VMs in an Azure Cloud Services application in a way that avoids a single point of hardware failure.

Even though applications run in VMs, it's important to understand that Azure Cloud Services provides PaaS, not infrastructure as a service (IaaS). Here's one way to think about it. With IaaS, such as Azure Virtual Machines, you first create and configure the environment your application runs in. Then you deploy your application into this environment. You're responsible for managing much of this world, by doing things such as deploying new patched versions of the operating system in each VM. In PaaS, by contrast, it's as if the environment already exists. All you have to do is deploy your application. Management of the platform it runs on, including deploying new versions of the operating system, is handled for you.

Azure Service fabric clusters


Fabric Cluster in Azure :

As an Azure Computing enthusiast, I am following the Service Fabric since the platform was available for private preview. The Service Fabric is a distributed platform that addresses significant challenges in managing cloud applications. i.e. Microservices, High-Density Web Services or self-host applications. The Azure Service Fabric avoids complex logistical problems around the infrastructure and service management. It mainly focuses on implementing critical, high-volume workload that is scalable, fault-tolerant, self-healing, stateless or stateful, fast deployable, resource balancing, self-optimising and manageable.

There are mainly two ways to provision the Service Fabric clusters,

Create Service Fabric Cluster using the Azure Portal

Creating Service Fabric Cluster using Azure Portal is simple, though there are some tricky steps involved while setting up security and certificates. We would highlight them as we go along. Azure Portal is a useful tool especially if you are configuring for quick proof of concept or early environment. For production use (at Enterprise Scale), I would recommend Azure Resource Manager Templates.

Basic Configuration

Basic configuration would require Cluster NameOperating SystemDefault VM CredentialsSubscriptionResource Group and Data Center Location. It is not a good idea to have the same username and password for all the VMs from a security perspective. However, it is fine for testing or development purposes.

Key configuration elements would be Operating System and Data Center Location.


Cluster Configuration & Node Types

Node Type configuration is one of the key decision points for your Service Fabric Cluster. Service Fabric Provisioning Orchestration would create some the VM Scale Set as equal to node types. At node type configuration, you can specify Node Type NameDurability TierMachine SizeReliability Tier and Initial VM Scale Set Capacity.

Durability Tier

The Durability Tier determines the minimum size of VM. I relate Durability term in this context as Up-Scaling your computing nodes, as well as there is an element of availability, too. Gold durability can be enabled on VM Size like D15_*, G5+ or equivalent, the similar constraint for Silver, too. The use case of the services should be the main driver for deciding durability tier.

Reliability Tier

The reliability tier configuration is more relevant to the High Availability requirement; the configuration value would run the system services with a count of target replica set. The configuration value would also determine the minimum number of nodes. However, bear in mind that there is no ceiling on numbers of VM (Azure limitation would apply).

I see them, as proper valuation as the minimal system should be in place. However, we can always scale-up or scale-out.


Node Types provides a physical segmentation within Service Fabric Cluster, you can consider separate node type for various drivers. i.e. Business Domain, Front-End Service Layer, Composite Service Layer, Core Service Layer, Back-End Service Layer, Service Profiling (High Throughput), Stateless Services (with lighter but higher more machines), Stateful (or Actor with High I/O but a smaller number of machines).

In a nutshell, it would provide much-needed flexibility to manage different enterprise services. The configuration parameters are same as Primary Node Type.


Custom Fabric Settings

You can configure runtime configuration values here, for more detail refer Customize Service Fabric cluster settings and Fabric Upgrade policy  .


Upgrade and Fabric Version

You can configure automatic Fabric Runtime upgrade or leave it for manual upgrade. A Azure Service Fabric cluster is a shared responsibility (as PaaS), you can choose a preferred update mode using Resource Manager template or the Azure Portal. For more information, please see Upgrade an Azure Service Fabric cluster  .


Security is key for any Public Cloud deployment. Service Fabric provides different configuration options i.e. Node-to-Node or Node-to-Client. You can consider some of the following,

  • X.509 Certificate Security (using Azure Key Vault) Recommended
  • X.509 Certificate Security (uploading .pfx directly and configuring through CD/CI pipeline to individual node)
  • Windows Security (Azure Active Directory)

By click Show advanced setting link to expand other options available to the configuration. i.e. Secondary Certificate, Windows AD configuration. Secondary Certificate is necessary as it would make Key Rotation easier and straightforward. Refer add a secondary cluster certificate using the portal  for more detail.


$ResouceGroup = "blog.nilayparikh.com"
$VName = "XXXX"
$SubID = "0000000-0000-0000-0000-000000000000"
$locationRegion = "southuk"
$newCertName = "npblogdemosfcertificate"
$dnsName = "xxxxxxxx.uksouth.cloudapp.azure.com" #The certificate's subject name must match the domain used to access the Service Fabric cluster.
$localCertPath = "D:\MyCertificates" # location where you want the .PFX to be stored

Invoke-AddCertToKeyVault -SubscriptionId $SubID -ResourceGroupName $ResouceGroup -Location $locationRegion -VaultName $VName -CertificateName $newCertName -CreateSelfSignedCertificate -DnsName $dnsName -OutputPath $localCertPath

/* Output */
Name  : CertificateThumbprint
Value : 7D96DC096AXX98DCXXXXX85178AECD2AXXXX889

Name  : SourceVault
Value : /subscriptions/0000000-0000-0000-0000-000000000000/resourceGroups/blog.nilayparikh.com/providers/Microsoft.KeyVault/vaults/XXXX

Name  : CertificateURL
Value : https://XXXX.vault.azure.net:443/secrets/npblogdemosfcertificate/0000000000000000000000000000000

If you are considering deploying X.509 certificate through the Azure Key Vault then you need to tick Enable access to Azure Virtual Machine for deployment option on Advance Access Policies.

Service Fabric Advance Access Policies

Quick hack for creating self-signed certificate for non-production use,

Review and Create Service Fabric Cluster

Review the summary and click on Create, it may take long to provision a cluster. The Azure Portal will provision following,

  • Load Balancer (per Node Type)
  • Subnet (per Node Type)
  • Public IP
  • Virtual Network (optional with Resource Manager Template)
  • Virtual Scale Sets (per Node Type)
  • Virtual Machines (per DurabilityReliability and Cluster Configuration)
  • Storage (per configuration, i.e. Logs)

That is it; it could take several minutes while Microsoft Azure provision you all the artefact that make Service Fabric Cluster.

Wednesday, 21 December 2022

Azure Batch account


Create a Batch account

Follow these steps to create a sample Batch account for test purposes. You need a Batch account to create pools and jobs. You can also link an Azure storage account with the Batch account. Although not required for this quickstart, the storage account is useful to deploy applications and store input and output data for most real-world workloads.

  1. In the Azure portal, select Create a resource.

  2. Type "batch service" in the search box, then select Batch Service.
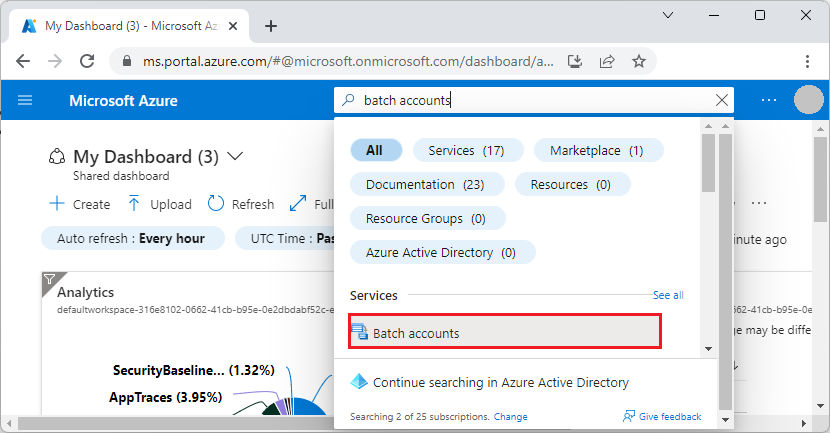
    Screenshot of Batch Service in the Azure Marketplace.

  3. Select Create.

  4. In the Resource group field, select Create new and enter a name for your resource group.

  5. Enter a value for Account name. This name must be unique within the Azure Location selected. It can contain only lowercase letters and numbers, and it must be between 3-24 characters.

  6. Optionally, under Storage account, you can specify a storage account. Click Select a storage account, then select an existing storage account or create a new one.

  7. Leave the other settings as is. Select Review + create, then select Create to create the Batch account.

When the Deployment succeeded message appears, go to the Batch account that you created.

Create a pool of compute nodes

Now that you have a Batch account, create a sample pool of Windows compute nodes for test purposes. The pool in this quickstart consists of two nodes running a Windows Server 2019 image from the Azure Marketplace.

  1. In the Batch account, select Pools > Add.

  2. Enter a Pool ID called mypool.

  3. In Operating System, use the following settings (you can explore other options).

    SettingValue
    Image TypeMarketplace
    Publishermicrosoftwindowsserver
    Offerwindowsserver
    Sku2019-datacenter-core-smalldisk
  4. Scroll down to enter Node Size and Scale settings. The suggested node size offers a good balance of performance versus cost for this quick example.

    SettingValue
    Node pricing tierStandard_A1_v2
    Target dedicated nodes2
  5. Keep the defaults for remaining settings, and select OK to create the pool.

Batch creates the pool immediately, but it takes a few minutes to allocate and start the compute nodes. During this time, the pool's Allocation state is Resizing. You can go ahead and create a job and tasks while the pool is resizing.

After a few minutes, the allocation state changes to Steady, and the nodes start. To check the state of the nodes, select the pool and then select Nodes. When a node's state is Idle, it is ready to run tasks.

Create a job

Now that you have a pool, create a job to run on it. A Batch job is a logical group of one or more tasks. A job includes settings common to the tasks, such as priority and the pool to run tasks on. The job won't have tasks until you create them.

  1. In the Batch account view, select Jobs > Add.

  2. Enter a Job ID called myjob.

  3. In Pool, select mypool.

  4. Keep the defaults for the remaining settings, and select OK.

Create tasks

Now, select the job to open the Tasks page. This is where you'll create sample tasks to run in the job. Typically, you create multiple tasks that Batch queues and distributes to run on the compute nodes. In this example, you create two identical tasks. Each task runs a command line to display the Batch environment variables on a compute node, and then waits 90 seconds.

When you use Batch, the command line is where you specify your app or script. Batch provides several ways to deploy apps and scripts to compute nodes.

To create the first task:

  1. Select Add.

  2. Enter a Task ID called mytask.

  3. In Command line, enter cmd /c "set AZ_BATCH & timeout /t 90 > NUL". Keep the defaults for the remaining settings, and select Submit.

Repeat the steps above to create a second task. Enter a different Task ID such as mytask2, but use the same command line.

After you create a task, Batch queues it to run on the pool. When a node is available to run it, the task runs. In our example, if the first task is still running on one node, Batch will start the second task on the other node in the pool.

View task output

The example tasks you created will complete in a couple of minutes. To view the output of a completed task, select the task, then select the file stdout.txt to view the standard output of the task. The contents are similar to the following example:
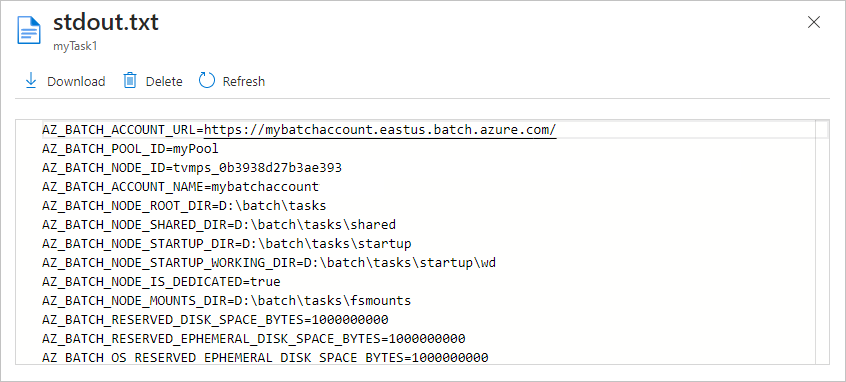
Screenshot of the output from a completed task.

The contents show the Azure Batch environment variables that are set on the node. When you create your own Batch jobs and tasks, you can reference these environment variables in task command lines, and in the apps and scripts run by the command lines.

Clean up resources

If you want to continue with Batch tutorials and samples, you can keep using the Batch account and linked storage account created in this quickstart. There is no charge for the Batch account itself.

You are charged for the pool while the nodes are running, even if no jobs are scheduled. When you no longer need the pool, delete it. In the account view, select Pools and the name of the pool. Then select Delete. After you delete the pool, all task output on the nodes is deleted.

When no longer needed, delete the resource group, Batch account, and all related resources. To do so, select the resource group for the Batch account and select Delete resource group.

Azure Kubernetes Service With CI/CD


Azure Kubernetes Service With CI/CD

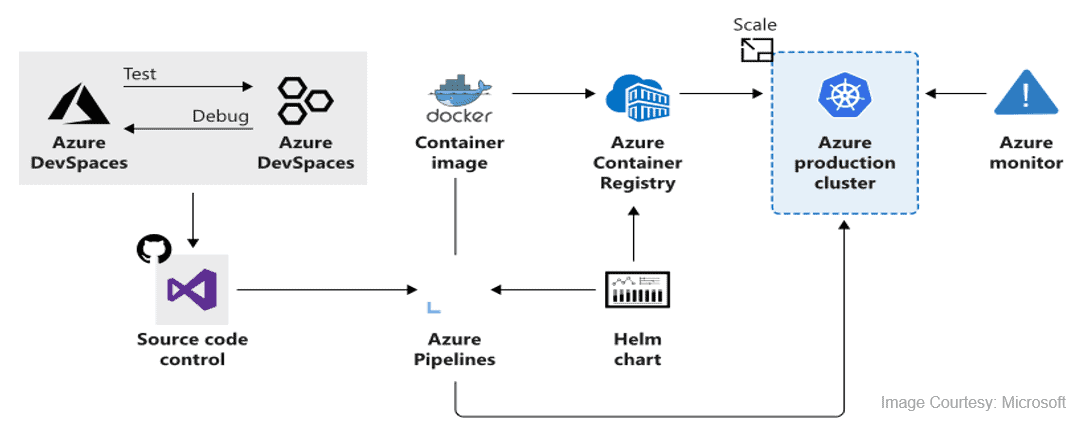
We can deploy AKS in CI/CD environment, using this we can continuously build and deploy applications in Azure Kubernetes Service. By deploying these using Azure Kubernetes Service (AKS), we can achieve replicable, manageable clusters of containers.

AKS_CI/CD

Azure Kubernetes Service Security


Azure Kubernetes Service Security

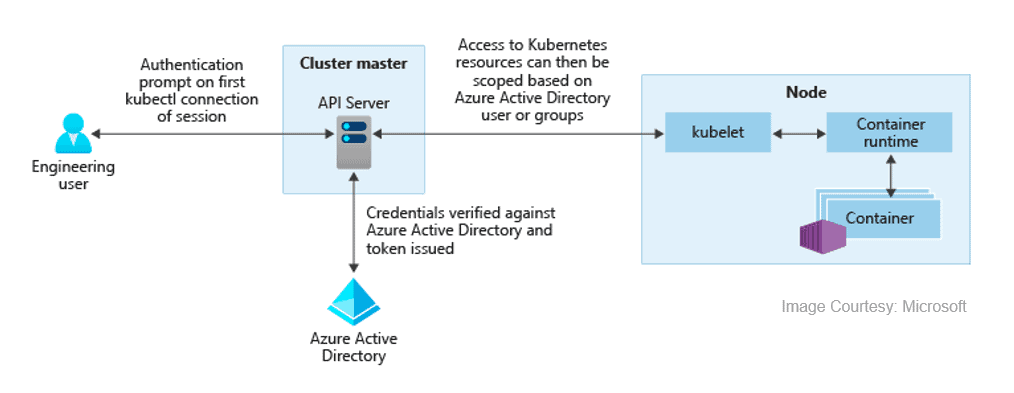
Azure Active Directory with AKS, We can integrate Azure Kubernetes with Azure Active Directory so the users in Azure Active Directory for user authentication. Using this user in Azure Active Directory can access the AKS cluster using an Azure AD authentication token. we can also configure Kubernetes role-based access control (RBAC) based on a user’s identity. Azure AD legacy integration can only be enabled during cluster creation.


Azure Active Directory


Azure Kubernetes Service Storage


Azure Kubernetes Service Storage

In AKS, There are two types of storage options available:

A) Azure Disk

B) Azure Files

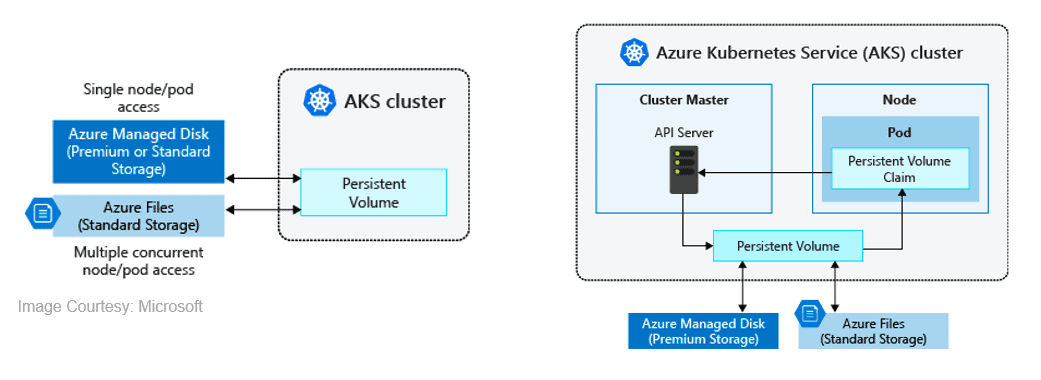
These stores are used to provide persistent storage to store data and images persistently. Azure disks can be used to create a Kubernetes DataDisk resource and mounted as ReadWrite, so the disks are only available to a single pod. we can’t share this with multiple pods. Azure Files are SMB based shared file system mounted across different machines. Using Azure files we can share data across multiple nodes and pods.


Azure Kubernetes Service Networking


Azure Kubernetes Service Networking

In AKS, we can deploy a cluster using the following networking models:

A) kubenet (Basic Networking)

B) CNI (Advanced Networking)

Also check: All you need to know about Kubernetes RBAC

AKS kubenet (Basic Networking)

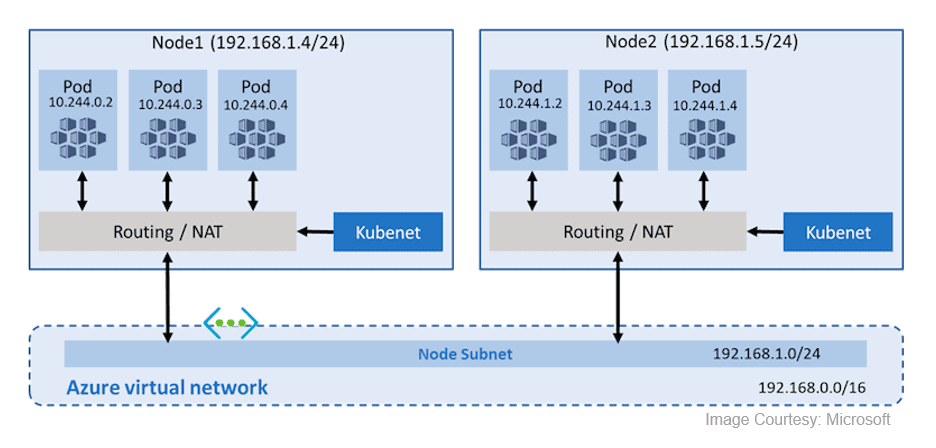
By default, Azure Kubernetes Service (AKS) clusters use kubenet, and this will create an Azure virtual network and subnet for you. Using kubenet, only the nodes receive an IP address in the virtual network subnet and pods can’t communicate directly with each other. Instead, User Defined Routing (UDR) and IP forwarding are used for connectivity between pods across nodes. In basic networking pod, IP natted inside subnet. Network address translation (NAT) is used so that the pods can reach resources on the Azure virtual network.

kubenet (Basic Networking)