Monday, 4 July 2022

AWS Serverless Application Repository Theory

 Serverless application Repository :

Serverless applications are changing the way companies do business by enabling them to deploy much faster and more frequently—a competitive advantage.

Amazon’s AWS Serverless Application Model (AWS SAM) has been a game changer in this space, making it easy for developers to create, access and deploy applications, thanks to simplified templates and code samples.

AWS Serverless Application Repositor :

The AWS Serverless Application Repository is a searchable ecosystem that allows developers to find serverless applications and their components for deployment. Its helps simplify serverless application development by providing ready-to-use apps.


Here are the basic steps:

  1. Search and discover. A developer can search the repository for code snippets, functions, serverless applications, and their components.
  2. Integrate with the AWS Lambda console. Repository components are already available to developers.
  3. Configure. Before deploying, developers can set environment variables, parameter values, and more. For example, you can go the plug-and-play route by adding repository components to a larger application framework, or you can deconstruct and tinker with the code for further customization. If needed, pull requests can also be submitted to repository authors.
  4. Deploy. Deployed applications can be managed from the AWS Management Console. A developer can follow prompts to name, describe and upload their serverless applications and components to the ecosystem where they can be shared internally and with other developers across the ecosystem. This feature makes AWS SAM a truly open-source environment

Benefits of programming in AWS SAM :

You can build serverless applications for almost any type of backend service without having to worry about scalability and managing servers. Here are some of the many benefits that building serverless applications in AWS SAM has to offer.

Low cost & efficient :

AWS SAM is low-cost and efficient for developers because of its pay-as-you-go structure. The platform only charges developers for usage, meaning you never pay for more of a service than you use.

Simplified processes :

The overarching goal of AWS SAM is ease-of-use. By design, it’s focused on simplifying application development so that programmers have more freedom to create in the open-source ecosystem.

Quick, scalable deployment :

AWS SAM makes deployment quick and simple by allowing developers to upload code to AWS and letting Amazon handle the rest. They also provide robust testing environments, so developers don’t miss a beat. All of this occurs on a platform that is easy to scale, allowing apps to grow and change to meet business objectives.

Convenient & accessible :

Undoubtedly, AWS SAM offers a convenient solution for developing in the cloud. Its serverless nature also means that it is a universally accessible platform. The wide reach of the internet makes it easy to execute code on-demand from anywhere.

Decreased time to market :

Overall, choosing a serverless application platform saves time and money that would otherwise be spent managing and operating servers or runtimes, whether on-premises or in the cloud. Because developers can create apps in a fraction of the time (think hours—not weeks or months), they are able to focus more of their attention on accelerating innovation in today’s competitive digital economy.

AWS SAM for Serverless Applications :

It’s clear that AWS SAM is a highly efficient, highly scalable, low-cost, and convenient solution for cloud programming.

But for those who haven’t yet made the switch, there are some concerns that arise from developing using AWS SAM, including:

  • 1.A general lack of control over the ecosystem that developers are coding in.
  • 2.Vendor lock-in that may occur when you sign up for any FaaS.
  • 3.Session timeouts that require developers to rewrite code, making it more complex instead of simplifying the process.
  • 4.AWS Lambda timeouts: Lambda functions are limited by a timeout value that can be configured from 3 seconds to 900 seconds (15 minutes). Lambda automatically terminates functions running longer than its time-out value.

    •  AWS Serverless Application Model :

    The AWS Serverless Application Model (SAM) is designed to make the creation, deployment, and execution of serverless applications as simple as possible. This can be done using AWS SAM templates with just a few choice code snippets—this way, practically anyone can create a serverless app.

  • AWS Serverless Application Model (SAM)


    • An open-source framework for building serverless applications.
    • It provides shorthand syntax to express functions, APIs, databases, and event source mappings. 
    • You create a JSON or YAML configuration template to model your applications. 
    • During deployment, SAM transforms and expands the SAM syntax into AWS CloudFormation syntax. Any resource that you can declare in an AWS CloudFormation template you can also declare in an AWS SAM template.
    • The SAM CLI provides a Lambda-like execution environment that lets you locally build, test, and debug applications defined by SAM templates. You can also use the SAM CLI to deploy your applications to AWS.
    • You can use AWS SAM to build serverless applications that use any runtime supported by AWS Lambda. You can also use SAM CLI to locally debug Lambda functions written in Node.js, Java, Python, and Go.
    • Template Anatomy
      • If you are writing an AWS Serverless Application Model template alone and not via CloudFormation, the Transform section is required.
      • The Globals section is unique to AWS SAM templates. It defines properties that are common to all your serverless functions and APIs. All the AWS::Serverless::FunctionAWS::Serverless::Api, and AWS::Serverless::SimpleTable resources inherit the properties that are defined in the Globals section.
      • The Resources section can contain a combination of AWS CloudFormation resources and AWS SAM resources.
    • Overview of Syntax
      • AWS::Serverless::Api
        • This resource type describes an API Gateway resource. It’s useful for advanced use cases where you want full control and flexibility when you configure your APIs.
      • AWS::Serverless::Application
        • This resource type embeds a serverless application from the AWS Serverless Application Repository or from an Amazon S3 bucket as a nested application. Nested applications are deployed as nested stacks, which can contain multiple other resources.
      • AWS::Serverless::Function
        • This resource type describes configuration information for creating a Lambda function. You can describe any event source that you want to attach to the Lambda function—such as Amazon S3, Amazon DynamoDB Streams, and Amazon Kinesis Data Streams.
      • AWS::Serverless::Layer Version
        • This resource type creates a Lambda layer version that contains library or runtime code needed by a Lambda function. When a serverless layer version is transformed, AWS SAM also transforms the logical ID of the resource so that old layer versions are not automatically deleted by AWS CloudFormation when the resource is updated.
      • AWS::Serverless::Simple Table
        • This resource type provides simple syntax for describing how to create DynamoDB tables.
    • Commonly used SAM CLI commands
      • The sam in it command generates pre-configured AWS SAM templates.
      • The sam local command supports local invocation and testing of your Lambda functions and SAM-based serverless applications by executing your function code locally in a Lambda-like execution environment.
      • The sam package and sam deploy commands let you bundle your application code and dependencies into a “deployment package” and then deploy your serverless application to the AWS Cloud.
      • The sam logs command enables you to fetch, tail, and filter logs for Lambda functions. 
      • The output of the sam publish command includes a link to the AWS Serverless Application Repository directly to your application.
      • Use sam validate to validate your SAM template.
    • Controlling access to APIs
      • You can use AWS SAM to control who can access your API Gateway APIs by enabling authorization within your AWS SAM template.
        • Lambda authorizer (formerly known as a custom authorizer) is a Lambda function that you provide to control access to your API. When your API is called, this Lambda function is invoked with a request context or an authorization token that are provided by the client application. The Lambda function returns a policy document that specifies the operations that the caller is authorized to perform, if any. There are two types of Lambda authorizers:
          • Token based type receives the caller’s identity in a bearer token, such as a JSON Web Token (JWT) or an OAuth token.
          • Request parameter based type receives the caller’s identity in a combination of headers, query string parameters, stage Variables, and $context variables.
        • Amazon Cognito user pools are user directories in Amazon Cognito. A client of your API must first sign a user in to the user pool and obtain an identity or access token for the user. Then your API is called with one of the returned tokens. The API call succeeds only if the required token is valid.
    • The optional Transform section of a CloudFormation template specifies one or more macros that AWS CloudFormation uses to process your template. Aside from macros you create, AWS CloudFormation also supports the AWS::Serverless transform which is a macro hosted on AWS CloudFormation.
      • The AWS::Serverless transform specifies the version of the AWS Serverless Application Model (AWS SAM) to use. This model defines the AWS SAM syntax that you can use and how AWS CloudFormation processes it. 

AWS LAMBDA - Practical


Lambda Configuration

Services -> Lambda

Create a Lambda Function

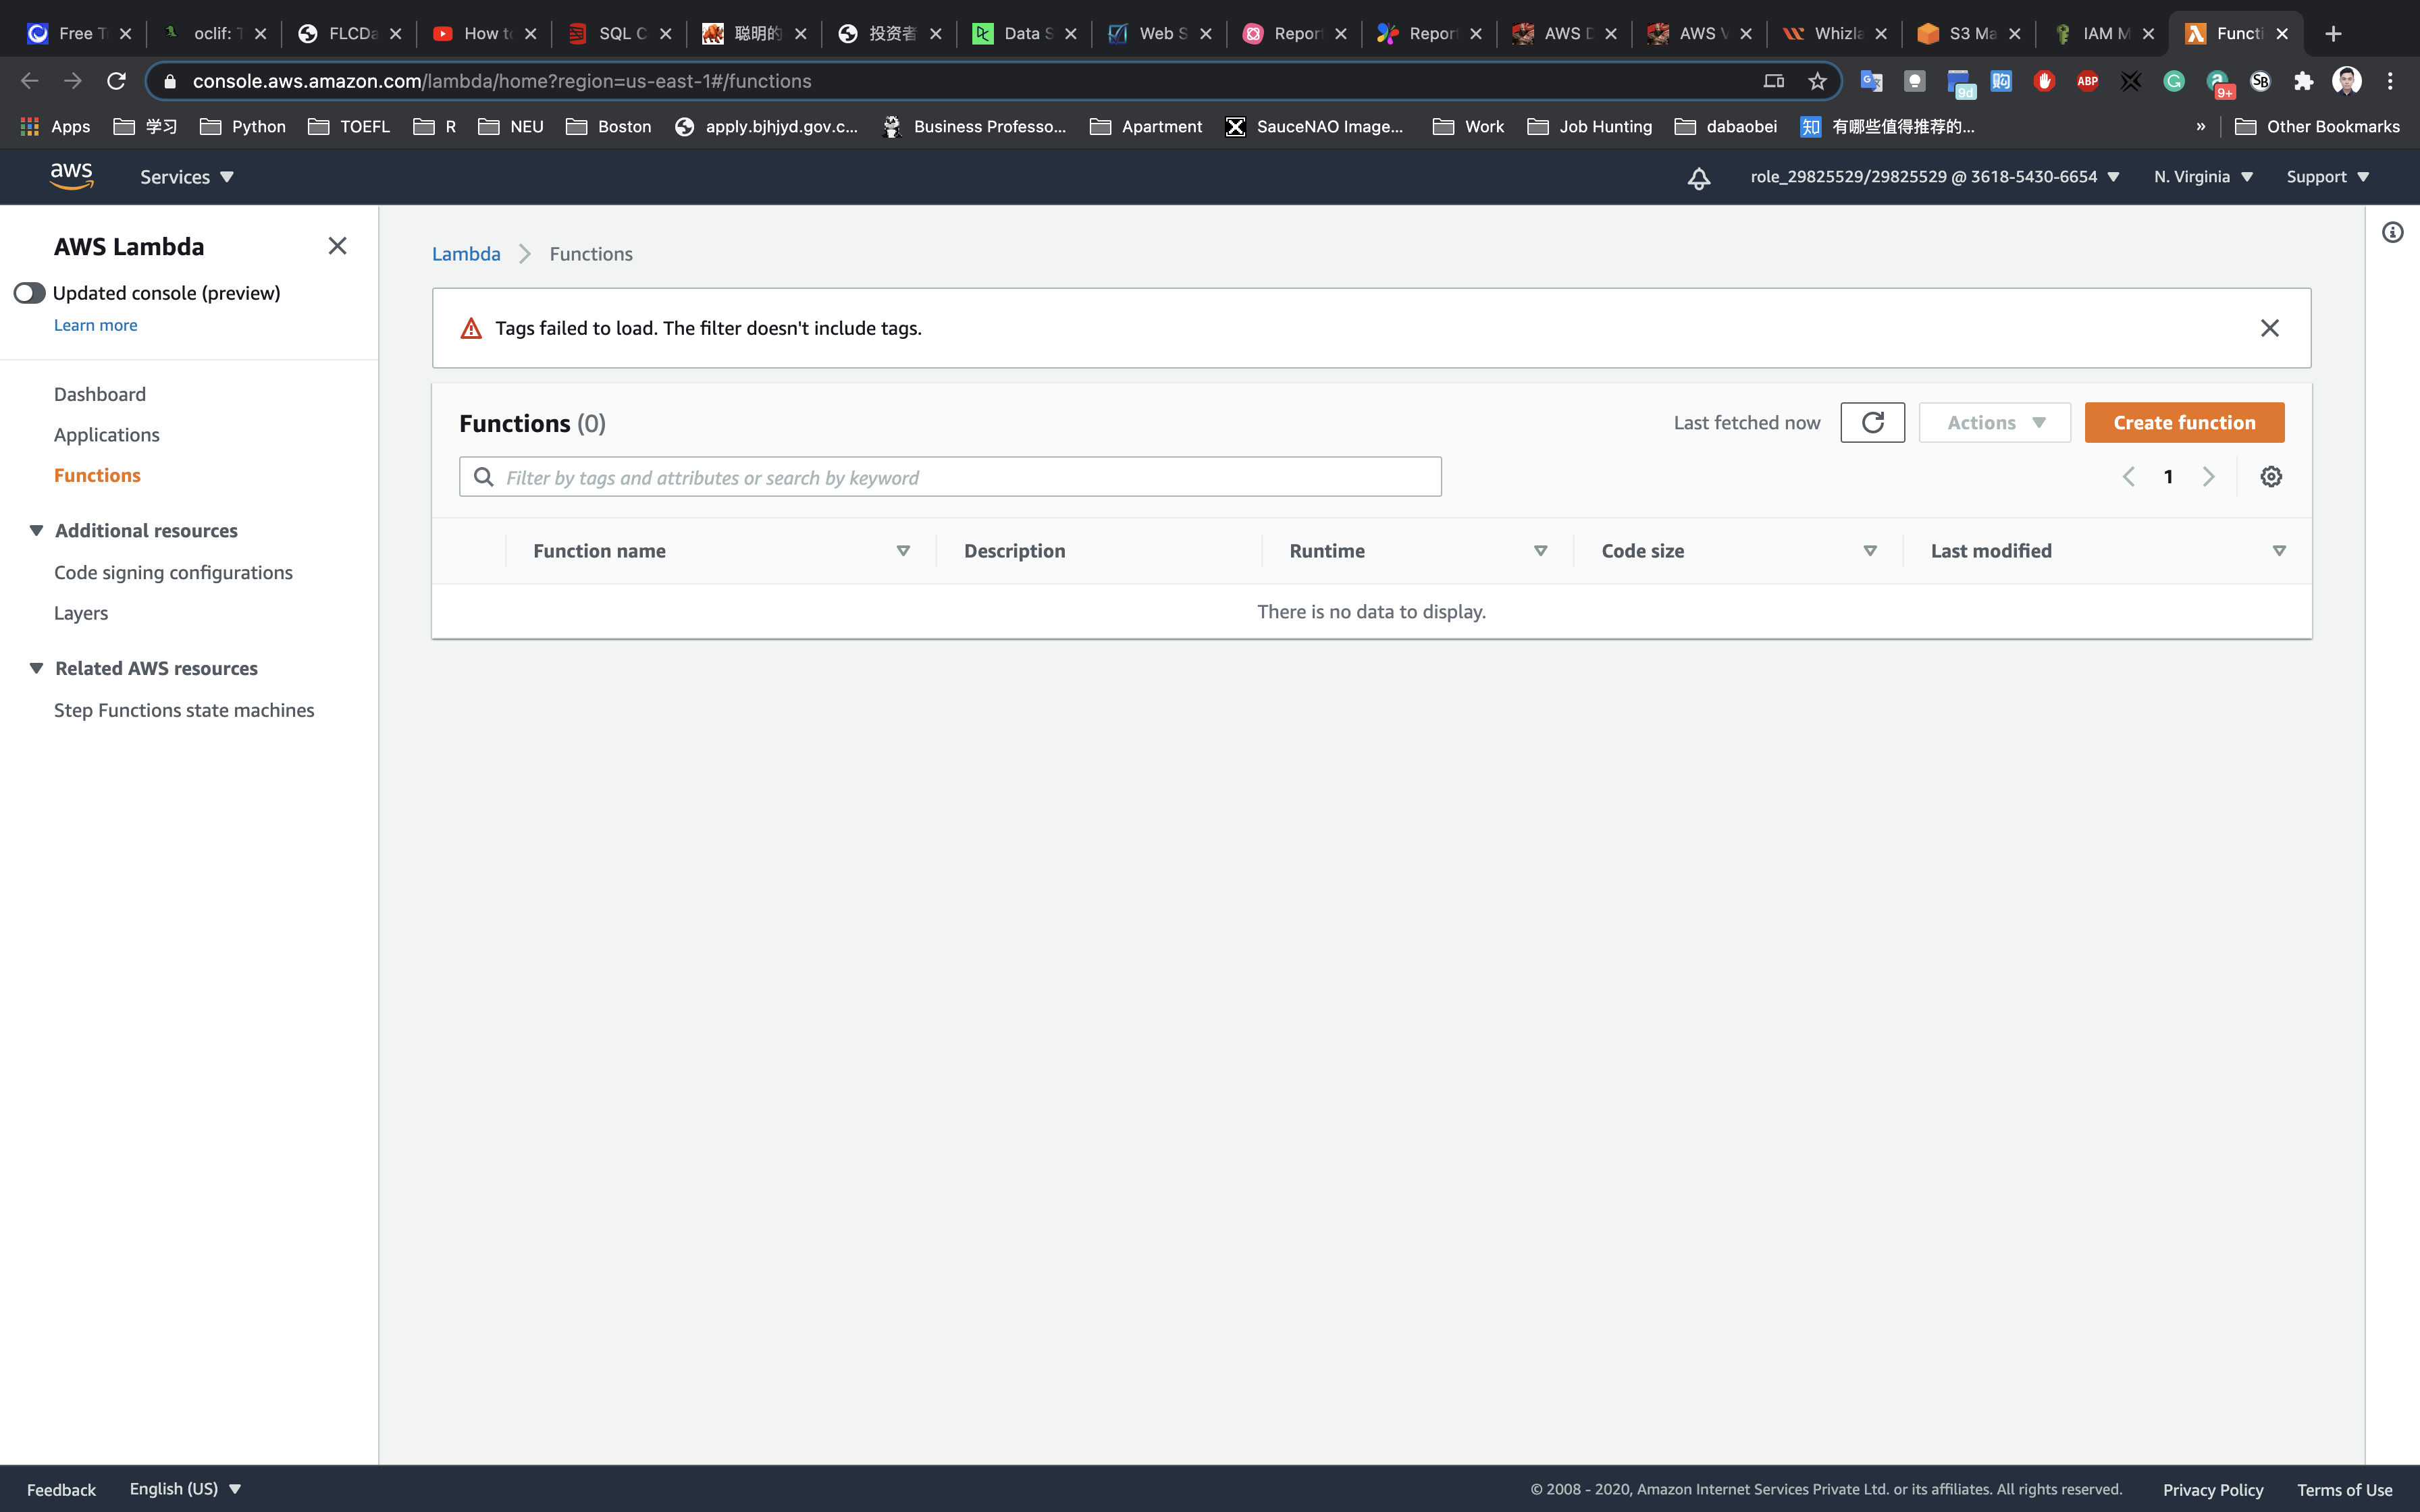
Click on the Create a function button.

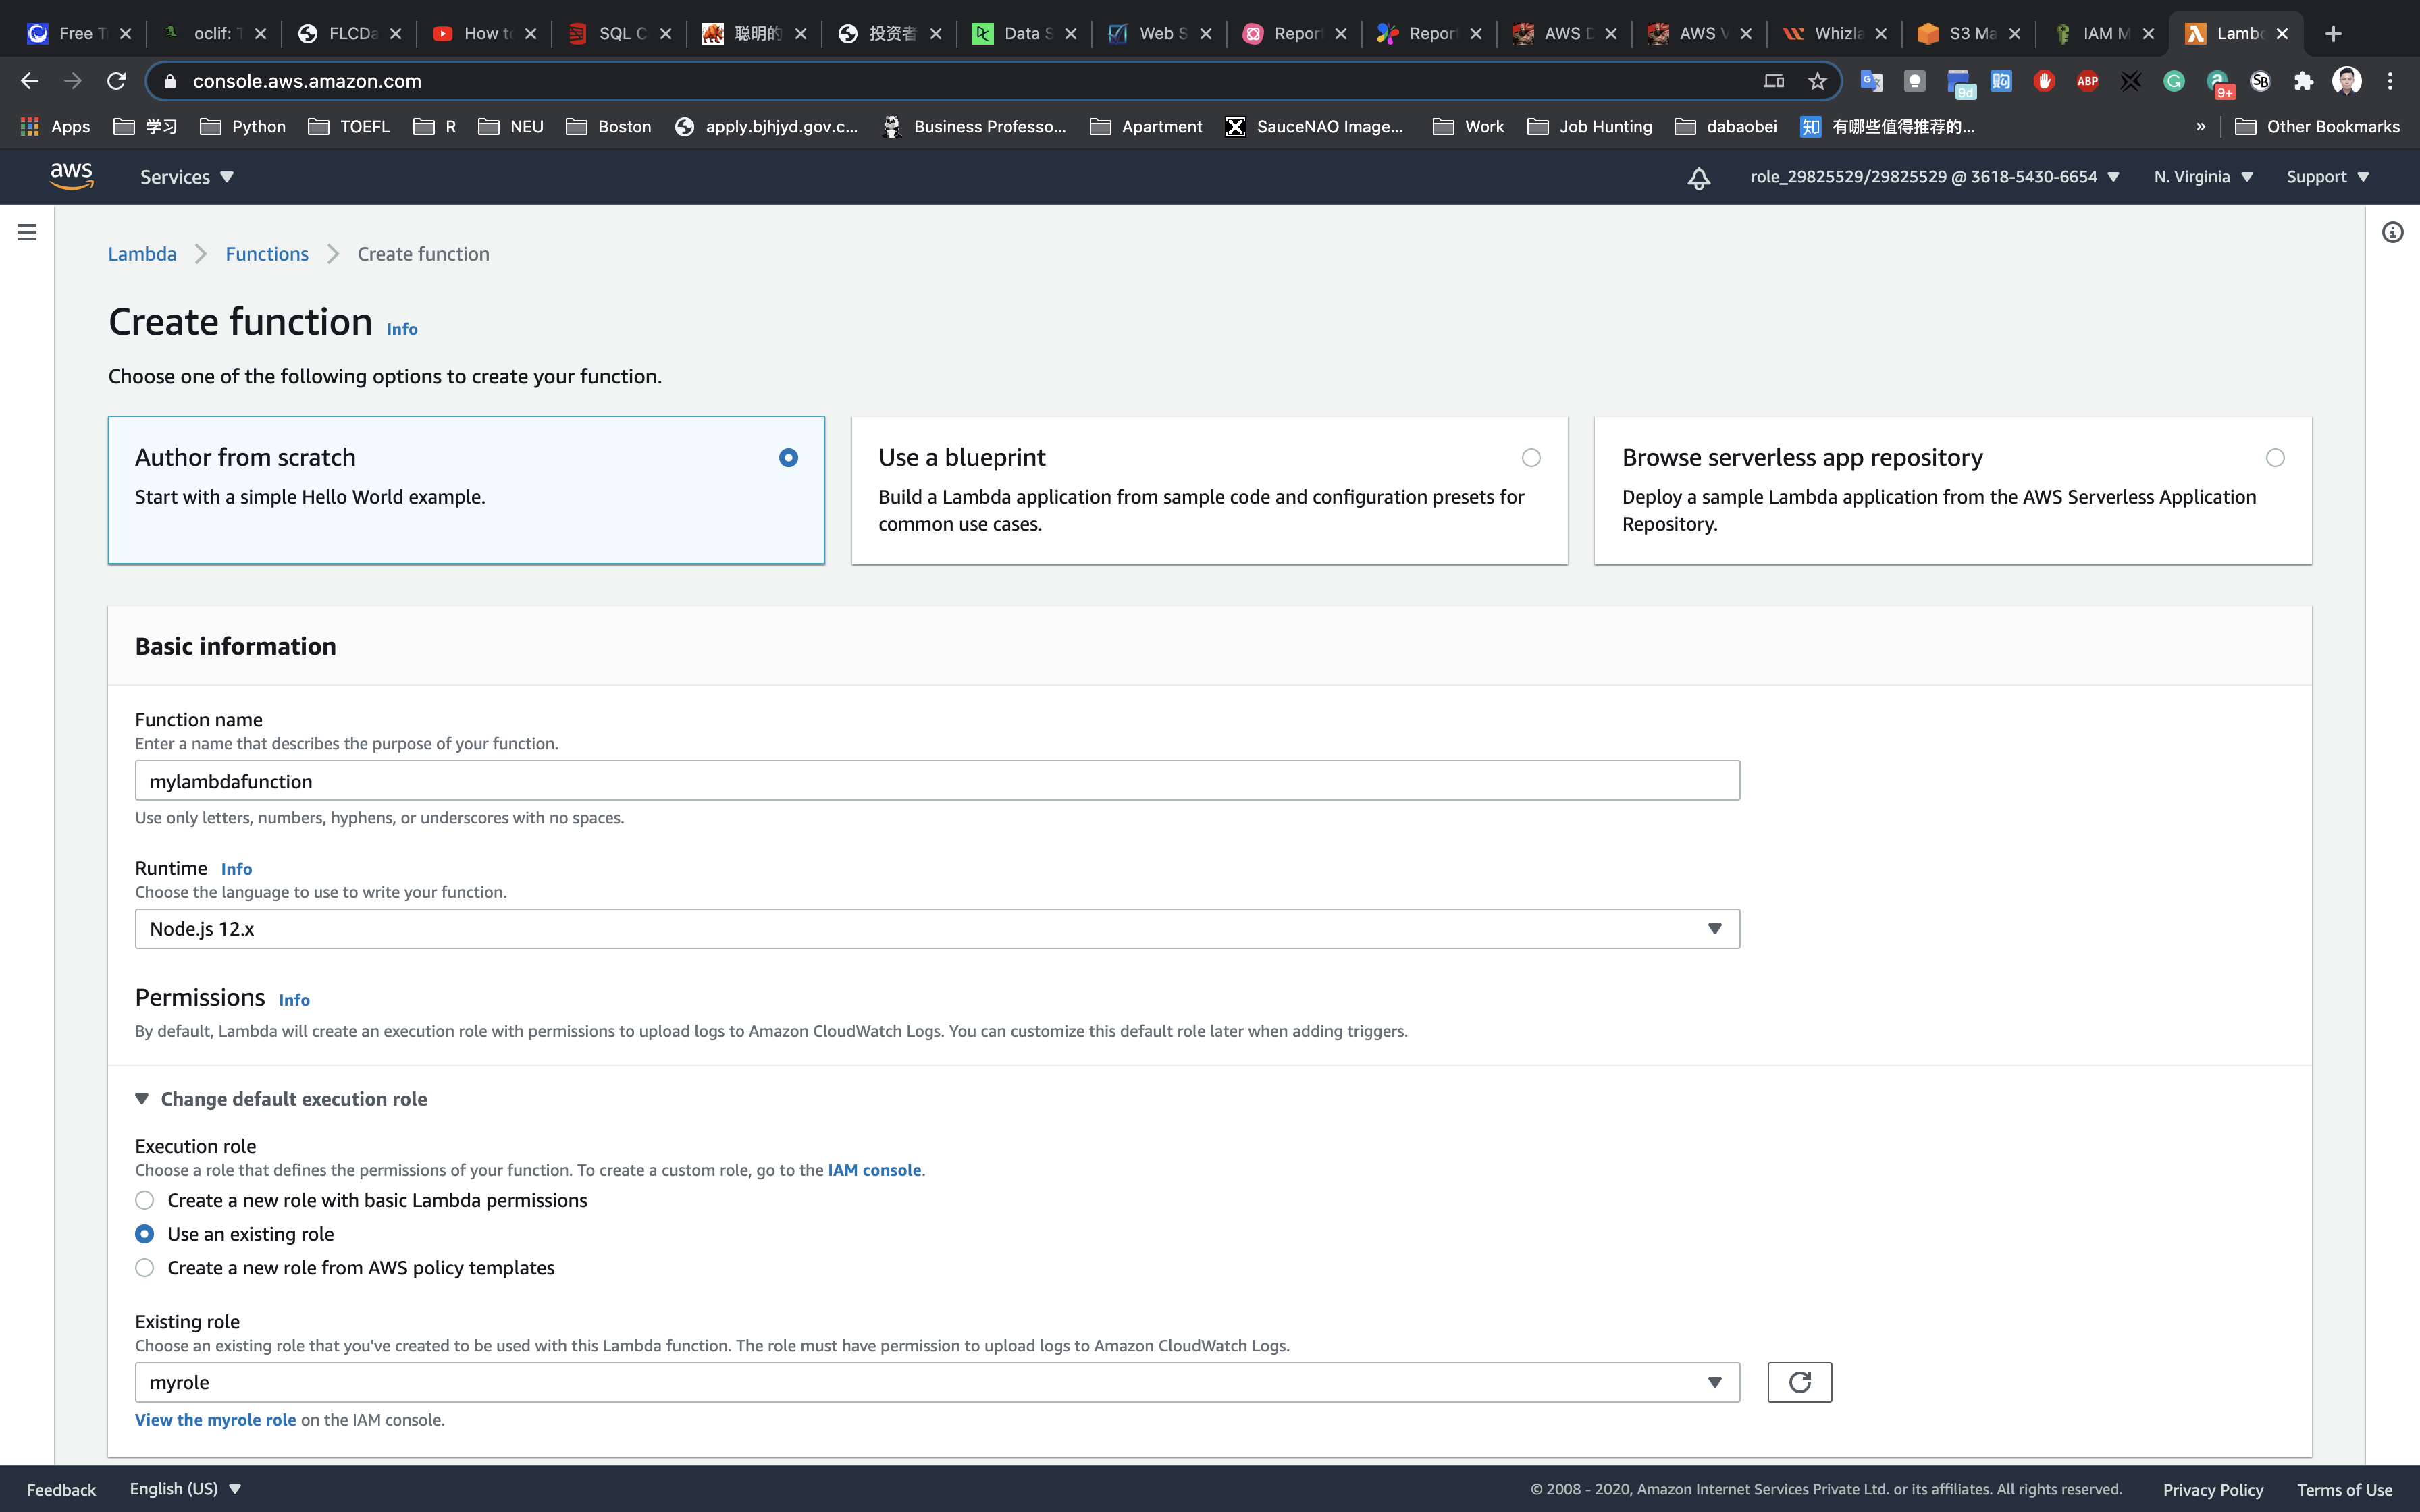
Choose Author from scratch.

  • Function name: mylambdafunction
  • Runtime: Select Node.js 12x

Role: In the permissions section, select use an existing role.

  • Existing role: Select myrole

Click on Create function


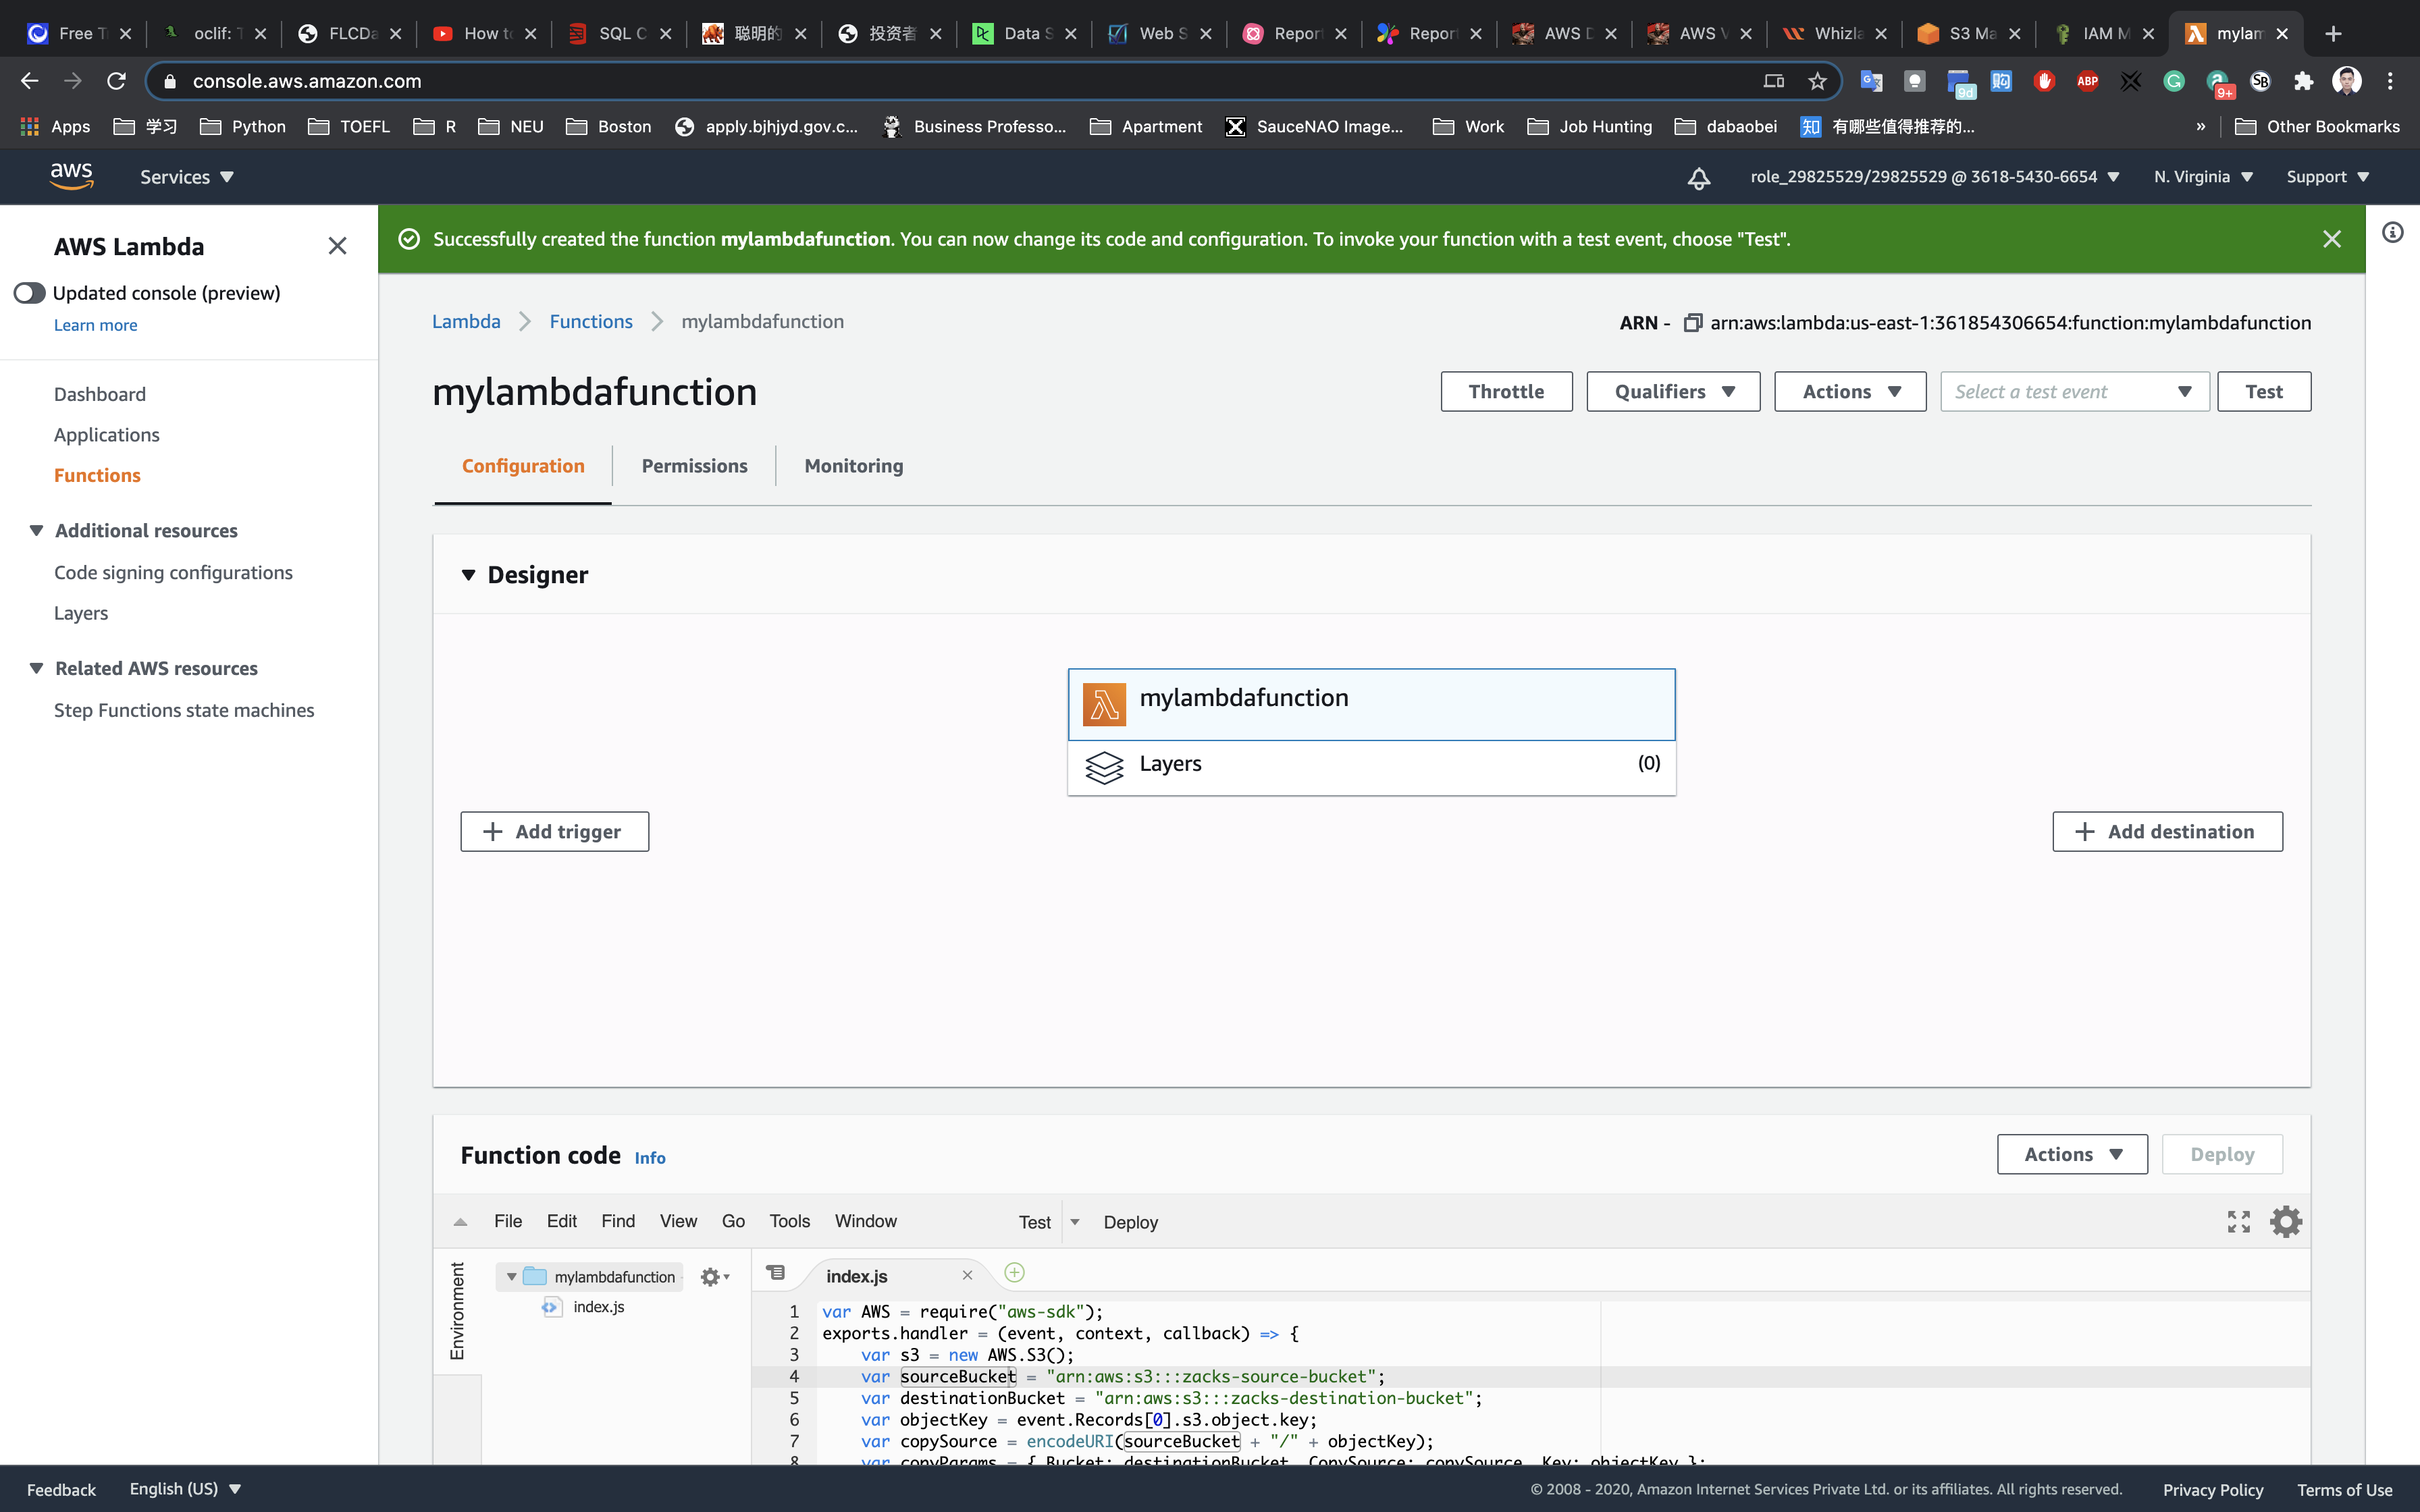
Configuration Page: On this page, we need to configure our lambda function.

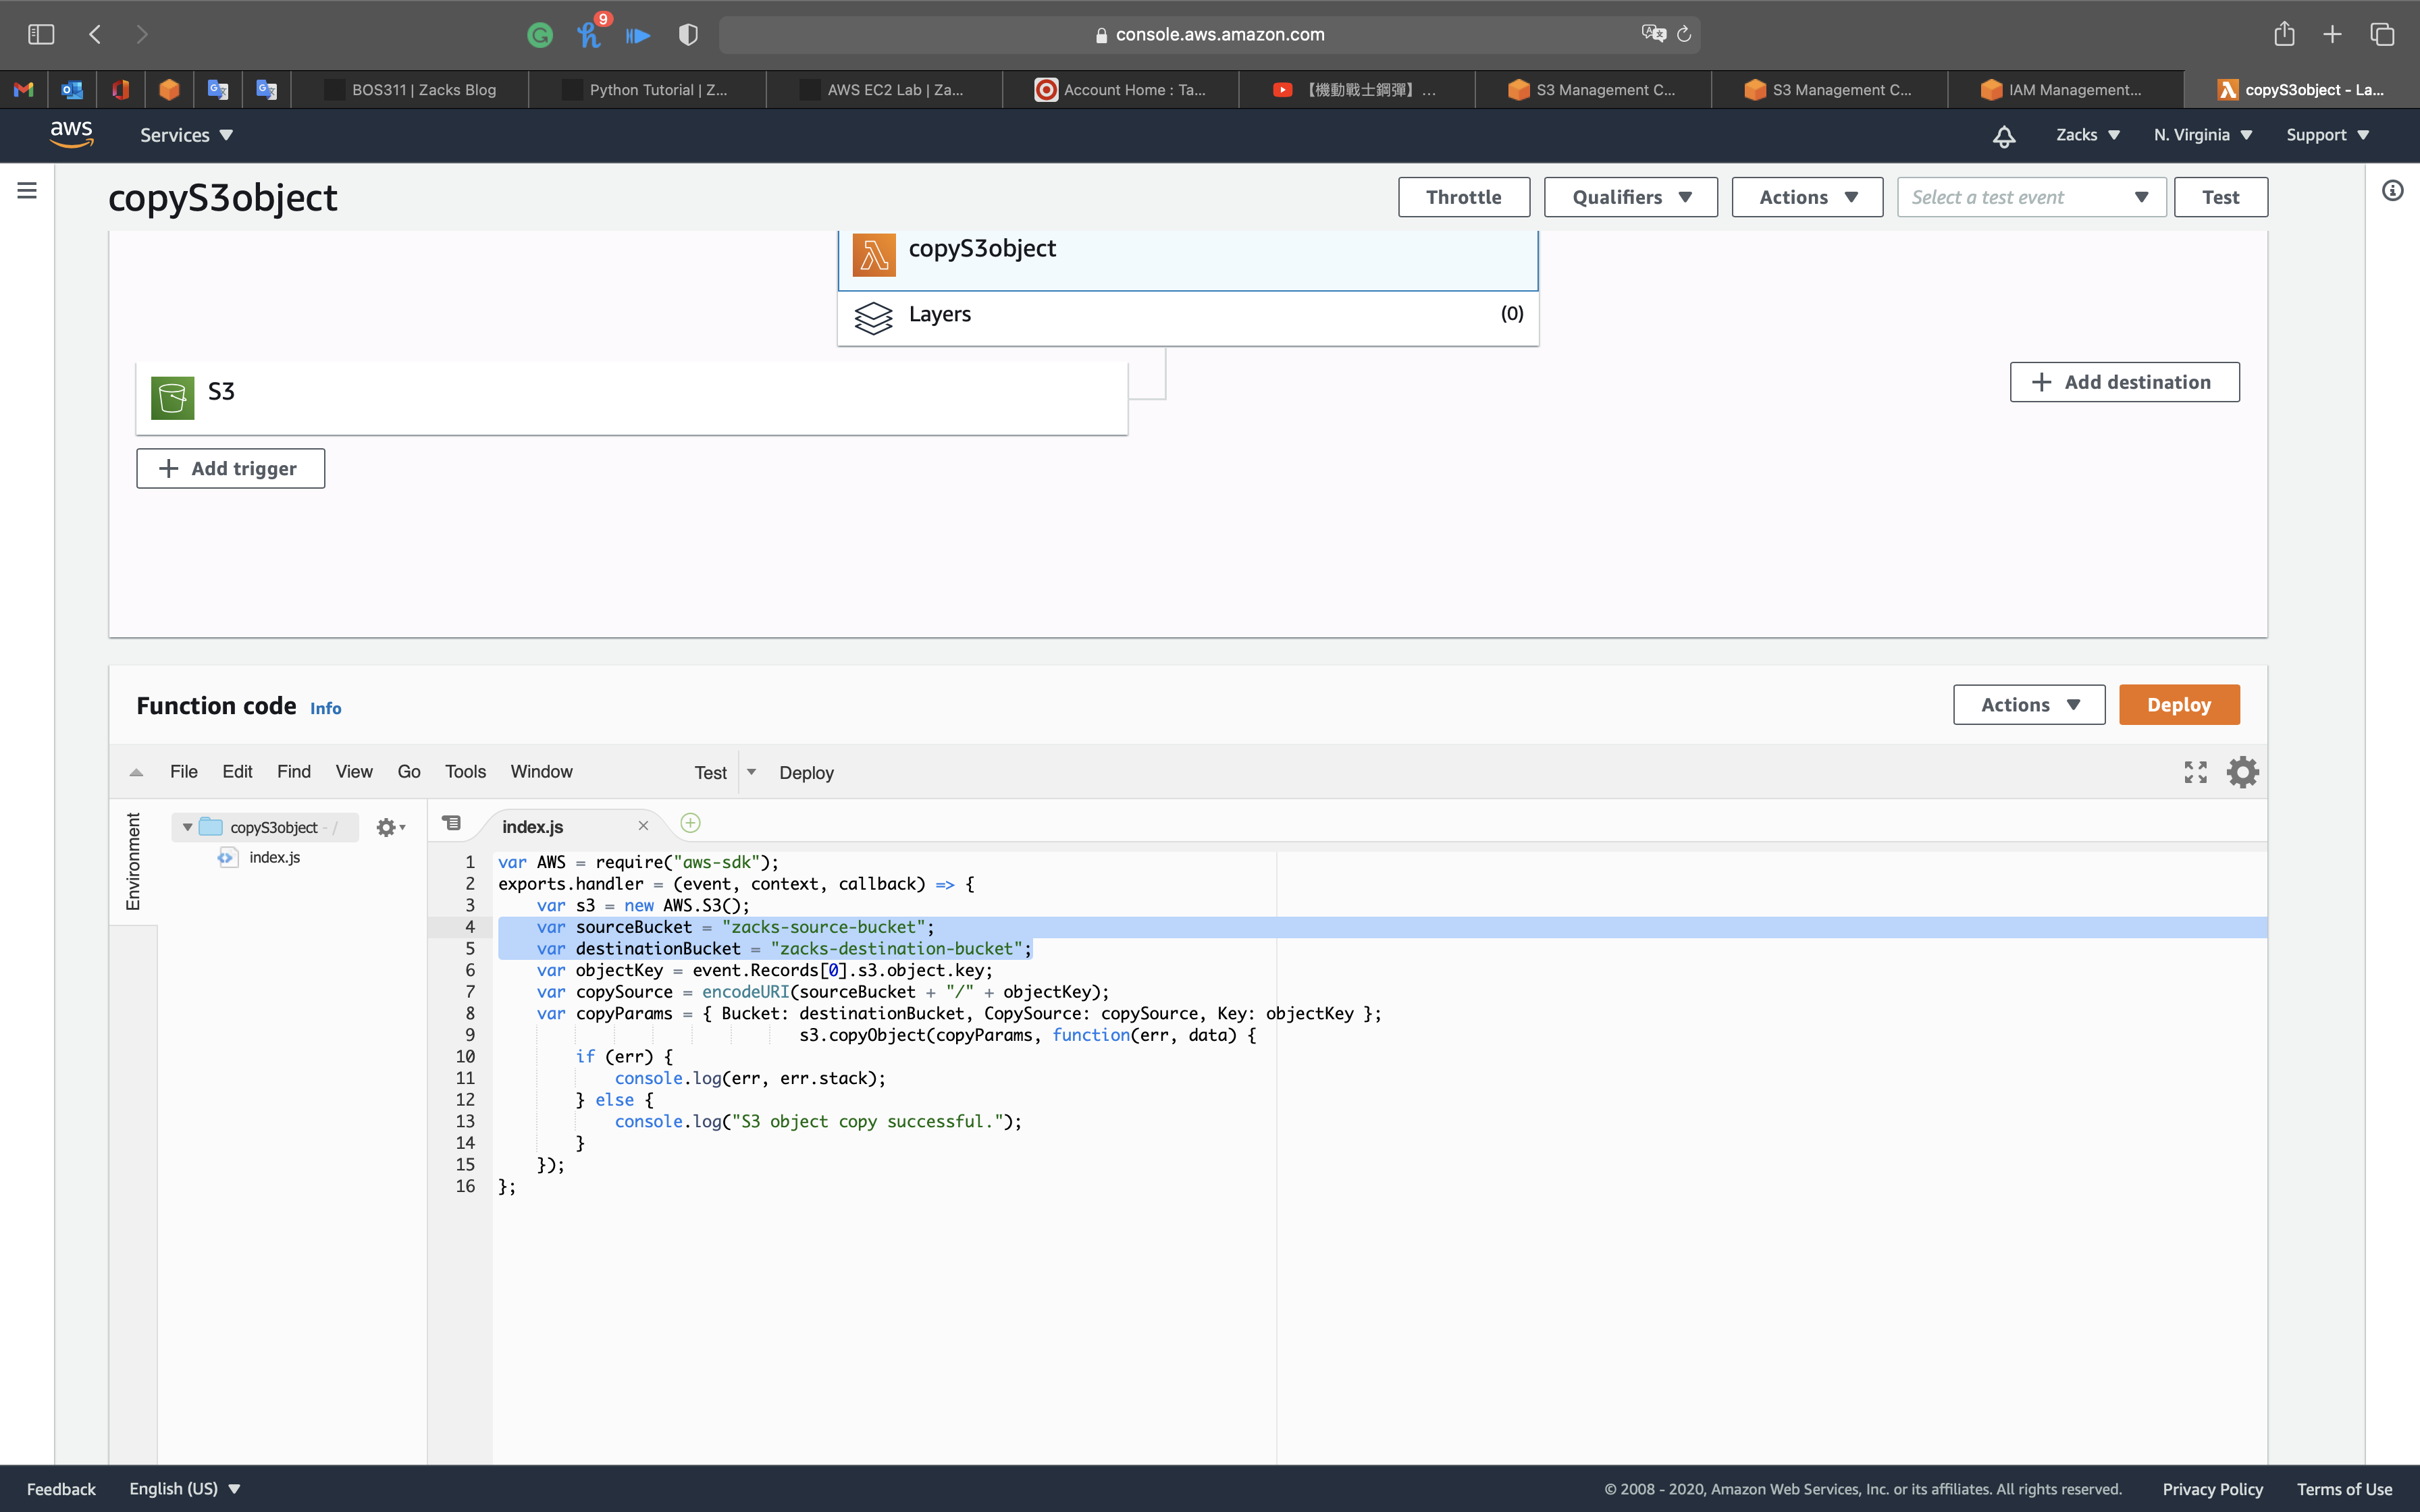
If you scroll down a little bit, you can see the Function code section. Here we need to write a NodeJs function which copies the object from the source bucket and paste it into the destination bucket.

Remove the existing code in AWS lambda index.js. Copy the below code and paste it into your lambda index.js file.

1
2
3
4
5
6
7
8
9
10
11
12
13
14
15
16
var AWS = require("aws-sdk");
exports.handler = (event, context, callback) => {
var s3 = new AWS.S3();
var sourceBucket = "your_source_bucket_name";
var destinationBucket = "your_destination_bucket_name";
var objectKey = event.Records[0].s3.object.key;
var copySource = encodeURI(sourceBucket + "/" + objectKey);
var copyParams = { Bucket: destinationBucket, CopySource: copySource, Key: objectKey };
s3.copyObject(copyParams, function(err, data) {
if (err) {
console.log(err, err.stack);
} else {
console.log("S3 object copy successful.");
}
});
};

You need to change the source and destination bucket name (not ARN!) in the index.js file based on your bucket names.

Save the function by clicking on Deploy in the right corner.


Adding Triggers to Lambda Function

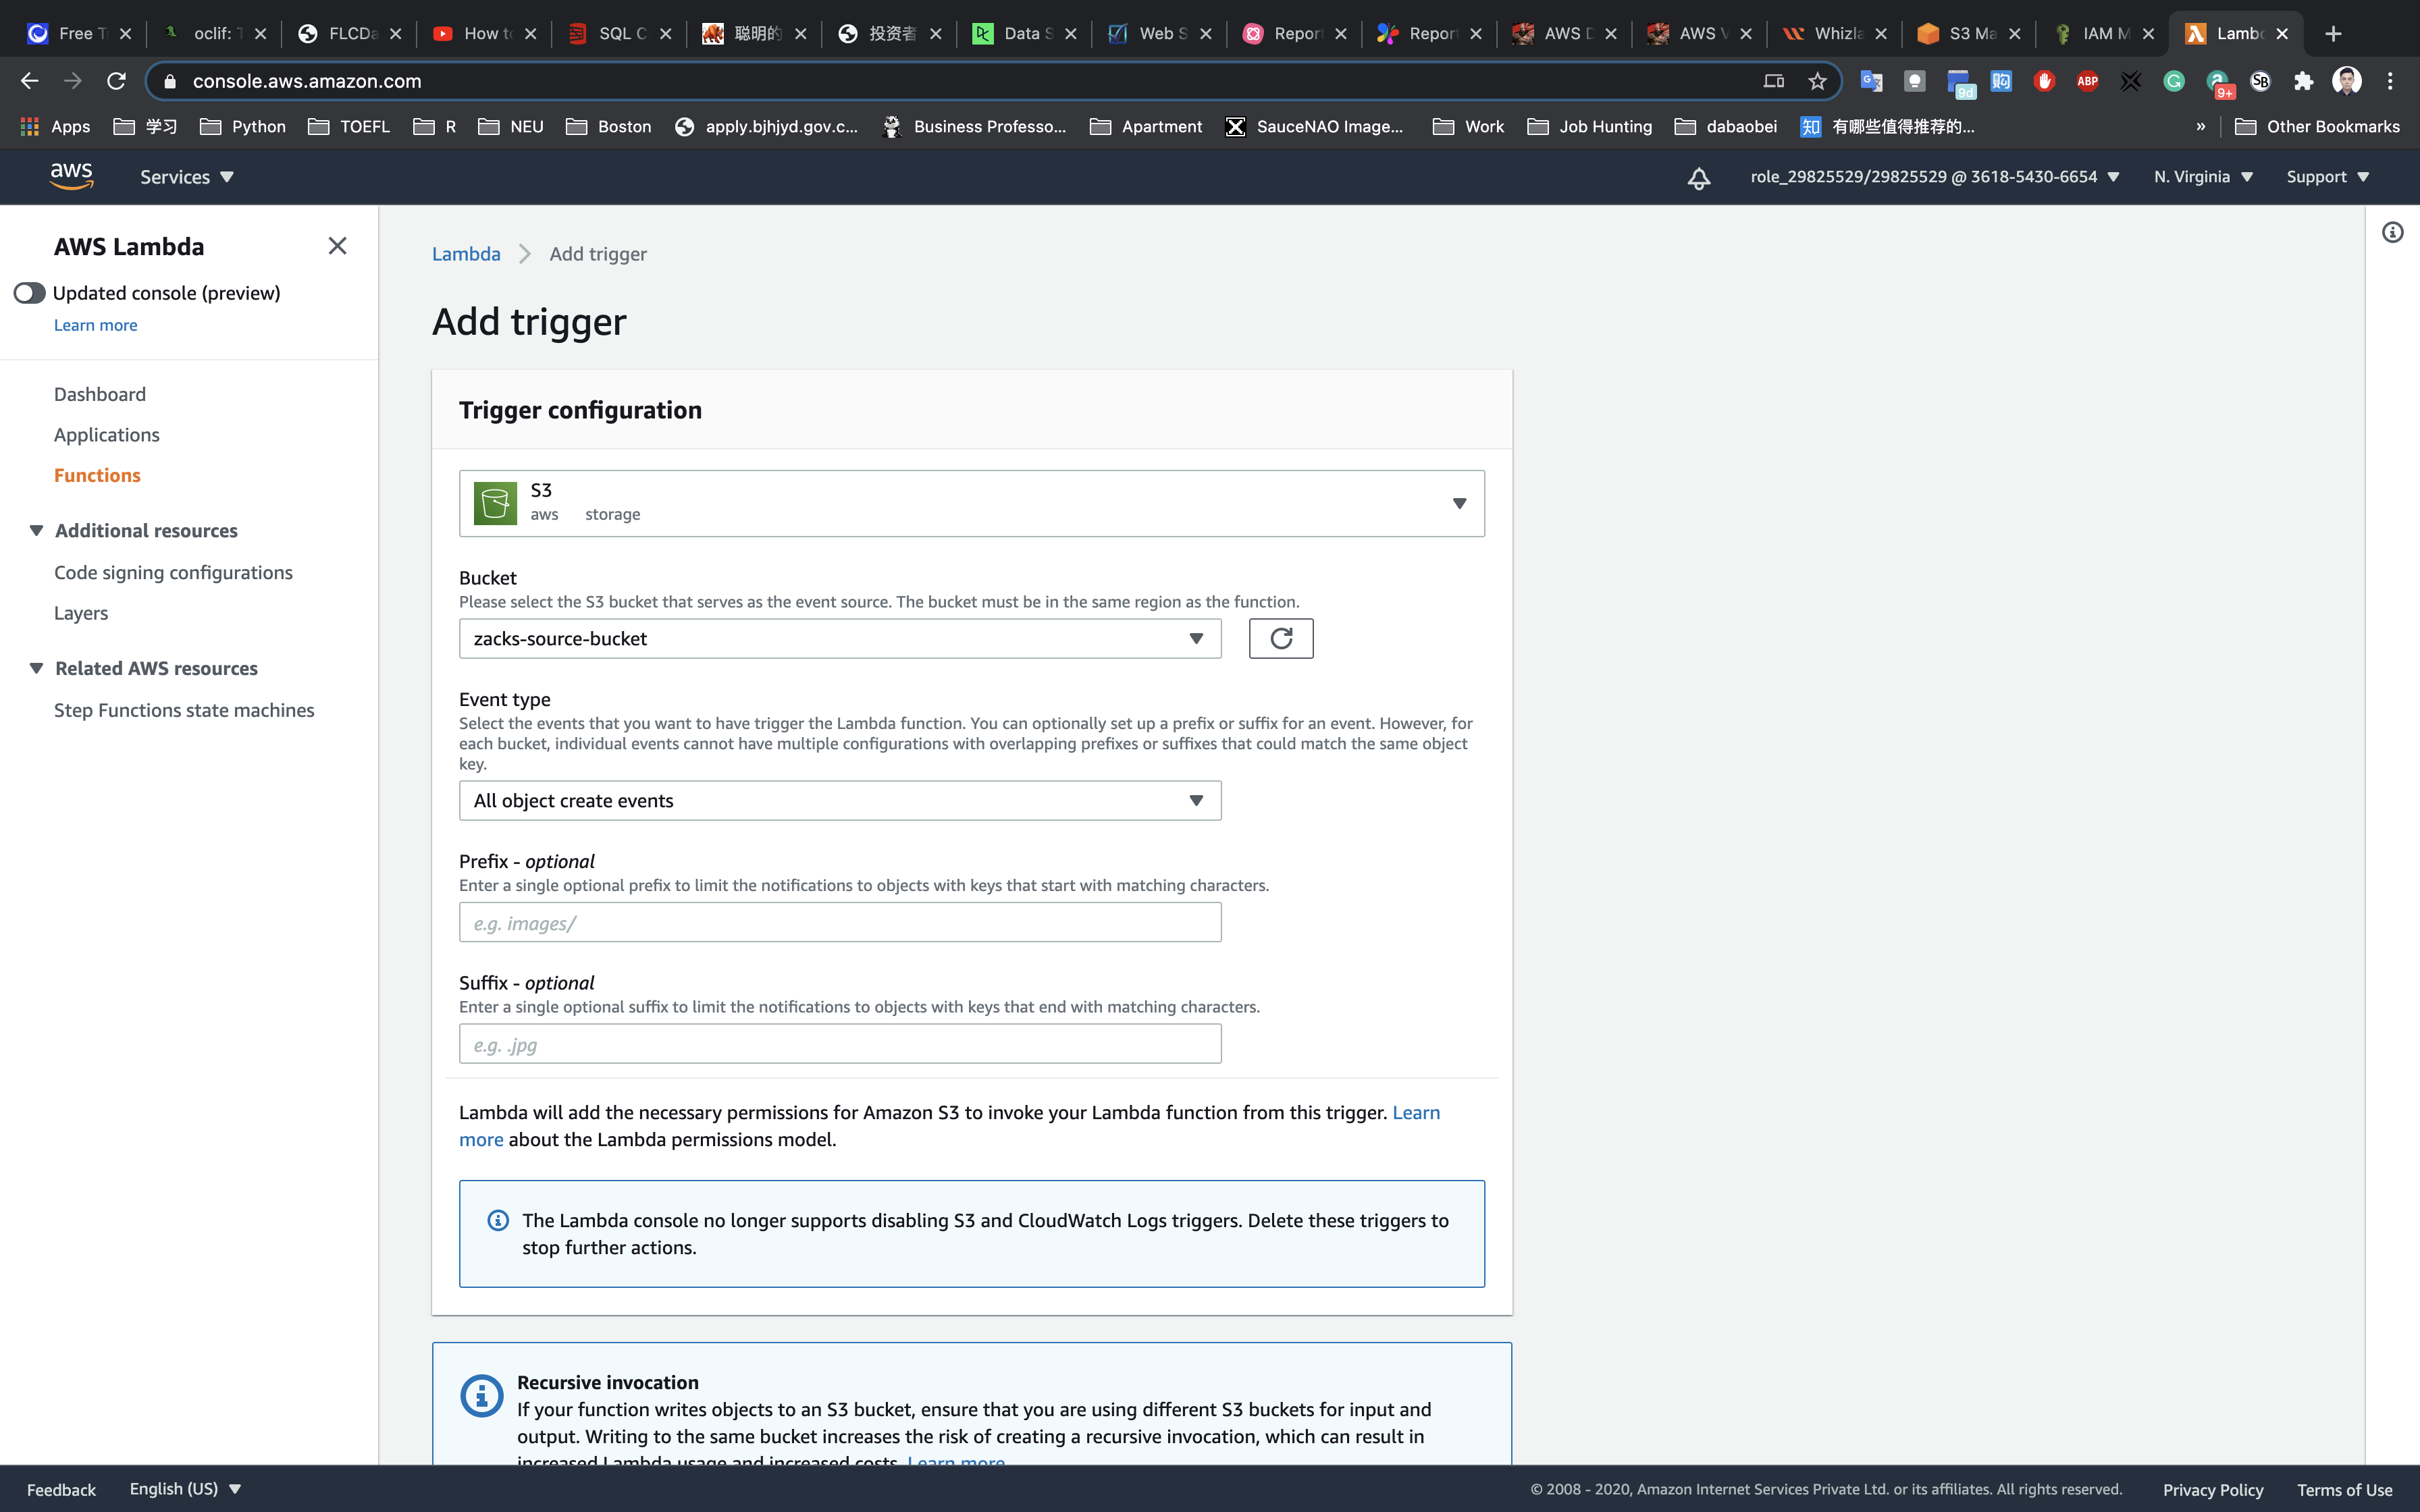
Go to the top and left page, click on + Add trigger under Designer`.

Scroll down the list and select S3 from the trigger list. Once you select S3, a form will appear. Enter these details:

  • Bucket: Select your source bucket - your_source_bucket_name.
  • Event type: All object create events

Leave other fields as default.

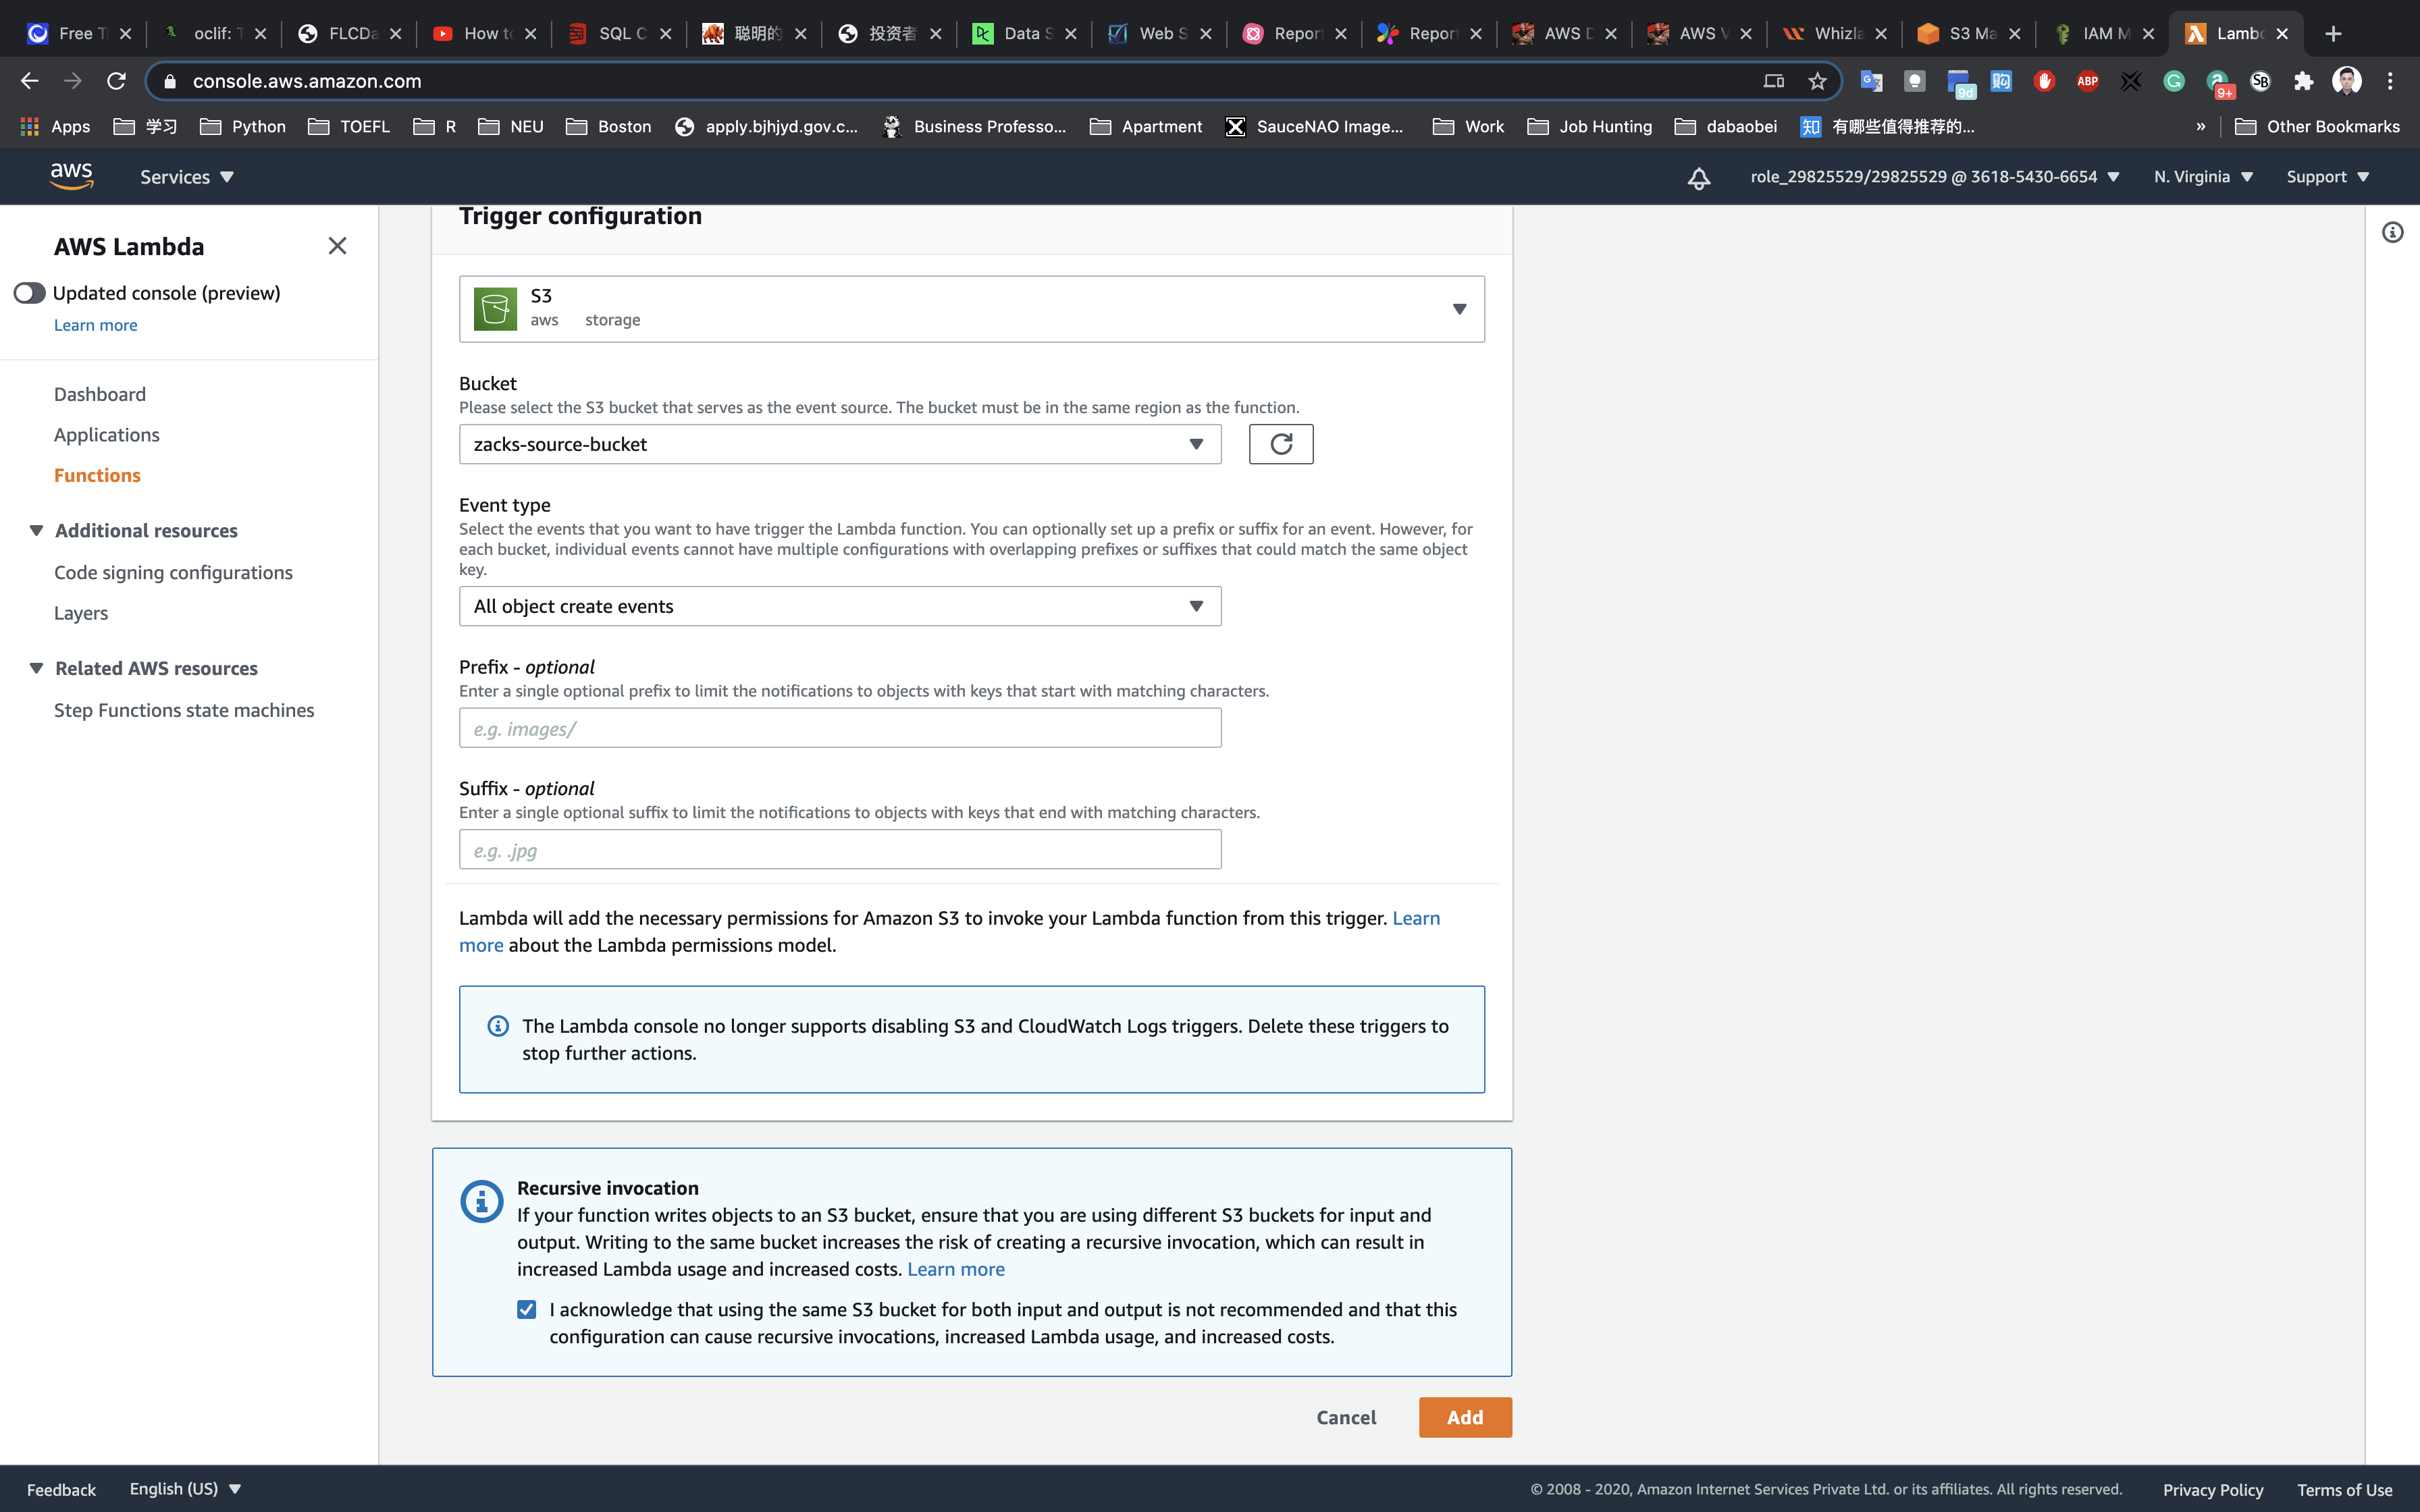
And check this option of Recursive invocation to avoid failures in case you upload multiple files at once.

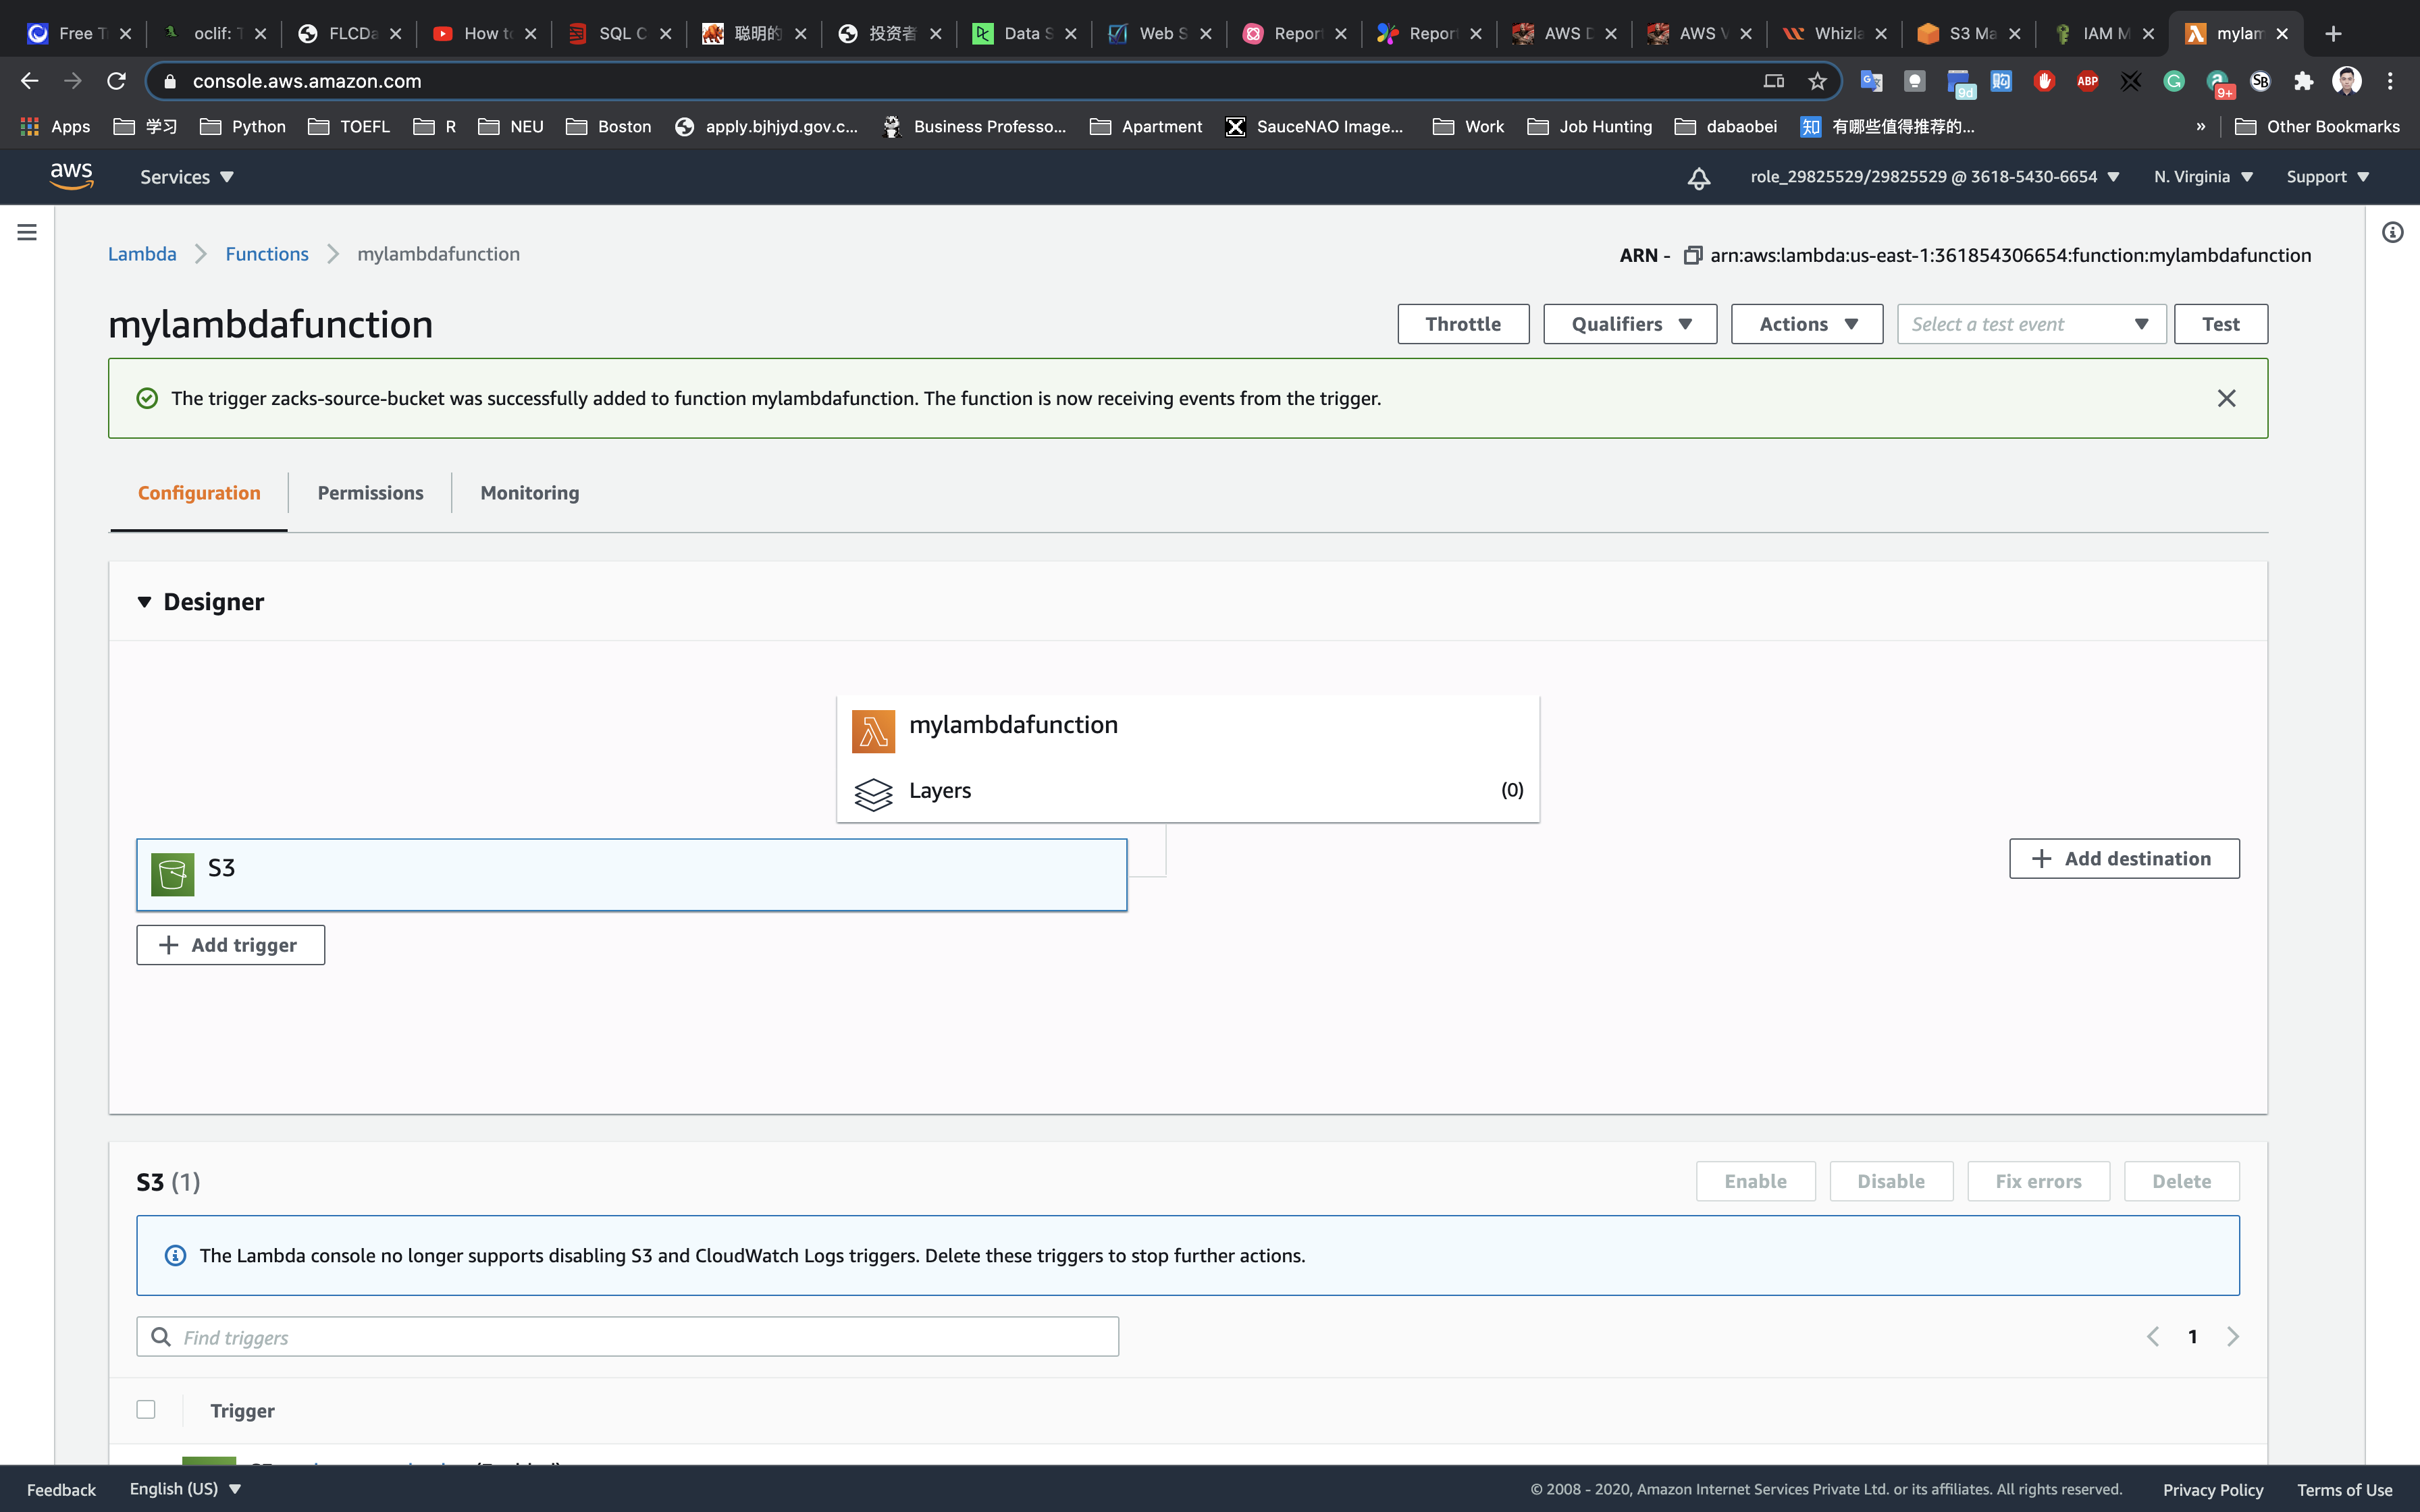
Click on Add.

AWS LAMBDA - Theory

WHAT IS AWS LAMBDA ?


Describing AWS Lambda

AWS Lambda service is a high-scale, provision-free serverless compute offering based on functions. It is used only for the compute layer of a serverless application. The purpose of AWS Lambda is to build event-driven applications that can be triggered by several events in AWS.

In the case where you have multiple simultaneous events, Lambda simply spins up multiple copies of the function to handle the events. In other words, Lambda can be described as a type of function as a service (FaaS). Three components comprise AWS Lambda:

  • A function. This is the actual code that performs the task.
  • A configuration. This specifies how your function is executed.
  • An event source (optional). This is the event that triggers the function. You can trigger with several AWS services or a third-party service.

When you specify an event source, your function is invoked when an event from that source occurs. The diagram below shows what this looks like:


Running a Lambda function

When configuring a lambda function, you specify which runtime environment you’d like to run your code in. Depending on the language you use, each environment provides its own set of binaries available for use in your code. You are also allowed to package any libraries or binaries you like as long as you can use them within the runtime environment. All environments are based on Amazon Linux AMI.

The current available runtime environments are:

  • nodeJS
  • Python
  • Go
  • Java
  • Ruby
  • .Net
  • C#

When running a lambda function, we only focus on the code because AWS manages capacity and all updates. AWS Lambda can be invoked synchronously using the Response Request Invocation  Type and asynchronously using the Event Invocation Type.

Concepts of Lambda function

To better understand how lambda function works, there are key concepts to understand.


Event source

Although AWS Lambda can be triggered using the Invoke API, the recommended way of triggering lambda is through event sources from within AWS.

There are two models of invocation supported:

(a) Push which get triggered by other events such as API gateway, new object in S3 or Amazon Alexa.

(b) Pull where the lambda function goes and poll an event source for new objects. Examples of such event sources are DynamoDB or Amazon Kinesis.

Lambda configuration

There are few configuration settings that can be used with lambda functions:

  • Memory dial which controls not just the memory but also affects how much CPU and network resources is allocated to the function.
  • Version/Aliases are used to revert function back to older versions. This is also key in implementing a deployment strategy such as blue/green or separating production from lower environments.
  • IAM Role gives the lambda function permission to interact with other AWS services and APIs.
  • Lambda function permission defines which push model event source is allowed to invoke the lambda function.
  • Network configuration for outbound connectivity. There are two choices:
    • Default which allows internet connectivity but no connectivity to private resources in your VPC services
    • VPC which allows your function to be provisioned inside your VPC and use an ENI. You can then attach things like security like you would any other ENIs.
  • Environment variables for dynamically injecting values that are consumed by code. This idea of separating code from config is one of the 12-factor app methodology around cloud native applications.
  • Dead letter queue is where you send all failed invocation events. This can either be SNS topic or SQS

Timeouts which is the allowed amount of time a function is allowed to run before it is timed out.

Create an AWS Lambda

There are few ways to create a lambda function in AWS, but the most common way to create it is with the console but this method should only be used if testing in dev. For production, it is best practice to automate the deployment of the lambda.

There are few third-party tools to set up automation, like Terraform, but since we are specifically talking about an AWS service, AWS recommends using Serverless Application Model (SAM) for this task. SAM is pretty much built on top of AWS CloudFormation and the template looks like a normal CloudFormation template except it has a transform block that specifically says we want the template to be a SAM template as opposed to a normal CloudFormation template. You can take a look at some example templates in the AWS labs.

AWS Lambda use cases

You can use AWS Lambda in a variety of situations, including but not limited to:

  • Log transfers where a lambda function is invoked every time there is a new log event in CloudWatch to transfer the logs into tools like Elasticsearch and Kibana.
  • A website where you can invoke your Lambda function over HTTP using Amazon API Gateway as the HTTP endpoint.
  • Mobile applications where you can create a Lambda function to process events published by your custom application.

Sunday, 3 July 2022

AWS Batch Theory

AWS Batch :

 AWS Batch is a set of batch management capabilities that enable developers, scientists, and engineers to easily and efficiently run hundreds of thousands of batch computing jobs on AWS. AWS Batch dynamically provisions the optimal quantity and different types of computing resources, such as CPU or memory-optimized compute resources, based on the volume and specific resource requirements of the batch jobs submitted.

With AWS Batch, there is no need to install and manage batch computing software or server clusters, instead, you focus on analyzing results and solving problems. AWS Batch plans, schedules, and executes your batch computing workloads using Amazon EC2, available with spot instance, and AWS compute resources with AWS Fargate or Fargate Spot.

Features of AWS Batch

The features of Amazon Batch are:

1.Dynamic Compute Resource Provisioning and Scaling

When AWS Batch is used with Farfate or Fargate spot, you will only need to set up a few concepts such as CE, job queue, and job definition. Now, you have a complete queue, scheduler, and compute architecture but you need not worry about managing a single piece of computing infrastructure.

2.AWS Batch with Fargate

When Fargate resources are used with AWS Batch, it allows you to have a completely serverless architecture for the batch jobs you need. Every batch receives the same exact amount of CPU and memory for the requests when you are dealing with Fargate. So, you will not have any wasted resource time and you also need not wait for any EC2 instance launches.

3.Priority-based Job Scheduling

One of the main features of AWS Batch is you can set up a number of queues with different priority levels. Unless the compute resources are available to execute the next job, the batch jobs are stored in queues. The AWS Batch scheduler is responsible for deciding when, where, and how to run the batch jobs that have already been submitted to a queue based on the resource requirements of the job.

4.Support for GPU Scheduling

AWS Batch supports GPU scheduling. It allows you to specify the number and type of accelerator that your jobs require as job definition input variables in AWS Batch. AWS Batch will scale up instances appropriate for your jobs based on the required number of GPUs and isolate the accelerators according to each job’s needs so that only the appropriate containers can access them.

5.Support for Popular Workflow Engines

AWS Batch supports and is integrated with the open-source and commercial workflows and languages such as Pegasus WMS, Luigi, Nextflow, Metaflow, Apache Airflow, and AWS Step Functions. This will enable you to use simple workflow languages to model your batch compute pipeline.

6.Integrated Monitoring and Logging

AWS Batch displays key operational metrics for your batch jobs in AWS Management Console. You can view metrics related to computing capacity as well as running, pending, and completed jobs. Logs for your jobs, e.g., STDERR and STDOUT, are available in AWS Management Console; the logs are also written Amazon CloudWatch Logs.

7.Support for Tightly-coupled HPC Workloads

AWS Batch supports multi-node parallel jobs, which enables you to run single jobs that span multiple EC2 instances. This feature lets you use AWS Batch to easily and efficiently run workloads such as large-scale, tightly-coupled high-performance computing (HPC) applications or distributed GPU model training.

Comparison between AWS Batch and AWS Lambda

AWS Batch
It allows developers, scientists, and engineers to run hundreds of thousands of batch computing operations on AWS quickly and easily. Based on the volume and specific resource requirements of the batch jobs submitted, it dynamically provisions the optimal quantity and kind of compute resources (e.g., CPU or memory optimized instances).

Pros

  • Scalable
  • Containerized

Cons

  • More overhead than lambda
  • Image management

AWS Lambda
AWS Lambda is a compute service that automatically maintains the underlying computing resources for you while running your code in response to events. You may use AWS Lambda to add custom logic to other AWS services or build your own back-end services that run on AWS scale, performance, and security.

Pros

  • Stateless
  • No deploy, no server, great sleep
  • Easy to deploy
  • Extensive API
  • VPC Support

Cons

  • Can’t execute ruby or go
  • Can’t execute PHP w/o significant effort

Use cases of AWS Batch:

Financial Services: Post-trade Analytics

The use case of this is to automate the analysis of the day’s transaction costs, execution reporting, and market performance. This is achieved by:

  • Firstly, send data, files, and applications to Amazon S3 where it sends the post-trade data to AWS object storage.
  • AWS Batch configures the resources and schedules the timing of when to run data analytics workloads.
  • After that, you have to run big data analytics tools for appropriate analysis and market predictions for the next day’s trading.
  • Then, the next big step is to store the analyzed data for long-term purposes or even for further analysis.

Life Sciences: Drug Screening for Biopharma

The main purpose of this use case is to rapidly search libraries of small molecules for drug discovery. This is done by:

  • Firstly, the AWS data or files are sent to Amazon S3. which further sends the small molecules and drug targets to AWS.
  • The AWS batch then configures the given resources and schedules the timing of when to run high-throughput screens.
  • After scheduling, big data will complete your compound screening jobs based on your AWS batch configuration.
  • The results are again stored for further analysis.

Digital Media: Visual Effects Rendering

The main purpose of this use case is to automate content rendering workloads and reduce the need for human intervention due to execution dependencies or resource scheduling. This is achieved by:

  • Firstly, graphic artists create a blueprint for the work that they have done.
  • They schedule render jobs in the pipeline manager.
  • After that, they submit the render jobs to AWS Batch. Then, AWS Batch will prefetch content from S3 or any other location.
  • In the next step, they either launch the distributed job across the render farm effectively managing the dependencies or they manage the license appropriately.
  • The final step is to post write back to Amazon S3 or output location.

Benefits of AWS Batch

  • Fully managed: The Batch traces user requests as they travel through your entire application. Since this request aggregates the data generated by various services and resources in your application, you have a chance to get an end-to-end view of how your application is proceeding.
  • Ready to use with AWS: It works with many services in AWS. Amazon Batch can be integrated with Amazon EC2, EC2 Container Service, Lambda, and Amazon Elastic Beanstalk.
  • Cost-optimized resource provisioning: With AWS Batch, you can obtain insights into how your application is performing and find root causes for any issues. With Batch’s tracking feature, you can find where the issues are that are causing performance dips in your application.


Cost of AWS Batch

Now, let us take a look at the pricing of the Batch.

There is no extra charge for AWS Batch. You just need to pay for AWS resources such as EC2 instances, AWS Lambda, and AWS Fargate that you use to create, store, and run your application. You can use your Reserved Instances, Savings Plan, EC2 Spot Instances, and Fargate with AWS Batch by specifying your compute-type requirements when setting up your AWS Batch compute environments.

Elastic Bean Stalk Practical

 Step 1: On Elastic Beanstalk console click on Create New Application option. A dialog box appears where you can give a name and appropriate description for your application.


Step 2: Now that the application folder has been created, you can click on the Actions tab and select Create Environment option. Beanstalk provides you with an option where you can create multiple Environments for your application.


Step 3: Choose among two different Environment Tier options. Choose PHP  Environment if you want your application to handle PHP requests or choose Worker Environment to handle background task


Elastic Bean Stalk Theory


AWS Elastic Beanstalk Components

There are certain key concepts which you will come across frequently when you deploy an application on Beanstalk. Let us have look at those concepts: 

Application:

  • An application in Elastic Beanstalk is conceptually similar to a folder
  • An application is a collection of components including environments, versions and environment configuration

Application Version:

  • An application version refers to a specific, labeled iteration of deployable code for a web application
  • An application version points to an Amazon S3 object that contains the deployable code such as a Java WAR file

Environment:

  • Environments within Elastic Beanstalk Application is where the current version of the application will be active
  • Each environment runs only a single application version at a time. But it is possible to run same or different versions of an application in many environments at the same time

Environment Tier:

Based on requirement beanstalk offers two different Environment tiers: Web Server Environment, Worker Environment


  • Web Server Environment: Handles HTTP requests from clients
  • Worker Environment: Processes background tasks which are resource consuming and time intensive

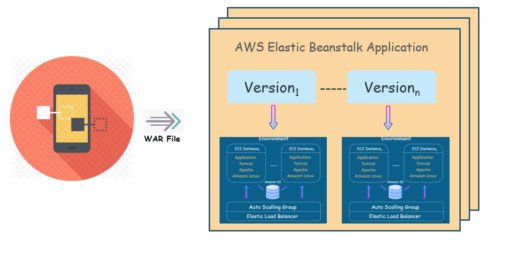
Here is an illustration to show how Application, Application version and Environments relate to each other:

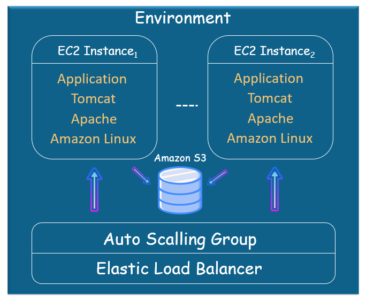
AWS- Elastic-Beanstalk-Application-EdurekaAnd here is how Beanstalk Environment using default container type looks like:

AWS-Elastic-Beanstalk-Environment-Edureka
Now that you know about different key concepts pertaining to Elastic Beanstalk, let understand the architecture of Elastic Beanstalk.

AWS Elastic Beanstalk Architecture

Before getting into AWS Elastic Beanstalk architecture, let’s answer the most frequently asked question,

What is an Elastic Beanstalk Environment?

Environment refers to the current version of the application. When you launch an Environment for your application, Beanstalk asks you to choose among two different Environment Tiers i.e, Web Server Environment or Worker Environment. Let’s understand them one by one.

Check out our AWS Certification Training in Top Cities

IndiaUnited StatesOther Countries
AWS Training in HyderabadAWS Training in AtlantaAWS Training in London
AWS Training in BangaloreAWS Training in BostonAWS Training in Adelaide
AWS Training in ChennaiAWS Training in NYCAWS Training in Singapore

Web Server Environment

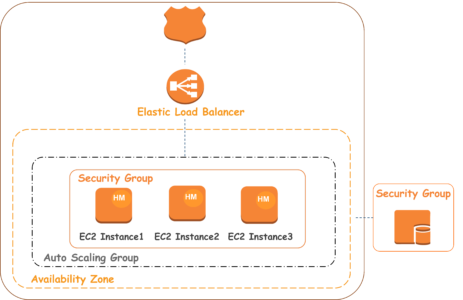
Application version which is installed on the Web Server Environment handles HTTP requests from the client. The following diagram illustrates an example AWS Elastic Beanstalk architecture for a Web Server Environment tier and shows how the components in that type of Environment Tier work together.

Beanstalk Environment – The Environment is the heart of the application. When you launch an Environment, Beanstalk assigns various resources that are needed to run the application successfully.

Elastic Load Balancer – When the application receives multiple requests from a client, Amazon Route53 forwards these requests to the Elastic Load Balancer. The load balancer distributes the requests among EC2 instances of Auto Scaling Group.

Auto Scaling Group – Auto Scaling Group automatically starts additional Amazon EC2 instances to accommodate increasing load on your application. If the load on your application decreases, Amazon EC2 Auto Scaling stops instances, but always leaves at least one instance running.

Host Manager – It is a software component which runs on every EC2 instance that has been assigned to your application. The host manager is responsible for various things like

  • Generating and monitoring application log files
  • Generating instance level events
  • Monitoring application server

Security Groups – Security Group is like a firewall for your instance. Elastic Beanstalk has a default security group, which allows the client to access the application using HTTP Port 80. It also provides you with an option where you can define security groups to the database server as well. The below image summarises what we have learned about Web Server Environment.

Architecture - AWS Elastic Beanstalk - Edureka

So that’s all about Web Server Environment. But what if the application version installed on Web Server Tier keeps denying multiple requests because it has encountered time intensive and resource consuming tasks while handling a request? Well, this is where Worker Tier comes into the picture.

Aws Ec2 Instance Theory


What is EC2 Instance?

  • It is a Computing resource that provides a virtual computing environment to deploy your application
  • In short, you can create a server on AWS and deploy your application on that server.

Why Use Amazon EC2?

  • No need for H/W, Develop and deploy the application faster.
  • Pay only for that you use
  • Auto scaling as per the workload.
  • Complete control of servers
  • Built-in security

EC2 Instance Types

  • General Purpose EC2 Instance
    • This type of instance is the most commonly utilised for testing. There are two types of general-purpose instances: “T” and “M.”
    • “T” instances are targeted to simple jobs just like testing environments, and they have a modest networking on the most basic options.
    • “M” Instances are for general use when you don’t want a testing environment, but you want an all-purpose instance. They offer more balanced resources compared to “T” instance
  • Compute Optimized
    • If your application requires to process a lot of information like math operations, load balancing, rendering task or sometimes video encoding
    • You need an instance that can process all that information in less time
  • Memory Optimized
    • If your app doesn’t require too much CPU, but instead, it needs more and faster RAM; you should check out the available option on the “X1e, X1 and R” instances.
  • Accelerated Computing
    • Creating a movie and need to render the textures? Need to design with power? Or you just have money to spend and want to play games on streaming?
  • Storage Optimized
    • This Kind of instances are provisioned with a more significant amount of TB for storage
    • You are going to have the best I/O Performance. These instances are a great option for those databases that need to be writing regularly on the disk, here we have three groups of instances: H, I and D.

Creating an EC2 instance

  1. Sign in to the AWS Management Console.
  2. Click on the EC2 service.
  3. Click on the Launch Instance button to create a new instance.

  4. Choose AMI: (Amazon Machine Image) AMI is a template used to create the EC2 instance.

  5. Choose Instance Type and then click on the Next. Suppose I choose a t2.micro as an instance type for testing purpose

  6. The main setup page of EC2 is shown below where we define setup configuration

  7. Never leave the default 8gb, if you want to be on the free tier limits you can set a value around 20gb -24gb, because sometimes you leave it as default and your instance is not going to have too many spaces to do many things, and click next

  8. Now, Add the Tags and then click on the Next.

  9. Configure Security Group. The security group allows some specific traffic to access your instance. i.e. If you want to have a web server you need to open port 80. If you want ssh access you need port 22, so let’s create a new one.

  10. Review an EC2 instance that you have just configured, and then click on the Launch button.

  11. Create a new key pair and enter the name of the key pair. Download the Key pair.
  12. Click on the Launch Instances button.