Creating an EC2 instance
- Sign in to the AWS Management Console.
- Click on the EC2 service.
- Click on the Launch Instance button to create a new instance.
Amazon Simple Storage Service (S3) is a storage for the internet. It is designed for large-capacity, low-cost storage provision across multiple geographical regions. Amazon S3 provides developers and IT teams with Secure, Durable and Highly Scalable object storage.
S3 is Secure because AWS provides:
S3 is Durable because:
S3 is Highly Scalable, since it automatically scales your storage according to your requirement and you only pay for the storage you use.
The next question which comes to our mind is,
What kind and how much of data one can store in AWS S3?
You can store virtually any kind of data, in any format, in S3 and when we talk about capacity, the volume and the number of objects that we can store in S3 are unlimited.
*An object is the fundamental entity in S3. It consists of data, key and metadata.
When we talk about data, it can be of two types-
Therefore, Amazon came up with 3 storage classes to provide its customers the best experience and at an affordable cost.
Let’s understand the 3 storage classes with a “health-care” use case:
1.Amazon S3 Standard for frequent data access  This is suitable for performance sensitive use cases where the latency should be kept low. e.g. in a hospital, frequently accessed data will be the data of admitted patients, which should be retrieved quickly.
2. Amazon S3 Standard for infrequent data access
This is suitable for use cases where the data is long lived and less frequently accessed, i.e for data archival but still expects high performance. e.g. in the same hospital, people who have been discharged, their records/data will not be needed on a daily basis, but if they return with any complication, their discharge summary should be retrieved quickly.
3.Amazon Glacier Suitable for use cases where the data is to be archived, and high performance is not required, it has a lower cost than the other two services.e.g. in the hospital, patients’ test reports, prescriptions, MRI, X Ray, Scan docs etc. that are older than a year will not be needed in the daily run and even if it is required, lower latency is not needed.
Specification Snapshot: Storage Classes

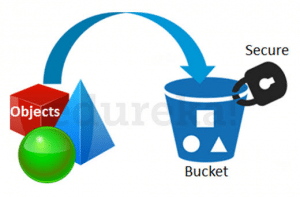
Data in S3 is organized in the form of buckets.

Before adding any data in S3 the user has to create a bucket which will be used to store objects.
You can self-choose where or in which region your data should be stored. Making a decision for the region is important and therefore it should be planned well.
These are the 4 parameters to choose the optimal region –
Let’s understand this through an example:
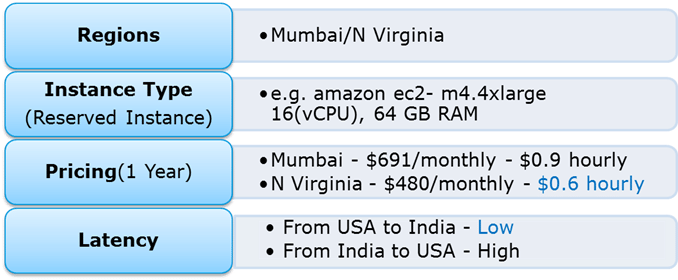
Suppose there is a company which has to launch these storage instances to host a website for the customers in the US and India.
To provide the best experience, the company has to choose a region, which best fits its requirements.

Now looking at the above parameters, we can clearly identify, that N Virginia will be the best region for this company because of the low latency and low price. Irrespective of your location, you can select any region which might suit your requirements, since you can access your S3 buckets from anywhere.
Talking about regions, let’s see about the possibility of having a backup in some other availability region or you may want to move your data to some other region. Thankfully, this feature has been recently added to the AWS S3 system and is pretty easy to use.
As the name suggests, Cross-region Replication enables user to either replicate or transfer data to some other location without any hassle.
This obviously has a cost to it which has been discussed further in this article.

How is the data transferred?
Besides traditional transfer practices that is over the internet, AWS has 2 more ways to provide data transfer securely and at a faster rate:
 Transfer Acceleration enables fast, easy and secure transfers over long distances by exploiting Amazon’s CloudFront edge technology.
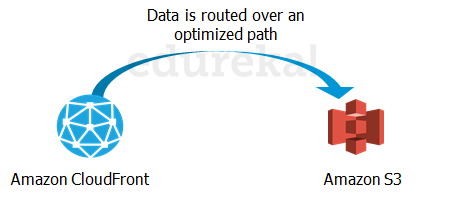
CloudFront is a caching service by AWS, in which the data from client site gets transferred to the nearest edge location and from there the data is routed to your AWS S3 bucket over an optimised network path.
The Snowball is a way of transferring your data physically. In this Amazon sends an equipment to your premises, on which you can load the data. It has a kindle attached to it which has your shipping address when it is shipped from Amazon. When data transfer is complete on the Snowball,  kindle changes the shipping address back to the AWS headquarters where the Snowball has to be sent.
The Snowball is ideal for customers who have large batches of data move. The average turnaround time for Snowball is 5-7 days, in the same time Transfer Acceleration can transfer up to 75 TB of data on a dedicated 1Gbps line. So depending on the use case, a customer can decide.
Obviously, there will be some cost around it, let’s look at the overall costing around S3.
Free on AWS?”
Yes! As a part of the AWS Free Usage Tier, you can get started with AWS S3 for free. Upon sign up, new AWS customers receive 5 GB of Amazon S3 standard storage, 20,000 Get-Requests, 2,000 Put-Requests, and 15GB of data transfer-out each month for one year.
Over this limit, there is a cost attached, let’s understand how amazon charges you:
Though having so many features, AWS S3 is affordable and flexible in its costing. It works on Pay Per Use, meaning, you only pay what you use. The table below is an example for pricing of S3 for a specific region:

Source: aws.amazon.com for North Virginia region
Cross Region Replication is billed in the following way:
If you replicate 1,000 1 GB objects (1,000 GB) between regions you will incur a request charge of $0.005 (1,000 requests x $0.005 per 1,000 requests) for replicating 1,000 objects and a charge of $20 ($0.020 per GB transferred x 1,000 GB) for inter-region data transfer. After replication, the 1,000 GB will incur storage charges based on the destination region.
Snowball, there are 2 variants:
This is the fixed service fee that they charge.
Apart from this there are on-site, charges which are exclusive of shipping days, the shipping days are free.
The first 10 on-site days are also free, meaning when the Snowball reaches your premises from then, till the day it is shipped back, they are the on-site days. The day it arrives, and the day it is shipped gets counted as shipping days, therefore are free.
This tutorial requires an AWS account. Sign up for AWS, or sign in to AWS if you already have an account.
Complete the following steps to get your WordPress instance up and running on Lightsail.
Note
For more information about creating an instance in Lightsail, see Creating an Amazon Lightsail instance in the Lightsail documentation.
Sign in to the Lightsail console.
On the Instances tab of the Lightsail home page, choose Create instance.

Choose the AWS Region and Availability Zone for your instance.

Choose your instance image.
Choose Linux/Unix as the platform.
Choose WordPress as the blueprint.

Choose an instance plan.
A plan includes a low, predictable cost, machine configuration (RAM, SSD, vCPU), and data transfer allowance. You can try the $3.50 USD Lightsail plan without charge for one month (up to 750 hours). AWS credits one free month to your account.
Note
For a limited time, Lightsail is extending its free tier to include three months free on select instance plans. The offer applies to new or existing AWS accounts who started using Lightsail on or after July 8, 2021. Offer only applies to one bundle per account. Standard charges apply after the first 750 hours of usage of the selected bundle each month.
You can use the following instance plans free for three months:
Linux/Unix instance plans: $3.50 USD per month, $5 USD per month, and $10 USD per month
Windows instance plans: $8 USD per month, $12 USD per month, and $20 USD per month
Enter a name for your instance.
Resource names:
Must be unique within each AWS Region in your Lightsail account.
Must contain 2 to 255 characters.
Must start and end with an alphanumeric character or number.
Can include alphanumeric characters, numbers, periods, dashes, and underscores.

Choose Create instance.
The default password to sign in to the administration dashboard of your WordPress website is stored on the instance.
Complete the following steps to connect to your instance using the browser-based SSH client in the Lightsail console, and get the password for the administration dashboard.
Note
For more information, see Getting the application user name and password for your Bitnami instance in Amazon Lightsail
On the Instances tab of the Lightsail home page, choose the SSH quick-connect icon for your WordPress instance.

After the browser-based SSH client window opens, enter the following command to retrieve the default application password:
cat $HOME/bitnami_application_passwordMake note of the password displayed on the screen. You use it later to sign in to the administration dashboard of your WordPress website.

Now that you have the password for the administration dashboard of your WordPress website, you can sign in. In the administration dashboard, you can change your user password, install plugins, change the theme of your website, and more.
Complete the following steps to sign in to the administration dashboard of your WordPress website.
In a browser window, go to:
http://PublicIpAddress/wp-login.phpIn the address, replace PublicIpAddress with the public IP address of your WordPress instance. You can get your instance's public IP address from the Lightsail console as shown in the following example:

In the Username or Email Address box, enter user.
In the Password box, enter the default password obtained earlier in this tutorial.
Choose Log in.

You are now signed in to the administration dashboard of your WordPress website where you can perform administrative actions. For more information about administering your WordPress website, see the WordPress Codex in the WordPress documentation.

The default public IP for your WordPress instance changes if you stop and start your instance. A static IP address, attached to an instance, stays the same even if you stop and start your instance.
Complete the following steps to create a static IP address and attach it to your WordPress instance.
Note
For more information, see Create a static IP and attach it to an instance in Amazon Lightsail.
On the Instances tab of the Lightsail home page, choose your running WordPress instance.

Choose the Networking tab, then choose Create static IP.

The static IP location, and attached instance are pre-selected based on the instance that you chose earlier in this tutorial.

Name your static IP, then choose Create.

Transfer management of your domain's DNS records to Lightsail. This allows you to more easily map a domain to your WordPress instance, and manage more of your website’s resources using the Lightsail console.
Complete the following steps to create a Lightsail DNS zone and map a domain to your WordPress instance.
On the Networking tab of the Lightsail home page, choose Create DNS zone.

Enter your domain, then choose Create DNS zone.

Make note of the name server addresses listed on the page.
You add these name server addresses to your domain name’s registrar to transfer management of your domain’s DNS records to Lightsail.

After management of your domain’s DNS records are transferred to Lightsail, add an A record to point the apex of your domain to your WordPress instance, as follows:
In the DNS zone for your domain, choose Add record.
In the Subdomain box, enter an @ symbol to map the apex of your domain (such as example.com) to your instance. The @ symbol explicitly symbolizes that you’re adding an apex record. It is not added as a subdomain.
In the Maps to box, choose the static IP that you attached to the WordPress instance in the previous step of this tutorial.
Choose the save icon.

Allow time for the change to propagate through the internet's DNS before your domain begins routing traffic to your WordPress instance.
Amazon Lightsail
What is Amazon Lightsail?
Amazon Lightsail is a cloud service offered by Amazon Web Services (AWS) that bundles cloud compute power and memory for new or less experienced cloud users.
AWS packages memory, processing, storage and transfer into virtual machines (VMs) for customers to purchase, then releases that compute capacity as Amazon Elastic Compute Cloud (EC2) instance. Amazon Lightsail derives its compute power from an EC2 instance. Amazon EC2 is a web service that provides secure, configurable compute capacity in the cloud.
AWS designed the Lightsail service to make it simple to understand and purchase. The vendor manages the infrastructure, which shares the same uptime and global regions and availability zones as EC2.
Amazon Lightsail launches virtual private servers (VPS), which are VMs with individual operating systems but have restricted access to physical server resources. Customers can choose from multiple Lightsail plans with the following characteristics:
memory ranging from 512 MB to 32 GB;
processors with one to eight cores;
a solid-state drive with 20 GB to 640 GB of storage;
data transfer allowances of 1 TB to 7 TB; and
pricing from $3.50 to $240 per month.
All plans include a static IP address, intuitive management console, secure shell terminal access, remote desktop access, domain name server management and server monitoring. Customers also have access to AWS tools.
Lightsail offers a variety of operating systems, applications and stacks so a customer can build a template. A developer uses the Lightsail command-line interface (CLI) as an alternative to the console. Lightsail also provides a reference for application programming interfaces (API) and documentation.
Amazon load balancer delivering WordPress site media content
Use Amazon LightSail's applications and configurations to build projects like a basic e-commerce application, website or blog -- for example, a WordPress blog.
Lightsail features
Designed for simplicity, Amazon Lightsail features the following:
Virtual servers. Lightsail virtual servers, or instances, are easy to create or delete. And, users can make advanced configurations to the server for networks and storage, for example. Via the Lightsail console users can install popular applications such as WordPress, Windows, Plesk and more.
Simplified load balancing. Load balancing is automated to enable web traffic to be routed across instances so a website and its applications can accommodate variations in traffic. And, Lightsail load balancers include integrated certificate management, and provides free SSL certificates.
Managed databases. Amazon Lightsail can launch and manage a fully configured MySQL or PostgreSQL Managed databases can be scaled separately from virtual servers, improve the availability of applications and run standalone in the cloud.
Containers. The Lightsail Container Service allows users to run containerized applications in the cloud and access them from the internet. One example is a Python web app.
Upgrade to EC2. Amazon Lightsail is scalable and can be upgraded to EC2, when and if required.
Access to AWS services. Lightsail integrates with more than 90 AWS services via Amazon Virtual Private Cloud (VPC) peering.
Amazon Lightsail use cases
Amazon Lightsail simplifies the process of hosting a website or server on a cloud platform. New users or those with minimal experience can start small and then scale. Here are common use cases for Lightsail:
Simple web applications. Users can deploy simple websites using preconfigured development stacks, such as LAMP, Nginx, MEAN and Node.js.
Websites. Businesses use Lightsail to create custom websites, including blogs, e-commerce sites and personal websites. Preconfigured applications integrate with common website building platforms, including WordPress, Magento, Plesk and Joomla.
Business software. Lightsail can run open source and commercial software such as MySQL.
Dev/test environments. Developers can create sandboxes using Lightsail to test outside of the production environment.
Amazon Lightsail is the easiest way to get started with Amazon Web Services (AWS) for developers who need to build websites or web applications. It includes everything you need to launch your project quickly - instances (virtual private servers), container services, managed databases, content delivery network (CDN) distributions, load balancers, SSD-based block storage, static IP addresses, DNS management of registered domains, and resource snapshots (backups) - for a low, predictable monthly price.
Lightsail is for developers. You can choose an image for your Lightsail instance that jumpstarts your dev project so you don't have to spend as much time installing software or frameworks.
If you're an individual developer or hobbyist working on a personal project, Lightsail can help you deploy and manage basic cloud resources. You might also be interested in learning or experimenting with cloud services, such as virtual machines or networking. Lightsail provides a quick way to get started.
Lightsail has images with base operating systems, development stacks like LAMP, LEMP (Nginx), and SQL Server Express, and applications like WordPress, Drupal, and Magento. For more detailed information about the software installed on each image, see Choose a Lightsail instance image.
As your project grows, you can add block storage disks and attach them to your Lightsail instance. You can take snapshots of these instances and disks and easily create new instances from those snapshots. You can also peer your VPC so that your Lightsail instances can use other AWS resources outside of Lightsail.
You can also create a Lightsail load balancer and attach target instances to create a highly available application. You can also configure your load balancer to handle encrypted (HTTPS) traffic, session persistence, health checking, and more.
Linux
Amazon Linux (2018)
Amazon Linux 2
CentOS 7 and 8
Ubuntu 16, 18, and 20
Free BSD 10
Debian 8, 9, and 10
openSUSE Leap
Windows
Windows Server 2019
Windows Server 2016
Windows Server 2012 R2
Linux
WordPress
WordPress Multisite
cPanel & WHM
PrestaShop
Drupal
Ghost
Joomla
Plesk Hosting Stack on Ubuntu
Linux
Magento
Redmine
Linux
LAMP stack (PHP 7)
Node.js
MEAN Stack
Nginx (LEMP Stack)
Django
Windows
SQL Server 2016 Express