Sunday, 3 July 2022

AWS LIGHTSAIL Practical


Step 1: Sign up for AWS

This tutorial requires an AWS account. Sign up for AWS, or sign in to AWS if you already have an account.

Step 2: Create a WordPress instance in Lightsail

Complete the following steps to get your WordPress instance up and running on Lightsail.

Note

For more information about creating an instance in Lightsail, see Creating an Amazon Lightsail instance in the Lightsail documentation.

  1. Sign in to the Lightsail console.

  2. On the Instances tab of the Lightsail home page, choose Create instance.

    Launching and configuring WordPress in Lightsail.
  3. Choose the AWS Region and Availability Zone for your instance.

    Launching and configuring WordPress in Lightsail.
  4. Choose your instance image.

    1. Choose Linux/Unix as the platform.

    2. Choose WordPress as the blueprint.

      Launching and configuring WordPress in Lightsail.
  5. Choose an instance plan.

    A plan includes a low, predictable cost, machine configuration (RAM, SSD, vCPU), and data transfer allowance. You can try the $3.50 USD Lightsail plan without charge for one month (up to 750 hours). AWS credits one free month to your account.

    Note

    For a limited time, Lightsail is extending its free tier to include three months free on select instance plans. The offer applies to new or existing AWS accounts who started using Lightsail on or after July 8, 2021. Offer only applies to one bundle per account. Standard charges apply after the first 750 hours of usage of the selected bundle each month.

    You can use the following instance plans free for three months:

    • Linux/Unix instance plans: $3.50 USD per month, $5 USD per month, and $10 USD per month

    • Windows instance plans: $8 USD per month, $12 USD per month, and $20 USD per month

  6. Enter a name for your instance.

    Resource names:

    • Must be unique within each AWS Region in your Lightsail account.

    • Must contain 2 to 255 characters.

    • Must start and end with an alphanumeric character or number.

    • Can include alphanumeric characters, numbers, periods, dashes, and underscores.

    Launching and configuring WordPress in Lightsail.
  7. Choose Create instance.

Step 3: Connect to your instance via SSH and get the password for your WordPress website

The default password to sign in to the administration dashboard of your WordPress website is stored on the instance.

Complete the following steps to connect to your instance using the browser-based SSH client in the Lightsail console, and get the password for the administration dashboard.

Note

For more information, see Getting the application user name and password for your Bitnami instance in Amazon Lightsail

  1. On the Instances tab of the Lightsail home page, choose the SSH quick-connect icon for your WordPress instance.

    Launching and configuring WordPress in Lightsail.
  2. After the browser-based SSH client window opens, enter the following command to retrieve the default application password:

    cat $HOME/bitnami_application_password
  3. Make note of the password displayed on the screen. You use it later to sign in to the administration dashboard of your WordPress website.

    Launching and configuring WordPress in Lightsail.

Step 4: Sign in to the administration dashboard of your WordPress website

Now that you have the password for the administration dashboard of your WordPress website, you can sign in. In the administration dashboard, you can change your user password, install plugins, change the theme of your website, and more.

Complete the following steps to sign in to the administration dashboard of your WordPress website.

  1. In a browser window, go to:

    http://PublicIpAddress/wp-login.php

    In the address, replace PublicIpAddress with the public IP address of your WordPress instance. You can get your instance's public IP address from the Lightsail console as shown in the following example:

    Launching and configuring WordPress in Lightsail.
  2. In the Username or Email Address box, enter user.

  3. In the Password box, enter the default password obtained earlier in this tutorial.

  4. Choose Log in.

    Launching and configuring WordPress in Lightsail.

    You are now signed in to the administration dashboard of your WordPress website where you can perform administrative actions. For more information about administering your WordPress website, see the WordPress Codex in the WordPress documentation.

    Launching and configuring WordPress in Lightsail.

Step 5: Create a Lightsail static IP address and attach it to your WordPress instance

The default public IP for your WordPress instance changes if you stop and start your instance. A static IP address, attached to an instance, stays the same even if you stop and start your instance.

Complete the following steps to create a static IP address and attach it to your WordPress instance.

Note

For more information, see Create a static IP and attach it to an instance in Amazon Lightsail.

  1. On the Instances tab of the Lightsail home page, choose your running WordPress instance.

    Launching and configuring WordPress in Lightsail.
  2. Choose the Networking tab, then choose Create static IP.

    Launching and configuring WordPress in Lightsail.
  3. The static IP location, and attached instance are pre-selected based on the instance that you chose earlier in this tutorial.

    Launching and configuring WordPress in Lightsail.
  4. Name your static IP, then choose Create.

    Launching and configuring WordPress in Lightsail.

Step 6: Create a Lightsail DNS zone and map a domain to your WordPress instance

Transfer management of your domain's DNS records to Lightsail. This allows you to more easily map a domain to your WordPress instance, and manage more of your website’s resources using the Lightsail console.

Complete the following steps to create a Lightsail DNS zone and map a domain to your WordPress instance.

On the Networking tab of the Lightsail home page, choose Create DNS zone.

  1. Launching and configuring WordPress in Lightsail.
  2. Enter your domain, then choose Create DNS zone.

    Launching and configuring WordPress in Lightsail.
  3. Make note of the name server addresses listed on the page.

    You add these name server addresses to your domain name’s registrar to transfer management of your domain’s DNS records to Lightsail.

    Launching and configuring WordPress in Lightsail.
  4. After management of your domain’s DNS records are transferred to Lightsail, add an A record to point the apex of your domain to your WordPress instance, as follows:

    1. In the DNS zone for your domain, choose Add record.

    2. In the Subdomain box, enter an @ symbol to map the apex of your domain (such as example.com) to your instance. The @ symbol explicitly symbolizes that you’re adding an apex record. It is not added as a subdomain.

    3. In the Maps to box, choose the static IP that you attached to the WordPress instance in the previous step of this tutorial.

    4. Choose the save icon.

      Launching and configuring WordPress in Lightsail.

    Allow time for the change to propagate through the internet's DNS before your domain begins routing traffic to your WordPress instance.

Aws Lightsail - Theory

 Amazon Lightsail


What is Amazon Lightsail?

Amazon Lightsail is a cloud service offered by Amazon Web Services (AWS) that bundles cloud compute power and memory for new or less experienced cloud users.


AWS packages memory, processing, storage and transfer into virtual machines (VMs) for customers to purchase, then releases that compute capacity as Amazon Elastic Compute Cloud (EC2) instance. Amazon Lightsail derives its compute power from an EC2 instance. Amazon EC2 is a web service that provides secure, configurable compute capacity in the cloud.


AWS designed the Lightsail service to make it simple to understand and purchase. The vendor manages the infrastructure, which shares the same uptime and global regions and availability zones as EC2.


Amazon Lightsail launches virtual private servers (VPS), which are VMs with individual operating systems but have restricted access to physical server resources. Customers can choose from multiple Lightsail plans with the following characteristics:


memory ranging from 512 MB to 32 GB;

processors with one to eight cores;

a solid-state drive with 20 GB to 640 GB of storage;

data transfer allowances of 1 TB to 7 TB; and

pricing from $3.50 to $240 per month.

All plans include a static IP address, intuitive management console, secure shell terminal access, remote desktop access, domain name server management and server monitoring. Customers also have access to AWS tools.


Lightsail offers a variety of operating systems, applications and stacks so a customer can build a template. A developer uses the Lightsail command-line interface (CLI) as an alternative to the console. Lightsail also provides a reference for application programming interfaces (API) and documentation.


Amazon load balancer delivering WordPress site media content 

Use Amazon LightSail's applications and configurations to build projects like a basic e-commerce application, website or blog -- for example, a WordPress blog.

Lightsail features

Designed for simplicity, Amazon Lightsail features the following:


Virtual servers. Lightsail virtual servers, or instances, are easy to create or delete. And, users can make advanced configurations to the server for networks and storage, for example. Via the Lightsail console users can install popular applications such as WordPress, Windows, Plesk and more.


Simplified load balancing. Load balancing is automated to enable web traffic to be routed across instances so a website and its applications can accommodate variations in traffic. And, Lightsail load balancers include integrated certificate management, and provides free SSL certificates.


Managed databases. Amazon Lightsail can launch and manage a fully configured MySQL or PostgreSQL Managed databases can be scaled separately from virtual servers, improve the availability of applications and run standalone in the cloud.


Containers. The Lightsail Container Service allows users to run containerized applications in the cloud and access them from the internet. One example is a Python web app.


Upgrade to EC2. Amazon Lightsail is scalable and can be upgraded to EC2, when and if required.


Access to AWS services. Lightsail integrates with more than 90 AWS services via Amazon Virtual Private Cloud (VPC) peering.


Amazon Lightsail use cases

Amazon Lightsail simplifies the process of hosting a website or server on a cloud platform. New users or those with minimal experience can start small and then scale. Here are common use cases for Lightsail:


Simple web applications. Users can deploy simple websites using preconfigured development stacks, such as LAMP, Nginx, MEAN and Node.js.


Websites. Businesses use Lightsail to create custom websites, including blogs, e-commerce sites and personal websites. Preconfigured applications integrate with common website building platforms, including WordPress, Magento, Plesk and Joomla.


Business software. Lightsail can run open source and commercial software such as MySQL.


Dev/test environments. Developers can create sandboxes using Lightsail to test outside of the production environment.


What is Amazon Lightsail?

Amazon Lightsail is the easiest way to get started with Amazon Web Services (AWS) for developers who need to build websites or web applications. It includes everything you need to launch your project quickly - instances (virtual private servers), container services, managed databases, content delivery network (CDN) distributions, load balancers, SSD-based block storage, static IP addresses, DNS management of registered domains, and resource snapshots (backups) - for a low, predictable monthly price.

Who is Lightsail for?

Lightsail is for developers. You can choose an image for your Lightsail instance that jumpstarts your dev project so you don't have to spend as much time installing software or frameworks.

If you're an individual developer or hobbyist working on a personal project, Lightsail can help you deploy and manage basic cloud resources. You might also be interested in learning or experimenting with cloud services, such as virtual machines or networking. Lightsail provides a quick way to get started.

Lightsail has images with base operating systems, development stacks like LAMP, LEMP (Nginx), and SQL Server Express, and applications like WordPress, Drupal, and Magento. For more detailed information about the software installed on each image, see Choose a Lightsail instance image.

As your project grows, you can add block storage disks and attach them to your Lightsail instance. You can take snapshots of these instances and disks and easily create new instances from those snapshots. You can also peer your VPC so that your Lightsail instances can use other AWS resources outside of Lightsail.

You can also create a Lightsail load balancer and attach target instances to create a highly available application. You can also configure your load balancer to handle encrypted (HTTPS) traffic, session persistence, health checking, and more.

Operating systems in Lightsail

    Linux

  • Amazon Linux (2018)

  • Amazon Linux 2

  • CentOS 7 and 8

  • Ubuntu 16, 18, and 20

  • Free BSD 10

  • Debian 8, 9, and 10

  • openSUSE Leap

    Windows

  • Windows Server 2019

  • Windows Server 2016

  • Windows Server 2012 R2

CMS applications in Lightsail

    Linux

  • WordPress 

  • WordPress Multisite 

  • cPanel & WHM

  • PrestaShop

  • Drupal 

  • Ghost

  • Joomla 

  • Plesk Hosting Stack on Ubuntu

E-commerce and project management applications in Lightsail

    Linux

  • Magento 

  • Redmine 

Development stacks in Lightsail

    Linux

  • LAMP stack (PHP 7) 

  • Node.js 

  • MEAN Stack 

  • Nginx (LEMP Stack) 

  • Django 

    Windows

  • SQL Server 2016 Express

Aws App Runner Lab Practical


AWS App Runner

Introduction:

Amazon Web Services, Inc. (AWS) announced its new service, i.e., AWS App Runner, on May 18, 2021. It is a fully managed container application service. With App Runner, it will be very convenient and quick for customers to build, deploy, and run containerized web applications and APIs with just a few clicks. Customers need to provide a container image or source code, and App Runner can automatically build and deploy the web application. It loads, balances traffic, and can scale and monitor application health when there is a demand. This service handles the configuration and operations of their container environments. With the help of this service, a customer can point their existing code or container repository and make an application run and scale in the cloud without having to configure infrastructure services, and, of course, there will be no burden for maintenance.


How it works:


Deployment methods:


App runner deploys in two ways:


1. Deploy from the source


2. Deploy from a container image


Deploy from the source:

With the help of App Runner, the application can be deployed by connecting to your source code. To run my web application, I will be using a python code already existing in my GitHub repository. App Runner connects to this project, and code will compile and deployed. The python code in my repository will create a test web page.


Go to AWS Console and search for App Runner service and click on Create an APP Runner Service.


Source & Deployment:


Choose Source Code Repository

Connect to your GitHub account by authenticating your GitHub login credentials.

In the repository, select the suitable repository which contains the application to deploy.

In Branch, select the appropriate Branch from the dropdown.

In Deployment Trigger, we can choose Manual or Automatic. In this example, we will choose Automatic, which indicates that App Runner automatically discovers the change made to the source code and then automatically builds and deploys the updated version. Otherwise, Manual can select if you want to manage things manually.


Configure Build:

In Build Setting, there are two ways to select the configuration file

Configure All Setting Here: This will specify all settings for your service here in the App Runner console

Use A Configuration File: Let App Runner read your configuration from the app runner.yaml file in your source repository.

In Runtime, currently, there are two options – Python 3 and Nodejs 12. To use other languages, container registry workflow needs to use.

In Build Command, enter the command to install dependencies or compile the code.

In Start Command, enter the command used to start a web server for your service.

In Port, enter the IP port your service uses.


Configure Service:

In Service Name, provide the name of your service.

In Virtual CPU & Memory, choose the CPU and memory size you want your container to have.

In Environment Variable, a key-value pair uses to store custom configuration values. This is optional.


Various other settings customize the service:


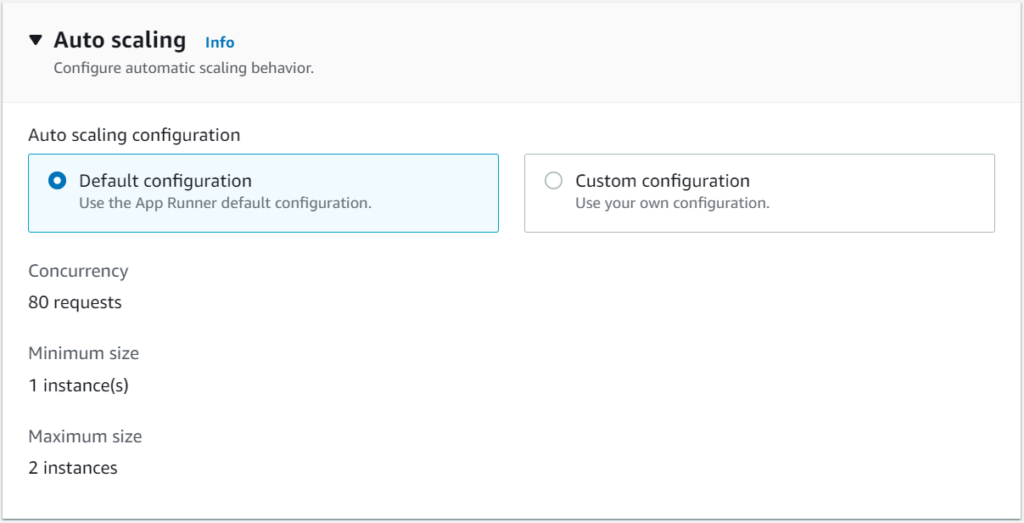
Auto Scaling uses to configure automatic scaling behavior. The Default configuration hasone instance of my container image with 80 concurrent requests, but if requests increases, it will scale to multiple instances by setting up the configuration through Custom Configuration.


Health Check performs a TCP health check at the Port that your application is listening to; various parameters can set up in this option.


Security uses to choose an IAM role that an instance can use, and this role permits the container to correspond with other AWS services. App Runner can encrypt all copies of the application source image. I have not used the IAM role here as my demo doesn’t require it.


Tags use to search and filter the resources. It also controls access permissions and tracks the AWS costs. Tags can add by clicking Add New Tag, and not using it for my demo here.


Review & Create:

A page displays all the configurations we have made in previous steps and then clicks on “create & deploy.”

After the deployment, a URL will generate for your application. And the application will be live on that custom URL. My test application is up and running now


2. Deploy from a Container Image:

Another deployment method uses a container image to push the container image to the Amazon ECR Public.

In the Source & Deployment tab, in the Repository type, select Container Registry

In the Provider, choose Amazon ECR public

In Container Image URI, enter the URI to the image.

After clicking next, follow the similar steps mentioned in Deploy from Source.


Region Availability:


Currently, App Runner is available in the following regions:

US East (N. Virginia)

US West (Oregon)

US East (Ohio)

Asia Pacific (Tokyo)

Europe (Ireland)

App Runner can use the AWS Management Console and AWS Copilot CLI.


Pricing:

App Runner costs for the compute and memory resources used by the application. App Runner billed when it is running. The application can be paused if not in use and can be resumed when required. In development and test environments, the strategy of pause and resume can be an excellent cost-saving option. To meet the application’s processing requirements, App Runner automatically scales the number of active containers up and down. The maximum limit can be set on the number of containers so that you can take control of the budget.

AWS App Runner

Introduction:


Amazon Web Services, Inc. (AWS) announced its new service, i.e., AWS App Runner, on May 18, 2021. It is a fully managed container application service. With App Runner, it will be very convenient and quick for customers to build, deploy, and run containerized web applications and APIs with just a few clicks. Customers need to provide a container image or source code, and App Runner can automatically build and deploy the web application. It loads, balances traffic, and can scale and monitor application health when there is a demand. This service handles the configuration and operations of their container environments. With the help of this service, a customer can point their existing code or container repository and make an application run and scale in the cloud without having to configure infrastructure services, and, of course, there will be no burden for maintenance.


How it works:


Deployment methods:


App runner deploys in two ways:


1. Deploy from the source


2. Deploy from a container image


Deploy from the source:

With the help of App Runner, the application can be deployed by connecting to your source code. To run my web application, I will be using a python code already existing in my GitHub repository. App Runner connects to this project, and code will compile and deployed. The python code in my repository will create a test web page.


Go to AWS Console and search for App Runner service and click on Create an APP Runner Service.


Source & Deployment:


Choose Source Code Repository

Connect to your GitHub account by authenticating your GitHub login credentials.

In the repository, select the suitable repository which contains the application to deploy.

In Branch, select the appropriate Branch from the dropdown.

In Deployment Trigger, we can choose Manual or Automatic. In this example, we will choose Automatic, which indicates that App Runner automatically discovers the change made to the source code and then automatically builds and deploys the updated version. Otherwise, Manual can select if you want to manage things manually.


Configure Build:

In Build Setting, there are two ways to select the configuration file

Configure All Setting Here: This will specify all settings for your service here in the App Runner console

Use A Configuration File: Let App Runner read your configuration from the app runner.yaml file in your source repository.

In Runtime, currently, there are two options – Python 3 and Nodejs 12. To use other languages, container registry workflow needs to use.

In Build Command, enter the command to install dependencies or compile the code.

In Start Command, enter the command used to start a web server for your service.

In Port, enter the IP port your service uses.


Configure Service:


In Service Name, provide the name of your service.

In Virtual CPU & Memory, choose the CPU and memory size you want your container to have.

In Environment Variable, a key-value pair uses to store custom configuration values. This is optional.


Various other settings customize the service:


Auto Scaling uses to configure automatic scaling behavior. The Default configuration hasone instance of my container image with 80 concurrent requests, but if requests increases, it will scale to multiple instances by setting up the configuration through Custom Configuration.

Health Check performs a TCP health check at the Port that your application is listening to; various parameters can set up in this option.

Security uses to choose an IAM role that an instance can use, and this role permits the container to correspond with other AWS services. App Runner can encrypt all copies of the application source image. I have not used the IAM role here as my demo doesn’t require it.

Tags use to search and filter the resources. It also controls access permissions and tracks the AWS costs. Tags can add by clicking Add New Tag, and not using it for my demo here.


Review & Create:

A page displays all the configurations we have made in previous steps and then clicks on “create & deploy.”

After the deployment, a URL will generate for your application. And the application will be live on that custom URL. My test application is up and running now


2. Deploy from a Container Image:

Another deployment method uses a container image to push the container image to the Amazon ECR Public.

In the Source & Deployment tab, in the Repository type, select Container Registry

In the Provider, choose Amazon ECR public

In Container Image URI, enter the URI to the image.

After clicking next, follow the similar steps mentioned in Deploy from Source.

Region Availability:


Currently, App Runner is available in the following regions:

US East (N. Virginia)

US West (Oregon)

US East (Ohio)

Asia Pacific (Tokyo)

Europe (Ireland)

App Runner can use the AWS Management Console and AWS Copilot CLI.


Pricing:

App Runner costs for the compute and memory resources used by the application. App Runner billed when it is running. The application can be paused if not in use and can be resumed when required. In development and test environments, the strategy of pause and resume can be an excellent cost-saving option. To meet the application’s processing requirements, App Runner automatically scales the number of active containers up and down. The maximum limit can be set on the number of containers so that you can take control of the budget.

Thursday, 30 June 2022

Linux Basic Commands

 Linux Basic Commands


ls --> to list files in folder 

pwd --> to see present working directory

cd --> change directory cd /

date --> to view system date

        date -s 10/20/2021

date -s 10:30 

                MM/DD/YY

arch --> to view architure 32 bit or 64bit

uname -a --> to view kernel version

cat /etc/redhat-release --> to view os version

cat /proc/cpuinfo --> to view processor info

free -h --> to view ram memory info

df -h   --> to view partation info 

cal    -->  to view calander

mkdir songs -->to create empty folder

touch file4  -->to create empty file

rm -rvf movies -->to delete file/folder

 rm - remove  

r-recursive

  v-verbose

  f-force

reboot --> to reboot a server

Wednesday, 22 June 2022

Attaching EBS volume on linux-ec2

  1. view  your existing instance.                                                                                                                        
          
  2. Attach an EBS Volume to your Linux EC2 Instance.