Sunday, 3 July 2022

Aws App Runner Lab Practical


AWS App Runner

Introduction:

Amazon Web Services, Inc. (AWS) announced its new service, i.e., AWS App Runner, on May 18, 2021. It is a fully managed container application service. With App Runner, it will be very convenient and quick for customers to build, deploy, and run containerized web applications and APIs with just a few clicks. Customers need to provide a container image or source code, and App Runner can automatically build and deploy the web application. It loads, balances traffic, and can scale and monitor application health when there is a demand. This service handles the configuration and operations of their container environments. With the help of this service, a customer can point their existing code or container repository and make an application run and scale in the cloud without having to configure infrastructure services, and, of course, there will be no burden for maintenance.


How it works:


Deployment methods:


App runner deploys in two ways:


1. Deploy from the source


2. Deploy from a container image


Deploy from the source:

With the help of App Runner, the application can be deployed by connecting to your source code. To run my web application, I will be using a python code already existing in my GitHub repository. App Runner connects to this project, and code will compile and deployed. The python code in my repository will create a test web page.


Go to AWS Console and search for App Runner service and click on Create an APP Runner Service.


Source & Deployment:


Choose Source Code Repository

Connect to your GitHub account by authenticating your GitHub login credentials.

In the repository, select the suitable repository which contains the application to deploy.

In Branch, select the appropriate Branch from the dropdown.

In Deployment Trigger, we can choose Manual or Automatic. In this example, we will choose Automatic, which indicates that App Runner automatically discovers the change made to the source code and then automatically builds and deploys the updated version. Otherwise, Manual can select if you want to manage things manually.


Configure Build:

In Build Setting, there are two ways to select the configuration file

Configure All Setting Here: This will specify all settings for your service here in the App Runner console

Use A Configuration File: Let App Runner read your configuration from the app runner.yaml file in your source repository.

In Runtime, currently, there are two options – Python 3 and Nodejs 12. To use other languages, container registry workflow needs to use.

In Build Command, enter the command to install dependencies or compile the code.

In Start Command, enter the command used to start a web server for your service.

In Port, enter the IP port your service uses.


Configure Service:

In Service Name, provide the name of your service.

In Virtual CPU & Memory, choose the CPU and memory size you want your container to have.

In Environment Variable, a key-value pair uses to store custom configuration values. This is optional.


Various other settings customize the service:


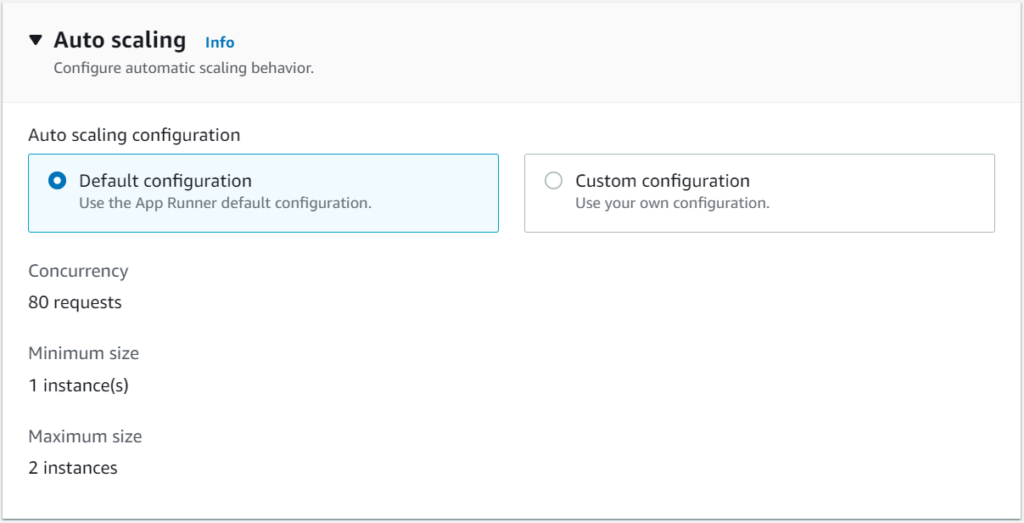
Auto Scaling uses to configure automatic scaling behavior. The Default configuration hasone instance of my container image with 80 concurrent requests, but if requests increases, it will scale to multiple instances by setting up the configuration through Custom Configuration.


Health Check performs a TCP health check at the Port that your application is listening to; various parameters can set up in this option.


Security uses to choose an IAM role that an instance can use, and this role permits the container to correspond with other AWS services. App Runner can encrypt all copies of the application source image. I have not used the IAM role here as my demo doesn’t require it.


Tags use to search and filter the resources. It also controls access permissions and tracks the AWS costs. Tags can add by clicking Add New Tag, and not using it for my demo here.


Review & Create:

A page displays all the configurations we have made in previous steps and then clicks on “create & deploy.”

After the deployment, a URL will generate for your application. And the application will be live on that custom URL. My test application is up and running now


2. Deploy from a Container Image:

Another deployment method uses a container image to push the container image to the Amazon ECR Public.

In the Source & Deployment tab, in the Repository type, select Container Registry

In the Provider, choose Amazon ECR public

In Container Image URI, enter the URI to the image.

After clicking next, follow the similar steps mentioned in Deploy from Source.


Region Availability:


Currently, App Runner is available in the following regions:

US East (N. Virginia)

US West (Oregon)

US East (Ohio)

Asia Pacific (Tokyo)

Europe (Ireland)

App Runner can use the AWS Management Console and AWS Copilot CLI.


Pricing:

App Runner costs for the compute and memory resources used by the application. App Runner billed when it is running. The application can be paused if not in use and can be resumed when required. In development and test environments, the strategy of pause and resume can be an excellent cost-saving option. To meet the application’s processing requirements, App Runner automatically scales the number of active containers up and down. The maximum limit can be set on the number of containers so that you can take control of the budget.

AWS App Runner

Introduction:


Amazon Web Services, Inc. (AWS) announced its new service, i.e., AWS App Runner, on May 18, 2021. It is a fully managed container application service. With App Runner, it will be very convenient and quick for customers to build, deploy, and run containerized web applications and APIs with just a few clicks. Customers need to provide a container image or source code, and App Runner can automatically build and deploy the web application. It loads, balances traffic, and can scale and monitor application health when there is a demand. This service handles the configuration and operations of their container environments. With the help of this service, a customer can point their existing code or container repository and make an application run and scale in the cloud without having to configure infrastructure services, and, of course, there will be no burden for maintenance.


How it works:


Deployment methods:


App runner deploys in two ways:


1. Deploy from the source


2. Deploy from a container image


Deploy from the source:

With the help of App Runner, the application can be deployed by connecting to your source code. To run my web application, I will be using a python code already existing in my GitHub repository. App Runner connects to this project, and code will compile and deployed. The python code in my repository will create a test web page.


Go to AWS Console and search for App Runner service and click on Create an APP Runner Service.


Source & Deployment:


Choose Source Code Repository

Connect to your GitHub account by authenticating your GitHub login credentials.

In the repository, select the suitable repository which contains the application to deploy.

In Branch, select the appropriate Branch from the dropdown.

In Deployment Trigger, we can choose Manual or Automatic. In this example, we will choose Automatic, which indicates that App Runner automatically discovers the change made to the source code and then automatically builds and deploys the updated version. Otherwise, Manual can select if you want to manage things manually.


Configure Build:

In Build Setting, there are two ways to select the configuration file

Configure All Setting Here: This will specify all settings for your service here in the App Runner console

Use A Configuration File: Let App Runner read your configuration from the app runner.yaml file in your source repository.

In Runtime, currently, there are two options – Python 3 and Nodejs 12. To use other languages, container registry workflow needs to use.

In Build Command, enter the command to install dependencies or compile the code.

In Start Command, enter the command used to start a web server for your service.

In Port, enter the IP port your service uses.


Configure Service:


In Service Name, provide the name of your service.

In Virtual CPU & Memory, choose the CPU and memory size you want your container to have.

In Environment Variable, a key-value pair uses to store custom configuration values. This is optional.


Various other settings customize the service:


Auto Scaling uses to configure automatic scaling behavior. The Default configuration hasone instance of my container image with 80 concurrent requests, but if requests increases, it will scale to multiple instances by setting up the configuration through Custom Configuration.

Health Check performs a TCP health check at the Port that your application is listening to; various parameters can set up in this option.

Security uses to choose an IAM role that an instance can use, and this role permits the container to correspond with other AWS services. App Runner can encrypt all copies of the application source image. I have not used the IAM role here as my demo doesn’t require it.

Tags use to search and filter the resources. It also controls access permissions and tracks the AWS costs. Tags can add by clicking Add New Tag, and not using it for my demo here.


Review & Create:

A page displays all the configurations we have made in previous steps and then clicks on “create & deploy.”

After the deployment, a URL will generate for your application. And the application will be live on that custom URL. My test application is up and running now


2. Deploy from a Container Image:

Another deployment method uses a container image to push the container image to the Amazon ECR Public.

In the Source & Deployment tab, in the Repository type, select Container Registry

In the Provider, choose Amazon ECR public

In Container Image URI, enter the URI to the image.

After clicking next, follow the similar steps mentioned in Deploy from Source.

Region Availability:


Currently, App Runner is available in the following regions:

US East (N. Virginia)

US West (Oregon)

US East (Ohio)

Asia Pacific (Tokyo)

Europe (Ireland)

App Runner can use the AWS Management Console and AWS Copilot CLI.


Pricing:

App Runner costs for the compute and memory resources used by the application. App Runner billed when it is running. The application can be paused if not in use and can be resumed when required. In development and test environments, the strategy of pause and resume can be an excellent cost-saving option. To meet the application’s processing requirements, App Runner automatically scales the number of active containers up and down. The maximum limit can be set on the number of containers so that you can take control of the budget.

Thursday, 30 June 2022

Linux Basic Commands

 Linux Basic Commands


ls --> to list files in folder 

pwd --> to see present working directory

cd --> change directory cd /

date --> to view system date

        date -s 10/20/2021

date -s 10:30 

                MM/DD/YY

arch --> to view architure 32 bit or 64bit

uname -a --> to view kernel version

cat /etc/redhat-release --> to view os version

cat /proc/cpuinfo --> to view processor info

free -h --> to view ram memory info

df -h   --> to view partation info 

cal    -->  to view calander

mkdir songs -->to create empty folder

touch file4  -->to create empty file

rm -rvf movies -->to delete file/folder

 rm - remove  

r-recursive

  v-verbose

  f-force

reboot --> to reboot a server

Wednesday, 22 June 2022

Attaching EBS volume on linux-ec2

  1. view  your existing instance.                                                                                                                        
          
  2. Attach an EBS Volume to your Linux EC2 Instance.


AWS Cloud Training ELASTIC BLOCK STORE

 What is Elastic Block Store (EBS)?


 EBS storage is allocated in volumes

  • A volume is a 'virtual disk' (size: 1GB - 1TB)
  • Basically, a raw block device
  • Can be attached to an instance (but only one at a time)
  • A single instance can access multiple volumes


 Placed in specific availability zones

  • Why is this useful?
  • Be sure to place it near instances (otherwise can't attach)


 Replicated across multiple servers

  • Data is not lost if a single server fails
  •  Amazon: Annual failure rate is 0.1-0.2%


 EC2 instances can have an EBS volume as their root device ("EBS

boot")

  • Result: Instance data persists independently from the lifetime of the instance
  •  You can stop and restart the instance, like suspending and resuming a laptop


 You won't be charged for the instance while it is stopped (only

for EBS)

  •  You can enable termination protection for the instance
  •  Blocks attempts to terminate the instance (e.g., by accident) until termination protection is disabled again


CREATE EBS VOLUMES


Once you are in the EC2 page, click Volumes under ELASTIC BLOCK STORE

on the left pane.


Once you are in the Volumes page, click on Create Volume to create a new

volume.


  Select Volume Type from the drop down list.


Specify Snapshot ID if you want your new volume to be copied data from the

snapshot, otherwise leave blank.

And select encrypt option if you want to encrypt your newly creating volume,

otherwise leave un selected.


Then click on create after specifying the values required.


Your volume will start creating.


DELETE EBS VOLUME

Once you logged in to AWS, go to EC2 section then go to Volumes section.
Click the volume which you want to delete and click on actions.


Friday, 10 June 2022

AWS Cloud Training IDENTITY AND ACCESS MANAGEMENT

 IDENTITY AND ACCESS MANAGEMENT


AWS Identity and Access Management (IAM) is a web service that helps you

securely control access to AWS resources for your users. You use IAM to control

who can use your AWS resources (authentication) and what resources they can use

and in what ways (authorization).


Choose Identity & Access management under Security & Identity from the AWS

console page.


CREATING USERS:

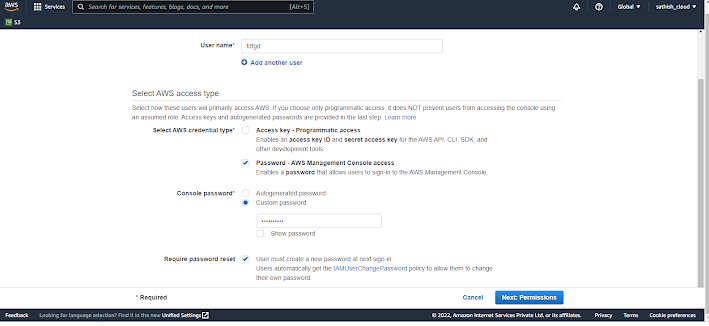
Once you are on IAM page, Click Users from left pane, then choose Add User to

create a user.


On the next page, click on Show User Security Credentials to see access keys or

choose Download Credentials to download them then click on close.


Under Users tab, select a user and click on User Actions, then select manage

Password to create a new password.


Once you are on IAM page, Click Users from left pane, then choose Add User to

create a user.


Thursday, 2 June 2022

Role and duties of a Linux/Windows system administrator

Role and duties of a Linux/Windows system administrator


  1. Create and update repositories. At the same time you must be able to install packages, remove or search them.
  2. Setting permissions on files and directories. You need to be good with special permissions such as SGID,SUID and sticky bits. Gain knowledge about ACLs.
  3. Process management. This is something practically required in company environment. Learn basic process management commands such as top, ps, vmstat etc.
  4. Managing and creating partitions. You must be good with file systems. Also gain knowledge about type of partitions such as swap.
  5. Sharing of files through NFS and SAMBA.
  6. Understanding of SElinux concepts. Understand how contexts work in SELinux .
  7. Learn SSH.
  8. Learn networking basics and understanding of firewalls would be great.
  9. Cron scheduling basics.
  10. Basic understanding of configuration files of various services.
  11. Basic shell scripting.


Role and duties of a Linux/Windows system administrator

The duties of a system administrator are wide-ranging and vary widely from one organization to another. Sysadmins are usually charged with installing, supporting, and maintaining servers or other computer systems, and planning for and responding to service outages and other problems. Other duties may include scripting or light programming, and project management for systems-related projects.

The system administrator is responsible for the following things:

  1. User administration (setup and maintaining account)
  2. Maintaining system
  3. Verify that peripherals are working properly
  4. Quickly arrange the repair for hardware in the occasion of hardware failure
  5. Monitor system performance
  6. Create file systems
  7. Install the software using tools such as apt command/apt-get command, dnf command/yum command, zypper command, apk command and others.
  8. Patching firmware and software
  9. Create a backup and recover policy (disaster recovery [DR])
  10. Monitor network communication
  11. Update system as soon as the new version of OS and application software comes out
  12. Implement the policies for the use of the computer system and network
  13. Setup security policies for users. A sysadmin must have a strong grasp of computer security (e.g. firewalls and intrusion detection systems. You must know how to use tools such as Wireshark and Nmap command)
  14. Documentation in form of an internal wiki. You must know how to read manual pages using the man command or help command.
  15. Password and identity management
  16. Network administration
  17. Database administration
  18. How to view and troubleshoot with Unix and Linux log files
  19. Setting up cron jobs on your Unix and Linux system using the crontab command
  20. Responsible for installing and maintaining all software systems and server hardware
  21. Maintenance of all system backup and providing training to all users.

  22. Upgrade the installed software with the new version of OS and create new storage.

  23. Ability to troubleshoot when required and work in Linux friendly applications

  24. Monitoring the servers and network communication

  25. Creating file systems

  26. Implementation of policies

  27. Creating security policies for users like firewalls.

  28. Managing the password and identity

  29. To monitor and evaluate everyday systems and all resources related to the server.


Linux System Administrator is a person who has ‘root’ access that is a ‘superuser’. It means he has the privilege to access everything which includes all user accounts, all system configurations, home directories with all files therein, and all files in the system.

Linux System Administrator has the following duties  (Write any five)

Installing and configuring server

A server is basically a computer program that facilitates the same computer or another computer by providing services to them.

It is the most important element of Modern OS and network design.

It is of the system administrator to configure the server so that the most essential server remains inaccessible. He must be aware of types of attacks and security bugs.

Installing and configuring application software

In order to ensure a correct execution environment, the administrator must provide software that is well configured and validated.

He should ensure adequate memory allotment and resolve software failure and dependency issues.

He must provide a set of activities to control hardware and software configuration and maintain policies for users.

Creating and maintaining user accounts

Users can access their own accounts but the administrator has access to every user account.

He can add, modify, delete or copy a user account.

He is responsible for maintaining security by providing role on a user account that defines the level of access.

Backing up and restoring files

To minimize the loss of data, the administrator must maintain a backup of files nd he should restore it whenever required.

Administrators can take backup in removable media such as hard drives or tapes as protection against loss.

Before creating a backup administrator must decide.

What is necessary to backup?

How frequently backup should perform.

Monitoring and tuning performance

Monitoring and tuning performance is essential for Linux to work more efficiently.

Administrators must identify system bottlenecks and should solve them.

Administrators can use system tools to increase performance, they can determine
 when hardware needs to be upgraded.

He should identify the early sign of failure .

Configuring a secure system
It is the duty of the administrator to involve tasks and decisions to run a secure Linux system and maintain data integrity.

It provides strong protection to individuals and corporate bodies and protects parts of the system even if it is under attack.

Administrator should ensure
The system has a firewall.

Not allow connection from unknown network.

Not install software if not needed.

Using tools to monitor security
Linux is the preferred operating system that demands secure networks, but it can be easily cracked by hackers.

It is important for administrators to be aware of the tools hackers use and software used to monitor and counter such activity.

It is duty of the administrator to prevent unauthorized use of his system.