Monday, 21 March 2022

AWS CodeDeploy


  • fully managed deployment service that automates software deployments to a variety of compute services such as Amazon EC2, AWS Fargate, AWS Lambda, and your on-premises servers.


Concepts

    • An Application is a name that uniquely identifies the application you want to deploy. CodeDeploy uses this name, which functions as a container, to ensure the correct combination of revision, deployment configuration, and deployment group are referenced during a deployment.
    • Compute platform is the platform on which CodeDeploy deploys an application (EC2, ECS, Lambda, On-premises servers).
    • Deployment configuration is a set of deployment rules and deployment success and failure conditions used by CodeDeploy during a deployment.
    • Deployment group contains individually tagged instances, Amazon EC2 instances in Amazon EC2 Auto Scaling groups, or both.
      • In an Amazon ECS deployment, a deployment group specifies the Amazon ECS service, load balancer, optional test listener, and two target groups. It also specifies when to reroute traffic to the replacement task set and when to terminate the original task set and ECS application after a successful deployment.
      • In an AWS Lambda deployment, a deployment group defines a set of CodeDeploy configurations for future deployments of an AWS Lambda function.
      • In an EC2/On-Premises deployment, a deployment group is a set of individual instances targeted for a deployment.
        • In an in-place deployment, the instances in the deployment group are updated with the latest application revision.
        • In a blue/green deployment, traffic is rerouted from one set of instances to another by deregistering the original instances from a load balancer and registering a replacement set of instances that typically has the latest application revision already installed.
    • Revision
      • for an AWS Lambda deployment is a YAML- or JSON-formatted application specification file (AppSpec file) that specifies information about the Lambda function to deploy. The revision can be stored in Amazon S3 buckets.
      • for an Amazon ECS deployment is a YAML- or JSON-formatted file that specifies the Amazon ECS task definition used for the deployment, a container name and port mapping used to route traffic, and optional Lambda functions run after deployment lifecycle events.
      • for an EC2/On-Premises deployment is an archive file that contains source content (source code, webpages, executable files, and deployment scripts) and an application specification file. The revision can be stored in Amazon S3 buckets or GitHub repositories.
    • Target revision is the most recent version of the application revision that you have uploaded to your repository and want to deploy to the instances in a deployment group.
    • A deployment goes through a set of predefined phases called deployment lifecycle events. A deployment lifecycle event gives you an opportunity to run code as part of the deployment.
      1. ApplicationStop
      2. DownloadBundle
      3. BeforeInstall
      4. Install
      5. AfterInstall
      6. ApplicationStart
      7. ValidateService

Features

      • CodeDeploy protects your application from downtime during deployments through rolling updates and deployment health tracking.
      • AWS CodeDeploy tracks and stores the recent history of your deployments.
      • CodeDeploy is platform and language agnostic.
      • CodeDeploy uses a file and command-based install model, which enables it to deploy any application and reuse existing setup code. The same setup code can be used to consistently deploy and test updates across your environment release stages for your servers or containers.
      • CodeDeploy integrates with Amazon Auto Scaling, which allows you to scale EC2 capacity according to conditions you define such as traffic spikes. Notifications are then sent to AWS CodeDeploy to initiate an application deployment onto new instances before they are placed behind an  Elastic Load Balancing load balancer.
      • When using AWS CodeDeploy with on-premises servers, make sure that they can connect to AWS public endpoints.
      • AWS CodeDeploy offers two types of deployments:
        • With in-place deployments, the application on each instance in the deployment group is stopped, the latest application revision is installed, and the new version of the application is started and validated. Only deployments that use the EC2/On-Premises compute platform can use in-place deployments.

AWS CodeDeploy

        • With blue/green deployments, once the new version of your application is tested and declared ready, CodeDeploy can shift the traffic from your old version (blue) to your new version (green) according to your specifications.
      • Deployment groups are used to match configurations to specific environments, such as a staging or production environments. An application can be deployed to multiple deployment groups.
      • You can integrate AWS CodeDeploy with your continuous integration and deployment systems by calling the public APIs using the AWS CLI or AWS SDKs.
    • Application Specification Files
      • The AppSpec file is a YAML-formatted or JSON-formatted file that is used to manage each deployment as a series of lifecycle event hooks.
      • For ECS Compute platform, the file specifies
        • The name of the ECS service and the container name and port used to direct traffic to the new task set.
        • The functions to be used as validation tests.
      • For Lambda compute platform, the file specifies
        • The AWS Lambda function version to deploy.
        • The functions to be used as validation tests.
      • For EC2/On-Premises compute platform, the file is always written in YAML and is used to
        • Map the source files in your application revision to their destinations on the instance.
        • Specify custom permissions for deployed files.
        • Specify scripts to be run on each instance at various stages of the deployment process.
    • Deployments
      • You can use the CodeDeploy console or the create-deployment command to deploy the function revision specified in the AppSpec file to the deployment group.
      • You can use the CodeDeploy console or the stop-deployment command to stop a deployment. When you attempt to stop the deployment, one of three things happens:
        • The deployment stops, and the operation returns a status of succeeded.
        • The deployment does not immediately stop, and the operation returns a status of pending. After the pending operation is complete, subsequent calls to stop the deployment return a status of succeeded.
        • The deployment cannot stop, and the operation returns an error.
      • With Lambda functions and EC2 instances, CodeDeploy implements rollbacks by redeploying, as a new deployment, a previously deployed revision.
      • With ECS services, CodeDeploy implements rollbacks by rerouting traffic from the replacement task set to the original task set.
      • The CodeDeploy agent is a software package that, when installed and configured on an EC2/on-premises instance, makes it possible for that instance to be used in CodeDeploy deployments. The agent is not required for deployments that use the Amazon ECS or AWS Lambda.
      • CodeDeploy monitors the health status of the instances in a deployment group. For the overall deployment to succeed, CodeDeploy must be able to deploy to each instance in the deployment and deployment to at least one instance must succeed.
      • You can specify a minimum number of healthy instances as a number of instances or as a percentage of the total number of instances required for the deployment to be successful.
      • CodeDeploy assigns two health status values to each instance:
        • Revision health – based on the application revision currently installed on the instance. Values include Current, Old and Unknown.
        • Instance health – based on whether deployments to an instance have been successful. Values include Healthy and Unhealthy.
    • Blue/Green Deployments
      • EC2/On-Premises compute platform
        • You must have one or more Amazon EC2 instances with identifying Amazon EC2 tags or an Amazon EC2 Auto Scaling group.
        • Each Amazon EC2 instance must have the correct IAM instance profile attached.
        • The CodeDeploy agent must be installed and running on each instance.
        • During replacement, you can either
          • use the Amazon EC2 Auto Scaling group you specify as a template for the replacement environment; or
          • specify the instances to be counted as your replacement using EC2 instance tags, EC2 Auto Scaling group names, or both.

AWS CodeDeploy 2

      • AWS Lambda platform
        • You must choose one of the following deployment configuration types to specify how traffic is shifted from the original Lambda function version to the new version:
          • Canary: Traffic is shifted in two increments. You can choose from predefined canary options that specify the percentage of traffic shifted to your updated Lambda function version in the first increment and the interval, in minutes, before the remaining traffic is shifted in the second increment.
          • Linear: Traffic is shifted in equal increments with an equal number of minutes between each increment. You can choose from predefined linear options that specify the percentage of traffic shifted in each increment and the number of minutes between each increment.
          • All-at-once: All traffic is shifted from the original Lambda function to the updated Lambda function version all at once.

AWS CodeDeploy 3

      • With Amazon ECS, production traffic shifts from your ECS service’s original task set to a replacement task set all at once.

AWS CodeDeploy 4

    • Advantages of using Blue/Green Deployments vs In-Place Deployments
      • An application can be installed and tested in the new replacement environment and deployed to production simply by rerouting traffic.
      • If you’re using the EC2/On-Premises compute platform, switching back to the most recent version of an application is faster and more reliable. Traffic can just be routed back to the original instances as long as they have not been terminated. With an in-place deployment, versions must be rolled back by redeploying the previous version of the application.
      • If you’re using the EC2/On-Premises compute platform, new instances are provisioned and contain the most up-to-date server configurations.
      • If you’re using the AWS Lambda compute platform, you control how traffic is shifted from your original AWS Lambda function version to your new AWS Lambda function version.
    • Deployment Configurations
      • This is a set of rules and success and failure conditions used by CodeDeploy during a deployment.
      • For EC2/On-Premises Compute Platform
        • The deployment configuration specifies the number or percentage of instances that must remain available at any time during a deployment.
        • You can use one of the three predefined deployment configurations provided by AWS or create a custom deployment configuration.

Deployment Configuration

Description

CodeDeployDefault.AllAtOnce

In-place deployments:

Attempts to deploy an application revision to as many instances as possible at once. The status of the overall deployment is displayed as Succeeded if the application revision is deployed to one or more of the instances. The status of the overall deployment is displayed as Failed if the application revision is not deployed to any of the instances.

Blue/green deployments:

  •  Deployment to replacement environment: Follows the same deployment rules as CodeDeployDefault.AllAtOnce for in-place deployments.
  • Traffic rerouting: Routes traffic to all instances in the replacement environment at once. Succeeds if traffic is successfully rerouted to at least one instance. Fails after rerouting to all instances fails.

CodeDeployDefault.HalfAtATime

In-place deployments:

Deploys to up to half of the instances at a time (fractions rounded down). The overall deployment succeeds if the application revision is deployed to at least half of the instances (fractions rounded up). Otherwise, the deployment fails.

Blue/green deployments:

  •  Deployment to replacement environment: Follows the same deployment rules as CodeDeployDefault.HalfAtATime for in-place deployments.
  •  Traffic rerouting: Routes traffic to up to half the instances in the replacement environment at a time. Succeeds if rerouting to at least half of the instances succeeds. Otherwise, fails.

CodeDeployDefault.OneAtATime

In-place deployments:

Deploys the application revision to only one instance at a time.

For deployment groups that contain only one instance, the overall deployment is successful only if deployment to the single instance is successful.

For deployment groups that contain more than one instance:

  •  The overall deployment succeeds if the application revision is deployed to all of the instances. An exception is if deployment to the last instance fails, the overall deployment still succeeds. This is because CodeDeploy allows only one instance at a time to be taken offline with the CodeDeployDefault.OneAtATime configuration.
  •  The overall deployment fails as soon as the application revision fails to be deployed to any but the last instance.

Blue/green deployments:

  •  Deployment to replacement environment: Follows same deployment rules as CodeDeployDefault.OneAtATime for in-place deployments.
  •  Traffic rerouting: Routes traffic to one instance in the replacement environment at a time. Succeeds if traffic is successfully rerouted to all replacement instances. Fails after the very first rerouting failure. An exception is if the last instance fails to register, the overall deployment still succeeds.
  • If you don’t specify a deployment configuration, CodeDeploy uses the CodeDeployDefault.OneAtATime deployment configuration.
      • For ECS Compute Platform
        • There are three ways traffic can be shifted during a deployment:
          • Canary: Traffic is shifted in two increments. You can choose from predefined canary options that specify the percentage of traffic shifted to your updated Amazon ECS task set in the first increment and the interval, in minutes, before the remaining traffic is shifted in the second increment.
          • Linear: Traffic is shifted in equal increments with an equal number of minutes between each increment. You can choose from predefined linear options that specify the percentage of traffic shifted in each increment and the number of minutes between each increment.
          • All-at-once: All traffic is shifted from the original Amazon ECS task set to the updated Amazon ECS task set all at once.
        • You can also create your own custom canary or linear deployment configuration

Deployment Configuration

Description

CodeDeployDefault.ECSLinear10PercentEveryXMinutes (Values of X :1, 3)

Shifts 10 percent of traffic every X minutes until all traffic is shifted.

CodeDeployDefault.ECSCanary10PercentXMinutes (Values of X: 5,15)

Shifts 10 percent of traffic in the first increment. The remaining 90 percent is deployed X minutes later.

CodeDeployDefault.ECSAllAtOnce

Shifts all traffic to the updated Amazon ECS container at once.

  • For Lambda Compute Platform

Deployment Configuration

Description

CodeDeployDefault.LambdaCanary10PercentXMinutes (Values of X: 5, 10, 15, 30)

Shifts 10 percent of traffic in the first increment. The remaining 90 percent is deployed X minutes later.

CodeDeployDefault.LambdaLinear10PercentEveryXMinutes (Values of X: 1, 2, 3, 10)

Shifts 10 percent of traffic every X minutes until all traffic is shifted.

CodeDeployDefault.LambdaAllAtOnce

Shifts all traffic to the updated Lambda functions at once.

  • With AWS CodeDeploy, you can also deploy your applications to your on-premises data centers.

codedeploy on-premises-2

Monitoring

    • In CodeDeploy, you should at the minimum monitor the following items
      • Deployment events and status
      • Instance events and status
    • Tools and Services
      • Amazon CloudWatch Alarms, Events and Logs
      • AWS CloudTrail
      • Amazon SNS
      • AWS CodeDeploy console

Pricing

    • There is no additional charge for code deployments to Amazon EC2 or AWS Lambda.
    • You are charged per on-premises instance update using AWS CodeDeploy.

AWS CodeCommit


  • fully-managed source control service that hosts secure Git-based repositories, similar to Github.
  • You can create your own code repository and use Git commands to interact with your own repository and other repositories.
  • You can store and version any kind of file, including application assets such as images and libraries alongside your code.
  • The AWS CodeCommit Console lets you visualize your code, pull requests, commits, branches, tags and other settings.

Concepts

    • An active user is any unique AWS identity (IAM user/role, federated user, or root account) that accesses AWS CodeCommit repositories during the month. AWS identities that are created through your use of other AWS Services, such as AWS CodeBuild and AWS CodePipeline, as well as servers accessing CodeCommit using a unique AWS identity, count as active users.
    • repository is the fundamental version control object in CodeCommit. It’s where you securely store code and files for your project. It also stores your project history, from the first commit through the latest changes.
    • file is a version-controlled, self-contained piece of information available to you and other users of the repository and branch where the file is stored.
    • pull request allows you and other repository users to review, comment on, and merge code changes from one branch to another.
    • An approval rule is used to designate a number of users who will approve a pull request before it is merged into your branch.
    • commit is a snapshot of the contents and changes to the contents of your repository. This includes information like who committed the change, the date and time of the commit, and the changes made as part of the commit.
    • In Git, branches are simply pointers or references to a commit. You can use branches to separate work on a new or different version of files without impacting work in other branches. You can use branches to develop new features, store a specific version of your project from a particular commit, etc.

Repository Features

    • You can share your repository with other users. 
    • If you add AWS tags to repositories, you can set up notifications so that repository users receive email about events, such as another user commenting on code. 
    • You can create triggers for your repository so that code pushes or other events trigger actions, such as emails or code functions.
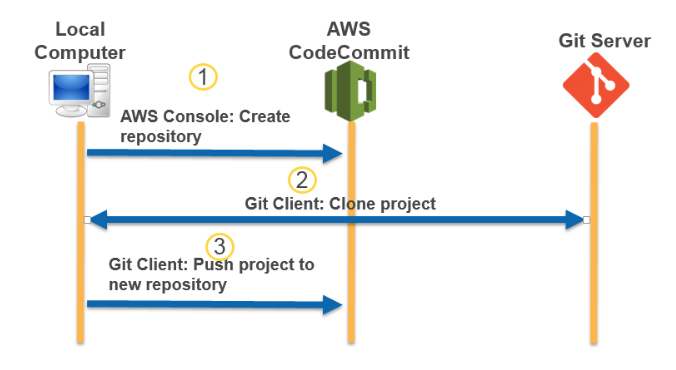
    • To copy a remote repository to your local computer, use the command ‘git clone
    • To connect to the repository after the name is changed, users must use the ‘git remote set-url’ command and specify the new URL to use.
    • To push changes from the local repo to the CodeCommit repository, run ‘git push remote-name branch-name’.
    • To pull changes to the local repo from the CodeCommit repository, run ‘git pull remote-name branch-name’.
    • You can create up to 10 triggers for Amazon SNS or AWS Lambda for each CodeCommit repository.
    • You can push your files to two different repositories at the same time.

File Features

    • You can organize your repository files with a directory structure.
    • CodeCommit automatically tracks every change to a file.
    • You can use the AWS Console or AWS CLI and the ‘put-file’ command to add a file or submit changes to a file in a CodeCommit repository.

Pull Requests

    • Pull requests require two branches: a source branch that contains the code you want reviewed, and a destination branch, where you merge the reviewed code.
    • Create pull requests to let other users see and review your code changes before you merge them into another branch.
    • Create approval rules for your pull requests to ensure the quality of your code by requiring users to approve the pull request before the code can be merged into the destination branch. You can specify the number of users who must approve a pull request. You can also specify an approval pool of users for the rule.
    • To review the changes on files included in a pull request and resolve merge conflicts, you use the CodeCommit console, the ‘git diff’ command, or a diff tool.
    • After the changes have been reviewed and all approval rules on the pull request have been satisfied, you can merge a pull request using the AWS Console, AWS CLI or with the ‘git merge’ command.
    • You can close a pull request without merging it with your code.

Commit and Branch Features

    • If using the AWS CLI, you can use the ‘create-commit’ command to create a new commit for your branch.
    • If using the AWS CLI, you can use ‘create-branch’ command to create a new branch for your repository..
    • You can also use Git commands to manage your commits and branches.
    • Create a new commit to a branch using ‘git commit -m message’.
    • Create a branch in your local repo by running the git checkout -b new-branch-name command.

Migration from Git repositories to CodeCommit

    • You can migrate a Git repository to a CodeCommit repository in a number of ways: by cloning it, mirroring it, or migrating all or just some of the branches.
    • You can also migrate your local repository in your machine to CodeCommit.

AWS CodeCommit

High Availability

    • CodeCommit stores your repositories in Amazon S3 and Amazon DynamoDB.

Security

    • You can transfer your files to and from AWS CodeCommit using HTTPS or SSH. For HTTPS authentication, you use a static username and password. For SSH authentication, you use public keys and private keys.
    • Your repositories are also automatically encrypted at rest through AWS KMS using customer-specific keys.
    • You can give users temporary access to your AWS CodeCommit repositories through a number of methods: SAML, Federation, Cross-Account Access, or through third party authorizes with Amazon Cognito.

Monitoring

    • CodeCommit uses AWS IAM to control and monitor who can access your data as well as how, when, and where they can access it. 
    • CodeCommit helps you monitor your repositories via AWS CloudTrail and AWS CloudWatch.
    • You can use Amazon SNS to receive notifications for events impacting your repositories. Each notification will include a status message as well as a link to the resources whose event generated that notification.

Pricing

    • The first 5 active users per month are free of charge. You also get to have unlimited repositories, with 50 GB-month total worth of storage, and 10,000 Git requests/month at no cost.
    • You are billed for each active user beyond the first 5 per month. You also get an additional 10GB-month of storage per active user, and an additional 2,000 Git requests per active user.
      • A Git request includes any push or pull that transmits repository objects, including a direct edit in the console or through the CodeCommit APIs.

AWS CodeBuild


  • A fully managed continuous integration service that compiles source code, runs tests, and produces software packages that are ready to deploy.

Concepts

    • build project defines how CodeBuild will run a build. It includes information such as where to get the source code, which build environment to use, the build commands to run, and where to store the build output.
    • build environment is the combination of operating system, programming language runtime, and tools used by CodeBuild to run a build.
    • The build specification is a YAML file that lets you choose the commands to run at each phase of the build and other settings. Without a build spec, CodeBuild cannot successfully convert your build input into build output or locate the build output artifact in the build environment to upload to your output bucket.
      • If you include a build spec as part of the source code, by default, the build spec file must be named buildspec.yml and placed in the root of your source directory.
    • A collection of input files is called build input artifacts or build input and a deployable version of a source code is called build output artifact or build output.

Features

    • AWS CodeBuild runs your builds in preconfigured build environments that contain the operating system, programming language runtime, and build tools (such as Apache Maven, Gradle, npm) required to complete the task. You just specify your source code’s location and select settings for your build, such as the build environment to use and the build commands to run during a build.
    • AWS CodeBuild builds your code and stores the artifacts into an Amazon S3 bucket, or you can use a build command to upload them to an artifact repository.
    • AWS CodeBuild provides build environments for
      • Java
      • Python
      • Node.js
      • Ruby
      • Go
      • Android
      • .NET Core for Linux
      • Docker
    • You can define the specific commands that you want AWS CodeBuild to perform, such as installing build tool packages, running unit tests, and packaging your code.
    • You can choose from three levels of compute capacity that vary by the amount of CPU and memory to best suit to your development needs.
      • Build.general1.small – 3GB memory, 2 vCPU
      • Build.general1.medium – 7GB memory, 4 vCPU
      • Build.general1.large – 15GB memory, 8 vCPU
    • You can integrate CodeBuild into existing CI/CD workflows using its source integrations, build commands, or Jenkins integration.
    • CodeBuild can connect to AWS CodeCommit, S3, GitHub, and GitHub Enterprise and Bitbucket to pull source code for builds.
    • CodeBuild allows you to use Docker images stored in another AWS account as your build environment, by granting resource level permissions.
    • It now allows you to access Docker images from any private registry as the build environment. Previously, you could only use Docker images from public DockerHub or Amazon ECR in CodeBuild.
    • You can access your past build results through the console, CloudWatch, or the API. The results include outcome (success or failure), build duration, output artifact location, and log location.
    • You can automate your release process by using AWS CodePipeline to test your code and run your builds with CodeBuild.
  • Steps in a Build Process
    • CodeBuild will create a temporary compute container of the class defined in the build project
    • CodeBuild loads it with the specified runtime environment
    • CodeBuild downloads the source code
    • CodeBuild executes the commands configured in the project
    • CodeBuild uploads the generated artifact to an S3 bucket
    • Then it destroys the compute container
  • Build Duration is calculated in minutes, from the time you submit your build until your build is terminated, rounded up to the nearest minute.
  • You can save time when your project builds by using a cache. A build project can use one of two types of caching:
    • Amazon S3 – stores the cache in an Amazon S3 bucket that is available across multiple build hosts. This is a good option for small intermediate build artifacts that are more expensive to build than to download. Not the best option for large build artifacts because they can take a long time to transfer over your network, which can affect build performance.
    • Local – stores a cache locally on a build host that is available to that build host only. This is a good option for large intermediate build artifacts because the cache is immediately available on the build host. Build performance is not impacted by network transfer time.
    • If you use a local cache, you must choose one or more of three cache modes:
      • source cache
      • Docker layer cache
      • custom cache.

Monitoring and Security

    • You can specify a key stored in the AWS Key Management Service to encrypt your artifacts.
    • CodeBuild provides security and separation at the infrastructure and execution levels.
    • You can use Amazon CloudWatch to watch your builds, report when something is wrong, and take automatic actions when appropriate.
    • You can monitor your builds at two levels:
      • At the project level: These metrics are for all builds in the specified project only.
      • At the AWS account level: These metrics are for all builds in one account
    • ProjectName is the only AWS CodeBuild metrics dimension. If it is specified, then the metrics are for that project. If it is not specified, then the metrics are for the current AWS account.

Pricing

    • You are charged for compute resources based on the duration it takes for your build to execute. The per-minute rate depends on the compute type you use.

AWS Billing and Cost Management


  • Cost Explorer tracks and analyzes your AWS usage. It is free for all accounts.
  • Use Budgets to manage budgets for your account.
  • Use Bills to see details about your current charges.
  • Use Payment History to see your past payment transactions.
  • AWS Billing and Cost Management closes the billing period at midnight on the last day of each month and then calculates your bill.
  • At the end of a billing cycle or at the time you choose to incur a one-time fee, AWS charges the credit card you have on file and issues your invoice as a downloadable PDF file.
  • With CloudWatch, you can create billing alerts that notify you when your usage of your services exceeds thresholds that you define.
  • Use cost allocation tags to track your AWS costs on a detailed level. AWS provides two types of cost allocation tags, an AWS generated tags and user-defined tags.

AWS Free Tier

  • When you create an AWS account, you’re automatically signed up for the free tier for 12 months.
  • You can use a number of AWS services for free, as long as you haven’t surpassed the allocated usage limit.
  • To help you stay within the limits, you can track your free tier usage and set a billing alarm with AWS Budgets to notify you if you start incurring charges.

AWS Cost and Usage Reports

  • The AWS Cost and Usage report provides information about your use of AWS resources and estimated costs for that usage.
  • The AWS Cost and Usage report is a .csv file or a collection of .csv files that is stored in an S3 bucket. Anyone who has permissions to access the specified S3 bucket can see your billing report files.
  • You can use the Cost and Usage report to track your Reserved Instance Utilization, charges, and allocations.
  • For time granularity, you can choose one of the following:
    • Hourly if you want your items in the report to be aggregated by the hour.
    • Daily if you want your items in the report to be aggregated by the day.
    • Monthly if you want your items in the report to be aggregated by month.
  • Report can be automatically uploaded into AWS Redshift and/or AWS QuickSight for analysis.

AWS Cost Explorer

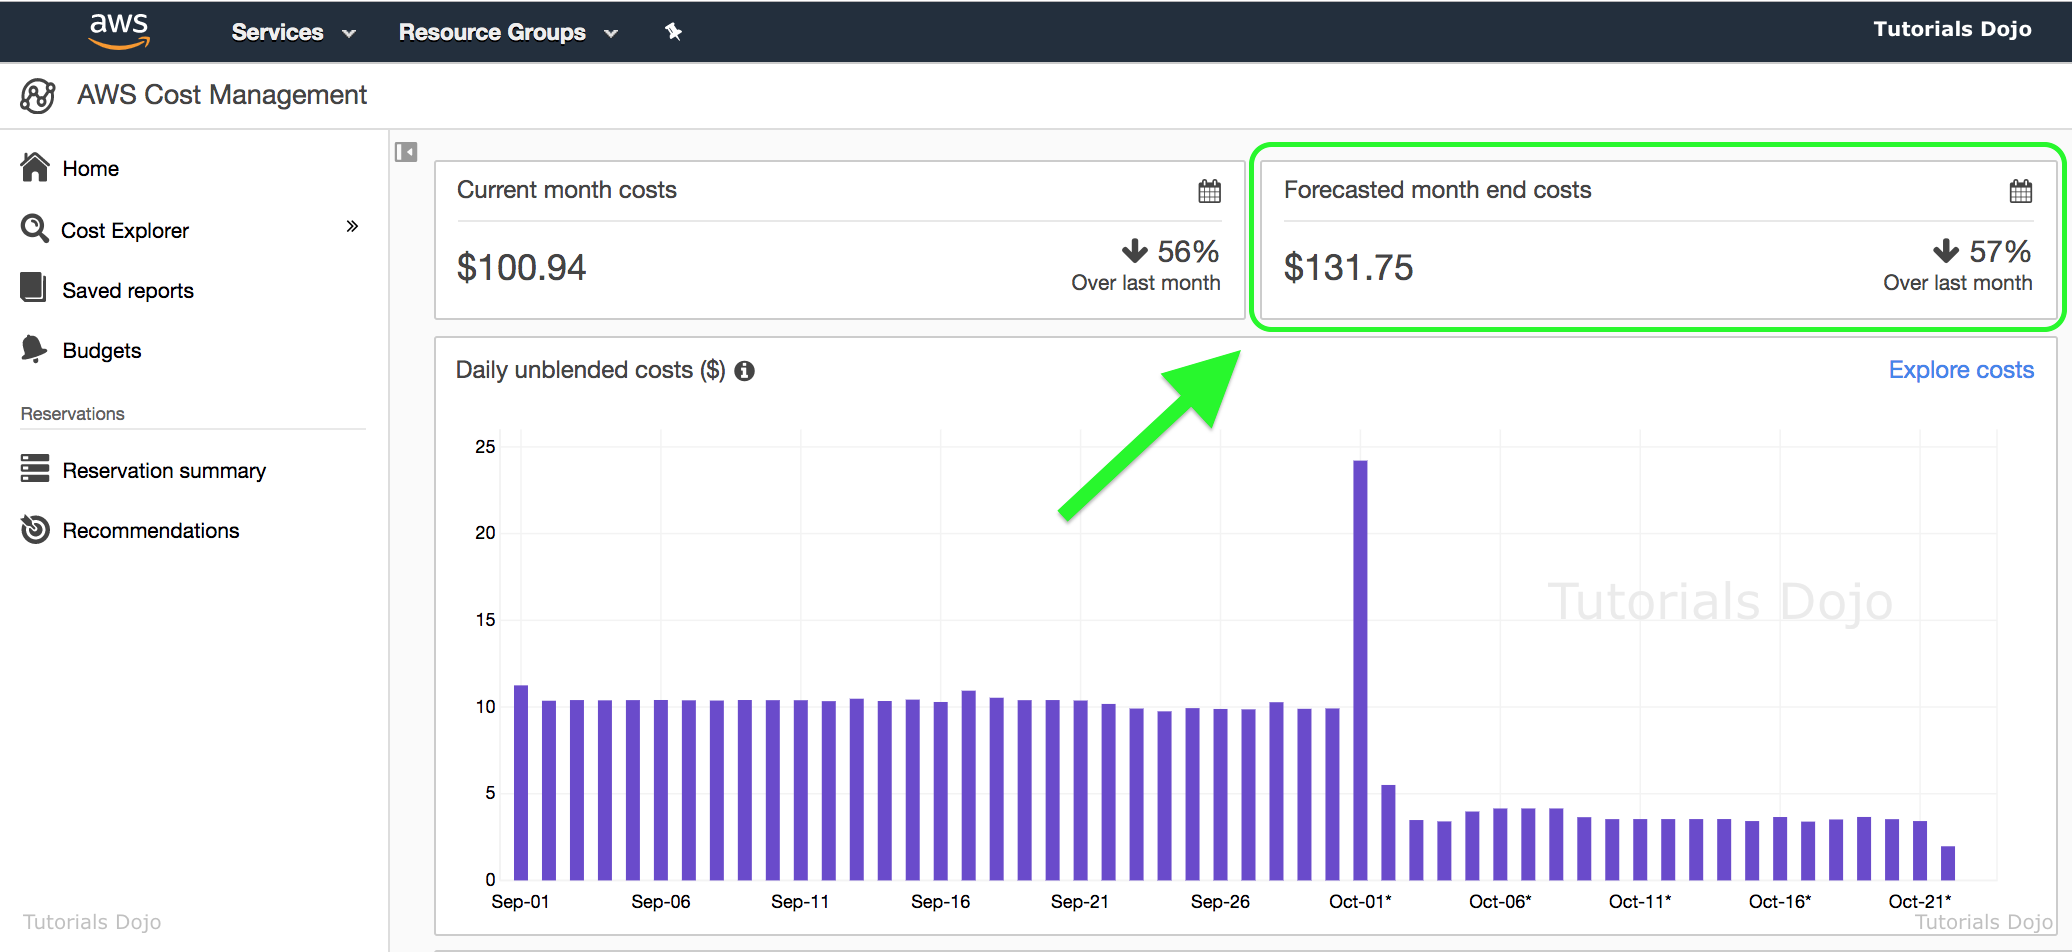
  • Cost Explorer includes a default report that helps you visualize the costs and usage associated with your TOP FIVE cost-accruing AWS services, and gives you a detailed breakdown on all services in the table view.
  • You can view data for up to the last 12 months, forecast how much you’re likely to spend for the next three months, and get recommendations on what Reserved Instances to purchase.
  • Cost Explorer must be enabled before it can be used. You can enable it only if you’re the owner of the AWS account and you signed in to the account with your root credentials.

Cost Explorer

  • If you’re the owner of a management account in an organization, enabling Cost Explorer enables Cost Explorer for all of the organization accounts. You can’t grant or deny access individually.
  • You can create forecasts that predict your AWS usage and define a time range for the forecast.
  • Other default reports available are:
    • The EC2 Monthly Cost and Usage report lets you view all of your AWS costs over the past two months, as well as your current month-to-date costs.
    • The Monthly Costs by Linked Account report lets you view the distribution of costs across your organization.
    • The Monthly Running Costs report gives you an overview of all of your running costs over the past three months, and provides forecasted numbers for the coming month with a corresponding confidence interval.

AWS Budgets

  • Set custom budgets that alert you when your costs or usage exceed or are forecasted to exceed your budgeted amount.
  • With Budgets, you can view the following information:
    • How close your plan is to your budgeted amount or to the free tier limits
    • Your usage to date, including how much you have used of your Reserved Instances and purchased Savings Plans.
    • Your current estimated charges from AWS and how much your predicted usage will incur in charges by the end of the month
    • How much of your budget has been used

  • Budget information is updated up to three times a day.
  • Types of Budgets:
    • Cost budgets – Plan how much you want to spend on a service.
    • Usage budgets – Plan how much you want to use one or more services.
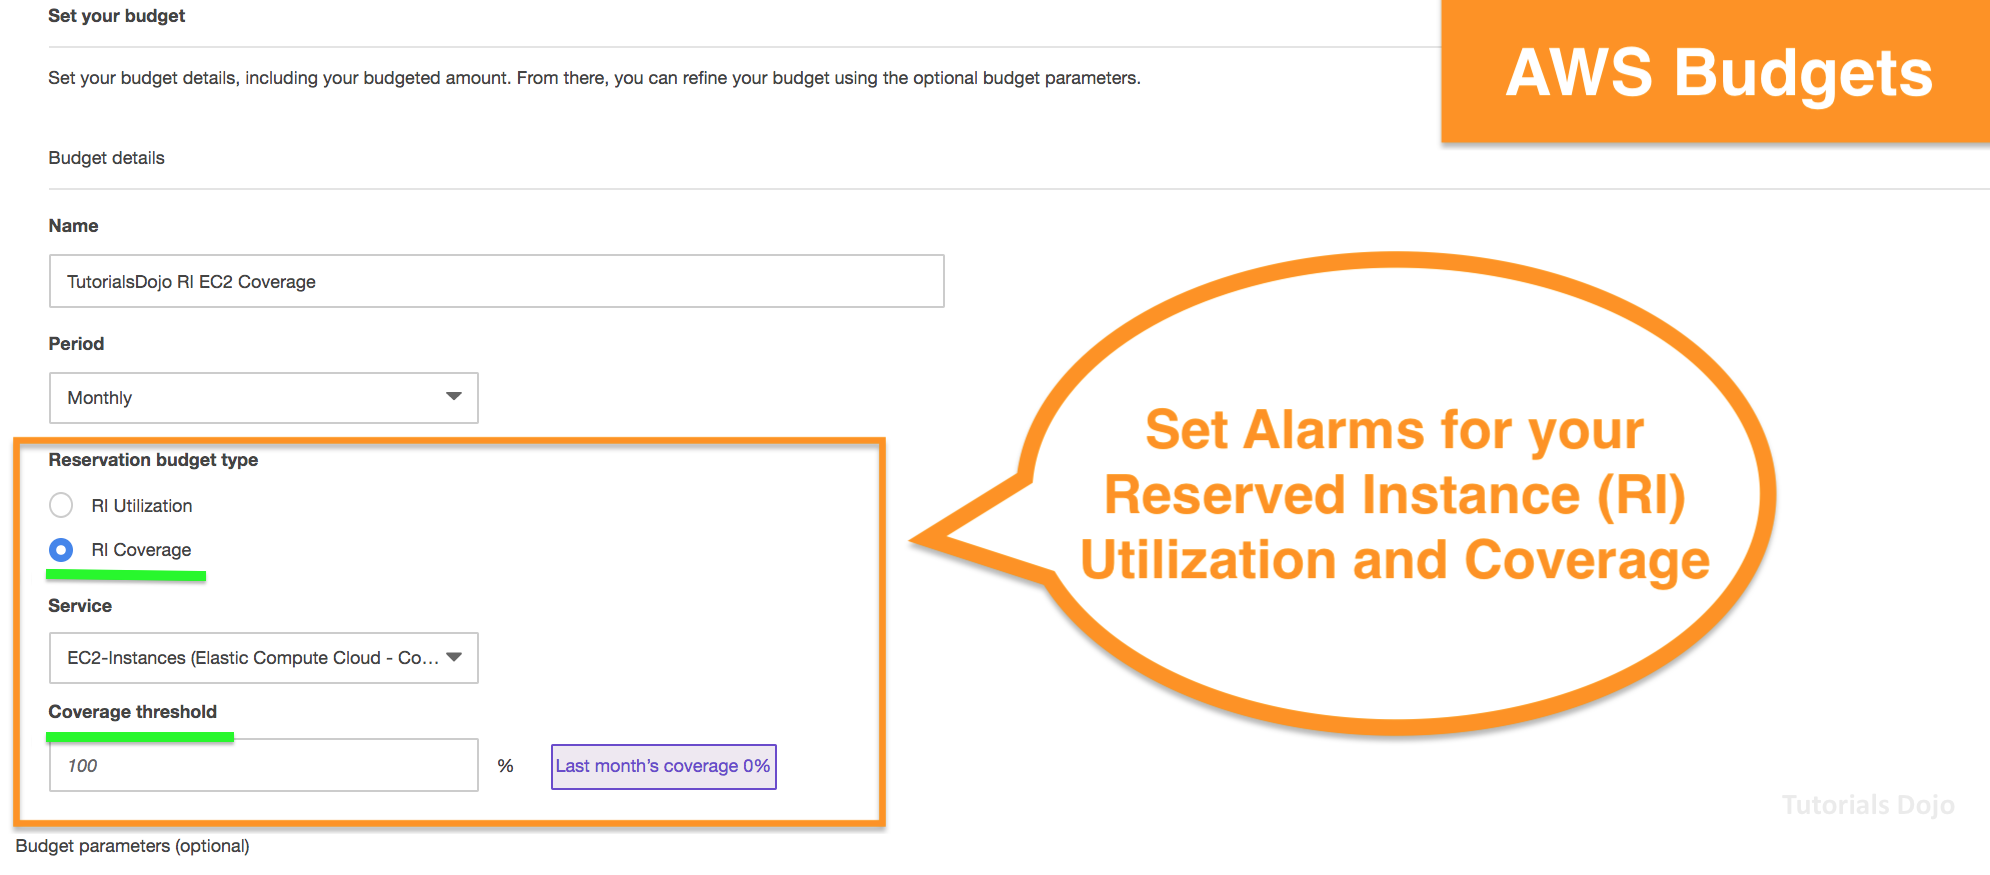
    • RI utilization budgets – Define a utilization threshold and receive alerts when your RI usage falls below that threshold.
    • RI coverage budgets – Define a coverage threshold and receive alerts when the number of your instance hours that are covered by RIs fall below that threshold.
  • Budgets can be tracked at the daily, monthly, quarterly, or yearly level, and you can customize the start and end dates.
  • Budget alerts can be sent via email and/or Amazon SNS topic.
  • First two budgets created are free of charge.