Monday, 22 February 2021

Linux Admin - Backup and Recovery

 Before exploring methods particular to CentOS for deploying a standard backup plan, let's first discuss typical considerations for a standard level backup policy. The first thing we want to get accustomed to is the 3-2-1 backup rule.

3-2-1 Backup Strategy

Throughout the industry, you'll often hear the term 3-2-1 backup model. This is a very good approach to live by when implementing a backup plan. 3-2-1 is defined as follows: 3 copies of data; for example, we may have the working copy; a copy put onto the CentOS server designed for redundancy using rsync; and rotated, offsite USB backups are made from data on the backup server. 2 different backup mediums. We would actually have three different backup mediums in this case: the working copy on an SSD of a laptop or workstation, the CentOS server data on a RADI6 Array, and the offsite backups put on USB drives. 1 copy of data offsite; we are rotating the USB drives offsite on a nightly basis. Another modern approach may be a cloud backup provider.

System Recovery

bare metal restore plan is simply a plan laid out by a CentOS administrator to get vital systems online with all data intact. Assuming 100% systems failure and loss of all past system hardware, an administrator must have a plan to achieve uptime with intact user-data costing minimal downtime. The monolithic kernel used in Linux actually makes bare metal restores using system images much easier than Windows. Where Windows uses a micro-kernel architecture.

A full data restore and bare metal recovery are usually accomplished through a combination of methods including working, configured production disk-images of key operational servers, redundant backups of user data abiding by the 3-2-1 rule. Even some sensitive files that may be stored in a secure, fireproof safe with limited access to the trusted company personnel.

A multiphase bare metal restore and data recovery plan using native CentOS tools may consist of −

  • dd to make and restore production disk-images of configured servers

  • rsync to make incremental backups of all user data

  • tar & gzip to store encrypted backups of files with passwords and notes from administrators. Commonly, this can be put on a USB drive, encrypted and locked in a safe that a Senior Manager access. Also, this ensures someone else will know vital security credentials if the current administrator wins the lottery and disappears to a sunny island somewhere.

If a system crashes due to a hardware failure or disaster, following will be the different phases of restoring operations −

  • Build a working server with a configured bare metal image

  • Restore data to the working server from backups

  • Have physical access to credentials needed to perform the first two operations

Use rsync for File Level Backups

rsync is a great utility for syncing directories of files either locally or to another server. rsync has been used for years by System Administrators, hence it is very refined for the purpose of backing up data. In the author's opinion, one of the best features of sync is its ability to be scripted from the command line.

In this tutorial, we will discuss rsync in various ways −

  • Explore and talk about some common options
  • Create local backups
  • Create remote backups over SSH
  • Restore local backups

rsync is named for its purpose: Remote Sync and is both powerful and flexible in use.

Following is a basic rsync remote backup over ssh −

MiNi:~ rdc$ rsync -aAvz --progress ./Desktop/ImportantStuff/ 
rdc@192.168.1.143:home/rdc/ Documents/RemoteStuff/
rdc@192.168.1.143's password:
sending incremental file list
   6,148 100%    0.00kB/s    0:00:00 (xfr#1, to-chk=23/25)
2017-02-14 16_26_47-002 - Veeam_Architecture001.png
   33,144 100%   31.61MB/s    0:00:00 (xfr#2, to-chk=22/25)
A Guide to the WordPress REST API | Toptal.pdf
   892,406 100%   25.03MB/s    0:00:00 (xfr#3, to-chk=21/25)
Rick Cardon Technologies, LLC..webloc
   77 100%    2.21kB/s    0:00:00 (xfr#4, to-chk=20/25)
backbox-4.5.1-i386.iso
   43,188,224   1%    4.26MB/s    0:08:29
sent 2,318,683,608 bytes  received 446 bytes  7,302,941.90 bytes/sec
total size is 2,327,091,863  speedup is 1.00
MiNi:~ rdc$

The following sync sent nearly 2.3GB of data across our LAN. The beauty of rsync is it works incrementally at the block level on a file-by-file basis. This means, if we change just two characters in a 1MB text file, only one or two blocks will be transferred across the lan on the next sync!

Furthermore, the incremental function can be disabled in favor of more network bandwidth used for less CPU utilization. This might prove advisable if constantly copying several 10MB database files every 10 minutes on a 1Gb dedicated Backup-Lan. The reasoning is: these will always be changing and will be transmitting incrementally every 10 minutes and may tax load of the remote CPU. Since the total transfer load will not exceed 5 minutes, we may just wish to sync the database files in their entirety.

Following are the most common switches with rsync −

rsync syntax:
rsync [options] [local path] [[remote host:remote path] or [target path

SwitchAction
-aArchive mode and assumes -r, -p, -t, -g, -l
-dSync only directory tree, no files
-rRecursive into directory
-lCopy symlinks as symlinks
-pPreserve permissions
-gPreserve group
-vVerbose output
-zCompress over network link
-XPreserve extended attributes
-APreserve ACLs
-tPreserve timestamps
-WTransfer whole file, not incremental blocks
-uDo not overwrite files on target
--progressShow transfer progress
--deleteDelete older files on target
--max-size = XXXMax file size to sync

When to use rsync

My personal preference for rsync is when backing up files from a source host to a target host. For example, all the home directories for data recovery or even offsite and into the cloud for disaster recovery.

Local Backup With rsync

We have already seen how to transfer files from one host to another. The same method can be used to sync directories and files locally.

Let's make a manual incremental backup of /etc/ in our root user's directory.

First, we need to create a directory off ~/root for the synced backup −

[root@localhost rdc]# mkdir /root/etc_baks

Then, assure there is enough free disk-space.

[root@localhost rdc]# du -h --summarize /etc/ 
49M    /etc/
 
[root@localhost rdc]# df -h 
Filesystem           Size     Used     Avail    Use%     Mounted on 
/dev/mapper/cl-root   43G      15G        28G    35%         /

We are good for syncing our entire /etc/ directory −

rsync -aAvr /etc/ /root/etc_baks/

Our synced /etc/ directory −

[root@localhost etc_baks]# ls -l ./
total 1436
drwxr-xr-x.   3 root root      101 Feb  1 19:40 abrt
-rw-r--r--.   1 root root       16 Feb  1 19:51 adjtime
-rw-r--r--.   1 root root     1518 Jun  7  2013 aliases
-rw-r--r--.   1 root root    12288 Feb 27 19:06 aliases.db
drwxr-xr-x.   2 root root       51 Feb  1 19:41 alsa
drwxr-xr-x.   2 root root     4096 Feb 27 17:11 alternatives
-rw-------.   1 root root      541 Mar 31  2016 anacrontab
-rw-r--r--.   1 root root       55 Nov  4 12:29 asound.conf
-rw-r--r--.   1 root root        1 Nov  5 14:16 at.deny
drwxr-xr-x.   2 root root       32 Feb  1 19:40 at-spi2
--{ condensed output }--

Now let's do an incremental rsync −

[root@localhost etc_baks]# rsync -aAvr --progress  /etc/ /root/etc_baks/
sending incremental file list

test_incremental.txt 
   0 100%    0.00kB/s    0:00:00 (xfer#1, to-check=1145/1282)
   
sent 204620 bytes  received 2321 bytes  413882.00 bytes/sec
total size is 80245040  speedup is 387.77

[root@localhost etc_baks]#

Only our test_incremental.txt file was copied.

Remote Differential Backups With rsync

Let's do our initial rsync full backup onto a server with a backup plan deployed. This example is actually backing up a folder on a Mac OS X Workstation to a CentOS server. Another great aspect of rsync is that it can be used on any platform rsync has been ported to.

MiNi:~ rdc$ rsync -aAvz Desktop/ImportanStuff/
rdc@192.168.1.143:Documents/RemoteStuff
rdc@192.168.1.143's password:
sending incremental file list
./
A Guide to the WordPress REST API | Toptal.pdf
Rick Cardon Tech LLC.webloc
VeeamDiagram.png
backbox-4.5.1-i386.iso
dhcp_admin_script_update.py
DDWRT/
DDWRT/.DS_Store
DDWRT/ddwrt-linksys-wrt1200acv2-webflash.bin
DDWRT/ddwrt_mod_notes.docx
DDWRT/factory-to-ddwrt.bin
open_ldap_config_notes/
open_ldap_config_notes/ldap_directory_a.png
open_ldap_config_notes/open_ldap_notes.txt
perl_scripts/
perl_scripts/mysnmp.pl
php_scripts/
php_scripts/chunked.php
php_scripts/gettingURL.php
sent 2,318,281,023 bytes  received 336 bytes  9,720,257.27 bytes/sec
total size is 2,326,636,892  speedup is 1.00
MiNi:~ rdc$

We have now backed up a folder from a workstation onto a server running a RAID6 volume with rotated disaster recovery media stored offsite. Using rsync has given us standard 3-2-1 backup with only one server having an expensive redundant disk array and rotated differential backups.

Now let's do another backup of the same folder using rsync after a single new file named test_file.txt has been added.

MiNi:~ rdc$ rsync -aAvz Desktop/ImportanStuff/
rdc@192.168.1.143:Documents/RemoteStuff 
rdc@192.168.1.143's password:  
sending incremental file list 
 ./ 
test_file.txt

sent 814 bytes  received 61 bytes  134.62 bytes/sec
total size is 2,326,636,910  speedup is 2,659,013.61
MiNi:~ rdc$

As you can see, only the new file was delivered to the server via rsync. The differential comparison was made on a file-by-file basis.

A few things to note are: This only copies the new file: test_file.txt, since it was the only file with changes. rsync uses ssh. We did not ever need to use our root account on either machine.

Simple, powerful and effective, rsync is great for backing up entire folders and directory structures. However, rsync by itself doesn't automate the process. This is where we need to dig into our toolbox and find the best, small, and simple tool for the job.

To automate rsync backups with cronjobs, it is essential that SSH users be set up using SSH keys for authentication. This combined with cronjobs enables rsync to be done automatically at timed intervals.

Use DD for Block-by-Block Bare Metal Recovery Images

DD is a Linux utility that has been around since the dawn of the Linux kernel meeting the GNU Utilities.

dd in simplest terms copies an image of a selected disk area. Then provides the ability to copy selected blocks of a physical disk. So unless you have backups, once dd writes over a disk, all blocks are replaced. Loss of previous data exceeds the recovery capabilities for even highly priced professional-level data-recovery.

The entire process for making a bootable system image with dd is as follows −

  • Boot from the CentOS server with a bootable linux distribution
  • Find the designation of the bootable disk to be imaged
  • Decide location where the recovery image will be stored
  • Find the block size used on your disk
  • Start the dd image operation

In this tutorial, for the sake of time and simplicity, we will be creating an ISO image of the master-boot record from a CentOS virtual machine. We will then store this image offsite. In case our MBR becomes corrupted and needs to be restored, the same process can be applied to an entire bootable disk or partition. However, the time and disk space needed really goes a little overboard for this tutorial.

It is encouraged for CentOS admins to become proficient in restoring a fully bootable disk/partition in a test environment and perform a bare metal restore. This will take a lot of pressure off when eventually one needs to complete the practice in a real life situation with Managers and a few dozen end-users counting downtime. In such a case, 10 minutes of figuring things out can seem like an eternity and make one sweat.

Note − When using dd make sure to NOT confuse source and target volumes. You can destroy data and bootable servers by copying your backup location to a boot drive. Or possibly worse destroy data forever by copying over data at a very low level with DD.

Following are the common command line switches and parameters for dd −

SwitchAction
if=In file or source to be copied
of=Out file or the copy of the in file
bsSet both input and output block size
obsSet output file block size
ibsSet input file block size
countSet the number of blocks to copy
convExtra options to add for imaging
NoerrorDo not stop processing an error
syncPads unfitted input blocks in the event of error or misalignment

Note on block size − The default block size for dd is 512 bytes. This was the standard block size of lower density hard disk drives. Today's higher density HDDs have increased to 4096 byte (4kB) block sizes to allow for disks ranging from 1TB and larger. Thus, we will want to check disk block size before using dd with newer, higher capacity hard disks.

For this tutorial, instead of working on a production server with dd, we will be using a CentOS installation running in VMWare. We will also configure VMWare to boot a bootable Linux ISO image instead of working with a bootable USB Stick.

First, we will need to download the CentOS image entitled: CentOS Gnome ISO. This is almost 3GB and it is advised to always keep a copy for creating bootable USB thumb-drives and booting into virtual server installations for trouble-shooting and bare metal images.

Other bootable Linux distros will work just as well. Linux Mint can be used for bootable ISOs as it has great hardware support and polished GUI disk tools for maintenance.

CentOS GNOME Live bootable image can be downloaded from: http://buildlogs.centos.org/rolling/7/isos/x86_64/CentOS-7-x86_64-LiveGNOME.iso

Let's configure our VMWare Workstation installation to boot from our Linux bootable image. The steps are for VMWare on OS X. However, they are similar across VMWare Workstation on Linux, Windows, and even Virtual Box.

Note − Using a virtual desktop solution like Virtual Box or VMWare Workstation is a great way to set up lab scenarios for learning CentOS Administration tasks. It provides the ability to install several CentOS installations, practically no hardware configuration letting the person focus on administration, and even save the server state before making changes.

First let's configure a virtual cd-rom and attach our ISO image to boot instead of the virtual CentOS server installation −

ISO image

Now, set the startup disk −

Startup Disk

Now when booted, our virtual machine will boot from the CentOS bootable ISO image and allow access to files on the Virtual CentOS server that was previously configured.

Let’s check our disks to see where we want to copy the MBR from (condensed output is as follows).

MiNt ~ # fdisk -l
Disk /dev/sda: 60 GiB, 21474836480 bytes, 41943040 sectors
Units: sectors of 1 * 512 = 512 bytes
Sector size (logical/physical): 512 bytes / 512 bytes
I/O size (minimum/optimal): 512 bytes / 512 bytes

Disk /dev/sdb: 20 GiB, 21474836480 bytes, 41943040 sectors
Units: sectors of 1 * 512 = 512 bytes
Sector size (logical/physical): 512 bytes / 512 bytes
I/O size (minimum/optimal): 512 bytes / 512 bytes

We have located both our physical disks: sda and sdb. Each has a block size of 512 bytes. So, we will now run the dd command to copy the first 512 bytes for our MBR on SDA1.

The best way to do this is −

[root@mint rdc]# dd if=/dev/sda bs=512 count=1  | gzip -c >
/mnt/sdb/images/mbr.iso.gz 
1+0 records in 
1+0 records out 
512 bytes copied, 0.000171388 s, 3.0 MB/s

[root@mint rdc]# ls /mnt/sdb/ 
   mbr-iso.gz
   
[root@mint rdc]#

Just like that, we have full image of out master boot record. If we have enough room to image the boot drive, we could just as easily make a full system boot image −

dd if=/dev/INPUT/DEVICE-NAME-HERE conv=sync,noerror bs=4K | gzip -c >
/mnt/sdb/boot-server-centos-image.iso.gz

The conv=sync is used when bytes must be aligned for a physical medium. In this case, dd may get an error if exact 4K alignments are not read (say... a file that is only 3K but needs to take minimum of a single 4K block on disk. Or, there is simply an error reading and the file cannot be read by dd.). Thus, dd with conv=sync,noerror will pad the 3K with trivial, but useful data to physical medium in 4K block alignments. While not presenting an error that may end a large operation.

When working with data from disks we always want to include: conv=sync,noerror parameter.

This is simply because the disks are not streams like TCP data. They are made up of blocks aligned to a certain size. For example, if we have 512 byte blocks, a file of only 300 bytes still needs a full 512 bytes of disk-space (possibly 2 blocks for inode information like permissions and other filesystem information).

Use gzip and tar for Secure Storage

gzip and tar are two utilities a CentOS administrator must become accustomed to using. They are used for a lot more than to simply decompress archives.

Using Gnu Tar in CentOS Linux

Tar is an archiving utility similar to winrar on Windows. Its name Tape Archive abbreviated as tar pretty much sums up the utility. tar will take files and place them into an archive for logical convenience. Hence, instead of the dozens of files stored in /etc. we could just "tar" them up into an archive for backup and storage convenience.

tar has been the standard for storing archived files on Unix and Linux for many years. Hence, using tar along with gzip or bzip is considered as a best practice for archives on each system.

Following is a list of common command line switches and options used with tar −

SwitchAction
-cCreates a new .tar archive
-CExtracts to a different directory
-jUses bzip2 compression
-zUses gzip compression
-vVerbose show archiving progress
-tLists archive contents
-fFile name of the archive
-xExtracts tar archive

Following is the basic syntax for creating a tar archive.

tar -cvf [tar archive name]

Note on Compression mechanisms with tar − It is advised to stick with one of two common compression schemes when using tar: gzip and bzip2. gzip files consume less CPU resources but are usually larger in size. While bzip2 will take longer to compress, they utilize more CPU resources; but will result in a smaller end filesize.

When using file compression, we will always want to use standard file extensions letting everyone including ourselves know (versus guess by trial and error) what compression scheme is needed to extract archives.

bzip2.tbz
bzip2.tar.tbz
bzip2.tb2
gzip.tar.gz
gzip.tgz

When needing to possibly extract archives on a Windows box or for use on Windows, it is advised to use the .tar.tbz or .tar.gz as most the three character single extensions will confuse Windows and Windows only Administrators (however, that is sometimes the desired outcome)

Let's create a gzipped tar archive from our remote backups copied from the Mac Workstation −

[rdc@mint Documents]$ tar -cvz -f RemoteStuff.tgz ./RemoteStuff/ 
./RemoteStuff/
./RemoteStuff/.DS_Store
./RemoteStuff/DDWRT/
./RemoteStuff/DDWRT/.DS_Store
./RemoteStuff/DDWRT/ddwrt-linksys-wrt1200acv2-webflash.bin
./RemoteStuff/DDWRT/ddwrt_mod_notes.docx
./RemoteStuff/DDWRT/factory-to-ddwrt.bin
./RemoteStuff/open_ldap_config_notes/
./RemoteStuff/open_ldap_config_notes/ldap_directory_a.png
./RemoteStuff/open_ldap_config_notes/open_ldap_notes.txt
./RemoteStuff/perl_scripts/
./RemoteStuff/perl_scripts/mysnmp.pl
./RemoteStuff/php_scripts/
./RemoteStuff/php_scripts/chunked.php
./RemoteStuff/php_scripts/gettingURL.php
./RemoteStuff/A Guide to the WordPress REST API | Toptal.pdf
./RemoteStuff/Rick Cardon Tech LLC.webloc
./RemoteStuff/VeeamDiagram.png
./RemoteStuff/backbox-4.5.1-i386.iso
./RemoteStuff/dhcp_admin_script_update.py
./RemoteStuff/test_file.txt
[rdc@mint Documents]$ ls -ld RemoteStuff.tgz
-rw-rw-r--. 1 rdc rdc 2317140451 Mar 12 06:10 RemoteStuff.tgz

Note − Instead of adding all the files directly to the archive, we archived the entire folder RemoteStuff. This is the easiest method. Simply because when extracted, the entire directory RemoteStuff is extracted with all the files inside the current working directory as ./currentWorkingDirectory/RemoteStuff/

Now let's extract the archive inside the /root/ home directory.

[root@centos ~]# tar -zxvf RemoteStuff.tgz
./RemoteStuff/
./RemoteStuff/.DS_Store
./RemoteStuff/DDWRT/
./RemoteStuff/DDWRT/.DS_Store
./RemoteStuff/DDWRT/ddwrt-linksys-wrt1200acv2-webflash.bin
./RemoteStuff/DDWRT/ddwrt_mod_notes.docx
./RemoteStuff/DDWRT/factory-to-ddwrt.bin
./RemoteStuff/open_ldap_config_notes/
./RemoteStuff/open_ldap_config_notes/ldap_directory_a.png
./RemoteStuff/open_ldap_config_notes/open_ldap_notes.txt
./RemoteStuff/perl_scripts/
./RemoteStuff/perl_scripts/mysnmp.pl
./RemoteStuff/php_scripts/
./RemoteStuff/php_scripts/chunked.php
./RemoteStuff/php_scripts/gettingURL.php
./RemoteStuff/A Guide to the WordPress REST API | Toptal.pdf
./RemoteStuff/Rick Cardon Tech LLC.webloc
./RemoteStuff/VeeamDiagram.png
./RemoteStuff/backbox-4.5.1-i386.iso
./RemoteStuff/dhcp_admin_script_update.py
./RemoteStuff/test_file.txt
[root@mint ~]# ping www.google.com

As seen above, all the files were simply extracted into the containing directory within our current working directory.

[root@centos ~]# ls -l 
total 2262872 
-rw-------.   1   root   root       1752   Feb   1   19:52   anaconda-ks.cfg 
drwxr-xr-x. 137   root   root       8192   Mar   9   04:42   etc_baks 
-rw-r--r--.   1   root   root       1800   Feb   2   03:14   initial-setup-ks.cfg 
drwxr-xr-x.   6   rdc    rdc        4096   Mar  10   22:20   RemoteStuff 
-rw-r--r--.   1   root   root 2317140451   Mar  12   07:12   RemoteStuff.tgz 
-rw-r--r--.   1   root   root       9446   Feb  25   05:09   ssl.conf [root@centos ~]#

Use gzip to Compress File Backups

As noted earlier, we can use either bzip2 or gzip from tar with the -j or -z command line switches. We can also use gzip to compress individual files. However, using bzip or gzip alone does not offer as many features as when combined with tar.

When using gzip, the default action is to remove the original files, replacing each with a compressed version adding the .gz extension.

Some common command line switches for gzip are −

SwitchAction
-cKeeps files after placing into the archive
-lGet statistics for the compressed archive
-rRecursively compresses files in the directories
-1 thru 9Specifies the compression level on a scale of 1 thru 9

gzip more or less works on a file-by-file basis and not on an archive basis like some Windows O/S zip utilities. The main reason for this is that tar already provides advanced archiving features. gzip is designed to provide only a compression mechanism.

Hence, when thinking of gzip, think of a single file. When thinking of multiple files, think of tar archives. Let's now explore this with our previous tar archive.

Note − Seasoned Linux professionals will often refer to a tarred archive as a tarball.

Let's make another tar archive from our rsync backup.

[root@centos Documents]# tar -cvf RemoteStuff.tar ./RemoteStuff/
[root@centos Documents]# ls
RemoteStuff.tar RemoteStuff/

For demonstration purposes, let's gzip the newly created tarball, and tell gzip to keep the old file. By default, without the -c option, gzip will replace the entire tar archive with a .gz file.

[root@centos Documents]# gzip -c RemoteStuff.tar > RemoteStuff.tar.gz
[root@centos Documents]# ls
RemoteStuff  RemoteStuff.tar  RemoteStuff.tar.gz
We now have our original directory, our tarred directory and finally our gziped tarball.

Let's try to test the -l switch with gzip.

[root@centos Documents]# gzip -l RemoteStuff.tar.gz  
     compressed        uncompressed        ratio uncompressed_name 
     2317140467          2326661120        0.4% RemoteStuff.tar
     
[root@centos Documents]#

To demonstrate how gzip differs from Windows Zip Utilities, let's run gzip on a folder of text files.

[root@centos Documents]# ls text_files/
 file1.txt  file2.txt  file3.txt  file4.txt  file5.txt
[root@centos Documents]#

Now let's use the -r option to recursively compress all the text files in the directory.

[root@centos Documents]# gzip -9 -r text_files/

[root@centos Documents]# ls ./text_files/
file1.txt.gz  file2.txt.gz  file3.txt.gz  file4.txt.gz  file5.txt.gz
 
[root@centos Documents]#

See? Not what some may have anticipated. All the original text files were removed and each was compressed individually. Because of this behavior, it is best to think of gzip alone when needing to work in single files.

Working with tarballs, let's extract our rsynced tarball into a new directory.

[root@centos Documents]# tar -C /tmp -zxvf RemoteStuff.tar.gz
./RemoteStuff/
./RemoteStuff/.DS_Store
./RemoteStuff/DDWRT/
./RemoteStuff/DDWRT/.DS_Store
./RemoteStuff/DDWRT/ddwrt-linksys-wrt1200acv2-webflash.bin
./RemoteStuff/DDWRT/ddwrt_mod_notes.docx
./RemoteStuff/DDWRT/factory-to-ddwrt.bin
./RemoteStuff/open_ldap_config_notes/
./RemoteStuff/open_ldap_config_notes/ldap_directory_a.png
./RemoteStuff/open_ldap_config_notes/open_ldap_notes.txt
./RemoteStuff/perl_scripts/
./RemoteStuff/perl_scripts/mysnmp.pl
./RemoteStuff/php_scripts/
./RemoteStuff/php_scripts/chunked.php

As seen above, we extracted and decompressed our tarball into the /tmp directory.

[root@centos Documents]# ls /tmp 
hsperfdata_root
RemoteStuff

Encrypt TarBall Archives

Encrypting tarball archives for storing secure documents that may need to be accessed by other employees of the organization, in case of disaster recovery, can be a tricky concept. There are basically three ways to do this: either use GnuPG, or use openssl, or use a third part utility.

GnuPG is primarily designed for asymmetric encryption and has an identity-association in mind rather than a passphrase. True, it can be used with symmetrical encryption, but this is not the main strength of GnuPG. Thus, I would discount GnuPG for storing archives with physical security when more people than the original person may need access (like maybe a corporate manager who wants to protect against an Administrator holding all the keys to the kingdom as leverage).

Openssl like GnuPG can do what we want and ships with CentOS. But again, is not specifically designed to do what we want and encryption has been questioned in the security community.

Our choice is a utility called 7zip. 7zip is a compression utility like gzip but with many more features. Like Gnu Gzip, 7zip and its standards are in the open-source community. We just need to install 7zip from our EHEL Repository (the next chapter will cover installing the Extended Enterprise Repositories in detail).

Install 7zip on Centos

7zip is a simple install once our EHEL repositories have been loaded and configured in CentOS.

[root@centos Documents]# yum -y install p7zip.x86_64 p7zip-plugins.x86_64
Loaded plugins: fastestmirror, langpacks
base
| 3.6 kB  00:00:00
epel/x86_64/metalink
|  13 kB  00:00:00
epel
| 4.3 kB  00:00:00
extras
| 3.4 kB  00:00:00
updates
| 3.4 kB  00:00:00
(1/2): epel/x86_64/updateinfo
| 756 kB  00:00:04      
(2/2):
epel/x86_64/primary_db
| 4.6 MB  00:00:18
Loading mirror speeds from cached hostfile
--> Running transaction check
---> Package p7zip.x86_64 0:16.02-2.el7 will be installed
---> Package p7zip-plugins.x86_64 0:16.02-2.el7 will be installed
--> Finished Dependency Resolution
Dependencies Resolved

Simple as that, 7zip is installed and ready be used with 256-bit AES encryption for our tarball archives.

Now let's use 7z to encrypt our gzipped archive with a password. The syntax for doing so is pretty simple −

7z a -p <output filename><input filename>

Where, a: add to archive, and -p: encrypt and prompt for passphrase

[root@centos Documents]# 7z a -p RemoteStuff.tgz.7z RemoteStuff.tar.gz

7-Zip [64] 16.02 : Copyright (c) 1999-2016 Igor Pavlov : 2016-05-21
p7zip Version 16.02 (locale=en_US.UTF-8,Utf16=on,HugeFiles=on,64 bits,1 CPU Intel(R)
Core(TM) i5-4278U CPU @ 2.60GHz (40651),ASM,AES-NI)
Scanning the drive:
1 file, 2317140467 bytes (2210 MiB)

Creating archive: RemoteStuff.tgz.7z

Items to compress: 1

Enter password (will not be echoed):
Verify password (will not be echoed) :

Files read from disk: 1
Archive size: 2280453410 bytes (2175 MiB)
Everything is Ok
[root@centos Documents]# ls
RemoteStuff  RemoteStuff.tar  RemoteStuff.tar.gz  RemoteStuff.tgz.7z  slapD
text_files

[root@centos Documents]#

Now, we have our .7z archive that encrypts the gzipped tarball with 256-bit AES.

Note − 7zip uses AES 256-bit encryption with an SHA-256 hash of the password and counter, repeated up to 512K times for key derivation. This should be secure enough if a complex key is used.

The process of encrypting and recompressing the archive further can take some time with larger archives.

7zip is an advanced offering with more features than gzip or bzip2. However, it is not as standard with CentOS or amongst the Linux world. Thus, the other utilities should be used often as possible.

Linux Admin - Log Management

 Systemd has changed the way system logging is managed for CentOS Linux. Instead of every daemon on the system placing logs into individual locations than using tools such as tail or grep as the primary way of sorting and filtering log entries, journald has brought a single point of administration to analyzing system logs.

The main components behind systemd logging are: journal, jounralctl, and journald.conf

journald is the main logging daemon and is configured by editing journald.conf while journalctl is used to analyze events logged by journald.

Events logged by journald include − kernel events, user processes, and daemon services.

Set the Correct System Time Zone

Before using journalctl, we need to make sure our system time is set to the correct time. To do this, we want to use timedatectl.

Let's check the current system time.

[root@centos rdc]# timedatectl status 
Local time: Mon 2017-03-20 00:14:49 MDT 
Universal time: Mon 2017-03-20 06:14:49 UTC 
RTC time: Mon 2017-03-20 06:14:49 
Time zone: America/Denver (MDT, -0600) 
NTP enabled: yes 
NTP synchronized: yes 
RTC in local TZ: no 
DST active: yes 
Last DST change: DST began at 
              Sun 2017-03-12 01:59:59 MST 
              Sun 2017-03-12 03:00:00 MDT 
Next DST change: DST ends (the clock jumps one hour backwards) at 
              Sun 2017-11-05 01:59:59 MDT 
              Sun 2017-11-05 01:00:00 MST
              
[root@centos rdc]#

Currently, the system is correct to the local time zone. If your system is not, let's set the correct time zone. After changing the settings, CentOS will automatically calculate the time zone offset from the current time zone, adjusting the system clock right away.

Let's list all the time zones with timedatectl −

[root@centos rdc]# timedatectl list-timezones 
Africa/Abidjan
Africa/Accra
Africa/Addis_Ababa
Africa/Algiers
Africa/Asmara
Africa/Bamako
Africa/Bangui
Africa/Banjul
Africa/Bissau

That is the contended output from timedatectl list-timezones. To find a specific local time-zone, the grep command can be used −

[root@centos rdc]# timedatectl list-timezones | grep -i "america/New_York" 
America/New_York
[root@centos rdc]#

The label used by CentOS is usually Country/Region with an underscore instead of space (New_York versus "New York").

Now let's set our time zone −

[root@centos rdc]# timedatectl set-timezone "America/New_York"

[root@centos rdc]# date 
Mon Mar 20 02:28:44 EDT 2017

[root@centos rdc]#

Your system clock should automatically adjust the time.

Use journalctl to Analyze Logs

Common command line switches when using journalctl −

SwitchAction
-kLists only kernel messages
-uLists by specific unit (httpd, sshd, etc...)
-bBoots the label offset
-oLogs the output format
-pFilters by log type (either name or number)
-FFieldname or fieldnamevalue
--utcTime in UTC offset
--sinceFilter by timeframe

Examine Boot Logs

First, we will examine and configure the boot logs in CentOS Linux. The first thing you will notice is that CentOS, by default, doesn't store boot logging that is persistent across reboots.

To check boot logs per reboot instance, we can issue the following command −

[root@centos rdc]# journalctl --list-boots 
-4 bca6380a31a2463aa60ba551698455b5 Sun 2017-03-19 22:01:57 MDT—Sun 2017-03-19 22:11:02 MDT
-3 3aaa9b84f9504fa1a68db5b49c0c7208 Sun 2017-03-19 22:11:09 MDT—Sun 2017-03-19 22:15:03 MDT
-2 f80b231272bf48ffb1d2ce9f758c5a5f Sun 2017-03-19 22:15:11 MDT—Sun 2017-03-19 22:54:06 MDT
-1 a071c1eed09d4582a870c13be5984ed6 Sun 2017-03-19 22:54:26 MDT—Mon 2017-03-20 00:48:29 MDT
 0 9b4e6cdb43b14a328b1fa6448bb72a56 Mon 2017-03-20 00:48:38 MDT—Mon 2017-03-20 01:07:36 MDT

[root@centos rdc]#  

After rebooting the system, we can see another entry.

[root@centos rdc]# journalctl --list-boots 
-5 bca6380a31a2463aa60ba551698455b5 Sun 2017-03-19 22:01:57 MDT—Sun 2017-03-19 22:11:02 MDT
-4 3aaa9b84f9504fa1a68db5b49c0c7208 Sun 2017-03-19 22:11:09 MDT—Sun 2017-03-19 22:15:03 MDT
-3 f80b231272bf48ffb1d2ce9f758c5a5f Sun 2017-03-19 22:15:11 MDT—Sun 2017-03-19 22:54:06 MDT
-2 a071c1eed09d4582a870c13be5984ed6 Sun 2017-03-19 22:54:26 MDT—Mon 2017-03-20 00:48:29 MDT
-1 9b4e6cdb43b14a328b1fa6448bb72a56 Mon 2017-03-20 00:48:38 MDT—Mon 2017-03-20 01:09:57 MDT
 0 aa6aaf0f0f0d4fcf924e17849593d972 Mon 2017-03-20 01:10:07 MDT—Mon 2017-03-20 01:12:44 MDT
 
[root@centos rdc]#

Now, let's examine the last boot logging instance −

root@centos rdc]# journalctl -b -5 
-- Logs begin at Sun 2017-03-19 22:01:57 MDT, end at Mon 2017-03-20 01:20:27 MDT. --
Mar 19 22:01:57 localhost.localdomain systemd-journal[97]: Runtime journal is using 8.0M 
(max allowed 108.4M
Mar 19 22:01:57 localhost.localdomain kernel: Initializing cgroup subsys cpuset
Mar 19 22:01:57 localhost.localdomain kernel: Initializing cgroup subsys cpu
Mar 19 22:01:57 localhost.localdomain kernel: Initializing cgroup subsys cpuacct
Mar 19 22:01:57 localhost.localdomain kernel: Linux version 3.10.0514.6.2.el7.x86_64 
(builder@kbuilder.dev.
Mar 19 22:01:57 localhost.localdomain kernel: Command line: 
BOOT_IMAGE=/vmlinuz-3.10.0-514.6.2.el7.x86_64 ro
Mar 19 22:01:57 localhost.localdomain kernel: Disabled fast string operations
Mar 19 22:01:57 localhost.localdomain kernel: e820: BIOS-provided physical RAM map:

Above is the condensed output from our last boot. We could also refer back to a boot log from hours, days, weeks, months, and even years. However, by default CentOS doesn't store persistent boot logs. To enable persistently storing boot logs, we need to make a few configuration changes −

  • Make central storage points for boot logs
  • Give proper permissions to a new log folder
  • Configure journald.conf for persistent logging

Configure Boot Location for Persistent Boot Logs

The initial place journald will want to store persistent boot logs is /var/log/journal. Since this doesn't exist by default, let's create it −

[root@centos rdc]# mkdir /var/log/journal

Now, let's give the directory proper permissions journald daemon access −

systemd-tmpfiles --create --prefix /var/log/journal

Finally, let's tell journald it should store persistent boot logs. In vim or your favorite text editor, open /etc/systemd/jounrald.conf".

# See journald.conf(5) for details.  
[Journal]=Storage=peristent

The line we are concerned with is, Storage=. First remove the comment #, then change to Storage = persistent as depicted above. Save and reboot your CentOS system and take care that there should be multiple entries when running journalctl list-boots.

Note − A constantly changing machine-id like that from a VPS provider can cause journald to fail at storing persistent boot logs. There are many workarounds for such a scenario. It is best to peruse the current fixes posted to CentOS Admin forums, than follow the trusted advice from those who have found plausible VPS workarounds.

To examine a specific boot log, we simply need to get each offset using journald --list-boots the offset with the -b switch. So to check the second boot log we'd use −

journalctl -b -2

The default for -b with no boot log offset specified will always be the current boot log after the last reboot.

Analyze Logs by Log Type

Events from journald are numbered and categorized into 7 separate types −

0 - emerg   :: System is unusable 
1 - alert   :: Action must be taken immediatly    
2 - crit    :: Action is advised to be taken immediatly 
3 - err     :: Error effecting functionality of application 
4 - warning :: Usually means a common issue that can affect security or usilbity 
5 - info    :: logged informtation for common operations 
6 - debug   :: usually disabled by default to troubleshoot functionality

Hence, if we want to see all warnings the following command can be issued via journalctl −

[root@centos rdc]# journalctl -p 4
-- Logs begin at Sun 2017-03-19 22:01:57 MDT, end at Wed 2017-03-22 22:33:42 MDT. --
Mar 19 22:01:57 localhost.localdomain kernel: ACPI: RSDP 00000000000f6a10 00024
(v02 PTLTD )
Mar 19 22:01:57 localhost.localdomain kernel: ACPI: XSDT 0000000095eea65b 0005C
(v01 INTEL  440BX    06040000 VMW  01
Mar 19 22:01:57 localhost.localdomain kernel: ACPI: FACP 0000000095efee73 000F4
(v04 INTEL  440BX    06040000 PTL  00
Mar 19 22:01:57 localhost.localdomain kernel: ACPI: DSDT 0000000095eec749 1272A
(v01 PTLTD  Custom   06040000 MSFT 03
Mar 19 22:01:57 localhost.localdomain kernel: ACPI: FACS 0000000095efffc0 00040
Mar 19 22:01:57 localhost.localdomain kernel: ACPI: BOOT 0000000095eec721 00028
(v01 PTLTD  $SBFTBL$ 06040000  LTP 00
Mar 19 22:01:57 localhost.localdomain kernel: ACPI: APIC 0000000095eeb8bd 00742
(v01 PTLTD  ? APIC   06040000  LTP 00 
Mar 19 22:01:57 localhost.localdomain kernel: ACPI: MCFG 0000000095eeb881 0003C
(v01 PTLTD  $PCITBL$ 06040000  LTP 00 
Mar 19 22:01:57 localhost.localdomain kernel: ACPI: SRAT 0000000095eea757 008A8
(v02 VMWARE MEMPLUG  06040000 VMW  00 
Mar 19 22:01:57 localhost.localdomain kernel: ACPI: HPET 0000000095eea71f 00038
(v01 VMWARE VMW HPET 06040000 VMW  00 
Mar 19 22:01:57 localhost.localdomain kernel: ACPI: WAET 0000000095eea6f7 00028
(v01 VMWARE VMW WAET 06040000 VMW  00 
Mar 19 22:01:57 localhost.localdomain kernel: Zone ranges: 
Mar 19 22:01:57 localhost.localdomain kernel:   DMA      [mem 0x000010000x00ffffff] 
Mar 19 22:01:57 localhost.localdomain kernel:   DMA32    [mem 0x010000000xffffffff] 
Mar 19 22:01:57 localhost.localdomain kernel:   Normal   empty 
Mar 19 22:01:57 localhost.localdomain kernel: Movable zone start for each node 
Mar 19 22:01:57 localhost.localdomain kernel: Early memory node ranges 
Mar 19 22:01:57 localhost.localdomain kernel:   node   0: [mem 0x000010000x0009dfff] 
Mar 19 22:01:57 localhost.localdomain kernel:   node   0: [mem 0x001000000x95edffff] 
Mar 19 22:01:57 localhost.localdomain kernel:   node   0: [mem 0x95f000000x95ffffff] 
Mar 19 22:01:57 localhost.localdomain kernel: Built 1 zonelists in Node order,
mobility grouping on.  Total pages: 60 
Mar 19 22:01:57 localhost.localdomain kernel: Policy zone: DMA32 
Mar 19 22:01:57 localhost.localdomain kernel: ENERGY_PERF_BIAS: Set to
'normal', was 'performance'

The above shows all warnings for the past 4 days on the system.

The new way of viewing and perusing logs with systemd does take little practice and research to become familiar with. However, with different output formats and particular notice to making all packaged daemon logs universal, it is worth embracing. journald offers great flexibility and efficiency over traditional log analysis methods.

Linux Admin - Traffic Monitoring in CentOS

 There are several third party tools that can add enhanced capabilities for CentOS traffic monitoring. In this tutorial, we will focus on those that are packaged in the main CentOS distribution repositories and the Fedora EPEL repository.

There will always be situations where an Administrator (for one reason or another) is left with only tools in the main CentOS repositories. Most utilities discussed are designed to be used by an Administrator with the shell of physical access. When traffic monitoring with an accessible web-gui, using third party utilities such as ntop-ng or Nagios is the best choice (versus re-creating such facilities from scratch).

For further research on both configurable web-gui solutions, following are a few links to get started on research.

Traffic Monitoring for LAN / WAN Scenarios

Nagios

Nagios has been around for a long time, therefore, it is both tried and tested. At one point it was all free and open-source, but has since advanced into an Enterprise solution with paid licensing models to support the need of Enterprise sophistication. Hence, before planning any rollouts with Nagios, make sure the open-source licensed versions will meet your needs or plan on spending with an Enterprise Budget in mind.

Most open-source Nagios traffic monitoring software can be found at − https://www.nagios.org

For a summarized history of Nagious, here is the official Nagios History page − https://www.nagios.org/about/history/

ntopng

Another great tool allowing bandwidth and traffic monitoring via a web-gui is called ntopngntopng is similar to the Unix utility ntop, and can collect data for an entire LAN or WAN. Providing a web-gui for administration, configuration, and charting makes it easy to use for the entire IT Departments.

Like Nagious, ntopng has both open-source and paid enterprise versions available. For more information about ntopng, please visit the website: http://www.ntop.org/

Install Fedora EPEL Repository ─ Extra Packages for Enterprise Linux

To access some of the needed tools for traffic monitoring, we will need to configure our CentOS system to use the EPEL Repository.

The EPEL Repository is not officially maintained or supported by CentOS. However, it is maintained by a group of Fedora Core volunteers to address the packages commonly used by Enterprise Linux professionals not included in either CentOS, Fedora Core, or Red Hat Linux Enterprise.

Caution

Remember, the EPEL Repository is not official for CentOS and may break compatibility and functionality on production servers with common dependencies. With that in mind, it is advised to always test on a non-production server running the same services as production before deploying on a system critical box.

Really, the biggest advantage of using the EHEL Repository over any other third party repository with CentOS is that we can be sure the binaries are not tainted. It is considered a best practice to not use the repositories from an untrusted source.

With all that said, the official EPEL Repository is so common with CentOS that it can be easily installed via YUM.

[root@CentOS rdc]# yum -y install epel-release
 Loaded plugins: fastestmirror, langpacks
 Loading mirror speeds from cached hostfile
 * base: repo1.dal.innoscale.net
 * extras: repo1.dal.innoscale.net
 * updates: mirror.hmc.edu
Resolving Dependencies
   --> Running transaction check
   ---> Package epel-release.noarch 0:7-9 will be installed
   --> Finished Dependency Resolution
Dependencies Resolved
--{ condensed output }--

After installing the EPEL Repository, we will want to update it.

[root@CentOS rdc]# yum repolist 
Loaded plugins: fastestmirror, langpacks 
epel/x86_64/metalink
|  11 kB  00:00:00      
epel
| 4.3 kB  00:00:00      
(1/3): epel/x86_64/group_gz
| 170 kB  00:00:00      
(2/3): epel/x86_64/updateinfo
| 753 kB  00:00:01      
(3/3): epel/x86_64/primary_db
--{ condensed output }--

At this point, our EPEL repository should be configured and ready to use. Let's start by installing nload for interface bandwidth monitoring.

The tools we will focus on in this tutorial are −

  • nload
  • ntop
  • ifstst
  • iftop
  • vnstat
  • net hogs
  • Wireshark
  • TCP Dump
  • Traceroute

These are all standard for monitoring traffic in Linux Enterprises. The usage of each range from simple to advanced, so we will only briefly discuss tools such as Wireshark and TCP Dump.

Install and Use nload

With our EPEL Repositories installed and configured in CentOS, we now should be able to install and use nload. This utility is designed to chart bandwidth per interface in real-time.

Like most other basic installs nload is installed via the YUM package manager.

[root@CentOS rdc]# yum -y install nload
Resolving Dependencies
--> Running transaction check
---> Package nload.x86_64 0:0.7.4-4.el7 will be installed
--> Finished Dependency Resolution
Dependencies Resolved
=============================================================================== 
=============================================================================== 
 Package                             Arch
 Version                           Repository                          Size 
=============================================================================== 
=============================================================================== 
Installing: 
 nload                               x86_64
 0.7.4-4.el7                        epel                                70 k  
Transaction Summary
=============================================================================== 
=============================================================================== 
Install  1 Package
Total download size: 70 k
Installed size: 176 k
Downloading packages:
--{ condensed output }--

Now we have nload installed, and using it is pretty straight forward.

[root@CentOS rdc]# nload enp0s5

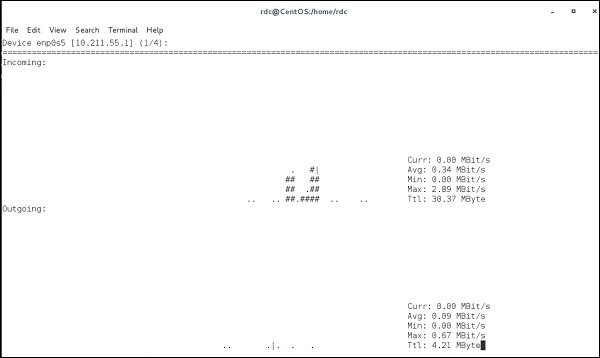
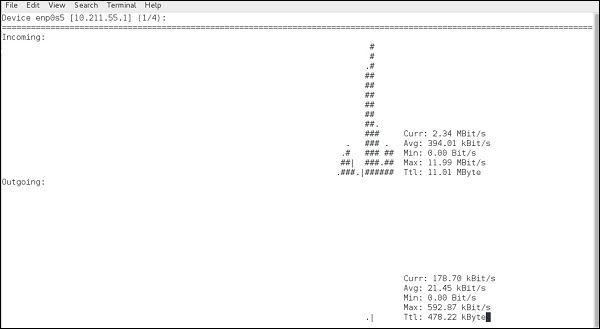
nload will monitor the specified interface. In this case, enp0s5 an Ethernet interface, in real-time from the terminal for network traffic loads and total bandwidth usage.

NLoad

As seen, nload will chart both incoming and outgoing data from the specified interface, along with providing a physical representation of the data flow with hash marks "#".

The depicted screenshot is of a simple webpage being loaded with some background daemon traffic.

Common command line switches for nload are −

CommandAction
-aTime period
-tTime update interval in milliseconds, the default is 500
-uSets display of traffic measurement h
-USets total in/out traffic measurement units same options as -u

The standard syntax for nload is −

nload [options] <interface>

If no interface is specified, nload will automatically grab the first Ethernet interface. Let's try measuring the total data in/out in Megabytes and current data-transfer speeds in Megabits.

[root@CentOS rdc]# nload -U M -u m

Speeds in Megabits

Data coming in/out the current interface is measured in megabits per second and each "Ttl" row, representing total data in/out is displayed in Megabytes.

nload is useful for an administrator to see how much data has passed through an interface and how much data is currently coming in/out a specified interface.

To see other interfaces without closing nload, simply use the left/right arrow keys. This will cycle through all available interfaces on the system.

It is possible to monitor multiple interfaces simultaneously using the -m switch −

[root@CentOS rdc]# nload -u K -U M -m lo -m enp0s5

load monitoring two interfaces simultaneously (lo and enp0s5) −

Load

Linux Admin - Remote Management

 When talking about remote management in CentOS as an Administrator, we will explore two methods −

  • Console Management
  • GUI Management

Remote Console Management

Remote Console Management means performing administration tasks from the command line via a service such as ssh. To use CentOS Linux effectively, as an Administrator, you will need to be proficient with the command line. Linux at its heart was designed to be used from the console. Even today, some system administrators prefer the power of the command and save money on the hardware by running bare-bones Linux boxes with no physical terminal and no GUI installed.

Remote GUI Management

Remote GUI Management is usually accomplished in two ways: either a remote X-Session or a GUI application layer protocol like VNC. Each has its strengths and drawbacks. However, for the most part, VNC is the best choice for Administration. It allows graphical control from other operating systems such as Windows or OS X that do not natively support the X Windows protocol.

Using remote X Sessions is native to both X-Window's Window-Managers and DesktopManagers running on X. However, the entire X Session architecture is mostly used with Linux. Not every System Administrator will have a Linux Laptop on hand to establish a remote X Session. Therefore, it is most common to use an adapted version of VNC Server.

The biggest drawbacks to VNC are: VNC does not natively support a multi-user environment such as remote X-Sessions. Hence, for GUI access to end-users remote XSessions would be the best choice. However, we are mainly concerned with administering a CentOS server remotely.

We will discuss configuring VNC for multiple administrators versus a few hundred endusers with remote X-Sessions.

Laying the Foundation for Security with SSH for Remote Console Access

ssh or Secure Shell is now the standard for remotely administering any Linux server. SSH unlike telnet uses TLS for authenticity and end-to-end encryption of communications. When properly configured an administrator can be pretty sure both their password and the server are trusted remotely.

Before configuring SSH, lets talk a little about the basic security and least common access. When SSH is running on its default port of 22; sooner rather than later, you are going to get brute force dictionary attacks against common user names and passwords. This just comes with the territory. No matter how many hosts you add to your deny files, they will just come in from different IP addresses daily.

With a few common rules, you can simply take some pro-active steps and let the bad guys waste their time. Following are a few rules of security to follow using SSH for remote administration on a production server −

  • Never use a common username or password. Usernames on the system should not be system default, or associated with the company email address like: systemadmin@yourcompany.com

  • Root access or administration access should not be allowed via SSH. Use a unique username and su to root or an administration account once authenticated through SSH.

  • Password policy is a must: Complex SSH user passwords like: "This&IS&a&GUD&P@ssW0rd&24&me". Change passwords every few months to eliminate susceptibility to incremental brute force attacks.

  • Disable abandoned or accounts that are unused for extended periods. If a hiring manager has a voicemail stating they will not be doing interviews for a month; that can lead to tech-savvy individuals with a lot time on their hands, for example.

  • Watch your logs daily. As a System Administrator, dedicate at least 30-40 minutes every morning reviewing system and security logs. If asked, let everyone know you don't have the time to not be proactive. This practice will help isolate warning signs before a problem presents itself to end-users and company profits.

Note On Linux Security − Anyone interested in Linux Administration should actively pursue current Cyber-Security news and technology. While we mostly hear about other operating systems being compromised, an insecure Linux box is a sought-after treasure for cybercriminals. With the power of Linux on a high-speed internet connection, a skilled cybercriminal can use Linux to leverage attacks on other operating systems.

Install and Configure SSH for Remote Access

Step 1 − Install SSH Server and all dependent packages.

[root@localhost]# yum -y install openssh-server 
'Loaded plugins: fastestmirror, langpacks 
Loading mirror speeds from cached hostfile 
* base: repos.centos.net 
* extras: repos.dfw.centos.com 
* updates: centos.centos.com 
Resolving Dependencies 
   --> Running transaction check 
   ---> Package openssh-server.x86_64 0:6.6.1p1-33.el7_3 will be installed 
   --> Finished Dependency Resolution 
Dependencies Resolved

Step 2 − Make a secure regular use to add for shell access.

[root@localhost ~]# useradd choozer 
[root@localhost ~]# usermod -c "Remote Access" -d /home/choozer -g users -G 
wheel -a choozer

Note − We added the new user to the wheel group enabling ability to su into root once SSH access has been authenticated. We also used a username that cannot be found in common word lists. This way, our account will not get locked out when SSH is attacked.

The file holding configuration settings for sshd server is /etc/ssh/sshd_config.

The portions we want to edit initially are −

LoginGraceTime 60m
PermitRootLogin no

Step 3 − Reload the SSH daemon sshd.

[root@localhost]# systemctl reload sshd

It is good to set the logout grace period to 60 minutes. Some complex administration tasks can exceed the default of 2 minutes. There is really nothing more frustrating than having SSH session timeout when configuring or researching changes.

Step 4 − Let's try to login using the root credentials.

bash-3.2# ssh centos.vmnet.local 
root@centos.vmnet.local's password:   
Permission denied (publickey,gssapi-keyex,gssapi-with-mic,password).

Step 5 − We can no longer login remotely via ssh with root credentials. So let's login to our unprivileged user account and su into the root account.

bash-3.2# ssh chooser@centos.vmnet.local
choozer@centos.vmnet.local's password:
[choozer@localhost ~]$ su root
Password:

[root@localhost choozer]#

Step 6 − Finally, let's make sure the SSHD service loads on boot and firewalld allows outside SSH connections.

[root@localhost]# systemctl enable sshd

[root@localhost]# firewall-cmd --permanent --add-service=ssh 
success

[root@localhost]# firewall-cmd --reload 
success
 
[root@localhost]#
 

SSH is now set up and ready for remote administration. Depending on your enterprise border, the packet filtering border device may need to be configured to allow SSH remote administration outside the corporate LAN.

Configure VNC for Remote CentOS Administration

There are a few ways to enable remote CentOS administration via VNC on CentOS 6 - 7. The easiest, but most limiting way is simply using a package called vinoVino is a Virtual Network Desktop Connection application for Linux designed around the Gnome Desktop platform. Hence, it is assumed the installation was completed with Gnome Desktop. If the Gnome Desktop has not been installed, please do so before continuing. Vino will be installed with a Gnome GUI install by default.

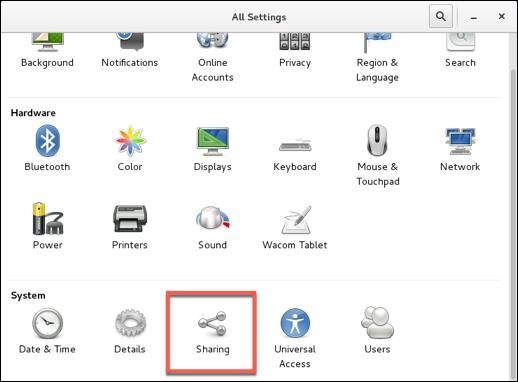
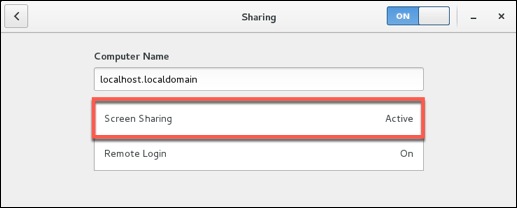
To configure screen sharing with Vino under Gnome, we want to go into the CentOS System Preferences for screen sharing.

Applications->System Tools->Settings->Sharing

Sharing

Screen Sharing

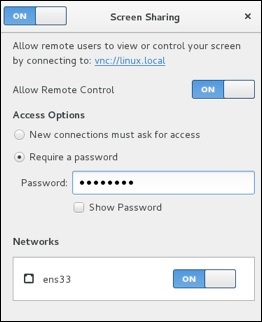
Screen Sharing Authentication

Notes to configuring VNC Desktop Sharing −

  • Disable New Connections must ask for access − This option will require physical access to ok every connection. This option will prevent remote administration unless someone is at the physical desktop.

  • Enable Require a password − This is separate from the user password. It will control the access to the virtual desktop and still require the user password to access a locked desktop (this is good for security).

  • Forward UP&P Ports: If available leave disabled − Forwarding UP&P ports will send Universal Plug and Play requests for a layer 3 device to allow VNC connections to the host automatically. We do not want this.

Make sure vino is listening on the VNC Port 5900.

[root@localhost]# netstat -antup | grep vino 
tcp        0        0 0.0.0.0:5900        0.0.0.0:*        LISTEN        4873/vino-server
tcp6       0        0 :::5900                :::*          LISTEN        4873/vino-server
   
[root@localhost]#

Let's now configure our Firewall to allow incoming VNC connections.

[root@localhost]# firewall-cmd --permanent --add-port=5900/tcp 
success

[root@localhost]# firewall-cmd --reload 
success

[root@localhost rdc]#

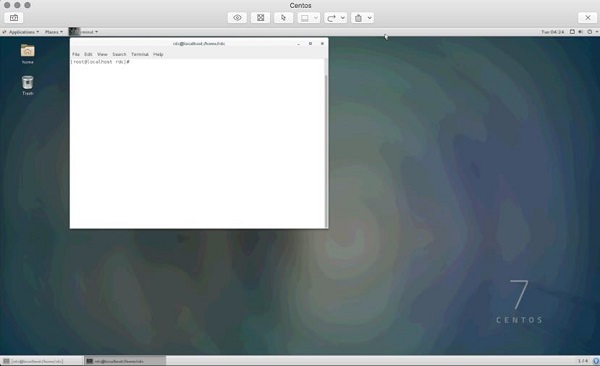
Finally, as you can see we are able to connect our CentOS Box and administer it with a VNC client on either Windows or OS X.

VNC client

It is just as important to obey the same rules for VNC as we set forth for SSH. Just like SSH, VNC is continually scanned across IP ranges and tested for weak passwords. It is also worth a note that leaving the default CentOS login enabled with a console timeout does help with remote VNC security. As an attacker will need the VNC and user password, make sure your screen sharing password is different and just as hard to guess as the user password.

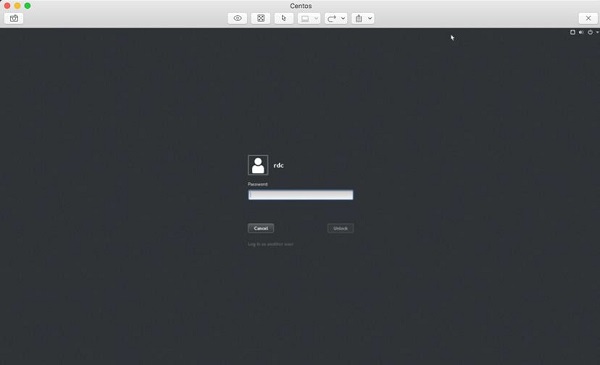
After entering the the VNC screen sharing password, we must also enter the user password to access a locked desktop.

VNC Screen Sharing Password

Security Note − By default, VNC is not an encrypted protocol. Hence, the VNC connection should be tunneled through SSH for encryption.

Set Up SSH Tunnel Through VNC

Setting up an SSH Tunnel will provide a layer of SSH encryption to tunnel the VNC connection through. Another great feature is it uses SSH compression to add another layer of compression to the VNC GUI screen updates. More secure and faster is always a good thing when dealing with the administration of CentOS servers!

So from your client that will be initiating the VNC connection, let's set up a remote SSH tunnel. In this demonstration, we are using OS X. First we need to sudo -s to root.

bash-3.2# sudo -s 
password:

Enter the user password and we should now have root shell with a # prompt −

bash-3.2#

Now, let's create our SSH Tunnel.

ssh -f rdc@192.168.1.143 -L 2200:192.168.1.143:5900 -N

Let's break this command down −

  • ssh − Runs the local ssh utility

  • -f − ssh should run in the background after the task fully executes

  • rdc@192.168.1.143 − Remote ssh user on the CentOS server hosting VNC services

  • -L 2200:192.168.1.143:5900 − Create our tunnel [Local Port]:[remote host]:[remote port of VNC service]

  • -N tells ssh we do not wish to execute a command on the remote system

bash-3.2# ssh -f rdc@192.168.1.143 -L 2200:192.168.1.143:5900 -N
rdc@192.168.1.143's password:

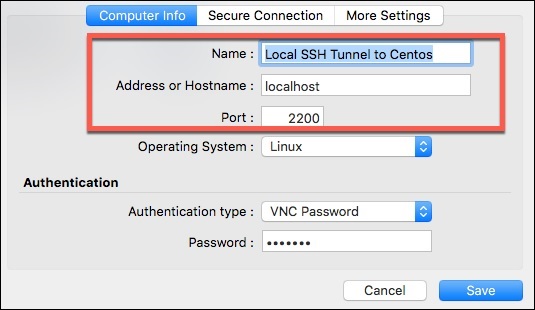
After successfully entering the remote ssh user's password, our ssh tunnel is created. Now for the cool part! To connect we point our VNC client at the localhost on the port of our tunnel, in this case port 2200. Following is the configuration on Mac Laptop's VNC Client −

SSH Tunnel

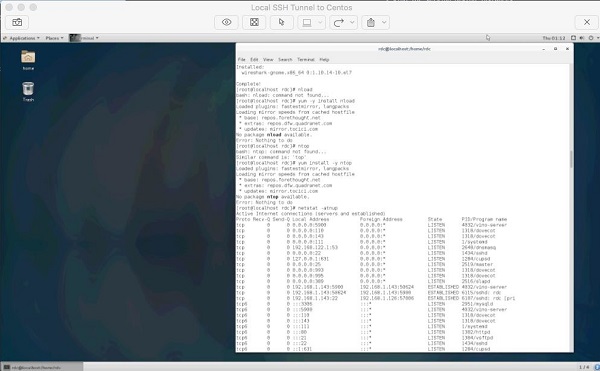
And finally, our remote VNC Desktop Connection!

VNC Desktop Connection

The cool thing about SSH tunneling is it can be used for almost any protocol. SSH tunnels are commonly used to bypass egress and ingress port filtering by an ISP, as well as trick application layer IDS/IPS while evading other session layer monitoring.

  • Your ISP may filter port 5900 for non-business accounts but allow SSH on port 22 (or one could run SSH on any port if port 22 is filtered).

  • Application level IPS and IDS look at payload. For example, a common buffer overflow or SQL Injection. End-to-end SSH encryption will encrypt application layer data.

SSH Tunneling is great tool in a Linux Administrator's toolbox for getting things done. However, as an Administrator we want to explore locking down the availability of lesser privileged users having access to SSH tunneling.

Administration Security Note − Restricting SSH Tunneling is something that requires thought on the part of an Administrator. Assessing why users need SSH Tunneling in the first place; what users need tunneling; along with practical risk probability and worst-case impact.

This is an advanced topic stretching outside the realm of an intermediate level primer. Research on this topic is advised for those who wish to reach the upper echelons of CentOS Linux Administration.

Use SSH Tunnel for Remote X-Windows

The design of X-Windows in Linux is really neat compared to that of Windows. If we want to control a remote Linux box from another Linux boxm we can take advantage of mechanisms built into X.

X-Windows (often called just "X"), provides the mechanism to display application windows originating from one Linux box to the display portion of X on another Linux box. So through SSH we can request an X-Windows application be forwarded to the display of another Linux box across the world!

To run an X Application remotely via an ssh tunnel, we just need to run a single command −

[root@localhost]# ssh -X rdc@192.168.1.105

The syntax is − ssh -X [user]@[host], and the host must be running ssh with a valid user.

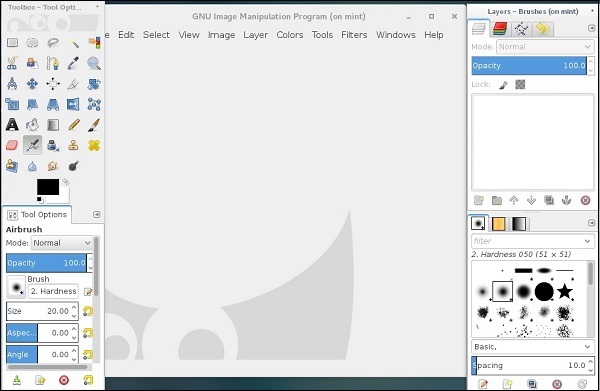
Following is a screenshot of GIMP running on a Ubuntu Workstation through a remote XWindows ssh tunnel.

Use SSH Tunnel for Remote X-Windows

It is pretty simple to run applications remotely from another Linux server or workstation. It is also possible to start an entire X-Session and have the entire desktop environment remotely through a few methods.

  • XDMCP

  • Headless software packages such as NX

  • Configuring alternate displays and desktops in X and desktop managers such as Gnome or KDE

This method is most commonly used for headless servers with no physical display and really exceeds the scope of an intermediate level primer. However, it is good to know of the options available.