Monday, 22 February 2021

Linux Admin - Traffic Monitoring in CentOS

 There are several third party tools that can add enhanced capabilities for CentOS traffic monitoring. In this tutorial, we will focus on those that are packaged in the main CentOS distribution repositories and the Fedora EPEL repository.

There will always be situations where an Administrator (for one reason or another) is left with only tools in the main CentOS repositories. Most utilities discussed are designed to be used by an Administrator with the shell of physical access. When traffic monitoring with an accessible web-gui, using third party utilities such as ntop-ng or Nagios is the best choice (versus re-creating such facilities from scratch).

For further research on both configurable web-gui solutions, following are a few links to get started on research.

Traffic Monitoring for LAN / WAN Scenarios

Nagios

Nagios has been around for a long time, therefore, it is both tried and tested. At one point it was all free and open-source, but has since advanced into an Enterprise solution with paid licensing models to support the need of Enterprise sophistication. Hence, before planning any rollouts with Nagios, make sure the open-source licensed versions will meet your needs or plan on spending with an Enterprise Budget in mind.

Most open-source Nagios traffic monitoring software can be found at − https://www.nagios.org

For a summarized history of Nagious, here is the official Nagios History page − https://www.nagios.org/about/history/

ntopng

Another great tool allowing bandwidth and traffic monitoring via a web-gui is called ntopngntopng is similar to the Unix utility ntop, and can collect data for an entire LAN or WAN. Providing a web-gui for administration, configuration, and charting makes it easy to use for the entire IT Departments.

Like Nagious, ntopng has both open-source and paid enterprise versions available. For more information about ntopng, please visit the website: http://www.ntop.org/

Install Fedora EPEL Repository ─ Extra Packages for Enterprise Linux

To access some of the needed tools for traffic monitoring, we will need to configure our CentOS system to use the EPEL Repository.

The EPEL Repository is not officially maintained or supported by CentOS. However, it is maintained by a group of Fedora Core volunteers to address the packages commonly used by Enterprise Linux professionals not included in either CentOS, Fedora Core, or Red Hat Linux Enterprise.

Caution

Remember, the EPEL Repository is not official for CentOS and may break compatibility and functionality on production servers with common dependencies. With that in mind, it is advised to always test on a non-production server running the same services as production before deploying on a system critical box.

Really, the biggest advantage of using the EHEL Repository over any other third party repository with CentOS is that we can be sure the binaries are not tainted. It is considered a best practice to not use the repositories from an untrusted source.

With all that said, the official EPEL Repository is so common with CentOS that it can be easily installed via YUM.

[root@CentOS rdc]# yum -y install epel-release
 Loaded plugins: fastestmirror, langpacks
 Loading mirror speeds from cached hostfile
 * base: repo1.dal.innoscale.net
 * extras: repo1.dal.innoscale.net
 * updates: mirror.hmc.edu
Resolving Dependencies
   --> Running transaction check
   ---> Package epel-release.noarch 0:7-9 will be installed
   --> Finished Dependency Resolution
Dependencies Resolved
--{ condensed output }--

After installing the EPEL Repository, we will want to update it.

[root@CentOS rdc]# yum repolist 
Loaded plugins: fastestmirror, langpacks 
epel/x86_64/metalink
|  11 kB  00:00:00      
epel
| 4.3 kB  00:00:00      
(1/3): epel/x86_64/group_gz
| 170 kB  00:00:00      
(2/3): epel/x86_64/updateinfo
| 753 kB  00:00:01      
(3/3): epel/x86_64/primary_db
--{ condensed output }--

At this point, our EPEL repository should be configured and ready to use. Let's start by installing nload for interface bandwidth monitoring.

The tools we will focus on in this tutorial are −

  • nload
  • ntop
  • ifstst
  • iftop
  • vnstat
  • net hogs
  • Wireshark
  • TCP Dump
  • Traceroute

These are all standard for monitoring traffic in Linux Enterprises. The usage of each range from simple to advanced, so we will only briefly discuss tools such as Wireshark and TCP Dump.

Install and Use nload

With our EPEL Repositories installed and configured in CentOS, we now should be able to install and use nload. This utility is designed to chart bandwidth per interface in real-time.

Like most other basic installs nload is installed via the YUM package manager.

[root@CentOS rdc]# yum -y install nload
Resolving Dependencies
--> Running transaction check
---> Package nload.x86_64 0:0.7.4-4.el7 will be installed
--> Finished Dependency Resolution
Dependencies Resolved
=============================================================================== 
=============================================================================== 
 Package                             Arch
 Version                           Repository                          Size 
=============================================================================== 
=============================================================================== 
Installing: 
 nload                               x86_64
 0.7.4-4.el7                        epel                                70 k  
Transaction Summary
=============================================================================== 
=============================================================================== 
Install  1 Package
Total download size: 70 k
Installed size: 176 k
Downloading packages:
--{ condensed output }--

Now we have nload installed, and using it is pretty straight forward.

[root@CentOS rdc]# nload enp0s5

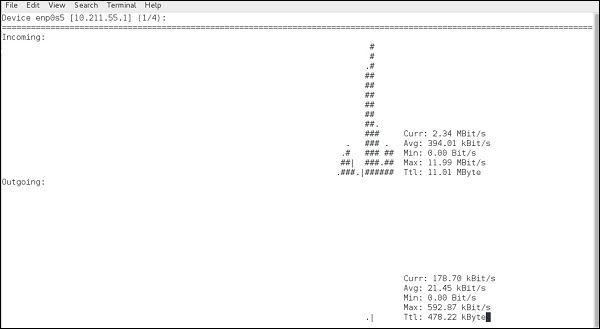
nload will monitor the specified interface. In this case, enp0s5 an Ethernet interface, in real-time from the terminal for network traffic loads and total bandwidth usage.
NLoad

As seen, nload will chart both incoming and outgoing data from the specified interface, along with providing a physical representation of the data flow with hash marks "#".

The depicted screenshot is of a simple webpage being loaded with some background daemon traffic.

Common command line switches for nload are −

CommandAction
-aTime period
-tTime update interval in milliseconds, the default is 500
-uSets display of traffic measurement h
-USets total in/out traffic measurement units same options as -u

The standard syntax for nload is −

nload [options] <interface>

If no interface is specified, nload will automatically grab the first Ethernet interface. Let's try measuring the total data in/out in Megabytes and current data-transfer speeds in Megabits.

[root@CentOS rdc]# nload -U M -u m
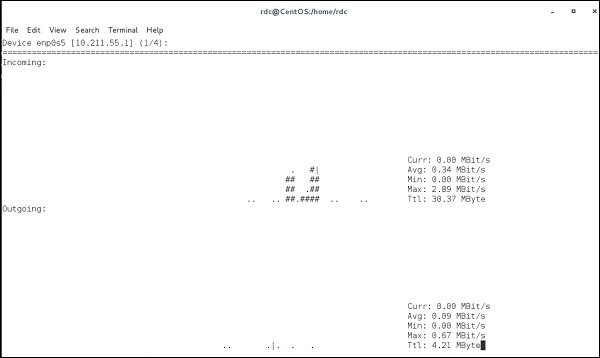
Speeds in Megabits

Data coming in/out the current interface is measured in megabits per second and each "Ttl" row, representing total data in/out is displayed in Megabytes.

nload is useful for an administrator to see how much data has passed through an interface and how much data is currently coming in/out a specified interface.

To see other interfaces without closing nload, simply use the left/right arrow keys. This will cycle through all available interfaces on the system.

It is possible to monitor multiple interfaces simultaneously using the -m switch −

[root@CentOS rdc]# nload -u K -U M -m lo -m enp0s5

load monitoring two interfaces simultaneously (lo and enp0s5) −

Load

Linux Admin - Remote Management

 When talking about remote management in CentOS as an Administrator, we will explore two methods −

  • Console Management
  • GUI Management

Remote Console Management

Remote Console Management means performing administration tasks from the command line via a service such as ssh. To use CentOS Linux effectively, as an Administrator, you will need to be proficient with the command line. Linux at its heart was designed to be used from the console. Even today, some system administrators prefer the power of the command and save money on the hardware by running bare-bones Linux boxes with no physical terminal and no GUI installed.

Remote GUI Management

Remote GUI Management is usually accomplished in two ways: either a remote X-Session or a GUI application layer protocol like VNC. Each has its strengths and drawbacks. However, for the most part, VNC is the best choice for Administration. It allows graphical control from other operating systems such as Windows or OS X that do not natively support the X Windows protocol.

Using remote X Sessions is native to both X-Window's Window-Managers and DesktopManagers running on X. However, the entire X Session architecture is mostly used with Linux. Not every System Administrator will have a Linux Laptop on hand to establish a remote X Session. Therefore, it is most common to use an adapted version of VNC Server.

The biggest drawbacks to VNC are: VNC does not natively support a multi-user environment such as remote X-Sessions. Hence, for GUI access to end-users remote XSessions would be the best choice. However, we are mainly concerned with administering a CentOS server remotely.

We will discuss configuring VNC for multiple administrators versus a few hundred endusers with remote X-Sessions.

Laying the Foundation for Security with SSH for Remote Console Access

ssh or Secure Shell is now the standard for remotely administering any Linux server. SSH unlike telnet uses TLS for authenticity and end-to-end encryption of communications. When properly configured an administrator can be pretty sure both their password and the server are trusted remotely.

Before configuring SSH, lets talk a little about the basic security and least common access. When SSH is running on its default port of 22; sooner rather than later, you are going to get brute force dictionary attacks against common user names and passwords. This just comes with the territory. No matter how many hosts you add to your deny files, they will just come in from different IP addresses daily.

With a few common rules, you can simply take some pro-active steps and let the bad guys waste their time. Following are a few rules of security to follow using SSH for remote administration on a production server −

  • Never use a common username or password. Usernames on the system should not be system default, or associated with the company email address like: systemadmin@yourcompany.com

  • Root access or administration access should not be allowed via SSH. Use a unique username and su to root or an administration account once authenticated through SSH.

  • Password policy is a must: Complex SSH user passwords like: "This&IS&a&GUD&P@ssW0rd&24&me". Change passwords every few months to eliminate susceptibility to incremental brute force attacks.

  • Disable abandoned or accounts that are unused for extended periods. If a hiring manager has a voicemail stating they will not be doing interviews for a month; that can lead to tech-savvy individuals with a lot time on their hands, for example.

  • Watch your logs daily. As a System Administrator, dedicate at least 30-40 minutes every morning reviewing system and security logs. If asked, let everyone know you don't have the time to not be proactive. This practice will help isolate warning signs before a problem presents itself to end-users and company profits.

Note On Linux Security − Anyone interested in Linux Administration should actively pursue current Cyber-Security news and technology. While we mostly hear about other operating systems being compromised, an insecure Linux box is a sought-after treasure for cybercriminals. With the power of Linux on a high-speed internet connection, a skilled cybercriminal can use Linux to leverage attacks on other operating systems.

Install and Configure SSH for Remote Access

Step 1 − Install SSH Server and all dependent packages.

[root@localhost]# yum -y install openssh-server 
'Loaded plugins: fastestmirror, langpacks 
Loading mirror speeds from cached hostfile 
* base: repos.centos.net 
* extras: repos.dfw.centos.com 
* updates: centos.centos.com 
Resolving Dependencies 
   --> Running transaction check 
   ---> Package openssh-server.x86_64 0:6.6.1p1-33.el7_3 will be installed 
   --> Finished Dependency Resolution 
Dependencies Resolved

Step 2 − Make a secure regular use to add for shell access.

[root@localhost ~]# useradd choozer 
[root@localhost ~]# usermod -c "Remote Access" -d /home/choozer -g users -G 
wheel -a choozer

Note − We added the new user to the wheel group enabling ability to su into root once SSH access has been authenticated. We also used a username that cannot be found in common word lists. This way, our account will not get locked out when SSH is attacked.

The file holding configuration settings for sshd server is /etc/ssh/sshd_config.

The portions we want to edit initially are −

LoginGraceTime 60m
PermitRootLogin no

Step 3 − Reload the SSH daemon sshd.

[root@localhost]# systemctl reload sshd

It is good to set the logout grace period to 60 minutes. Some complex administration tasks can exceed the default of 2 minutes. There is really nothing more frustrating than having SSH session timeout when configuring or researching changes.

Step 4 − Let's try to login using the root credentials.

bash-3.2# ssh centos.vmnet.local 
root@centos.vmnet.local's password:   
Permission denied (publickey,gssapi-keyex,gssapi-with-mic,password).

Step 5 − We can no longer login remotely via ssh with root credentials. So let's login to our unprivileged user account and su into the root account.

bash-3.2# ssh chooser@centos.vmnet.local
choozer@centos.vmnet.local's password:
[choozer@localhost ~]$ su root
Password:

[root@localhost choozer]#

Step 6 − Finally, let's make sure the SSHD service loads on boot and firewalld allows outside SSH connections.

[root@localhost]# systemctl enable sshd

[root@localhost]# firewall-cmd --permanent --add-service=ssh 
success

[root@localhost]# firewall-cmd --reload 
success
 
[root@localhost]#
 

SSH is now set up and ready for remote administration. Depending on your enterprise border, the packet filtering border device may need to be configured to allow SSH remote administration outside the corporate LAN.

Configure VNC for Remote CentOS Administration

There are a few ways to enable remote CentOS administration via VNC on CentOS 6 - 7. The easiest, but most limiting way is simply using a package called vinoVino is a Virtual Network Desktop Connection application for Linux designed around the Gnome Desktop platform. Hence, it is assumed the installation was completed with Gnome Desktop. If the Gnome Desktop has not been installed, please do so before continuing. Vino will be installed with a Gnome GUI install by default.

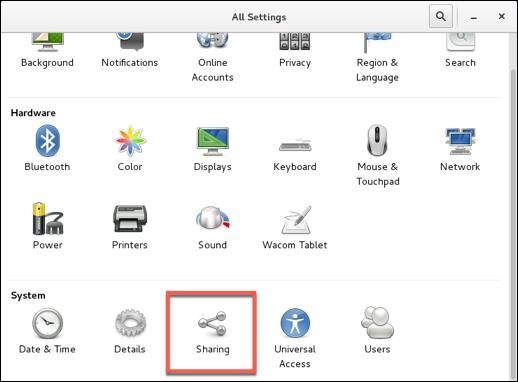
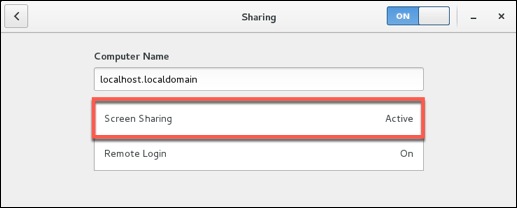
To configure screen sharing with Vino under Gnome, we want to go into the CentOS System Preferences for screen sharing.

Applications->System Tools->Settings->Sharing

Sharing

Screen Sharing

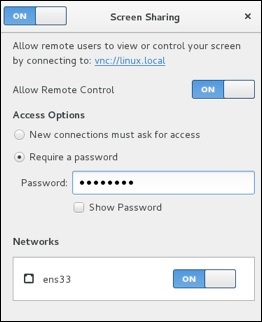
Screen Sharing Authentication

Notes to configuring VNC Desktop Sharing −

  • Disable New Connections must ask for access − This option will require physical access to ok every connection. This option will prevent remote administration unless someone is at the physical desktop.

  • Enable Require a password − This is separate from the user password. It will control the access to the virtual desktop and still require the user password to access a locked desktop (this is good for security).

  • Forward UP&P Ports: If available leave disabled − Forwarding UP&P ports will send Universal Plug and Play requests for a layer 3 device to allow VNC connections to the host automatically. We do not want this.

Make sure vino is listening on the VNC Port 5900.

[root@localhost]# netstat -antup | grep vino 
tcp        0        0 0.0.0.0:5900        0.0.0.0:*        LISTEN        4873/vino-server
tcp6       0        0 :::5900                :::*          LISTEN        4873/vino-server
   
[root@localhost]#

Let's now configure our Firewall to allow incoming VNC connections.

[root@localhost]# firewall-cmd --permanent --add-port=5900/tcp 
success

[root@localhost]# firewall-cmd --reload 
success

[root@localhost rdc]#

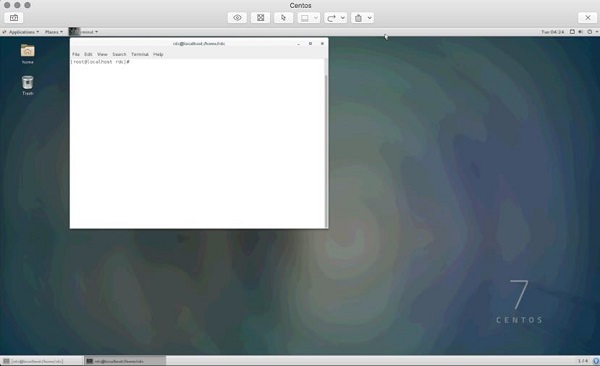
Finally, as you can see we are able to connect our CentOS Box and administer it with a VNC client on either Windows or OS X.

VNC client

It is just as important to obey the same rules for VNC as we set forth for SSH. Just like SSH, VNC is continually scanned across IP ranges and tested for weak passwords. It is also worth a note that leaving the default CentOS login enabled with a console timeout does help with remote VNC security. As an attacker will need the VNC and user password, make sure your screen sharing password is different and just as hard to guess as the user password.

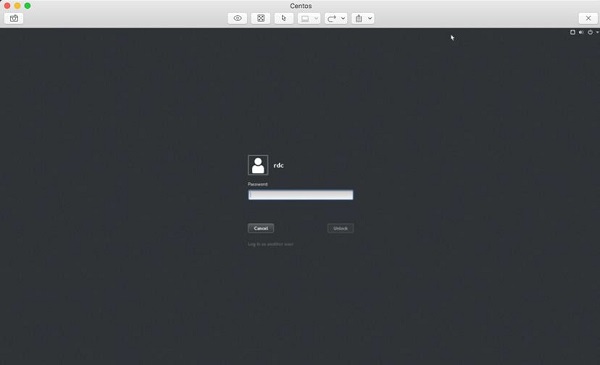
After entering the the VNC screen sharing password, we must also enter the user password to access a locked desktop.

VNC Screen Sharing Password

Security Note − By default, VNC is not an encrypted protocol. Hence, the VNC connection should be tunneled through SSH for encryption.

Set Up SSH Tunnel Through VNC

Setting up an SSH Tunnel will provide a layer of SSH encryption to tunnel the VNC connection through. Another great feature is it uses SSH compression to add another layer of compression to the VNC GUI screen updates. More secure and faster is always a good thing when dealing with the administration of CentOS servers!

So from your client that will be initiating the VNC connection, let's set up a remote SSH tunnel. In this demonstration, we are using OS X. First we need to sudo -s to root.

bash-3.2# sudo -s 
password:

Enter the user password and we should now have root shell with a # prompt −

bash-3.2#

Now, let's create our SSH Tunnel.

ssh -f rdc@192.168.1.143 -L 2200:192.168.1.143:5900 -N

Let's break this command down −

  • ssh − Runs the local ssh utility

  • -f − ssh should run in the background after the task fully executes

  • rdc@192.168.1.143 − Remote ssh user on the CentOS server hosting VNC services

  • -L 2200:192.168.1.143:5900 − Create our tunnel [Local Port]:[remote host]:[remote port of VNC service]

  • -N tells ssh we do not wish to execute a command on the remote system

bash-3.2# ssh -f rdc@192.168.1.143 -L 2200:192.168.1.143:5900 -N
rdc@192.168.1.143's password:

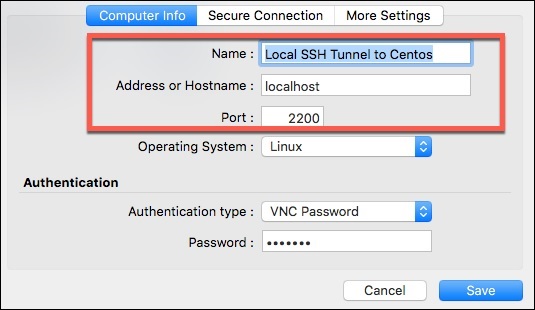
After successfully entering the remote ssh user's password, our ssh tunnel is created. Now for the cool part! To connect we point our VNC client at the localhost on the port of our tunnel, in this case port 2200. Following is the configuration on Mac Laptop's VNC Client −

SSH Tunnel

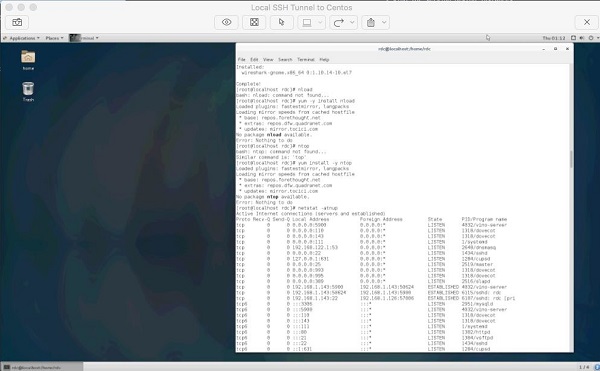
And finally, our remote VNC Desktop Connection!

VNC Desktop Connection

The cool thing about SSH tunneling is it can be used for almost any protocol. SSH tunnels are commonly used to bypass egress and ingress port filtering by an ISP, as well as trick application layer IDS/IPS while evading other session layer monitoring.

  • Your ISP may filter port 5900 for non-business accounts but allow SSH on port 22 (or one could run SSH on any port if port 22 is filtered).

  • Application level IPS and IDS look at payload. For example, a common buffer overflow or SQL Injection. End-to-end SSH encryption will encrypt application layer data.

SSH Tunneling is great tool in a Linux Administrator's toolbox for getting things done. However, as an Administrator we want to explore locking down the availability of lesser privileged users having access to SSH tunneling.

Administration Security Note − Restricting SSH Tunneling is something that requires thought on the part of an Administrator. Assessing why users need SSH Tunneling in the first place; what users need tunneling; along with practical risk probability and worst-case impact.

This is an advanced topic stretching outside the realm of an intermediate level primer. Research on this topic is advised for those who wish to reach the upper echelons of CentOS Linux Administration.

Use SSH Tunnel for Remote X-Windows

The design of X-Windows in Linux is really neat compared to that of Windows. If we want to control a remote Linux box from another Linux boxm we can take advantage of mechanisms built into X.

X-Windows (often called just "X"), provides the mechanism to display application windows originating from one Linux box to the display portion of X on another Linux box. So through SSH we can request an X-Windows application be forwarded to the display of another Linux box across the world!

To run an X Application remotely via an ssh tunnel, we just need to run a single command −

[root@localhost]# ssh -X rdc@192.168.1.105

The syntax is − ssh -X [user]@[host], and the host must be running ssh with a valid user.

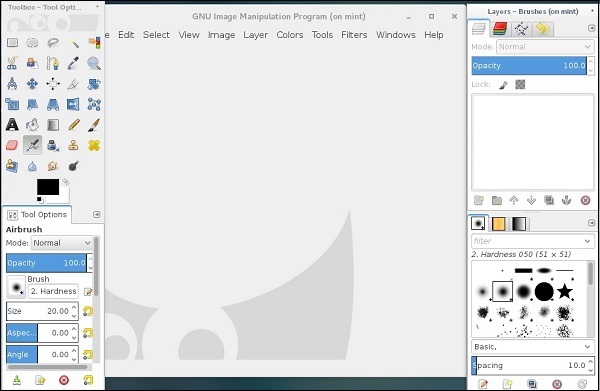
Following is a screenshot of GIMP running on a Ubuntu Workstation through a remote XWindows ssh tunnel.

Use SSH Tunnel for Remote X-Windows

It is pretty simple to run applications remotely from another Linux server or workstation. It is also possible to start an entire X-Session and have the entire desktop environment remotely through a few methods.

  • XDMCP

  • Headless software packages such as NX

  • Configuring alternate displays and desktops in X and desktop managers such as Gnome or KDE

This method is most commonly used for headless servers with no physical display and really exceeds the scope of an intermediate level primer. However, it is good to know of the options available.

Linux Admin - Install Anonymous FTP

 Before delving into installing FTP on CentOS, we need to learn a little about its use and security. FTP is a really efficient and well-refined protocol for transferring files between the computer systems. FTP has been used and refined for a few decades now. For transferring files efficiently over a network with latency or for sheer speed, FTP is a great choice. More so than either SAMBA or SMB.

However, FTP does possess some security issues. Actually, some serious security issues. FTP uses a really weak plain-text authentication method. It is for this reason authenticated sessions should rely on sFTP or FTPS, where TLS is used for end-to-end encryption of the login and transfer sessions.

With the above caveats, plain old FTP still has its use in the business environment today. The main use is, anonymous FTP file repositories. This is a situation where no authentication is warranted to download or upload files. Some examples of anonymous FTP use are −

  • Large software companies still use anonymous ftp repositories allowing Internet users to download shareware and patches.

  • Allowing internet users to upload and download public documents.

  • Some applications will automatically send encrypted, archived logs for or configuration files to a repository via FTP.

Hence, as a CentOS Administrator, being able to install and configure FTP is still a designed skill.

We will be using an FTP daemon called vsFTP, or Very Secure FTP Daemon. vsFTP has been used in development for a while. It has a reputation for being secure, easy to install and configure, and is reliable.

Step 1 − Install vsFTPd with the YUM Package Manager.

[root@centos]# yum -y install vsftpd.x86_64

Step 2 − Configure vsFTP to Start on Boot with systemctl.

[root@centos]# systemctl start vsftpd 
[root@centos]# systemctl enable vsftpd 
Created symlink from /etc/systemd/system/multi-
user.target.wants/vsftpd.service to /usr/lib/systemd/system/vsftpd.service.

Step 3 − Configure FirewallD to allow FTP control and transfer sessions.

[root@centos]# firewall-cmd --add-service=ftp --permanent 
success 
[root@centos]#

Assure our FTP daemon is running.

[root@centos]# netstat -antup | grep vsftp 
tcp6       0       0 :::21       :::*       LISTEN       13906/vsftpd         
[root@centos]#

Step 4 − Configure vsFTPD For Anonymous Access.

Create a root FTP directory

[root@centos]# mkdir /ftp

Change owner and group of FTP root to ftp

[root@centos]# chown ftp:ftp /ftp
Set minimal permissions for FTP root:

[root@centos]# chmod -R 666 /ftp/

[root@centos]# ls -ld /ftp/
drw-rw-rw-. 2 ftp ftp 6 Feb 27 02:01 /ftp/

[root@centos]#

In this case, we gave users read/write access to the entire root FTP tree.

Configure /etc/vsftpd/vsftpd.conf"

[root@centos]# vim /etc/vsftpd/vsftpd.conf
# Example config file /etc/vsftpd/vsftpd.conf
#
# The default compiled in settings are fairly paranoid. This sample file
# loosens things up a bit, to make the ftp daemon more usable.
# Please see vsftpd.conf.5 for all compiled in defaults.
#
# READ THIS: This example file is NOT an exhaustive list of vsftpd options.
# Please read the vsftpd.conf.5 manual page to get a full idea of vsftpd's
# capabilities.

We will want to change the following directives in the vsftp.conf file.

  • Enable Anonymous uploading by uncommenting anon_mkdir_write_enable=YES

  • chown uploaded files to owned by the system ftp user

    chown_uploads = YES

    chown_username = ftp

  • Change system user used by vsftp to the ftp user: nopriv_user = ftp

  • Set the custom banner for the user to read before signing in.

    ftpd_banner = Welcome to our Anonymous FTP Repo. All connections are monitored and logged.

  • Let's set IPv4 connections only −

    listen = YES

    listen_ipv6 = NO

Now, we need to restart or HUP the vsftp service to apply our changes.

[root@centos]# systemctl restart vsftpd

Let's connect to our FTP host and make sure our FTP daemon is responding.

[root@centos rdc]# ftp 10.0.4.34 
Connected to localhost (10.0.4.34). 
220 Welcome to our Anonymous FTP Repo. All connections are monitored and logged. 
Name (localhost:root): anonymous 
331 Please specify the password. 
Password: 
'230 Login successful. 
Remote system type is UNIX. 
Using binary mode to transfer files. 
ftp>

Set Up Postfix MTA and IMAP/POP3

 In order to send an email from our CentOS 7 server, we will need the setup to configure a modern Mail Transfer Agent (MTA). Mail Transfer Agent is the daemon responsible for sending outbound mail for system users or corporate Internet Domains via SMTP.

It is worth noting, this tutorial only teaches the process of setting up the daemon for local use. We do not go into detail about advanced configuration for setting up an MTA for business operations. This is a combination of many skills including but not limited to: DNS, getting a static routable IP address that is not blacklisted, and configuring advanced security and service settings. In short, this tutorial is meant to familiarize you with the basic configuration. Do not use this tutorial for MTA configuration of an Internet facing host.

With its combined focus on both security and the ease of administration, we have chosen Postfix as the MTA for this tutorial. The default MTA installed in the older versions of CentOS is SendmailSendmail is a great MTA. However, of the author's humble opinion, Postfix hits a sweet spot when addressing the following notes for an MTA. With the most current version of CentOS, Postfix has superseded Sendmail as the default MTA.

Postfix is a widely used and well documented MTA. It is actively maintained and developed. It requires minimal configuration in mind (this is just email) and is efficient with system resources (again, this is just email).

Step 1 − Install Postfix from YUM Package Manager.

[root@centos]# yum -y install postfix

Step 2 − Configure Postfix config file.

The Postfix configuration file is located in: /etc/postfix/main.cf

In a simple Postfix configuration, the following must be configured for a specific host: host name, domain, origin, inet_interfaces, and destination.

Configure the hostname − The hostname is a fully qualified domain name of the Postfix host. In OpenLDAP chapter, we named the CentOS box: centos on the domain vmnet.local. Let’s stick with that for this chapter.

# The myhostname parameter specifies the internet hostname of this
# mail system. The default is to use the fully-qualified domain name
# from gethostname(). $myhostname is used as a default value for many
# other configuration parameters.
#
myhostname = centos.vmnet.local

Configure the domain − As stated above, the domain we will be using in this tutorial is vmnet.local

# The mydomain parameter specifies the local internet domain name.
# The default is to use $myhostname minus the first component.
# $mydomain is used as a default value for many other configuration
# parameters.
#
mydomain = vmnet.local

Configure the origin − For a single server and domain set up, we just need to uncomment the following sections and leave the default Postfix variables.

# SENDING MAIL
#
# The myorigin parameter specifies the domain that locally-posted
# mail appears to come from. The default is to append $myhostname,
# which is fine for small sites.  If you run a domain with multiple
# machines, you should (1) change this to $mydomain and (2) set up
# a domain-wide alias database that aliases each user to
# user@that.users.mailhost.
#
# For the sake of consistency between sender and recipient addresses,
# myorigin also specifies the default domain name that is appended
# to recipient addresses that have no @domain part. 
#
myorigin = $myhostname
myorigin = $mydomain

Configure the network interfaces − We will leave Postfix listening on our single network interface and all protocols and IP Addresses associated with that interface. This is done by simply leaving the default settings enabled for Postfix.

# The inet_interfaces parameter specifies the network interface
# addresses that this mail system receives mail on.  By default,
# the software claims all active interfaces on the machine. The
# parameter also controls delivery of mail to user@[ip.address].
#
# See also the proxy_interfaces parameter, for network addresses that
# are forwarded to us via a proxy or network address translator.
#
# Note: you need to stop/start Postfix when this parameter changes. 
#
#inet_interfaces = all
#inet_interfaces = $myhostname
#inet_interfaces = $myhostname, localhost
#inet_interfaces = localhost
# Enable IPv4, and IPv6 if supported
inet_protocols = all

Step 3 − Configure SASL Support for Postfix.

Without SASL Authentication support, Postfix will only allow sending email from local users. Or it will give a relaying denied error when the users send email away from the local domain.

Note − SASL or Simple Application Security Layer Framework is a framework designed for authentication supporting different techniques amongst different Application Layer protocols. Instead of leaving authentication mechanisms up to the application layer protocol, SASL developers (and consumers) leverage current authentication protocols for higher level protocols that may not have the convenience or more secure authentication (when speaking of access to secured services) built in.

Install the "cyrus-sasl* package

[root@centos]# yum -y install  cyrus-sasl 
Loaded plugins: fastestmirror, langpacks 
Loading mirror speeds from cached hostfile 
 * base: repos.forethought.net 
 * extras: repos.dfw.quadranet.com 
 * updates: mirrors.tummy.com 
Package cyrus-sasl-2.1.26-20.el7_2.x86_64 already installed and latest version
Nothing to do

Configure /etc/postfix/main.cf for SASL Auth

smtpd_sasl_auth_enable = yes
smtpd_recipient_restrictions =
permit_mynetworks,permit_sasl_authenticated,reject_unauth_destination
smtpd_sasl_security_options = noanonymous
smtpd_sasl_type = dovecot
smtpd_sasl_path = private/auth

My SASL Options in main.conf

##Configure SASL Options Entries:
smtpd_sasl_auth_enable = yes
smptd_recipient_restrictions =
permit_mynetworks,permit_sasl_authenticated,reject_unauth_destination
smtp_sasl_type = dovecot
smtp_sasl_path = private/auth/etc

Step 4 − Configure FirewallD to allow incoming SMTP Services.

[root@centos]# firewall-cmd --permanent --add-service=smtp 
success

[root@centos]# firewall-cmd --reload 
success

[root@centos]#

Now let's check to make sure our CentOS host is allowing and responding to the requests on port 25 (SMTP).

Nmap scan report for 172.16.223.132 
Host is up (0.00035s latency). 
Not shown: 993 filtered ports 
PORT    STATE  SERVICE 
   20/tcp  closed ftp-data 
   21/tcp  open   ftp 
   22/tcp  open   ssh 
   25/tcp  open   smtp 
   80/tcp  open   http 
   389/tcp open   ldap 
   443/tcp open   https 
MAC Address: 00:0C:29:BE:DF:5F (VMware)

As you can see, SMTP is listening and the daemon is responding to the requests from our internal LAN.

Install Dovecot IMAP and POP3 Server

Dovecot is a secure IMAP and POP3 Server deigned to handle incoming mail needs of a smaller to larger organization. Due to its prolific use with CentOS, we will be using Dovecot as an example of installing and configuring an incoming mail-server for CentOS and MTA SASL Provider.

As noted previously, we will not be configuring MX records for DNS or creating secure rules allowing our services to handle mail for a domain. Hence, just setting these services up on an Internet facing host may leave leverage room for security holes w/o SPF Records.

Step 1 − Install Dovecot.

[root@centos]# yum -y install dovecot

Step 2 − Configure dovecot.

The main configuration file for dovecot is located at: /etc/dovecot.conf. We will first back up the main configuration file. It is a good practice to always backup configuration files before making edits. This way id (for example) line breaks get destroyed by a text editor, and years of changes are lost. Reverting is easy as copying the current backup into production.

Enable protocols and daemon service for dovecot

# Protocols we want to be serving. 
protocols = imap imaps pop3 pop3s

Now, we need to enable the dovecot daemon to listen on startup −

[root@localhost]# systemctl start  dovecot 
[root@localhost]# systemctl enable dovecot

Let's make sure Dovecot is listening locally on the specified ports for: imap, pop3, imap secured, and pop3 secured.

[root@localhost]# netstat -antup | grep dovecot 
 tcp        0        0 0.0.0.0:110        0.0.0.0:*        LISTEN        4368/dovecot
 tcp        0        0 0.0.0.0:143        0.0.0.0:*        LISTEN        4368/dovecot
 tcp        0        0 0.0.0.0:993        0.0.0.0:*        LISTEN        4368/dovecot
 tcp        0        0 0.0.0.0:995        0.0.0.0:*        LISTEN        4368/dovecot
 tcp6       0        0 :::110                :::*          LISTEN        4368/dovecot
 tcp6       0        0 :::143                :::*          LISTEN        4368/dovecot
 tcp6       0        0 :::993                :::*          LISTEN        4368/dovecot
 tcp6       0        0 :::995                :::*          LISTEN        4368/dovecot

[root@localhost]#

As seen, dovecot is listening on the specified ports for IPv4 and IPv4.

POP3110
POP3s995
IMAP143
IMAPs993

Now, we need to make some firewall rules.

[root@localhost]# firewall-cmd --permanent --add-port=110/tcp 
success
 
[root@localhost]# firewall-cmd --permanent --add-port=143/tcp 
success
 
[root@localhost]# firewall-cmd --permanent --add-port=995/tcp 
success
 
[root@localhost]# firewall-cmd --permanent --add-port=993/tcp 
success
 
[root@localhost]# firewall-cmd --reload 
success
 
[root@localhost]#

Our incoming mail sever is accepting requests for POP3POP3sIMAP, and IMAPs to hosts on the LAN.

Port Scanning host: 192.168.1.143

   Open TCP Port:   21          ftp 
   Open TCP Port:   22          ssh 
   Open TCP Port:   25          smtp 
   Open TCP Port:   80          http 
   Open TCP Port:   110         pop3 
   Open TCP Port:   143         imap 
   Open TCP Port:   443         https 
   Open TCP Port:   993         imaps 
   Open TCP Port:   995         pop3s 

Linux Admin - MySQL Setup On CentOS 7

 As touched upon briefly when configuring CentOS for use with Maria DB, there is no native MySQL package in the CentOS 7 yum repository. To account for this, we will need to add a MySQL hosted repository.

MariaDB vs MySQL On CentOS Linux

One thing to note is MySQL will require a different set of base dependencies from MariaDB. Also using MySQL will break the concept and philosophy of CentOS: production packages designed for maximum reliability.

So when deciding whether to use Maria or MySQL one should weigh two options: Will my current DB Schema work with Maria? What advantage does installing MySQL over Maria give me?

Maria components are 100% transparent to MySQL structure, with some added efficiency with better licensing. Unless a compelling reason comes along, it is advised to configure CentOS to use MariaDB.

The biggest reasons for favoring Maria on CentOS are −

  • Most people will be using MariaDB. When experiencing issues you will get more assistance with Maria.

  • CentOS is designed to run with Maria. Hence, Maria will offer better stability.

  • Maria is officially supported for CentOS.

Download and Add the MySQL Repository

We will want to download and install the MySQL repository from −

http://repo.mysql.com/mysql-community-release-el7-5.noarch.rpm

Step 1 − Download the Repository.

The repository comes conveniently packaged in an rpm package for easy installation. It can be downloaded with wget −

[root@centos]# wget http://repo.mysql.com/mysql-community-release-el75.noarch.rpm
   --2017-02-26 03:18:36--  http://repo.mysql.com/mysql-community-release-el75.noarch.rpm
   Resolving repo.mysql.com (repo.mysql.com)... 104.86.98.130

Step 2 − Install MySQL From YUM.

We can now use the yum package manager to install MySQL −

[root@centos]# yum -y install mysql-server

Step 3 − Start and Enable the MySQL Daemon Service.

[root@centos]# systemctl start mysql 
[root@centos]# systemctl enable  mysql

Step 4 − Make sure our MySQL service is up and running.

[root@centos]# netstat -antup | grep 3306 
tcp6       0       0 :::3306       :::*       LISTEN       6572/mysqld
[root@centos]#

Note − We will not allow any firewall rules through. It's common to have MySQL configured to use Unix Domain Sockets. This assures only the web-server of the LAMP stack, locally, can access the MySQL database, taking out a complete dimension in the attack vector at the database software.