Sunday, 15 March 2020

Azure Database service

Azure Database service

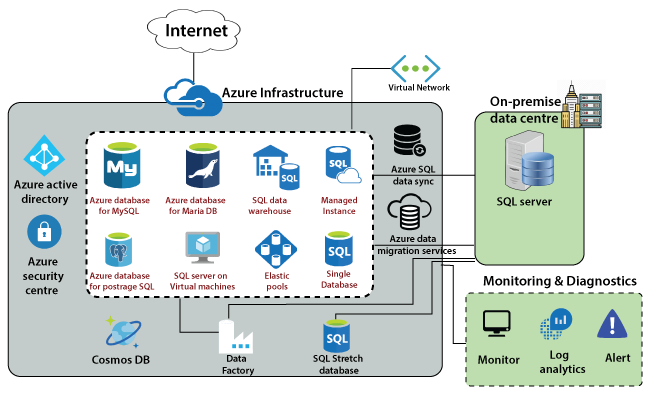
The basic fundamental building block that is available in Azure is the SQL database. Microsoft offers this SQL server and SQL database on Azure in many ways. We can deploy a single database, or we can deploy multiple databases as part of a shared elastic pool.

Azure Database Service Architecture

Microsoft introduced a managed instance that is targeted towards on-premises customers. So, if we have some SQL databases within our on-premises datacentre and we want to migrate that database into Azure without any complex configuration, or ambiguity, then we can use managed instance. Because this is mainly targeted towards on-premises customers who want to lift and share their on-premises database into Azure with the least effort and optimized cost. We can also take advantage of licensing we have within our on-premises data center.
Azure Database service
Microsoft will be responsible for maintenance patching and related services. But, in case if we want to go for the IaaS service for the SQL server, then we can deploy SQL Server on the Azure Virtual machine. If the data have a dependency on the underlying platform and we want to log into the SQL Server, in that case, we can use the SQL server on a virtual machine.
We can deploy a SQL data warehouse on the cloud. Azure offers many other database services for different types of databases such as MySQL, Maria DB, and also PostgreSQL. Once we deployed a database into Azure, we need to migrate the data into it or replicate the data into it.
Azure Database Services for Data Migration
The services that are available in Azure, which we can use to migrate the data from our on-premises SQL Server into Azure.
Azure Data Migration Service: It is used to migrate the data from our existing SQL server and database within the on-premises data center into Azure.
Azure SQL data sync: If we want to replicate the data from our on-premises database into Azure, then we can use Azure SQL data sync.
SQL Stretch Database: It is used to migrate cold data into Azure. SQL stretch database is a bit different from other database offerings. It works as a hybrid database because it divides the data into different types - hot and cold. A hot data will be kept in the on-premises data center and cold data in the Azure.
Data Factory
It is used for ETL transformation, extraction loading, etc. Using the data factory, we can even extract the data from our on-premises data center. We can do some conversion and load it into the Azure SQL database. Data Factory is an ETL tool that is offered on the cloud, which we can use to connect to different databases, extract the data, transform it, and load into a destination.
Security
All the databases that are existing in Azure need to be secured, and also we need to accept connections from known origins. For this purpose, all these database services come with firewall rules where we can configure from which particular IP address we want to allow connections. We can define those firewall rules to limit the number of connections and also reduce the surface attack area.
Cosmos DB
Cosmos DB is a NoSQL data store that is available in Azure, and it is designed to be globally scalable and also very highly available with extremely low latency. Microsoft guarantees latency in terms of reading and writes with Cosmos DB. For example - if we have any applications such as IoT, gaming where we get a lot of data from different users spread across globally, then we will go for Cosmos DB. Because Cosmos DB is designed to be globally scalable and highly available due to which our users will experience low latency.
Finally, there are two things, and one is we need to secure all the services. For that purpose, we can integrate all these services with Azure Active Directory and manage the users from Azure Active Directory also. To monitor all these services, we can use the security center. There is an individual monitoring tool too, but Azure security center will keep on monitoring all these services and provide recommendations if something is wrong.

Azure VNet Connectivity

Azure VNet Connectivity

In a typical IT environment, we tend to have multiple virtual networks, and also the workloads in these different virtual networks need to communicate with each other. So, we will discuss some connectivity scenarios which we can use to enable communication between workloads in various virtual networks.
Azure VNet Connectivity

Peering

Virtual network peering enables us to connect two VNet in the same or across regions. If both of the virtual networks are in Azure and also within the same region, then you can use peering. Due to this, the workload in those virtual machines can communicate with each other.
  • The traffic between different virtual machines in peered virtual networks is routed directly from the Microsoft backbone infrastructure, not through a gateway or over the public Internet.
  • We can deploy hub-and-spoke networks, where the virtual hub network can host infrastructure components such as a virtual network appliance or a VPN gateway.
  • Every spoke virtual network could then peer with the hub virtual network Traffic can flow through virtual network appliances or VPN gateways in the virtual hub network.
  • When virtual networks have peered, we can also configure the gateway in the peered virtual network as a transit point to an on-premises network.

Global peering

If we have a virtual network in azure that exists in different regions, then we can use Global peering. Gateway transit is supported for both VNet peering and Global VNet Peering.
Site to Site VPN: If we have an on-premises virtual network, and we may have other virtual networks existing in other cloud providers. To connect to our virtual network in Azure with the network that is an on-premises data center, we can use Site to site VPN.
Express Route: If we have a business requirement where this connection between our on-premises data center and virtual network should be on a private channel of communication, then you can use Express Route.

Points to Remember while peering:

  • Peering between VNets is allowed in the same subscription only.
  • Peering between VNets in different subscriptions under the same AD tenant is allowed.
  • Peering between VNets in different subscription located in different AD tenants are also allowed.

VPN Gateway

A VPN gateway is a specific type of virtual network gateway, which is used to send encrypted traffic between an Azure virtual network and an on-premises location over the public internet. VPN gateway act as a middle man on both sides of the virtual networks. And if the workloads in those virtual networks need to communicate with each other, they will communicate via this encrypted channel of communication between the VPN gateways of both virtual networks.
When we are planning to deploy a VPN gateway into Azure, we can configure the number of setting related to it:
  • Gateway SKUs: We need to select the SKU that satisfies our requirements based on the types of workloads, throughputs, features, and SLAs.
  • Zone-redundant gateways: We can get benefits from zone-resiliency to access your mission-critical, scalable service on Azure when we use zone-redundant gateways.
  • Connection types: Connection type can be IPsec, Vnet2Vnet, ExpressRoute, VPNClient.
  • VPN types: The VPN type that we choose depends on the connection topology that we want to create and the VPN device. It can be a policy-based VPN or Route-based VPN.
  • Gateway subnet: Before you create a VPN gateway, you must create a gateway subnet with the name 'GatewaySubnet' and do not deploy anything else into that subnet.
  • Local network gateway: Local network gateway usually represents your on-premises location, i.e., VPN devices, and address prefixes.
  • Connection topologies: Site to site, Multi-site, point-to-site, Vnet-to-Vnet, and express route.
  • Monitoring and Alerts: Monitors the key metrics and configure alerts.

Azure Load Balancer

The load balancer is used to distribute the incoming traffic to the pool of virtual machines. It stops routing the traffic to a failed virtual machine in the pool. In this way, we can make our application resilient to any software or hardware failures in that pool of virtual machines.

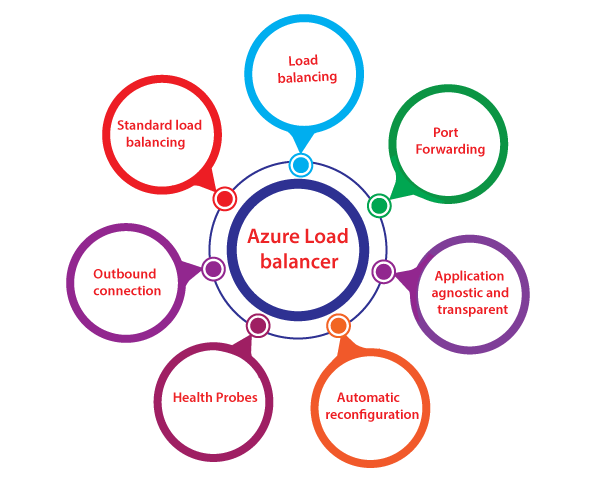
Features of Azure load balancer

Azure Load Balancer
  • Load Balancing: Azure load balancer uses a 5-tuple hash composed of source IP, source port, destination IP, destination port, and protocol. We can configure a load balancing role within the load balancer in such a way based on the source port and source IP address from where the traffic is originating.
  • Port forwarding: Load balancer also has port forwarding capability if we have a pool of web servers, and we don't want to associate public IP address for each web server in that pool. If we're going to carry out any maintenance activities, you need to RDP into those Web servers having a public IP address on that web servers.
  • Application agnostic and transparent: Load balancer doesn't directly interact with TCP or UDP or the application layer. We can route the traffic based on URL or multi-site hosting, and then we can go for the application gateway.
  • Automatic reconfiguration: Load balancer can reconfigure itself when we scale up or down instances. So, if we are adding more virtual machines into the backend pool, automatically load balancer will reconfigure.
  • Health probes: As we discussed earlier, the load balancer can recognize any failed virtual machines in the backend pool and stop routing the traffic to that particular failed virtual machine. It will recognize using health probes we can configure a health probe to determine the health of the instances in the backend pool.
  • Outbound connection: All the outbound flows from a private IP address inside our virtual network to public IP addresses on the Internet can be translated to a frontend IP of the load balancer.

Configuration elements of Load Balancer

  • Front-end IP configuration: It is the IP address to which the incoming traffic will initially come to, and Azure load balancer can have one or more front end IP addresses. They are sometimes also called as virtual IPs.
  • Back-end address pool: These are the pool of virtual machines to which the traffic will eventually go to.
  • Load balancing rules: A load balancing rule is simply a mapping between the front end IP configuration and back-end address pool.
  • Probes: Probes enable us to keep track of the health of VM instances. If a health probe files, the VM instance will be taken out of rotation automatically.
  • Inbound & Outbound NAT rules: NAT rules defining the inbound traffic flowing through the front end IP and distributes to the backend IP. Outbound rules will transmit VM private IP to load balancer public IP.

Creating Azure Load Balancer

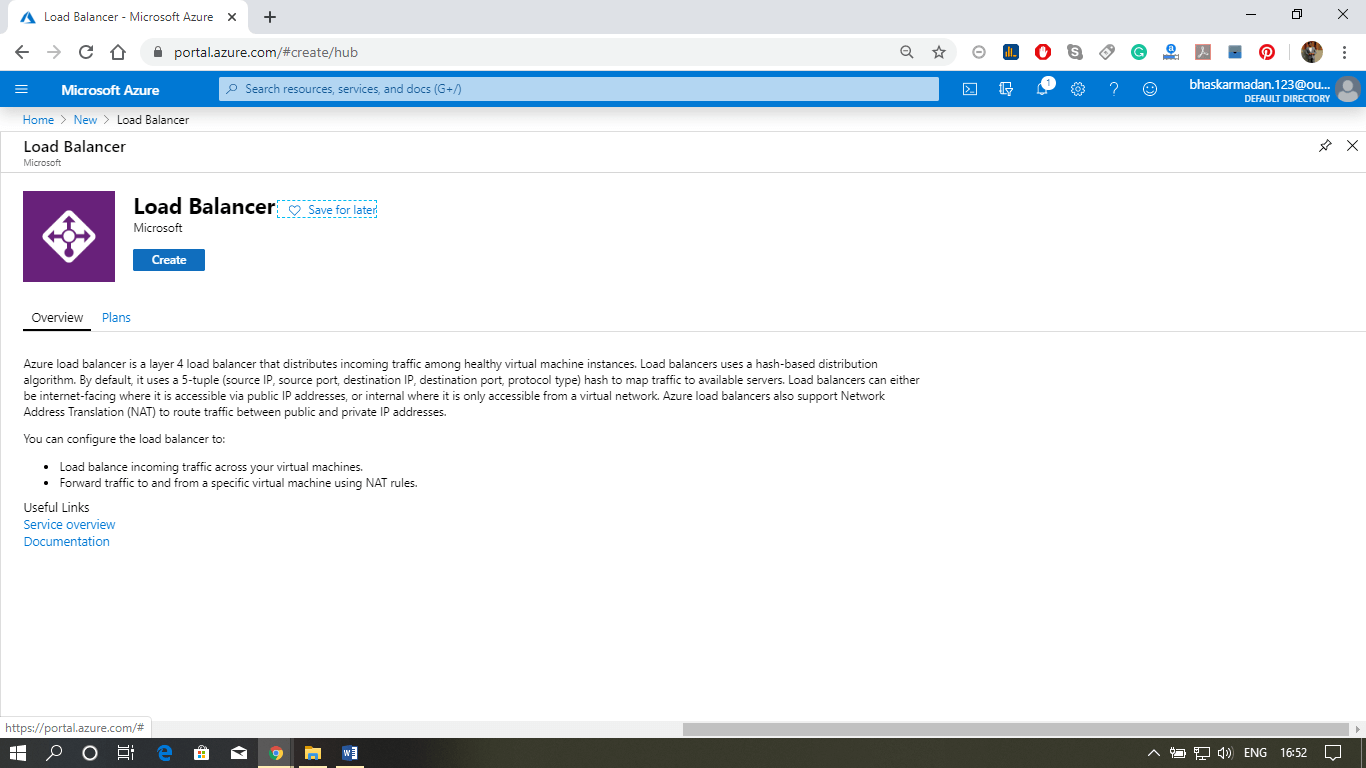
Step1: Go to the Azure portal, and click on create a Resource. After that, type-in Load Balancer, and click on it.
Azure Load Balancer
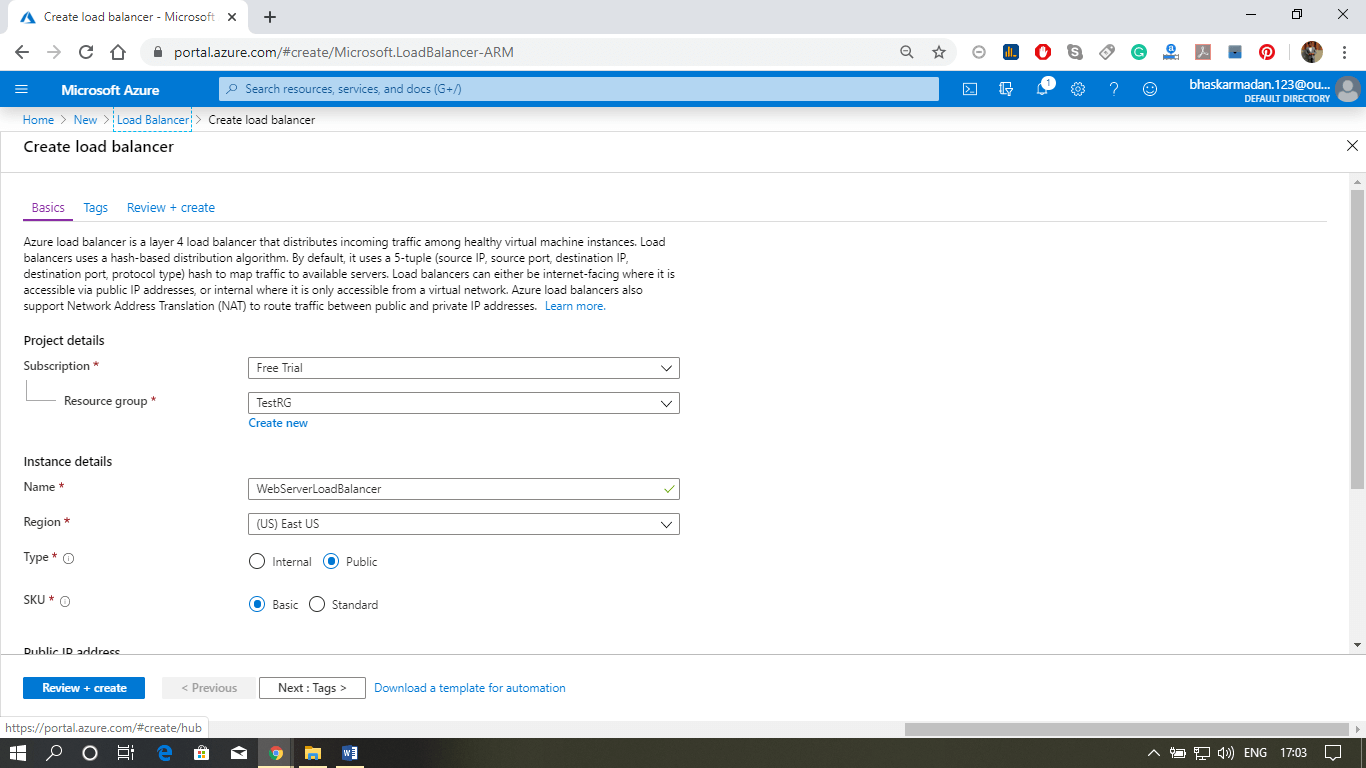
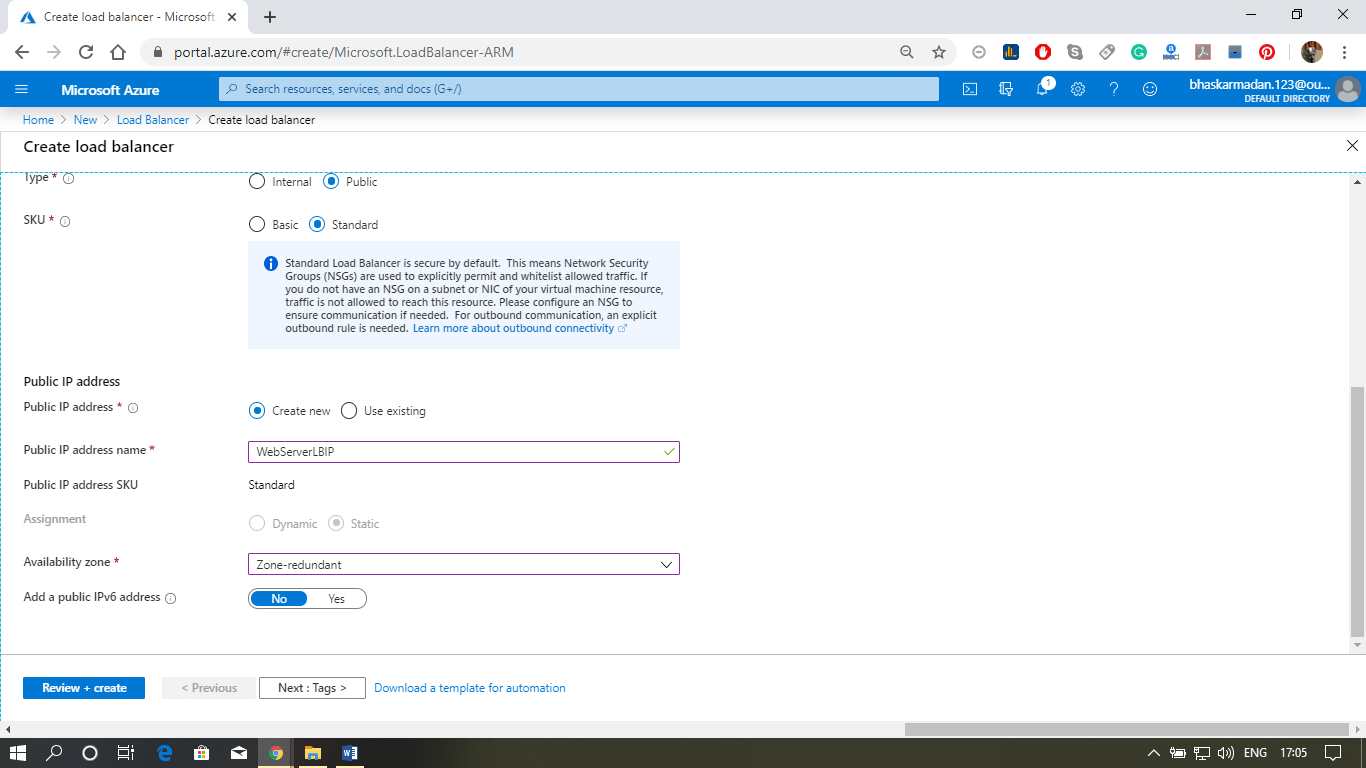
Step 2: You are now on the Load Balancer creation page. Fill all the required details as the figure below. And click on review+create.
Azure Load Balancer
Azure Load Balancer
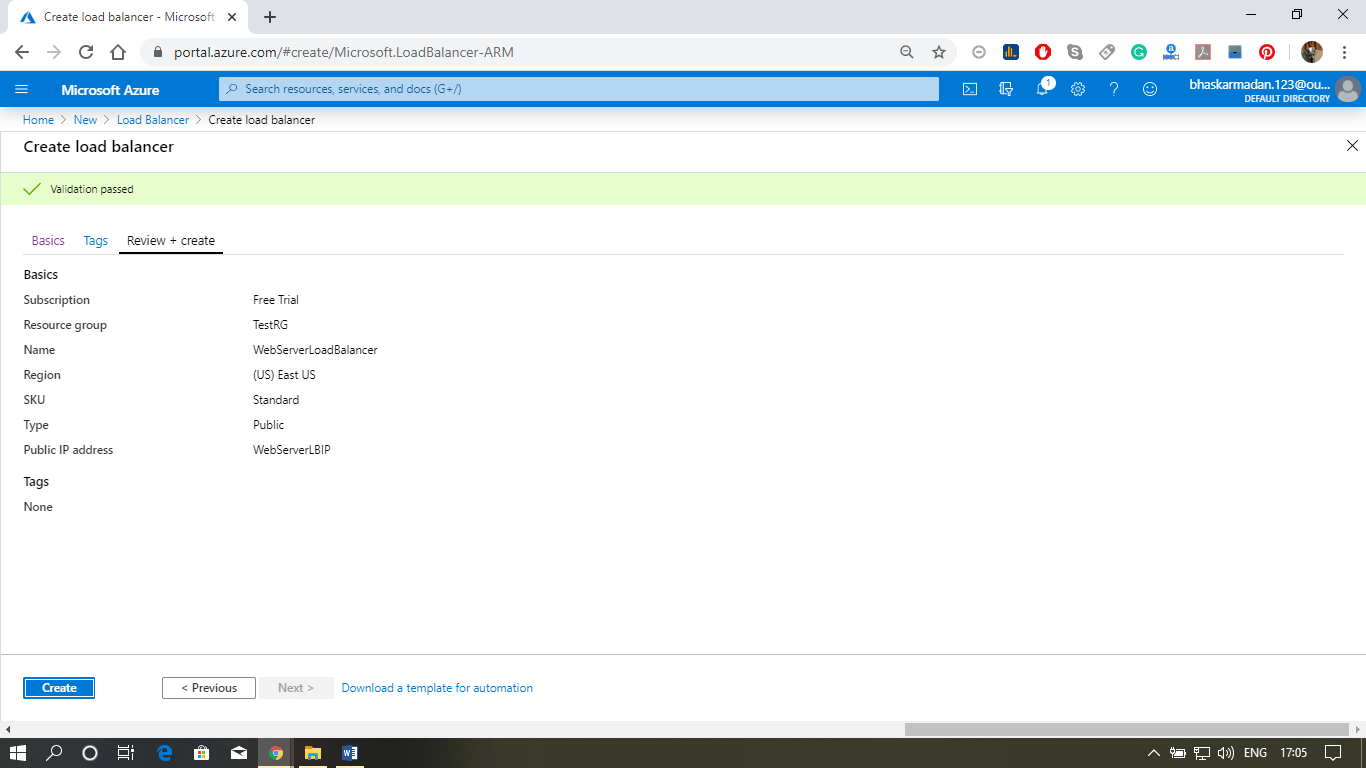
Step 3: You will be redirected to the review page. Check all the details and click on Create.
Azure Load Balancer
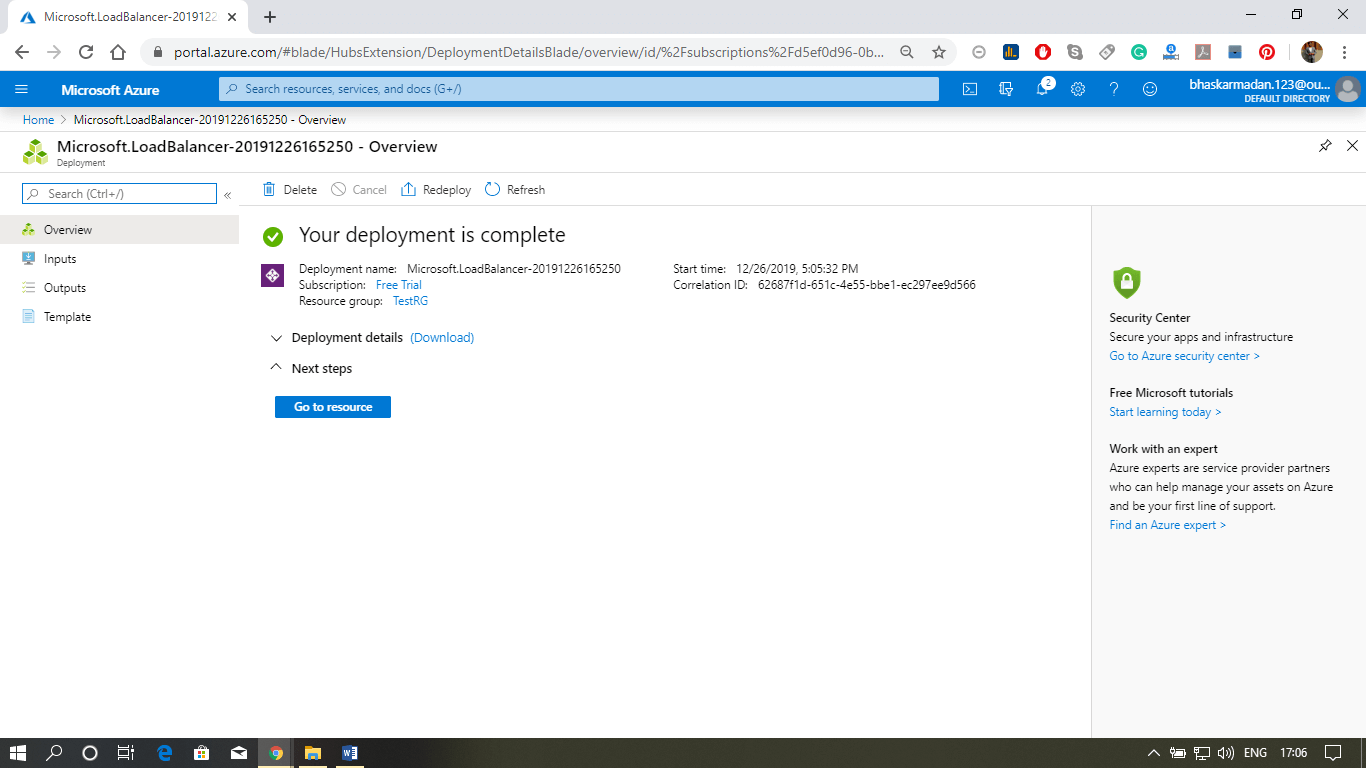
Your Load Balancer is now created.
Azure Load Balancer

Azure Availability Zones and Sets

If we want to migrate a mission-critical application into Azure and because of the nature of the application, one of the key requirements is to make an application resilient to both reasonable failures, data center failure, and also even rack failure. So, to make that application highly available in all circumstances, we use Azure services that can deliver that requirement in terms of making application resilient to reasonable failures.
Azure Availability Zones and Sets
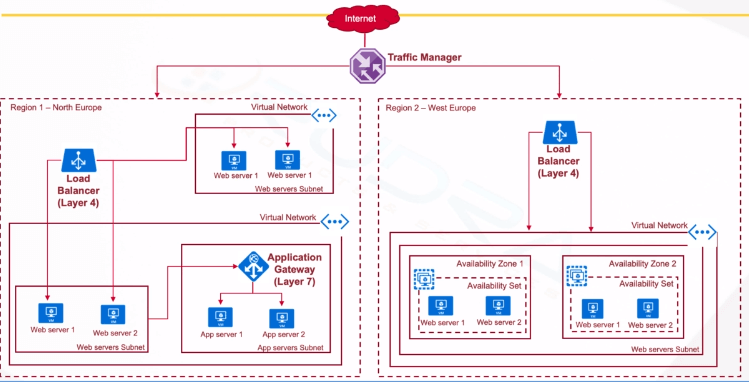
Traffic Manager: We can use traffic manager to monitor the endpoints located in different regions, and if any of the endpoints are no longer reachable, then all the traffic can be routed to other regional endpoints. It contains different routing methods, such as priority weightage, performance, geographic, etc.
Azure Load balancer: We can use Azure load balancer to balance the traffic between our web servers or application servers. It offers layer-4 load balancing, i.e., if we use source IP, source port, destination IP, destination port, and protocol using which we can configure the rules in load balancer to load balance traffic between a form of web servers.
Application Gateway: If we want to load-balance traffic based on URL based routing, or we can say that we want to host multiple sites on the same public IP address and other things, then we can use the application gateway.
To deliver high availability, Azure provides two more important features.
Availability Zone: It is a high availability offering that protects your application and data from data center failures. Generally, every Azure region consists of multiple data centers located at different physical locations. When you are deploying your services into Azure, you can able to select into which availability zone you want to deploy your service.
Availability Set: It works at a rack level. It is a logical grouping of the virtual machine within the data center that allows Azure to understand how your application is built to provide for redundancy and availability. The availability set consists of two domains one is fault domain, and another is the update domain.
  • Fault Domain: It is a logical group of the underlying hardware that share a common power source and network switch similar to a rack within an on-premises data center. So, if we are deploying all the virtual machines into the same fault domain, then any hardware failure will knock out all the virtual machines in that particular rack or fault domain.
  • Update Domain: It is a logical group of the underlying hardware that can undergo maintenance or be rebooted at the same time because Azure will do infrastructure management.
  • Managed Disk fault domains: For VMs using Azure Managed Disks, VMs are aligned with managed disk fault domains when using a managed availability set. This alignment ensures that all the managed disks attached to a VM are with the same managed disk fault domain.

Azure Network Interface

A Network Interface (NIC) is an interconnection between a Virtual Machine and the underlying software network. An Azure Virtual Machine (VM) has one or more network interfaces (NIC) attached to it. Any NIC can have one or more static or dynamic public and private IP addresses assigned to it.
Configuring the network interface
Virtual network & subnets: we can attach a network interface to a VNet and Subnet, and once we deployed a NIC into a VNet, we can't change it.
IP configuration: Public and private IP addresses will be assigned at the NIC level. Primary & secondary IP configurations
NSG & Routes: We can apply zero or one network security group and one or more routes to a network interface.
IP Forwarding: This setting must be enabled for every network interface that is attached to the virtual machine.
DNS servers- We can specify which DNS server the Azure DHCP servers assign a network interface.

IP addresses

It is a unique reference that identifies each computer using the Internet Protocol to communicate over a network.
There are two ways to define an IP address:
Private IP AddressingPublic IP addressing
Private IPv4 addresses enable a virtual machine to communicate with other resources in a virtual network or other connected networks.When we assign a public IP address to an Azure resource that supports public IP addresses, which enables Inbound communication from the internet to the resource, resources like Azure VMs and Outbound connectivity to the internet using a predictable IP address is called a public IP address.
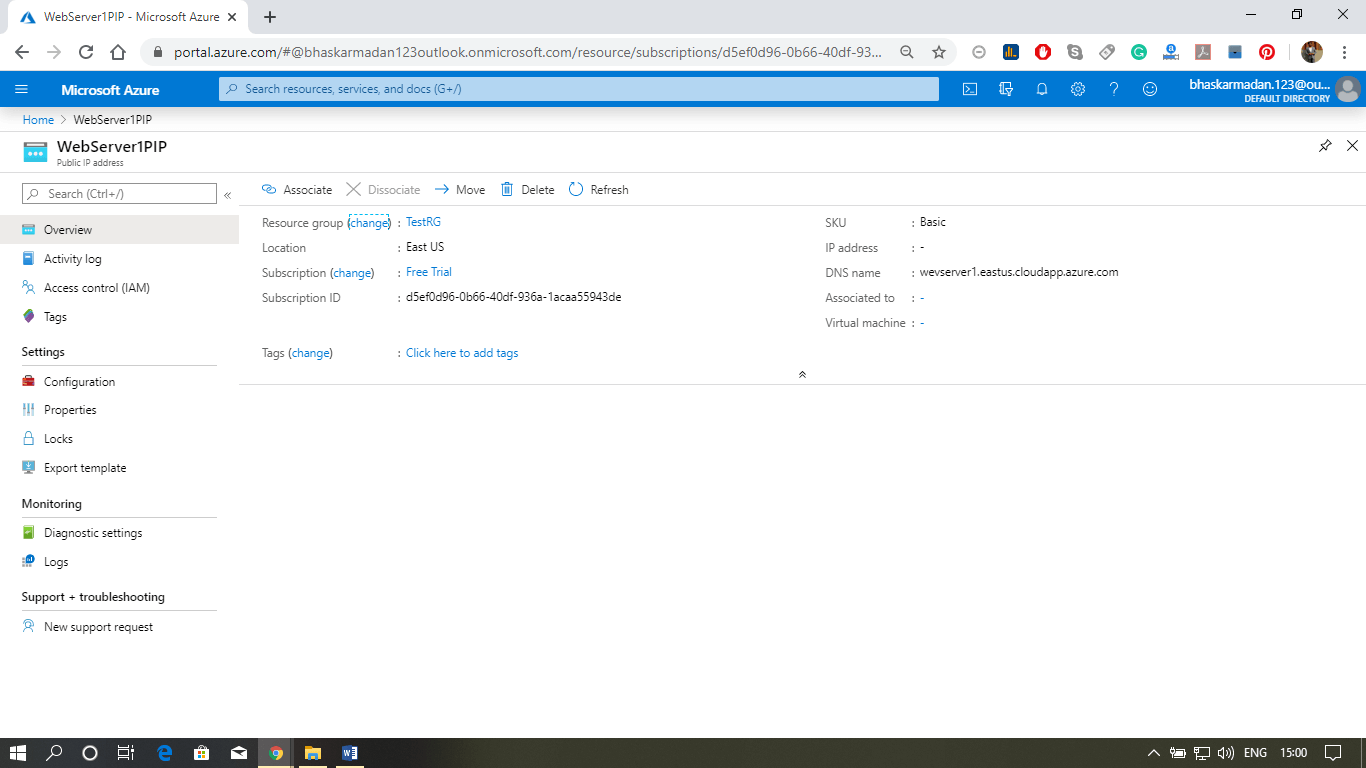
When we select the dynamic addresses, Azure automatically assigns the next available address from the address space of the subnet you selected.The dynamic addresses are released when a public IP address resource will be dissociated from a resource it is associated to.
When we select static addresses, we must manually assign an available IP address from within the address space of the subnet you selected.Static IP addresses are assigned to the machine when a public IP address is created.

Hostname resolution

We can specify a DNS domain name label for a public IP resource, which creates a mapping for domainnamelabel.location.cloudapp.azure.com to the public IP address in the Azure-managed DNS servers.
Internal DNS hostname resolution (for VMs)
All Azure VM's are configured with Azure-managed DNS servers by default unless you want to set custom DNS servers explicitly, and these Azure managed DNS servers provide internal name resolution for VM's that reside with the same VNet. So if we want to RDP from one virtual machine to another virtual machine, you actually can use the name of the machine in stuff Private IP address.

Configure multiple NICs and IP addresses for a VM

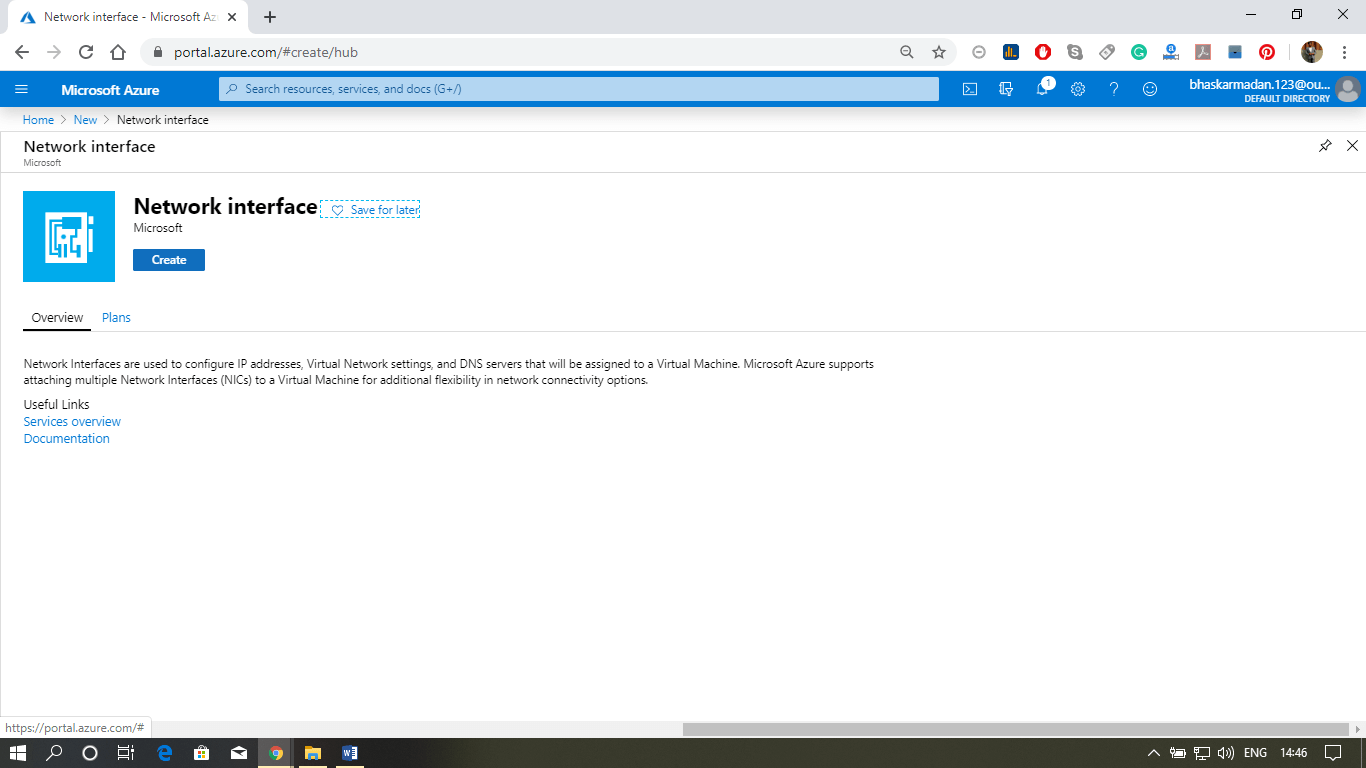
Step 1: Click on Create resource button and type-in network interface. Then click on Network Interface and create.
Azure Network Interface
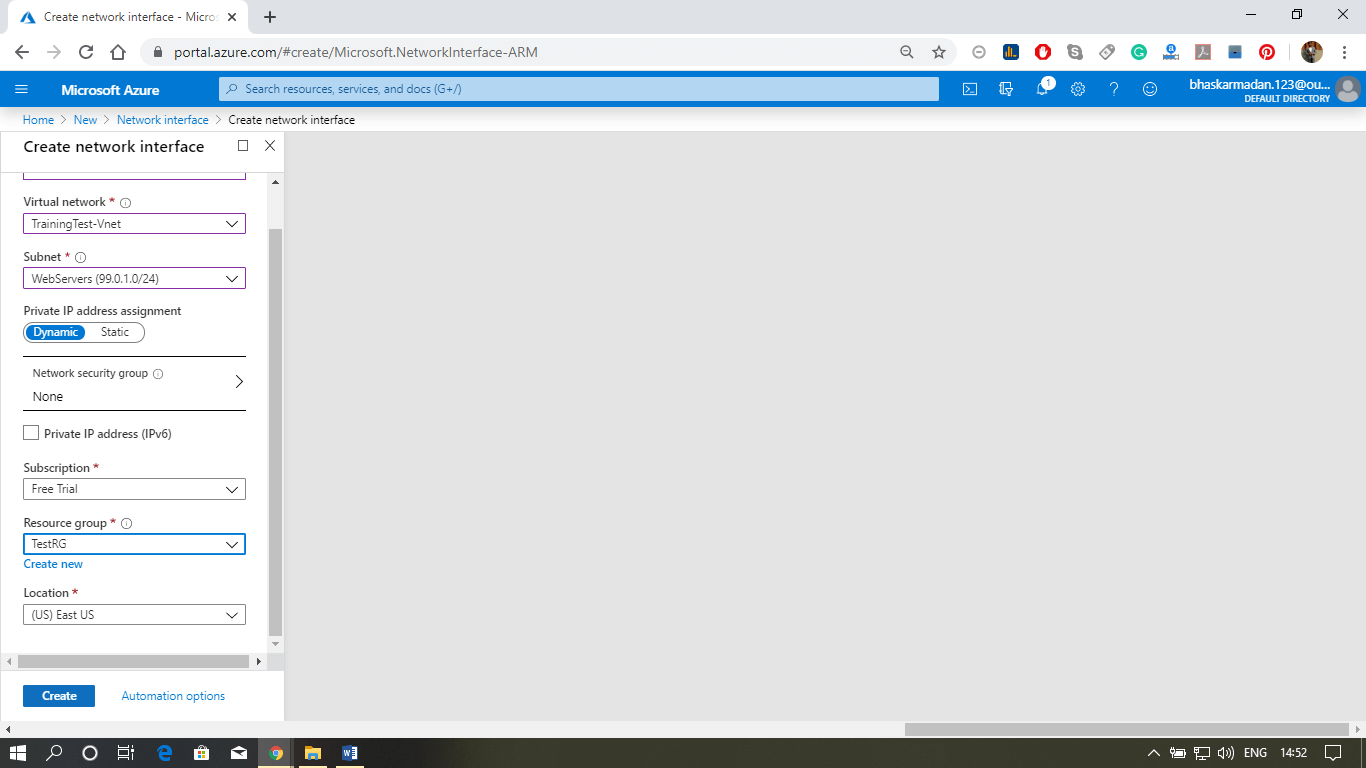
Step 2: Now, fill the required details and click on create.
Azure Network Interface
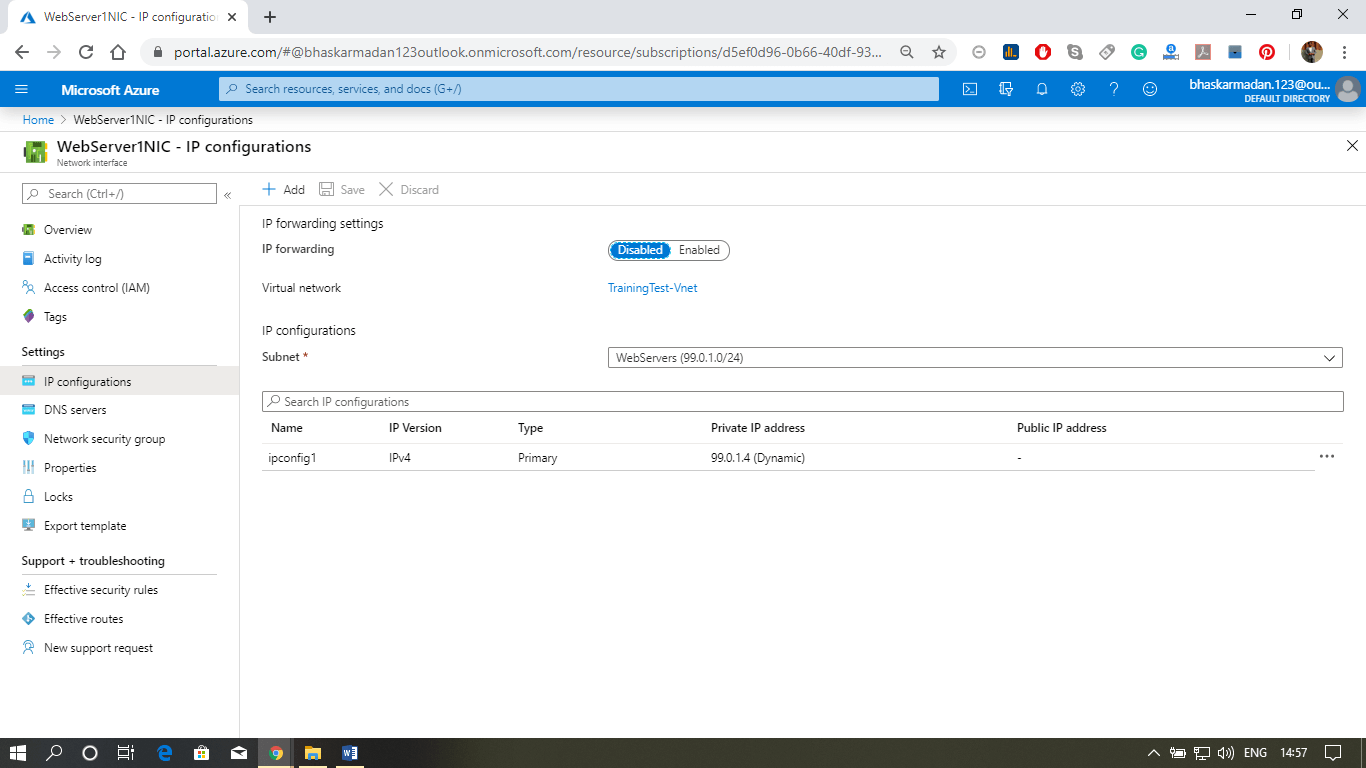
Step 3: Your Network Interface will be created and ready to embed.
Azure Network Interface
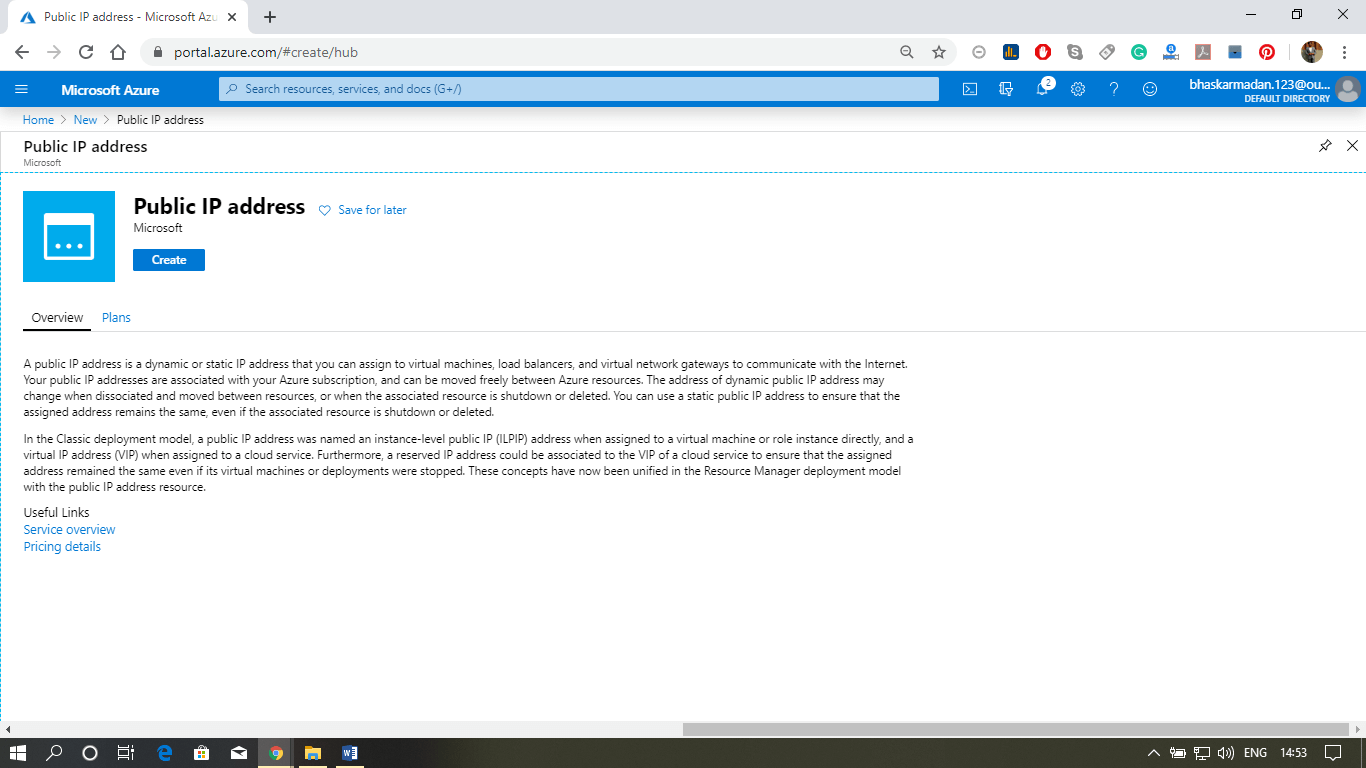
Step 4: Again, go to the home page and create a public IP address.
Azure Network Interface
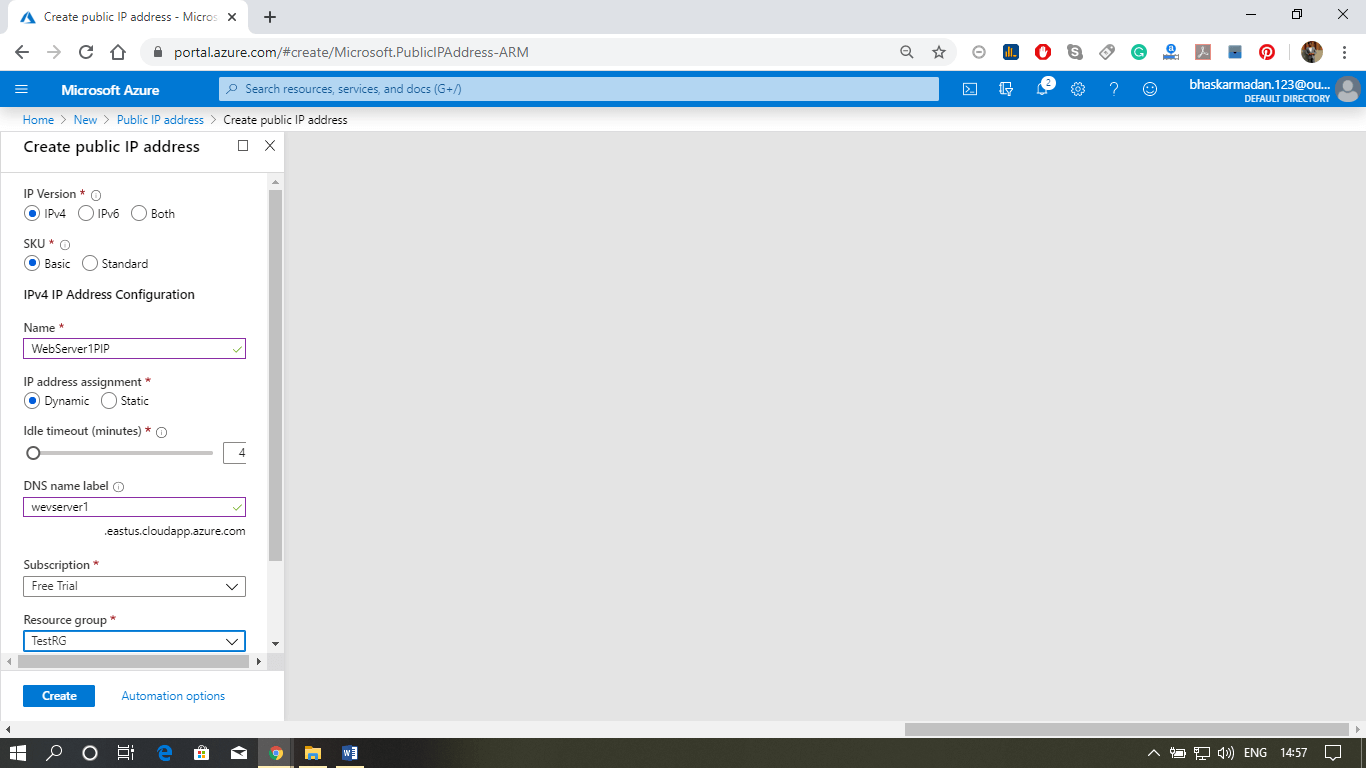
Step 5: Now, fill the required details and click on create.
Azure Network Interface
Step 6: You have now both the NIC and IP address ready to use with the virtual machine.
Azure Network Interface

Azure Network Security

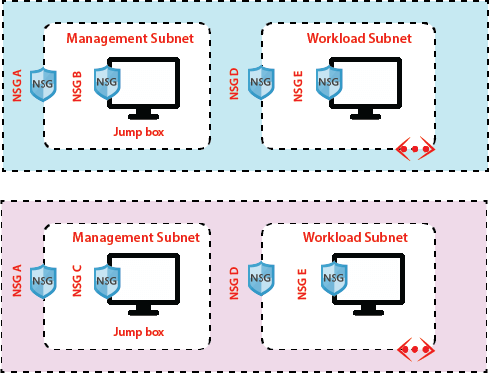
A network security group consists of security rules that allow or deny inbound/Outbound network traffic to or from different types of Azure resources that we will host in our Azure virtual network. And we can apply the network security group at different levels. For example:
Azure Network Security

Security rule properties:

Name: The name of the network should be unique within the network security group.
Priority: Security rules are processed in priority order with a lower number has the highest priority.
Source or Destination: (The IP address, CIDR (Classless inter-domain routing) block, service tag, or application security group) The ability to specify multiple individual IP addresses and ranges in a rule is referred to as augmented security rules.
Protocol: TCP, UDP, etc.
Port range: we can specify an individual or range of ports
Action: Allow or Deny

Service Tags

Service tag represents a group of IP address prefixes to help minimize complexity for security rule creation. We cannot create our service tag, nor specify which Ip address is included within a tag. Microsoft manages the address prefixes encompassed by the service tag, and automatically updates the service tag as an address change.
Earlier, if we want to allow communication to Azure service from our virtual machine, we need to configure IoT of outbound rules because Microsoft is providing list of IP addresses for each service you need to configure those list of IP addresses in our NSG rule to allow outbound connection from our virtual machine to that particular service and also in case if Microsoft is changing the addresses you need to change your rules.
Using service tags will simplify your NSG rules a lot, for example:
Storage: This tag denotes the IP address space for the Azure Storage service. If you specify Storage for the value, traffic is allowed or denied to storage.
SQL: This tag denotes the address prefixes of the Azure SQL Database, Azure Database for MySQL, Azure Database for PostgreSQL, and Azure SQL Data Warehouse services.
Azure CosmosDB: This tag denotes the address prefixes of the Azure Cosmos Database services.
AzureKeyVault: This tag denotes the address prefixes of the Azure KeyVault service. If you specify AzureKeyVault for the value, traffic is allowed or denied to AzureKeyVault.
EventHub: This tag denotes the address prefixes of the Azure EventHub service. If you specify EventHub for the value, traffic is allowed or denied to EventHub.

Default Rules

Some default rules are created by default when we create NSG. There are two types of default rules.
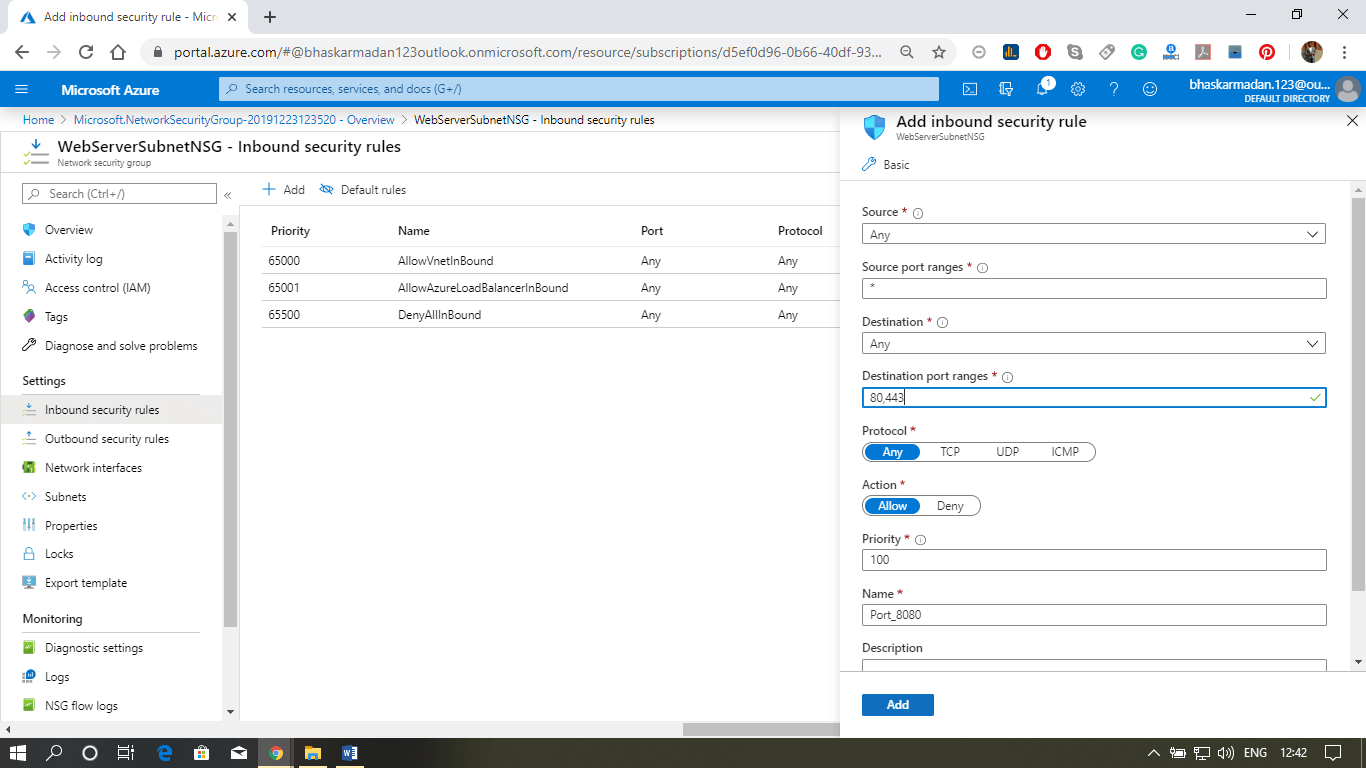
Inbound Security rules
  • AllowVNetInbound: Traffic is allowed from any resources within the VNet
  • AllowAzureLoadBalancerInbound: Any traffic originating from Azure load-balancer to any of the virtual machines within the network is permitted.
  • DenyAllInbound: By default, virtual machines in the virtual network can communicate with each other, and also Azure load balancer can communicate with virtual machines within the virtual network.
Azure Network Security
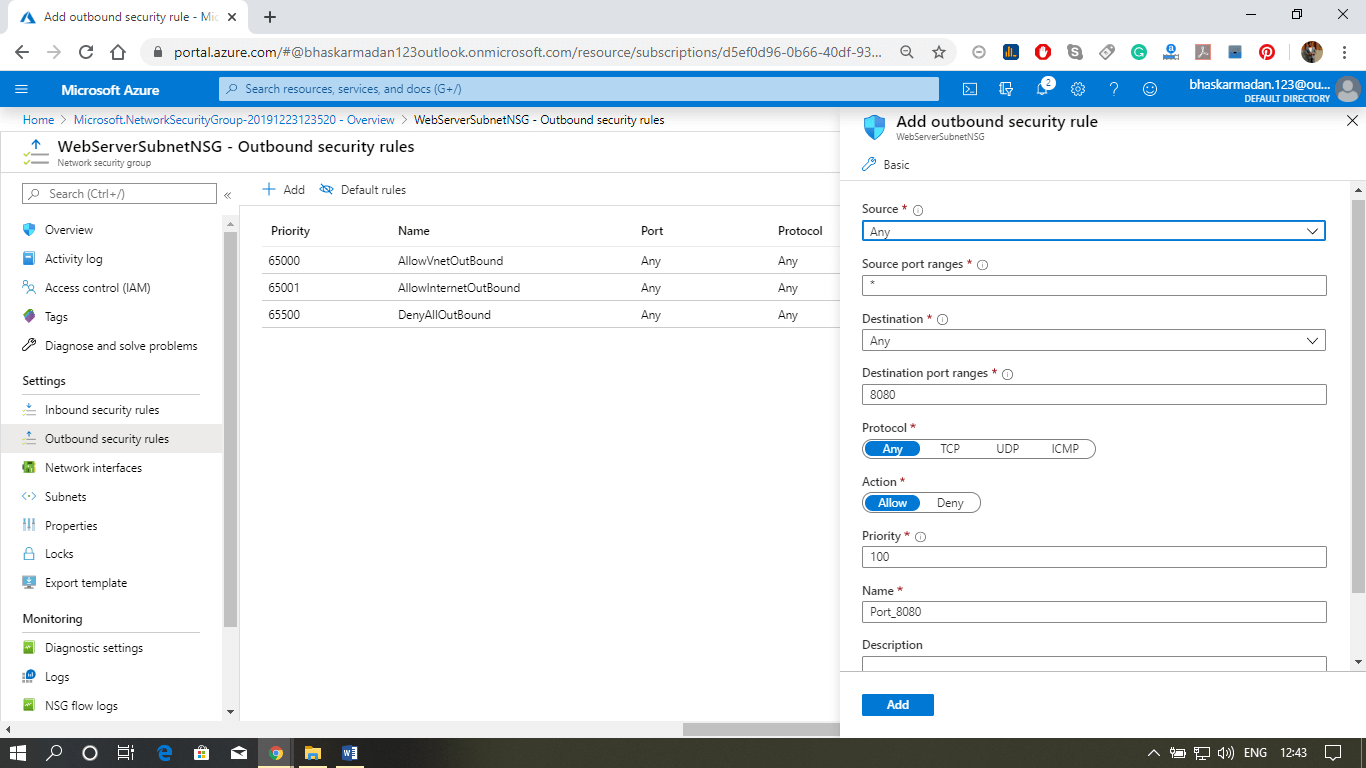
Outbound Security rules
  • AllowVNetOutBound: Traffic is allowed through any resources within the VNet
  • AllowInternetOutBound: Traffic originating from any resources in the VNet to the Internet is allowed.
  • DenyAllOutBound: By default, virtual machines in a virtual network can communicate with each other, and also Azure load balancer can interact with the virtual machine within the virtual network.
Azure Network Security

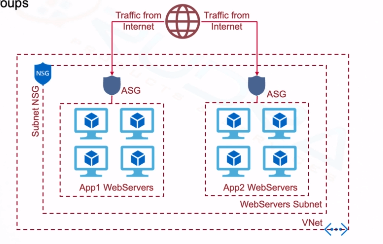
Application Security Groups

Application security groups enable you to configure network security as a natural extension of an application's structure, allowing you to group virtual machines and define network security policies based on those groups. For example -
Azure Network Security

Configuring an NSG at Subnet and VM level

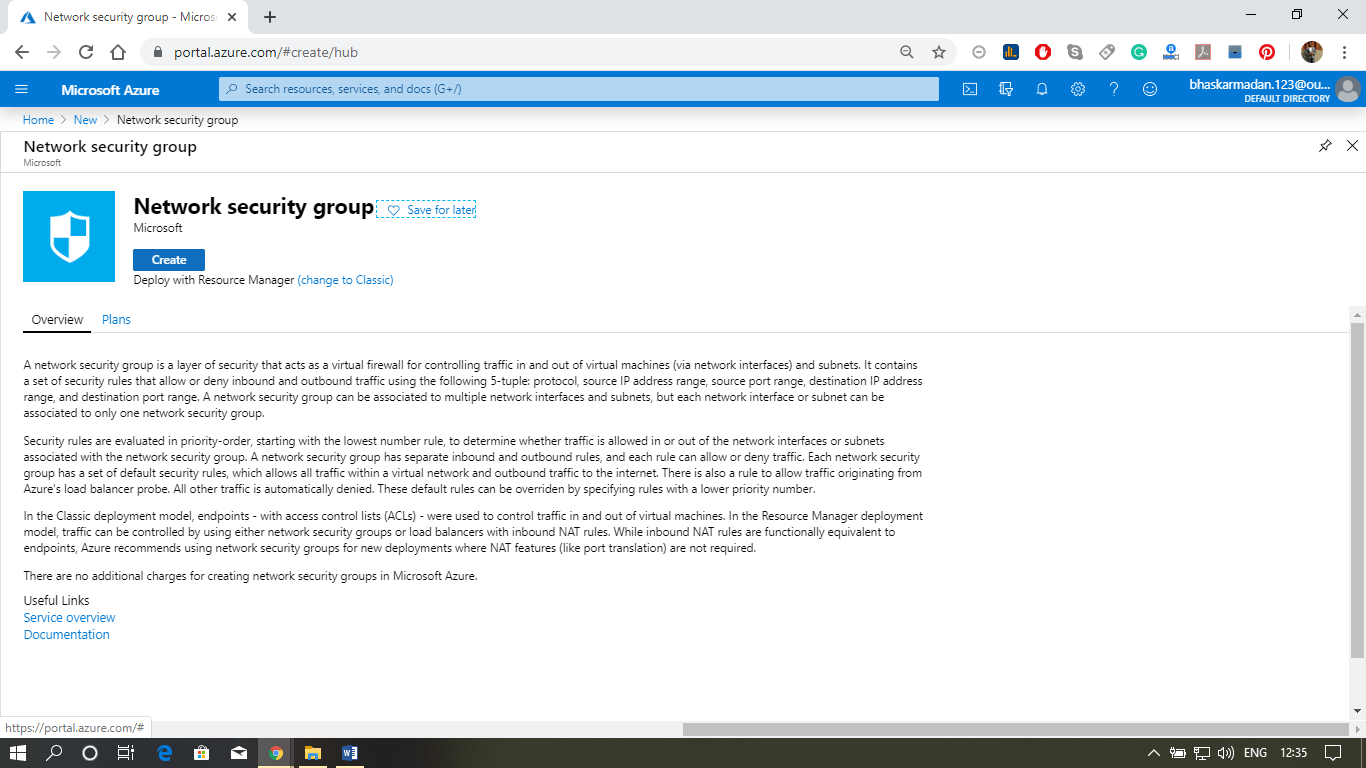
Step 1: Click on create a resource button and type-in Network Security Group. Then select Network Security Group, and click on create button.
Azure Network Security
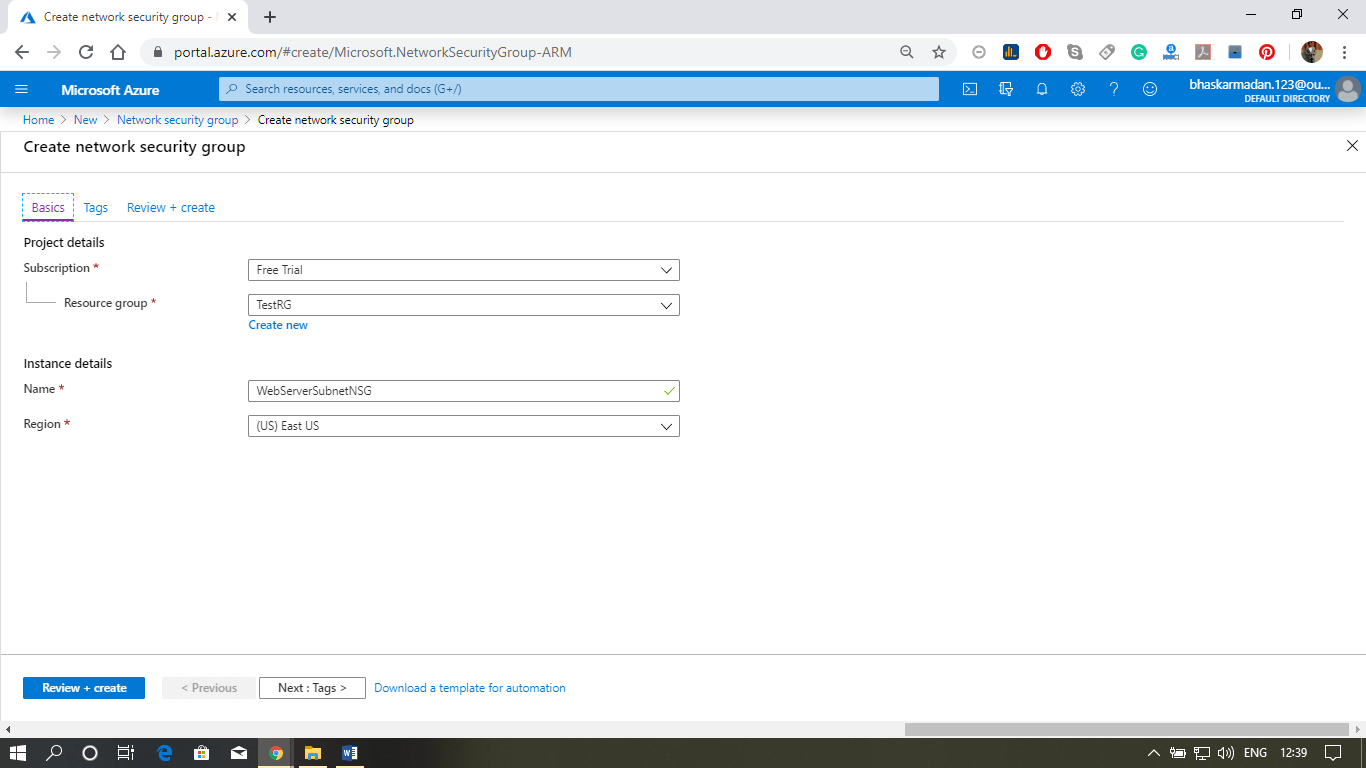
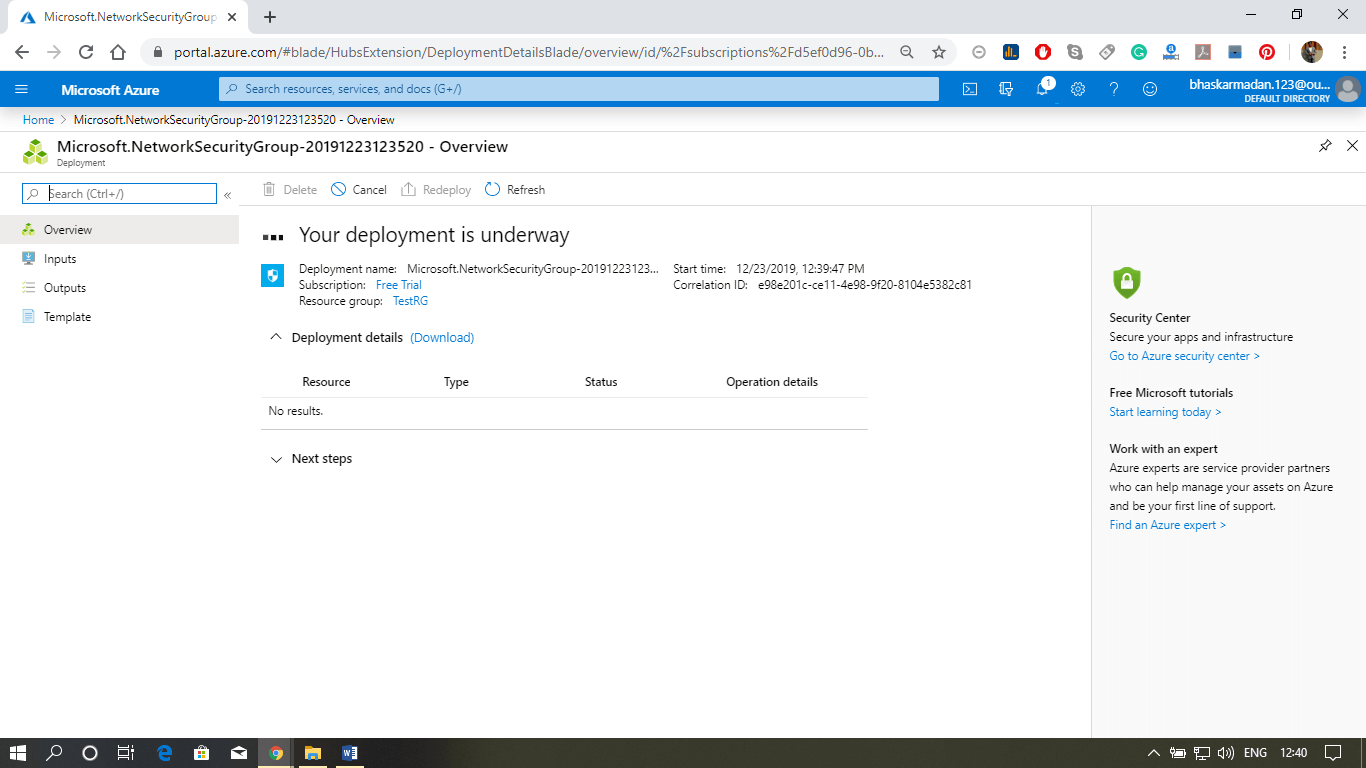
Step 2: Now, you are on the Network Security Group creation page. Select the resource group, fill the name, select the region, and click on review+create.
Azure Network Security
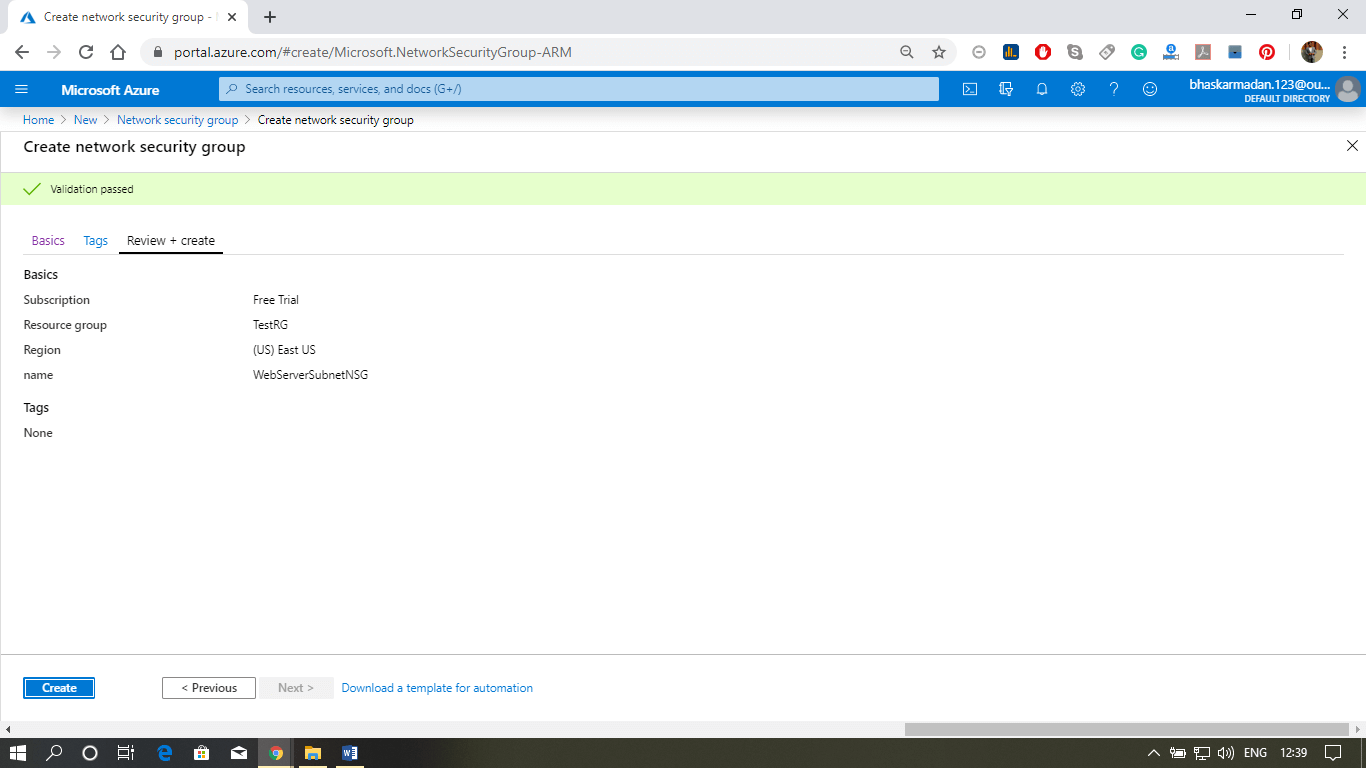
Step 3: Your NSG is created, now we will associate this NSG with the subnet.
Azure Network Security
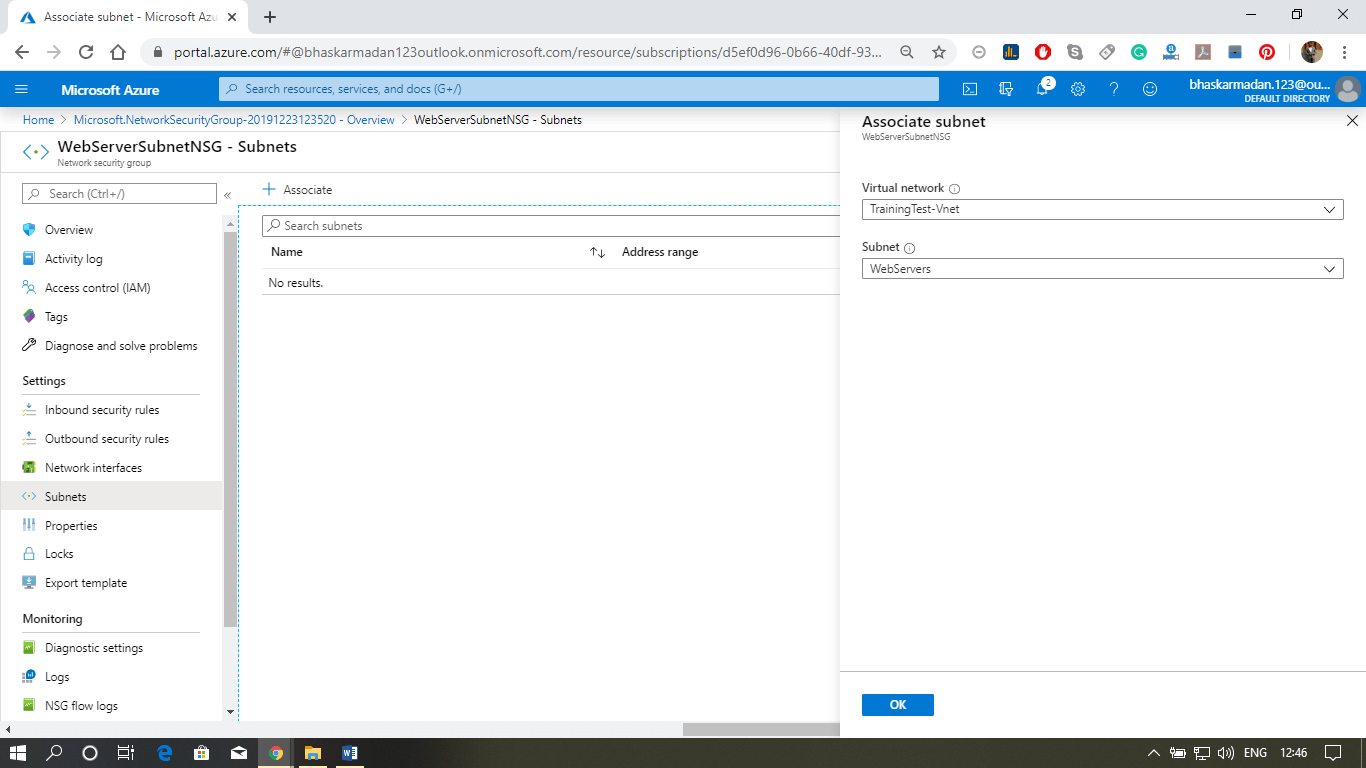
Step 4: Click on the subnet, then click on add Associate. Select the virtual network and subnet with which you want to associate this NSG.
Azure Network Security
Step 5: Finally, click on the ok button. Your NSG is now associated with the subnet.

Azure Virtual Network

The Azure Virtual Network is a logical representation of the network in the cloud. So, by creating an Azure Virtual Network, we can define our private IP address range on Azure, and also deploy different kinds of Azure resources. For Example - Azure virtual machine, App service environment, Integration service environment, etc.

Azure Vnet Capabilities

Following are the capabilities of the Azure Vnet:
Isolation and segmentation: To deploy resources such as virtual machines into virtual networks, they will be isolated from other resources. By putting the virtual machine into your virtual network, it cannot be reached from the Internet or other Azure resources unless we enable communication in between. We can also use subnets within virtual networks to further segment our resources within the network.
Communication with the Internet: All resources in a virtual network can communicate outbound to the Internet by default. But it needs to establish an inbound connection from the Internet. We can either use public IP or load balancers.
Communication between resources: Communication between the number of resources inside the virtual network or with other resources through service endpoints.
Communication with on-premises resources: By establishing either point to site VPN or site to site VPN or Express route, your workloads within Azure virtual network can seamlessly communicate with workloads within our on-premises data center.
There are lots of capabilities within the Azure virtual network that we can use to control the traffic.
Filter network traffic: We can use Network Security Groups, Application Security Group, Azure firewall, or third-party network virtual appliance to filter the traffic coming to the resources in the virtual network.
Route network traffic: We can route the network traffic using the routing tables, we can configure user-defined routes to route all the outbound traffic, let's say via a firewall.
Monitor network traffic: By network security groups and traffic analytics monitoring solution, you'll be able to carry out extensive monitoring on both inbound and outbound communications.
Subnet
Subnet plays a vital role because many configurations will be done at a subnet level. It is a range of IP addresses in the VNet. Vnet can be divided into multiple subnets based on different design considerations, for example - we can deploy a virtual machine, App services environment, integration service environment, etc. VMs & PaaS services deployed to subnets n the same VNet and can communicate with each other without any extra configuration. Route tables, NSG, Service endpoints, and policies are configured to the subnets.
Creating Azure Virtual Network and subnets
Step 1: Select your existing resource group, or you can create a new resource group.
Azure Virtual Network
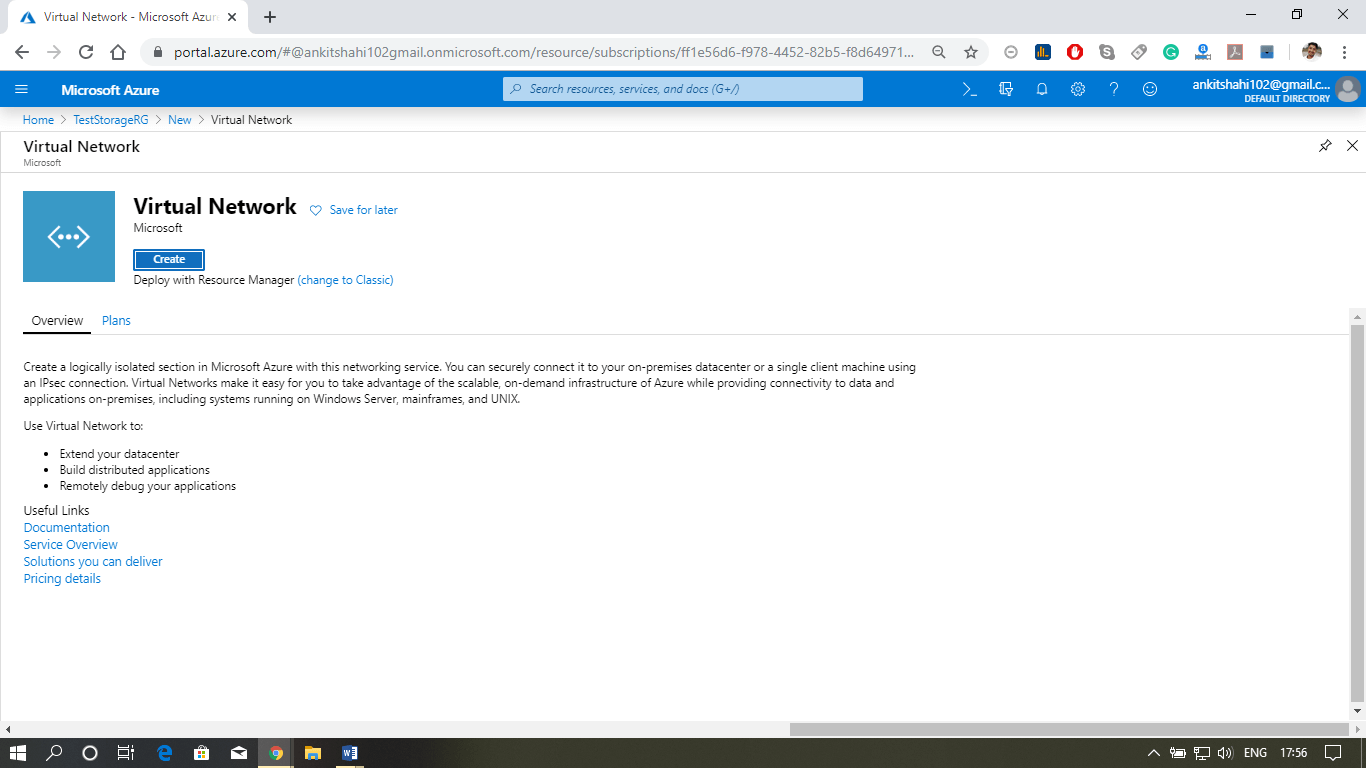
Step 2: After opening your resource group, click on Add then type in Virtual network in the search box. Click on Create.
Azure Virtual Network
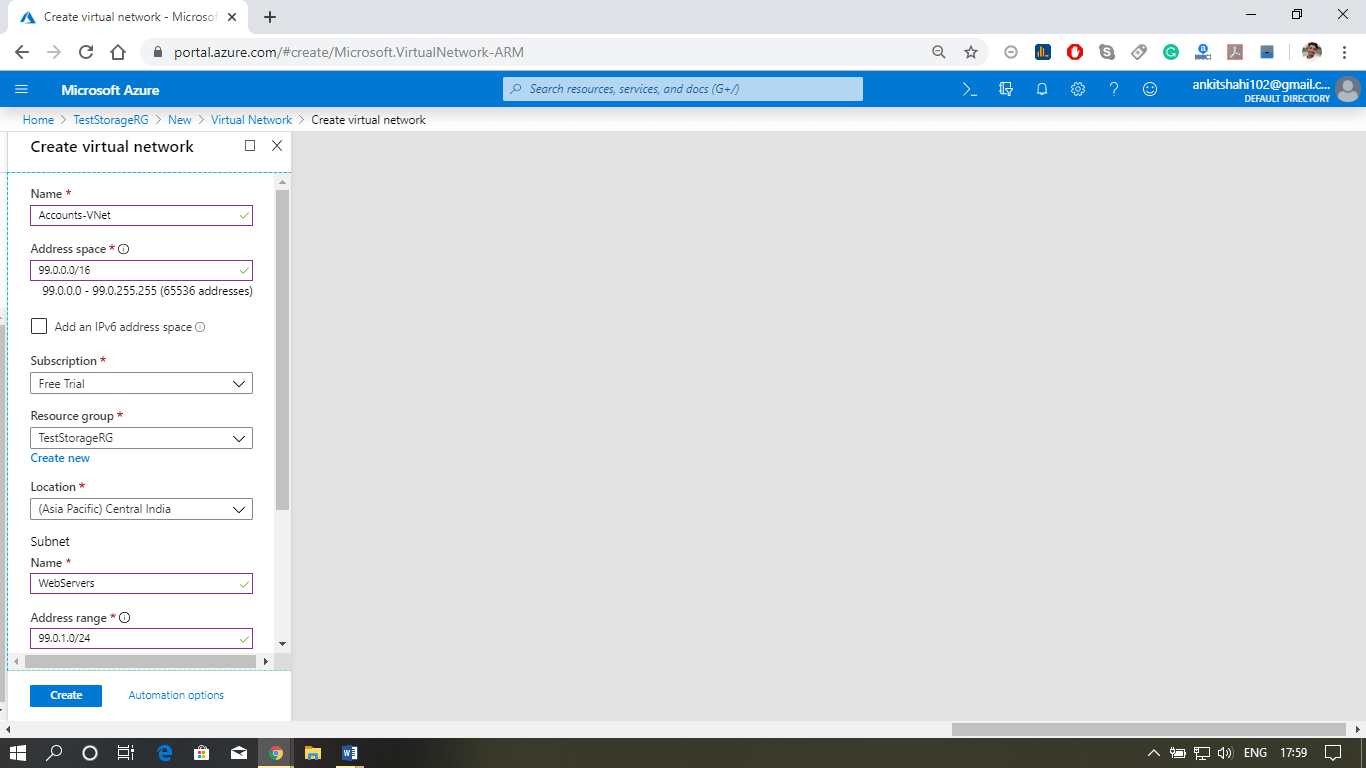
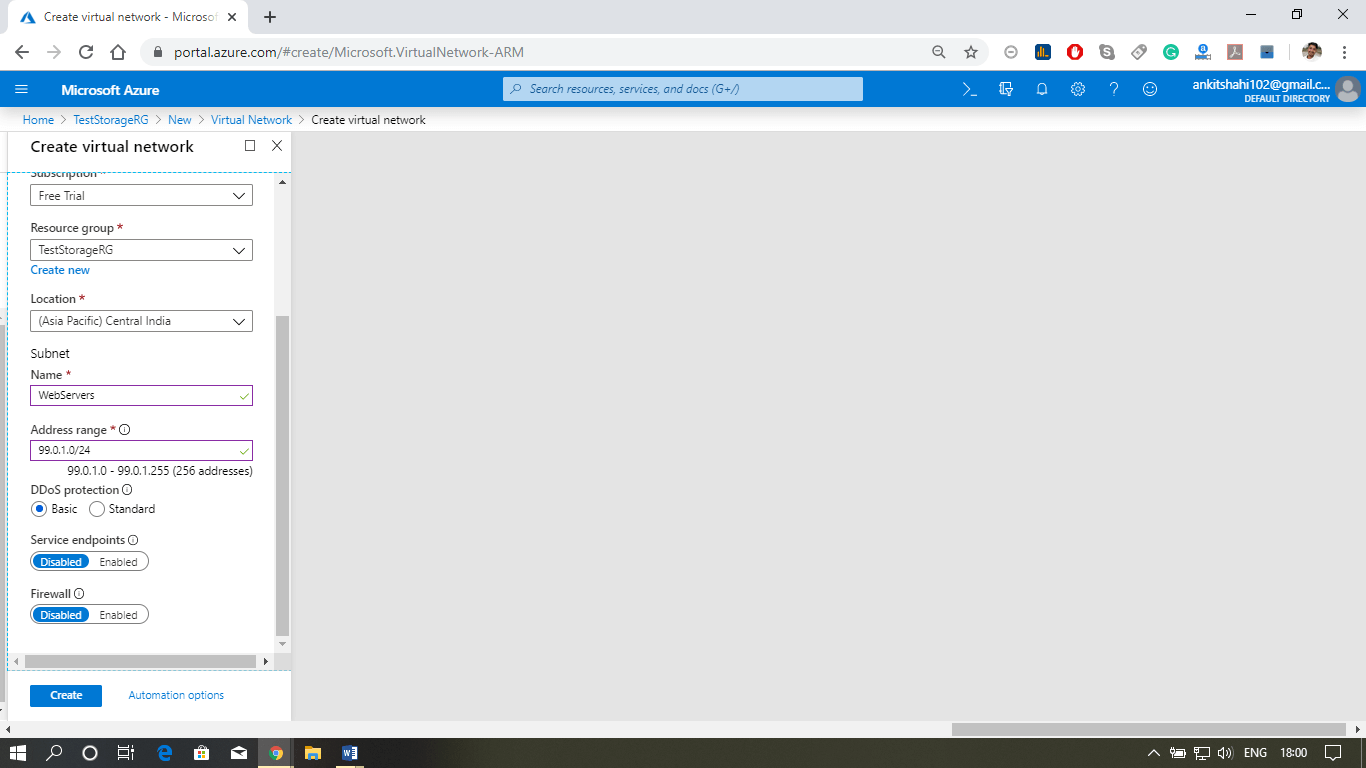
Step 3: A new window will appear, where you need to fill the details like - name, address space (e.g., 99.0.0.0/16), Name of the subnet, subnet address space (e.g., 99.0.1.0/24). Leave everything as it is and click on create.
Azure Virtual Network
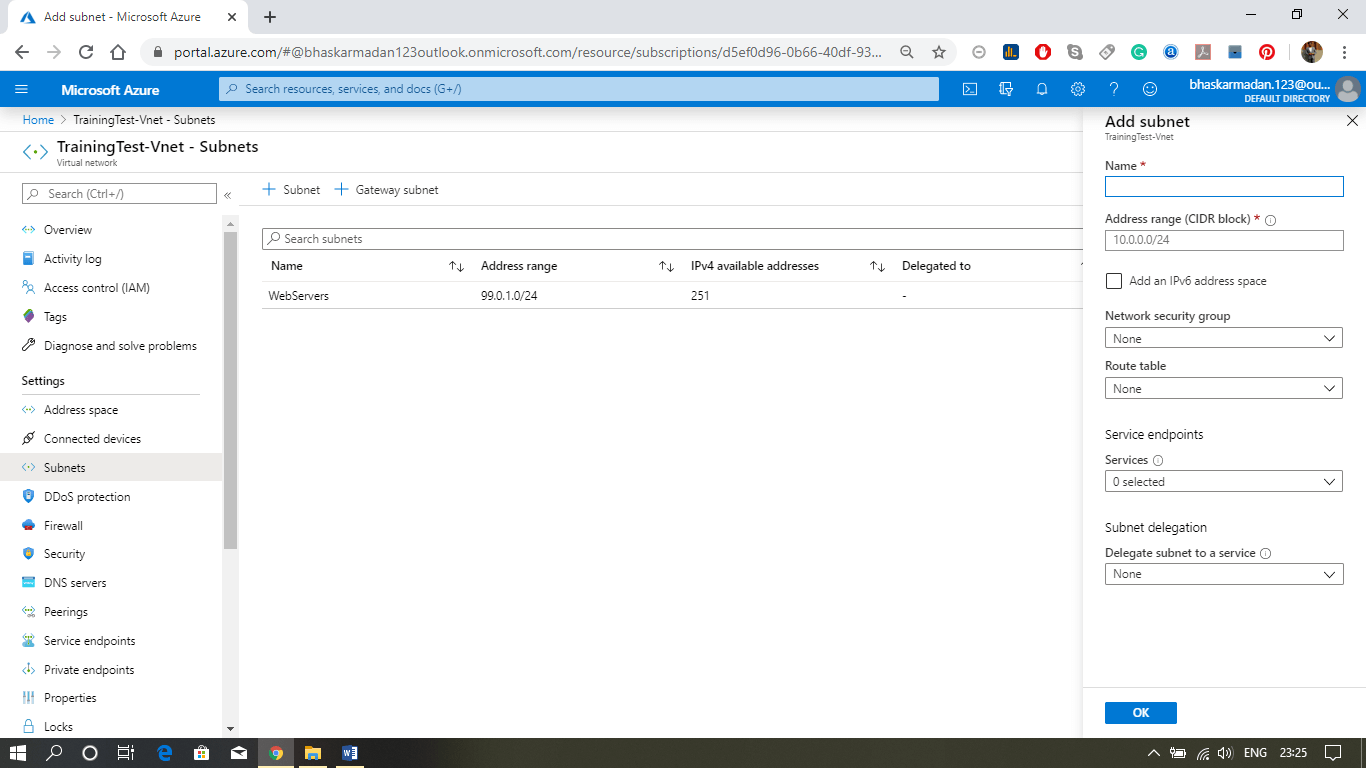
Step 4: Now, your Vnet is created. Let's add a subnet into it. Click on the subnet, then click on add subnet.
Azure Virtual Network
Step 5: On the next slider window, give a name to the subnet you want to create, provide the address range (if the address range is currently in use, you cannot change it). Then click on the ok button to create the subnet.