Azure App ServicesThe most fundamental building block of Azure App Service is the App Service plan or App Service environment.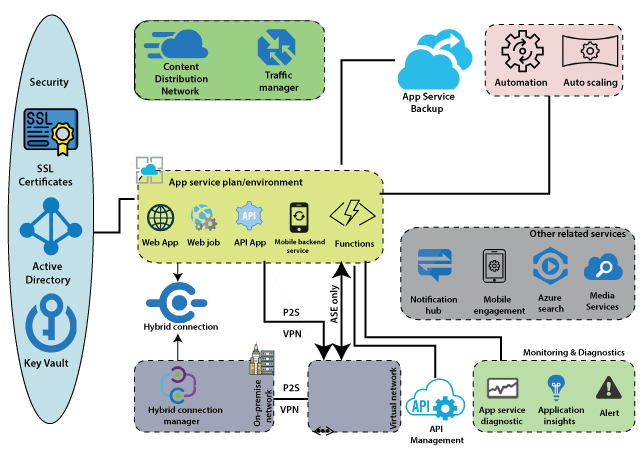 There are two types of hosting environments within App Service. App Service plan and App Service environment. App Service Environment is a more sophisticated version of the App Service plan and comes with a lot more features when compared to the App Service plan. Within these, we can host several Apps like - web applications, web jobs, batches, APIs, and mobile backend services that can be consumed from our mobile Front-End. There are two types of hosting environments within App Service. App Service plan and App Service environment. App Service Environment is a more sophisticated version of the App Service plan and comes with a lot more features when compared to the App Service plan. Within these, we can host several Apps like - web applications, web jobs, batches, APIs, and mobile backend services that can be consumed from our mobile Front-End.Other related services are closely related to these apps within the App service plan. Those related services are a notification hub that we can use to push notifications into mobile devices. We can use Mobile engagement to carry out Mobile analytics. Apart from these related services, there is one more service, which is very important when it comes to APIs, which is API management. API management can act as a wrapper around our API apps when we're exposing those APIs to the outside world. It comes with a lot of features such as throttling, security, and it will be beneficial if we want to commoditize our APIs and sell it to the outside world. To enable communication between apps in the App Service plan and apps installed on virtual machines within the virtual network. There are two ways we can do it. One way is to establish Point-to-site VPN between apps in the App Service plan and virtual network via which the apps can communicate with each other. And the second way is if we have the App service environment. Because it will get deployed into a virtual machine by itself, the Apps within that App Service environment can seamlessly communicate with the apps installed on virtual machines within the virtual network. And finally, there are two important things. The first one is security, and the second one is monitoring to secure and control the App services environment. App Service planAn app service plan denotes a set of features and capacity that we can share across multiple apps in the same subscription and geographical region. A single or dual app can be configured to run on the same computing resources.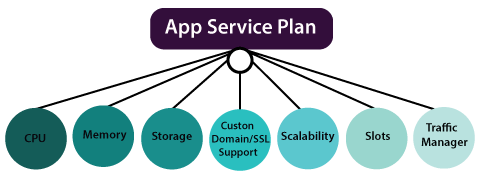 Each App Service plan defines: Each App Service plan defines:
Environment features
Web apps OverviewAzure App Service Web Apps is a service for hosting web applications. The key feature of App Service Web Apps.
Creating App Service Plan in Azure PortalStep 1: Click on create a new resource and search for App Service Plan to create it.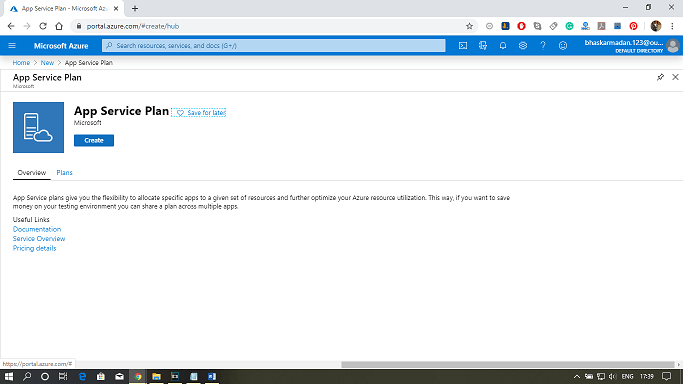 Step 2: Fill-in all the required details and select the SKU size, as shown in the figure below. Then click on create. Step 2: Fill-in all the required details and select the SKU size, as shown in the figure below. Then click on create.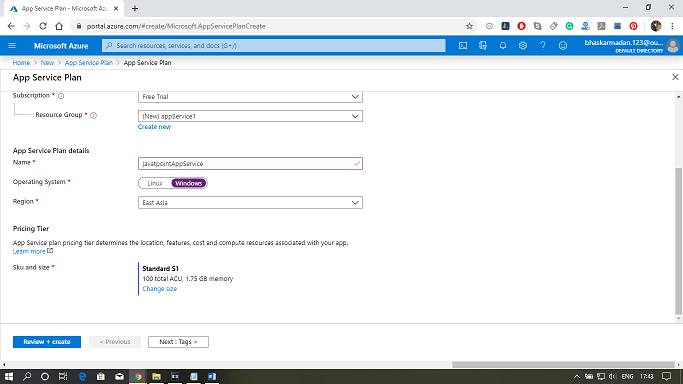 Step 3: Your app service plan will be created. You can now explore and modify it as per your requirement. Step 3: Your app service plan will be created. You can now explore and modify it as per your requirement.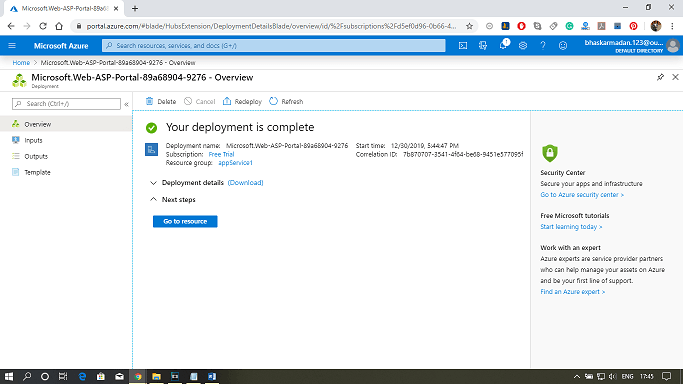 |
Sunday, 15 March 2020
Azure App Services
Azure Cloud Service
Cloud Service is a Platform as a Service that is designed to support web applications that are scalable, reliable, and cheaper to operate. Using cloud service, we can deploy a web application into Azure. We have more control over Virtual Machines. We can install custom software on VMs that uses Azure Cloud Service, and we can access them remotely.
Using cloud service, we don't create virtual machines. Instead, we provide a configuration file that tells Azure how many instances we would like to create, the size of the instance, and the platform will create them for us.
Cloud service is able to detect any failed VMs and applications and ready to start new VMs or application instances when a failure occurs. Cloud service applications shouldn't maintain state in the file system of its own VMs.
Cloud Service Roles
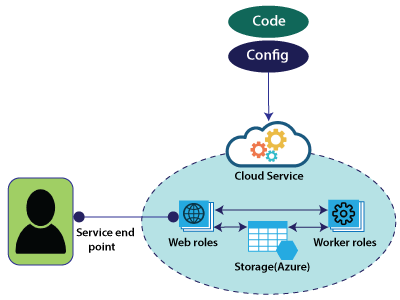
Web role: It automatically deploys and hosts our app through IIS.
Work role: It does not use IIS and runs our app standalone. If we want to run any continuous bathes, then we can use worker roles, and both the Web role and Worker role will interact with storage to get an application package, etc.
To deploy these Web roles and Worker roles, we will provide configuration and code associated with these web applications.
Cloud Service Components
Three key components constitute a cloud service.
- ServiceDefenition.csdef file specifies the settings that are used by Azure to configure the cloud service. For example - sites, endpoints, certificates, etc.
- ServiceConfiguration.cscfg contains the values that will be used to determine the configuration of settings for the cloud service. For example - number of instances, types of instances, ports, etc.
- Service package.cspkg used to deploy the application as a cloud service. First, it needs to be packaged using the CSPacK command-line tool. CSPacK generates an application package file that can be uploaded into Azure using the portal.
Creating cloud service using the Azure portal
Step 1: Click on create a resource and then type-in Cloud Service.
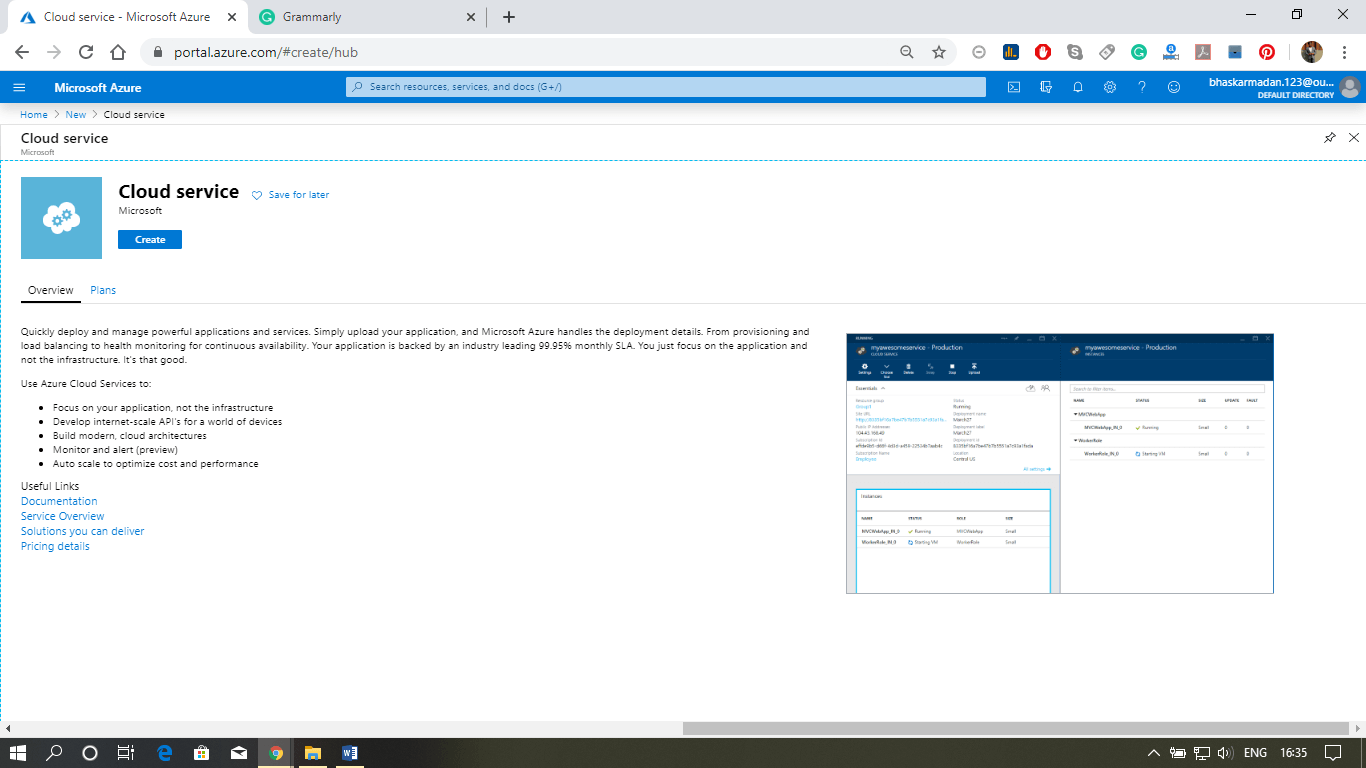
Step 2: After that, click on it and then click on create.
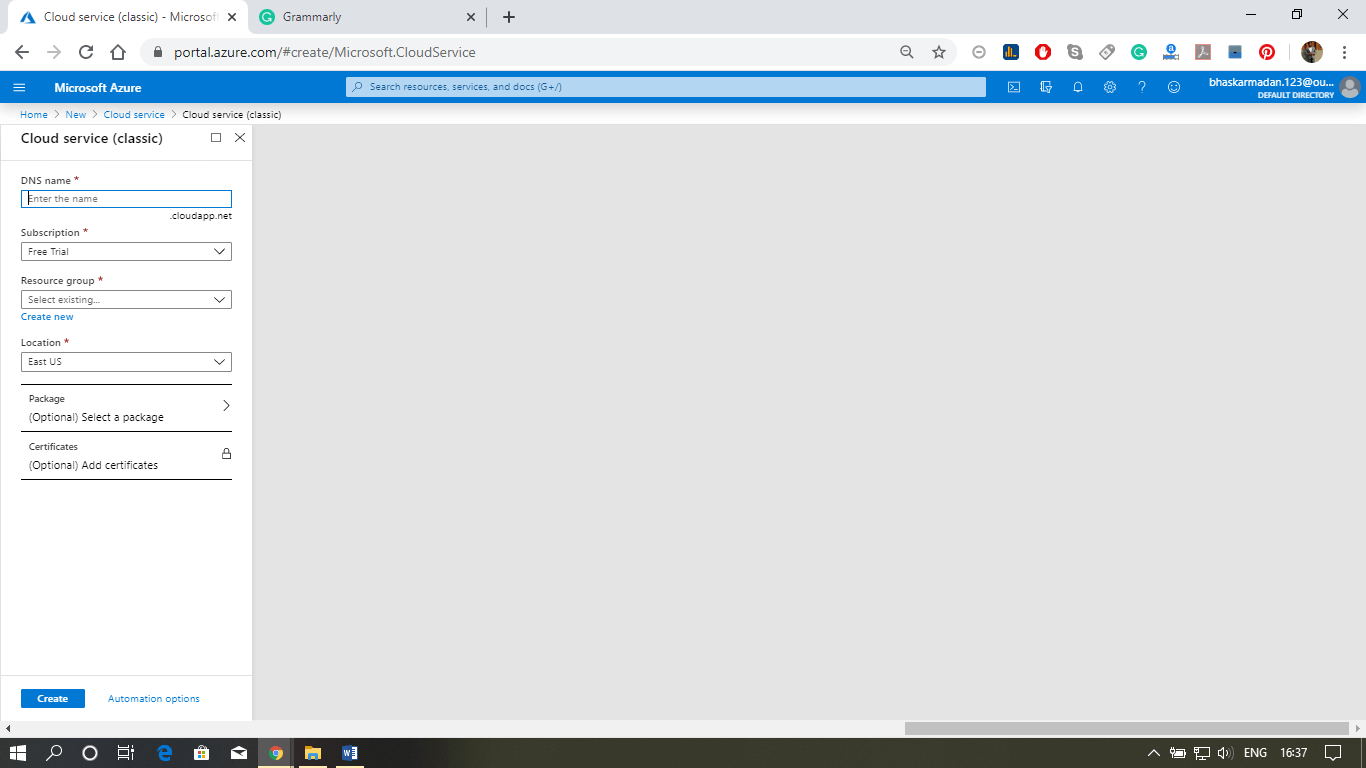
Step 3: Fill-in the DNS name, select the resource group, and location.
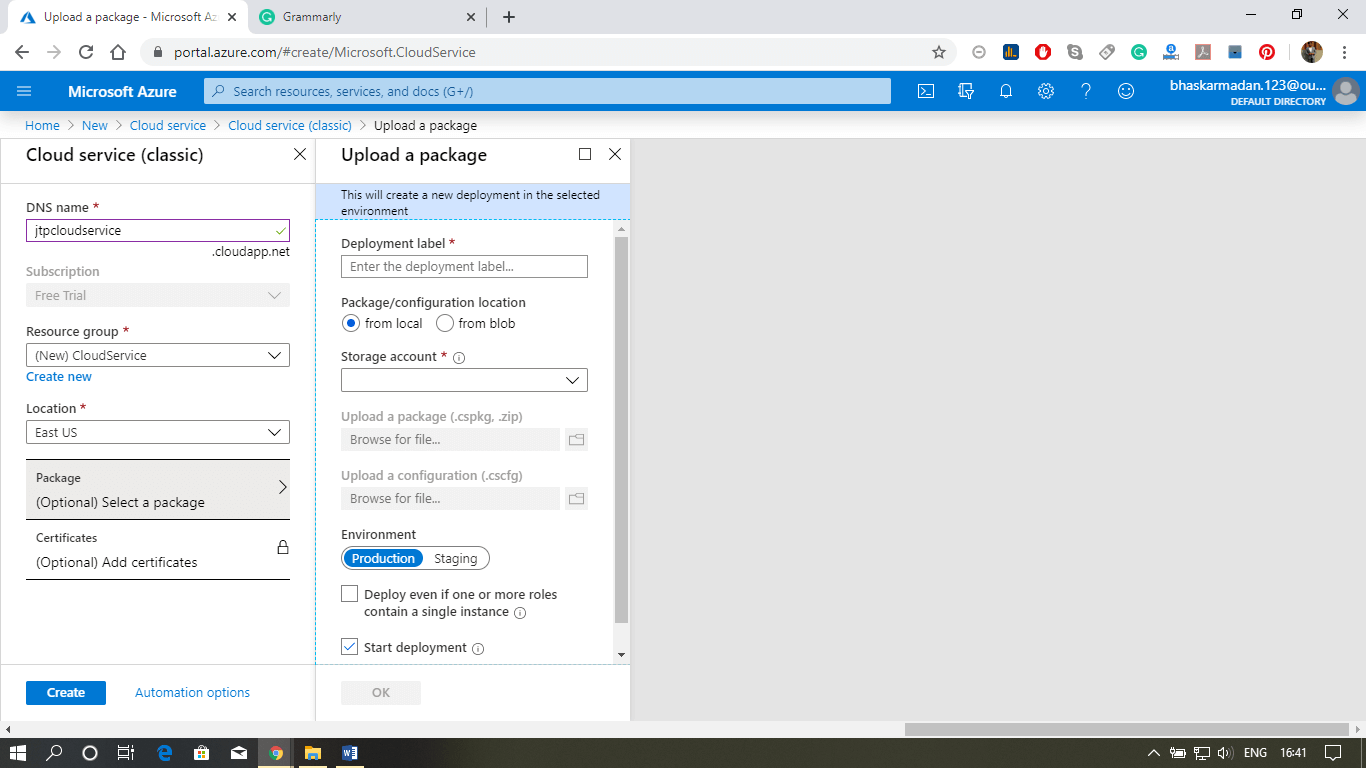
Step 4: Now, Click on create. Your cloud service will be created.
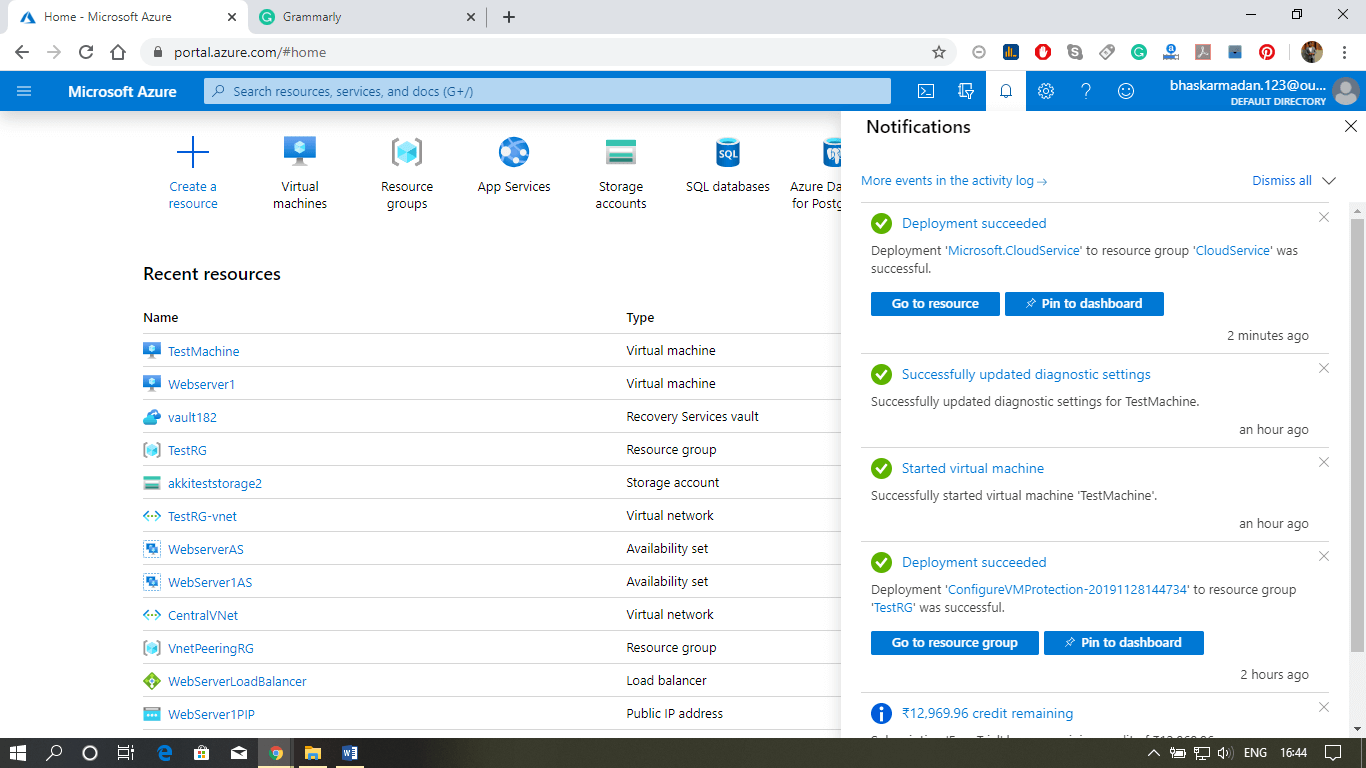
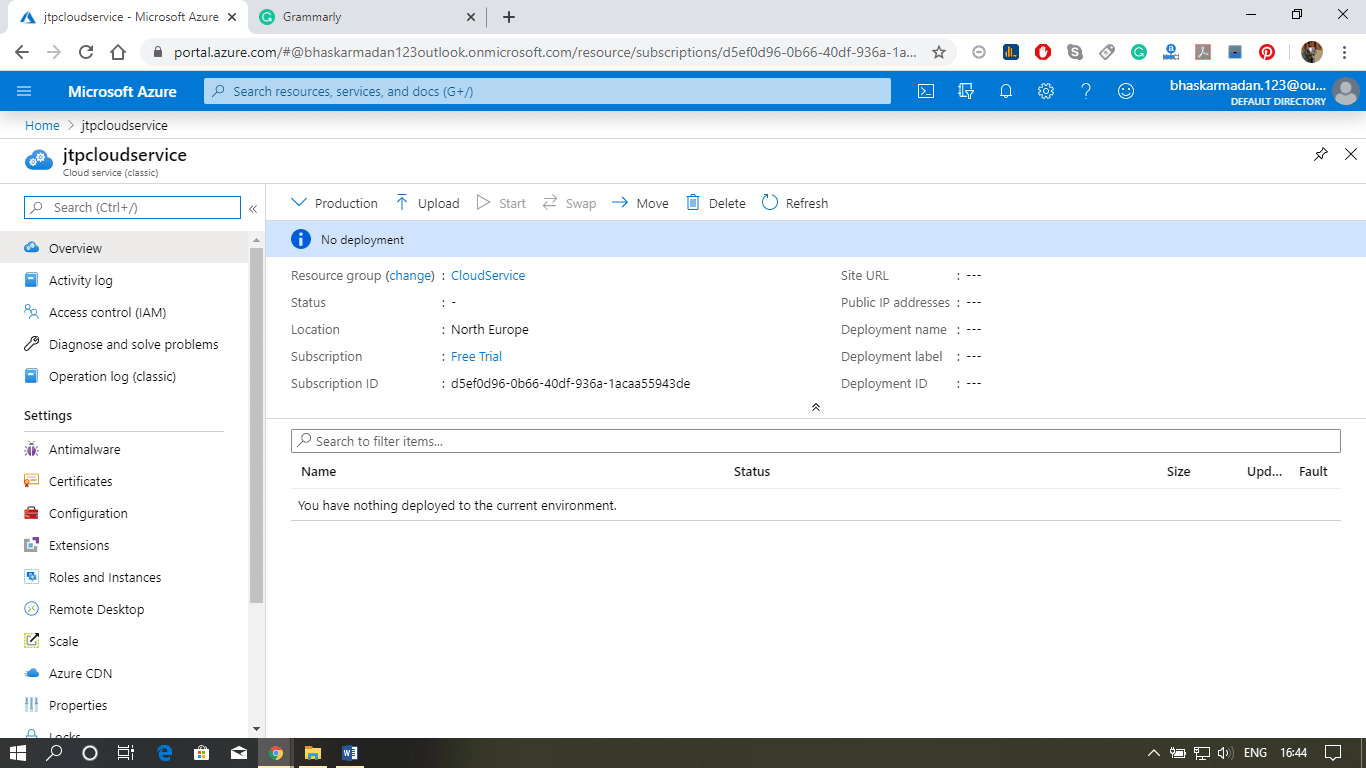
Step 5: To view the cloud service, click on go-to resources.
Step 6: Now, go to Visual Studio and create a new cloud service project. Here you can see the basic configuration setting, as shown in the image below.
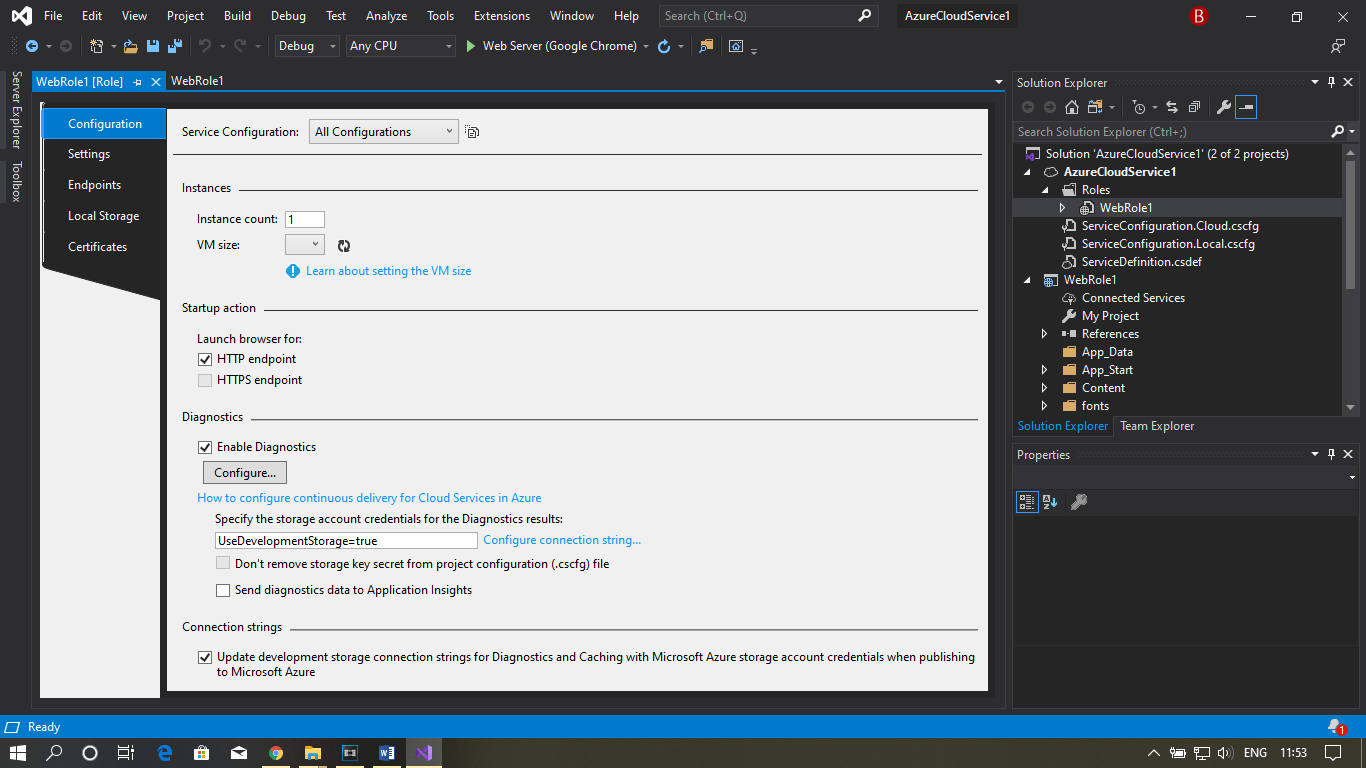
Step 7: To publish this cloud service into Azure, right-click on the file name. Then click on publish.
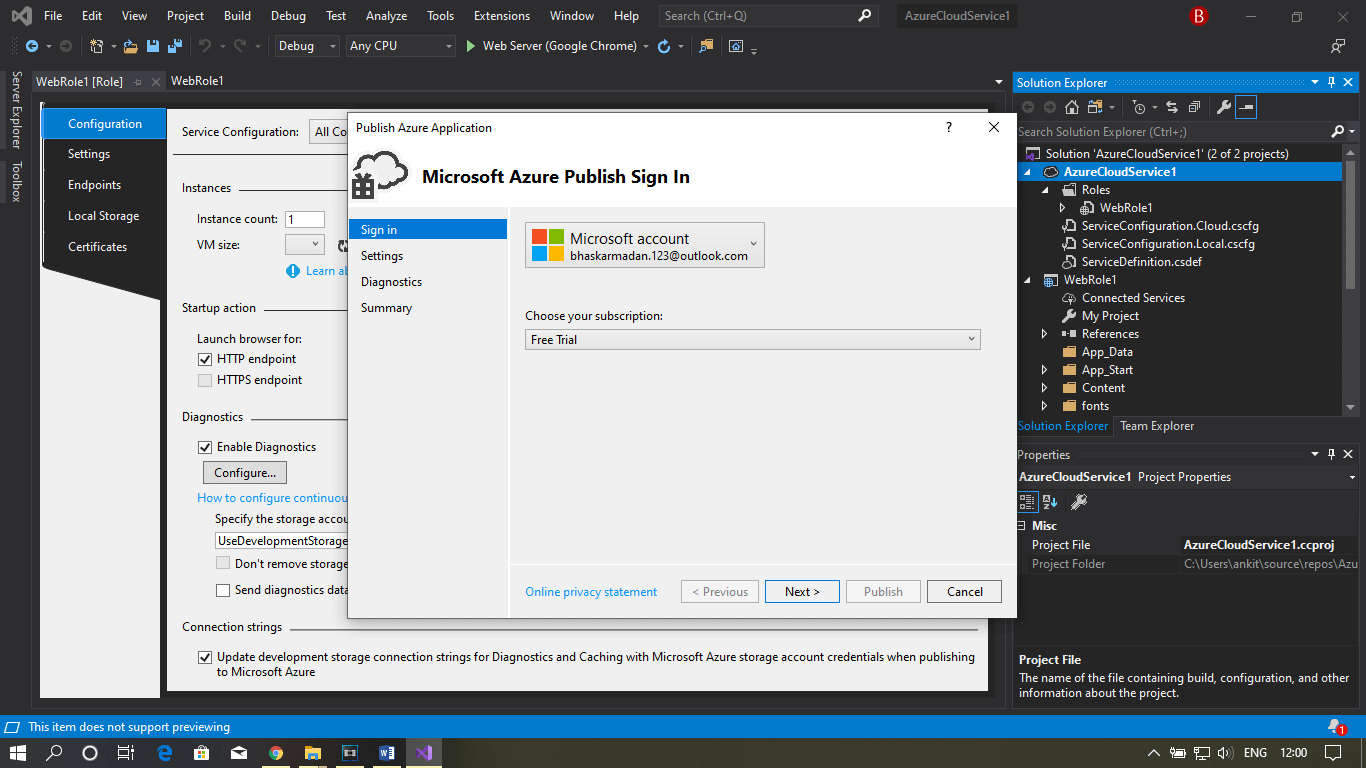
Step 8: Select your subscription and click next.
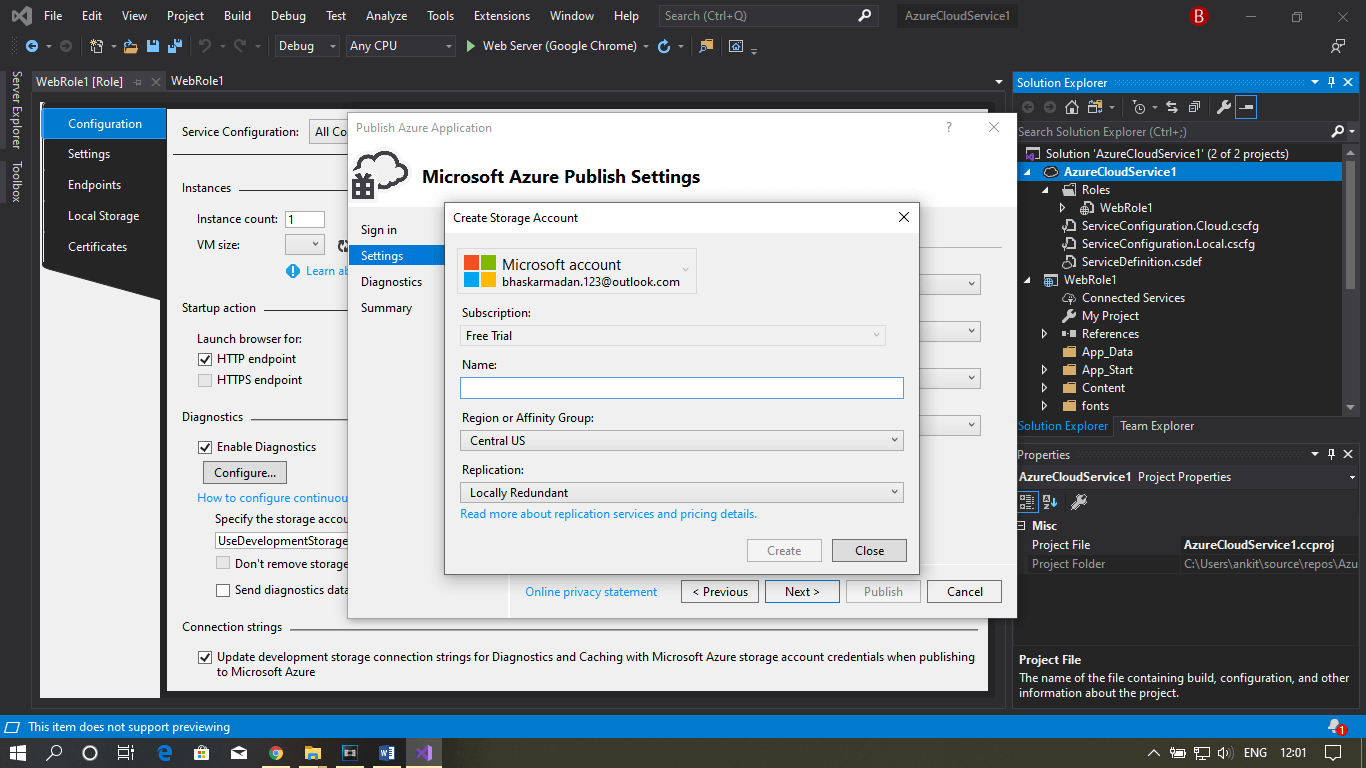
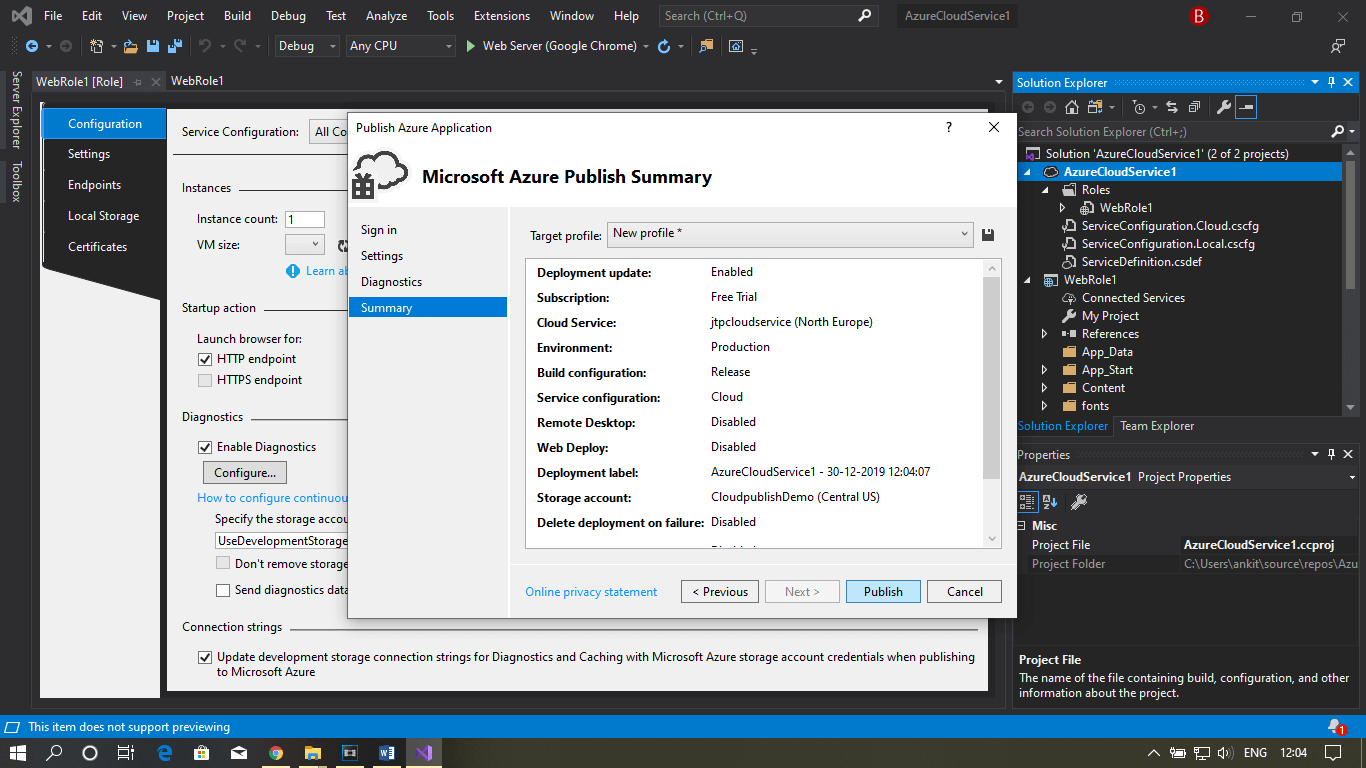
Step 9: Fill all the required details and then click on publish.
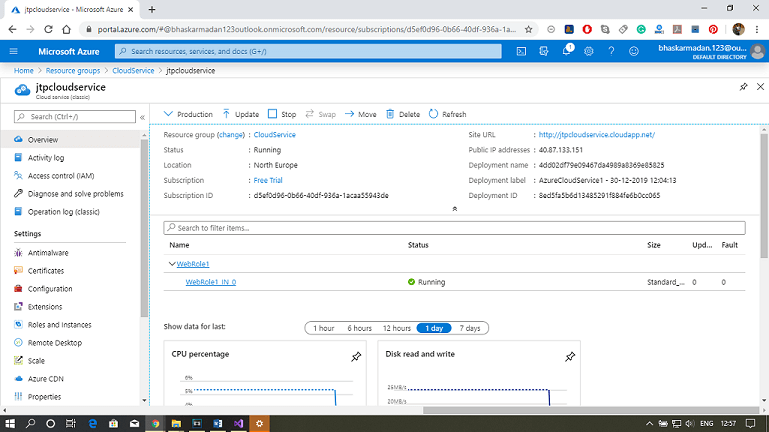
Step 10: Now, go to the Azure portal and click on the Resource group that you have created. You can now see your web role published, as shown in the figure below.
Azure VM Monitoring
There are different Azure services that are available to monitor our Azure virtual machines.
Diagnostics and metrics
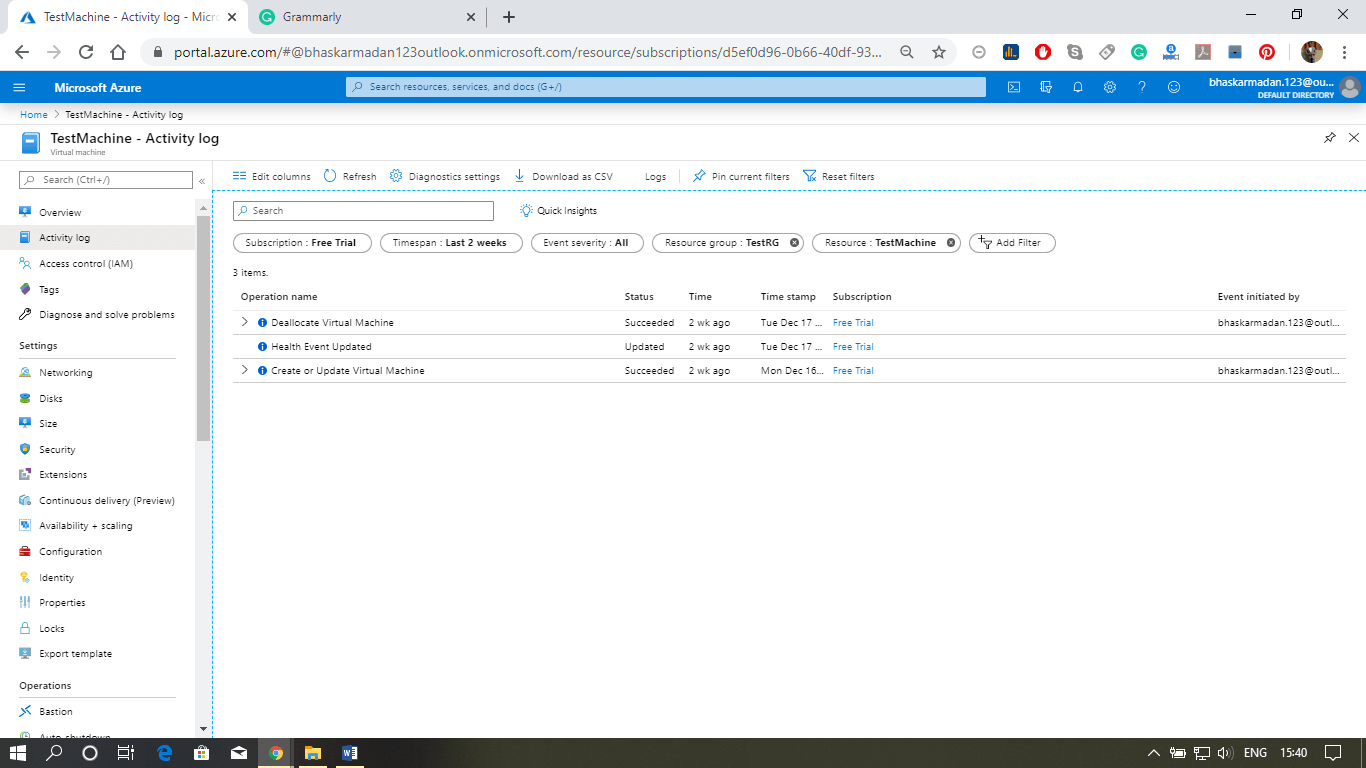
- Using the activity log, we can monitor and audit the operation carried on a Virtual machine. For example - starting the virtual machine, stopping the virtual machine, reimaging, etc.
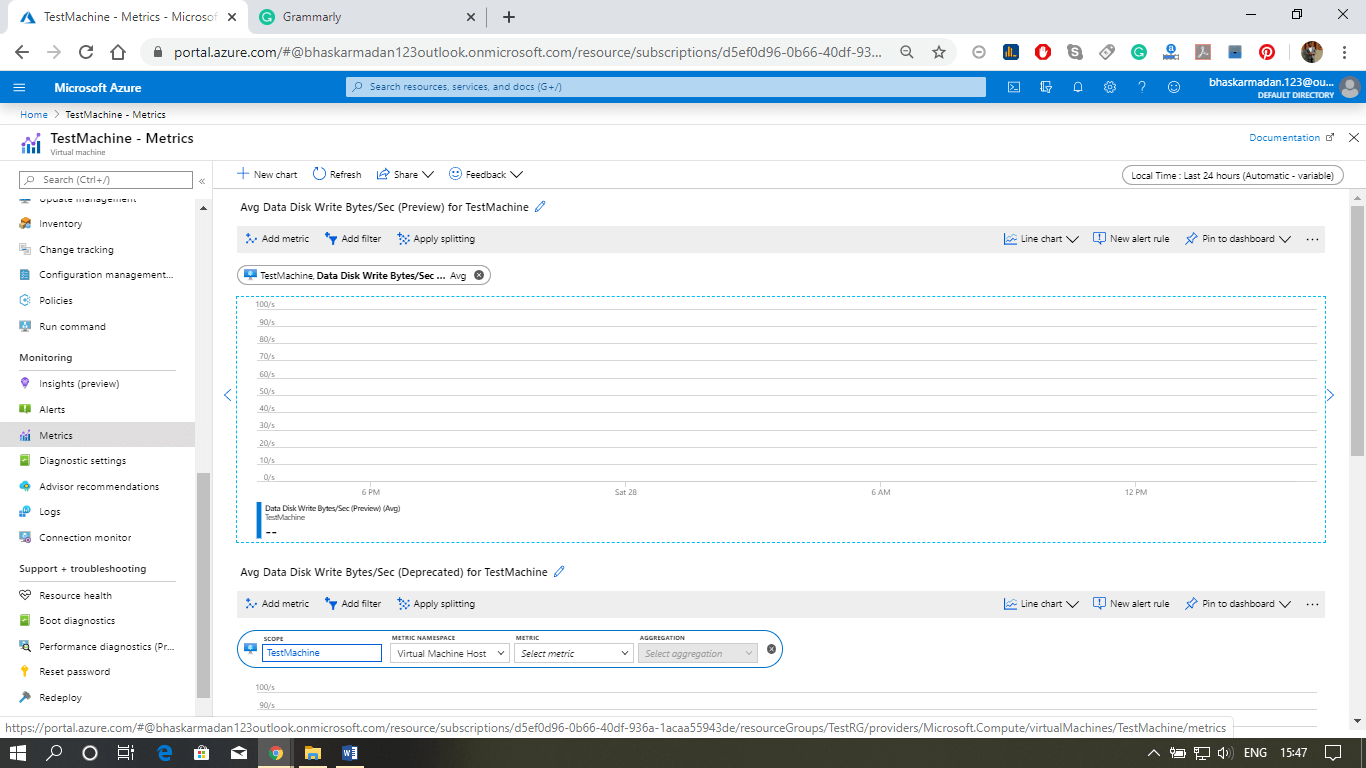
- Observe base metrics for the VM using Azure monitor. You will see those metrics in the form of a dashboard within the resource section itself. But if you go to Azure monitor, you can monitor all the base metrics of any resources within Azure, including virtual machines.
- Enable the collection of boot diagnostics and view it using the Azure portal.
- Enable the collection of guest OS diagnostics data, and analyze using OMS (Operation Management Speed).
- We can set up and monitor the collection of diagnostics data using metrics in the Azure portal, the Azure CLI, Azure PowerShell, and REST APIs
Alerts
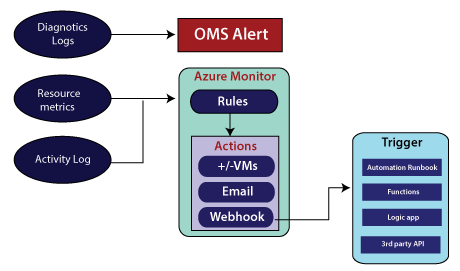
Azure provides a comprehensive ability to get alerted. There are three sources of information against which we can get alerted.
- Activity Log
- Resource Metrics
- Diagnostic Logs
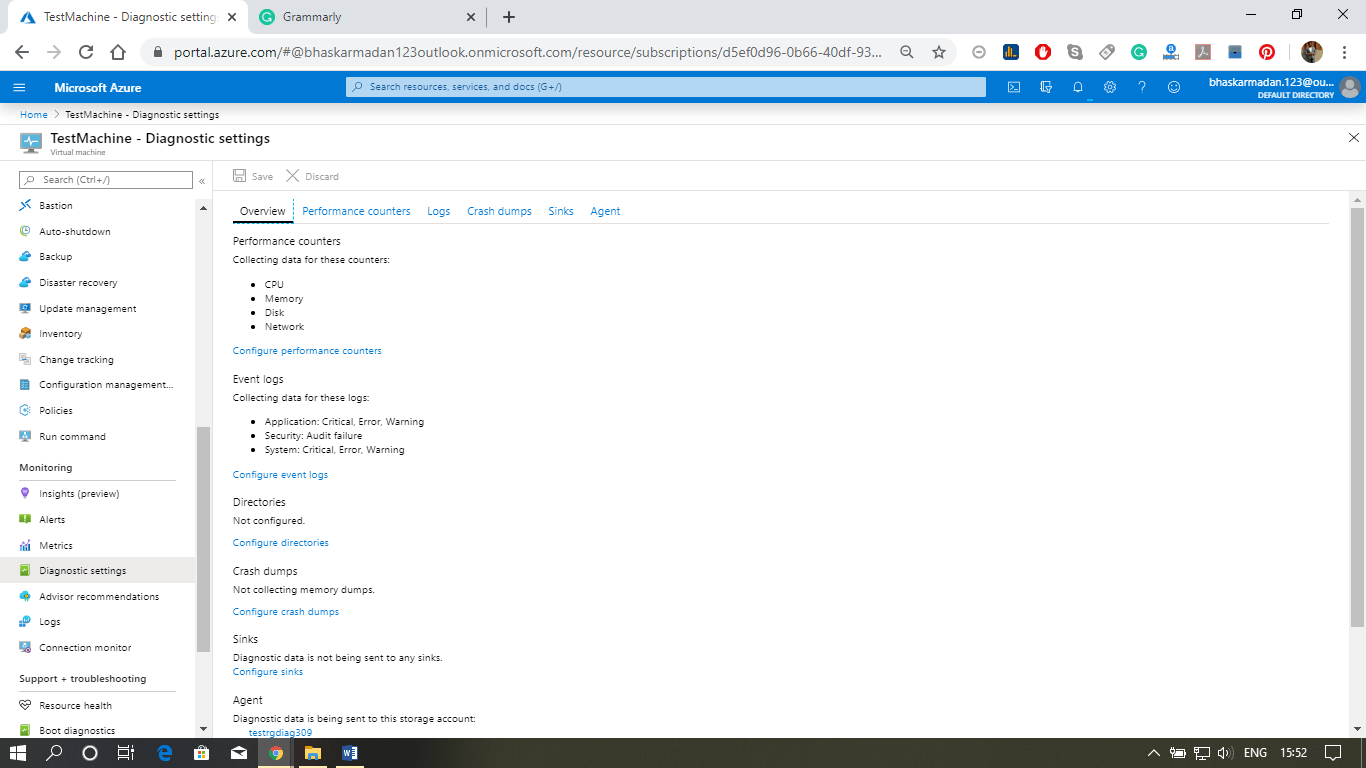
When it comes to diagnostic logs, we can raise an alert based on diagnostic logs using an OMS alert. And in case of resource metrics and activity logs, we'll use the Azure monitor. The azure monitor is a basic one, but it is comprehensive if we compare it with others. But, when comparing to OMS, The Azure monitor is a basic one that we can use for resource metrics and activity logs.
Assume, if somebody stopped virtual machine that we want to get alerted or if the CPU utilization in one of the virtual machines is beyond 90 percent, then we want to get alerted. We can define these rules in Azure monitor. Once the condition within the rule is satisfied, then we can take a number of actions as a result of that. We can trigger Azure automation Runbook, azure function, logic app, or third party API.
Health Monitoring
Azure service health
- It provides timely and personalized information when problems in Azure services impact your services.
- It helps you prepare for upcoming planned maintenance.
Azure resource health
- Resource health helps you diagnose and get support when an Azure issue impacts your resources.
- It can be used to view the current and past health of your Azure resources.
- It provides technical support when you need help with Azure service issues.
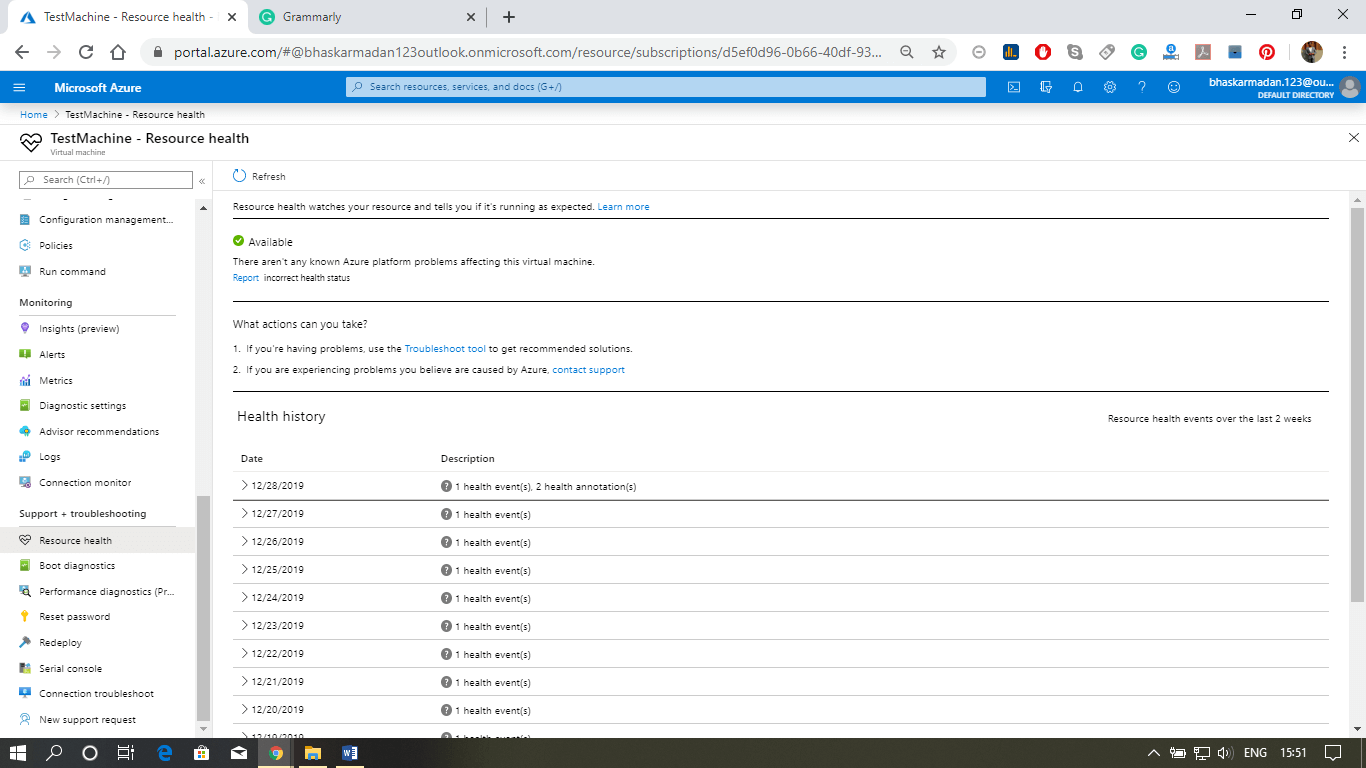
Advanced monitoring
- Operations management suite (OMS): It includes monitoring, alerting, and alert remediation capabilities across cloud and on-premises assets.
- Log analytics: It collects data generated by resources in our cloud and on-premises environments and from other monitoring tools to provide analysis across multiple resources.
- Network Watcher: It monitors our VM and its associated resources as they relate to the network that they are present.
Azure Virtual Machine Security
There are many services available to secure our virtual machine.
Azure Active Directory
- By using the Azure Active Directory, we can control access to our virtual machines to different users or groups of users. When we create a virtual machine, we can assign a user to it, and while we are assigning the user to the virtual machine, we will also associate a particular rule to them. That role defines the level of access that the user will have on our virtual machine.
- Users, groups, and applications from that directory can manage resources in the Azure subscription.
- It grants access by assigning the appropriate RBAC role to users, groups, and applications at a certain scope. The scope of a role assignment can be a subscription, a resource group, or a single resource.
- Azure RBAC has three essential roles that apply to all resource types:
- Owner: They have full access to all resources, including the right to delegate access to others.
- Contributor: They can create and manage all types of Azure resources but can't grant access to others.
- Reader: They can only view existing Azure resources.
Azure security center
The Azure security center identifies potential virtual machine (VM) configuration issues and targeted security threats. These might include VMs that are missing network security groups, unencrypted disks, and brute-force Remote Desktop Protocol (RDP) attacks.
We can customize the recommendations we would like to see from the Security Center using security policies.
- Set up data collection
- Set up security policies
- View VM configuration health
- Remediate configuration issues
- View detected threats
Managed Service Identity
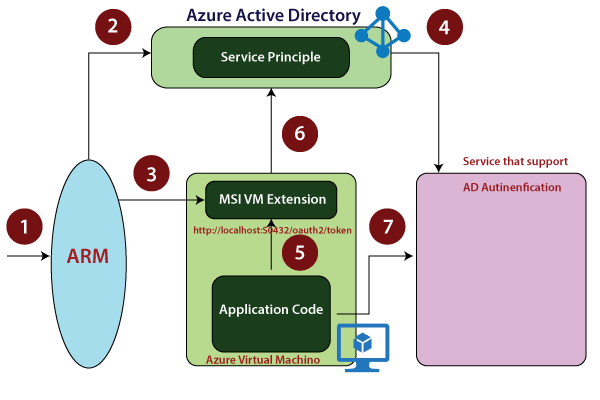
It is newly introduced in Azure. Earlier, what used to happen was whenever we're deploying an application into a virtual machine, we generally have user id and password within a configuration file of a folder of that application. But if someone gets access to that virtual machine, they can be able to go to the configuration file and view that also. To further increase the security of our application code and safety of services that are being accessed by application code, we can use Managed Service Identity.
Other Security Features
- Network security group: To filter the traffic in and out of the virtual machine.
- Microsoft Antimalware for Azure: We can install on our Azure virtual machines to secure our machines against any malware.
- Encryption: We can enable Azure Disk Encryption.
- Key Vault and SSH Keys: we can use key vault to store the certificates or any sensitive key.
- Policies: All the security-related policies we can apply using it.
Azure Backup
Azure Backup is a service provided by Microsoft Azure to back up and restore our data over the Microsoft cloud. Azure Backup replaces our existing on-premises or off-site backup solution with a cloud-based solution that is reliable, secure, and cost-competitive. It is not only used as cloud storage to back-up our data to the cloud, but we can also use our existing local disc to back-up the data.
So, Azure backup works with this heterogeneous storage environment with the combination of on-premises storage and also cloud storage. Whenever Azure backup uses local storage, we'll not get charged for it. You will only get charged when the data is backed up in the cloud.
Advantages of Azure Backup
- Automatic storage management
- Unlimited scaling
- Multiple Storage options
- Application consistent backup
- Long-Term retention
Working of Azure backup service
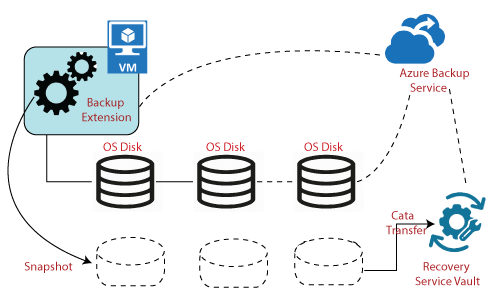
The first thing we do when we're using Azure backup is to define backup policy. The policy describes how frequently you need to take a backup and also which target you need to backup. After that, we also identify the destination where the data need to get stored, which in most cases, it's going to be recovery services vault. Backup of the data will not get stored in a storage account, and it will be stored in the recovery service vault, which is also an online storage facility where we can save the backup of all our virtual machines.
Components of Azure Backup service
| Component | What is protected? | Backup storage | Backup frequency |
|---|---|---|---|
| Azure Backup agent | Files, Folders, System State Windows only. | Recovery service vault | Three backups per day |
| System Center DPM | Files, Folders, Volumes, VMs, Applications, Workloads | Recovery service vault, Local disk, Tape | Two backups per day to RSV, Every 15 minutes for SQL Server, Every hour for other workloads |
| Azure Backup Server | Files, Folders, Volumes, VMs, Applications, Workloads | Recovery service vault, Local disk | Two backups per day to RSV, Every 15 minutes for SQL Server, Every hour for other workloads |
| Azure IaaS VM Backup | VMs, All disks Windows and Linux | Recovery service vault | One backup per day |
How to take the backup of VM using the Azure backup
Step 1: Go into Virtual Machine and click on Backup. The following window will appear once you click on backup.
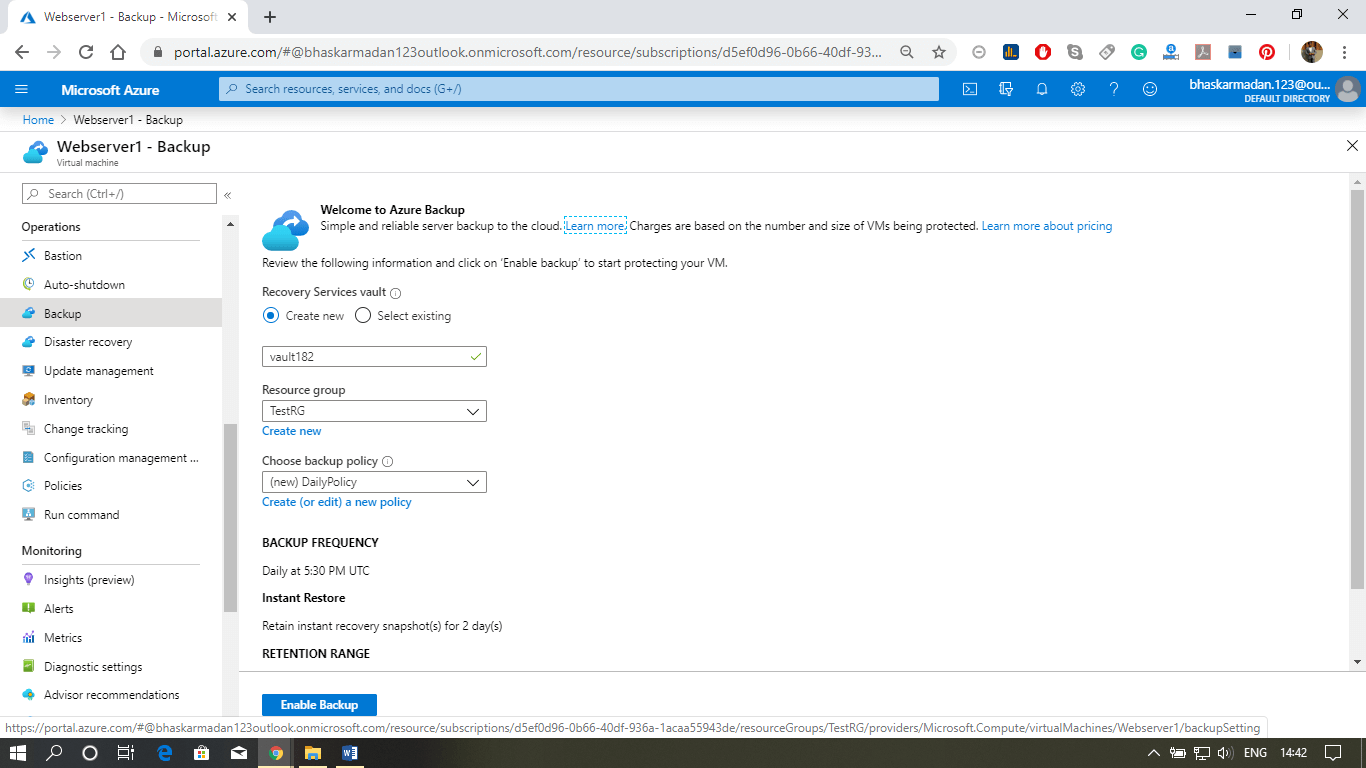
Step 2: Configure the Backup policy according to your requirements and Click on Enable Back up.
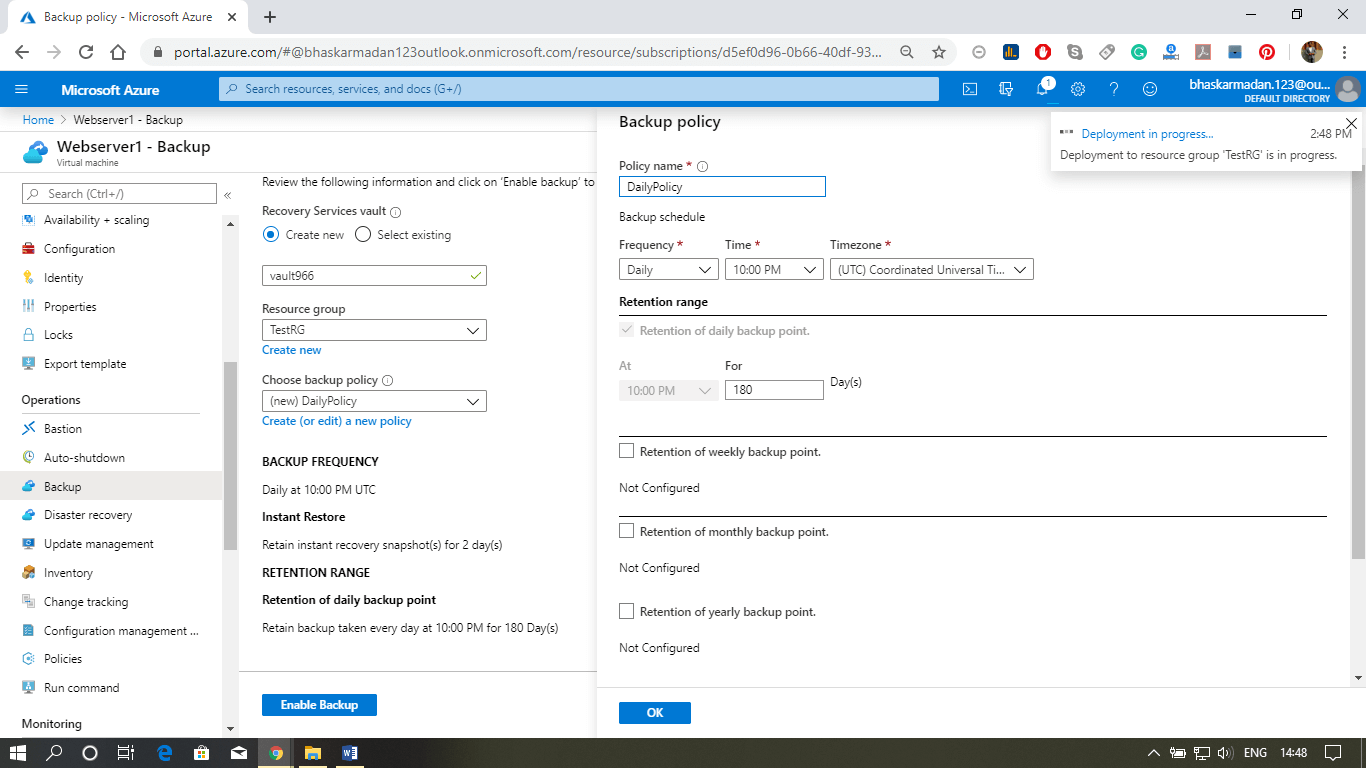
Step 3: Now, go to the resource group and click on the Recovery Service vault that you have created, as shown below.
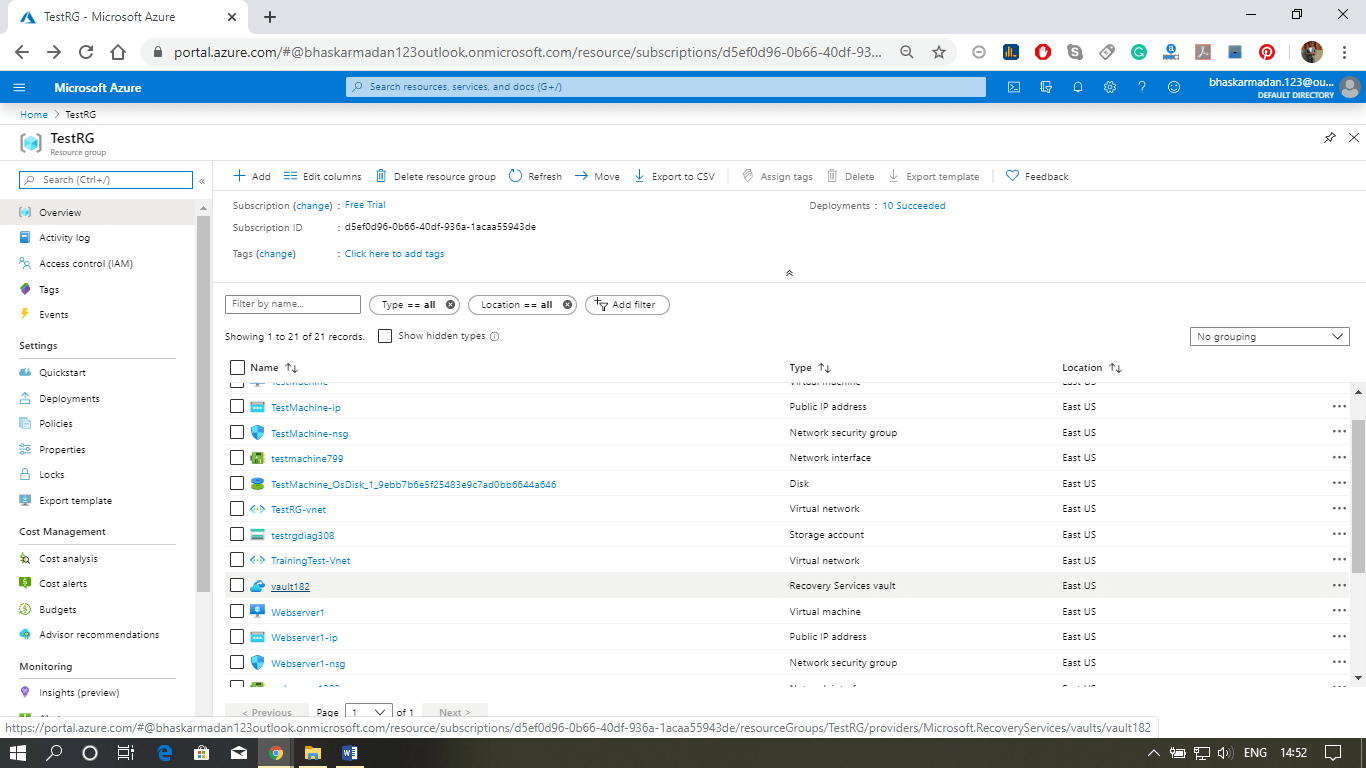
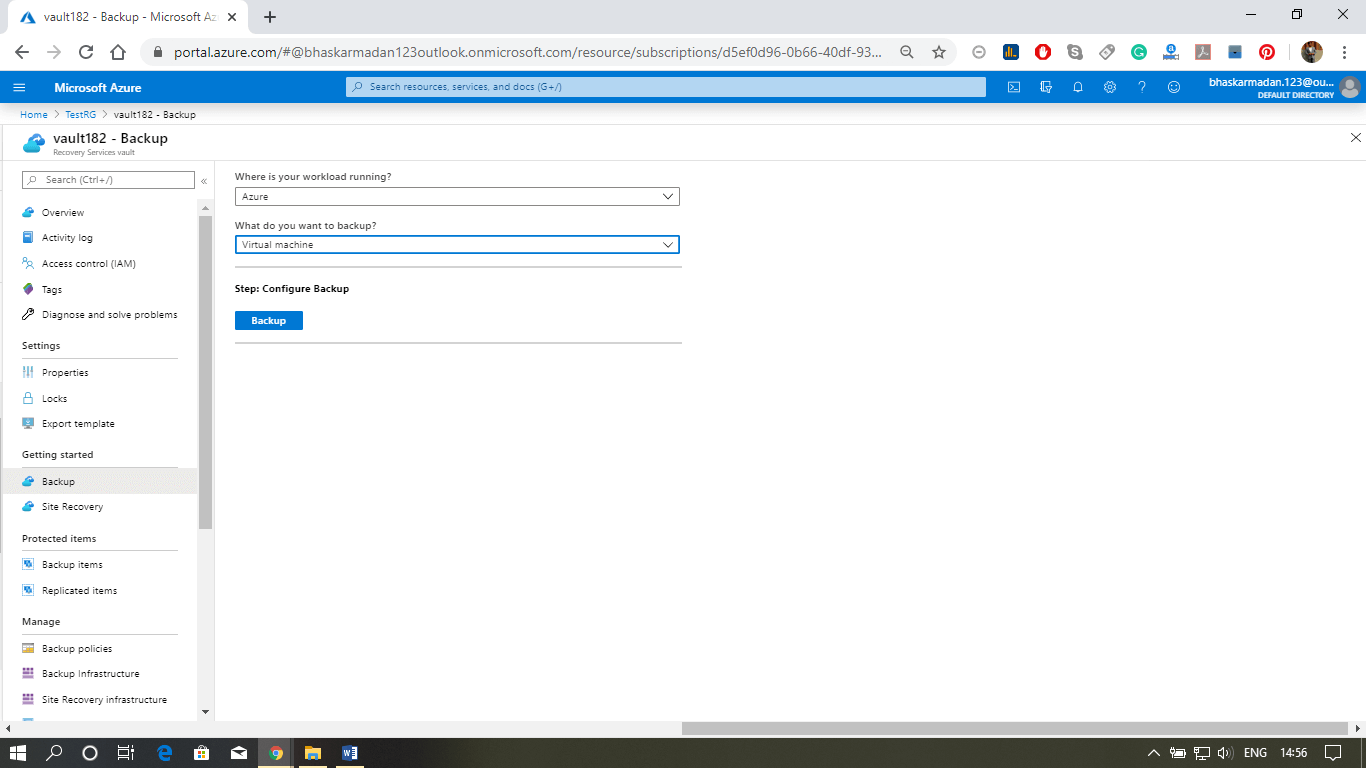
Step 4: In case you would like to take a backup from the recovery services vault and choose different settings, then you can click on backup and then select where your workload is running.
Azure Virtual Machine Scale Set & Auto Scaling
Virtual Machine scale sets
The scale sets are Azure compute resources that can be used to deploy and manage identical VMs. They are designed to support virtual machine auto-scaling. VM scale sets can be created using the Azure portal, JSON templates, and REST APIs. To increase or decrease the number of VMs in the scale set, we can change the capacity property and redeploy the template. A virtual machine scale set is created inside VNET, and individual VMs in the scale set are not allocated with public IP addresses.
Any virtual machine that we deploy and is the part of the virtual machine scale set will not be allocated with a public IP address. Because sometimes, the virtual machine scale set will have a front end balancer that will manage the load, and that will have a public IP address. We can use that public IP address and connect to underlying virtual machines in the virtual machine scale set.
Virtual Machine Auto Scaling
Autoscale enables us to dynamically allocate or remove resources based on the load on the services. You can specify the maximum and the minimum number of instances to run and add or remove VMs based on a set of rules within the range.
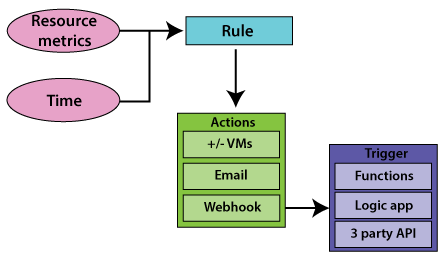
The first step in auto-scaling is to select a metric or time. So, it can be a metric based auto-scaling, or it can be a schedule based auto-scaling. The metrics can be CPU utilization, etc., and the time can be like the night at 6 o'clock till morning 6:00, we want to reduce no of servers. We can have a schedule based auto-scaling. In case if we're going to reach according to load, then we can use metric based auto-scaling.
The next step in the auto-scaling is to define a rule with the condition. For example - if the CPU utilization is higher than 80 percent, then spin off a new instance. And once the condition is met, we can carry some actions. The actions can be adding or removing virtual machines, or it can be sending email to a system administrator, etc. We need to select whether it is a time-based auto-scaling or metric-based, and we need to choose the metric. We define the rule and actions that need to be triggered when the condition in that rule is satisfied.
Horizontal and Vertical scaling
- Horizontal scaling: The increasing or decreasing the number of VM instances. It auto-scales horizontally and sometimes called as Scale-out or Scale in scaling.
- Vertical scaling: In this, we keep the same numbers of VMs but make VM more or less powerful. Power is measured as memory, CPU speed, disk space, etc. It is limited by the availability of larger hardware within the same region and usually requires a VM to start and stop. This is sometimes called Scale up or scale downscaling. Below are the steps to achieve vertical scaling.
- Setup Azure automation account
- Import the Azure Automation Vertical scale runbooks into our subscriptions.
- Add a webhook to our network.
- Add an alert to our Virtual Machine.
- We can also scale web apps and cloud services.
Metrics for Autoscaling
- Compute metrics: The available metrics will depend upon the installed operating system. For windows, we can have a processor, memory, and logical disk metrics. For Linux, we can have processor, memory, physical & network interface metrics.
- Web Apps metrics: It includes CPU & memory percentage, Disk & HTTP queue length, and bytes received/sent.
- Storage/ Service bus metrics: We can scale by Storage queue length, which is the number of messages in the storage queue. Storage queue length is a particular metric, and the threshold applied will be the number of messages per instance.
Tools to implement Auto Scale
- We can use the Azure portal to create a scale set and enable auto-scaling based on a metric.
- We can provision and deploy VM scale sets using Resource Manager Templates.
- ARM templates can be deployed using Azure CLI, PowerShell, REST, and also directly from Visual Studio.
Scaling Azure Virtual Machine
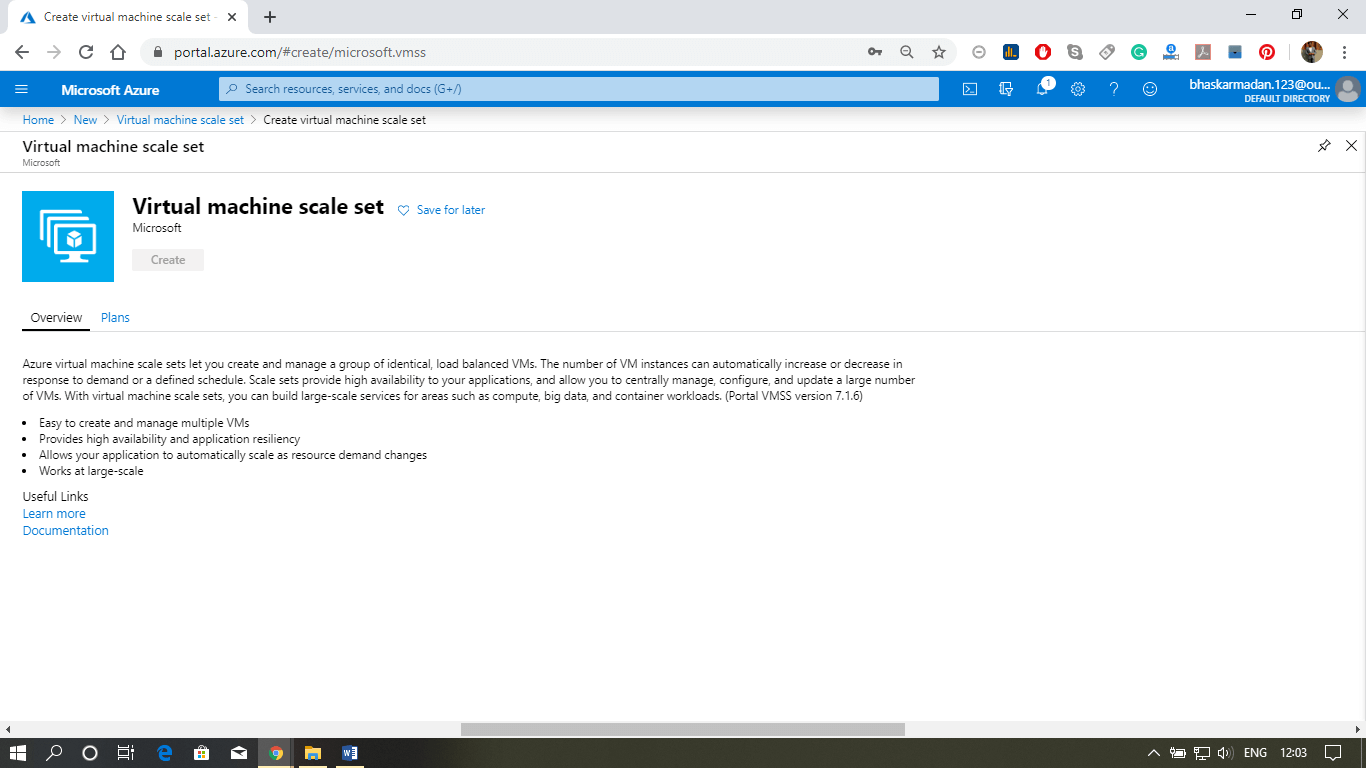
Step 1: Go to Azure Marketplace and type in the Virtual Machine scale set. Then click on Create.
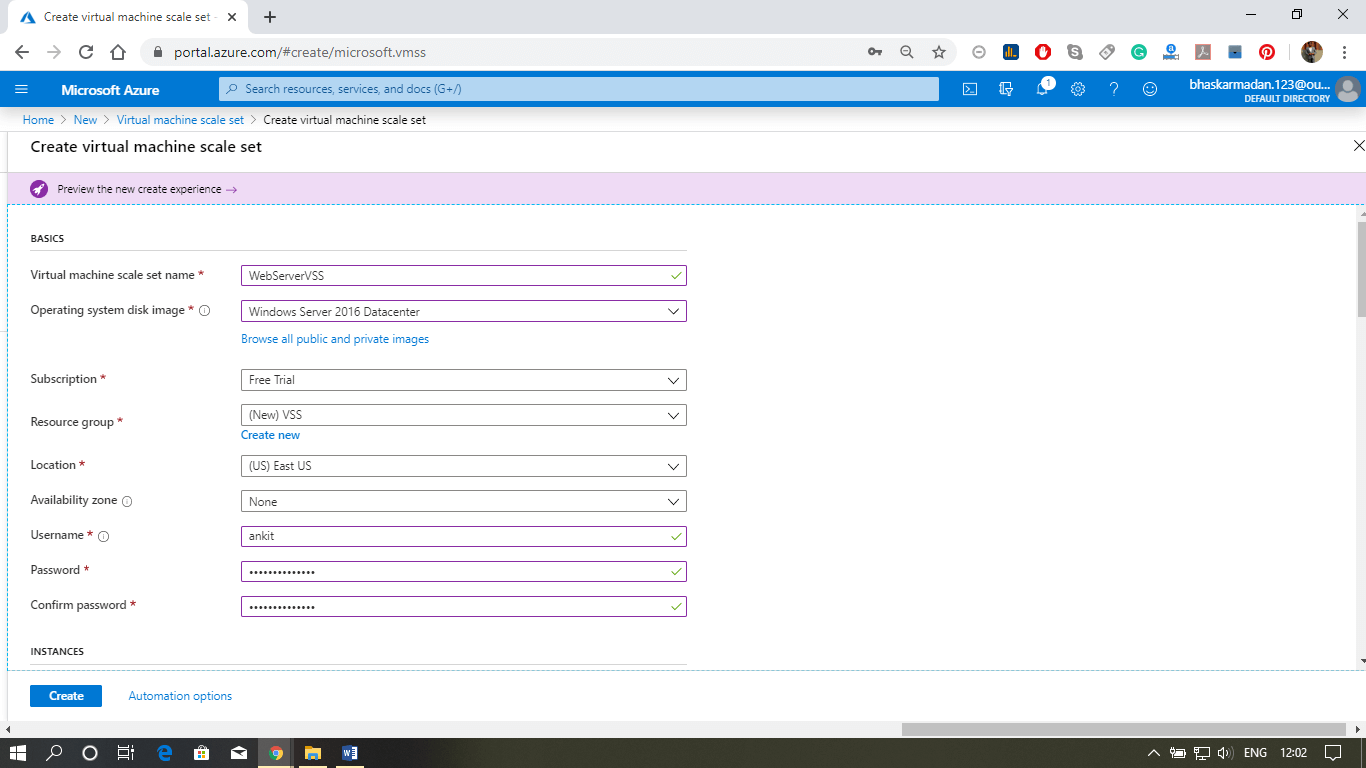
Step 2: We need to give a name to this scale set. And fill all the other required details, as shown in the figure below. Then click on create.
Step 3: Now, your Virtual Machine scale set is successfully deployed. To view VMSS, you can go to resources.
Step 4: Now, click on scaling. Provide an auto-scale setting name. And select the resource group.
Step 5: Scroll Down, and you will find two ways to auto-scale. First, click on "add a rule? for auto-scaling based on the metric. We are going to scale our virtual machine if the average percentage of CPU utilization is above 70 percent.
Step 6: Now, select the time and date based scaling, where you can scale when you need more space. And the last thing is Notify, where you get notified whenever the auto-scaling gets triggered.
Azure VM Storage
Azure VM Storage
Disks used by VMs
- Operating system disk: In Azure, every virtual machine will have an operating system disk.
- Temporary disk: Each VM contains a temporary drive. The temporary disk provides short-term storage for applications and processes.
- Data disk: A data disk is a VHD that's attached to a virtual machine to store application data or other data we need to keep.
Performance tiers
- Standard Storage: It is backed by HDDs and deliver cost-effective storage while still being performant. It is ideal for development and testing, not-critical, and Infrequent access because the max throughput and IOPS per disk is 60MB/s and 500, respectively.
- Premium Storage: It is backed by SSDs, and deliver high-performance, low-latency disk support for VMs running I/O-intensive workloads. The maximum throughput and IOPS per disk are 250MB/s and 7500, respectively.
Types of the disk in Azure
- Unmanaged disks: It is the traditional type of disks that have been used by VMs. We can create our storage account and specify the storage account when you create the disk. The scalability targets of SA (20, 000 IOPS) are not exceeded.
- Managed disks: Managed disks handles the storage account creation/management. We do not have to care about scalability limits the storage account. Microsoft always recommends us to use Azure Managed Disks for new VMs.
Disk encryption
- Storage Service Encryption: Azure Storage Service Encryption provides encryption-at-rest and safeguards our data to meet our organizational security and compliance commitments. It is enabled by default for all Managed Disks, Snapshots, and Images in every region where managed disks are available.
- Azure Disk Encryption: Azure Disk Encryption allows you to encrypt the OS and Data disks used by an IaaS Virtual Machine. For Windows, the drives are encrypted using industry-standard BitLocker encryption technology. For Linux, the disks are encrypted using the DM-Crypt technology.
Virtual Machine Availability
- Availability Set: Availability Set is a logical grouping of VMs within a data center that allows Azure services to understand how our application is built to provide redundancy and availability. An availability set is composed of two additional groupings that protect against hardware failures and allow updates to be applied safely.
- Fault domains- It is a logical group of the underlying hardware that shares a common network switch and power source, similar to a rack within an on-premises datacenter.
- Update Domain: It is a logical group of the underlying hardware that will go under maintenance or be rebooted at the same time.
- Managed Disk fault domains: For VMs using Azure Managed Disks, VMs are aligned with managed disk fault domains when using a managed availability set. This alignment ensures that all the managed disks attached to a VM are within the same managed disk fault domain.
- Availability Zones: It is a physically separate zone within an Azure region. There are three Availability zones per supported within the Azure region. All availability zone has the same amount of power source, network, and cooling, and is separated from the other Availability Zones within the Azure region.
Storage Availability
- Azure Managed Disks
- Locally redundant storage (LRS): We will have three copies of the same data within the same facility. So, if there is a datacenter failure, then there is a high probability that we might lose the data.
- Storage account-based disks
- Locally redundant storage (LRS): It maintains three replicas with the facility.
- Zone redundant storage (ZRS): It maintains three replicas but across facilities.
- Geo-redundant storage (GRS): The replicas will be maintained in a paired region. For example - if our disk is in Central US, a copy will be kept in East US also.
- Read-access geo-redundant storage (RA-GRS): The copy will be available for read-only access in a different region.
Creating Availability Set
We will see here how Azure evenly distributes your virtual machines into different fault and update domains of that availability set.
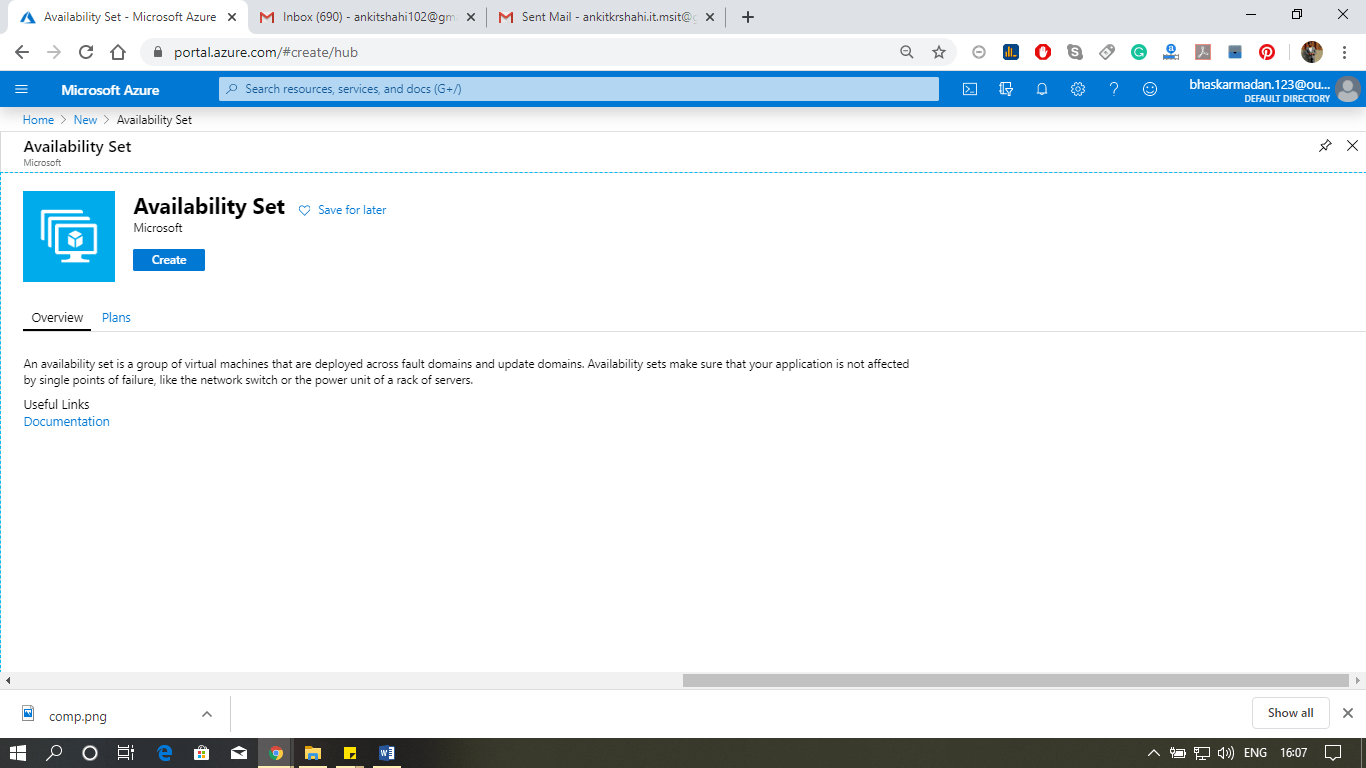
Step 1: Click on New, then type in an Availability set, and press enter. Now, Click on Create.
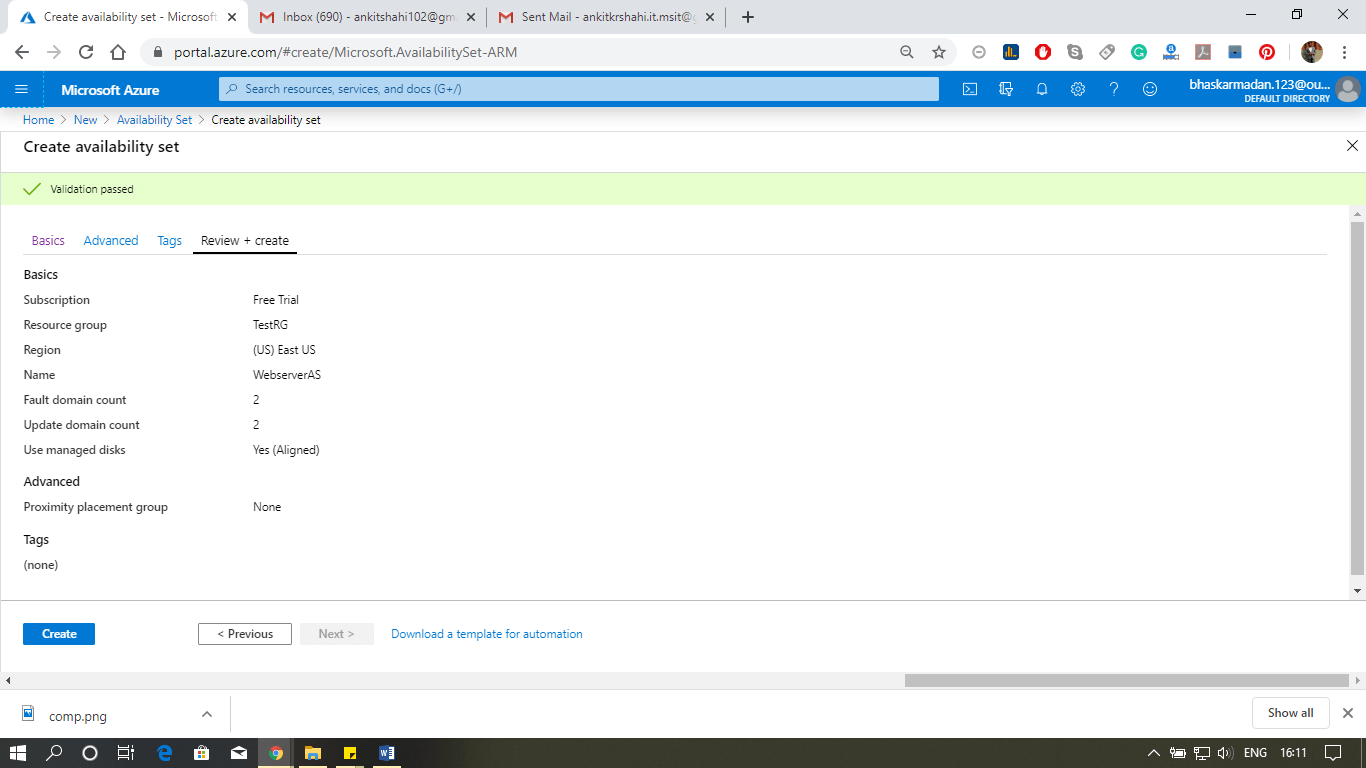
Step 2: You are currently on the Availability set creation page. Fill in all the required details as shown in the figure below, and click on Create.
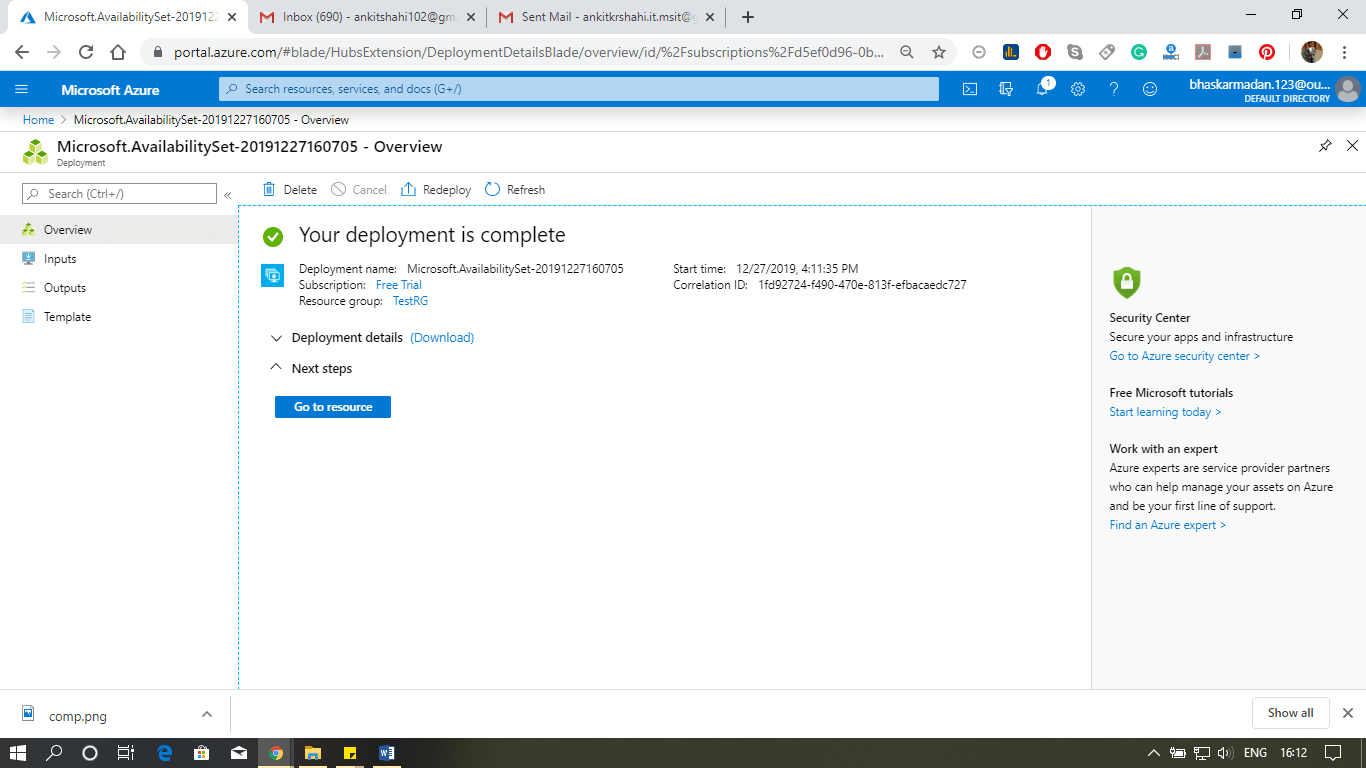
Step 3: Now Click on Go to resource to open the Availability set.
Step 4: Click on Virtual Machine. Any virtual machine that you have added to this Availability set will show here.
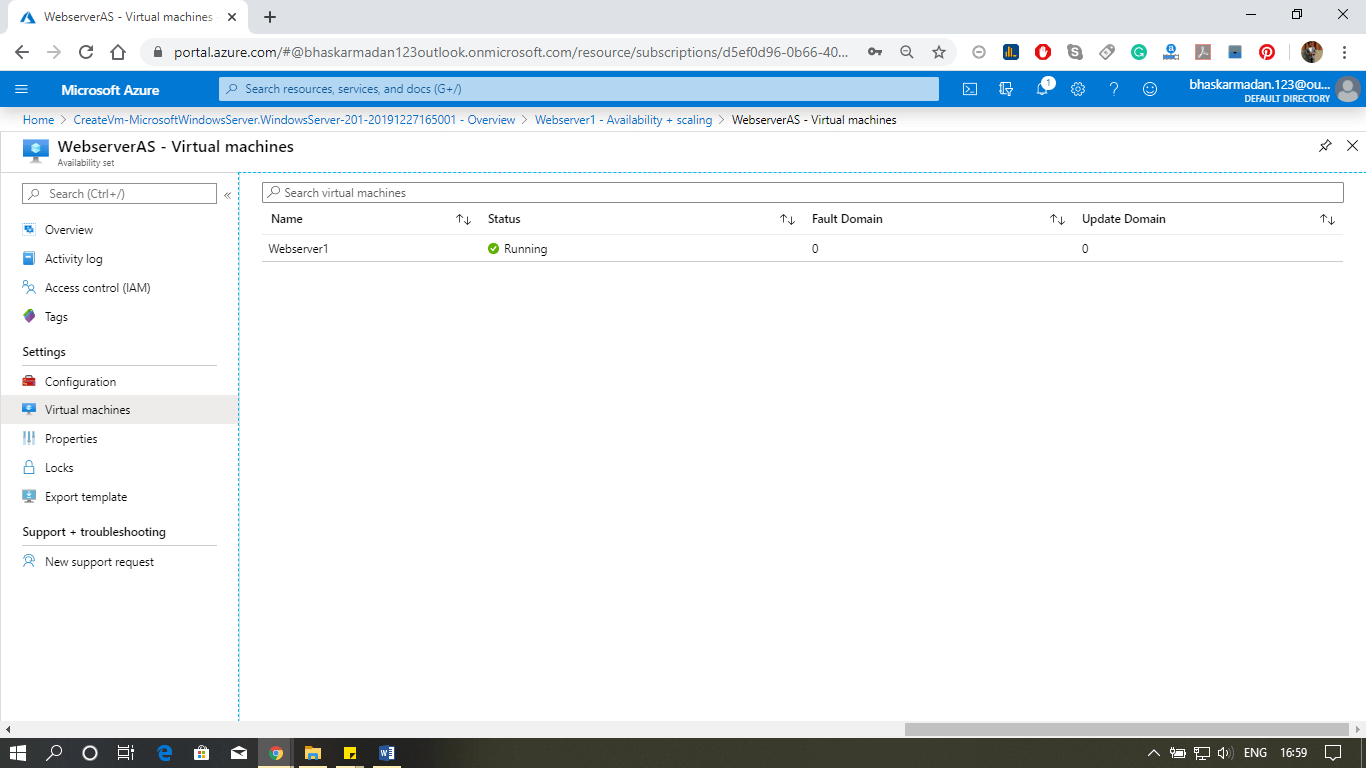
This is how you can make a web server farm tolerant of both unplanned outages and planned outages.
Subscribe to:
Comments (Atom)
