Thursday, 12 September 2019

Use tags to organize your Azure resources

You apply tags to your Azure resources giving metadata to logically organize them into a taxonomy. Each tag consists of a name and a value pair. For example, you can apply the name "Environment" and the value "Production" to all the resources in production.
After you apply tags, you can retrieve all the resources in your subscription with that tag name and value. Tags enable you to retrieve related resources from different resource groups. This approach is helpful when you need to organize resources for billing or management.
Your taxonomy should consider a self-service metadata tagging strategy in addition to an auto-tagging strategy to reduce the burden on users and increase accuracy.
The following limitations apply to tags:
  • Not all resource types support tags. To determine if you can apply a tag to a resource type, see Tag support for Azure resources.
  • Each resource or resource group can have a maximum of 50 tag name/value pairs. Currently, storage accounts only support 15 tags, but that limit will be raised to 50 in a future release. If you need to apply more tags than the maximum allowed number, use a JSON string for the tag value. The JSON string can contain many values that are applied to a single tag name. A resource group can contain many resources that each have 50 tag name/value pairs.
  • The tag name is limited to 512 characters, and the tag value is limited to 256 characters. For storage accounts, the tag name is limited to 128 characters, and the tag value is limited to 256 characters.
  • Generalized VMs don't support tags.
  • Tags applied to the resource group are not inherited by the resources in that resource group.
  • Tags can't be applied to classic resources such as Cloud Services.
  • Tag names can't contain these characters: <>%&\?/
To apply tags to resources, the user must have write access to that resource type. To apply tags to all resource types, use the Contributor role. To apply tags to only one resource type, use the contributor role for that resource. For example, to apply tags to virtual machines, use the Virtual Machine Contributor.
 Note
This article provides steps for how to delete personal data from the device or service and can be used to support your obligations under the GDPR. If you’re looking for general info about GDPR, see the GDPR section of the Service Trust portal.

Policies

You can use Azure Policy to enforce tagging rules and conventions. By creating a policy, you avoid the scenario of resources being deployed to your subscription that don't comply with the expected tags for your organization. Instead of manually applying tags or searching for resources that aren't compliant, you can create a policy that automatically applies the needed tags during deployment. The following section shows example policies for tags.

Tags

Apply tag and its default valueAppends a specified tag name and value, if that tag is not provided. You specify the tag name and value to apply.
Billing Tags Policy InitiativeRequires specified tag values for cost center and product name. Uses built-in policies to apply and enforce required tags. You specify the required values for the tags.
Enforce tag and its valueRequires a specified tag name and value. You specify the tag name and value to enforce.
Enforce tag and its value on resource groupsRequires a tag and value on a resource group. You specify the required tag name and value.

PowerShell

 Note
This article has been updated to use the new Azure PowerShell Az module. You can still use the AzureRM module, which will continue to receive bug fixes until at least December 2020. To learn more about the new Az module and AzureRM compatibility, see Introducing the new Azure PowerShell Az module. For Az module installation instructions, see Install Azure PowerShell.
To see the existing tags for a resource group, use:
Azure PowerShell
(Get-AzResourceGroup -Name examplegroup).Tags
That script returns the following format:
PowerShell
Name                           Value
----                           -----
Dept                           IT
Environment                    Test
To see the existing tags for a resource that has a specified resource ID, use:
Azure PowerShell
(Get-AzResource -ResourceId /subscriptions/<subscription-id>/resourceGroups/<rg-name>/providers/Microsoft.Storage/storageAccounts/<storage-name>).Tags
Or, to see the existing tags for a resource that has a specified name and resource group, use:
Azure PowerShell
(Get-AzResource -ResourceName examplevnet -ResourceGroupName examplegroup).Tags
To get resource groups that have a specific tag, use:
Azure PowerShell
(Get-AzResourceGroup -Tag @{ Dept="Finance" }).ResourceGroupName
To get resources that have a specific tag, use:
Azure PowerShell
(Get-AzResource -Tag @{ Dept="Finance"}).Name
To get resources that have a specific tag name, use:
Azure PowerShell
(Get-AzResource -TagName Dept).Name
Every time you apply tags to a resource or a resource group, you overwrite the existing tags on that resource or resource group. Therefore, you must use a different approach based on whether the resource or resource group has existing tags.
To add tags to a resource group without existing tags, use:
Azure PowerShell
Set-AzResourceGroup -Name examplegroup -Tag @{ Dept="IT"; Environment="Test" }
To add tags to a resource group that has existing tags, retrieve the existing tags, add the new tag, and reapply the tags:
Azure PowerShell
$tags = (Get-AzResourceGroup -Name examplegroup).Tags
$tags.Add("Status", "Approved")
Set-AzResourceGroup -Tag $tags -Name examplegroup
To add tags to a resource without existing tags, use:
Azure PowerShell
$r = Get-AzResource -ResourceName examplevnet -ResourceGroupName examplegroup
Set-AzResource -Tag @{ Dept="IT"; Environment="Test" } -ResourceId $r.ResourceId -Force
To add tags to a resource that has existing tags, use:
Azure PowerShell
$r = Get-AzResource -ResourceName examplevnet -ResourceGroupName examplegroup
$r.Tags.Add("Status", "Approved")
Set-AzResource -Tag $r.Tags -ResourceId $r.ResourceId -Force
To apply all tags from a resource group to its resources, and not keep existing tags on the resources, use the following script:
Azure PowerShell
$groups = Get-AzResourceGroup
foreach ($g in $groups)
{
    Get-AzResource -ResourceGroupName $g.ResourceGroupName | ForEach-Object {Set-AzResource -ResourceId $_.ResourceId -Tag $g.Tags -Force }
}
To apply all tags from a resource group to its resources, and keep existing tags on resources that aren't duplicates, use the following script:
Azure PowerShell
$group = Get-AzResourceGroup "examplegroup"
if ($null -ne $group.Tags) {
    $resources = Get-AzResource -ResourceGroupName $group.ResourceGroupName
    foreach ($r in $resources)
    {
        $resourcetags = (Get-AzResource -ResourceId $r.ResourceId).Tags
        if ($resourcetags)
        {
            foreach ($key in $group.Tags.Keys)
            {
                if (-not($resourcetags.ContainsKey($key)))
                {
                    $resourcetags.Add($key, $group.Tags[$key])
                }
            }
            Set-AzResource -Tag $resourcetags -ResourceId $r.ResourceId -Force
        }
        else
        {
            Set-AzResource -Tag $group.Tags -ResourceId $r.ResourceId -Force
        }
    }
}
To remove all tags, pass an empty hash table:
Azure PowerShell
Set-AzResourceGroup -Tag @{} -Name examplegroup

Azure CLI

To see the existing tags for a resource group, use:
Azure CLI
az group show -n examplegroup --query tags
That script returns the following format:
JSON
{
  "Dept"        : "IT",
  "Environment" : "Test"
}
Or, to see the existing tags for a resource that has a specified name, type, and resource group, use:
Azure CLI
az resource show -n examplevnet -g examplegroup --resource-type "Microsoft.Network/virtualNetworks" --query tags
When looping through a collection of resources, you might want to show the resource by resource ID. A complete example is shown later in this article. To see the existing tags for a resource that has a specified resource ID, use:
Azure CLI
az resource show --id <resource-id> --query tags
To get resource groups that have a specific tag, use az group list:
Azure CLI
az group list --tag Dept=IT
To get all the resources that have a particular tag and value, use az resource list:
Azure CLI
az resource list --tag Dept=Finance
Every time you apply tags to a resource or a resource group, you overwrite the existing tags on that resource or resource group. Therefore, you must use a different approach based on whether the resource or resource group has existing tags.
To add tags to a resource group without existing tags, use:
Azure CLI
az group update -n examplegroup --set tags.Environment=Test tags.Dept=IT
To add tags to a resource without existing tags, use:
Azure CLI
az resource tag --tags Dept=IT Environment=Test -g examplegroup -n examplevnet --resource-type "Microsoft.Network/virtualNetworks"
To add tags to a resource that already has tags, retrieve the existing tags, reformat that value, and reapply the existing and new tags:
Azure CLI
jsonrtag=$(az resource show -g examplegroup -n examplevnet --resource-type "Microsoft.Network/virtualNetworks" --query tags)
rt=$(echo $jsonrtag | tr -d '"{},' | sed 's/: /=/g')
az resource tag --tags $rt Project=Redesign -g examplegroup -n examplevnet --resource-type "Microsoft.Network/virtualNetworks"
To apply all tags from a resource group to its resources, and not keep existing tags on the resources, use the following script:
Azure CLI
groups=$(az group list --query [].name --output tsv)
for rg in $groups
do
  jsontag=$(az group show -n $rg --query tags)
  t=$(echo $jsontag | tr -d '"{},' | sed 's/: /=/g')
  r=$(az resource list -g $rg --query [].id --output tsv)
  for resid in $r
  do
    az resource tag --tags $t --id $resid
  done
done
To apply all tags from a resource group to its resources, and keep existing tags on resources, use the following script:
Azure CLI
groups=$(az group list --query [].name --output tsv)
for rg in $groups
do
  jsontag=$(az group show -n $rg --query tags)
  t=$(echo $jsontag | tr -d '"{},' | sed 's/: /=/g')
  r=$(az resource list -g $rg --query [].id --output tsv)
  for resid in $r
  do
    jsonrtag=$(az resource show --id $resid --query tags)
    rt=$(echo $jsonrtag | tr -d '"{},' | sed 's/: /=/g')
    az resource tag --tags $t$rt --id $resid
  done
done

Templates

To tag a resource during deployment, add the tags element to the resource you're deploying. Provide the tag name and value.

Apply a literal value to the tag name

The following example shows a storage account with two tags (Dept and Environment) that are set to literal values:
JSON
{
    "$schema": "https://schema.management.azure.com/schemas/2015-01-01/deploymentTemplate.json#",
    "contentVersion": "1.0.0.0",
    "parameters": {
        "location": {
            "type": "string",
            "defaultValue": "[resourceGroup().location]"
        }
    },
    "resources": [
        {
            "apiVersion": "2019-04-01",
            "type": "Microsoft.Storage/storageAccounts",
            "name": "[concat('storage', uniqueString(resourceGroup().id))]",
            "location": "[parameters('location')]",
            "tags": {
                "Dept": "Finance",
                "Environment": "Production"
            },
            "sku": {
                "name": "Standard_LRS"
            },
            "kind": "Storage",
            "properties": {}
        }
    ]
}
To set a tag to a datetime value, use the utcNow function.

Apply an object to the tag element

You can define an object parameter that stores several tags, and apply that object to the tag element. Each property in the object becomes a separate tag for the resource. The following example has a parameter named tagValues that is applied to the tag element.
JSON
{
    "$schema": "https://schema.management.azure.com/schemas/2015-01-01/deploymentTemplate.json#",
    "contentVersion": "1.0.0.0",
    "parameters": {
        "location": {
            "type": "string",
            "defaultValue": "[resourceGroup().location]"
        },
        "tagValues": {
            "type": "object",
            "defaultValue": {
                "Dept": "Finance",
                "Environment": "Production"
            }
        }
    },
    "resources": [
        {
            "apiVersion": "2019-04-01",
            "type": "Microsoft.Storage/storageAccounts",
            "name": "[concat('storage', uniqueString(resourceGroup().id))]",
            "location": "[parameters('location')]",
            "tags": "[parameters('tagValues')]",
            "sku": {
                "name": "Standard_LRS"
            },
            "kind": "Storage",
            "properties": {}
        }
    ]
}

Apply a JSON string to the tag name

To store many values in a single tag, apply a JSON string that represents the values. The entire JSON string is stored as one tag that can't exceed 256 characters. The following example has a single tag named CostCenter that contains several values from a JSON string:
JSON
{
    "$schema": "https://schema.management.azure.com/schemas/2015-01-01/deploymentTemplate.json#",
    "contentVersion": "1.0.0.0",
    "parameters": {
        "location": {
            "type": "string",
            "defaultValue": "[resourceGroup().location]"
        }
    },
    "resources": [
        {
            "apiVersion": "2019-04-01",
            "type": "Microsoft.Storage/storageAccounts",
            "name": "[concat('storage', uniqueString(resourceGroup().id))]",
            "location": "[parameters('location')]",
            "tags": {
                "CostCenter": "{\"Dept\":\"Finance\",\"Environment\":\"Production\"}"
            },
            "sku": {
                "name": "Standard_LRS"
            },
            "kind": "Storage",
            "properties": {}
        }
    ]
}

Apply tags from resource group

To apply tags from a resource group to a resource, use the resourceGroup function. When getting the tag value, use the tags.[tag-name] syntax instead of the tags.tag-name syntax, because some characters aren't parsed correctly in the dot notation.
JSON
{
    "$schema": "https://schema.management.azure.com/schemas/2015-01-01/deploymentTemplate.json#",
    "contentVersion": "1.0.0.0",
    "parameters": {
        "location": {
            "type": "string",
            "defaultValue": "[resourceGroup().location]"
        }
    },
    "resources": [
        {
            "apiVersion": "2019-04-01",
            "type": "Microsoft.Storage/storageAccounts",
            "name": "[concat('storage', uniqueString(resourceGroup().id))]",
            "location": "[parameters('location')]",
            "tags": {
                "Dept": "[resourceGroup().tags['Dept']]",
                "Environment": "[resourceGroup().tags['Environment']]"
            },
            "sku": {
                "name": "Standard_LRS"
            },
            "kind": "Storage",
            "properties": {}
        }
    ]
}

Portal

  1. To view the tags for a resource or a resource group, looks for existing tags in the overview. If you have not previously applied tags, the list is empty.
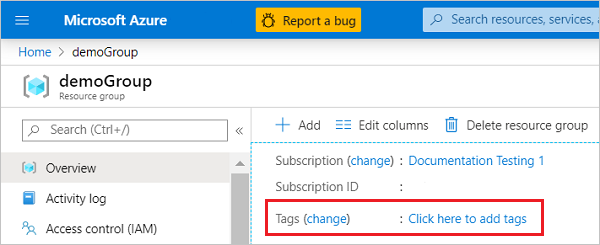
    View tags for resource or resource group
  2. To add a tag, select Click here to add tags.
  3. Provide a name and value. Select + to add the tag.
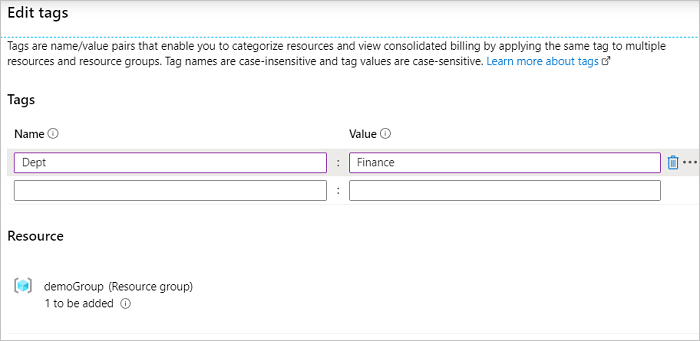
    Add tag
  4. Continue adding tags as needed. When done, select Save.
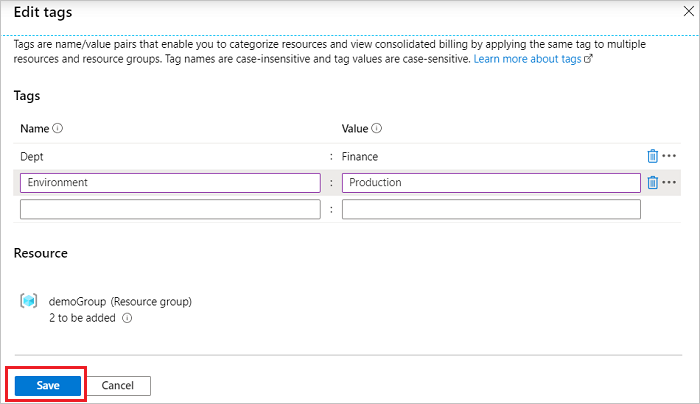
    Save tags
  5. The tags are now displayed in the overview.
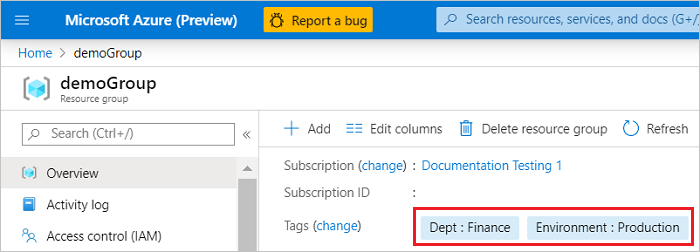
    Show tags
  6. To add or delete a tag, select change.
  7. To delete a tag, select the trash icon. Then, select Save.
    Delete tag
To bulk assign tags to multiple resources:
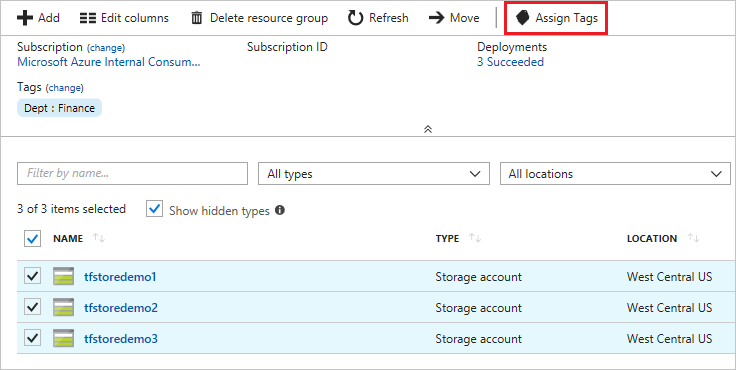
  1. From any list of resources, select the checkbox for the resources you want to assign the tag.
    Select multiple resources
  2. Select Assign tags
    Assign tags
  3. After each name and value, select +. When done, select Assign.
    Select assign
To view all resources with a tag:
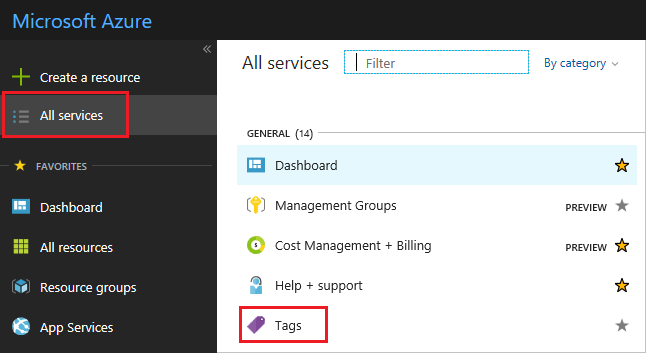
  1. Select All services and Tags.
    Find by tag
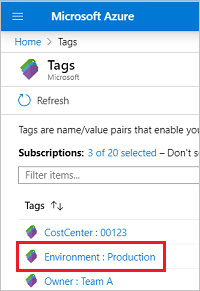
  2. Select the tag for viewing resources.
    Select tag
  3. All resources with that tag are displayed.
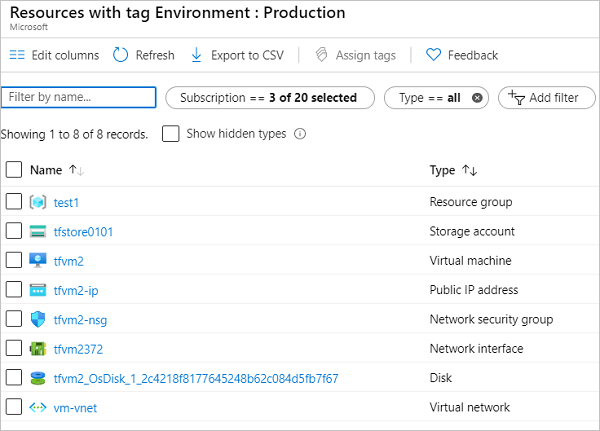
    View resources by tag
  4. For quick access, pin the view to the dashboard.
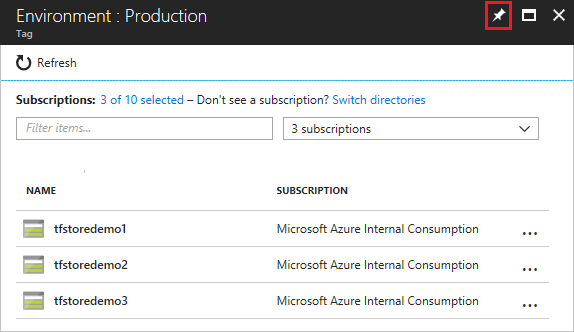
    Pin to dashboard
  5. The view is available from the dashboard.
    Dashboard

REST API

The Azure portal and PowerShell both use the Resource Manager REST API behind the scenes. If you need to integrate tagging into another environment, you can get tags by using GET on the resource ID and update the set of tags by using a PATCH call.

Tags and billing

You can use tags to group your billing data. For example, if you're running multiple VMs for different organizations, use the tags to group usage by cost center. You can also use tags to categorize costs by runtime environment, such as the billing usage for VMs running in the production environment.
You can retrieve information about tags through the Azure Resource Usage and RateCard APIs or the usage comma-separated values (CSV) file. You download the usage file from the Azure Account Center or Azure portal. For more information, see Download or view your Azure billing invoice and daily usage data. When downloading the usage file from the Azure Account Center, select Version 2. For services that support tags with billing, the tags appear in the Tags column.
For REST API operations, see Azure Billing REST API Reference.

Next steps

Manage and request quotas for Azure resources

As with other Azure services, there are limits on certain resources associated with the Azure Machine Learning service. These limits range from a cap on the number of workspaces you can create to limits on the actual underlying compute that gets used for model training or inference/scoring.
This article gives more details on the pre-configured limits on various Azure resources for your subscription and also contains handy links to request quota enhancements for each type of resource. These limits are put in place to prevent budget over-runs due to fraud, and to honor Azure capacity constraints.
Keep these quotas in mind as you design and scale up your Azure Machine Learning service resources for production workloads. For example, if your cluster doesn't reach the target number of nodes you specified, then you might have reached an Azure Machine Learning Compute cores limit for your subscription. If you want to raise the limit or quota above the Default Limit, open an online customer support request at no charge. The limits can't be raised above the Maximum Limit value shown in the following tables due to Azure Capacity constraints. If there is no Maximum Limit column, then the resource doesn't have adjustable limits.

Special considerations

  • A quota is a credit limit, not a capacity guarantee. If you have large-scale capacity needs, contact Azure support.
  • Your quota is shared across all the services in your subscriptions including Azure Machine Learning service. The only exception is Azure Machine Learning compute which has a separate quota from the core compute quota. Be sure to calculate the quota usage across all services when evaluating your capacity needs.
  • Default limits vary by offer Category Type, such as Free Trial, Pay-As-You-Go, and series, such as Dv2, F, G, and so on.

Default resource quotas

Here is a breakdown of the quota limits by various resource types within your Azure subscription.
 Important
Limits are subject to change. The latest can always be found at the service-level quota document for all of Azure.

Virtual machines

There is a limit on the number of virtual machines you can provision on an Azure subscription across your services or in a standalone manner. This limit is at the region level both on the total cores and also on a per family basis.
It is important to emphasize that virtual machine cores have a regional total limit and a regional per size series (Dv2, F, etc.) limit that are separately enforced. For example, consider a subscription with a US East total VM core limit of 30, an A series core limit of 30, and a D series core limit of 30. This subscription would be allowed to deploy 30 A1 VMs, or 30 D1 VMs, or a combination of the two not to exceed a total of 30 cores (for example, 10 A1 VMs and 20 D1 VMs).
ResourceDefault limitMaximum limit
VMs per subscription25,0001 per region.25,000 per region.
VM total cores per subscription201 per region.Contact support.
VM per series, such as Dv2 and F, cores per subscription201 per region.Contact support.
Coadministrators per subscriptionUnlimited.Unlimited.
Storage accounts per region per subscription250250
Resource groups per subscription980980
Availability sets per subscription2,000 per region.2,000 per region.
Azure Resource Manager API request size4,194,304 bytes.4,194,304 bytes.
Tags per subscription2Unlimited.Unlimited.
Unique tag calculations per subscription210,00010,000
Cloud services per subscriptionN/A3N/A3
Affinity groups per subscriptionN/A3N/A3
Subscription-level deployments per location8004800
1Default limits vary by offer category type, such as Free Trial and Pay-As-You-Go, and by series, such as Dv2, F, and G. For example, the default for Enterprise Agreement subscriptions is 350.
2You can apply an unlimited number of tags per subscription. The number of tags per resource or resource group is limited to 50. Resource Manager returns a list of unique tag name and values in the subscription only when the number of tags is 10,000 or less. You still can find a resource by tag when the number exceeds 10,000.
3These features are no longer required with Azure resource groups and Resource Manager.
4If you reach the limit of 800 deployments, delete deployments from the history that are no longer needed. To delete subscription level deployments, use Remove-AzDeployment or az deployment delete.
 Note
Virtual machine cores have a regional total limit. They also have a limit for regional per-size series, such as Dv2 and F. These limits are separately enforced. For example, consider a subscription with a US East total VM core limit of 30, an A series core limit of 30, and a D series core limit of 30. This subscription can deploy 30 A1 VMs, or 30 D1 VMs, or a combination of the two not to exceed a total of 30 cores. An example of a combination is 10 A1 VMs and 20 D1 VMs.
For a more detailed and up-to-date list of quota limits, check the Azure-wide quota article here.

Azure Machine Learning Compute

For Azure Machine Learning Compute, there is a default quota limit on both the number of cores and number of unique compute resources allowed per region in a subscription. This quota is separate from the VM core quota above and the core limits are not shared currently between the two resource types.
Available resources:
  • Dedicated cores per region have a default limit of 24 - 300 depending on your subscription offer type. The number of dedicated cores per subscription can be increased. Contact Azure support to discuss increase options.
  • Low-priority cores per region have a default limit of 24 - 300 depending on your subscription offer type. The number of low-priority cores per subscription can be increased. Contact Azure support to discuss increase options.
  • Clusters per region have a default limit of 100 and a maximum limit of 200. Contact Azure support if you want to request an increase beyond this limit.
  • There are other strict limits which cannot be exceeded once hit.
ResourceMaximum limit
Maximum workspaces per resource group800
Maximum nodes in a single Azure Machine Learning Compute (AmlCompute) resource100 nodes
Maximum GPU MPI processes per node1-4
Maximum GPU workers per node1-4
Maximum job lifetime90 days1
Maximum job lifetime on a Low Priority Node1 day2
Maximum parameter servers per node1
1 The maximum lifetime refers to the time that a run start and when it finishes. Completed runs persist indefinitely; data for runs not completed within the maximum lifetime is not accessible. 2 Jobs on a Low Priority node could be pre-empted any time there is a capacity constraint. It is recommended to implement checkpointing in your job.

Azure Machine Learning Pipelines

For Azure Machine Learning Pipelines, there is a quota limit on the number of steps in a pipeline and on the number of schedule-based runs of published pipelines per region in a subscription.
  • Maximum number of steps allowed in a pipeline is 30,000
  • Maximum number of the sum of schedule-based runs and blob pulls for blog-triggered schedules of published pipelines per subscription per month is 100,000
 Note
If you want to increase this limit, contact Microsoft Support.

Container instances

There is also a limit on the number of container instances that you can spin up in a given time period (scoped hourly) or across your entire subscription.
ResourceDefault limit
Container groups per subscription1001
Number of containers per container group60
Number of volumes per container group20
Ports per IP5
Container instance log size - running instance4 MB
Container instance log size - stopped instance16 KB or 1,000 lines
Container creates per hour3001
Container creates per 5 minutes1001
Container deletes per hour3001
Container deletes per 5 minutes1001
1To request a limit increase, create an Azure Support request.
For a more detailed and up-to-date list of quota limits, check the Azure-wide quota article here.

Storage

There is a limit on the number of storage accounts per region as well in a given subscription. The default limit is 200 and includes both Standard and Premium Storage accounts. If you require more than 200 storage accounts in a given region, make a request through Azure Support. The Azure Storage team will review your business case and may approve up to 250 storage accounts for a given region.

Find your quotas

Viewing your quota for various resources, such as Virtual Machines, Storage, Network, is easy through the Azure portal.
  1. On the left pane, select All services and then select Subscriptions under the General category.
  2. From the list of subscriptions, select the subscription whose quota you are looking for.
    There is a caveat, specifically for viewing the Azure Machine Learning Compute quota. As mentioned above, that quota is separate from the compute quota on your subscription.
  3. On the left pane, select Machine Learning service and then select any workspace from the list shown
  4. On the next blade, under the Support + troubleshooting section select Usage + quotas to view your current quota limits and usage.
  5. Select a subscription to view the quota limits. Remember to filter to the region you are interested in.

Request quota increases

If you want to raise the limit or quota above the default limit, open an online customer support request at no charge.
The limits can't be raised above the maximum limit value shown in the tables. If there is no maximum limit, then the resource doesn't have adjustable limits. This article covers the quota increase process in more detail.
When requesting a quota increase, you need to select the service you are requesting to raise the quota against, which could be services such as Machine Learning service quota, Container instances or Storage quota. In addition for Azure Machine Learning Compute, you can simply click on the Request Quota button while viewing the quota following the steps above.
 Note
Free Trial subscriptions are not eligible for limit or quota increases. If you have a Free Trial subscription, you can upgrade to a Pay-As-You-Go subscription. For more information, see Upgrade Azure Free Trial to Pay-As-You-Go and Free Trial subscription FAQ.

Assign administrator and non-administrator roles to users with Azure Active Directory

sign administrator and non-administrator roles to users with Azure Active Directory

If a user in your organization needs permission to manage Azure Active Directory (Azure AD) resources, you must assign the user an appropriate role in Azure AD, based on the actions the user needs permission to perform.
For more information about the available roles, see Assigning administrator roles in Azure Active Directory. For more information about adding users, see Add new users to Azure Active Directory.

Assign roles

A common way to assign Azure AD roles to a user is on the Directory role page for a user.
You can also assign roles using Privileged Identity Management (PIM). For more detailed information about how to use PIM, see Privileged Identity Management.

To assign a role to a user

  1. Sign in to the Azure portal using a Global administrator account for the directory.
  2. Select Azure Active Directory, select Users, and then search for and select the user getting the role assignment. For example, Alain Charon.
  3. On the Alain Charon - Profile page, select Directory role.
    The Alain Charon - Directory role page appears.
  4. Select Add role, select the role to assign to Alain (for example, Application administrator), and then choose Select.
    Directory roles page, showing the selected role
    The Application administrator role is assigned to Alain Charon and it appears on the Alain Charon - Directory role page.

Remove a role assignment

If you need to remove the role assignment from a user, you can also do that from the Alain Charon - Directory role page.

To remove a role assignment from a user

  1. Select Azure Active Directory, select Users, and then search for and select the user getting the role assignment removed. For example, Alain Charon.
  2. Select Directory role, select Application administrator, and then select Remove role.
    Directory roles page, showing the selected role and the remove option
    The Application administrator role is removed from Alain Charon and it no longer appears on the Alain Charon - Directory role page.

View and assign administrator roles in Azure Active Directory

View and assign administrator roles in Azure Active Directory

You can now see and manage all the members of the administrator roles in the Azure Active Directory portal. If you frequently manage role assignments, you will probably prefer this experience. And if you ever wondered “What the heck do these roles really do?”, you can see a detailed list of permissions for each of the Azure AD administrator roles.

View all roles

In Azure Active Directory, select Roles and administrators to see the list of all available roles.
Click the ellipsis on the right of each row to open the detailed description of the role.
list of roles in Azure AD portal

View my roles

It's easy to view your own permissions as well. Select Your Role on the Roles and administrators page to see the roles that are currently assigned to you.

View assignments for a role

Click a role to view the users assigned to the role. You can select Manage in PIM for additional management capabilities. Privileged Role Administrators can change “Permanent” (always active in the role) assignments to “Eligible” (in the role only when elevated). If you don't have PIM, you can still select Manage in PIM to sign up for a trial. Privileged Identity Management requires an Azure AD Premium P2 license plan.
list of members of an admin role
If you are a Global Administrator or a Privileged Role Administrator, you can easily add or remove members, filter the list, or select a member to see their active assigned roles.

View a user's role permissions

When you're viewing a role's members, select Description to see the complete list of permissions granted by the role assignment. The page includes links to relevant documentation to help guide you through managing directory roles.
list of permissions for an admin role