Friday, 5 July 2019

How to Create Users & Manage Permissions: Role Strategy Plugin

Generally, in a large organization, there are multiple, separate teams to manage and run jobs in Jenkins. But managing this crowd of users and assigning roles to them can prove troublesome.
By default, Jenkins comes with very basic user creation options. You can create multiple users but can only assign the same global roles and privileges to them. This not ideal, especially for a large organization.
The Role Strategy Plugin enable you to assign different roles and privileges to different users. You will first need to install the plugin in your Jenkins mange environment.
In this tutorial, you will learn
  • How to Create/Add a User
  • Install Role Strategy Plugin
  • Create Roles
  • Assign a Role
  • Project Roles

How to Create/Add a User

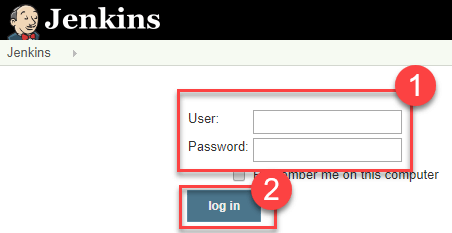
Step 1) Login to your Jenkins dashboard by visiting http://localhost:8080/
If you haven't installed Jenkins in your local server, go to the appropriate URL and access your dashboard by using your login credentials.
Step 2) You will now see options to create new users and manage current users.
Step 3)
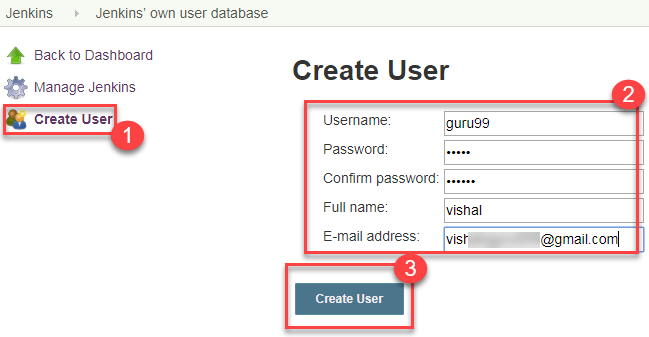
  • Under Manage Jenkins, Click Create User
  • Enter User details like password, name, email etc.
  • Click Create User
Step 4) User is created

Install Role Strategy Plugin

There are two methods for installing plugins in Jenkins:
  1. Installing it through your Jenkins dashboard
  2. Downloading the plugin from Jenkins website and installing it manually.
Step 1)
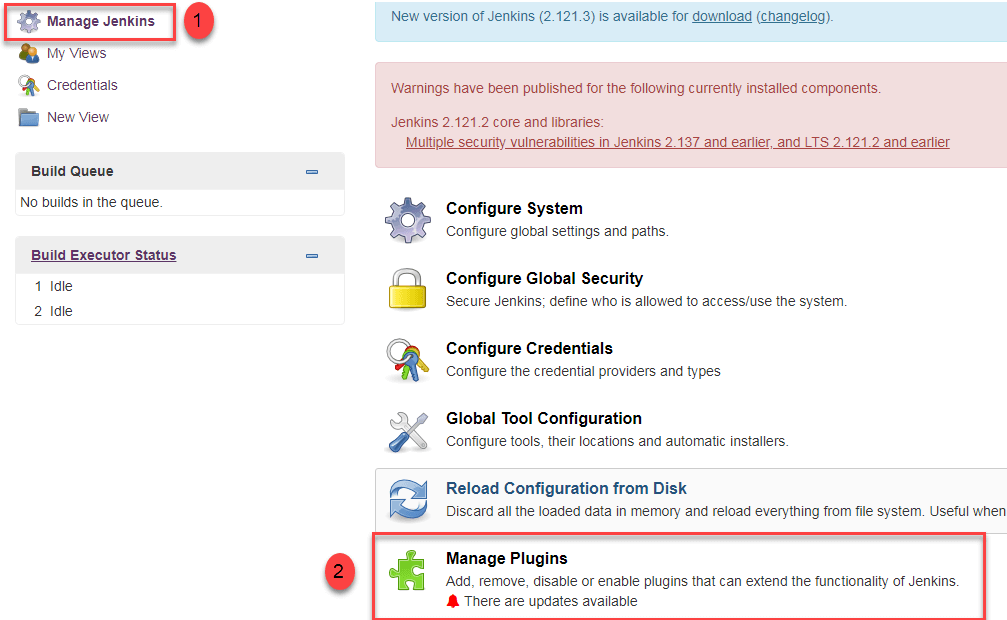
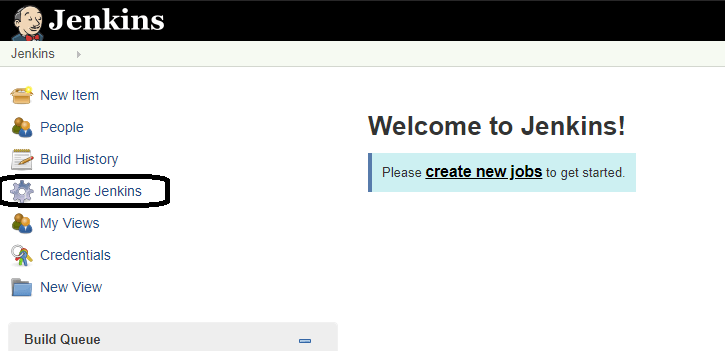
1. Go to Manage Jenkins
2. Click on the Manage Plugins option
Step 2)
  1. In available section, screen Search for "role".
  2. Select Role-based Authorization Strategy plugin
  3. Click on "Install without restart" (make sure you have an active internet connection)
Step 3)
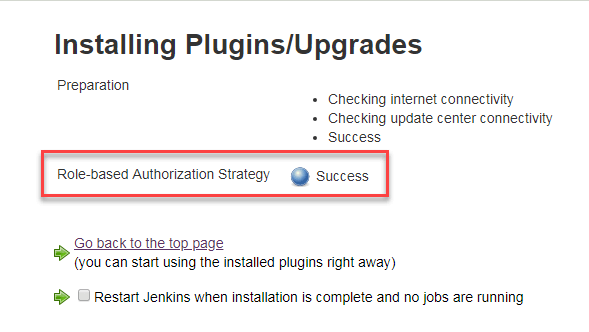
Once the plugin is installed, a "success" status will be displayed.
Click on Go back to the top page.
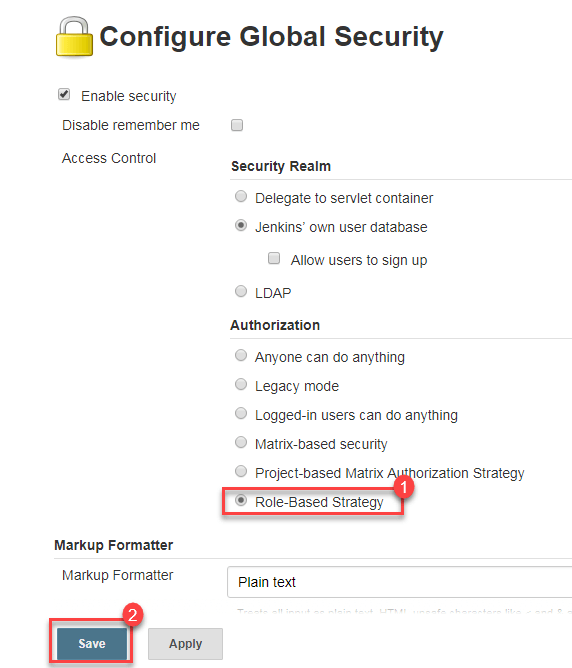
Step 4) Go to Manage Jenkins -> Configure Global Security -> Under Authorization, select Role Based Strategy. Click on Save.

Create Roles

In this step, we shall learn to certain roles to a single user or a group of users.
Step 1)
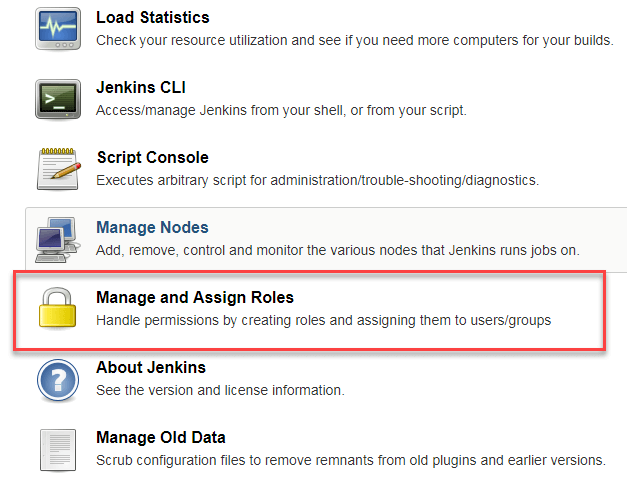
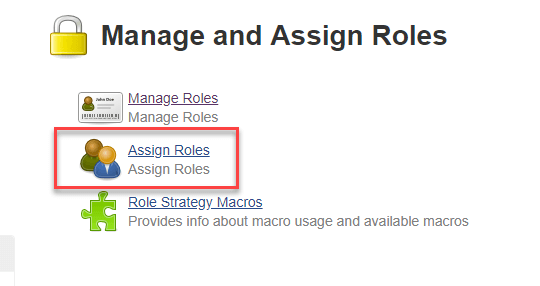
1. Go to Manage Jenkins
2. Select Manage and Assign Roles
Note: that the Manage and Assign Roles option will only be visible if you've installed the role strategy plugin.
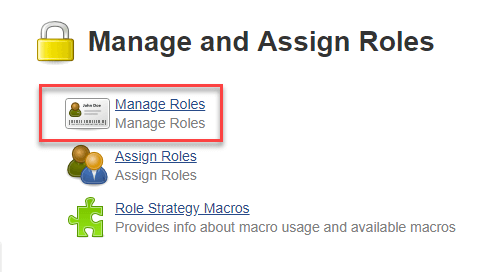
Step 2) Click on Manage Roles to add new roles based on your organization.
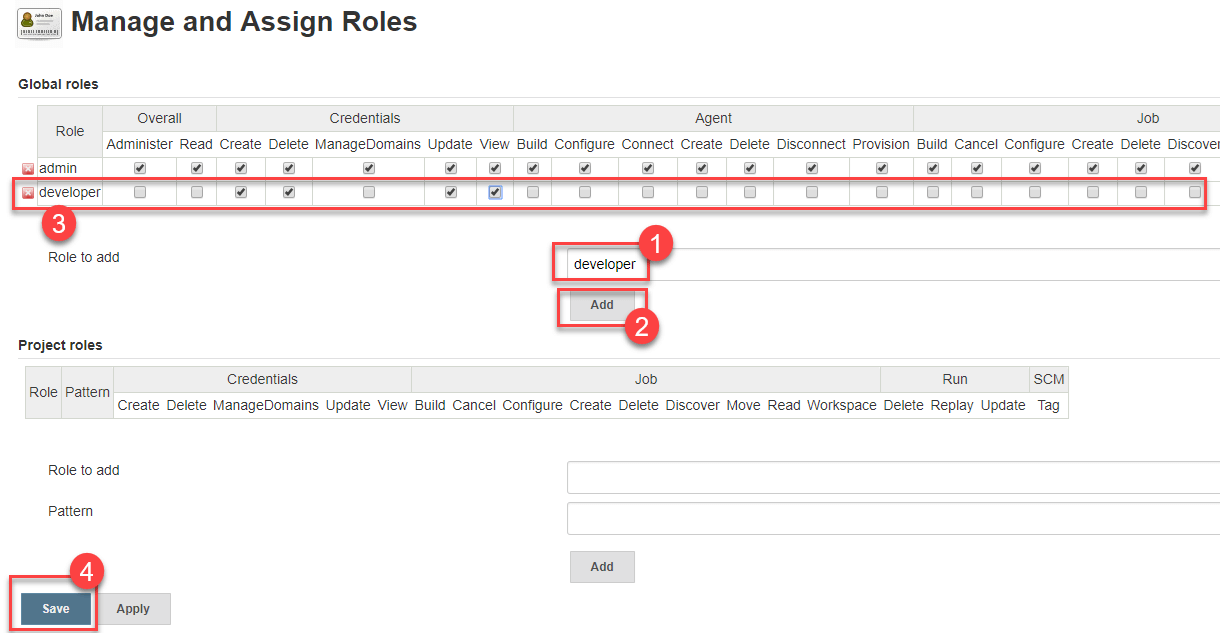
Step 3) To create a new role called "developer",
  1. Type "developer" under "role".
  2. Click on "Add" to create a new role.
  3. Now, select the permissions you want to assign to the "Developer" role.
  4. Click Save
Assign a Role

Step 1) Now that you have created roles, let us assign them to specific users.
  1. Go to Manage Jenkins
  2. Select Manage and Assign Roles
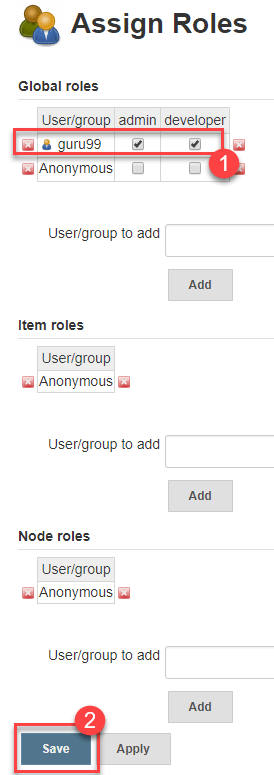
Step 2) We shall add the new role "developer" to user "guru99"
  1. Selector developer role checkbox
  2. Click Save
You can assign any role to any user, as per your need.

Project Roles

You can create project specific roles under Project Roles.
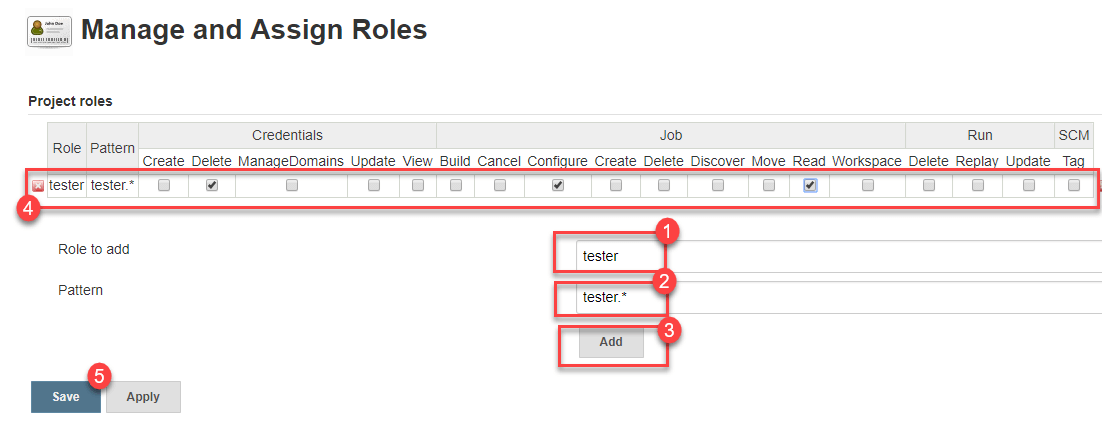
Step 1) In Jenkin's Manage and Assign Roles
  1. Enter a role as "tester"
  2. Add a pattern to this by adding tester.*, so that any username starting with "tester" will be assigned the project role you specify.
  3. Click Add
  4. Select privileges
  5. Click Save
Jenkins GitHub Integration: Install Git Plugin

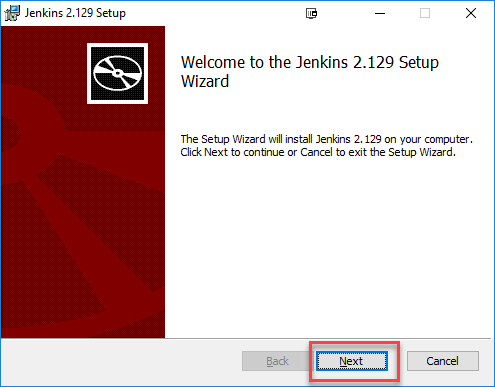
You have learned, from previous Guru99 tutorials, what Jenkins is and how to install it onto a Windows system. Assuming you have completed those basic steps, we shall now move on to Plugin management.
Jenkins has outstanding plugin support. There are thousands of third-party application plugins available on their website. To know if Jenkins supports the third-party applications you have in mind, check their plugins directory at https://wiki.jenkins-ci.org/display/JENKINS/Plugins.
In this tutorial, you will learn:
  • Installation of Plugins in Jenkins
  • Install GIT Plugin
  • Integrating Jenkins with GitHub

Installation of Plugins in Jenkins

Jenkins comes with a pretty basic setup, so you will need to install the required plugins to enable respective third-party application support.
GitHub is a web-based repository of code which plays a major role in DevOps. It provides a common platform for multiple developers working on the same code/project to upload and retrieve updated code, thereby facilitating continuous integration.
Jenkins needs to have GitHub plugin installed to be able to pull code from the GitHub repository.
You need not install a GitHub plugin if you have already installed the Git plugin in response to the prompt during the Jenkins' installation setup. But if not, here is how you install GitHub plugins in Jenkins and pull code from a GitHub repository.

Install GIT Plugin

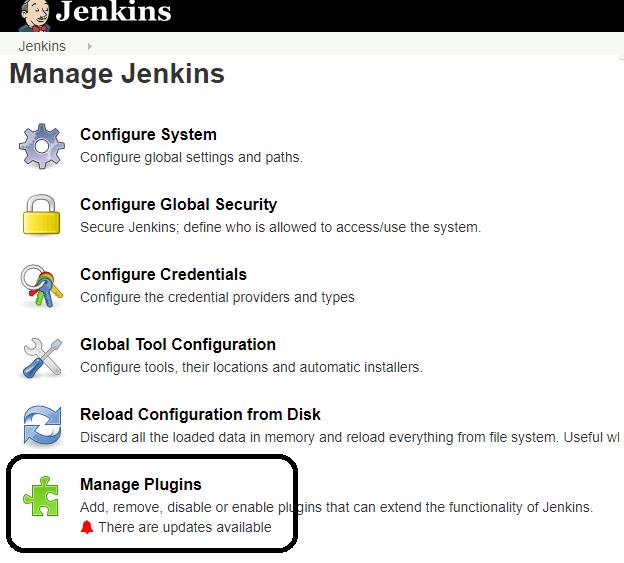
Step 1: Click on the Manage Jenkins button on your Jenkins dashboard:
Step 2: Click on Manage Plugins:
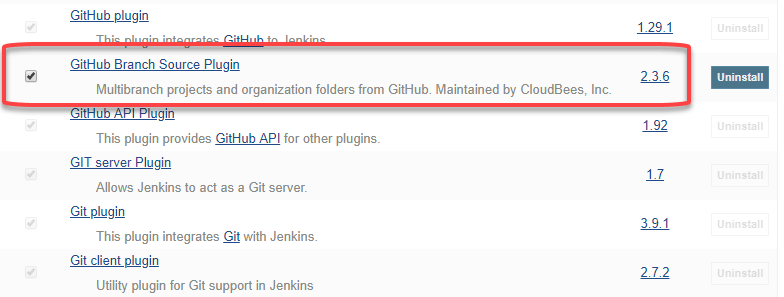
Step 3: In the Plugins Page
  1. Select the GIT Plugin
  2. Click on Install without restart. The plugin will take a few moments to finish downloading depending on your internet connection, and will be installed automatically.
  3. You can also select the option Download now and Install after restart button. In which plugin is installed after restart
  4. You will be shown a "No updates available" message if you already have the Git plugin installed.
Step 4: Once the plugins have been installed, go to Manage Jenkins on your Jenkins dashboard. You will see your plugins listed among the rest.

Integrating Jenkins with GitHub

We shall now discuss the process of integrating GitHub into Jenkins in a Windows system.
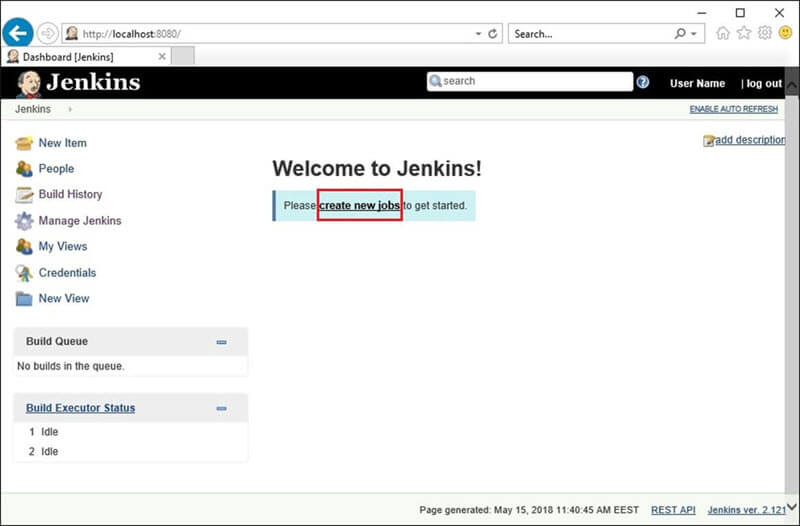
Step 1) Create a new job in Jenkins, open the Jenkins dashboard with your Jenkins URL. For example, http://localhost:8080/
Click on create new jobs:
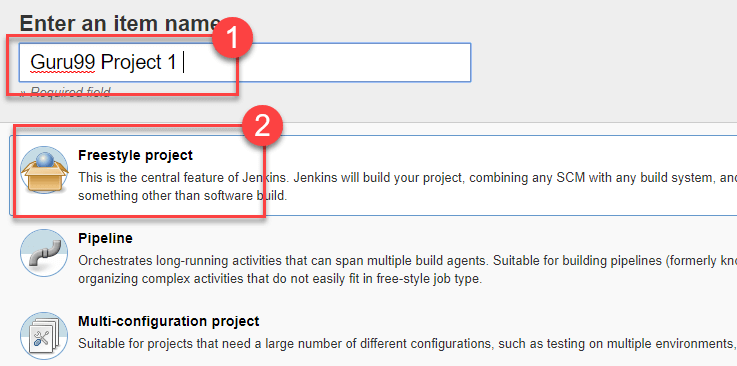
Step 2) Enter the item name, select job type and click OK. We shall create a Freestyle project as an example.
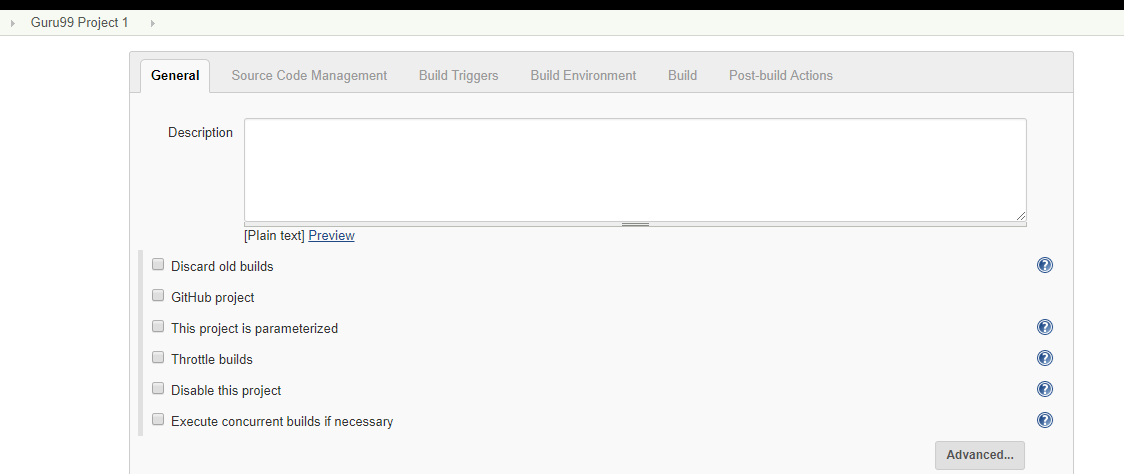
Step 3) Once you click OK, the page will be redirected to its project form. Here you will need to enter the project information:
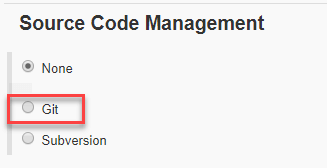
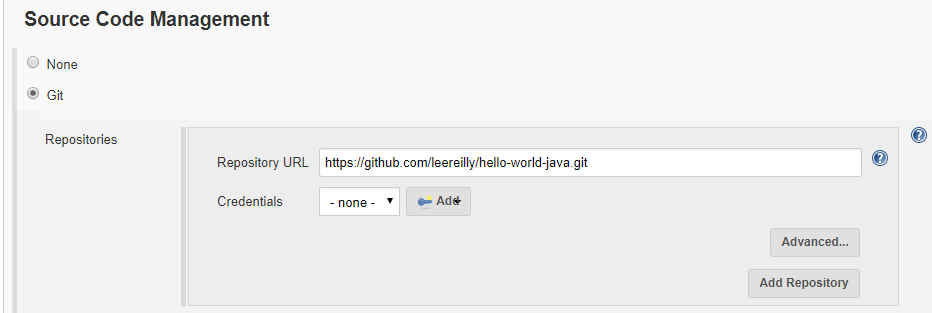
Step 4) You will see a Git option under Source Code Management if your Git plugin has been installed in Jenkins:
NOTE: If the Git option does not appear, try re-installing the plugins, followed by a restart and a re-login into your Jenkins dashboard. You will now be able to see the Git option as mentioned above.
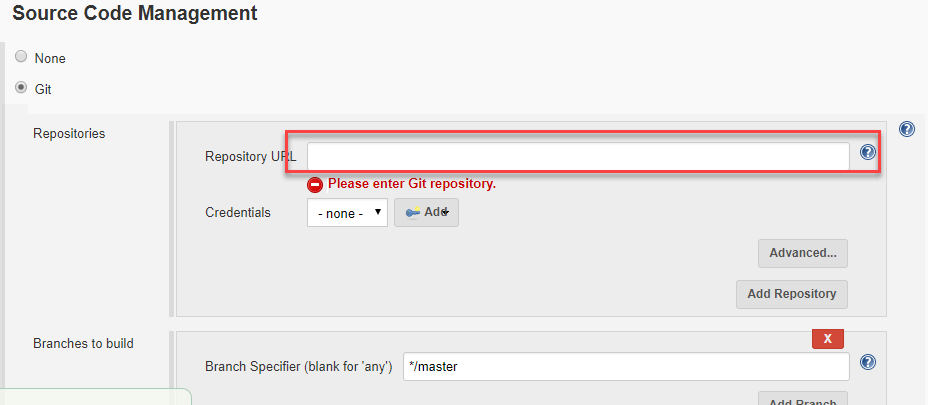
Step 5) Enter the Git repository URL to pull the code from GitHub.
Step 6) You might get an error message the first time you enter the repository URL. For example:
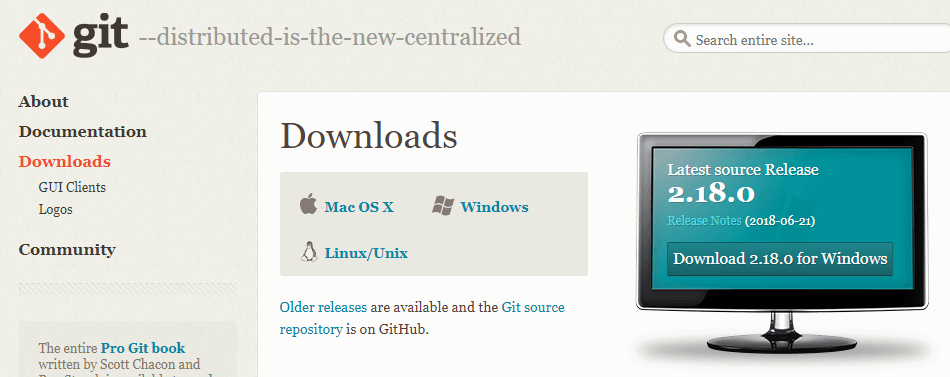
This happens if you do not have Git installed in your local machine. To install Git in your local machine, go to https://git-scm.com/downloads
Download the appropriate Git file for your Operating System, in this case, Windows, and install it onto your local machine running Jenkins. Complete the onscreen instructions to install GIT.
Step 6) You can execute Git repositories in your Jenkins once Git has been installed on your machine. To check if it has been successfully installed onto your system, open your command prompt, type "Git" and press enter. You should see different options come up for Git:
This means that Git has been installed in your system.
Step 7) Once you have everything in place, try adding the Git URL into Jenkins. You will not see any error messages:
Git is now properly configured on your system.

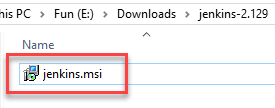
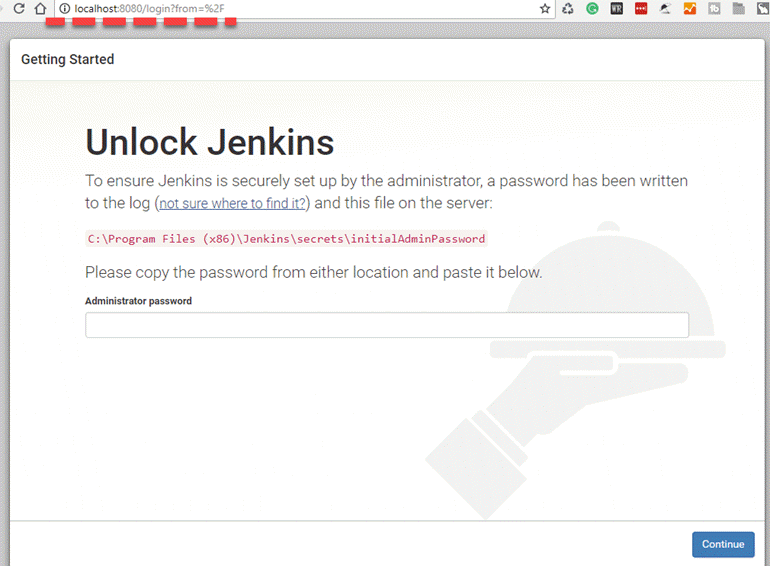
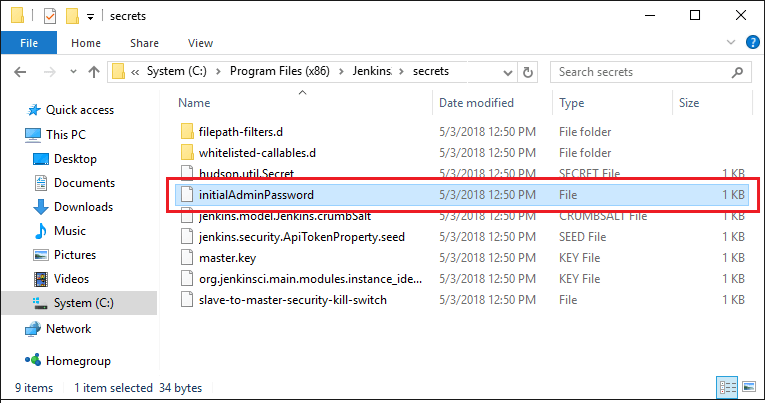
How to Download & Install Jenkins on Windows


What is Jenkin for Continuous Integration?

What is Continuous Integration?

In Continuous Integration after a code commit, the software is built and tested immediately. In a large project with many developers, commits are made many times during a day. With each commit code is built and tested. If the test is passed, build is tested for deployment. If deployment is a success, the code is pushed to production. This commit, build, test, and deploy is a continuous process and hence the name continuous integration/deployment.
A Continuous Integration Pipeline is a powerful instrument that consists of a set of tools designed to hostmonitorcompile and test code, or code changes, like:
  • Continuous Integration Server (Jenkins, Bamboo, CruiseControl, TeamCity, and others)
  • Source Control Tool (e.g., CVS, SVN, GIT, Mercurial, Perforce, ClearCase and others)
  • Build tool (Make, ANT, Maven, Ivy, Gradle, and others)
  • Automation testing framework (Selenium, Appium, TestComplete, UFT, and others)
In this tutorial, you will learn
  • What is Continuous Integration?
  • What is Jenkin?
  • Jenkin History
  • Why Continuous Integration with Jenkins?
  • Real-world case study of Continuous Integration
  • Advantages of using Jenkins
  • Disadvantages of using Jenkins

What is Jenkin?

Jenkins is an open source Continuous Integration server capable of orchestrating a chain of actions that help to achieve the Continuous Integration process (and not only) in an automated fashion.
Jenkins is entirely written in Java. Jenkins is a widely used application around the world that has around 300k installations and growing day by day.
It is a server-based application and requires a web server like Apache Tomcat. The reason Jenkins became so popular is that of its monitoring of repeated tasks which arise during the development of a project. For example, if your team is developing a project, Jenkins will continuously test your project builds and show you the errors in early stages of your development.
By using Jenkins, software companies can accelerate their software development process, as Jenkins can automate build and test at a rapid rate. Jenkins supports the complete development lifecycle of software from building, testing, documenting the software, deploying and other stages of a software development lifecycle.

Jenkin History

  • Kohsuke Kawaguchi, a Java developer, working at SUN Microsystems, was tired of building the code and fixing errors repetitively. In 2004, created an automation server called Hudson that automates build and test task.
  • In 2011, Oracle who owned Sun Microsystems had a dispute with Hudson open source community, so the forked Hudson and renamed it as Jenkins.
  • Both Hudson and Jenkins continued to operate independently. But in short span of time, Jenkins acquired a lot of projects and contributors while Hudson remained with only 32 projects. With time, Jenkins became more popular, and Hudson is not maintained anymore.

Why Continuous Integration with Jenkins?

Some people might think that the old-fashioned way of developing the software is the better way. Let's understand the advantages of CI with Jenkins with the following example
Let us imagine, that there are around 10 developers who are working on a shared repository. Some developer completes their task in 25 days while others take 30 days to complete.
Before JenkinsAfter Jenkins
Once all Developers had completed their assigned coding tasks, they used to commit their code all at same time. Later, Build is tested and deployed.

Code commit built, and test cycle was very infrequent, and a single build was done after many days.
The code is built and test as soon as Developer commits code. Jenkin will build and test code many times during the day

If the build is successful, then Jenkins will deploy the source into the test server and notifies the deployment team.

If the build fails, then Jenkins will notify the errors to the developer team.
Since the code was built all at once, some developers would need to wait until other developers finish coding to check their buildThe code is built immediately after any of the Developer commits.
It is not an easy task to isolate, detect, and fix errors for multiple commits.Since the code is built after each commit of a single developer, it's easy to detect whose code caused the built to fail
Code build and test process are entirely manual, so there are a lot of chances for failure.Automated build and test process saving timing and reducing defects.
The code is deployed once all the errors are fixed and tested.The code is deployed after every successful build and test.
Development Cycle is slowThe development cycle is fast. New features are more readily available to users. Increases profits.

Real-world case study of Continuous Integration

I am sure all of you aware of old phone Nokia. Nokia used to implement a procedure called nightly build. After multiple commits from diverse developers during the day, the software built every night. Since the software was built only once in a day, it's a huge pain to isolate, identify, and fix the errors in a large code base.
Later, they adopted Continuous Integration approach. The software was built and tested as soon as a developer committed code. If any error is detected, the respective developer can quickly fix the defect.

Jenkins Plugins

By default, Jenkins comes with a limited set of features. If you want to integrate your Jenkins installation with version control tools like Git, then you need to install plugins related to Git. In fact, for integration with tools like Maven, Amazon EC2, you need to install respective plugins in your Jenkins.
Plugins integration in Jenkins

Advantages of using Jenkins

  • Jenkins is being managed by the community which is very open. Every month, they hold public meetings and take inputs from the public for the development of Jenkins project.
  • So far around 280 tickets are closed, and the project publishes stable release every three months.
  • As technology grows, so does Jenkins. So far Jenkins has around 320 plugins published in its plugins database. With plugins, Jenkins becomes even more powerful and feature rich.
  • Jenkins also supports cloud-based architecture so that you can deploy Jenkins in cloud-based platforms.
  • The reason why Jenkins became popular is that it was created by a developer for developers.

Disadvantages of using Jenkins

Though Jenkins is a very powerful tool, it has its flaws.
  • Its interface is out dated and not user friendly compared to current UI trends.
  • Though Jenkins is loved by many developers, it's not that easy to maintain it because Jenkins runs on a server and requires some skills as server administrator to monitor its activity.
  • One of the reasons why many people don't implement Jenkins is due to its difficulty in installing and configuring Jenkins.
  • Continuous integrations regularly break due to some small setting changes. Continuous integration will be paused and therefore requires some developer attention.

Conclusion:

  • In Continuous Integration, after a code commit, the software is built and tested immediately
  • Jenkins is an open source Continuous Integration server capable of orchestrating a chain of actions
  • Before Jenkins when all Developers had completed their assigned coding tasks, they used to commit their code all at same time. Later, Build is tested and deployed.
  • After Jenkins the code is built and test as soon as Developer commits code. Jenkin will build and test code many times during the day
  • By default, Jenkins comes with a limited set of features. If you want to integrate your Jenkins installation with version control tools like Git, then you need to install plugins related to Git
  • The biggest pros of Jenkins is that it is managed by the community which holds public meetings and take inputs from the public for the development of Jenkins projects
  • The biggest con of Jenkin is that Its interface is out dated and not user friendly compared to current UI trends.

Jenkins Tutorial for Beginners: Learn in 3 Day

Training Summary


Jenkin is the most popular, open source Continuous Integration tool. It has tons of plugins that enhance its functionality. In this online training course, you will learn to Install Jenkin, create jobs, pipelines, integrate with GitHub, Selenium, and other tools.

What should I know?


Nothing! This tutorial is designed for absolute beginners to Jenkins and CI.


Syllabus

 TutorialWhat is Jenkin for Continuous Integration?
 TutorialHow to Download & Install Jenkins on Windows
 TutorialJenkins GitHub Integration: Install Git Plugin
 TutorialHow to Create Users & Manage Permissions: Role Strategy Plugin
 TutorialHow to Create Builds with the Jenkins Freestyle Project
 TutorialJenkins Pipeline Tutorial: JenkinsFile EXAMPLE
 TutorialContinuous Integration - Jenkins vs Travis-CI
 Tutorial15 Best Jenkins Alternatives