Thursday, 20 September 2018

Kali Linux - Information Gathering Tools

In this chapter, we will discuss the information gathering tools of Kali Linux.

NMAP and ZenMAP

NMAP and ZenMAP are useful tools for the scanning phase of Ethical Hacking in Kali Linux. NMAP and ZenMAP are practically the same tool, however NMAP uses command line while ZenMAP has a GUI.
NMAP is a free utility tool for network discovery and security auditing. Many systems and network administrators also find it useful for tasks such as network inventory, managing service upgrade schedules, and monitoring host or service uptime.
NMAP uses raw IP packets in novel ways to determine which hosts are available on the network, what services (application name and version) those hosts are offering, which operating systems (and OS versions) they are running, what type of packet filters/firewalls are in use, etc.
Now, let’s go step by step and learn how to use NMAP and ZenMAP.
Step 1 − To open, go to Applications → 01-Information Gathering → nmap or zenmap.
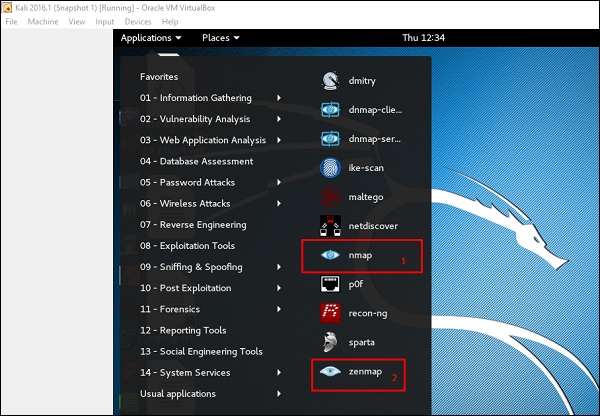
Nmap ZenMap
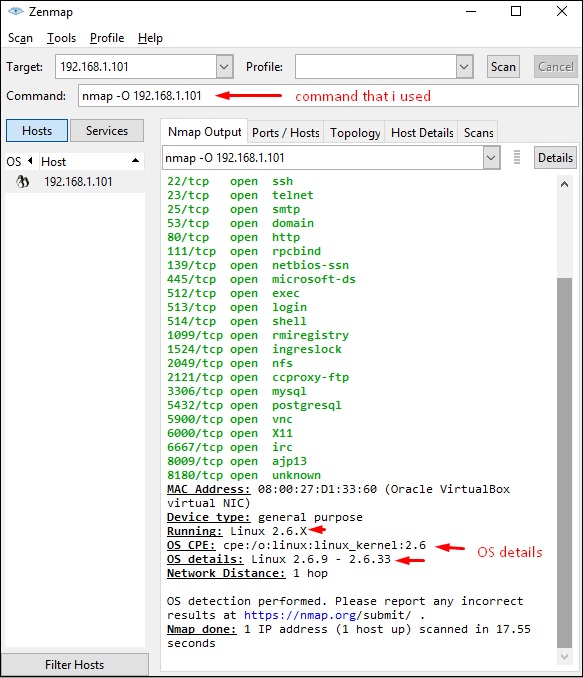
Step 2 − The next step is to detect the OS type/version of the target host. Based on the help indicated by NMAP, the parameter of OS type/version detection is variable “-O”. For more information, use this link: https://nmap.org/book/man-os-detection.html
The command that we will use is −
nmap -O 192.168.1.101
The following screenshot shows where you need to type the above command to see the Nmap output −
Nmap Output
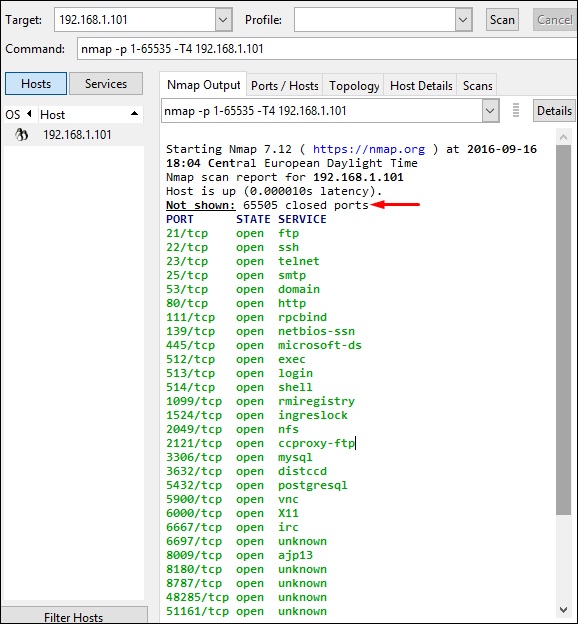
Step 3 − Next, open the TCP and UDP ports. To scan all the TCP ports based on NMAP, use the following command −
nmap -p 1-65535 -T4  192.168.1.101 
Where the parameter “–p” indicates all the TCP ports that have to be scanned. In this case, we are scanning all the ports and “-T4” is the speed of scanning at which NMAP has to run.
Following are the results. In green are all the TCP open ports and in red are all the closed ports. However, NMAP does not show as the list is too long.
Closed Ports

Stealth Scan

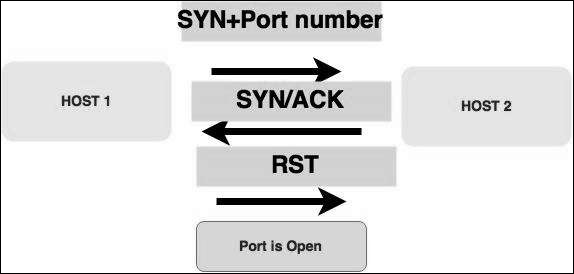
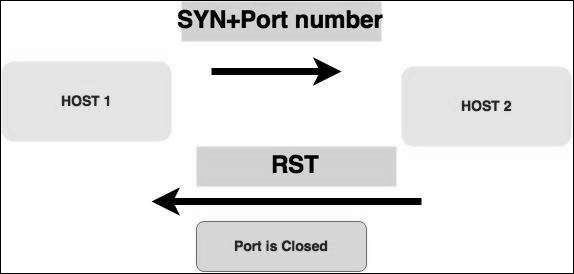
Stealth scan or SYN is also known as half-open scan, as it doesn’t complete the TCP three-way handshake. A hacker sends a SYN packet to the target; if a SYN/ACK frame is received back, then it’s assumed the target would complete the connect and the port is listening. If an RST is received back from the target, then it is assumed the port isn’t active or is closed.
Half Open Scan
Syn Packet
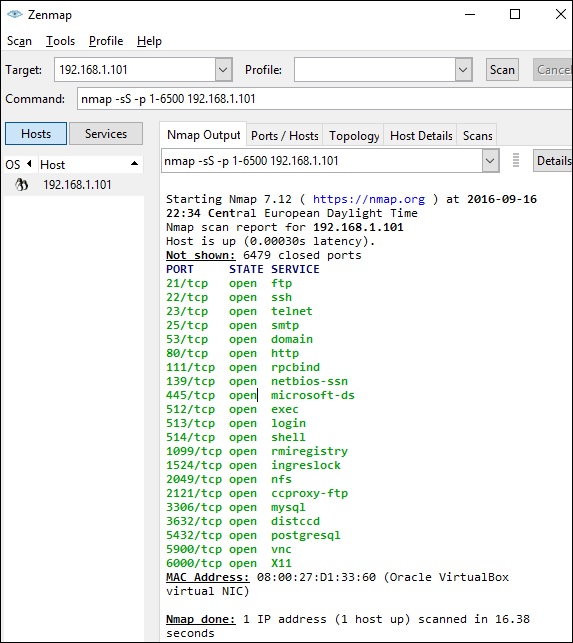
Now to see the SYN scan in practice, use the parameter –sS in NMAP. Following is the full command −
nmap -sS -T4 192.168.1.101 
The following screenshot shows how to use this command −
ZenMap Command

Searchsploit

Searchsploit is a tool that helps Kali Linux users to directly search with the command line from Exploit database archive.
To open it, go to Applications → 08-Exploitation Tools → searchsploit, as shown in the following screenshot.
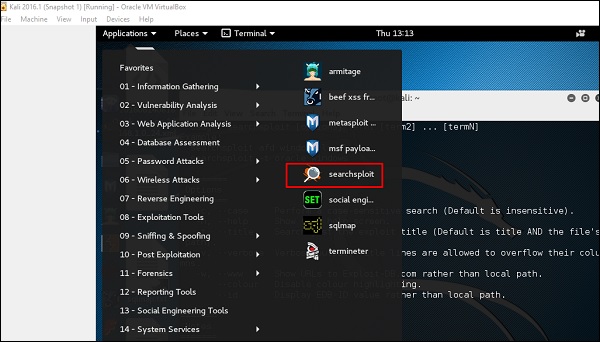
Searchsploit
After opening the terminal, type "searchsploit exploit index name".
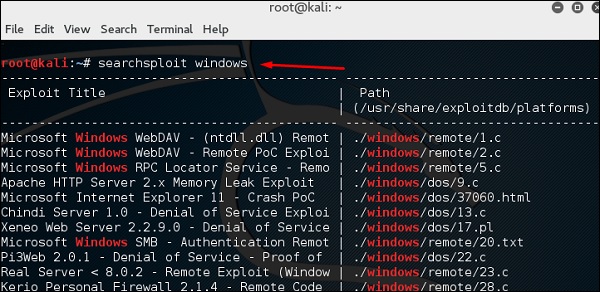
Exploit Index Name

DNS Tools

n this section, we will learn how to use some DNS tools that Kali has incorporated. Basically, these tools help in zone transfers or domain IP resolving issues.

dnsenum.pl

The first tool is dnsenum.pl which is a PERL script that helps to get MX, A, and other records connect to a domain.
Click the terminal on the left panel.
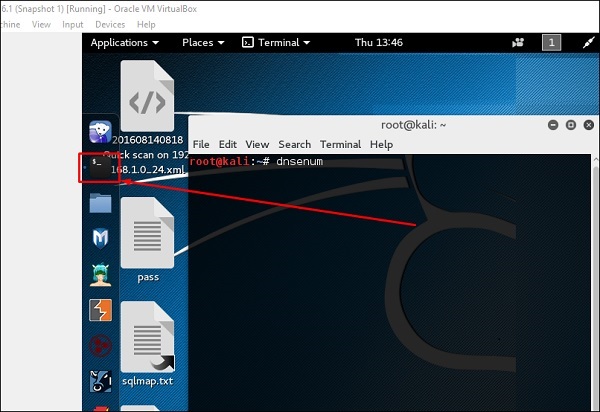
Terminal Left Panel
Type “dnsenum domain name” and all the records will be shown. In this case, it shows A records.
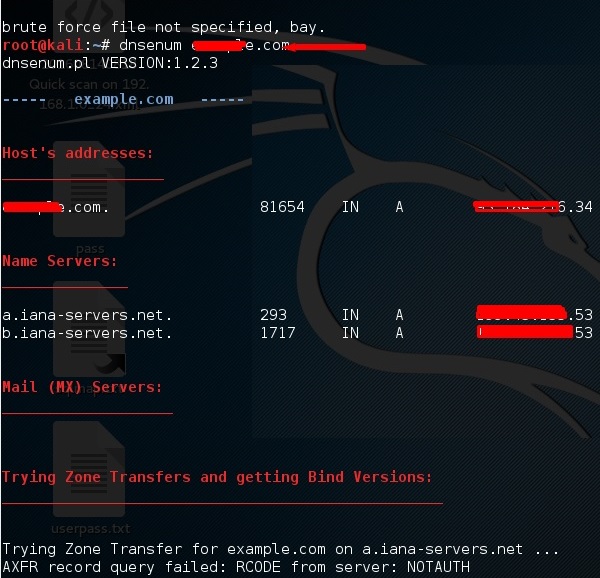
Domain Name

DNSMAP

The second tool is DNSMAP which helps to find the phone numbers, contacts, and other subdomain connected to this domain, that we are searching. Following is an example.
Click the terminal as in the upper section , then write “dnsmap domain name”
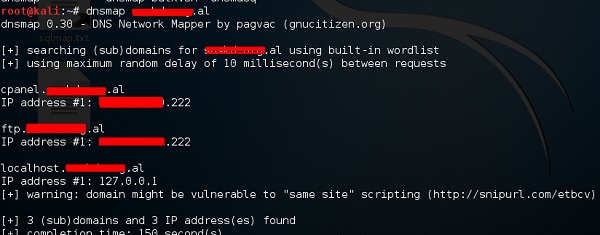
DNS Map

dnstracer

The third tool is dnstracer, which determines where a given Domain Name Server (DNS) gets its information from for a given hostname.
Click the terminal as in the upper section, then type “dnstracer domain name”.
DnsTracer

LBD Tools

LBD (Load Balancing Detector) tools are very interesting as they detect if a given domain uses DNS and/or HTTP load balancing. It is important because if you have two servers, one or the other may not be updated and you can try to exploit it. Following are the steps to use it −
First, click the terminal on the left panel.
Terminal Left Panel
Then, type “lbd domainname”. If it produces a result as “FOUND”, it means that the server has a load balance. In this case, the result is “NOT FOUND”.
LBD Domain Name

Hping3

Hping3 is widely used by ethical hackers. It is nearly similar to ping tools but is more advanced, as it can bypass the firewall filter and use TCP, UDP, ICMP and RAW-IP protocols. It has a traceroute mode and the ability to send files between a covered channel.
Click the terminal on the left panel.
Terminal Left Panel
Type “hping3 –h” which will show how to use this command.
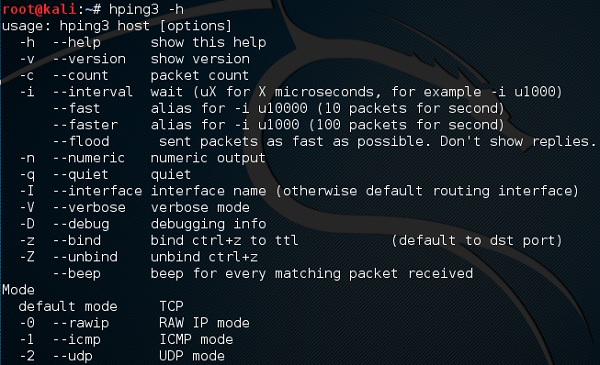
Hping3
The other command is “hping3 domain or IP -parameter”
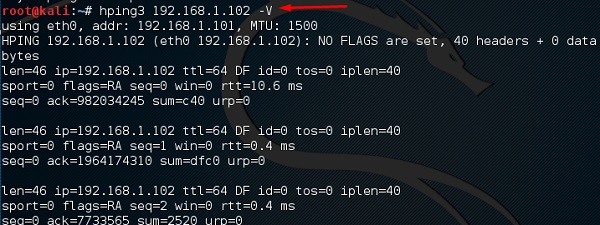
IP Parameter

Kali Linux - Installation and Configuration

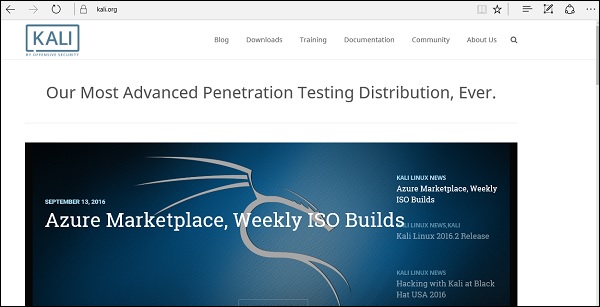
Kali Linux is one of the best security packages of an ethical hacker, containing a set of tools divided by the categories. It is an open source and its official webpage is https://www.kali.org.
Generally, Kali Linux can be installed in a machine as an Operating System, as a virtual machine which we will discuss in the following section. Installing Kali Linux is a practical option as it provides more options to work and combine the tools. You can also create a live boot CD or USB. All this can be found in the following link: https://www.kali.org/downloads/
BackTrack was the old version of Kali Linux distribution. The latest release is Kali 2016.1 and it is updated very often.
Linux Distribution
To install Kali Linux −
  • First, we will download the Virtual box and install it.
  • Later, we will download and install Kali Linux distribution.

Download and Install the Virtual Box

A Virtual Box is particularly useful when you want to test something on Kali Linux that you are unsure of. Running Kali Linux on a Virtual Box is safe when you want to experiment with unknown packages or when you want to test a code.
With the help of a Virtual Box, you can install Kali Linux on your system (not directly in your hard disk) alongside your primary OS which can MAC or Windows or another flavor of Linux.
Let’s understand how you can download and install the Virtual Box on your system.
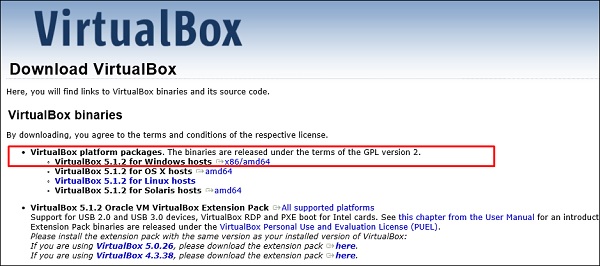
Step 1 − To download, go to https://www.virtualbox.org/wiki/Downloads. Depending on your operating system, select the right package. In this case, it will be the first one for Windows as shown in the following screenshot.
Virtual Box First Page
Step 2 − Click Next.
SetUp
Step 3 − The next page will give you options to choose the location where you want to install the application. In this case, let us leave it as default and click Next.
Custom Setup
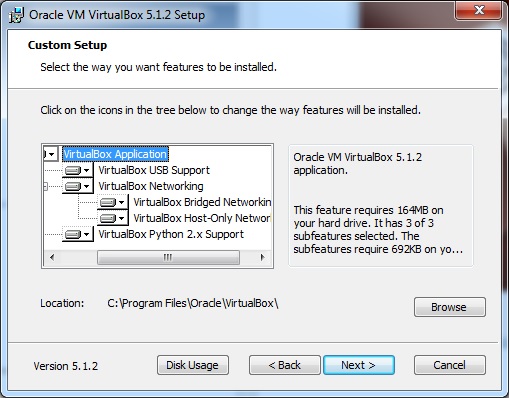
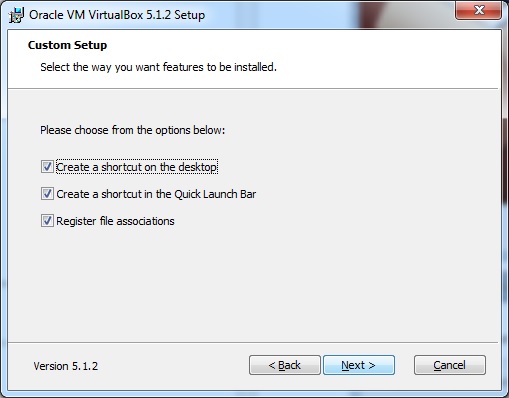
Step 4 − Click Next and the following Custom Setup screenshot pops up. Select the features you want to be installed and click Next.
Custom Features
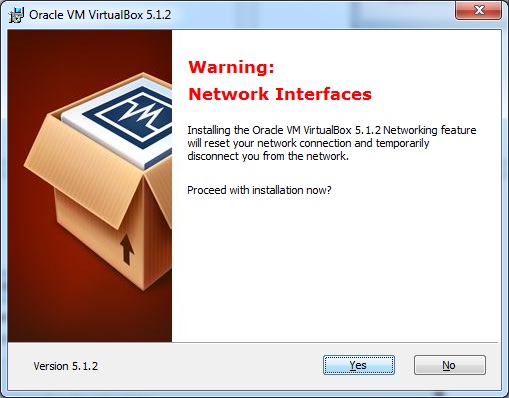
Step 5 − Click Yes to proceed with the installation.
Network Interface
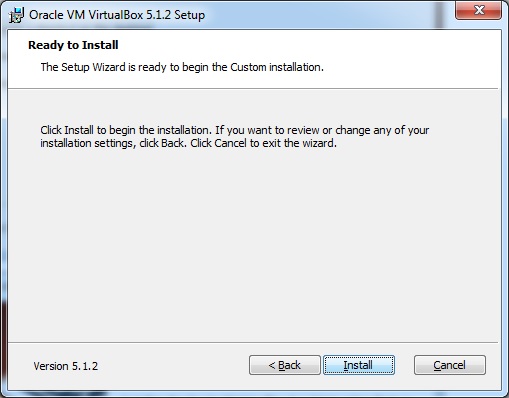
Step 6 − The Ready to Install screen pops up. Click Install.
Ready to install
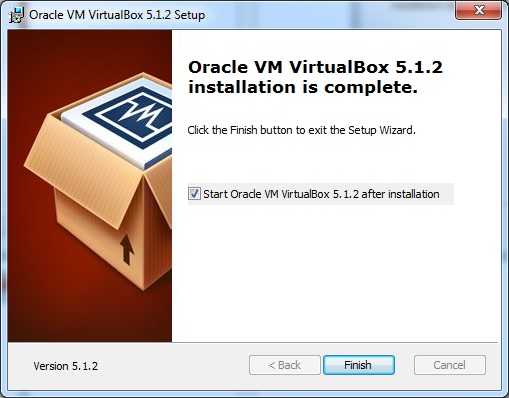
Step 7 − Click the Finish button.
Complete Installation
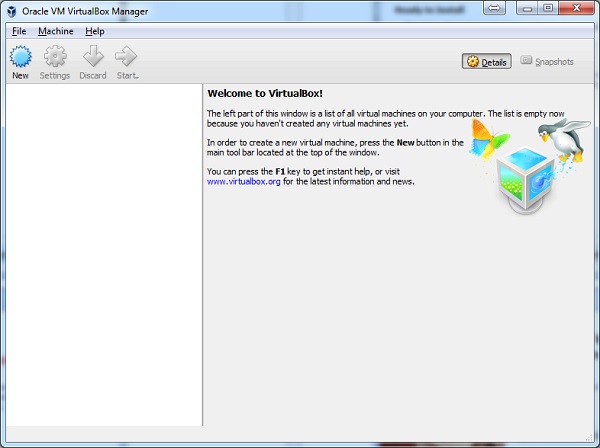
The Virtual Box application will now open as shown in the following screenshot. Now we are ready to install the rest of the hosts for this manual and this is also recommended for professional usage.
Virtual Manager

Install Kali Linux

Now that we have successfully installed the Virtual Box, let’s move on to the next step and install Kali Linux.
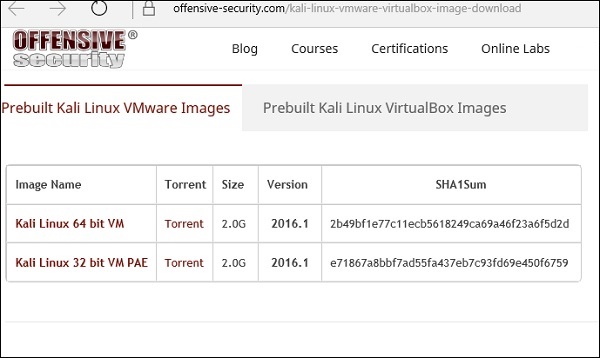
Step 1 − Download the Kali Linux package from its official website: https://www.kali.org/downloads/
Offensive Security
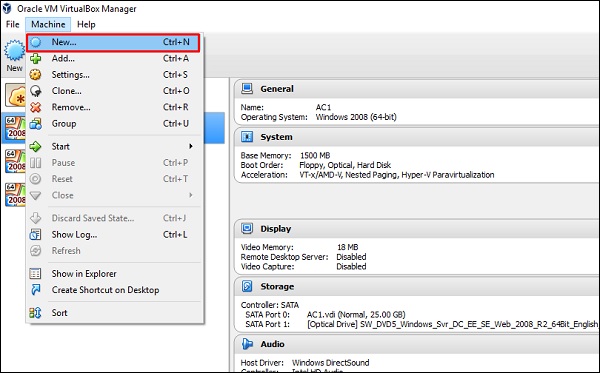
Step 2 − Click VirtualBox → New as shown in the following screenshot.
Machine New
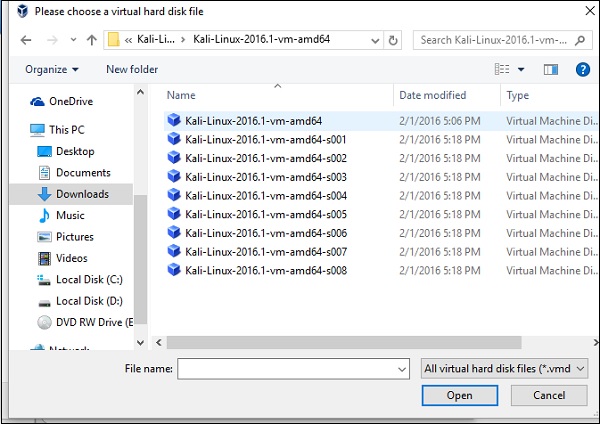
Step 3 − Choose the right virtual hard disk file and click Open.
Hard Disk File
Step 4 − The following screenshot pops up. Click the Create button.
Create
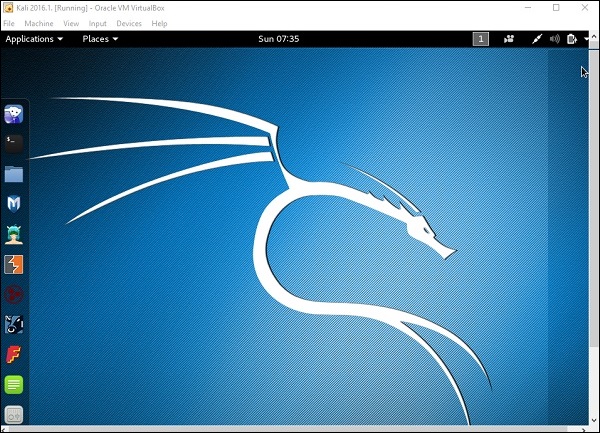
Step 5 − Start Kali OS. The default username is root and the password is toor.
Kali OS

Update Kali

It is important to keep updating Kali Linux and its tools to the new versions, to remain functional. Following are the steps to update Kali.
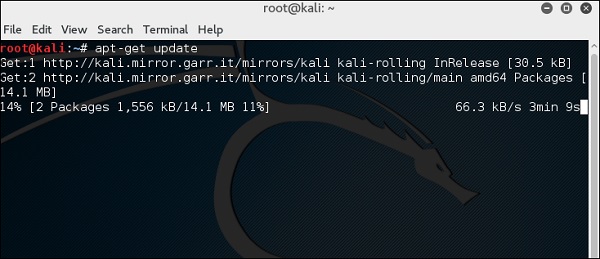
Step 1 − Go to Application → Terminal. Then, type “apt-get update” and the update will take place as shown in the following screenshot.
Application
Terminal
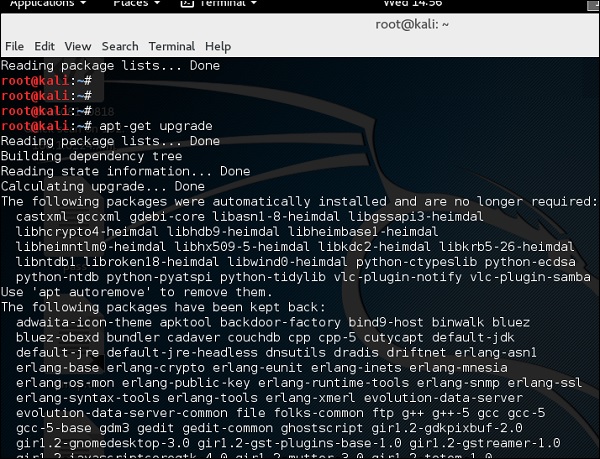
Step 2 − Now to upgrade the tools, type “apt-get upgrade” and the new packages will be downloaded.
Upgrade
Step 3 − It will ask if you want to continue. Type “Y” and “Enter”.
Enter Y
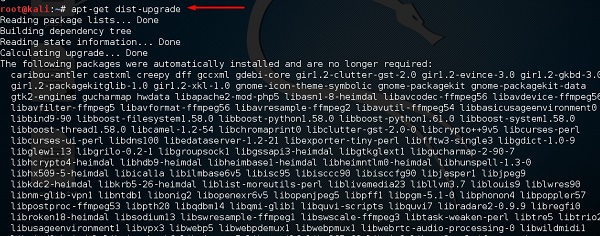
Step 4 − To upgrade to a newer version of Operating System, type “apt-get distupgrade”.
Dist Upgrade

Laboratory Setup

In this section, we will set up another testing machine to perform the tests with the help of tools of Kali Linux.
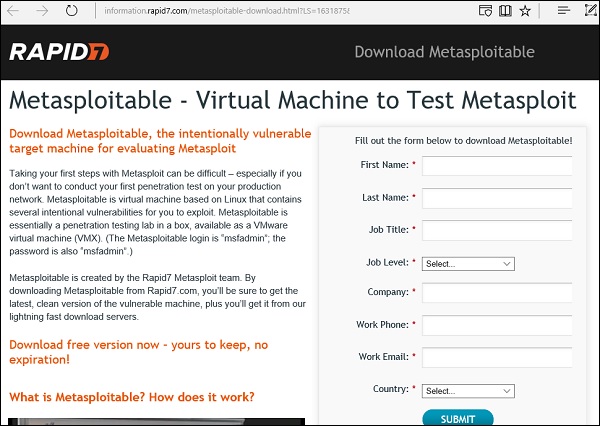
Step 1 − Download Metasploitable, which is a Linux machine. It can be downloaded from the official webpage of Rapid7https://information.rapid7.com/metasploitabledownload.html?LS=1631875&CS=web
Metasploitable
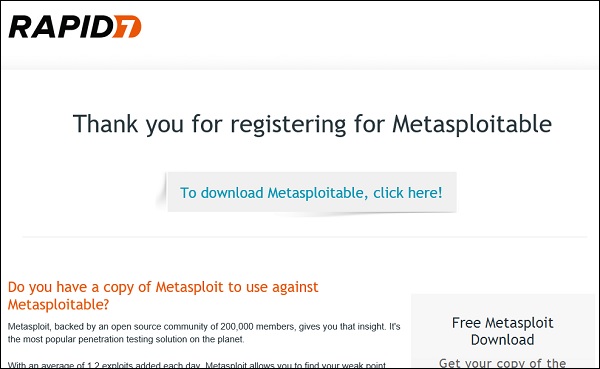
Step 2 − Register by supplying your details. After filling the above form, we can download the software.
Registering
Step 3 − Click VirtualBox → New.
Machine New
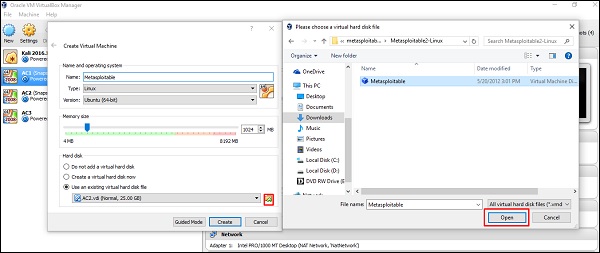
Step 4 − Click “Use an existing virtual hard disk file”. Browse the file where you have downloaded Metasploitable and click Open.
Existing Hard Disk
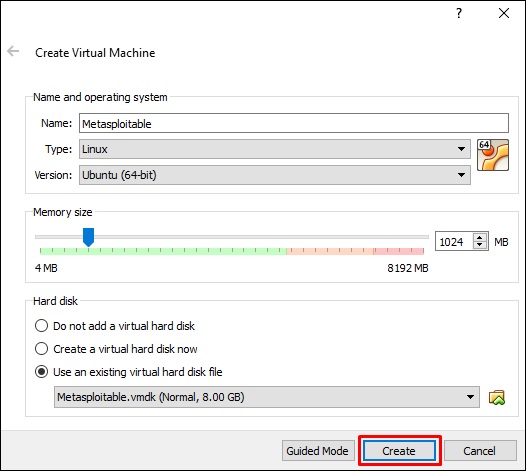
Step 5 − A screen to create a virtual machine pops up. Click “Create”.
Machine Popups
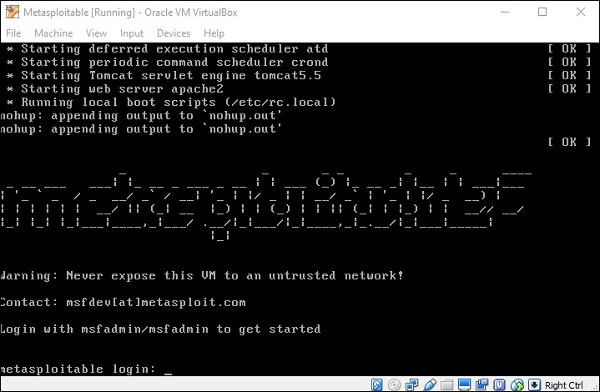
The default username is msfadmin and the password is msfadmin.
Login Details

Kali Linux Tutorial

Kali Linux is one of the best open-source security packages of an ethical hacker, containing a set of tools divided by categories. Kali Linux can be installed in a machine as an Operating System, which is discussed in this tutorial. Installing Kali Linux is a practical option as it provides more options to work and combine the tools. This tutorial gives a complete understanding on Kali Linux and explains how to use it in practice.

Audience

This tutorial has been prepared for beginners to help them understand the fundamentals of Kali Linux. It will specifically be useful for penetration testing professionals. After completing this tutorial, you will find yourself at a moderate level of expertise from where you can take yourself to the next levels.

Prerequisites

Although this tutorial will benefit most of the beginners, it will definitely be a plus if you are familiar with the basic concepts of any Linux operating system.

Tuesday, 11 September 2018

Windows Server 2016- Backup Management

In this chapter, we will install and configure Backup which does not differ too much from the previous versions.
To Install the backup feature, we should follow the steps given below.
Step 1 − Go to Server Manager → Manage → Add Roles and Features → Next → Check the Role-based or feature-based installation box → then check on the Select a server from the server pool box and then click Next.
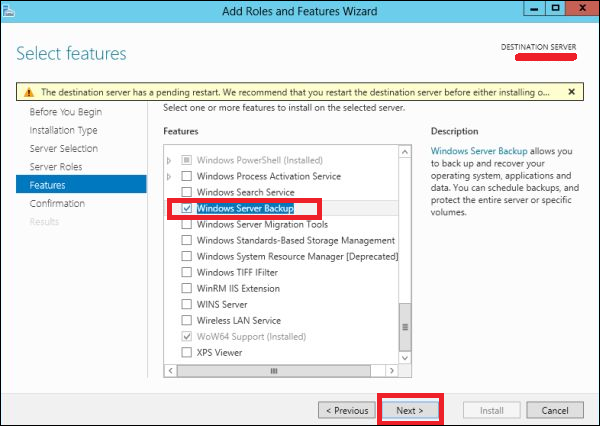
Once all this is done, check the Windows Backup Server box and then click on Next as shown in the following screenshot.
Windows Backup Server
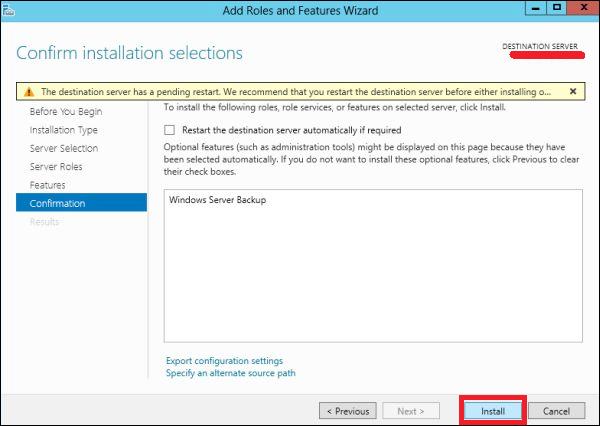
Step 2 − Click Install and then wait for the process to Finish.
Click Install Wait
Now let us go and Configure the Backup Feature it, for which we should follow the steps given below.
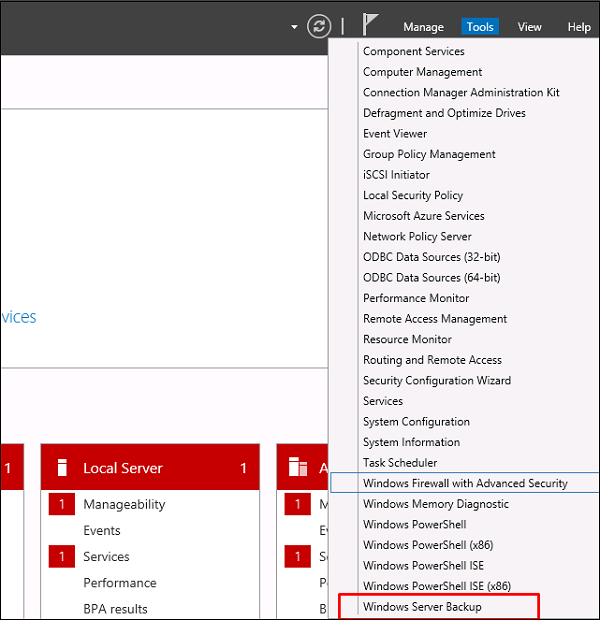
Step 1 − Go to Server Manager → Tools → Windows Server Backup.
Server Backup
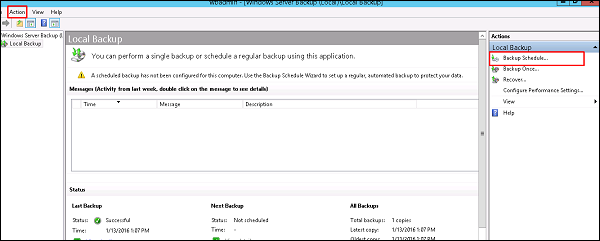
Step 2 − Click on Backup Schedule… in the left side panel or click on Action at the top of the screen as shown in the following screenshot.
Backup Schedule
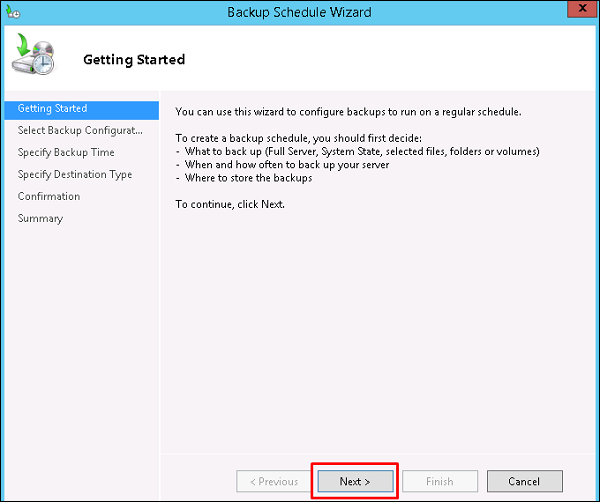
Step 3 − Click Next.
Getting Started
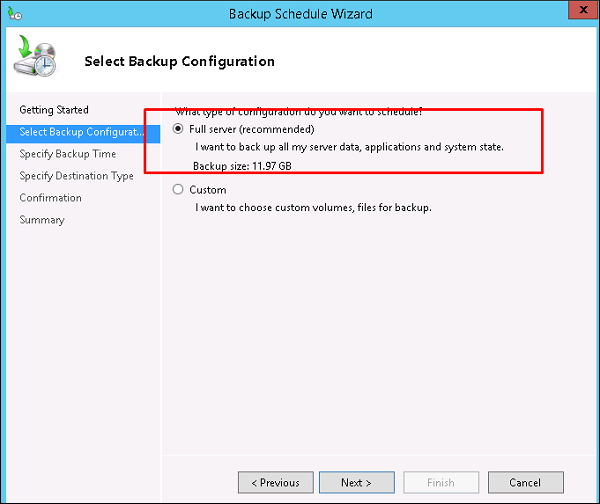
Step 4 − If you want to backup a file or a folder, you can click on custom file, but in this case I want to do a full backup of the server. So, we should click on the first option Full server (recommended) and then click Next.
Full Server
Step 5 − We should do backup once in a day, so we will choose the first option and the appropriate time, which generally is recommended at night → Next.
Backup
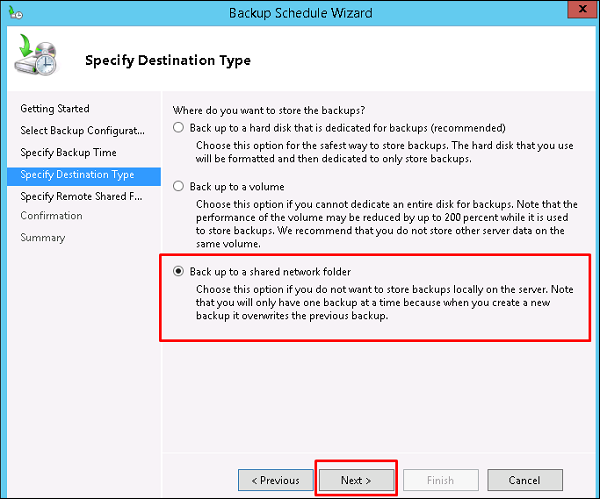
Step 6 − We should not click on the Back Up to a shared network folderoption because the backup should be saved somewhere out of the server that is being backed up and then click on Next.
Shared Network
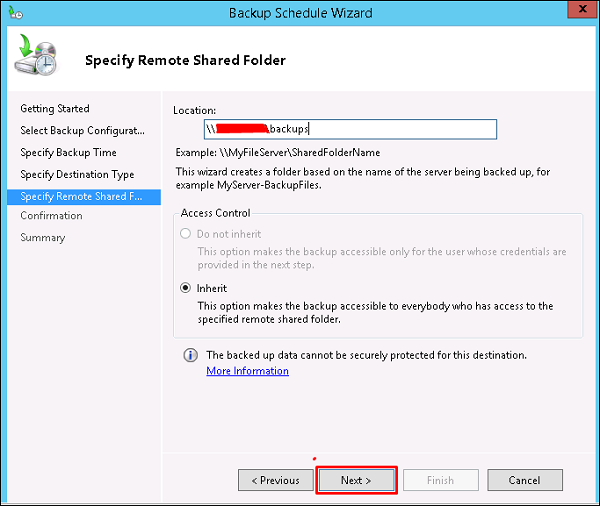
Step 7 − At the location, put the shared folder path and then → Next.
Folder Path
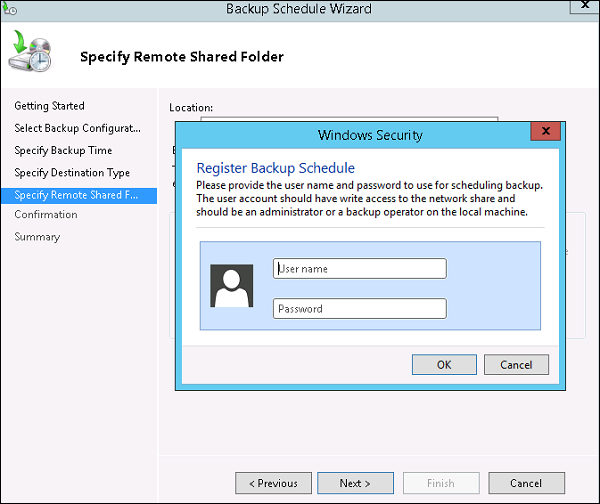
Step 8 − It will pop-up a credentials table asking you for the username and password of the shared folder which you should put here and then click → OK.
Credentials
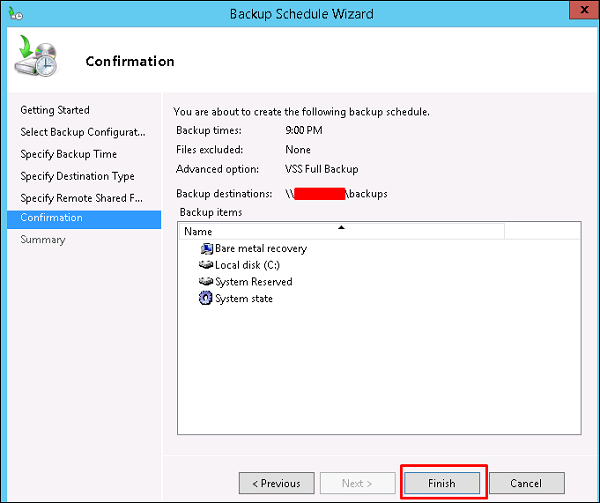
Step 9 − Click the Finish button.
Confirmation Finished
Step 10 − Now you will get a window showing the status if the backup was created successfully or not, which can be seen in the following screenshot.
Status