Saturday, 28 April 2018

Virtualization

Virtualization is the latest buzz word. You may wonder computers are getting cheaper every day, why should I care and why should I use virtualization? Virtualization is a broad term that refers to the abstraction of computer resources such as:
  1. Platform Virtualization
  2. Resource Virtualization
  3. Storage Virtualization
  4. Network Virtualization
  5. Desktop Virtualization
This article describes why you need virtualization and list commonly used FOSS and proprietary Linux virtualization software.

Why should I use virtualization?

  • Consolidation – It means combining multiple software workloads on one computer system. You can run various virtual machines in order to save money and power (electricity).
  • Testing – You can test various configuration. You can create less resource hungry and low priority virtual machines (VM). Often, I test new Linux distro inside VM. This is also good for students who wish to learn new operating systems and programming languages / database without making any changes to working environment. At my work place I give developers virtual test machines for testing and debugging their software.
  • Security and Isolation – If mail server or any other app gets cracked, only that VM will be under control of the attacker. Also, isolation means misbehaving apps (e.g. memory leaks) cannot bring down whole server.

Open Source Linux Virtualization Software

  1. OpenVZ is an operating system-level virtualization technology based on the Linux kernel and operating system.
  2. Xen is a virtual machine monitor for 32 / 64 bit Intel / AMD (IA 64) and PowerPC 970 architectures. It allows several guest operating systems to be executed on the same computer hardware concurrently. XEN is included with most popular Linux distributions such as Debian, Ubuntu, CentOS, RHEL, Fedora and many others.
  3. Kernel-based Virtual Machine (KVM) is a Linux kernel virtualization infrastructure. KVM currently supports native virtualization using Intel VT or AMD-V. A wide variety of guest operating systems work with KVM, including many flavours of Linux, BSD, Solaris, and Windows etc. KVM is included with Debian, OpenSuse and other Linux distributions.
  4. Linux-VServer is a virtual private server implementation done by adding operating system-level virtualization capabilities to the Linux kernel.
  5. VirtualBox is an x86 virtualization software package, developed by Sun Microsystems as part of its Sun xVM virtualization platform. Supported host operating systems include Linux, Mac OS X, OS/2 Warp, Windows XP or Vista, and Solaris, while supported guest operating systems include FreeBSD, Linux, OpenBSD, OS/2 Warp, Windows and Solaris.
  6. Bochs is a portable x86 and AMD64 PC emulator and debugger. Many guest operating systems can be run using the emulator including DOS, several versions of Microsoft Windows, BSDs, Linux, AmigaOS, Rhapsody and MorphOS. Bochs can run on many host operating systems, like Windows, Windows Mobile, Linux and Mac OS X.
  7. User Mode Linux (UML) was the first virtualization technology for Linux. User-mode Linux is generally considered to have lower performance than some competing technologies, such as Xen and OpenVZ. Future work in adding support for x86 virtualization to UML may reduce this disadvantage.

Proprietary Linux Virtualization Software

  1. VMware ESX Server and VMWare Server – VMware Server (also known as GSX Server) is an entry-level server virtualization software. VMware ESX Server is an enterprise-level virtualization product providing data center virtualization. It can run various guest operating systems such as FreeBSD, Linux, Solaris, Windows and others.
  2. Commercial implementations of XEN available with various features and support.
    • Citrix XenServer : XenServer is based on the open source Xen hypervisor, an exceptionally lean technology that delivers low overhead and near-native performance.
    • Oracle VM : Oracle VM is based on the open-source Xen hypervisor technology, supports both Windows and Linux guests and includes an integrated Web browser based management console. Oracle VM features fully tested and certified Oracle Applications stack in an enterprise virtualization environment.
    • Sun xVM : The xVM Server uses a bare-metal hypervisor based on the open source Xen under a Solaris environment on x86-64 systems. On SPARC systems, xVM is based on Sun’s Logical Domains and Solaris. Sun plans to support Microsoft Windows (on x86-64 systems only), Linux, and Solaris as guest operating systems.
  3. Parallels Virtuozzo Containers – It is an operating system-level virtualization product designed for large-scale homegenous server environments and data centers. Parallels Virtuozzo Containers is compatible with x86, x86-64 and IA-64 platforms. You can run various Linux distributions inside Parallels Virtuozzo Containers.
Personally, I’ve used VMware ESX / Server, XEN, OpenVZ and VirtualBox.

Vsftpd pure ftp pro Over SSL/TLS

Create certificates.
[root@www ~]# 
cd /etc/pki/tls/certs 

[root@www certs]# 
openssl req -x509 -nodes -newkey rsa:2048 -keyout vsftpd.pem -out vsftpd.pem -days 365 

Generating a 2048 bit RSA private key
......++++++
.......++++++
writing new private key to '/etc/pki/tls/certs/vsftpd.pem'
-----
You are about to be asked to enter information that will be incorporated
into your certificate request.
What you are about to enter is what is called a Distinguished Name or a DN.
There are quite a few fields but you can leave some blank
For some fields there will be a default value,
If you enter '.', the field will be left blank.
-----
Country Name (2 letter code) [AU]:
JP
     
# country

State or Province Name (full name) [Some-State]:
Hiroshima
     
# State

Locality Name (eg, city) []:
Hiroshima
     
# city

Organization Name (eg, company) [Internet Widgits Pty Ltd]:
Server World
     
# company

Organizational Unit Name (eg, section) []:
IT Solution
     
# department

Common Name (eg, YOUR name) []:
www.srv.world
     
# server's FQDN

Email Address []:
xxx@srv.world
     
# admin's email
[root@www certs]# 
chmod 600 vsftpd.pem 
[2]Configure Vsftpd.
[root@www ~]# 
vi /etc/vsftpd/vsftpd.conf
# add follows to the end

rsa_cert_file=/etc/pki/tls/certs/vsftpd.pem
ssl_enable=YES
ssl_ciphers=HIGH
ssl_tlsv1=YES
ssl_sslv2=NO
ssl_sslv3=NO
force_local_data_ssl=YES
force_local_logins_ssl=YES
[root@www ~]# 
/etc/rc.d/init.d/vsftpd restart 

Shutting down vsftpd:                    [  OK  ]
Starting vsftpd for vsftpd:              [  OK  ]
[3]If IPTables is running, allow FTP port and fixed PASV ports. For "-I INPUT 5" section below, Replace it to your own environment.
[root@www ~]# 
vi /etc/vsftpd/vsftpd.conf
# add to the end: fix PASV ports

pasv_enable=YES
pasv_min_port=21000
pasv_max_port=21010
[root@www ~]# 
/etc/rc.d/init.d/vsftpd restart 

[root@www ~]# 
iptables -I INPUT 5 -p tcp -m state --state NEW -m tcp --dport 21 -j ACCEPT 

[root@www ~]# 
iptables -I INPUT 5 -p tcp -m state --state NEW -m tcp --dport 21000:21010 -j ACCEPT 
FTP Client : CentOS
 
Configure FTP Client to use FTPS connection.
[4]Install FTP Client and configure like follows.
[redhat@dlp ~]$ 
vi ~/.lftprc
# create new

set ftp:ssl-auth TLS
set ftp:ssl-force true
set ftp:ssl-protect-list yes
set ftp:ssl-protect-data yes
set ftp:ssl-protect-fxp yes
set ssl:verify-certificate no
[redhat@dlp ~]$ 
lftp -u cent www.srv.world 

Password:
lftp cent@www.srv.world:~>


Configure ProFTPD to use SSL/TLS.
[1]Create certificates.
[root@www ~]# 
cd /etc/pki/tls/certs 

[root@www certs]# 
openssl req -x509 -nodes -newkey rsa:2048 -keyout proftpd.pem -out proftpd.pem -days 365 

Generating a 2048 bit RSA private key
......++++++
.......++++++
writing new private key to '/etc/pki/tls/certs/proftpd.pem'
-----
You are about to be asked to enter information that will be incorporated
into your certificate request.
What you are about to enter is what is called a Distinguished Name or a DN.
There are quite a few fields but you can leave some blank
For some fields there will be a default value,
If you enter '.', the field will be left blank.
-----
Country Name (2 letter code) [AU]:
JP
     
# country

State or Province Name (full name) [Some-State]:
Hiroshima
     
# State

Locality Name (eg, city) []:
Hiroshima
     
# city

Organization Name (eg, company) [Internet Widgits Pty Ltd]:
Server World
     
# company

Organizational Unit Name (eg, section) []:
IT Solution
     
# department

Common Name (eg, YOUR name) []:
www.srv.world
     
# server's FQDN

Email Address []:
xxx@srv.world
     
# admin's email
[root@www certs]# 
chmod 600 proftpd.pem 
[2]Configure ProFTPD.
[root@www ~]# 
vi /etc/proftpd.conf
# add to the end

TLSEngine                 on
TLSRequired               on
TLSProtocol               TLSv1.2
TLSLog                    /var/log/proftpd/tls.log
TLSRSACertificateFile     /etc/pki/tls/certs/proftpd.pem
TLSRSACertificateKeyFile  /etc/pki/tls/certs/proftpd.pem

[root@www ~]# 
/etc/rc.d/init.d/proftpd restart 

Shutting down proftpd:                [  OK  ]
Starting proftpd:                     [  OK  ]
[3]If IPTables is running, allow FTP port and fixed PASV ports. For "-I INPUT 5" section below, Replace it to your own environment.
[root@www ~]# 
vi /etc/proftpd.conf
# add to the end: fix PASV ports

PassivePorts              21000 21010

[root@www ~]# 
/etc/rc.d/init.d/proftpd restart 

[root@www ~]# 
iptables -I INPUT 5 -p tcp -m state --state NEW -m tcp --dport 21 -j ACCEPT 

[root@www ~]# 
iptables -I INPUT 5 -p tcp -m state --state NEW -m tcp --dport 21000:21010 -j ACCEPT 
FTP Client : CentOS
 
Configure FTP Client to use FTPS connection.
[4]Install FTP Client and configure like follows.
[redhat@dlp ~]$ 
vi ~/.lftprc
# create new

set ftp:ssl-auth TLS
set ftp:ssl-force true
set ftp:ssl-protect-list yes
set ftp:ssl-protect-data yes
set ftp:ssl-protect-fxp yes
set ssl:verify-certificate no
[redhat@dlp ~]$ 
lftp -u cent www.srv.world 

Password:
lftp cent@www.srv.world:~>


Configure Pure-FTPd to use SSL/TLS.
[1]Create certificates.
[root@www ~]# 
cd /etc/pki/tls/certs 

[root@www certs]# 
openssl req -x509 -nodes -newkey rsa:2048 -keyout pure-ftpd.pem -out pure-ftpd.pem -days 365 

Generating a 2048 bit RSA private key
......++++++
.......++++++
writing new private key to '/etc/pki/tls/certs/pure-ftpd.pem'
-----
You are about to be asked to enter information that will be incorporated
into your certificate request.
What you are about to enter is what is called a Distinguished Name or a DN.
There are quite a few fields but you can leave some blank
For some fields there will be a default value,
If you enter '.', the field will be left blank.
-----
Country Name (2 letter code) [AU]:
JP
     
# country

State or Province Name (full name) [Some-State]:
Hiroshima
     
# State

Locality Name (eg, city) []:
Hiroshima
     
# city

Organization Name (eg, company) [Internet Widgits Pty Ltd]:
Server World
     
# company

Organizational Unit Name (eg, section) []:
IT Solution
     
# department

Common Name (eg, YOUR name) []:
www.srv.world
     
# server's FQDN

Email Address []:
xxx@srv.world
     
# admin's email
[root@www certs]# 
chmod 600 pure-ftpd.pem 
[2]Configure Pure-FTPd.
[root@www ~]# 
vi /etc/pure-ftpd/pure-ftpd.conf
# line 430: uncomment

TLS       1
[root@www ~]# 
/etc/rc.d/init.d/pure-ftpd restart 

Stopping pure-ftpd:                 [  OK  ]
Starting pure-ftpd:                 [  OK  ]
[3]If IPTables is running, allow FTP port and fixed PASV ports. For "-I INPUT 5" section below, Replace it to your own environment.
[root@www ~]# 
vi /etc/pure-ftpd/pure-ftpd.conf
# line 180: uncomment and fix PASV ports

PassivePortRange       
21000 21010
[root@www ~]# 
/etc/rc.d/init.d/pure-ftpd restart 

[root@www ~]# 
iptables -I INPUT 5 -p tcp -m state --state NEW -m tcp --dport 21 -j ACCEPT 

[root@www ~]# 
iptables -I INPUT 5 -p tcp -m state --state NEW -m tcp --dport 21000:21010 -j ACCEPT 
FTP Client : CentOS
 
Configure FTP Client to use FTPS connection.
[4]Install FTP Client and configure like follows.
[redhat@dlp ~]$ 
vi ~/.lftprc
# create new

set ftp:ssl-auth TLS
set ftp:ssl-force true
set ftp:ssl-protect-list yes
set ftp:ssl-protect-data yes
set ftp:ssl-protect-fxp yes
set ssl:verify-certificate no
[redhat@dlp ~]$ 
lftp -u cent www.srv.world 

Password:
lftp cent@www.srv.world:~>


[root@www ~]# 
vi /etc/pure-ftpd/pure-ftpd.conf
# line 368: uncomment

CallUploadScript   yes
[root@www ~]# 
vi /etc/pure-ftpd/clamscan.sh
# create new

#!/bin/bash

/usr/bin/clamscan --remove --quiet --no-summary "$1"

[root@www ~]# 
chmod 755 /etc/pure-ftpd/clamscan.sh 

[root@www ~]# 
pure-uploadscript -B -r /etc/pure-ftpd/clamscan.sh 

[root@www ~]# 
echo "pure-uploadscript -B -r /etc/pure-ftpd/clamscan.sh" >> /etc/rc.local 

[root@www ~]# 
/etc/rc.d/init.d/pure-ftpd restart 

Stopping pure-ftpd:                  [  OK  ]
Starting pure-ftpd:                  [  OK  ]

Configure FTP Server - Pure-FTPd


Install Pure-FTPd to configure FTP Server.
[1]Install Pure-FTPd.
# install from EPEL

[root@www ~]# 
yum --enablerepo=epel -y install pure-ftpd
[root@www ~]# 
vi /etc/pure-ftpd/pure-ftpd.conf
# line 77: change (no Anonymous)

NoAnonymous       
yes
# line 143: uncomment

UnixAuthentication       yes
# line 437: uncomment (if only IPv4)

IPV4Only       yes
# line 443: uncomment (if only IPv6)

IPV6Only       yes
[root@www ~]# 
/etc/rc.d/init.d/pure-ftpd start 

Starting proftpd:     [  OK  ]
[root@www ~]# 
chkconfig pure-ftpd on
[2]If IPTables is running, allow FTP port and fixed PASV ports. For "-I INPUT 5" section below, Replace it to your own environment.
[root@www ~]# 
vi /etc/pure-ftpd/pure-ftpd.conf
# # line 180: uncomment and fix PASV ports

PassivePortRange       
21000 21010
[root@www ~]# 
/etc/rc.d/init.d/pure-ftpd restart 

[root@www ~]# 
iptables -I INPUT 5 -p tcp -m state --state NEW -m tcp --dport 21 -j ACCEPT 

[root@www ~]# 
iptables -I INPUT 5 -p tcp -m state --state NEW -m tcp --dport 21000:21010 -j ACCEPT 
[3]If SELinux is enabled, change bollean setting.
[root@www ~]# 
setsebool -P allow_ftpd_full_access on

Install Vsftpd

Install Vsftpd to configure FTP Server.
[1]Install Vsftpd.
[root@www ~]# 
yum -y install vsftpd
[root@www ~]# 
vi /etc/vsftpd/vsftpd.conf
# line 12: no anonymous

anonymous_enable=
NO
# line 81,82: uncomment ( allow ascii mode )

ascii_upload_enable=YES
ascii_download_enable=YES
# line 96,97: uncomment ( enable chroot )

chroot_local_user=YES
chroot_list_enable=YES
# line 99: uncomment ( specify chroot list )

chroot_list_file=/etc/vsftpd/chroot_list
# line 105: uncomment

ls_recurse_enable=YES
# add follows to the end

# specify root directory ( if don't specify, users' home directory become FTP home directory)

local_root=public_html
# use localtime

use_localtime=YES
[root@www ~]# 
vi /etc/vsftpd/chroot_list
# add users who are not applied with chroot

cent
[root@www ~]# 
/etc/rc.d/init.d/vsftpd start 

Starting vsftpd for vsftpd: 
[  OK  ]

[root@www ~]# 
chkconfig vsftpd on
[2]If IPTables is running, allow FTP port and fixed PASV ports. For "-I INPUT 5" section below, Replace it to your own environment.
[root@www ~]# 
vi /etc/vsftpd/vsftpd.conf
# add follows to the end: fix PASV ports

pasv_enable=YES
pasv_min_port=21000
pasv_max_port=21010
[root@www ~]# 
/etc/rc.d/init.d/vsftpd restart 

[root@www ~]# 
iptables -I INPUT 5 -p tcp -m state --state NEW -m tcp --dport 21 -j ACCEPT 

[root@www ~]# 
iptables -I INPUT 5 -p tcp -m state --state NEW -m tcp --dport 21000:21010 -j ACCEPT 
[3]If SELinux is enabled, change bollean setting.
[root@www ~]# 
setsebool -P allow_ftpd_full_access on

ProFTPD

About ProFTPD

ProFTPD is a popular ftp server. Because it was written as a powerful and configurable program, it is not necessarily the lightest ftp server available.

Step One—Install ProFTPD

Before we do anything else, we need to download the EPEL repository which will allow us to install ProFTPD on our virtual private server with yum.
sudo rpm -Uvh http://download.fedoraproject.org/pub/epel/6/i386/epel-release-6-8.noarch.rpm
The next step is to install ProFTPD
sudo yum install proftpd
Finally, we must also download a ftp client, so that we can connect to an ftp server from the command line:
sudo yum install ftp
Once the files finish downloading, the ProFTPD server will be on your VPS. However, we still have to make a few changes to the configuration.

Step Two—Configure ProFTPD

Once ProFTPD is installed, you can make the needed adjustments in the configuration. Unlike some other ftp configurations, ProFTPD disables anonymous login from the outset and we only need to address a small change in the config file.
Open up the file:
sudo vi /etc/proftpd.conf
Go ahead and change the Server Name to your host name.
ServerName                      "example.com"
Save and Exit from that file.
Then, to prevent any issues, add your droplet name and IP address to the hosts file:
sudo vi /etc/hosts
The line can look something like this:
12.34.56.789 servername
Restart after you have made all of your changes:
sudo service proftpd restart

Step Three—Access the FTP server

You can reach an FTP server in the browser by typing the domain name into the address bar and logging in with the appropriate ID. Keep in mind, you will only be able to access the user's home directory.
ftp://example.com
Alternatively, you can reach the FTP server through the command line by typing:
 ftp example.com

Then you can use the word, "exit," to get out of the FTP shell.

How to Install Webmin on CentOS 6.7

Introduction

In this tutorial, we will be instructing you on how to install Webmin, a web-based interface for system administration, on a server running a base CentOS 6.7 server. With Webmin you can setup specified user accounts, web sites through Apache, your DNS locally, and more. Webmin removes the need to manually edit configuration files and lets you manage the system from a GUI (Graphical User Interface.)

Prerequisites

For our tutorial, you will only need to have a server running CentOS 6.7 and access to the Internet. If you do not have a CentOS server, Atlantic.Net offers fast SSD Cloud servers, up in 30 seconds.

Installing Webmin via Repo on CentOS 6.7

The first thing to do to install is to create your own repo or repository for which to pull the Webmin files. Once logged in the server run the below to open a new repo.
nano /etc/yum.repos.d/webmin.repo
Then copy the following into the file. Once done, close and save the file.
[Webmin]
name=Webmin Distribution Neutral
#baseurl=http://download.webmin.com/download/yum
mirrorlist=http://download.webmin.com/download/yum/mirrorlist
enabled=1
You will now need to download and import an asc key and import it into RPM.
wget http://www.webmin.com/jcameron-key.asc
rpm --import jcameron-key.asc
We can now install Webmin via yum.
yum install webmin
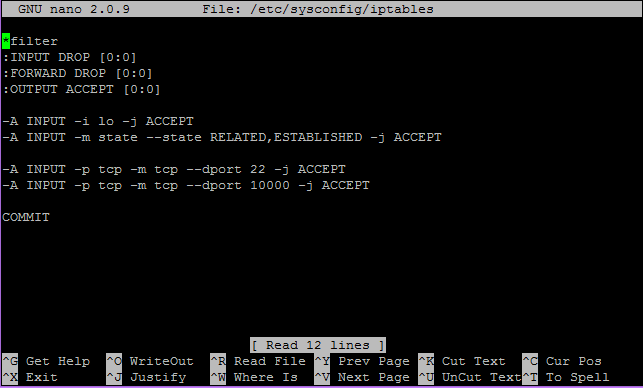
If you have an activate firewall on your CentOS server using IPTables, you will want to add a rule to allow TCP port 1000 through as that would be the port the Webmin GUI runs on.  You can copy and paste the below INPUT rule to your firewall. It’d look like the below picture when done. When finished, restart IPTables so the change takes effect.
nano /etc/sysconfig/iptables
-A INPUT -p tcp -m tcp --dport 10000 -j ACCEPT
service iptables restart
An example of the IPtables rules that we are adding
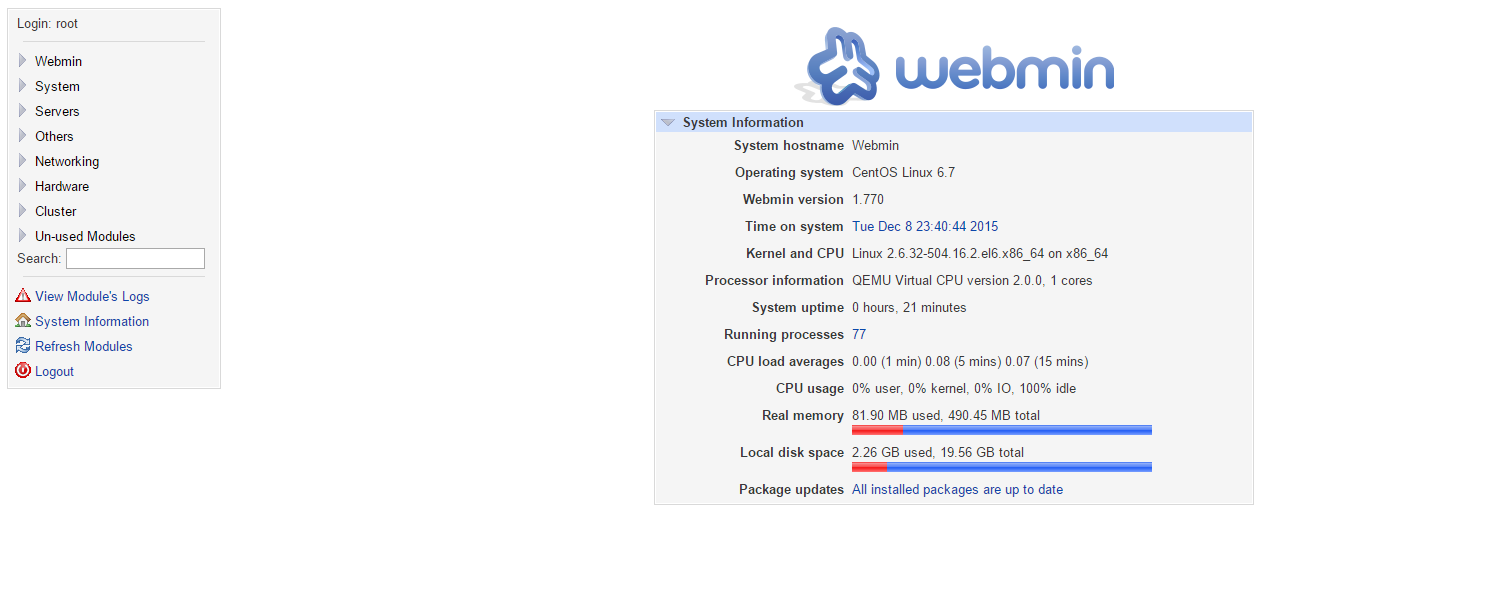
And that’s it! You may now access your Webmin portal by browsing to https://Your_IP_Address:10000 and log in using your servers root username and password. When logged in, it should resemble the below. Please note it will put up a warning regarding unsecure access when going to https. This is due to a self-signed certificate on the server and is normal.
An example of the Webmin Webpage