Monday 17 June 2024

Part 1 - Managing Network Rules by using Azure Tags with Illumio for Microsoft Azure Firewall

 Part 1 - Managing Network Rules by using Azure Tags with Illumio for Microsoft Azure Firewall


Written in collaboration between @andrewmathu and @gusmodena


Introduction


In today's ever-evolving realm of the present IT infrastructure, where virtualization and cloud computing have become standard practices, the orchestration of firewall rules has evolved into a delicate balancing act between security and adaptability. Traditionally, firewall rules have relied heavily on the use of IP addresses to control access, which, while effective, often proves to be a complex and labor-intensive approach. The moment has arrived to adopt a more streamlined and effective approach that not only bolsters security but also streamlines the management procedure. This entails employing predefined tags that are assigned to virtual machines, aligning with the applications they run or the specific environment they are a part of, including Development (Dev), Production (Prod), and Quality Assurance (QA).


This is the 1st of a 2-part blog series where we will explore the complexities associated with managing firewall rules using IP addresses and explore the advantages of transitioning to a tag-based approach. We'll discover how this shift can not only make your infrastructure more secure but also significantly reduce the burden on your IT teams, allowing them to focus on what truly matters: safeguarding your digital assets in an ever-evolving threat landscape.


Illumio for Microsoft Azure Firewall


In collaboration with Illumio, the leader in Zero Trust Segmentation, Microsoft has built Illumio for Microsoft Azure Firewall - an integrated solution that extends the advantages of Zero Trust Segmentation into the Azure environment.


Illumio's integration with Microsoft Azure Firewall was released in General Availability in August 2023, empowering Azure users to implement Zero Trust Segmentation, extending their capabilities beyond traditional network and application filtering. This collaboration equips firewall operations teams with enhanced insights into rule management by providing comprehensive context about the resources under protection. This enriched context allows administrators to effortlessly identify the resources covered by each rule, ascertain ownership, and execute rule lifecycle management tasks with increased confidence and efficiency.


Leveraging the Azure platform, this solution protects your assets within Azure Virtual Networks and at the Azure perimeter. It empowers organizations to comprehensively analyze application traffic and dependencies, enforcing consistent protection throughout the environment. As a result, this approach minimizes vulnerabilities, mitigates breaches, and enhances operational efficiency.


Key benefits of using Illumio for Microsoft Azure Firewall include:

  • Reduce security risks with a single view of your east-west and north-south traffic based on Azure Firewall flow data within your Azure subscriptions.
  • Provides a full view of your application traffic with real-time visibility of interactions and dependencies across your environment.
  • Easily deploy and configure Azure application-based policies within the Illumio platform.
  • Deploy Azure Firewall policies confidently with policies that automatically scale along with your applications.
  • Avoid application downtime by understanding the impact of Azure Firewall policies before they are enforced.
  • It works with all 3 SKUs of Azure Firewall – Basic, Standard, and Premium - to meet the needs of any organization.


Connecting Illumio for Microsoft Azure Firewall to Azure subscription


First, we need to have access to Illumio for Microsoft Azure Firewall which is available by registering directly with Illumio or by deploying the solution from Azure’s Marketplace. In this blog, we are using a Tenant which has been registered directly with Illumio. To login into Illumio’s portal we are using the URL https://lumos1.illum.io/login.


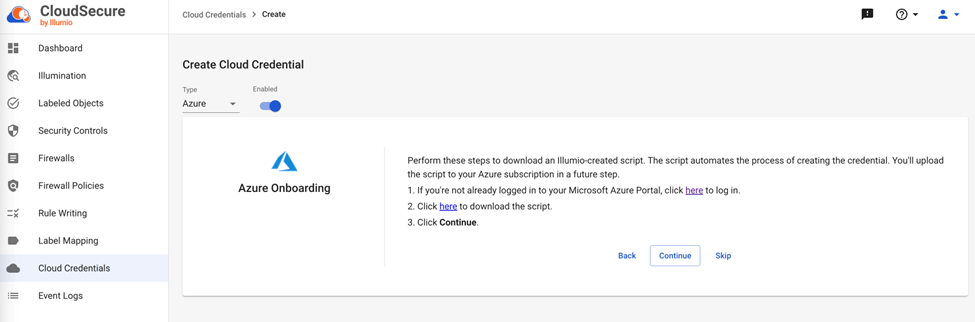
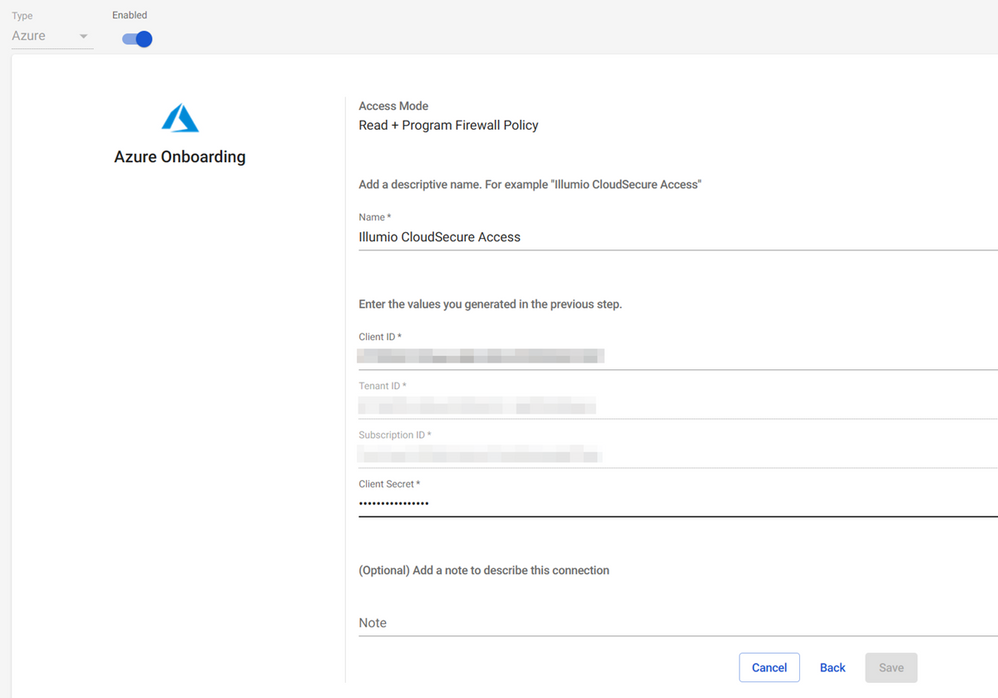
Next, we have to add a new cloud credential, which will connect Illumio for Microsoft Azure Firewall to our Azure Subscription.


thumbnail image 1 of blog post titled 


							Part 1 - Managing Network Rules by using Azure Tags with Illumio for Microsoft Azure Firewall


The easiest way to add a new credential is by downloading and running an Illumio-created script, which automates the process of creating an App Registration on Azure, assigning the required roles for the newly created credential at subscription level. The roles assigned are Reader, Storage Blob Data Reader and a custom role called Illumio Firewall Administrator-“SubId”. The PowerShell script can be found here or can be downloaded from the Illumio portal. Click on “Cloud Credentials” then “Create” and follow the wizard.


thumbnail image 2 of blog post titled 


							Part 1 - Managing Network Rules by using Azure Tags with Illumio for Microsoft Azure Firewall


We are running the script via Azure Cloud Shell, so before running the command below, we need to upload the script to our account.


thumbnail image 3 of blog post titled 


							Part 1 - Managing Network Rules by using Azure Tags with Illumio for Microsoft Azure Firewall


To run the script, we are using the following command line:

Once the script is completed, we will see the following output with the Client ID, Tenant ID, Subscription ID, and Client Secret, that will be used on the Illumio for Microsoft Azure Firewall portal.


thumbnail image 4 of blog post titled 


							Part 1 - Managing Network Rules by using Azure Tags with Illumio for Microsoft Azure Firewall


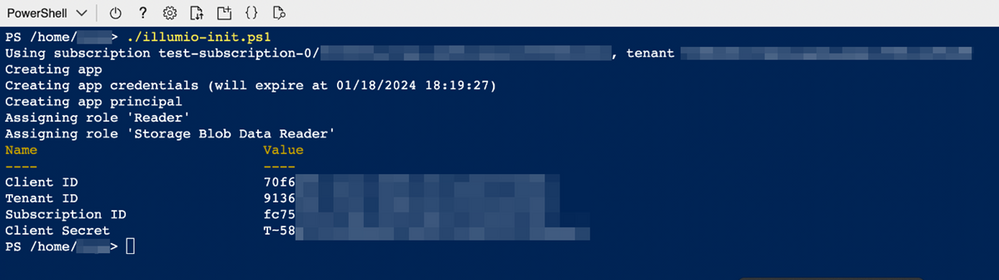
This output data will be added to the form below as part of adding a new credential.


thumbnail image 5 of blog post titled 


							Part 1 - Managing Network Rules by using Azure Tags with Illumio for Microsoft Azure Firewall


Creating Label Mappings


Once we have the credentials added, we can navigate through the Firewalls and Firewall Policies tab to find the resources identified by Illumio for Microsoft Azure Firewall and then start creating the label mappings and choosing the policies that we want to manage.


In the image below, we are seeing multiple Firewall Policies, but for this blog we are only going to enable the management by Illumio for Microsoft Azure Firewall for the policy “azfw-pol-prem-1”.


thumbnail image 6 of blog post titled 


							Part 1 - Managing Network Rules by using Azure Tags with Illumio for Microsoft Azure Firewall


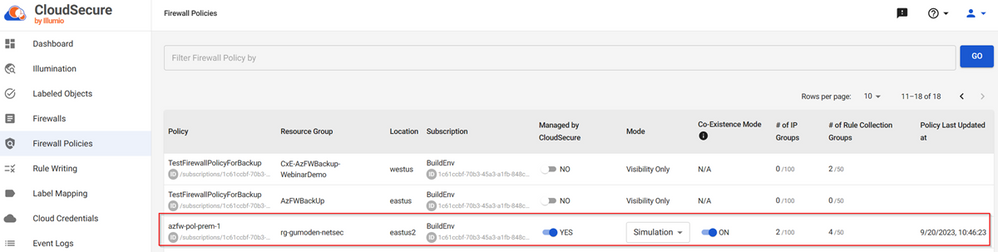
After enabling the management option, the mode will be automatically changed from “Visibility Only” to "Simulation". There are two modes for policy enforcement: Simulation and Enforcement. The Simulation mode allows security teams to test and validate the outcome and impact of their security policies before fully enforcing them. This mode helps protect applications and workloads by containing cyber-attacks and reducing risk.


In contrast, the "Enforcement" mode is used to enforce the security policies on managed workloads. The Illumio policy model follows an allowlist model, meaning all communication between workloads is denied unless explicitly allowed by Illumio security policy. Users create segmentation rules to allow traffic between their workloads.


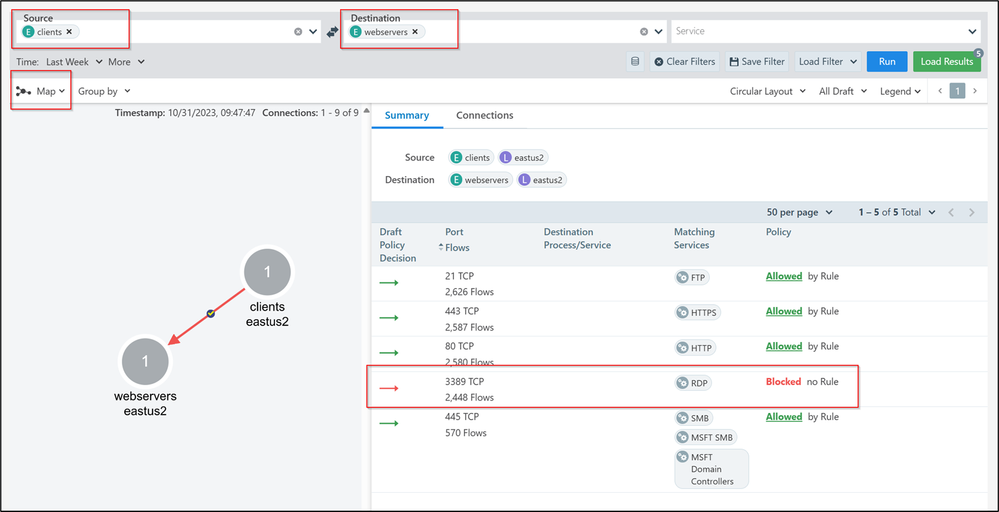
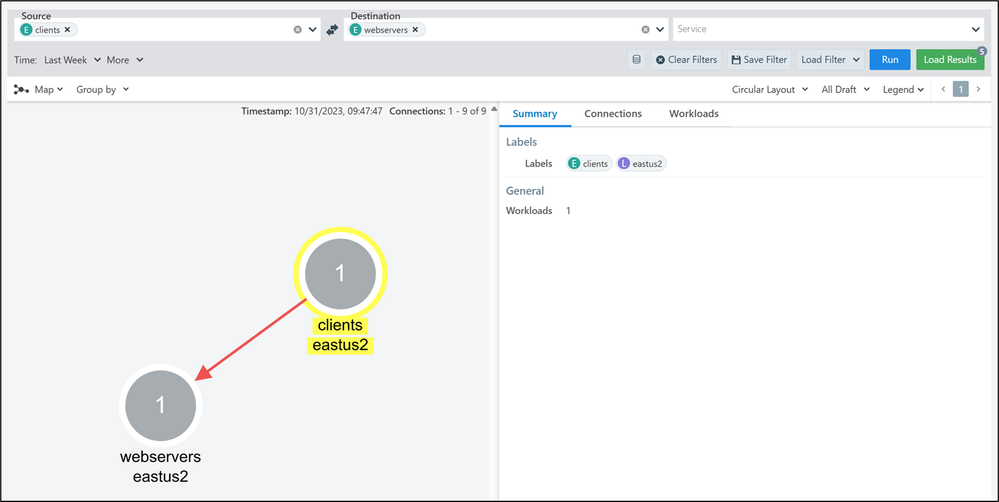
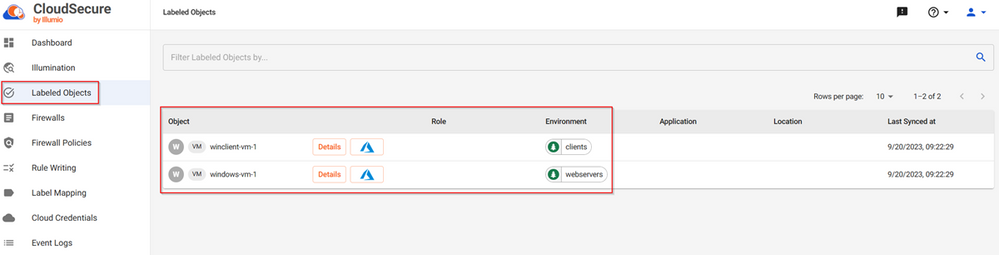
Now that we have enabled the management of the Firewall Policy, we will create label mappings. To create label mappings, we can use specific Cloud Metadata or Cloud Tags. If you use Cloud Tags, ensure that you have a definition for your Tags. In this blog we are using a tag called “environment” with the values “clients” and “webservers”.


thumbnail image 7 of blog post titled 


							Part 1 - Managing Network Rules by using Azure Tags with Illumio for Microsoft Azure Firewall


To create the mappings, click on “Label Mapping” located on the left side and then click on “Add Rule”.


thumbnail image 8 of blog post titled 


							Part 1 - Managing Network Rules by using Azure Tags with Illumio for Microsoft Azure Firewall


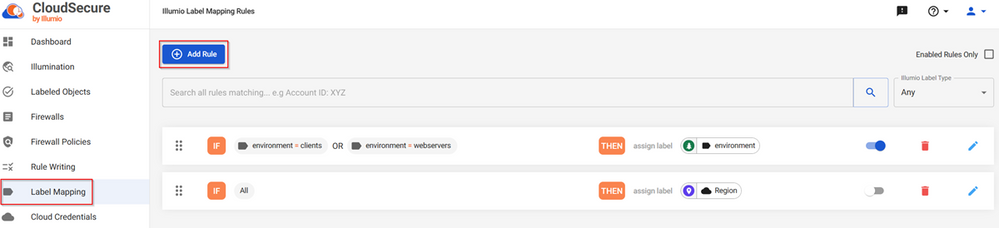
When creating a label mapping, we must define the “match criteria” and the “assign a label”. For the “match criteria” we can have multiple criteria using the operators “AND” or “OR”. This is how our label mapping looks like:


thumbnail image 9 of blog post titled 


							Part 1 - Managing Network Rules by using Azure Tags with Illumio for Microsoft Azure Firewall


For Label Type we have 4 options:

  • Application
  • Environment
  • Location
  • Role


And for the “Value of “, we can use:

  • Custom Value
  • Cloud Metadata
  • Cloud Tag


After creating the Label Mapping, we must wait for Illumio for Microsoft Azure Firewall to scan our Azure Subscription to find resources matching what we just defined. Once the scan is done, we can find the resources under “Labeled Objects”.


thumbnail image 10 of blog post titled 


							Part 1 - Managing Network Rules by using Azure Tags with Illumio for Microsoft Azure Firewall


Creating Rule Writings


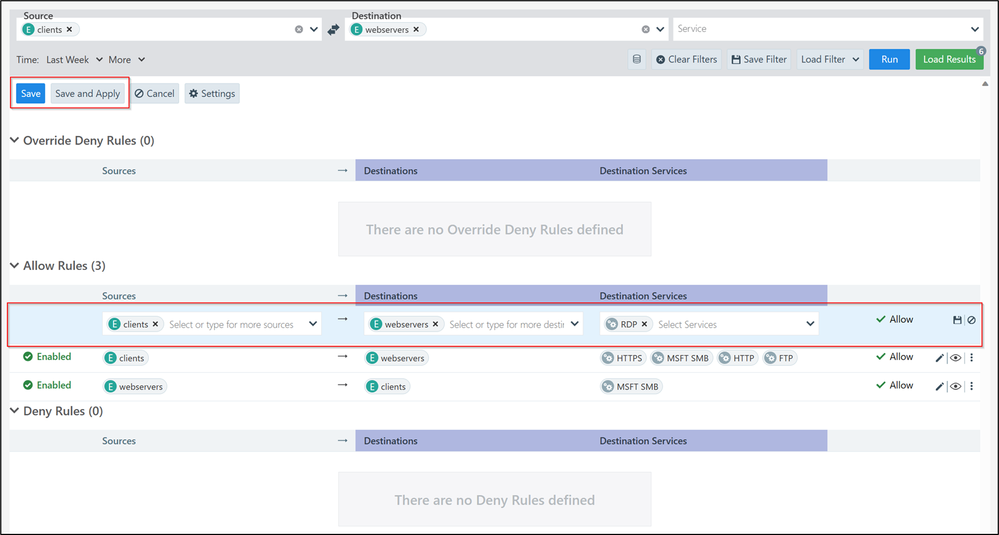
Now it’s time to create Rule Writings which will be provisioned and deployed into our Firewall Policy. Click on “Rule Writing” on the left side and then on “Add”. We can create 3 types of rules:

  • Add Override Deny Rule
  • Add Allow Rule
  • Add Deny Rule


thumbnail image 11 of blog post titled 


							Part 1 - Managing Network Rules by using Azure Tags with Illumio for Microsoft Azure Firewall


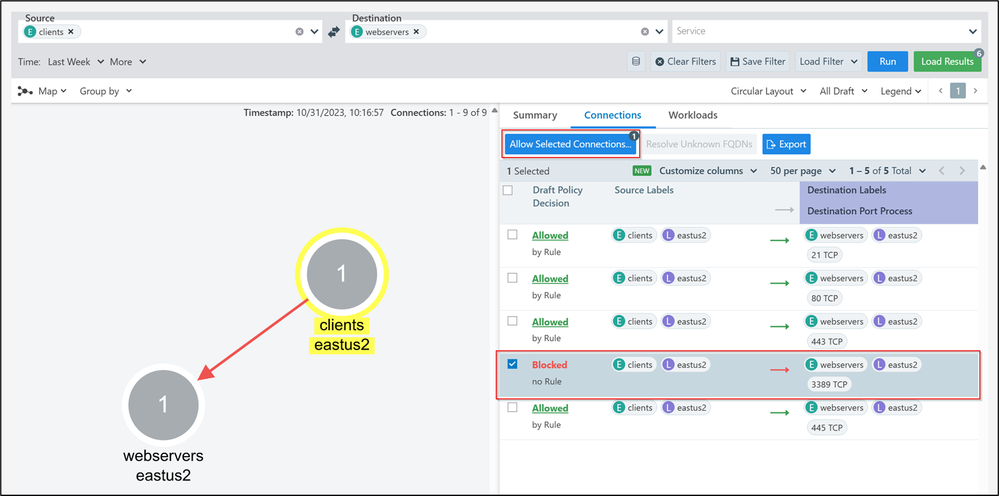
For this demonstration we are creating 1 “Allow” rule, allowing traffic from “Clients” to “Webservers” on ports 443 (HTTPS), 445 (SMB), 80 (HTTP), 21 and 22 (FTP).  The Destination Services are predefined, but we can also create new services or even use Port/Port Ranges.


thumbnail image 12 of blog post titled 


							Part 1 - Managing Network Rules by using Azure Tags with Illumio for Microsoft Azure Firewall


thumbnail image 13 of blog post titled 


							Part 1 - Managing Network Rules by using Azure Tags with Illumio for Microsoft Azure Firewall


Now that the rule is created, we must wait for the provisioning of the rule. This is an automatic process that runs periodically. In the case the provisioning takes too long it’s recommended to check the Event Logs to ensure that there is no unexpected error occurring, like for example, “AuthorizationFailed”.


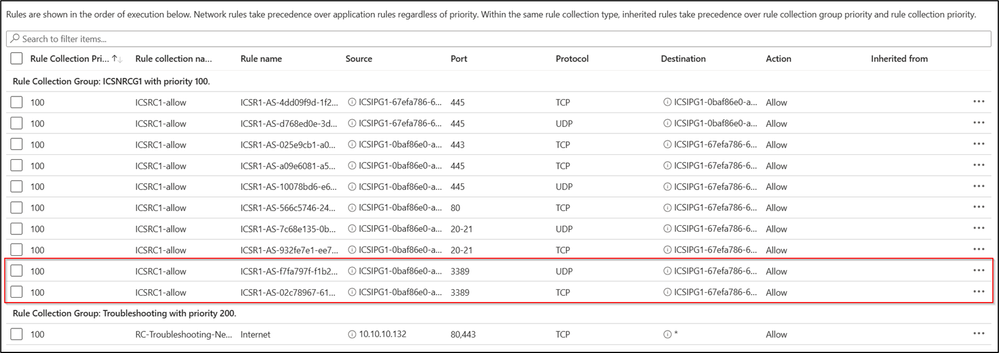
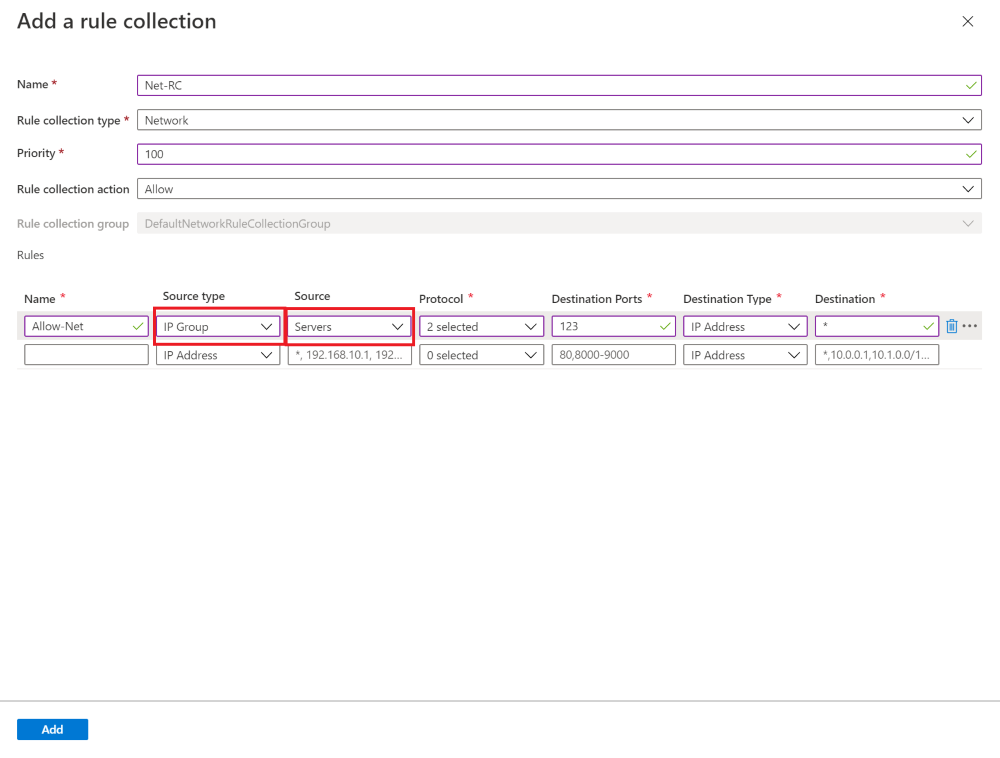
Moving to Azure Portal, we will check our Firewall Policy “azfw-pol-prem-1” to see the details of the new rule created, and this is what the Azure Policy looks like.


thumbnail image 14 of blog post titled 


							Part 1 - Managing Network Rules by using Azure Tags with Illumio for Microsoft Azure Firewall


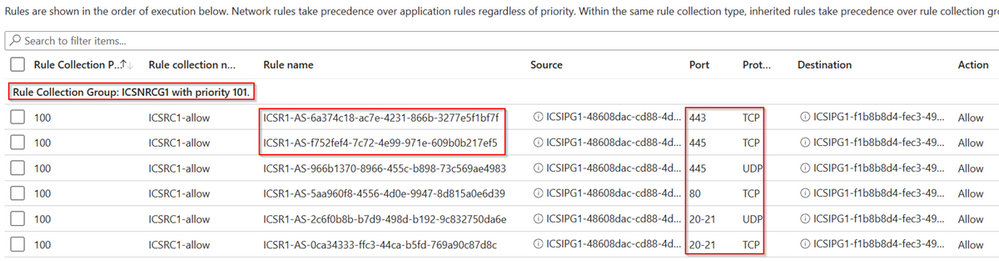
We can see that Illumio for Microsoft Azure Firewall has created a Resource Collection Group called “ICSNRCG1” with priority 101 and a Rule Collection called “ICSRC1-allow”. The Rule Collection contains 6 rules, one corresponding to each unique combination of Source IP, Destination IP, Port and Protocol, as it is defined in our Rule Writing previously. Within the source and destination fields, two distinct IP groups are used, “ICSIPG1-48608dac*” for the Cloud Tag value clients and “ICSIPG1-f1b8b8d4*” for the Cloud Tag value webservers.

Part2 - Managing Azure Firewall Network Rules with Illumination

 Part2 - Managing Azure Firewall Network Rules with Illumination


Written in collaboration between @andrewmathu and @gusmodena


Introduction


The second tutorial in this 2-part blog series about Illumio for Microsoft Azure Firewall is going to explore how to use Illumination to visualize and manage the network traffic and security policies of your environment. Illumination provides a unique new way to reveal the traffic flows in your network and to help you configure policies to secure your applications.


Before you deep dive into this blog post, we recommend you read part 1 of the blog series: Part 1 - Managing Network Rules by using Azure Tags with Illumio for Microsoft Azure Firewall - Micr...


What is Illumination?


Illumination is a graphical tool that maps the connections and flows between your workloads, helping you to understand the traffic patterns and dependencies of your applications, and to design and test security policies that control the access between your workloads. Illumination uses a color-coded system to indicate whether the traffic is allowed or blocked by your policy, and whether the policy is active or in draft.


Illumination has different levels of detail - you can zoom in and out to see the traffic at the location, environment, application and role levels, or present a view based on specific tags associated with your Azure resources. You can also filter the traffic by labels, policy state, services, or time range. With Illumination, you can discover and group your workloads, write, and test rules for them, and enforce them with confidence.


Getting Started


Illumination relies on the new Azure Firewall Network logs category (Azure Firewall Network Rule) stored in a storage account to identify the network traffic and create the mappings. Check the pre-requisites below to configure the Diagnostic setting.


Pre-requisites

  • Storage Account
  • AZFW Diagnostic Setting
    • Category: Azure Firewall Network Rule
    • Destination Detail: Archive to a storage account

thumbnail image 1 of blog post titled 


							Part 2 - Managing Azure Firewall Network Rules with Illumination


Also, as discussed in Part 1 of the blog series, you will need to ensure that the App Registration created for Illumio has the following permissions:

  • Reader
  • Storage Blob Data Reader
  • Illumio Firewall Administrator-“SubId”


Exploring Illumination


Once you have gone through all the configurations discussed previously, you will be able to start using Illumination. You can use Illumination to visualize allowed traffic flows between NSGs, VMs and Firewalls in your Azure subscription. The Illumination map visualizes current VMs and traffic flowing through a selected Illumio-managed Azure Firewall along with the connections your rules allow or deny. VMs are represented by the Illumio labels that you assigned in the Label Mapping step. Notice how the labels make it easy to understand what is occurring in your subscription so that you can write effective rules. In a typical iterative approach, you would:


  • Analyze current flows and connections.
  • Understand the impact your rules will have when enforced.
  • Discover details you may have missed or did not know about.
  • Iterate as necessary by adding, removing, or tuning rules in the Rule Writing tab and then returning to Illumination.


Below you will find an example describing how to use Illumination to visualize the impact these rules have on the network.

  1. In Illumio for Microsoft Azure Firewall, click the Illumination tab.
  2. You can use the filters “Source”, “Destination” or “Service” to narrow the view to specific workloads.
  3. Notice that Map is the default view, as shown in the image below. You can also use Table and Mash views if desired.
  4. Click “Run”
  5. Notice that while you are in Map view, traffic links are presented as colored arrows.
    1. Green arrows show the traffic that is either currently allowed or would be allowed if your rules were enforced.
    2. Red arrows show the traffic that is either currently blocked or would be blocked if your rules were enforced.
    3. Orange arrows show the traffic that is simulated blocked due to no rule.

thumbnail image 2 of blog post titled 


							Part 2 - Managing Azure Firewall Network Rules with Illumination


In the screenshot above we are filtering the traffic from “clients” to “webservers”, over the last week. When we click run, Illumination checks the Azure Firewall logs stored in the storage account to identify the flows and build the map. Once the map is displayed, you will see all the resources included in the Azure Tag environment with the value “clients” and “webservers”. In our example we only have 1 VM in each group.


Clicking on the group clients, a new tab will open on the right side of the screen with three tabs (Summary, Connections and Workloads). In Summary you will find the labels and the total number of workloads within the group.


thumbnail image 3 of blog post titled 


							Part 2 - Managing Azure Firewall Network Rules with Illumination


In the Connections tab you will find an aggregate view of all the flows identified from the logs. In the example below you can see that we have Allowed and Blocked traffic flows.


thumbnail image 4 of blog post titled 


							Part 2 - Managing Azure Firewall Network Rules with Illumination


In case you want to allow the traffic from clients to webservers on port 3389, you will select the checkbox of the Blocked flow and then click on “Allow Selected Connections”. Then you will have the option to make some changes to the rules before saving and applying.


thumbnail image 5 of blog post titled 


							Part 2 - Managing Azure Firewall Network Rules with Illumination


Once you click Save and Apply it will be added to your rule writing and then deployed to your Azure Firewall Policy after a few minutes.


thumbnail image 6 of blog post titled 


							Part 2 - Managing Azure Firewall Network Rules with Illumination


If you want to know the resources identified within the clients group, you can move to the Workloads tab to find the name of the virtual machines labeled as clients.


thumbnail image 7 of blog post titled 


							Part 2 - Managing Azure Firewall Network Rules with Illumination


With Illumination, you obtain a powerful tool that lets you see and understand the traffic flows and dependencies across your Azure resources and applications. You can also apply Zero Trust principles by creating granular and dynamic policies that segment and isolate your workloads. Moreover, you can simplify the configuration and maintenance of your Azure Firewall with Illumio’s intuitive interface.

IP Groups in Azure Firewall policy


IP Groups in Azure Firewall policy

IP Groups allow you to group and manage IP addresses for Azure Firewall policy in the following ways:

  • As a source type in DNAT rules
  • As a source or destination type in network rules
  • As a source type in application rules

An IP Group can have a single IP address, multiple IP addresses, or one or more IP address ranges.

IP Groups can be reused in Azure Firewall DNAT, network, and application rules for multiple firewalls across regions and subscriptions in Azure. Group names must be unique. You can configure an IP Group in the Azure portal, Azure CLI, or REST API. A sample template is provided to help you get started.

Sample format

The following IPv4 address format examples are valid to use in IP Groups:

  • Single address: 10.0.0.0
  • CIDR notation: 10.1.0.0/32
  • Address range: 10.2.0.0-10.2.0.31

Create an IP Group

An IP Group can be created using the Azure portal, Azure CLI, or REST API. For more information, see Create an IP Group.

Browse IP Groups

  1. In the Azure portal search bar, type IP Groups and select it. You can see the list of the IP Groups, or you can select Add to create a new IP Group.

  2. Select an IP Group to open the overview page. You can edit, add, or delete IP addresses or IP Groups.

    IP Groups overview

Manage an IP Group

You can see all the IP addresses in the IP Group and the rules or resources that are associated with it. To delete an IP Group, you must first dissociate the IP Group from the resource that is using it.

  1. To view or edit the IP addresses, select IP Addresses under Settings on the left pane.
  2. To add a single or multiple IP address(es), select Add IP Addresses. This opens the Drag or Browse page for an upload, or you can enter the address manually.
  3. Selecting the ellipses () to the right to edit or delete IP addresses. To edit or delete multiple IP addresses, select the boxes and select Edit or Delete at the top.
  4. Finally, can export the file in the CSV file format.

 Bemærk

If you delete all the IP addresses in an IP Group while it is still in use in a rule, that rule is skipped.

Use an IP Group

You can now select IP Group as a Source type or Destination type for the IP address(es) when you create a policy with DNAT, application, or network rules.

IP Groups in Firewall

Manage a public IP address by using Azure Firewall


Manage a public IP address by using Azure Firewall

In this article, you learn how to manage public IP addresses for Azure Firewall by using the Azure portal. You learn how to create an Azure Firewall by using an existing public IP in your subscription, change the IP configuration, and finally, add an IP configuration to the firewall.

Azure Firewall is a cloud-based network security service that protects your Azure Virtual Network resources. Azure Firewall requires at least one public static IP address to be configured. This IP or set of IPs is the external connection point to the firewall.

Azure Firewall supports Standard SKU public IP addresses. Basic SKU public IP address and public IP prefixes aren't supported.

Prerequisites

  • An Azure account with an active subscription. Create one for free.
  • Three Standard SKU public IP addresses that aren't associated with any resources. For more information on creating a Standard SKU public IP address, see Quickstart: Create a public IP address by using the Azure portal.
    • For the purposes of the examples in this article, create three new public IP addresses: myStandardPublicIP-1myStandardPublicIP-2, and myStandardPublicIP-3.

Create an Azure firewall with an existing public IP

In this section, you create an Azure firewall. Use the first IP address you created in the prerequisites as the public IP for the firewall.

  1. In the Azure portal, search for and select Firewalls.

  2. On the Firewalls page, select Create.

  3. In Create firewall, enter or select the following information.

    SettingValue
    Project details
    SubscriptionSelect your subscription.
    Resource groupCreate a new resource group named myResourceGroupFW.
    Instance details
    NameEnter myFirewall.
    RegionSelect West US 2.
    Availability zoneLeave the default of None.
    Firewall SKUSelect Standard.
    Firewall managementLeave the default of Use a Firewall Policy to manage this firewall.
    Firewall policyCreate a new firewall policy named myFirewallPolicy in West US 2, and set the Policy tier to Standard.
    Choose a virtual networkLeave default of Create new.
    Virtual network nameEnter myVNet.
    Address spaceEnter 10.0.0.0/16.
    Subnet address spaceEnter 10.0.0.0/26.
    Public IP addressSelect myStandardPublicIP-1 or your public IP.
    Forced tunnelingLeave the default of Disabled.
  4. Select Review + create.

  5. Select Create.

The following image shows the Create firewall page with the example information.

Screenshot that shows the Create firewall page with the example information.

Change the public IP address for a firewall

In this section, you change the public IP address associated with the firewall. A firewall must have at least one public IP address associated with its configuration. You can't update the IP address if the firewall's existing IP has any destination network address translation (DNAT) rules associated with it.

  1. In the Azure portal, search for and select Firewalls.

  2. On the Firewalls page, select myFirewall.

  3. On the myFirewall page, go to Settings, and then select Public IP configuration.

  4. In Public IP configuration, select myStandardPublicIP-1.

  5. Select the Public IP address dropdown, and then select myStandardPublicIP-2.

    Screenshot that shows the Edd public IP configuration pane and highlights the Public IP address field.

  6. Select Save.

Add a public IP configuration to a firewall

In this section, you add a public IP configuration to Azure Firewall. For more information about multiple IPs, see Multiple public IP addresses.

  1. In the Azure portal, search for and select Firewalls.

  2. On the Firewalls page, select myFirewall.

  3. On the myFirewall page, go to Settings, and then select Public IP configuration.

  4. Select Add a public IP configuration.

  5. In Name, enter myNewPublicIPconfig.

  6. In Public IP address, select myStandardPublicIP-3.

    Screenshot that shows the Add public IP configuration pane and highlights the Name and Public IP address fields.